virtualbox 虚拟机 + vagrant 快速创建 linux 环境
补充:据说需要开机启动时,设置 CPU 虚拟化 才可以。但我就算了吧
安装教程
https://www.bilibili.com/video/BV1np4y1C7Yf?p=6
virtualbox 虚拟机下载、安装(大概103M)
https://www.virtualbox.org/wiki/Downloads
vagrant 下载、安装(大概258M)
vagrant 镜像仓库(找到 centos/7 确认一下名字即可,不需要下载任何东西,稍后用 vagrant 命令行安装镜像)
https://app.vagrantup.com/boxes/search
CMD 安装
# 验证 vagrant 安装成功(ctrl + c)
$ vagrant
# 会在文件夹下创建一个 Vagrantfile
$ vagrant init centos/7
A `Vagrantfile` has been placed in this directory. You are now
ready to `vagrant up` your first virtual environment! Please read
the comments in the Vagrantfile as well as documentation on
`vagrantup.com` for more information on using Vagrant.
# 启动和安装(需要等待一段时间)
$ vagrant up
连接虚拟机
默认创建的是 vagrant 用户,如果要切换 root 用户,密码也是 vagrant
$ vagrant ssh
# vagrants
$ whoami
# 切换 root 用户,密码是 vagrant
$ su root
下次启动
# 确保文件夹下存在 vagrantfile
$ vagrant up
$ vagrant ssh
修改网络桥接方式
https://www.bilibili.com/video/BV1np4y1C7Yf?p=8&spm_id_from=pageDriver
打开 Vagrantfile,找到 config.vm.network "private_network", ip: "192.168.33.10"
打开 cmd,输入 ipconfig。找到 「VirtualBox Host-Only Network」 的 ipv4 地址。
譬如 192.168.56.1,那我们就修改为 192.168.56.10(只要同网段即可)
重启一下 $ vagrant reload,然后尝试虚拟机与主机互ping验证。
宿主机 ping 虚拟机
ping 192.168.56.10
正在 Ping 192.168.56.10 具有 32 字节的数据:
来自 192.168.56.10 的回复: 字节=32 时间<1ms TTL=64
来自 192.168.56.10 的回复: 字节=32 时间<1ms TTL=64
来自 192.168.56.10 的回复: 字节=32 时间<1ms TTL=64
来自 192.168.56.10 的回复: 字节=32 时间<1ms TTL=64
虚拟机 ping 宿主机
ping 192.168.1.40
64 bytes from 192.168.1.40: icmp_seq=1 ttl=127 time=0.501 ms
64 bytes from 192.168.1.40: icmp_seq=2 ttl=127 time=0.716 ms
64 bytes from 192.168.1.40: icmp_seq=3 ttl=127 time=0.660 ms
64 bytes from 192.168.1.40: icmp_seq=4 ttl=127 time=0.570 ms
64 bytes from 192.168.1.40: icmp_seq=5 ttl=127 time=0.664 ms
安装 Docker
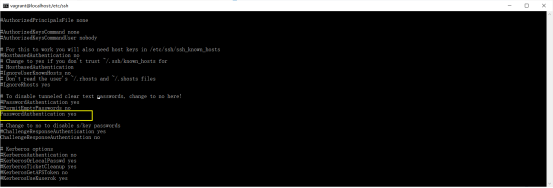
修改 SSHD 密码登录方式
$ cd /etc/ssh
$ vi sshd_config
找到 password 关键词,设置 PasswordAuthentication yes
重启一下 sshd
$ service sshd restart
这样就可以用 xshell 登录了。

 浙公网安备 33010602011771号