Python基础之模块
一.os模块
1.os.path.abspath(path),返回path规范化的绝对路径
import os
print(os.path.abspath(r"D:\a\新建文本文档.txt"))
"""
D:\a\新建文本文档.txt
"""
2.os.path.split(path),将path分割成目录和文件名二元组返回
print(os.path.split(r"D:\a\新建文本文档.txt"))
"""
('D:\\a', '新建文本文档.txt')
"""
3.os.path.dirname(path),返回path的目录。其实就是os.path.split(path)的第一个元素
print(os.path.dirname(r"D:\a\新建文本文档.txt"))
"""
D:\a
"""
4.os.path.basename(),返回path最后的文件名。如何path以/或\结尾,那么就会返回空值。即os.path.split(path)的第二个元素
print(os.path.basename(r"D:\a\新建文本文档.txt"))
"""
新建文本文档.txt
"""
5.os.path.exists(),如果path存在,返回True;如果path不存在,返回False
print(os.path.exists(r"D:\a\新建文本文档.txt"))
"""
True
"""
6.os.path.isabs(),如果path是绝对路径,返回True
print(os.path.isabs(r"D:\a\新建文本文档.txt"))
"""
True
"""
7.os.path.isfile(),如果path是一个存在的文件,返回True。否则返回False
print(os.path.isfile(r"D:\a\新建文本文档.txt"))
"""
True
"""
8.os.path.isdir(),如果path是一个存在的目录,则返回True。否则返回False
print(os.path.isdir(r"D:\a"))
"""
True
"""
9.os.path.join()将多个路径组合后返回,第一个绝对路径之前的参数将被忽略
print(os.path.join('a',r'D:\b','新建文本文件.txt'))
"""
D:\b\新建文本文件.txt
"""
10.os.path.getatime(),返回path所指向的文件或者目录的最后存取时间
print(os.path.getatime(r"D:\a\新建文本文档.txt"))
"""
1496674596.1832142
"""
11.os.path.getmtime(), 返回path所指向的文件或者目录的最后修改时间
print(os.path.getmtime(r"D:\a\新建文本文档.txt"))
"""
1496674596.1832142
"""
二.random模块
1.取出随机的ip地址
import random
proxy_ip=[
    '192.1.1.1',
    '192.1.1.2',
    '192.1.1.3',
    '192.1.1.4',
]

print(random.choice(proxy_ip))
2.验证码实例
import random
def v_code(n=5):
    res=''
    for i in range(n):
        num=random.randint(0,9)
        s=chr(random.randint(65,90))
        add=random.choice([num,s])
        res+=str(add)
    return res

print(v_code(6))
三.sys模块
进度条,在pycharm下无效,在命令行下执行
import sys,time

for i in range(50):
    sys.stdout.write('%s\r' %('#'*i))
    sys.stdout.flush()
    time.sleep(0.1)
四.time时间模块
1.时间戳,1970年1月1日之后的秒
import time
print(time.time())
"""
1496677931.1134853
"""
2.结构化时间
print(time.localtime())
print(time.localtime().tm_year)
print(time.gmtime())
"""
time.struct_time(tm_year=2017, tm_mon=6, tm_mday=5, tm_hour=23, tm_min=54, tm_sec=45, tm_wday=0, tm_yday=156, tm_isdst=0)
2017
time.struct_time(tm_year=2017, tm_mon=6, tm_mday=5, tm_hour=15, tm_min=54, tm_sec=45, tm_wday=0, tm_yday=156, tm_isdst=0)
"""
3.结构化的字符串,默认为当前时间
print(time.strftime('%Y-%m-%d %H:%M:%S'))
print(time.strftime('%Y-%m-%d %X'))
"""
2017-06-05 23:55:48
2017-06-05 23:55:48
"""
五.hashlib模块
用于加密相关的操作,代替了md5模块和sha模块,主要提供 SHA1, SHA224, SHA256, SHA384, SHA512 ,MD5 算法
1.md5
hash = hashlib.md5()
hash.update(bytes('admin', encoding='utf-8'))
print(hash.hexdigest())
print(hash.digest())
"""
21232f297a57a5a743894a0e4a801fc3
b'!#/)zW\xa5\xa7C\x89J\x0eJ\x80\x1f\xc3'
"""
2.sha1
hash = hashlib.sha1()
hash.update(bytes('admin', encoding='utf-8'))
print(hash.hexdigest())
"""
d033e22ae348aeb5660fc2140aec35850c4da997
"""
3.sha256
hash = hashlib.sha256()
hash.update(bytes('admin', encoding='utf-8'))
print(hash.hexdigest())
"""
d033e22ae348aeb5660fc2140aec35850c4da997
"""
4.sha384
hash = hashlib.sha384()
hash.update(bytes('admin', encoding='utf-8'))
print(hash.hexdigest())
"""
9ca694a90285c034432c9550421b7b9dbd5c0f4b6673f05f6dbce58052ba20e4248041956ee8c9a2ec9f10290cdc0782
"""
5.sha512
hash = hashlib.sha512()
hash.update(bytes('admin', encoding='utf-8'))
print(hash.hexdigest())
"""
c7ad44cbad762a5da0a452f9e854fdc1e0e7a52a38015f23f3eab1d80b931dd472634dfac71cd34ebc35d16ab7fb8a90c81f975113d6c7538dc69dd8de9077ec
"""
以上加密算法虽然依然非常厉害,但时候存在缺陷,即:通过撞库可以反解。所以,有必要对加密算法中添加自定义key再来做加密。
import hashlib
hash = hashlib.md5(bytes('898oaFs09f',encoding="utf-8"))
hash.update(bytes('admin',encoding="utf-8"))
print(hash.hexdigest())
"""
67929daefab29024d18340945036e291
"""
python内置还有一个 hmac 模块,它内部对我们创建 key 和 内容 进行进一步的处理然后再加密
import hmac
h = hmac.new(bytes('898oaFs09f', encoding="utf-8"))
h.update(bytes('admin', encoding="utf-8"))
print(h.hexdigest())
"""
17186c513df61e8b3fb4a134f474b130
"""
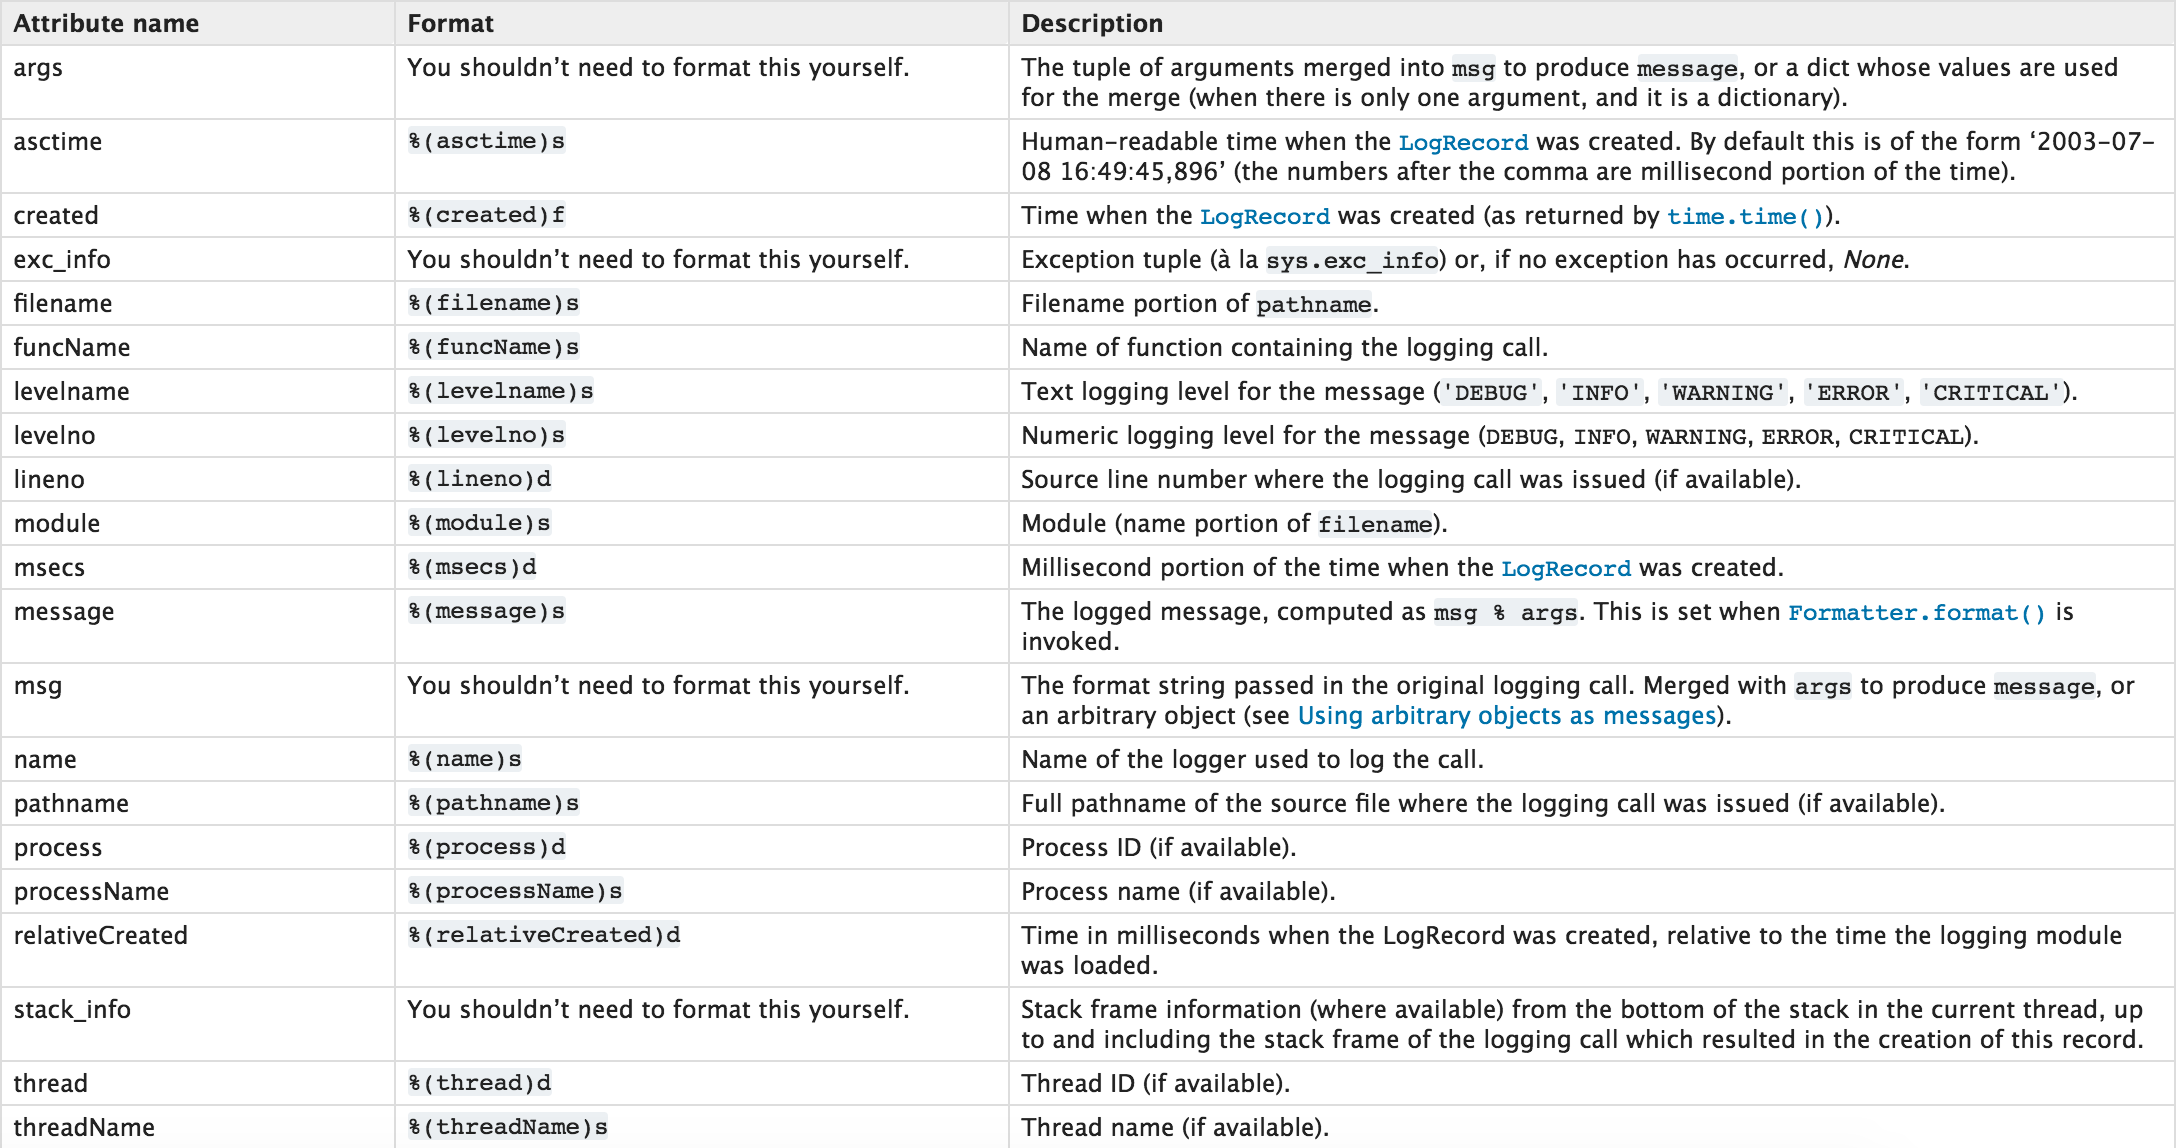
六.logging模块
用于便捷记录日志且线程安全的模块
1.单日志文件
import logging


logging.basicConfig(filename='log.log',
                    format='%(asctime)s - %(name)s - %(levelname)s -%(module)s:  %(message)s',
                    datefmt='%Y-%m-%d %H:%M:%S %p',
                    level=10)

logging.debug('debug')
logging.info('info')
logging.warning('warning')
logging.error('error')
logging.critical('critical')
logging.log(10,'log')
日志等级
CRITICAL = 50
FATAL = CRITICAL
ERROR = 40
WARNING = 30
WARN = WARNING
INFO = 20
DEBUG = 10
NOTSET = 0
注:只有【当前写等级】大于【日志等级】时,日志文件才被记录。
日志记录格式:
2.多日志文件
对于上述记录日志的功能,只能将日志记录在单文件中,如果想要设置多个日志文件,logging.basicConfig将无法完成,需要自定义文件和日志操作对象。
日志一
# 定义文件
file_1_1 = logging.FileHandler('l1_1.log', 'a', encoding='utf-8')
fmt = logging.Formatter(fmt="%(asctime)s - %(name)s - %(levelname)s -%(module)s:  %(message)s")
file_1_1.setFormatter(fmt)

file_1_2 = logging.FileHandler('l1_2.log', 'a', encoding='utf-8')
fmt = logging.Formatter()
file_1_2.setFormatter(fmt)

# 定义日志
logger1 = logging.Logger('s1', level=logging.ERROR)
logger1.addHandler(file_1_1)
logger1.addHandler(file_1_2)


# 写日志
logger1.critical('1111')
日志二
# 定义文件
file_2_1 = logging.FileHandler('l2_1.log', 'a')
fmt = logging.Formatter()
file_2_1.setFormatter(fmt)

# 定义日志
logger2 = logging.Logger('s2', level=logging.INFO)
logger2.addHandler(file_2_1)
七.json模块
json、pickle、shuelve为python提供的用于序列化的模块,eval内置方法可以将一个字符串转成python对象,不过,eval方法是有局限性的,对于普通的数据类型,json.loads和eval都能用,但遇到特殊类型的时候,eval就不管用了,所以eval的重点还是通常用来执行一个字符串表达式,并返回表达式的值。
import json 导入模块后使用
1、序列化概念:
我们把对象(变量)从内存中变成可存储或传输的过程称之为序列化,在Python中叫pickling,在其他语言中也被称之为serialization,marshalling,flattening等等,都是一个意思。
2、为什么要用序列化:
a. 保证系统和应用的用户操作状态
b. 跨平台数据交互
3、json序列化:
如果我们要在不同的编程语言之间传递对象,就必须把对象序列化为标准格式,比如XML,但更好的方法是序列化为JSON,因为JSON表示出来就是一个字符串,可以被所有语言读取,也可以方便地存储到磁盘或者通过网络传输。JSON不仅是标准格式,并且比XML更快,而且可以直接在Web页面中读取,非常方便。
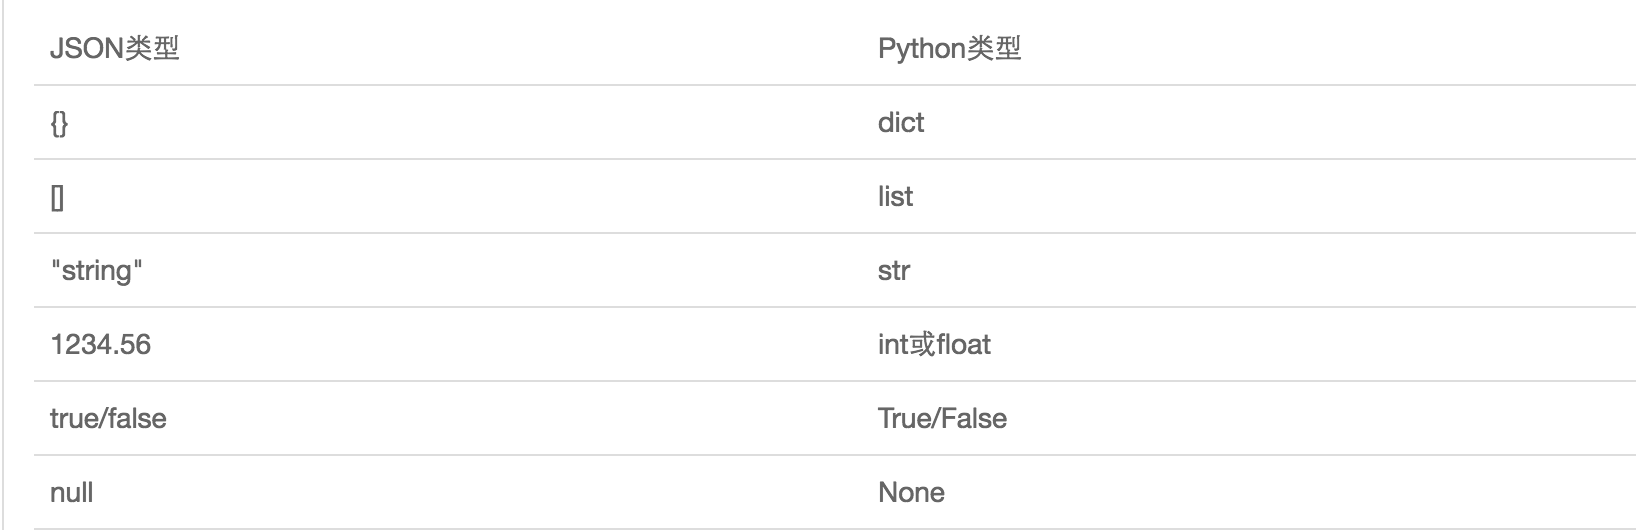
JSON表示的对象就是标准的JavaScript语言的对象,JSON和Python内置的数据类型对应如下:
4、python的json应用流程图:

import json
dic = {
    'name':'alex',
    'age':9000,
    'height':'150cm',
}

# 写入dumps
res = json.dumps(dic)
with open('a.json', 'w') as f:
     f.write(res)

# 读取loads
with open('a.json', 'r') as f:
    dic = json.loads(f.read())
    print(dic, type(dic))
"""
{'name': 'alex', 'age': 9000, 'height': '150cm'} <class 'dict'>
"""
简单写法:
import json
dic = {
    'name':'alex',
    'age':9000,
    'height':'150cm',
}
json.dump(dic,open('a.json', 'w')) #写入dump
res = json.load(open('a.json', 'r')) #读取/赋值load
print(res)
"""
{'name': 'alex', 'age': 9000, 'height': '150cm'}
"""
ps.注意''and"":无论数据是怎样创建的,只要满足json格式,就可以json.loads出来,不一定非要dumps的数据才能loads
import json
# dct="{'1':111}"#json 不认单引号
# dct=str({"1":111})#报错,因为生成的数据还是单引号:{'one': 1}

dct='{"1":"111"}'
print(json.loads(dct))

# conclusion:
# 无论数据是怎样创建的,只要满足json格式,就可以json.loads出来,不一定非要dumps的数据才能loads
八.xml模块
xml是实现不同语言或程序之间进行数据交换的协议,可扩展标记语言,标准通用标记语言的子集,是一种用于标记电子文件使其具有结构性的标记语言。xml的格式如下,就是通过<>节点来区别数据结构的:
xml文件:
<?xml version="1.0"?>
<data>
    <country name="Liechtenstein">
        <rank updated="yes">2</rank>
        <year>2008</year>
        <gdppc>141100</gdppc>
        <neighbor name="Austria" direction="E"/>
        <neighbor name="Switzerland" direction="W"/>
    </country>
    <country name="Singapore">
        <rank updated="yes">5</rank>
        <year>2011</year>
        <gdppc>59900</gdppc>
        <neighbor name="Malaysia" direction="N"/>
    </country>
    <country name="Panama">
        <rank updated="yes">69</rank>
        <year>2011</year>
        <gdppc>13600</gdppc>
        <neighbor name="Costa Rica" direction="W"/>
        <neighbor name="Colombia" direction="E"/>
    </country>
</data>
python模块解析xml
import xml.etree.ElementTree as ET

tree = ET.parse("a")
root = tree.getroot()
# 只遍历year
for i in root.iter('year'):
    print(i.tag,i.text,i.attrib)
"""
year 2009 {'update': 'yes'}
year 2012 {'update': 'yes'}
year 2012 {'update': 'yes'}
"""
# 遍历整个xml
for country in root:
    print('=====>',country.attrib['name'])
    for item in country:
        print(item.tag,item.text,item.attrib)
"""
=====> Liechtenstein
rank 2 {'updated': 'yes'}
year 2009 {'update': 'yes'}
gdppc 141100 {}
neighbor None {'name': 'Austria', 'direction': 'E'}
neighbor None {'name': 'Switzerland', 'direction': 'W'}
=====> Singapore
rank 5 {'updated': 'yes'}
year 2012 {'update': 'yes'}
gdppc 59900 {}
neighbor None {'name': 'Malaysia', 'direction': 'N'}
=====> Panama
rank 69 {'updated': 'yes'}
year 2012 {'update': 'yes'}
gdppc 13600 {}
neighbor None {'name': 'Costa Rica', 'direction': 'W'}
neighbor None {'name': 'Colombia', 'direction': 'E'}
"""
创建xml文件
# -*- coding:utf-8 -*-
# /user/bin/python
import xml.etree.ElementTree as ET

new_xml = ET.Element("namelist")
name = ET.SubElement(new_xml, "name", attrib={"enrolled": "yes"})
age = ET.SubElement(name, "age", attrib={"checked": "no"})
sex = ET.SubElement(name, "sex")
sex.text = '33'
name2 = ET.SubElement(new_xml, "name", attrib={"enrolled": "no"})
age = ET.SubElement(name2, "age")
age.text = '19'

et = ET.ElementTree(new_xml)  # 生成文档对象
et.write("test.xml", encoding="utf-8", xml_declaration=True)

ET.dump(new_xml)  # 打印生成的格式

 浙公网安备 33010602011771号