android性能优化
http://stackvoid.com/performance-tuning-on-android/
http://greenrobot.me/devpost/doing-more-with-less-being-a-good-android-citizen/
http://droidyue.com/blog/2015/04/12/avoid-memory-leaks-on-context-in-android/
Performance Tips
IN THIS DOCUMENT
- Avoid Creating Unnecessary Objects
- Prefer Static Over Virtual
- Use Static Final For Constants
- Avoid Internal Getters/Setters
- Use Enhanced For Loop Syntax
- Consider Package Instead of Private Access with Private Inner Classes
- Avoid Using Floating-Point
- Know and Use the Libraries
- Use Native Methods Carefully
- Use Native Methods Judiciously
- Closing Notes
This document primarily covers micro-optimizations that can improve overall app performance when combined, but it's unlikely that these changes will result in dramatic performance effects. Choosing the right algorithms and data structures should always be your priority, but is outside the scope of this document. You should use the tips in this document as general coding practices that you can incorporate into your habits for general code efficiency.
There are two basic rules for writing efficient code:
- Don't do work that you don't need to do.
- Don't allocate memory if you can avoid it.
One of the trickiest problems you'll face when micro-optimizing an Android app is that your app is certain to be running on multiple types of hardware. Different versions of the VM running on different processors running at different speeds. It's not even generally the case that you can simply say "device X is a factor F faster/slower than device Y", and scale your results from one device to others. In particular, measurement on the emulator tells you very little about performance on any device. There are also huge differences between devices with and without a JIT: the best code for a device with a JIT is not always the best code for a device without.
To ensure your app performs well across a wide variety of devices, ensure your code is efficient at all levels and agressively optimize your performance.
Avoid Creating Unnecessary Objects
Object creation is never free. A generational garbage collector with per-thread allocation pools for temporary objects can make allocation cheaper, but allocating memory is always more expensive than not allocating memory.
As you allocate more objects in your app, you will force a periodic garbage collection, creating little "hiccups" in the user experience. The concurrent garbage collector introduced in Android 2.3 helps, but unnecessary work should always be avoided.
Thus, you should avoid creating object instances you don't need to. Some examples of things that can help:
- If you have a method returning a string, and you know that its result will always be appended to a
StringBufferanyway, change your signature and implementation so that the function does the append directly, instead of creating a short-lived temporary object. - When extracting strings from a set of input data, try to return a substring of the original data, instead of creating a copy. You will create a new
Stringobject, but it will share thechar[]with the data. (The trade-off being that if you're only using a small part of the original input, you'll be keeping it all around in memory anyway if you go this route.)
A somewhat more radical idea is to slice up multidimensional arrays into parallel single one-dimension arrays:
- An array of
ints is a much better than an array ofIntegerobjects, but this also generalizes to the fact that two parallel arrays of ints are also a lot more efficient than an array of(int,int)objects. The same goes for any combination of primitive types. - If you need to implement a container that stores tuples of
(Foo,Bar)objects, try to remember that two parallelFoo[]andBar[]arrays are generally much better than a single array of custom(Foo,Bar)objects. (The exception to this, of course, is when you're designing an API for other code to access. In those cases, it's usually better to make a small compromise to the speed in order to achieve a good API design. But in your own internal code, you should try and be as efficient as possible.)
Generally speaking, avoid creating short-term temporary objects if you can. Fewer objects created mean less-frequent garbage collection, which has a direct impact on user experience.
Prefer Static Over Virtual
If you don't need to access an object's fields, make your method static. Invocations will be about 15%-20% faster. It's also good practice, because you can tell from the method signature that calling the method can't alter the object's state.
Use Static Final For Constants
Consider the following declaration at the top of a class:
static int intVal = 42;
static String strVal = "Hello, world!";
The compiler generates a class initializer method, called <clinit>, that is executed when the class is first used. The method stores the value 42 into intVal, and extracts a reference from the classfile string constant table forstrVal. When these values are referenced later on, they are accessed with field lookups.
We can improve matters with the "final" keyword:
static final int intVal = 42;
static final String strVal = "Hello, world!";
The class no longer requires a <clinit> method, because the constants go into static field initializers in the dex file. Code that refers to intVal will use the integer value 42 directly, and accesses to strVal will use a relatively inexpensive "string constant" instruction instead of a field lookup.
Note: This optimization applies only to primitive types and String constants, not arbitrary reference types. Still, it's good practice to declare constants static final whenever possible.
Avoid Internal Getters/Setters
In native languages like C++ it's common practice to use getters (i = getCount()) instead of accessing the field directly (i = mCount). This is an excellent habit for C++ and is often practiced in other object oriented languages like C# and Java, because the compiler can usually inline the access, and if you need to restrict or debug field access you can add the code at any time.
However, this is a bad idea on Android. Virtual method calls are expensive, much more so than instance field lookups. It's reasonable to follow common object-oriented programming practices and have getters and setters in the public interface, but within a class you should always access fields directly.
Without a JIT, direct field access is about 3x faster than invoking a trivial getter. With the JIT (where direct field access is as cheap as accessing a local), direct field access is about 7x faster than invoking a trivial getter.
Note that if you're using ProGuard, you can have the best of both worlds because ProGuard can inline accessors for you.
Use Enhanced For Loop Syntax
The enhanced for loop (also sometimes known as "for-each" loop) can be used for collections that implement the Iterable interface and for arrays. With collections, an iterator is allocated to make interface calls to hasNext()and next(). With an ArrayList, a hand-written counted loop is about 3x faster (with or without JIT), but for other collections the enhanced for loop syntax will be exactly equivalent to explicit iterator usage.
There are several alternatives for iterating through an array:
static class Foo {
    int mSplat;
}

Foo[] mArray = ...

public void zero() {
    int sum = 0;
    for (int i = 0; i < mArray.length; ++i) {
        sum += mArray[i].mSplat;
    }
}

public void one() {
    int sum = 0;
    Foo[] localArray = mArray;
    int len = localArray.length;

    for (int i = 0; i < len; ++i) {
        sum += localArray[i].mSplat;
    }
}

public void two() {
    int sum = 0;
    for (Foo a : mArray) {
        sum += a.mSplat;
    }
}
zero() is slowest, because the JIT can't yet optimize away the cost of getting the array length once for every iteration through the loop.
one() is faster. It pulls everything out into local variables, avoiding the lookups. Only the array length offers a performance benefit.
two() is fastest for devices without a JIT, and indistinguishable from one() for devices with a JIT. It uses the enhanced for loop syntax introduced in version 1.5 of the Java programming language.
So, you should use the enhanced for loop by default, but consider a hand-written counted loop for performance-critical ArrayList iteration.
Tip: Also see Josh Bloch's Effective Java, item 46.
Consider Package Instead of Private Access with Private Inner Classes
Consider the following class definition:
public class Foo {
    private class Inner {
        void stuff() {
            Foo.this.doStuff(Foo.this.mValue);
        }
    }

    private int mValue;

    public void run() {
        Inner in = new Inner();
        mValue = 27;
        in.stuff();
    }

    private void doStuff(int value) {
        System.out.println("Value is " + value);
    }
}
What's important here is that we define a private inner class (Foo$Inner) that directly accesses a private method and a private instance field in the outer class. This is legal, and the code prints "Value is 27" as expected.
The problem is that the VM considers direct access to Foo's private members from Foo$Inner to be illegal because Foo and Foo$Inner are different classes, even though the Java language allows an inner class to access an outer class' private members. To bridge the gap, the compiler generates a couple of synthetic methods:
/*package*/ static int Foo.access$100(Foo foo) {
    return foo.mValue;
}
/*package*/ static void Foo.access$200(Foo foo, int value) {
    foo.doStuff(value);
}
The inner class code calls these static methods whenever it needs to access the mValue field or invoke thedoStuff() method in the outer class. What this means is that the code above really boils down to a case where you're accessing member fields through accessor methods. Earlier we talked about how accessors are slower than direct field accesses, so this is an example of a certain language idiom resulting in an "invisible" performance hit.
If you're using code like this in a performance hotspot, you can avoid the overhead by declaring fields and methods accessed by inner classes to have package access, rather than private access. Unfortunately this means the fields can be accessed directly by other classes in the same package, so you shouldn't use this in public API.
Avoid Using Floating-Point
As a rule of thumb, floating-point is about 2x slower than integer on Android-powered devices.
In speed terms, there's no difference between float and double on the more modern hardware. Space-wise,double is 2x larger. As with desktop machines, assuming space isn't an issue, you should prefer double to float.
Also, even for integers, some processors have hardware multiply but lack hardware divide. In such cases, integer division and modulus operations are performed in software—something to think about if you're designing a hash table or doing lots of math.
Know and Use the Libraries
In addition to all the usual reasons to prefer library code over rolling your own, bear in mind that the system is at liberty to replace calls to library methods with hand-coded assembler, which may be better than the best code the JIT can produce for the equivalent Java. The typical example here is String.indexOf() and related APIs, which Dalvik replaces with an inlined intrinsic. Similarly, the System.arraycopy() method is about 9x faster than a hand-coded loop on a Nexus One with the JIT.
Tip: Also see Josh Bloch's Effective Java, item 47.
Use Native Methods Carefully
Developing your app with native code using the Android NDK isn't necessarily more efficient than programming with the Java language. For one thing, there's a cost associated with the Java-native transition, and the JIT can't optimize across these boundaries. If you're allocating native resources (memory on the native heap, file descriptors, or whatever), it can be significantly more difficult to arrange timely collection of these resources. You also need to compile your code for each architecture you wish to run on (rather than rely on it having a JIT). You may even have to compile multiple versions for what you consider the same architecture: native code compiled for the ARM processor in the G1 can't take full advantage of the ARM in the Nexus One, and code compiled for the ARM in the Nexus One won't run on the ARM in the G1.
Native code is primarily useful when you have an existing native codebase that you want to port to Android, not for "speeding up" parts of your Android app written with the Java language.
If you do need to use native code, you should read our JNI Tips.
Tip: Also see Josh Bloch's Effective Java, item 54.
Performance Myths
On devices without a JIT, it is true that invoking methods via a variable with an exact type rather than an interface is slightly more efficient. (So, for example, it was cheaper to invoke methods on a HashMap map than a Map map, even though in both cases the map was a HashMap.) It was not the case that this was 2x slower; the actual difference was more like 6% slower. Furthermore, the JIT makes the two effectively indistinguishable.
On devices without a JIT, caching field accesses is about 20% faster than repeatedly accessing the field. With a JIT, field access costs about the same as local access, so this isn't a worthwhile optimization unless you feel it makes your code easier to read. (This is true of final, static, and static final fields too.)
Always Measure
Before you start optimizing, make sure you have a problem that you need to solve. Make sure you can accurately measure your existing performance, or you won't be able to measure the benefit of the alternatives you try.
Every claim made in this document is backed up by a benchmark. The source to these benchmarks can be found in the code.google.com "dalvik" project.
The benchmarks are built with the Caliper microbenchmarking framework for Java. Microbenchmarks are hard to get right, so Caliper goes out of its way to do the hard work for you, and even detect some cases where you're not measuring what you think you're measuring (because, say, the VM has managed to optimize all your code away). We highly recommend you use Caliper to run your own microbenchmarks.
You may also find Traceview useful for profiling, but it's important to realize that it currently disables the JIT, which may cause it to misattribute time to code that the JIT may be able to win back. It's especially important after making changes suggested by Traceview data to ensure that the resulting code actually runs faster when run without Traceview.
For more help profiling and debugging your apps, see the following documents:
Improving Layout Performance
VIDEO
DevBytes: Optimising Layouts with Hierarchy Viewer
Layouts are a key part of Android applications that directly affect the user experience. If implemented poorly, your layout can lead to a memory hungry application with slow UIs. The Android SDK includes tools to help you identify problems in your layout performance, which when combined the lessons here, you will be able to implement smooth scrolling interfaces with a minimum memory footprint.
Lessons
- Optimizing Layout Hierarchies
- In the same way a complex web page can slow down load time, your layout hierarchy if too complex can also cause performance problems. This lesson shows how you can use SDK tools to inspect your layout and discover performance bottlenecks.
- Re-using Layouts with <include/>
- If your application UI repeats certain layout constructs in multiple places, this lesson shows you how to create efficient, re-usable layout constructs, then include them in the appropriate UI layouts.
- Loading Views On Demand
- Beyond simply including one layout component within another layout, you might want to make the included layout visible only when it's needed, sometime after the activity is running. This lesson shows how you can improve your layout's initialization performance by loading portions of your layout on demand.
- Making ListView Scrolling Smooth
- If you've built an instance of
ListViewthat contains complex or data-heavy content in each list item, the scroll performance of the list might suffer. This lesson provides some tips about how you can make your scrolling performance more smooth. -
Optimizing Layout Hierarchies
THIS LESSON TEACHES YOU TO
YOU SHOULD ALSO READ
It is a common misconception that using the basic layout structures leads to the most efficient layouts. However, each widget and layout you add to your application requires initialization, layout, and drawing. For example, using nested instances of
LinearLayoutcan lead to an excessively deep view hierarchy. Furthermore, nesting several instances ofLinearLayoutthat use thelayout_weightparameter can be especially expensive as each child needs to be measured twice. This is particularly important when the layout is inflated repeatedly, such as when used in aListVieworGridView.In this lesson you'll learn to use Hierarchy Viewer and Layoutoptto examine and optimize your layout.
Inspect Your Layout
The Android SDK tools include a tool called Hierarchy Viewer that allows you to analyze your layout while your application is running. Using this tool helps you discover bottlenecks in the layout performance.
Hierarchy Viewer works by allowing you to select running processes on a connected device or emulator, then display the layout tree. The traffic lights on each block represent its Measure, Layout and Draw performance, helping you identify potential issues.
For example, figure 1 shows a layout that's used as an item in a
ListView. This layout shows a small bitmap image on the left and two stacked items of text on the right. It is especially important that layouts that will be inflated multiple times—such as this one—are optimized as the performance benefits will be multiplied.![]()
Figure 1. Conceptual layout for an item in a
ListView.The
hierarchyviewertool is available in<sdk>/tools/. When opened, the Hierarchy Viewer shows a list of available devices and its running components. Click Load View Hierarchy to view the layout hierarchy of the selected component. For example, figure 2 shows the layout for the list item illustrated by figure 1.![]()
Figure 2. Layout hierarchy for the layout in figure 1, using nested instances of
LinearLayout.![]()
Figure 3. Clicking a hierarchy node shows its performance times.
In figure 2, you can see there is a 3-level hierarchy with some problems laying out the text items. Clicking on the items shows the time taken for each stage of the process (figure 3). It becomes clear which items are taking the longest to measure, layout, and render, and where you should spend time optimizing.
The timings for rendering a complete list item using this layout are:
- Measure: 0.977ms
- Layout: 0.167ms
- Draw: 2.717ms
Revise Your Layout
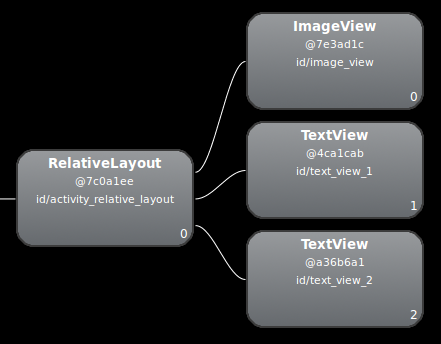
Because the layout performance above slows down due to a nested
LinearLayout, the performance might improve by flattening the layout—make the layout shallow and wide, rather than narrow and deep. ARelativeLayoutas the root node allows for such layouts. So, when this design is converted to useRelativeLayout, you can see that the layout becomes a 2-level hierarchy. Inspection of the new layout looks like this:![]()
Figure 4. Layout hierarchy for the layout in figure 1, using
RelativeLayout.Now rendering a list item takes:
- Measure: 0.598ms
- Layout: 0.110ms
- Draw: 2.146ms
Might seem like a small improvement, but this time is multiplied several times because this layout is used for every item in a list.
Most of this time difference is due to the use of
layout_weightin theLinearLayoutdesign, which can slow down the speed of measurement. It is just one example of how each layout has appropriate uses and you should carefully consider whether using layout weight is necessary.Use Lint
It is always good practice to run the lint tool on your layout files to search for possible view hierarchy optimizations. Lint has replaced the Layoutopt tool and has much greater functionality. Some examples of lintrules are:
- Use compound drawables - A
LinearLayoutwhich contains anImageViewand aTextViewcan be more efficiently handled as a compound drawable. - Merge root frame - If a
FrameLayoutis the root of a layout and does not provide background or padding etc, it can be replaced with a merge tag which is slightly more efficient. - Useless leaf - A layout that has no children or no background can often be removed (since it is invisible) for a flatter and more efficient layout hierarchy.
- Useless parent - A layout with children that has no siblings, is not a
ScrollViewor a root layout, and does not have a background, can be removed and have its children moved directly into the parent for a flatter and more efficient layout hierarchy. - Deep layouts - Layouts with too much nesting are bad for performance. Consider using flatter layouts such as
RelativeLayoutorGridLayoutto improve performance. The default maximum depth is 10.
Another benefit of Lint is that it is integrated into Android Studio. Lint automatically runs whenever you compile your program. With Android Studio, you can also run lint inspections for a specific build variant, or for all build variants.
You can also manage inspection profiles and configure inspections within Android Studio with theFile>Settings>Project Settings option. The Inspection Configuration page appears with the supported inspections.
![]()
Figure 5. Inspection Configuration
Lint has the ability to automatically fix some issues, provide suggestions for others and jump directly to the offending code for review.
Re-using Layouts with <include/>
THIS LESSON TEACHES YOU TO
YOU SHOULD ALSO READ
Although Android offers a variety of widgets to provide small and re-usable interactive elements, you might also need to re-use larger components that require a special layout. To efficiently re-use complete layouts, you can use the
<include/>and<merge/>tags to embed another layout inside the current layout.Reusing layouts is particularly powerful as it allows you create reusable complex layouts. For example, a yes/no button panel, or custom progress bar with description text. It also means that any elements of your application that are common across multiple layouts can be extracted, managed separately, then included in each layout. So while you can create individual UI components by writing a custom
View, you can do it even more easily by re-using a layout file.Create a Re-usable Layout
If you already know the layout that you want to re-use, create a new XML file and define the layout. For example, here's a layout from the G-Kenya codelab that defines a title bar to be included in each activity (
titlebar.xml):<FrameLayout xmlns:android="http://schemas.android.com/apk/res/android"
android:layout_width=”match_parent”
android:layout_height="wrap_content"
android:background="@color/titlebar_bg">
<ImageView android:layout_width="wrap_content"
android:layout_height="wrap_content"
android:src="@drawable/gafricalogo" />
</FrameLayout>The root
Viewshould be exactly how you'd like it to appear in each layout to which you add this layout.Use the <include> Tag
Inside the layout to which you want to add the re-usable component, add the
<include/>tag. For example, here's a layout from the G-Kenya codelab that includes the title bar from above:Here's the layout file:
<LinearLayout xmlns:android="http://schemas.android.com/apk/res/android"
    android:orientation="vertical"
    android:layout_width=”match_parent”
    android:layout_height=”match_parent”
    android:background="@color/app_bg"
    android:gravity="center_horizontal">

    <include layout="@layout/titlebar"/>

    <TextView android:layout_width=”match_parent”
              android:layout_height="wrap_content"
              android:text="@string/hello"
              android:padding="10dp" />

    ...

</LinearLayout>
You can also override all the layout parameters (any
android:layout_*attributes) of the included layout's root view by specifying them in the<include/>tag. For example:<include android:id=”@+id/news_title”
android:layout_width=”match_parent”
android:layout_height=”match_parent”
layout=”@layout/title”/>However, if you want to override layout attributes using the
<include>tag, you must override bothandroid:layout_heightandandroid:layout_widthin order for other layout attributes to take effect.Use the <merge> Tag
The
<merge />tag helps eliminate redundant view groups in your view hierarchy when including one layout within another. For example, if your main layout is a verticalLinearLayoutin which two consecutive views can be re-used in multiple layouts, then the re-usable layout in which you place the two views requires its own root view. However, using anotherLinearLayoutas the root for the re-usable layout would result in a verticalLinearLayoutinside a verticalLinearLayout. The nestedLinearLayoutserves no real purpose other than to slow down your UI performance.To avoid including such a redundant view group, you can instead use the
<merge>element as the root view for the re-usable layout. For example:<merge xmlns:android="http://schemas.android.com/apk/res/android">
<Button
android:layout_width="fill_parent"
android:layout_height="wrap_content"
android:text="@string/add"/>
<Button
android:layout_width="fill_parent"
android:layout_height="wrap_content"
android:text="@string/delete"/>
</merge>Now, when you include this layout in another layout (using the
<include/>tag), the system ignores the<merge>element and places the two buttons directly in the layout, in place of the<include/>tag.Loading Views On Demand
THIS LESSON TEACHES YOU TO
YOU SHOULD ALSO READ
Sometimes your layout might require complex views that are rarely used. Whether they are item details, progress indicators, or undo messages, you can reduce memory usage and speed up rendering by loading the views only when they are needed.
Define a ViewStub
ViewStubis a lightweight view with no dimension and doesn’t draw anything or participate in the layout. As such, it's cheap to inflate and cheap to leave in a view hierarchy. EachViewStubsimply needs to include theandroid:layoutattribute to specify the layout to inflate.The following
ViewStubis for a translucent progress bar overlay. It should be visible only when new items are being imported into the application.<ViewStub
android:id="@+id/stub_import"
android:inflatedId="@+id/panel_import"
android:layout="@layout/progress_overlay"
android:layout_width="fill_parent"
android:layout_height="wrap_content"
android:layout_gravity="bottom" />Load the ViewStub Layout
When you want to load the layout specified by the
ViewStub, either set it visible by callingsetVisibility(View.VISIBLE)or callinflate().((ViewStub) findViewById(R.id.stub_import)).setVisibility(View.VISIBLE);
// or
View importPanel = ((ViewStub) findViewById(R.id.stub_import)).inflate();Note: The
inflate()method returns the inflatedViewonce complete. so you don't need to callfindViewById()if you need to interact with the layout.Once visible/inflated, the
ViewStubelement is no longer part of the view hierarchy. It is replaced by the inflated layout and the ID for the root view of that layout is the one specified by theandroid:inflatedIdattribute of the ViewStub. (The IDandroid:idspecified for theViewStubis valid only until theViewStublayout is visible/inflated.)Note: One drawback of
ViewStubis that it doesn’t currently support the<merge/>tag in the layouts to be inflated.Making ListView Scrolling Smooth
THIS LESSON TEACHES YOU TO
YOU SHOULD ALSO READ
The key to a smoothly scrolling
ListViewis to keep the application’s main thread (the UI thread) free from heavy processing. Ensure you do any disk access, network access, or SQL access in a separate thread. To test the status of your app, you can enableStrictMode.Use a Background Thread
Using a background thread ("worker thread") removes strain from the main thread so it can focus on drawing the UI. In many cases, using
AsyncTaskprovides a simple way to perform your work outside the main thread.AsyncTaskautomatically queues up all theexecute()requests and performs them serially. This behavior is global to a particular process and means you don’t need to worry about creating your own thread pool.In the sample code below, an
AsyncTaskis used to load images in a background thread, then apply them to the UI once finished. It also shows a progress spinner in place of the images while they are loading.// Using an AsyncTask to load the slow images in a background thread
new AsyncTask<ViewHolder, Void, Bitmap>() {
private ViewHolder v;
@Override
protected Bitmap doInBackground(ViewHolder... params) {
v = params[0];
return mFakeImageLoader.getImage();
}
@Override
protected void onPostExecute(Bitmap result) {
super.onPostExecute(result);
if (v.position == position) {
// If this item hasn't been recycled already, hide the
// progress and set and show the image
v.progress.setVisibility(View.GONE);
v.icon.setVisibility(View.VISIBLE);
v.icon.setImageBitmap(result);
}
}
}.execute(holder);Beginning with Android 3.0 (API level 11), an extra feature is available in
AsyncTaskso you can enable it to run across multiple processor cores. Instead of callingexecute()you can specifyexecuteOnExecutor()and multiple requests can be executed at the same time depending on the number of cores available.Hold View Objects in a View Holder
Your code might call
findViewById()frequently during the scrolling ofListView, which can slow down performance. Even when theAdapterreturns an inflated view for recycling, you still need to look up the elements and update them. A way around repeated use offindViewById()is to use the "view holder" design pattern.A
ViewHolderobject stores each of the component views inside the tag field of the Layout, so you can immediately access them without the need to look them up repeatedly. First, you need to create a class to hold your exact set of views. For example:static class ViewHolder {
TextView text;
TextView timestamp;
ImageView icon;
ProgressBar progress;
int position;
}Then populate the
ViewHolderand store it inside the layout.ViewHolder holder = new ViewHolder();
holder.icon = (ImageView) convertView.findViewById(R.id.listitem_image);
holder.text = (TextView) convertView.findViewById(R.id.listitem_text);
holder.timestamp = (TextView) convertView.findViewById(R.id.listitem_timestamp);
holder.progress = (ProgressBar) convertView.findViewById(R.id.progress_spinner);
convertView.setTag(holder);Now you can easily access each view without the need for the look-up, saving valuable processor cycles.
Optimizing Battery Life
DEPENDENCIES AND PREREQUISITES
- Android 2.0 (API level 5) or higher
- Experience with Intents and Intent Filters
YOU SHOULD ALSO READ
For your app to be a good citizen, it should seek to limit its impact on the battery life of its host device. After this class you will be able to build apps that monitor modify their functionality and behavior based on the state of the host device.
By taking steps such as disabling background service updates when you lose connectivity, or reducing the rate of such updates when the battery level is low, you can ensure that the impact of your app on battery life is minimized, without compromising the user experience.
Lessons
- Monitoring the Battery Level and Charging State
- Learn how to alter your app's update rate by determining, and monitoring, the current battery level and changes in charging state.
- Determining and Monitoring the Docking State and Type
- Optimal refresh rates can vary based on how the host device is being used. Learn how to determine, and monitor, the docking state and type of dock being used to affect your app's behavior.
- Determining and Monitoring the Connectivity Status
- Without Internet connectivity you can't update your app from an online source. Learn how to check the connectivity status to alter your background update rate. You'll also learn to check for Wi-Fi or mobile connectivity before beginning high-bandwidth operations.
- Manipulating Broadcast Receivers On Demand
- Broadcast receivers that you've declared in the manifest can be toggled at runtime to disable those that aren't necessary due to the current device state. Learn to improve efficiency by toggling and cascading state change receivers and delay actions until the device is in a specific state.
-
Monitoring the Battery Level and Charging State
THIS LESSON TEACHES YOU TO
- Determine the Current Charging State
- Monitor Changes in Charging State
- Determine the Current Battery Level
- Monitor Significant Changes in Battery Level
YOU SHOULD ALSO READ
When you're altering the frequency of your background updates to reduce the effect of those updates on battery life, checking the current battery level and charging state is a good place to start.
The battery-life impact of performing application updates depends on the battery level and charging state of the device. The impact of performing updates while the device is charging over AC is negligible, so in most cases you can maximize your refresh rate whenever the device is connected to a wall charger. Conversely, if the device is discharging, reducing your update rate helps prolong the battery life.
Similarly, you can check the battery charge level, potentially reducing the frequency of—or even stopping—your updates when the battery charge is nearly exhausted.
Determine the Current Charging State
Start by determining the current charge status. The
BatteryManagerbroadcasts all battery and charging details in a stickyIntentthat includes the charging status.Because it's a sticky intent, you don't need to register a
BroadcastReceiver—by simply callingregisterReceiverpassing innullas the receiver as shown in the next snippet, the current battery status intent is returned. You could pass in an actualBroadcastReceiverobject here, but we'll be handling updates in a later section so it's not necessary.IntentFilter ifilter = new IntentFilter(Intent.ACTION_BATTERY_CHANGED);
Intent batteryStatus = context.registerReceiver(null, ifilter);You can extract both the current charging status and, if the device is being charged, whether it's charging via USB or AC charger:
// Are we charging / charged?
int status = batteryStatus.getIntExtra(BatteryManager.EXTRA_STATUS, -1);
boolean isCharging = status == BatteryManager.BATTERY_STATUS_CHARGING ||
                     status == BatteryManager.BATTERY_STATUS_FULL;

// How are we charging?
int chargePlug = batteryStatus.getIntExtra(BatteryManager.EXTRA_PLUGGED, -1);
boolean usbCharge = chargePlug == BatteryManager.BATTERY_PLUGGED_USB;
boolean acCharge = chargePlug == BatteryManager.BATTERY_PLUGGED_AC;
Typically you should maximize the rate of your background updates in the case where the device is connected to an AC charger, reduce the rate if the charge is over USB, and lower it further if the battery is discharging.
Monitor Changes in Charging State
The charging status can change as easily as a device can be plugged in, so it's important to monitor the charging state for changes and alter your refresh rate accordingly.
The
BatteryManagerbroadcasts an action whenever the device is connected or disconnected from power. It's important to to receive these events even while your app isn't running—particularly as these events should impact how often you start your app in order to initiate a background update—so you should register aBroadcastReceiverin your manifest to listen for both events by defining theACTION_POWER_CONNECTEDandACTION_POWER_DISCONNECTEDwithin an intent filter.<receiver android:name=".PowerConnectionReceiver">
<intent-filter>
<action android:name="android.intent.action.ACTION_POWER_CONNECTED"/>
<action android:name="android.intent.action.ACTION_POWER_DISCONNECTED"/>
</intent-filter>
</receiver>Within the associated
BroadcastReceiverimplementation, you can extract the current charging state and method as described in the previous step.public class PowerConnectionReceiver extends BroadcastReceiver {
@Override
public void onReceive(Context context, Intent intent) {
int status = intent.getIntExtra(BatteryManager.EXTRA_STATUS, -1);
boolean isCharging = status == BatteryManager.BATTERY_STATUS_CHARGING ||
status == BatteryManager.BATTERY_STATUS_FULL;
int chargePlug = intent.getIntExtra(BatteryManager.EXTRA_PLUGGED, -1);
boolean usbCharge = chargePlug == BatteryManager.BATTERY_PLUGGED_USB;
boolean acCharge = chargePlug == BatteryManager.BATTERY_PLUGGED_AC;
}
}Determine the Current Battery Level
In some cases it's also useful to determine the current battery level. You may choose to reduce the rate of your background updates if the battery charge is below a certain level.
You can find the current battery charge by extracting the current battery level and scale from the battery status intent as shown here:
int level = batteryStatus.getIntExtra(BatteryManager.EXTRA_LEVEL, -1);
int scale = batteryStatus.getIntExtra(BatteryManager.EXTRA_SCALE, -1);

float batteryPct = level / (float)scale;
Monitor Significant Changes in Battery Level
You can't easily continually monitor the battery state, but you don't need to.
Generally speaking, the impact of constantly monitoring the battery level has a greater impact on the battery than your app's normal behavior, so it's good practice to only monitor significant changes in battery level—specifically when the device enters or exits a low battery state.
The manifest snippet below is extracted from the intent filter element within a broadcast receiver. The receiver is triggered whenever the device battery becomes low or exits the low condition by listening for
ACTION_BATTERY_LOWandACTION_BATTERY_OKAY.<receiver android:name=".BatteryLevelReceiver">
<intent-filter>
<action android:name="android.intent.action.ACTION_BATTERY_LOW"/>
<action android:name="android.intent.action.ACTION_BATTERY_OKAY"/>
</intent-filter>
</receiver>It is generally good practice to disable all your background updates when the battery is critically low. It doesn't matter how fresh your data is if the phone turns itself off before you can make use of it.
In many cases, the act of charging a device is coincident with putting it into a dock. The next lesson shows you how to determine the current dock state and monitor for changes in device docking.
Determining and Monitoring the Docking State and Type
THIS LESSON TEACHES YOU TO
- Determine the Current Docking State
- Determine the Current Dock Type
- Monitor for Changes in the Dock State or Type
YOU SHOULD ALSO READ
Android devices can be docked into several different kinds of docks. These include car or home docks and digital versus analog docks. The dock-state is typically closely linked to the charging state as many docks provide power to docked devices.
How the dock-state of the phone affects your update rate depends on your app. You may choose to increase the update frequency of a sports center app when it's in the desktop dock, or disable your updates completely if the device is car docked. Conversely, you may choose to maximize your updates while car docked if your background service is updating traffic conditions.
The dock state is also broadcast as a sticky
Intent, allowing you to query if the device is docked or not, and if so, in which kind of dock.Determine the Current Docking State
The dock-state details are included as an extra in a sticky broadcast of the
ACTION_DOCK_EVENTaction. Because it's sticky, you don't need to register aBroadcastReceiver. You can simply callregisterReceiver()passing innullas the broadcast receiver as shown in the next snippet.IntentFilter ifilter = new IntentFilter(Intent.ACTION_DOCK_EVENT);
Intent dockStatus = context.registerReceiver(null, ifilter);You can extract the current docking status from the
EXTRA_DOCK_STATEextra:int dockState = battery.getIntExtra(EXTRA_DOCK_STATE, -1);
boolean isDocked = dockState != Intent.EXTRA_DOCK_STATE_UNDOCKED;Determine the Current Dock Type
If a device is docked, it can be docked in any one of four different type of dock:
- Car
- Desk
- Low-End (Analog) Desk
- High-End (Digital) Desk
Note that the latter two options were only introduced to Android in API level 11, so it's good practice to check for all three where you are only interested in the type of dock rather than it being digital or analog specifically:
boolean isCar = dockState == EXTRA_DOCK_STATE_CAR;
boolean isDesk = dockState == EXTRA_DOCK_STATE_DESK ||
                 dockState == EXTRA_DOCK_STATE_LE_DESK ||
                 dockState == EXTRA_DOCK_STATE_HE_DESK;
Monitor for Changes in the Dock State or Type
Whenever the device is docked or undocked, the
ACTION_DOCK_EVENTaction is broadcast. To monitor changes in the device's dock-state, simply register a broadcast receiver in your application manifest as shown in the snippet below:<action android:name="android.intent.action.ACTION_DOCK_EVENT"/>You can extract the dock type and state within the receiver implementation using the same techniques described in the previous step.
Determining and Monitoring the Connectivity Status
THIS LESSON TEACHES YOU TO
- Determine if you Have an Internet Connection
- Determine the Type of your Internet Connection
- Monitor for Changes in Connectivity
YOU SHOULD ALSO READ
Some of the most common uses for repeating alarms and background services is to schedule regular updates of application data from Internet resources, cache data, or execute long running downloads. But if you aren't connected to the Internet, or the connection is too slow to complete your download, why both waking the device to schedule the update at all?
You can use the
ConnectivityManagerto check that you're actually connected to the Internet, and if so, what type of connection is in place.Determine if You Have an Internet Connection
There's no need to schedule an update based on an Internet resource if you aren't connected to the Internet. The following snippet shows how to use the
ConnectivityManagerto query the active network and determine if it has Internet connectivity.ConnectivityManager cm =
(ConnectivityManager)context.getSystemService(Context.CONNECTIVITY_SERVICE);
NetworkInfo activeNetwork = cm.getActiveNetworkInfo();
boolean isConnected = activeNetwork != null &&
activeNetwork.isConnectedOrConnecting();Determine the Type of your Internet Connection
It's also possible to determine the type of Internet connection currently available.
Device connectivity can be provided by mobile data, WiMAX, Wi-Fi, and ethernet connections. By querying the type of the active network, as shown below, you can alter your refresh rate based on the bandwidth available.
boolean isWiFi = activeNetwork.getType() == ConnectivityManager.TYPE_WIFI;Mobile data costs tend to be significantly higher than Wi-Fi, so in most cases, your app's update rate should be lower when on mobile connections. Similarly, downloads of significant size should be suspended until you have a Wi-Fi connection.
Having disabled your updates, it's important that you listen for changes in connectivity in order to resume them once an Internet connection has been established.
Monitor for Changes in Connectivity
The
ConnectivityManagerbroadcasts theCONNECTIVITY_ACTION("android.net.conn.CONNECTIVITY_CHANGE") action whenever the connectivity details have changed. You can register a broadcast receiver in your manifest to listen for these changes and resume (or suspend) your background updates accordingly.<action android:name="android.net.conn.CONNECTIVITY_CHANGE"/>Changes to a device's connectivity can be very frequent—this broadcast is triggered every time you move between mobile data and Wi-Fi. As a result, it's good practice to monitor this broadcast only when you've previously suspended updates or downloads in order to resume them. It's generally sufficient to simply check for Internet connectivity before beginning an update and, should there be none, suspend further updates until connectivity is restored.
This technique requires toggling broadcast receivers you've declard in the manifest, which is described in the next lesson.
Manipulating Broadcast Receivers On Demand
THIS LESSON TEACHES YOU TO
YOU SHOULD ALSO READ
The simplest way to monitor device state changes is to create a
BroadcastReceiverfor each state you're monitoring and register each of them in your application manifest. Then within each of these receivers you simply reschedule your recurring alarms based on the current device state.A side-effect of this approach is that your app will wake the device each time any of these receivers is triggered—potentially much more frequently than required.
A better approach is to disable or enable the broadcast receivers at runtime. That way you can use the receivers you declared in the manifest as passive alarms that are triggered by system events only when necessary.
Toggle and Cascade State Change Receivers to Improve Efficiency
Use can use the
PackageManagerto toggle the enabled state on any component defined in the manifest, including whichever broadcast receivers you wish to enable or disable as shown in the snippet below:ComponentName receiver = new ComponentName(context, myReceiver.class);
PackageManager pm = context.getPackageManager();
pm.setComponentEnabledSetting(receiver,
PackageManager.COMPONENT_ENABLED_STATE_ENABLED,
PackageManager.DONT_KILL_APP)Using this technique, if you determine that connectivity has been lost, you can disable all of your receivers except the connectivity-change receiver. Conversely, once you are connected you can stop listening for connectivity changes and simply check to see if you're online immediately before performing an update and rescheduling a recurring update alarm.
You can use the same technique to delay a download that requires higher bandwidth to complete. Simply enable a broadcast receiver that listens for connectivity changes and initiates the download only after you are connected to Wi-Fi.
Sending Operations to Multiple Threads
DEPENDENCIES AND PREREQUISITES
- Android 3.0 (API Level 11) or higher
- Loading Data in the Backgroundtraining class
- Running in a Background Servicetraining class
YOU SHOULD ALSO READ
TRY IT OUT
Download the sampleThreadSample.zip
The speed and efficiency of a long-running, data-intensive operation often improves when you split it into smaller operations running on multiple threads. On a device that has a CPU with multiple processors (cores), the system can run the threads in parallel, rather than making each sub-operation wait for a chance to run. For example, decoding multiple image files in order to display them on a thumbnail screen runs substantially faster when you do each decode on a separate thread.
This class shows you how to set up and use multiple threads in an Android app, using a thread pool object. You'll also learn how to define code to run on a thread and how to communicate between one of these threads and the UI thread.
Lessons
- Specifying the Code to Run on a Thread
- Learn how to write code to run on a separate
Thread, by defining a class that implements theRunnableinterface. - Creating a Manager for Multiple Threads
- Learn how to create an object that manages a pool of
Threadobjects and a queue ofRunnableobjects. This object is called aThreadPoolExecutor. - Running Code on a Thread Pool Thread
- Learn how to run a
Runnableon a thread from the thread pool. - Communicating with the UI Thread
- Learn how to communicate from a thread in the thread pool to the UI thread.


 浙公网安备 33010602011771号