springboot-8-企业开发
一、邮件发送
流程:
mbqplwpheeyvgdjh
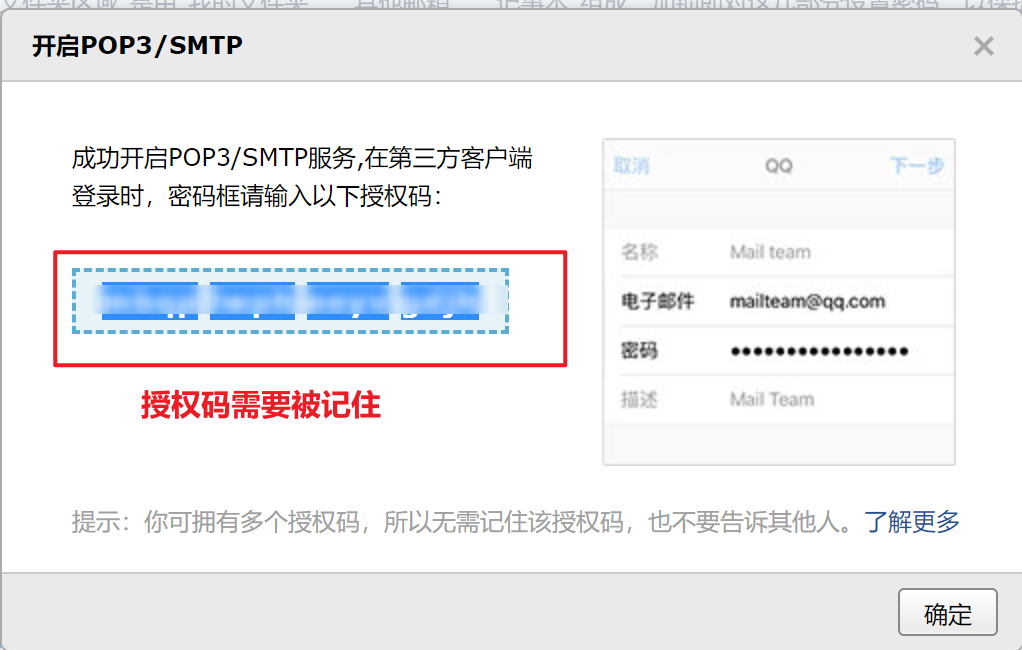
首先需要开启POS3/SMTP服务,这是一个邮件传输协议
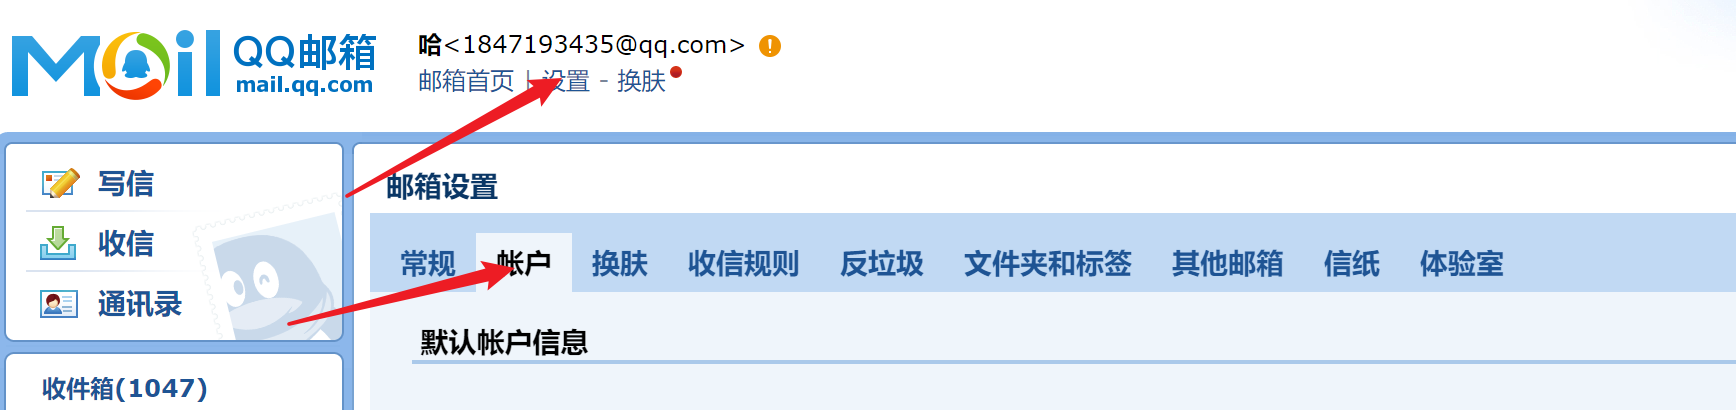
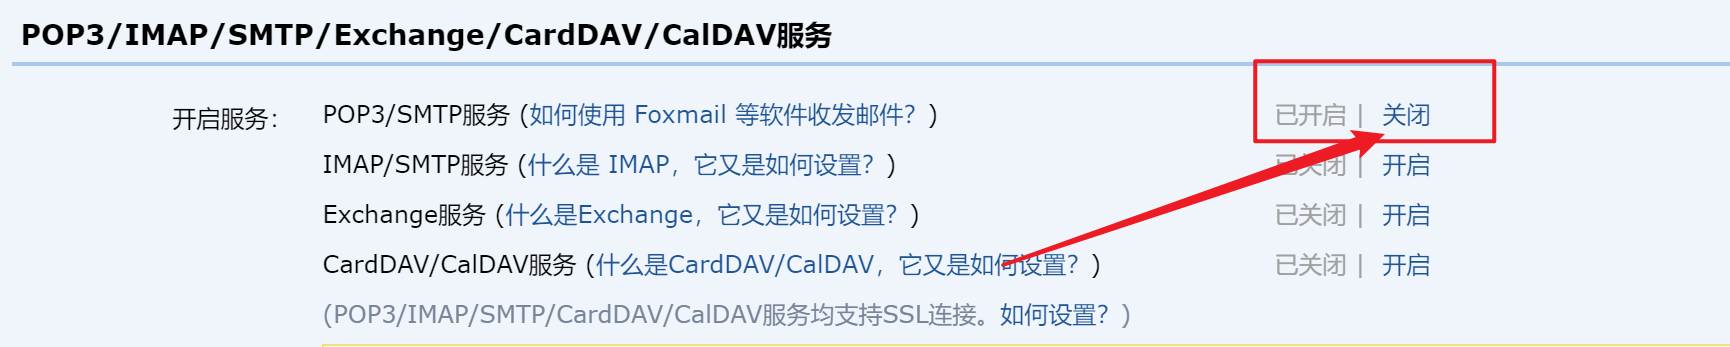
点击开启
导入依赖
<!--mail-->
<dependency>
    <groupId>org.springframework.boot</groupId>
    <artifactId>spring-boot-starter-mail</artifactId>
</dependency>
参数配置
# 配置邮件发送服务器得地址和端口(465或者587)
spring.mail.host=smtp.qq.com
spring.mail.port=587
# 配置用户账号和密码
spring.mail.username=1847193435@qq.com
spring.mail.password=mbqplwpheeyvgdjh
# 配置默认编码方式、SSL连接配置、最后开启debug可以查看文件日志
spring.mail.default-encoding=UTF-8
spring.mail.properties.mail.smtp.socketFactory.class = javax.net.ssl.SSLSocketFactor
spring.mail.properties.mail.debug = true
配置邮件发送组件
@Component
public class MailService {
    @Autowired
    JavaMailSender javaMailSender;
	//有抄送人
    public void sendMailWitrhCc(String from,
                         String to,
                         String cc,
                         String subject,
                         String content){
        SimpleMailMessage simpleMailMessage = new SimpleMailMessage();
        simpleMailMessage.setFrom(from);
        simpleMailMessage.setTo(to);
        simpleMailMessage.setCc(cc);
        simpleMailMessage.setSubject(subject);
        simpleMailMessage.setText(content);
        javaMailSender.send(simpleMailMessage);
    }
    //无抄送人
    public void sendMail(String from,
                         String to,
                         String subject,
                         String content){
        SimpleMailMessage simpleMailMessage = new SimpleMailMessage();
        simpleMailMessage.setFrom(from);
        simpleMailMessage.setTo(to);
        simpleMailMessage.setSubject(subject);
        simpleMailMessage.setText(content);
        javaMailSender.send(simpleMailMessage);
    }
}
测试发送
@SpringBootTest
class EmailApplicationTests {

    @Autowired
    MailService mailService;

    @Test
    void contextLoads() {
        mailService.sendMail("1847193435@qq.com",
                "1847193435@qq.com",
                "test",
                "测试邮件");
    }
}
发送带附件邮件:
public void sendAttachFileMail(String from,
                               String to,
                               String subject,
                               String content,
                               File file) {
    try{
        MimeMessage mimeMessage = javaMailSender.createMimeMessage();
        //MimeMessageHelper简化了邮件配置,第二个参数true表示构造一个multipart message类型得邮件
        MimeMessageHelper helper = new MimeMessageHelper(mimeMessage, true);
        helper.setFrom(from);
        helper.setTo(to);
        helper.setSubject(subject);
        helper.setText(content);
        helper.addAttachment(file.getName(),file);
        javaMailSender.send(mimeMessage);
    }catch (MessagingException e){
        e.printStackTrace();
    }
}
测试
@SpringBootTest
class EmailApplicationTests {

    @Autowired
    MailService mailService;

    @Test
    void contextLoads() {
        mailService.sendAttachFileMail("1847193435@qq.com",
                "1847193435@qq.com",
                "test",
                "文件测试附带",
                new File("C:\\Users\\86186\\Desktop\\xml语法.md"));
    }
}
发送带图片资源的邮件:
public void sendMailWithImg(String from,
                            String to,
                            String subject,
                            String content,
                            String[] srcPaths,
                            String[] resIds){
    if (srcPaths.length != resIds.length){
        System.out.println("发送错误");
        return;
    }
    try{
        MimeMessage message = javaMailSender.createMimeMessage();
        MimeMessageHelper helper = new MimeMessageHelper(message, true);
        helper.setFrom(from);
        helper.setTo(to);
        helper.setSubject(subject);
        //后面这个true参数表示html格式
        helper.setText(content,true);
        for (int i = 0 ; i<srcPaths.length;i++){
            FileSystemResource res = new FileSystemResource(new File(srcPaths[i]));
            helper.addInline(resIds[i],res);
        }
        javaMailSender.send(message);
    }catch (MessagingException e){
        System.out.println("发送错误");
    }

}
测试
@Test
void contextLoads() {
    mailService.sendMailWithImg("1847193435@qq.com",
            "1247166001@qq.com",
            "springboot基于java测试",
            "<div><h1>test发送邮件</h1>" +
                    "    正常的lwy:<div><img style='width: 100px;height: 100px;' src='cid:p1'></div>\n" +
                    "    猖狂的lwy:<div><img style='width: 100px;height: 100px;' src='cid:p2'></div>\n" +
                    "</div>",
            new String[]{"C:\\Users\\86186\\Pictures\\lwy\\1.jpg","C:\\Users\\86186\\Pictures\\lwy\\2.jpg"},
            new String[]{"p1","p2"}
            );
}
使用thymeleaf构建邮件模板
对于格式复杂的邮件,如果采用字符串进行HTML模板拼接,不但容易出错,而且不易维护,使用html模板就可以很好的解决这个问题
其实最终的目的还是去把我们要加载的信息和模板结合然后再作为邮件的content发送出去
流程:
导入依赖
<!--mail-->
<dependency>
    <groupId>org.springframework.boot</groupId>
    <artifactId>spring-boot-starter-mail</artifactId>
</dependency>
<!--thymeleaf-->
<dependency>
    <groupId>org.springframework.boot</groupId>
    <artifactId>spring-boot-starter-thymeleaf</artifactId>
</dependency>
创建模板
<!DOCTYPE html>
<html lang="en" xmlns:th=http://www.thymeleaf.org
      xmlns:sec=http://www.thymeleaf.org/extras/spring-security
      xmlns:shiro=http://www.pollix.at/thymeleaf/shiro>
<head>

    <title>邮件</title>
</head>
<body>
<h1>邮箱激活</h1>
<h4>你的注册信息如下是:</h4>
<div>
    <table border="1">
        <tr>
            <th>用户名</th>
            <th th:text="${username}"></th>
        </tr>
        <tr>
            <th>性别</th>
            <th th:text="${gender}"></th>
        </tr>
    </table>
</div>
<div><a th:href="@{https://www.baidu.com/}">核对无误请点击本链接来激活邮箱</a> </div>
</body>
</html>
MailService中添加方法
//发送html邮件
public void sendHtmlMail(String from,
                         String to,
                         String subject,
                         String content){
    try{
        MimeMessage message = javaMailSender.createMimeMessage();
        MimeMessageHelper helper = new MimeMessageHelper(message, true);
        helper.setFrom(from);
        helper.setTo(to);
        helper.setSubject(subject);
        helper.setText(content,true);
        javaMailSender.send(message);
    }catch (MessagingException e){
        System.out.println("发送错误");
    }
}
测试
@Test
void contextLoads() {
    //注意这个context是thymeleaf中的
    Context context = new Context();
    context.setVariable("username","sang");
    context.setVariable("gender","男");
    String content = templateEngine.process("mailtemplate.html", context);
    mailService.sendHtmlMail("1847193435@qq.com",
            "1847193435@qq.com",
            "testtemplate",
            content);
}
二、定时任务
简单的定时任务用@schedule就可以完成,
复杂的定时任务需要整合Quartz来实现
流程:
依赖只需要是web依赖即可
在项目启动类上添加一个@EnableScheduling注解,来开启定时任务
@SpringBootApplication
@EnableScheduling
public class ScheduleApplication {

    public static void main(String[] args) {
        SpringApplication.run(ScheduleApplication.class, args);
    }
}
配置定时任务
@Component
public class MySchedule {
    @Scheduled(fixedDelay = 1000)
    public void fixedDelay(){
        System.out.println("fixedDelay:"+new Date());
    }

    @Scheduled(fixedRate = 2000)
    public void fixedRate(){
        System.out.println("fixedRate:"+new Date());
    }

    @Scheduled(initialDelay = 1000,fixedRate = 2000)
    public void initialDelay(){
        System.out.println("initialDelay:"+new Date());
    }

    @Scheduled(cron = "0 * * * * ?")
    public void cron(){
        System.out.println("cron: "+new Date());
    }
}
整合Quartz:
主要思想就是:需要通过组件向IOC容器提供三个bean,JobDetail,Trigger,SchedulerFactory
JobDetail --> Trigger --> SchedulerFactory
流程:
导入依赖:
<!--quartz-->
<dependency>
    <groupId>org.springframework.boot</groupId>
    <artifactId>spring-boot-starter-quartz</artifactId>
</dependency>
编写定时任务
- 一种是直接放入到IOC容器中的组件
- 无需继承其他类
- 不能传输参数
- 一种是需要加入参数的类似于pojo的类
- 需要继承QuartzJobBean,并重写executeInternal方法
- 主要用来进行需要参数的定时任务
@Component
public class MyFirstJob {
    public void sayHello(){
        System.out.println("MyFirstJob: "+new Date());
    }
}

//这个后来需要实例化才用,所以不需要放到IOC容器中去
public class MySecondJob extends QuartzJobBean {
    String name;

    public MySecondJob() {
    }

    public void setName(String name) {
        this.name = name;
    }

    @Override
    protected void executeInternal(JobExecutionContext context) throws JobExecutionException {
        System.out.println("hello "+name+new Date());

    }
}
开始配置JobDetail,分别对应两个Job
//对应没有继承QuartzJobBean的那个IOC容器中的bean
@Bean
MethodInvokingJobDetailFactoryBean jobDetail1(){
    MethodInvokingJobDetailFactoryBean bean = new MethodInvokingJobDetailFactoryBean();
    bean.setTargetBeanName("myFirstJob");
    bean.setTargetMethod("sayHello");
    return bean;
}

@Bean
JobDetailFactoryBean jobDetail2(){
    //创建一个工厂bean
    JobDetailFactoryBean bean = new JobDetailFactoryBean();
    //把要加载的定时任务类加载到IOC容器中去,但这个时候类中的参数还是空的
    bean.setJobClass(MySecondJob.class);
    //把我们需要的参数放在这个map集合里面
    JobDataMap jobDataMap = new JobDataMap();
    jobDataMap.put("name","sang");
    //把参数加载到这个工厂bean中来
    bean.setJobDataMap(jobDataMap);
    bean.setDurability(true);
    return bean;
}
开始配置Trigger(触发器),有两种触发器
@Bean
SimpleTriggerFactoryBean simpleTriggerFactoryBean(){
    SimpleTriggerFactoryBean bean = new SimpleTriggerFactoryBean();
    bean.setJobDetail(jobDetail1().getObject());
    bean.setRepeatCount(3);
    bean.setStartDelay(1000);
    bean.setRepeatInterval(2000);
    return bean;
}

@Bean
CronTriggerFactoryBean cronTriggerFactoryBean(){
    CronTriggerFactoryBean bean = new CronTriggerFactoryBean();
    bean.setJobDetail(jobDetail2().getObject());
    bean.setCronExpression("* * * * * ?");
    return bean;
}
最后把触发器又配置到定时工厂的bean里面
@Bean
SchedulerFactoryBean schedulerFactoryBean(){
    SchedulerFactoryBean bean = new SchedulerFactoryBean();
    SimpleTrigger simpleTrigger = simpleTriggerFactoryBean().getObject();
    CronTrigger cronTrigger = cronTriggerFactoryBean().getObject();
    bean.setTriggers(simpleTrigger,cronTrigger);
    return bean;
}
三、批处理
spring batch框架:
提供了记录/跟踪、事务管理、作业处理统计、作业重启以及资源管理等功能。
主要提供ItemReader、ItemProccessor、ItemWriter来完成数据的读取、处理以及写出操作,并且可以将批处理的执行状态持久化到数据库中。
流程:
略
四、swagger2
简介:
帮助软件开发人员设计,构建,记录和使用RESTful Web服务,他将代码和文档融为一体,可以完美解决上面的问题,使开发人员将大部分精力集中到业务中去
流程:
导入依赖:
<!--swagger-->
<dependency>
    <groupId>io.springfox</groupId>
    <artifactId>springfox-swagger2</artifactId>
    <version>2.9.2</version>
</dependency>
<!--swagger-ui-->
<dependency>
    <groupId>io.springfox</groupId>
    <artifactId>springfox-swagger-ui</artifactId>
    <version>2.9.2</version>
</dependency>
swagger配置
需要添加@EnableSwagger2开启配置
@Configuration
@EnableSwagger2
public class SwaggerConfig {
    @Bean
    Docket docket(){
        return new Docket(DocumentationType.SWAGGER_2)
                .select()
                .apis(RequestHandlerSelectors.basePackage("com.wang.control"))
                .paths(PathSelectors.any())
                .build()
                .apiInfo(
                        new ApiInfoBuilder().description("为人师开发文档")
                        .contact(
                                new Contact("江南一点南","https://www.cnblogs.com/CoderWangEx/","1847193435@qq.com")
                        ).version("v1.0")
                        .title("API测试文档")
                        .license("Apache2.0")
                        .licenseUrl("http://www.apache.org/license/LICENSE-2.0")
                        .build()
                );
    }
}
pojo类
@Data
@ApiModel(value = "用户实体类",description = "用户信息描述类")
public class User {
    @ApiModelProperty(value = "用户名")
    private String username;
    @ApiModelProperty(value = "用户地址")
    private String address;
}
控制器(restful风格)
@RestController
@Api(tags = "用户数据接口")
public class UserControl {

    //需要添加两个信息,一个是方法简介,一个是传入参数简介
    @ApiOperation(value = "查询用户",notes = "根据id查询用户")
    //paramType是指方法参数的类型,可选值有path(参数获取方式@PathVariable)、query(参数获取方式@RequestParam)、header(参数获取方式@RequestHeader)、body以及form
    @ApiImplicitParam(paramType = "path",name = "id",value = "用户id",required = true)
    @GetMapping("/users/{id}")
    public String getUserById(@PathVariable("id")Integer id){
        return "/user/"+id;
    }


    @ApiResponses({
            @ApiResponse(code = 200,message = "删除成功!"),
            @ApiResponse(code = 500,message = "删除失败!")
    })
    @ApiOperation(value = "删除用户",notes = "通过id删除用户")
    @ApiImplicitParam(paramType = "path",name = "id",value = "用户id",required = true)
    @DeleteMapping("/user/{id}")
    public String deleteUserById(@PathVariable()Integer id){
        return id+"已被删除";
    }


    @ApiOperation(value = "添加用户",notes = "添加一个用户,传入用户名和地址")
    @ApiImplicitParams({
            @ApiImplicitParam(paramType = "query",name = "username",value = "用户名",required = true,defaultValue = "sang"),
            @ApiImplicitParam(paramType = "query",name = "address",value = "地址",required = true,defaultValue = "北京")
    })
    @PostMapping("/user")
    public String addUser(@RequestParam(value = "username")String username,
                          @RequestParam(value = "address")String address){
        return username+":"+address;
    }


    @ApiOperation(value = "修改用户",notes = "通过id,去修改用户的地址")
    @ApiImplicitParam(paramType = "body",name = "user",value = "用户对象",required = true)
    @PutMapping("/user")
    public String updateUser(@RequestBody() User user){
        return user.toString();
    }

    @ApiIgnore
    @GetMapping("/ignore")
    public String ignoreMethod(){
        return "已被忽略";
    }

}
美化swagger
使用knife4j美化,只需要在原来的基础上加上开启knife4j的注解即可
流程:
导入依赖
<!--整合Knife4j-->
<dependency>
    <groupId>com.github.xiaoymin</groupId>
    <artifactId>knife4j-spring-boot-starter</artifactId>
    <version>2.0.4</version>
</dependency>
开启knife4j
/**
 * Swagger2API文档的配置
 */
@Configuration
@EnableSwagger2
@EnableKnife4j
public class Swagger2Config {

}
访问http://localhost:8088/doc.html即可
五、数据校验
流程:
导入依赖:
<!--jsr303-->
<dependency>
    <groupId>org.springframework.boot</groupId>
    <artifactId>spring-boot-starter-validation</artifactId>
</dependency>
出错信息参数配置
通过LocalValidationFactoryBean的源码可以知道默认的ValidationMessageSource(校验出错时的提示文件)是resource目录下的ValidationMessages.properties文件
故我们需要在resource目录下创建一个ValidationMessages.properties文件,用于放置错误信息
user.name.size=用户名长度介于5到10格字符
user.address.notnull=用户地址不能为空
user.age.size=年龄输入不正确
user.email.notnull=邮箱不能为空
user.email.pattern=邮箱格式不正确
pojo类
@Data
public class User {
    private Integer id;

    @Size(min = 5,max = 10,message = "{user.name.size}")
    private String name;

    @NotNull
    private String address;

    @DecimalMin(value = "1",message = "{user.age.size}")
    @DecimalMax(value = "100",message = "{user.age.size}")
    private Integer age;

    @Email(message = "{user.email.pattern}")
    @NotNull(message = "{user.email.notnull}")
    private String email;
}
控制器:
在需要校验的参数前加上注解@Validation,后面再加上BindingResult result用于接收错误信息
@RestController
public class UserControl {
    @PostMapping("/user")
    public List<String> addUser(@Validated User user, BindingResult result){
        ArrayList<String> errors = new ArrayList<>();
        if (result.hasErrors()){
            List<ObjectError> allErrors = result.getAllErrors();
            for (ObjectError error : allErrors){
                errors.add(error.getDefaultMessage());
            }
        }
        return errors;
    }
}
没有找到配置出错信息的文件:
应该是文件名错了
ValidationMessages.properties
注意message后有个s
报错信息乱码:
需要再idea中改一下ValidationMessages.properties的编码格式
修改ValidationMessages.properties的编码格式,改成UTF-8。
File > Settings > Editor > File Encodings,
添加ValidationMessages.properties,指定编码为UTF-8,并勾选Transparent native-to-ascii conversion,
再apply ,ok。
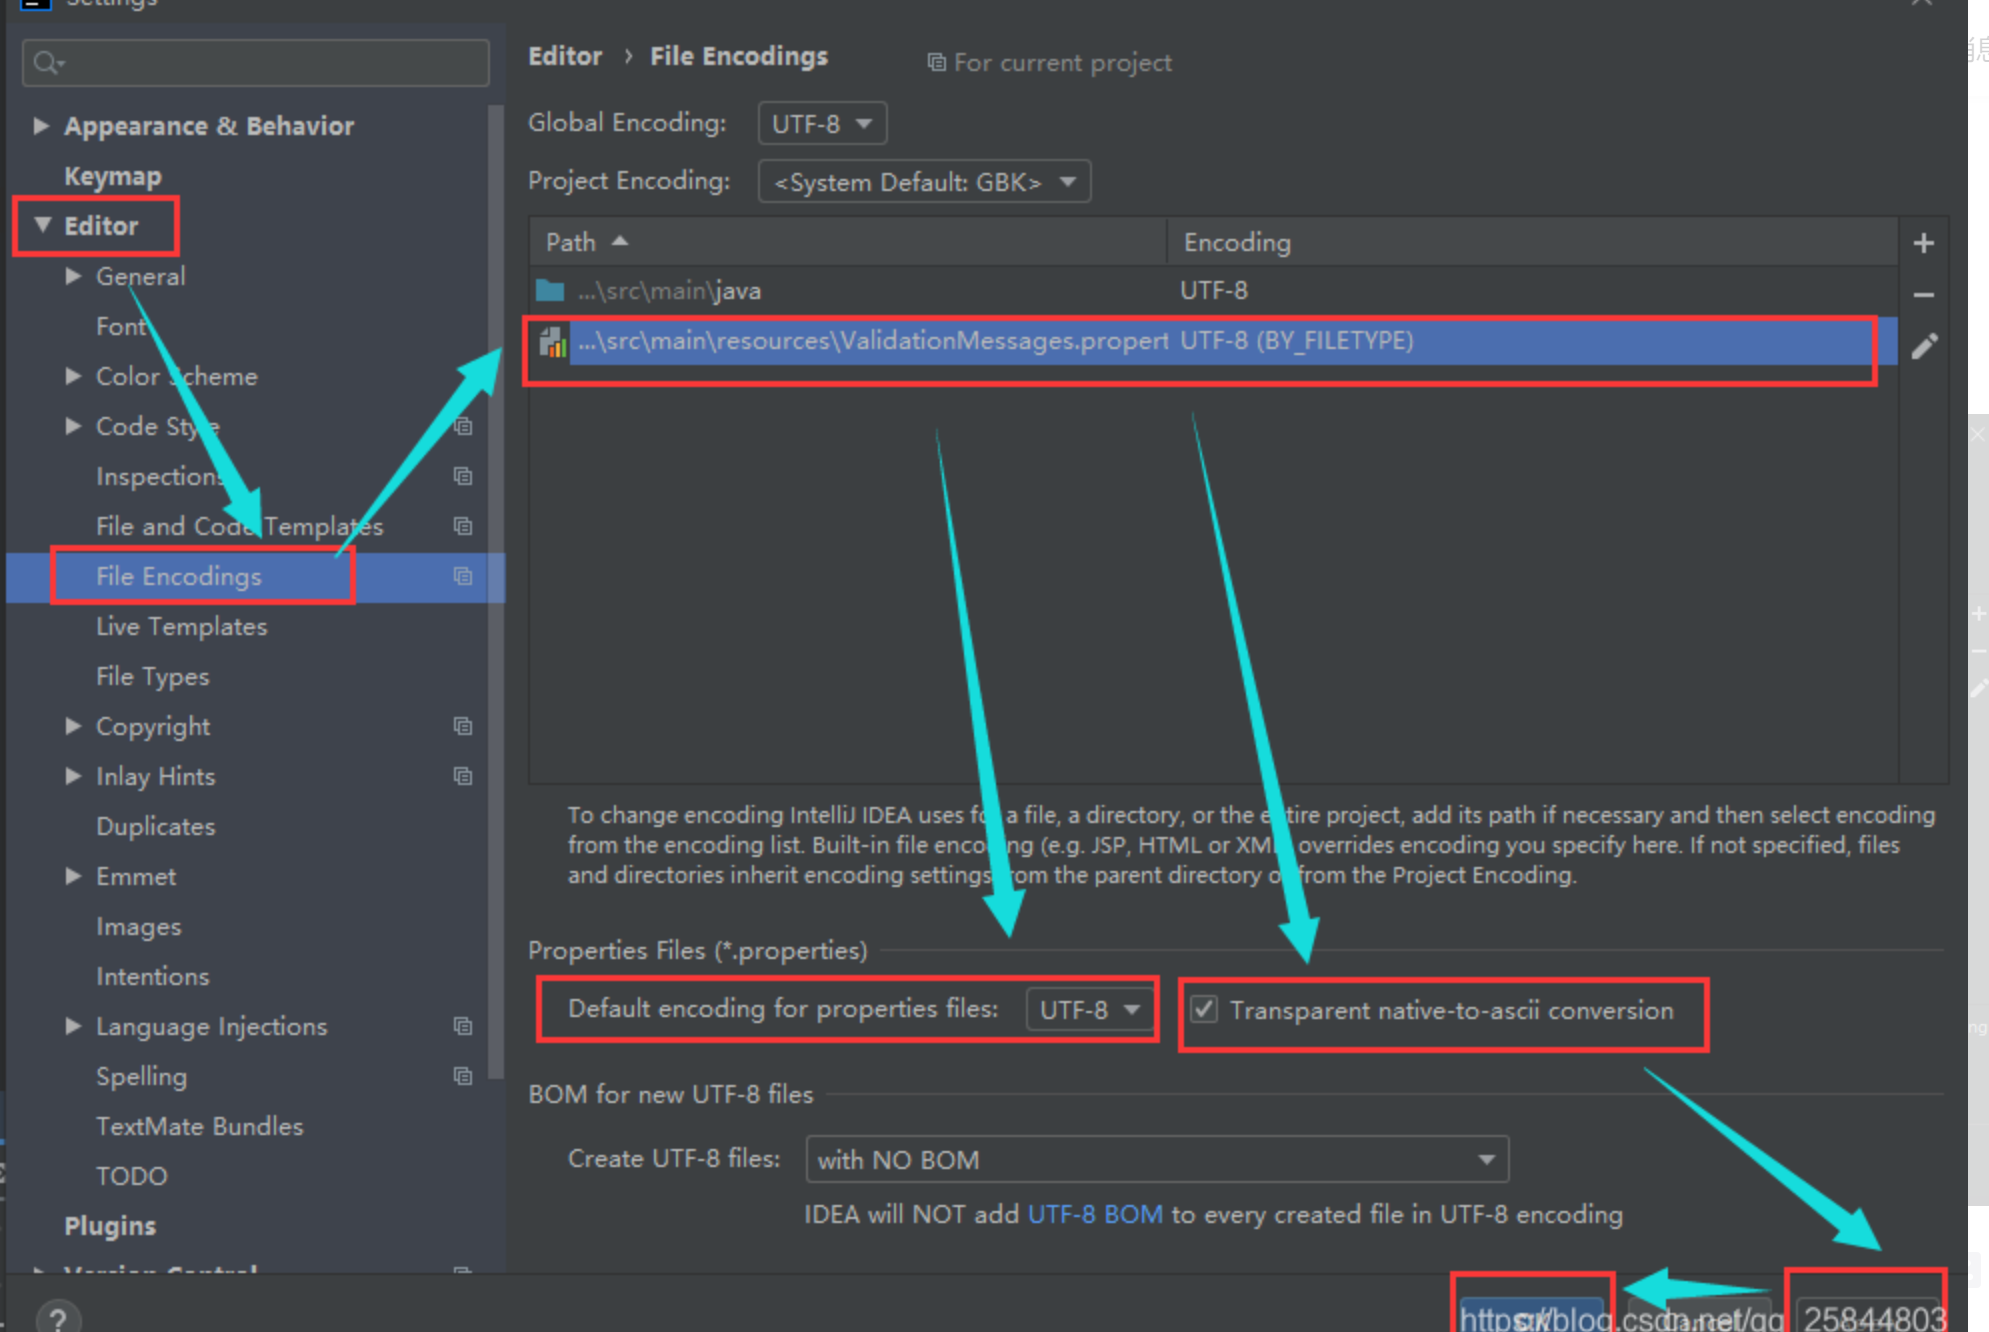
如果还不行,就把这个文件删掉,再创建就可以了
分组校验:
流程:
导入依赖,
配置ValidationMessages.properties
创建两个分组接口
public interface ValidationGroup1 {
}

public interface ValidationGroup2 {
}
然后在配置pojo的时候注解的参数加上group,即可分组
public class Employee {
    private Integer id;

    @Size(min = 5,max = 10,message = "{user.name.size}",groups = ValidationGroup1.class)
    private String name;


    @NotNull(message = "{user.address.notnull}",groups = ValidationGroup2.class)
    private String address;


    @DecimalMin(value = "1",message = "{user.age.size}")
    @DecimalMax(value = "200",message = "{user.age.size}")
    private Integer age;


    @Email(message = "{user.email.pattern}")
    @NotNull(message = "{user.email.notnull}")
    private String email;

}
控制器,在注解@Validated的参数表示出要用哪个分组
//这里表示使用第二种分配方式
@PostMapping("/user2")
public List<String> addUser2(@Validated(value = ValidationGroup2.class) User user, BindingResult result){
    ArrayList<String> errors = new ArrayList<>();
    if (result.hasErrors()){
        List<ObjectError> allErrors = result.getAllErrors();
        for (ObjectError error : allErrors){
            errors.add(error.getDefaultMessage());
        }
    }
    return errors;
}
常用校验注解
废话不多说,直接上表格说明:
| 注解 | 作用类型 | 解释 |
|---|---|---|
| @NotNull | 任何类型 | 属性不能为null |
| @NotEmpty | 集合 | 集合不能为null,且size大于0 |
| @NotBlanck | 字符串、字符 | 字符类不能为null,且去掉空格之后长度大于0 |
| @AssertTrue | Boolean、boolean | 布尔属性必须是true |
| @Min | 数字类型(原子和包装) | 限定数字的最小值(整型) |
| @Max | 同@Min | 限定数字的最大值(整型) |
| @DecimalMin | 同@Min | 限定数字的最小值(字符串,可以是小数) |
| @DecimalMax | 同@Min | 限定数字的最大值(字符串,可以是小数) |
| @Range | 数字类型(原子和包装) | 限定数字范围(长整型) |
| @Length | 字符串 | 限定字符串长度 |
| @Size | 集合 | 限定集合大小 |
| @Past | 时间、日期 | 必须是一个过去的时间或日期 |
| @Future | 时期、时间 | 必须是一个未来的时间或日期 |
| 字符串 | 必须是一个邮箱格式 | |
| @Pattern | 字符串、字符 | 正则匹配字符串 |

 浙公网安备 33010602011771号