sso-oauth2,jks
(一)、spring boot security 认证--自定义登录实现
简介
spring security主要分为两部分,认证(authentication)和授权(authority)。
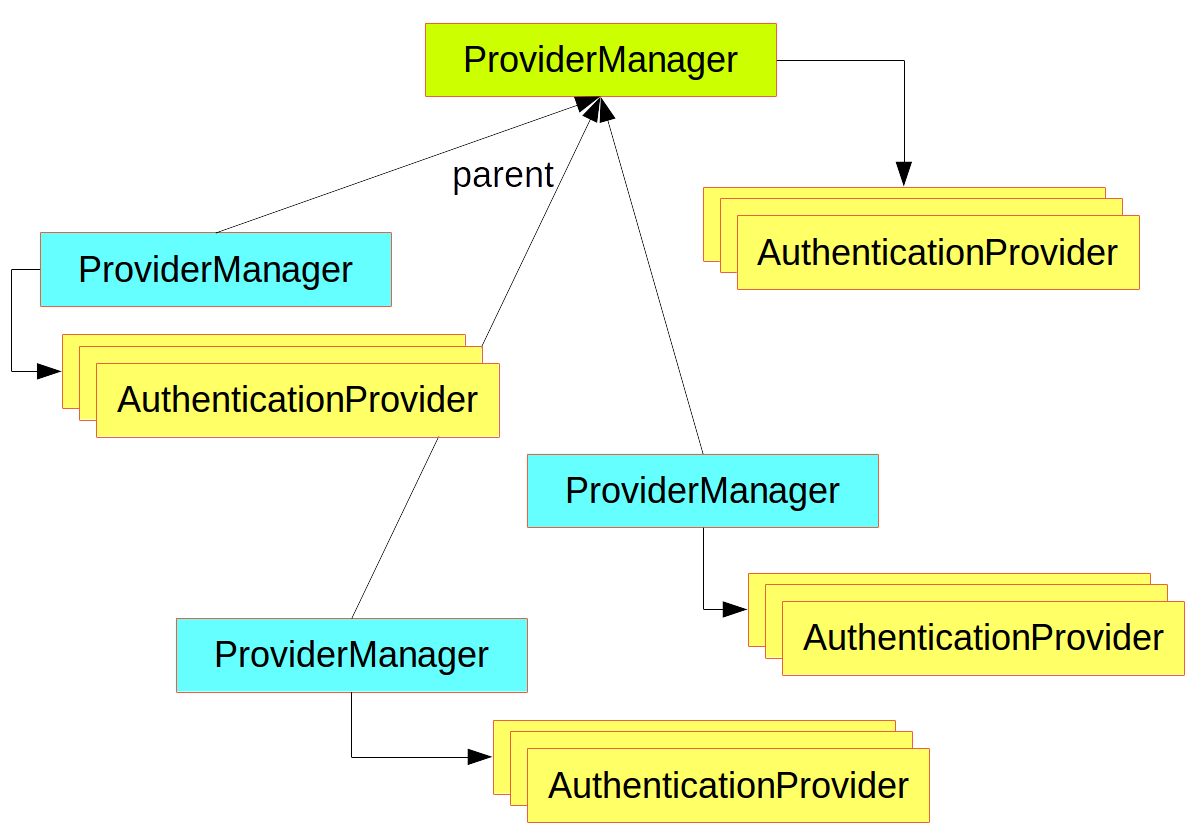
这一篇主要是认证部分,它由 ProviderManager(AuthenticationManager)实现。具体层次结构如下:
AuthenticationManager说明
认证的核心就是登录,这里简单介绍下security自定义token登录的实现逻辑,同时兼容用户名密码登录。
大体分为以下几个步骤:
- 自定义AuthenticationToken实现: 不同登录方式使用不同的token
- 自定义AuthenticationProcessingFilter实现:用来过滤指定的登录方式,生成对应的自定义AuthenticationToken实现
- 自定义AuthenticationProvider实现:针对不同登录方式提供的认证逻辑
- 自定义UserDetailsService实现:自定义用户信息查询服务
- WebSecurityConfigurerAdapter声明:security信息配置,将前面的自定义对象注入到流程中。
代码路径
步骤说明
注:仅说明实现方式,逻辑简化处理。
1、自定义AuthenticationProcessingFilter实现
package demo.model;

import org.springframework.security.authentication.AbstractAuthenticationToken;
import org.springframework.security.core.GrantedAuthority;

import java.util.Collection;

/**
 *
 * @Description:  声明自定义token,是为后面的AuthenticationProvider提供支撑,区分不同类型的处理。
 *
 * @auther: csp
 * @date:  2019/1/7 下午6:25
 *
 */
public class LoginToken extends AbstractAuthenticationToken {

    private final String token;

    public LoginToken(String token) {
        super(null);
        this.token = token;
    }

    public LoginToken(String token, Collection<? extends GrantedAuthority> authorities) {
        super(authorities);
        this.token = token;
        setAuthenticated(true);
    }


    // 这个地方传递下token,逻辑是简化的逻辑,具体可以根据实际场景处理。
    // 如jwt token,解析出来username等信息,放到该token中。
    @Override
    public Object getCredentials() {
        return this.token;
    }

    @Override
    public Object getPrincipal() {
        return null;
    }
}
2、自定义AuthenticationProcessingFilter实现
package demo.filter;

import demo.model.LoginToken;
import org.springframework.security.authentication.AbstractAuthenticationToken;
import org.springframework.security.core.Authentication;
import org.springframework.security.core.AuthenticationException;
import org.springframework.security.web.authentication.AbstractAuthenticationProcessingFilter;
import org.springframework.security.web.util.matcher.AntPathRequestMatcher;

import javax.servlet.http.HttpServletRequest;
import javax.servlet.http.HttpServletResponse;

/**
 *
 * @Description: 自定义filter,用来筛选出来想要的登录方式。
 *
 * @auther: csp
 * @date:  2019/1/7 下午6:27
 *
 */
public class MyTokenAuthenticationFilter extends AbstractAuthenticationProcessingFilter {

    private static final String SPRING_SECURITY_RESTFUL_TOKEN = "token";

    public static final String SPRING_SECURITY_RESTFUL_LOGIN_URL = "/tokenLogin";
    private boolean postOnly = true;

    // 请求路径声明,url不能被权限拦截。
    // 会根据AntPathRequestMatcher 筛选请求,符合条件的才会认为有效
    public MyTokenAuthenticationFilter() {
        super(new AntPathRequestMatcher(SPRING_SECURITY_RESTFUL_LOGIN_URL, null));
    }


    @Override
    public Authentication attemptAuthentication(HttpServletRequest request, HttpServletResponse response) throws AuthenticationException {

        AbstractAuthenticationToken authRequest;

        String token = obtainParameter(request, SPRING_SECURITY_RESTFUL_TOKEN);

        authRequest = new LoginToken(token);

        // Allow subclasses to set the "details" property
        setDetails(request, authRequest);

        // 根据AuthenticationManager校验具体的请求,实际的登录验证触发。
        return this.getAuthenticationManager().authenticate(authRequest);
    }

    private void setDetails(HttpServletRequest request,
                            AbstractAuthenticationToken authRequest) {
        authRequest.setDetails(authenticationDetailsSource.buildDetails(request));
    }

    private String obtainParameter(HttpServletRequest request, String parameter) {
        String result =  request.getParameter(parameter);
        return result == null ? "" : result;
    }
}
3、自定义AuthenticationProvider实现
package demo.provider;

import demo.model.LoginToken;
import org.springframework.security.authentication.AuthenticationProvider;
import org.springframework.security.authentication.BadCredentialsException;
import org.springframework.security.core.Authentication;
import org.springframework.security.core.AuthenticationException;
import org.springframework.security.core.userdetails.UserDetails;
import org.springframework.security.core.userdetails.UserDetailsService;

/**
 *
 * @Description: token验证逻辑
 *
 * @auther: csp
 * @date:  2019/1/7 下午9:05
 *
 */
public class MyTokenProvider implements AuthenticationProvider {

    UserDetailsService userDetailsService;

    public MyTokenProvider(UserDetailsService userDetailsService) {
        this.userDetailsService = userDetailsService;
    }


    @Override public Authentication authenticate(Authentication authentication) throws AuthenticationException {
        String token = (authentication.getCredentials() == null) ? "NONE_PROVIDED"
            : (String) authentication.getCredentials();

        // loginToken_user
        // 这个地方简化处理,实际需要校验token,如jwt token 需要解密 验证信息
        if (token.startsWith("loginToken_")) {

            // 验证下token对不对,然后加载下信息。
            String userName = token.split("_")[1];
            UserDetails user = userDetailsService.loadUserByUsername(userName);

            LoginToken result = new LoginToken(token, user.getAuthorities());
            result.setDetails(authentication.getDetails());

            return result;
        }

        throw new BadCredentialsException("token无效");
    }

    /**
     *
     * @Description:  只处理特定类型的登录
     *
     * @auther: csp
     * @date:  2019/1/7 下午9:03
     * @param authenticationClass
     * @return: boolean
     *
     */
    @Override
    public boolean supports(Class<?> authenticationClass) {
        return (LoginToken.class
                .isAssignableFrom(authenticationClass));
    }

    public UserDetailsService getUserDetailsService() {
        return userDetailsService;
    }

    public void setUserDetailsService(UserDetailsService userDetailsService) {
        this.userDetailsService = userDetailsService;
    }
}
4、自定义UserDetailsService实现
package demo.service;

import demo.model.UrlGrantedAuthority;
import org.slf4j.Logger;
import org.slf4j.LoggerFactory;
import org.springframework.security.authentication.DisabledException;
import org.springframework.security.core.GrantedAuthority;
import org.springframework.security.core.authority.SimpleGrantedAuthority;
import org.springframework.security.core.userdetails.User;
import org.springframework.security.core.userdetails.UserDetails;
import org.springframework.security.core.userdetails.UserDetailsService;
import org.springframework.security.core.userdetails.UsernameNotFoundException;
import org.springframework.stereotype.Component;

import java.util.ArrayList;
import java.util.List;

/**
 *
 * @Description: 用户信息查询逻辑,这里token认证和用户名登录使用同一个service
 *
 * @auther: csp
 * @date:  2019/1/7 下午9:06
 *
 */
@Component public class MyUserDetailsService implements UserDetailsService {

    private Logger logger = LoggerFactory.getLogger(getClass());

    @Override public UserDetails loadUserByUsername(String username) throws UsernameNotFoundException {
        logger.info("用户的用户名: {}", username);

        List<GrantedAuthority> list = new ArrayList<GrantedAuthority>();


        // 模拟下逻辑,简单处理下。
        if ("admin".equals(username)) {
            // 自定义权限实现
            UrlGrantedAuthority authority = new UrlGrantedAuthority(null, "/admin/index");
            list.add(authority);
            // 封装用户信息,并返回。参数分别是:用户名,密码,用户权限
            User user = new User(username, "123456", list);

            return user;
        }
        else if ("user".equals(username)) {
            list.add(new SimpleGrantedAuthority("ROLE_USER"));
            User user = new User(username, "123456", list);

            return user;
        }
        else {
            throw new DisabledException("用户不存在");
        }

    }
}
5、WebSecurityConfigurerAdapter声明
package demo.config;

import demo.filter.MyTokenAuthenticationFilter;
import demo.provider.MyTokenProvider;
import org.springframework.beans.factory.annotation.Autowired;
import org.springframework.context.annotation.Bean;
import org.springframework.security.access.AccessDecisionManager;
import org.springframework.security.access.vote.AbstractAccessDecisionManager;
import org.springframework.security.authentication.dao.DaoAuthenticationProvider;
import org.springframework.security.config.annotation.ObjectPostProcessor;
import org.springframework.security.config.annotation.authentication.builders.AuthenticationManagerBuilder;
import org.springframework.security.config.annotation.web.builders.HttpSecurity;
import org.springframework.security.config.annotation.web.builders.WebSecurity;
import org.springframework.security.config.annotation.web.configuration.EnableWebSecurity;
import org.springframework.security.config.annotation.web.configuration.WebSecurityConfigurerAdapter;
import org.springframework.security.core.userdetails.UserDetailsService;
import org.springframework.security.crypto.bcrypt.BCryptPasswordEncoder;
import org.springframework.security.web.access.intercept.FilterSecurityInterceptor;
import org.springframework.security.web.authentication.SimpleUrlAuthenticationFailureHandler;
import org.springframework.security.web.authentication.SimpleUrlAuthenticationSuccessHandler;
import org.springframework.security.web.authentication.UsernamePasswordAuthenticationFilter;

@EnableWebSecurity
public class SecurityConfig extends WebSecurityConfigurerAdapter {

	@Autowired
	private UserDetailsService myUserDetailsService;

	// @formatter:off
	@Override
	protected void configure(HttpSecurity http) throws Exception {

		http
			// 将tokenfilter追加进去,筛选出来tokenLogin逻辑。
			.addFilterBefore(getTokenAuthenticationFilter(), UsernamePasswordAuthenticationFilter.class)
			.logout().logoutUrl("/logout").logoutSuccessUrl("/").and()
			.formLogin().loginPage("/login").defaultSuccessUrl("/").failureUrl("/login-error").permitAll().and()
			.authorizeRequests()
			.antMatchers(MyTokenAuthenticationFilter.SPRING_SECURITY_RESTFUL_LOGIN_URL).permitAll()
			.antMatchers("/admin/**").hasRole("ADMIN")
			.antMatchers("/user/**").hasRole("USER")
			.anyRequest().authenticated();
	}
	// @formatter:on


	@Override
	public void configure(WebSecurity web) throws Exception {
		//忽略请求 不走security filters
		web.ignoring().antMatchers("/login-error2","/css/**","/info","/health","/hystrix.stream");
	}


	/**
	 * 1、用户验证,指定多个AuthenticationProvider
	 * 实际执行时候根据provider的supports方法判断是否走逻辑
	 *
	 * 2、如果不覆盖,优先会获取AuthenticationProvider bean作为provider;
	 * 如果没有bean,默认提供DaoAuthenticationProvider
	 *
	 * @param auth
	 */
	@Override
	public void configure(AuthenticationManagerBuilder auth) throws Exception {
		auth.authenticationProvider(myTokenProvider());
		// 未配置时候用户名密码默认登录provider
		auth.authenticationProvider(daoAuthenticationProvider());
	}

	@Bean
	public DaoAuthenticationProvider daoAuthenticationProvider(){
		DaoAuthenticationProvider provider1 = new DaoAuthenticationProvider();
		// 设置userDetailsService
		provider1.setUserDetailsService(myUserDetailsService);
		// 禁止隐藏用户未找到异常
		provider1.setHideUserNotFoundExceptions(false);
		// 使用BCrypt进行密码的hash
//		provider1.setPasswordEncoder(myEncoder());
		return provider1;
	}


	/**
	 *
	 * @Description:  自定义token方式认证逻辑provider
	 *
	 * @auther: csp
	 * @date:  2019/1/7 下午9:18
	 * @return: demo.provider.MyTokenProvider
	 *
	 */
	@Bean
	public MyTokenProvider myTokenProvider() {
		return new MyTokenProvider(myUserDetailsService);
	}

//	@Bean
	public BCryptPasswordEncoder myEncoder(){
		return new BCryptPasswordEncoder(6);
	}

	/**
	 * token登录过滤器,用来筛选出来token登录方式。
	 */
	@Bean
	public MyTokenAuthenticationFilter getTokenAuthenticationFilter() {
		MyTokenAuthenticationFilter filter = new MyTokenAuthenticationFilter();
		try {
			// 使用的是默认的authenticationManager
			filter.setAuthenticationManager(this.authenticationManagerBean());
		} catch (Exception e) {
			e.printStackTrace();
		}
//		filter.setAuthenticationSuccessHandler(new MyLoginAuthSuccessHandler());
		filter.setAuthenticationSuccessHandler(new SimpleUrlAuthenticationSuccessHandler("/"));
		filter.setAuthenticationFailureHandler(new SimpleUrlAuthenticationFailureHandler("/login-error2"));
		return filter;
	}

}
6、验证
- 用户名密码登录:
admin 123456
user 123456
- token登录:
user登录:
http://127.0.0.1:9999/tokenLogin?token=loginToken_user
admin登录:
http://127.0.0.1:9999/tokenLogin?token=loginToken_admin
(二)、spring boot security 授权--自定义授权实现
1、简介
spring security主要分为两部分,认证(authentication)和授权(authority)。
这一篇主要是授权部分,它由FilterSecurityInterceptor逻辑拦截处理,具体通过AccessDecisionManager实现。
1.1 系统授权实现说明
系统提供了三种实现方式:
- AffirmativeBased(spring security默认使用):
只要有投通过(ACCESS_GRANTED)票,则直接判为通过。
如果没有投通过票且反对(ACCESS_DENIED)票在1个及其以上的,则直接判为不通过。 - ConsensusBased(少数服从多数):
通过的票数大于反对的票数则判为通过;通过的票数小于反对的票数则判为不通过;
通过的票数和反对的票数相等,则可根据配置allowIfEqualGrantedDeniedDecisions(默认为true)进行判断是否通过。 - UnanimousBased(反对票优先):
无论多少投票者投了多少通过(ACCESS_GRANTED)票,只要有反对票(ACCESS_DENIED),那都判为不通过;如果没有反对票且有投票者投了通过票,那么就判为通过.
这三种方式都包含了一个AccessDecisionManager(权限控制处理)和多个AccessDecisionVoter(投票项)。
1.2 自定义实现说明
系统默认提供的是基于ROLE(角色)的权限,这里自定义一下,处理 url + httpMethod 方式的权限拦截。
有三种方式可以实现:
方式一:
通过.access 方式实现。
步骤:
1. 自定义MyAuthService:实际权限校验服务
2. WebSecurityConfigurerAdapter配置:注入自定义校验服务
方式二:
通过.accessDecisionManager,覆盖AccessDecisionManager方式实现。
步骤:
1. 自定义AccessDecisionManager: 实现授权逻辑校验。
2. WebSecurityConfigurerAdapter配置:注入自定义AccessDecisionManager
方式三:
通过 添加AccessDecisionVoter投票项处理。这种兼容默认ROLE的AffirmativeBased实现
步骤:
1. 自定义AccessDecisionVoter: 实现授权投票逻辑
2. WebSecurityConfigurerAdapter配置:注入自定义AccessDecisionVoter
2、代码路径
3、方式一(.access 方式)步骤说明:
3.1、自定义MyAuthService
package demo.service;

import org.slf4j.Logger;
import org.slf4j.LoggerFactory;
import org.springframework.security.authentication.AnonymousAuthenticationToken;
import org.springframework.security.core.Authentication;
import org.springframework.stereotype.Component;

import javax.servlet.http.HttpServletRequest;

@Component
public class MyAuthService {
    private Logger log = LoggerFactory.getLogger(this.getClass());

    /**
     *
     * @Description: 判断一个请求是否拥有权限。
     *
     * @auther: csp
     * @date:  2019/1/7 下午9:48
     * @param request
     * @param authentication
     * @return: boolean
     *
     */
    public boolean canAccess(HttpServletRequest request, Authentication authentication) {
        Object principal = authentication.getPrincipal();
        if(principal == null){
            return false;
        }

        if(authentication instanceof AnonymousAuthenticationToken){
            //check if this uri can be access by anonymous
            return false;
        }

        authentication.getAuthorities();
        String uri = request.getRequestURI();
        //check this uri can be access by this role

        // TODO 实际根据权限列表判断。
        log.info("=================== myAuth pass ===================");
        return true;

    }
}
3.2 WebSecurityConfigurerAdapter配置
 http
    .authorizeRequests()
    // .access 方式 校验是否有权限。
    .antMatchers("/user/**", "/").access("@myAuthService.canAccess(request,authentication)")
    .and().logout().logoutUrl("/logout").logoutSuccessUrl("/").and()
    .formLogin().loginPage("/login").defaultSuccessUrl("/").failureUrl("/login-error");
4、方式二(.accessDecisionManager)步骤说明:
4.1、自定义AccessDecisionManager
package demo.config;

import demo.model.UrlGrantedAuthority;
import org.springframework.security.access.AccessDecisionManager;
import org.springframework.security.access.AccessDeniedException;
import org.springframework.security.access.ConfigAttribute;
import org.springframework.security.core.Authentication;
import org.springframework.security.core.GrantedAuthority;
import org.springframework.security.web.FilterInvocation;
import org.springframework.security.web.util.matcher.AntPathRequestMatcher;
import org.springframework.util.StringUtils;

import java.util.Collection;

/**
 *
 * @Description: 自定义AccessDecisionManager,通过url和httpmethod拦截权限
 *
 * @auther: csp
 * @date:  2019/1/7 下午9:59
 *
 */
public class UrlMatchAccessDecisionManager implements AccessDecisionManager {


    @Override public boolean supports(ConfigAttribute attribute) {
            return true;
    }

    @Override public boolean supports(Class<?> clazz) {
        return true;
    }

    @Override public void decide(Authentication authentication, Object object, Collection<ConfigAttribute> attributes) {

        if (authentication == null) {
            throw new AccessDeniedException("无权限!");
        }

        Collection<? extends GrantedAuthority> authorities = authentication.getAuthorities();

        // 请求路径
        String url = getUrl(object);
        // http 方法
        String httpMethod = getMethod(object);

        boolean hasPerm = false;

        // request请求路径和httpMethod 和权限列表比对。
        for (GrantedAuthority authority : authorities) {
            if (!(authority instanceof UrlGrantedAuthority))
                continue;
            UrlGrantedAuthority urlGrantedAuthority = (UrlGrantedAuthority) authority;
            if (StringUtils.isEmpty(urlGrantedAuthority.getAuthority()))
                continue;
            //如果method为null,则默认为所有类型都支持
            String httpMethod2 = (!StringUtils.isEmpty(urlGrantedAuthority.getHttpMethod())) ?
                urlGrantedAuthority.getHttpMethod() :
                httpMethod;
            //AntPathRequestMatcher进行匹配,url支持ant风格(如:/user/**)
            AntPathRequestMatcher antPathRequestMatcher = new AntPathRequestMatcher(urlGrantedAuthority.getAuthority(),
                httpMethod2);
            if (antPathRequestMatcher.matches(((FilterInvocation) object).getRequest())) {
                hasPerm = true;
                break;
            }
        }

        if (!hasPerm) {
            throw new AccessDeniedException("无权限!");
        }
    }

    /**
     * 获取请求中的url
     */
    private String getUrl(Object o) {
        //获取当前访问url
        String url = ((FilterInvocation) o).getRequestUrl();
        int firstQuestionMarkIndex = url.indexOf("?");
        if (firstQuestionMarkIndex != -1) {
            return url.substring(0, firstQuestionMarkIndex);
        }
        return url;
    }

    private String getMethod(Object o) {
        return ((FilterInvocation) o).getRequest().getMethod();
    }
}
4.2、WebSecurityConfigurerAdapter配置
http
    .authorizeRequests()
      // 覆盖默认的AffirmativeBased授权逻辑。
    .accessDecisionManager(getAccessDecisionManager())
    .and().logout().logoutUrl("/logout").logoutSuccessUrl("/").and()
    .formLogin().loginPage("/login").defaultSuccessUrl("/").failureUrl("/login-error");
5、方式三(添加AccessDecisionVoter投票项)步骤说明:
5.1、自定义AccessDecisionVoter
package demo.service;

import demo.model.UrlGrantedAuthority;
import org.springframework.security.access.AccessDecisionVoter;
import org.springframework.security.access.ConfigAttribute;
import org.springframework.security.core.Authentication;
import org.springframework.security.core.GrantedAuthority;
import org.springframework.security.web.FilterInvocation;
import org.springframework.security.web.util.matcher.AntPathRequestMatcher;
import org.springframework.util.StringUtils;

import java.util.Collection;

/**
 *
 * @Description: 增加一个授权逻辑投票项,根据url和httpmethod判断权限。
 *
 * @auther: csp
 * @date:  2019/1/7 下午10:03
 *
 */
public class UrlMatchVoter implements AccessDecisionVoter<Object> {


    @Override public boolean supports(ConfigAttribute attribute) {
            return true;
    }

    @Override public boolean supports(Class<?> clazz) {
        return true;
    }

    @Override public int vote(Authentication authentication, Object object,
        Collection<ConfigAttribute> attributes) {

        if (authentication == null) {
            return ACCESS_DENIED;
        }


        Collection<? extends GrantedAuthority> authorities = authentication.getAuthorities();

        // 请求路径
        String url = getUrl(object);
        // http 方法
        String httpMethod = getMethod(object);

        boolean hasPerm = false;

        for (GrantedAuthority authority : authorities) {
            if (!(authority instanceof UrlGrantedAuthority))
                continue;
            UrlGrantedAuthority urlGrantedAuthority = (UrlGrantedAuthority) authority;
            if (StringUtils.isEmpty(urlGrantedAuthority.getAuthority()))
                continue;
            //如果method为null,则默认为所有类型都支持
            String httpMethod2 = (!StringUtils.isEmpty(urlGrantedAuthority.getHttpMethod())) ?
                urlGrantedAuthority.getHttpMethod() :
                httpMethod;
            //AntPathRequestMatcher进行匹配,url支持ant风格(如:/user/**)
            AntPathRequestMatcher antPathRequestMatcher = new AntPathRequestMatcher(urlGrantedAuthority.getAuthority(),
                httpMethod2);
            if (antPathRequestMatcher.matches(((FilterInvocation) object).getRequest())) {
                hasPerm = true;
                break;
            }
        }

        if (!hasPerm) {
            return ACCESS_DENIED;
        }

        return ACCESS_GRANTED;
    }

    /**
     * 获取请求中的url
     */
    private String getUrl(Object o) {
        //获取当前访问url
        String url = ((FilterInvocation) o).getRequestUrl();
        int firstQuestionMarkIndex = url.indexOf("?");
        if (firstQuestionMarkIndex != -1) {
            return url.substring(0, firstQuestionMarkIndex);
        }
        return url;
    }

    private String getMethod(Object o) {
        return ((FilterInvocation) o).getRequest().getMethod();
    }
}
5.2、WebSecurityConfigurerAdapter配置
http
			// 将tokenfilter追加进去,筛选出来tokenLogin逻辑。
			.addFilterBefore(getTokenAuthenticationFilter(), UsernamePasswordAuthenticationFilter.class)
			.logout().logoutUrl("/logout").logoutSuccessUrl("/").and()
			.formLogin().loginPage("/login").defaultSuccessUrl("/").failureUrl("/login-error").permitAll().and()
			.authorizeRequests()
			.antMatchers(MyTokenAuthenticationFilter.SPRING_SECURITY_RESTFUL_LOGIN_URL).permitAll()
			.antMatchers("/admin/**").hasRole("ADMIN")
			.antMatchers("/user/**").hasRole("USER")
			.anyRequest().authenticated()
			// 修改授权相关逻辑
			.withObjectPostProcessor(new ObjectPostProcessor<FilterSecurityInterceptor>() {
				public <O extends FilterSecurityInterceptor> O postProcess(
					O fsi) {

//					// 覆盖SecurityMetadataSource
//					fsi.setSecurityMetadataSource(fsi.getSecurityMetadataSource());

//					// 覆盖AccessDecisionManager
//					fsi.setAccessDecisionManager(getAccessDecisionManager());

					// 为默认的AffirmativeBased逻辑增加投票项,
					AccessDecisionManager accessDecisionManaer = fsi.getAccessDecisionManager();
					if (accessDecisionManager instanceof AbstractAccessDecisionManager) {
						((AbstractAccessDecisionManager) accessDecisionManager).getDecisionVoters().add(new UrlMatchVoter());
					}

					return fsi;
				}
			});
5.3 验证
user 通过角色授权(ROLE),
admin 通过自定义投票项 UrlMatchVoter 授权。
由于AuthenticationManager使用的是默认的AffirmativeBased,所以只要有一个通过,则说明有权限。
(三)、spring boot security 加载流程简介
流程图说明:
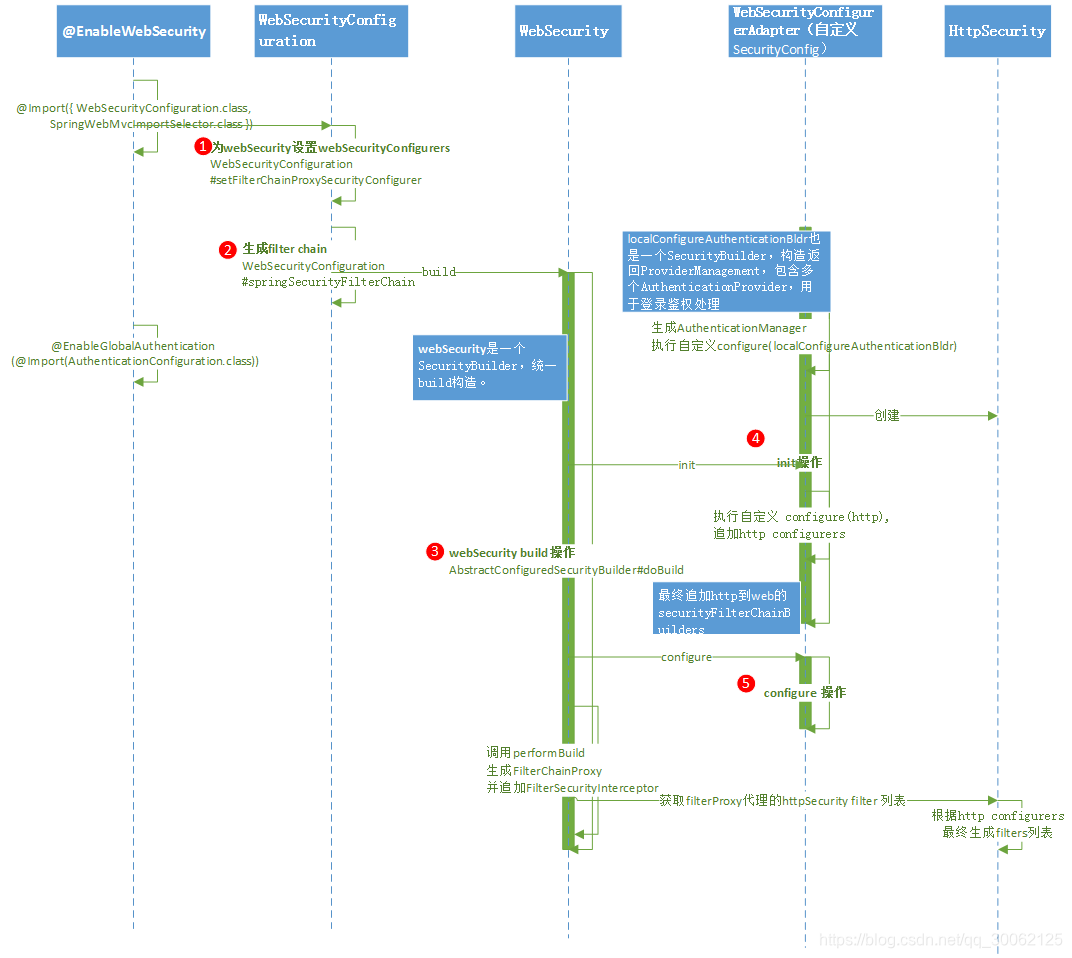
核心关注FilterChainProxy的生成。
部分注释点说明:
1、为webSecurity设置webSecurityConfigurers
org.springframework.security.config.annotation.web.configuration.WebSecurityConfiguration#setFilterChainProxySecurityConfigurer
通过#{@autowiredWebSecurityConfigurersIgnoreParents.getWebSecurityConfigurers()}查找WebSecurityConfigurer.class类型的bean,我们自定义的SecurityConfig 就是。
2、生成filter chain
2.1 bean声明,最终返回springSecurityFilterChain
org.springframework.security.config.annotation.web.configuration.WebSecurityConfiguration#springSecurityFilterChain
3、webSecurity build操作
org.springframework.security.config.annotation.AbstractConfiguredSecurityBuilder#doBuild
3.1 根据自定义的WebSecurityConfigurerAdapter进行build操作,我们这里是SecurityConfig。SecurityConfig的init过程中见第4步骤说明。
3.2 调用performBuild
生成filter chain,包括FilterChainProxy
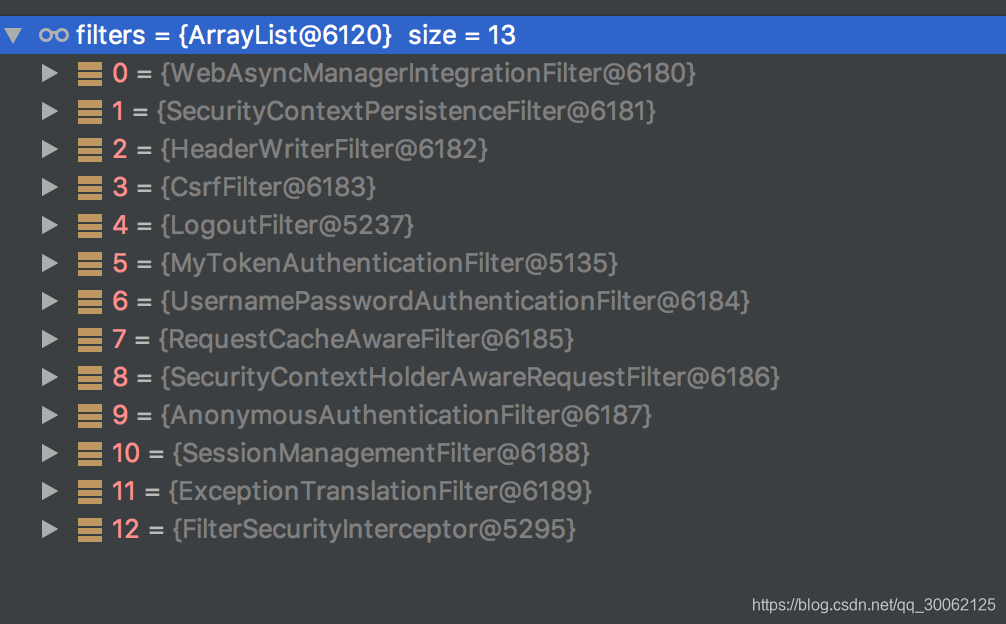
3.2.1 FilterChainProxy包含两部分,一部分是忽略请求列表,每一个配置url就是一个DefaultSecurityFilterChain;一部分是需要鉴权的chain,包含httpSecurity filter列表,是核心功能。
filters 在请求时候根据请求信息动态匹配。
3.2.2 部分filter说明如下
Table 6.1. Standard Filter Aliases and Ordering
|
Alias |
Filter Class |
Namespace Element or Attribute |
|
CHANNEL_FILTER |
ChannelProcessingFilter(协议跳转) |
http/intercept-url@requires-channel |
|
SECURITY_CONTEXT_FILTER |
SecurityContextPersistenceFilter(SecurityContext保存到session中,给下一次web请求使用) |
http |
|
CONCURRENT_SESSION_FILTER |
ConcurrentSessionFilter(存放session信息,刷新请求时间;以及session失效后,触发登出操作) |
session-management/concurrency-control |
|
HEADERS_FILTER |
HeaderWriterFilter |
http/headers |
|
CSRF_FILTER |
CsrfFilter(csrf校验处理) |
http/csrf |
|
LOGOUT_FILTER |
LogoutFilter(登出逻辑实现) |
http/logout |
|
X509_FILTER |
X509AuthenticationFilter(X509证书认证) |
http/x509 |
|
PRE_AUTH_FILTER |
AbstractPreAuthenticatedProcessingFilterSubclasses |
N/A |
|
CAS_FILTER |
CasAuthenticationFilter(cas 单点登录) |
N/A |
|
FORM_LOGIN_FILTER |
UsernamePasswordAuthenticationFilter(用户名密码认证) |
http/form-login |
|
BASIC_AUTH_FILTER |
BasicAuthenticationFilter(basic认证) |
http/http-basic |
|
SERVLET_API_SUPPORT_FILTER |
SecurityContextHolderAwareRequestFilter |
http/@servlet-api-provision |
|
JAAS_API_SUPPORT_FILTER |
JaasApiIntegrationFilter(Jaas认证) |
http/@jaas-api-provision |
|
REMEMBER_ME_FILTER |
RememberMeAuthenticationFilter(remeber me 实现,借助cookie) |
http/remember-me |
|
ANONYMOUS_FILTER |
AnonymousAuthenticationFilter(无登录,补充一个默认认证) |
http/anonymous |
|
SESSION_MANAGEMENT_FILTER |
SessionManagementFilter(多会话管理) |
session-management |
|
EXCEPTION_TRANSLATION_FILTER |
ExceptionTranslationFilter(异常处理,页面跳转) |
http |
|
FILTER_SECURITY_INTERCEPTOR |
FilterSecurityInterceptor(权限控制) |
http |
|
SWITCH_USER_FILTER |
SwitchUserFilter |
N/A |
4、WebSecurityConfigurerAdapter init操作
org.springframework.security.config.annotation.web.configuration.WebSecurityConfigurerAdapter#init
4.1 生成AuthenticationManager, 执行自定义configure(localConfigureAuthenticationBldr)
4.1.1 disableLocalConfigureAuthenticationBldr为false
localConfigureAuthenticationBldr也是一个SecurityBuilder,构造返回ProviderManagement,包含多个AuthenticationProvider,用于登录鉴权处理,通过自定义SecurityConfig configure(AuthenticationManagerBuilder auth) 追加AuthenticationProvider。
4.1.2 disableLocalConfigureAuthenticationBldr为true
该逻辑中,走authenticationConfiguration逻辑,如果没有AuthenticationProvider bean,会创建DaoAuthenticationProvider。
4.2 执行自定义 configure(http) ,追加http相关配置,并将SecurityConfigurer追加到configurers集合中,如http中.logout()就会创建一个LogoutConfigurer放到集合中。
这些配置最终会生成filter,filter顺序是固定的,org.springframework.security.config.annotation.web.builders.FilterComparator#FilterComparator中存放了初始顺序。
4.3 最终追加http到web的securityFilterChainBuilders,用于后续filter生成等处理。
5、WebSecurityConfigurerAdapter configure 操作
该操作默认空操作,可以修改WebSecurity相关逻辑。
6、spring boot FilterChainProxy自动注入
org.springframework.boot.autoconfigure.security.SecurityFilterAutoConfiguration#securityFilterChainRegistration 自动注入springSecurityFilterChain filter,也就是FilterChainProxy
(四)、spring boot security 请求流程 和 filter 说明
简介:
此处以我们前面demo中的用户名密码登录作为例子进行说明。
登入 登出流程如下:

filters逻辑如下:
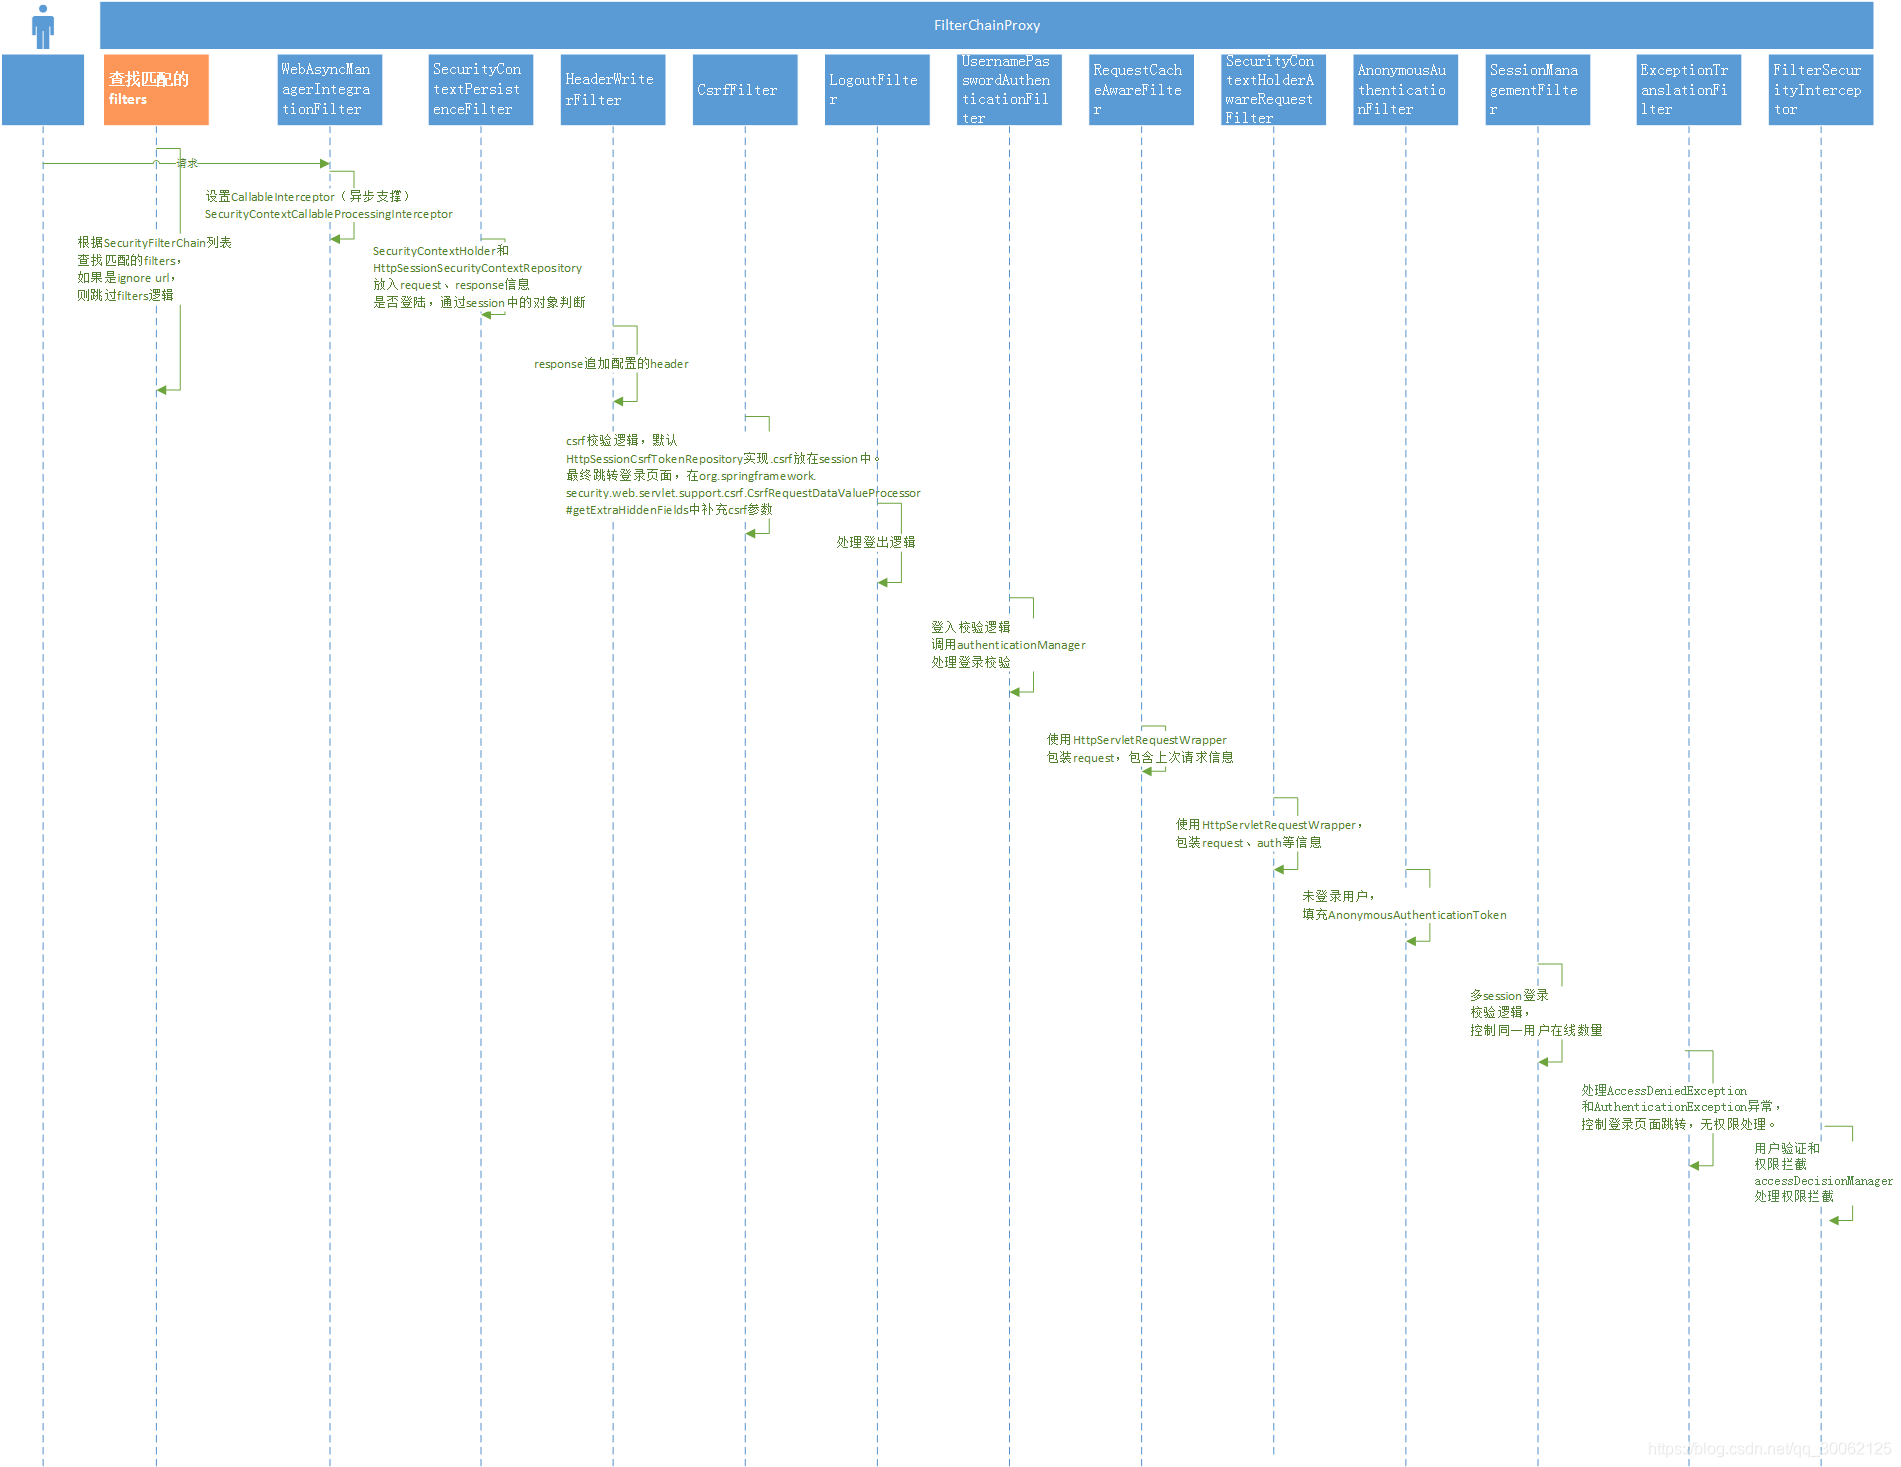
1、MethodSecurityInterceptor 流程与 FilterSecurityInterceptor 类似。
2、demo中的自定义AuthenticationProcessingFilter(MyTokenAuthenticationFilter) 在UsernamePasswordAuthenticationFilter之前,实现token方式登录。
(五)、spring boot security SecurityProperties 配置说明
类路径:org.springframework.boot.autoconfigure.security.SecurityProperties

配置:


{

"name": "security.basic.authorize-mode",

"type": "org.springframework.boot.autoconfigure.security.SecurityAuthorizeMode",

"description": "Security authorize mode to apply.",

"sourceType": "org.springframework.boot.autoconfigure.security.SecurityProperties$Basic",

"defaultValue": "role"

},

{

"name": "security.basic.enabled",

"type": "java.lang.Boolean",

"description": "Enable basic authentication.",

"sourceType": "org.springframework.boot.autoconfigure.security.SecurityProperties$Basic",

"defaultValue": true

},

{

"name": "security.basic.path",

"type": "java.lang.String[]",

"description": "Comma-separated list of paths to secure.",

"sourceType": "org.springframework.boot.autoconfigure.security.SecurityProperties$Basic",

"defaultValue": ["/**"]

},

{

"name": "security.basic.realm",

"type": "java.lang.String",

"description": "HTTP basic realm name.",

"sourceType": "org.springframework.boot.autoconfigure.security.SecurityProperties$Basic",

"defaultValue": "Spring"

},

{

"name": "security.enable-csrf",

"type": "java.lang.Boolean",

"description": "Enable Cross Site Request Forgery support.",

"sourceType": "org.springframework.boot.autoconfigure.security.SecurityProperties",

"defaultValue": false

},

{

"name": "security.filter-dispatcher-types",

"type": "java.util.Set<java.lang.String>",

"description": "Security filter chain dispatcher types.",

"sourceType": "org.springframework.boot.autoconfigure.security.SecurityProperties"

},

{

"name": "security.filter-order",

"type": "java.lang.Integer",

"description": "Security filter chain order.",

"sourceType": "org.springframework.boot.autoconfigure.security.SecurityProperties",

"defaultValue": 0

},

{

"name": "security.headers.cache",

"type": "java.lang.Boolean",

"description": "Enable cache control HTTP headers.",

"sourceType": "org.springframework.boot.autoconfigure.security.SecurityProperties$Headers",

"defaultValue": true

},

{

"name": "security.headers.content-security-policy",

"type": "java.lang.String",

"description": "Value for content security policy header.",

"sourceType": "org.springframework.boot.autoconfigure.security.SecurityProperties$Headers"

},

{

"name": "security.headers.content-security-policy-mode",

"type": "org.springframework.boot.autoconfigure.security.SecurityProperties$Headers$ContentSecurityPolicyMode",

"description": "Content security policy mode.",

"sourceType": "org.springframework.boot.autoconfigure.security.SecurityProperties$Headers",

"defaultValue": "default"

},

{

"name": "security.headers.content-type",

"type": "java.lang.Boolean",

"description": "Enable \"X-Content-Type-Options\" header.",

"sourceType": "org.springframework.boot.autoconfigure.security.SecurityProperties$Headers",

"defaultValue": true

},

{

"name": "security.headers.frame",

"type": "java.lang.Boolean",

"description": "Enable \"X-Frame-Options\" header.",

"sourceType": "org.springframework.boot.autoconfigure.security.SecurityProperties$Headers",

"defaultValue": true

},

{

"name": "security.headers.hsts",

"type": "org.springframework.boot.autoconfigure.security.SecurityProperties$Headers$HSTS",

"description": "HTTP Strict Transport Security (HSTS) mode (none, domain, all).",

"sourceType": "org.springframework.boot.autoconfigure.security.SecurityProperties$Headers",

"defaultValue": "all"

},

{

"name": "security.headers.xss",

"type": "java.lang.Boolean",

"description": "Enable cross site scripting (XSS) protection.",

"sourceType": "org.springframework.boot.autoconfigure.security.SecurityProperties$Headers",

"defaultValue": true

},

{

"name": "security.ignored",

"type": "java.util.List<java.lang.String>",

"description": "Comma-separated list of paths to exclude from the default secured paths.",

"sourceType": "org.springframework.boot.autoconfigure.security.SecurityProperties"

},

{

"name": "security.oauth2.authorization.check-token-access",

"type": "java.lang.String",

"description": "Spring Security access rule for the check token endpoint (e.g. a SpEL expression\n like \"isAuthenticated()\") . Default is empty, which is interpreted as \"denyAll()\"\n (no access).",

"sourceType": "org.springframework.boot.autoconfigure.security.oauth2.authserver.AuthorizationServerProperties"

},

{

"name": "security.oauth2.authorization.realm",

"type": "java.lang.String",

"description": "Realm name for client authentication. If an unauthenticated request comes in to the\n token endpoint, it will respond with a challenge including this name.",

"sourceType": "org.springframework.boot.autoconfigure.security.oauth2.authserver.AuthorizationServerProperties"

},

{

"name": "security.oauth2.authorization.token-key-access",

"type": "java.lang.String",

"description": "Spring Security access rule for the token key endpoint (e.g. a SpEL expression like\n \"isAuthenticated()\"). Default is empty, which is interpreted as \"denyAll()\" (no\n access).",

"sourceType": "org.springframework.boot.autoconfigure.security.oauth2.authserver.AuthorizationServerProperties"

},

{

"name": "security.oauth2.client.access-token-uri",

"type": "java.lang.String",

"sourceType": "org.springframework.security.oauth2.client.token.grant.code.AuthorizationCodeResourceDetails"

},

{

"name": "security.oauth2.client.access-token-uri",

"type": "java.lang.String",

"sourceType": "org.springframework.security.oauth2.client.token.grant.client.ClientCredentialsResourceDetails"

},

{

"name": "security.oauth2.client.access-token-validity-seconds",

"type": "java.lang.Integer",

"sourceType": "org.springframework.security.oauth2.provider.client.BaseClientDetails"

},

{

"name": "security.oauth2.client.additional-information",

"type": "java.util.Map<java.lang.String,java.lang.Object>",

"sourceType": "org.springframework.security.oauth2.provider.client.BaseClientDetails"

},

{

"name": "security.oauth2.client.authentication-scheme",

"type": "org.springframework.security.oauth2.common.AuthenticationScheme",

"sourceType": "org.springframework.security.oauth2.client.token.grant.code.AuthorizationCodeResourceDetails"

},

{

"name": "security.oauth2.client.authentication-scheme",

"type": "org.springframework.security.oauth2.common.AuthenticationScheme",

"sourceType": "org.springframework.security.oauth2.client.token.grant.client.ClientCredentialsResourceDetails"

},

{

"name": "security.oauth2.client.authorities",

"type": "java.util.Collection<org.springframework.security.core.GrantedAuthority>",

"sourceType": "org.springframework.security.oauth2.provider.client.BaseClientDetails"

},

{

"name": "security.oauth2.client.authorized-grant-types",

"type": "java.util.Set<java.lang.String>",

"sourceType": "org.springframework.security.oauth2.provider.client.BaseClientDetails"

},

{

"name": "security.oauth2.client.auto-approve-scopes",

"type": "java.util.Set<java.lang.String>",

"sourceType": "org.springframework.security.oauth2.provider.client.BaseClientDetails"

},

{

"name": "security.oauth2.client.client-authentication-scheme",

"type": "org.springframework.security.oauth2.common.AuthenticationScheme",

"sourceType": "org.springframework.security.oauth2.client.token.grant.code.AuthorizationCodeResourceDetails"

},

{

"name": "security.oauth2.client.client-authentication-scheme",

"type": "org.springframework.security.oauth2.common.AuthenticationScheme",

"sourceType": "org.springframework.security.oauth2.client.token.grant.client.ClientCredentialsResourceDetails"

},

{

"name": "security.oauth2.client.client-id",

"type": "java.lang.String",

"sourceType": "org.springframework.security.oauth2.provider.client.BaseClientDetails"

},

{

"name": "security.oauth2.client.client-id",

"type": "java.lang.String",

"sourceType": "org.springframework.security.oauth2.client.token.grant.code.AuthorizationCodeResourceDetails"

},

{

"name": "security.oauth2.client.client-id",

"type": "java.lang.String",

"sourceType": "org.springframework.security.oauth2.client.token.grant.client.ClientCredentialsResourceDetails"

},

{

"name": "security.oauth2.client.client-id",

"type": "java.lang.String",

"description": "OAuth2 client id.",

"sourceType": "org.springframework.boot.autoconfigure.security.oauth2.OAuth2ClientProperties"

},

{

"name": "security.oauth2.client.client-secret",

"type": "java.lang.String",

"sourceType": "org.springframework.security.oauth2.provider.client.BaseClientDetails"

},

{

"name": "security.oauth2.client.client-secret",

"type": "java.lang.String",

"sourceType": "org.springframework.security.oauth2.client.token.grant.code.AuthorizationCodeResourceDetails"

},

{

"name": "security.oauth2.client.client-secret",

"type": "java.lang.String",

"sourceType": "org.springframework.security.oauth2.client.token.grant.client.ClientCredentialsResourceDetails"

},

{

"name": "security.oauth2.client.client-secret",

"type": "java.lang.String",

"description": "OAuth2 client secret. A random secret is generated by default.",

"sourceType": "org.springframework.boot.autoconfigure.security.oauth2.OAuth2ClientProperties"

},

{

"name": "security.oauth2.client.grant-type",

"type": "java.lang.String",

"sourceType": "org.springframework.security.oauth2.client.token.grant.code.AuthorizationCodeResourceDetails"

},

{

"name": "security.oauth2.client.grant-type",

"type": "java.lang.String",

"sourceType": "org.springframework.security.oauth2.client.token.grant.client.ClientCredentialsResourceDetails"

},

{

"name": "security.oauth2.client.id",

"type": "java.lang.String",

"sourceType": "org.springframework.security.oauth2.client.token.grant.code.AuthorizationCodeResourceDetails"

},

{

"name": "security.oauth2.client.id",

"type": "java.lang.String",

"sourceType": "org.springframework.security.oauth2.client.token.grant.client.ClientCredentialsResourceDetails"

},

{

"name": "security.oauth2.client.pre-established-redirect-uri",

"type": "java.lang.String",

"sourceType": "org.springframework.security.oauth2.client.token.grant.code.AuthorizationCodeResourceDetails"

},

{

"name": "security.oauth2.client.refresh-token-validity-seconds",

"type": "java.lang.Integer",

"sourceType": "org.springframework.security.oauth2.provider.client.BaseClientDetails"

},

{

"name": "security.oauth2.client.registered-redirect-uri",

"type": "java.util.Set<java.lang.String>",

"sourceType": "org.springframework.security.oauth2.provider.client.BaseClientDetails"

},

{

"name": "security.oauth2.client.resource-ids",

"type": "java.util.Set<java.lang.String>",

"sourceType": "org.springframework.security.oauth2.provider.client.BaseClientDetails"

},

{

"name": "security.oauth2.client.scope",

"type": "java.util.Set<java.lang.String>",

"sourceType": "org.springframework.security.oauth2.provider.client.BaseClientDetails"

},

{

"name": "security.oauth2.client.scope",

"type": "java.util.List<java.lang.String>",

"sourceType": "org.springframework.security.oauth2.client.token.grant.code.AuthorizationCodeResourceDetails"

},

{

"name": "security.oauth2.client.scope",

"type": "java.util.List<java.lang.String>",

"sourceType": "org.springframework.security.oauth2.client.token.grant.client.ClientCredentialsResourceDetails"

},

{

"name": "security.oauth2.client.token-name",

"type": "java.lang.String",

"sourceType": "org.springframework.security.oauth2.client.token.grant.code.AuthorizationCodeResourceDetails"

},

{

"name": "security.oauth2.client.token-name",

"type": "java.lang.String",

"sourceType": "org.springframework.security.oauth2.client.token.grant.client.ClientCredentialsResourceDetails"

},

{

"name": "security.oauth2.client.use-current-uri",

"type": "java.lang.Boolean",

"sourceType": "org.springframework.security.oauth2.client.token.grant.code.AuthorizationCodeResourceDetails"

},

{

"name": "security.oauth2.client.user-authorization-uri",

"type": "java.lang.String",

"sourceType": "org.springframework.security.oauth2.client.token.grant.code.AuthorizationCodeResourceDetails"

},

{

"name": "security.oauth2.resource.filter-order",

"type": "java.lang.Integer",

"description": "The order of the filter chain used to authenticate tokens. Default puts it after\n the actuator endpoints and before the default HTTP basic filter chain (catchall).",

"sourceType": "org.springframework.boot.autoconfigure.security.oauth2.resource.ResourceServerProperties",

"defaultValue": 0

},

{

"name": "security.oauth2.resource.id",

"type": "java.lang.String",

"description": "Identifier of the resource.",

"sourceType": "org.springframework.boot.autoconfigure.security.oauth2.resource.ResourceServerProperties"

},

{

"name": "security.oauth2.resource.jwk.key-set-uri",

"type": "java.lang.String",

"description": "The URI to get verification keys to verify the JWT token. This can be set when\n the authorization server returns a set of verification keys.",

"sourceType": "org.springframework.boot.autoconfigure.security.oauth2.resource.ResourceServerProperties$Jwk"

},

{

"name": "security.oauth2.resource.jwt.key-uri",

"type": "java.lang.String",

"description": "The URI of the JWT token. Can be set if the value is not available and the key\n is public.",

"sourceType": "org.springframework.boot.autoconfigure.security.oauth2.resource.ResourceServerProperties$Jwt"

},

{

"name": "security.oauth2.resource.jwt.key-value",

"type": "java.lang.String",

"description": "The verification key of the JWT token. Can either be a symmetric secret or\n PEM-encoded RSA public key. If the value is not available, you can set the URI\n instead.",

"sourceType": "org.springframework.boot.autoconfigure.security.oauth2.resource.ResourceServerProperties$Jwt"

},

{

"name": "security.oauth2.resource.prefer-token-info",

"type": "java.lang.Boolean",

"description": "Use the token info, can be set to false to use the user info.",

"sourceType": "org.springframework.boot.autoconfigure.security.oauth2.resource.ResourceServerProperties",

"defaultValue": true

},

{

"name": "security.oauth2.resource.service-id",

"type": "java.lang.String",

"sourceType": "org.springframework.boot.autoconfigure.security.oauth2.resource.ResourceServerProperties",

"defaultValue": "resource"

},

{

"name": "security.oauth2.resource.token-info-uri",

"type": "java.lang.String",

"description": "URI of the token decoding endpoint.",

"sourceType": "org.springframework.boot.autoconfigure.security.oauth2.resource.ResourceServerProperties"

},

{

"name": "security.oauth2.resource.token-type",

"type": "java.lang.String",

"description": "The token type to send when using the userInfoUri.",

"sourceType": "org.springframework.boot.autoconfigure.security.oauth2.resource.ResourceServerProperties"

},

{

"name": "security.oauth2.resource.user-info-uri",

"type": "java.lang.String",

"description": "URI of the user endpoint.",

"sourceType": "org.springframework.boot.autoconfigure.security.oauth2.resource.ResourceServerProperties"

},

{

"name": "security.oauth2.sso.filter-order",

"type": "java.lang.Integer",

"description": "Filter order to apply if not providing an explicit WebSecurityConfigurerAdapter (in\n which case the order can be provided there instead).",

"sourceType": "org.springframework.boot.autoconfigure.security.oauth2.client.OAuth2SsoProperties"

},

{

"name": "security.oauth2.sso.login-path",

"type": "java.lang.String",

"description": "Path to the login page, i.e. the one that triggers the redirect to the OAuth2\n Authorization Server.",

"sourceType": "org.springframework.boot.autoconfigure.security.oauth2.client.OAuth2SsoProperties",

"defaultValue": "/login"

},

{

"name": "security.require-ssl",

"type": "java.lang.Boolean",

"description": "Enable secure channel for all requests.",

"sourceType": "org.springframework.boot.autoconfigure.security.SecurityProperties",

"defaultValue": false

},

{

"name": "security.sessions",

"type": "org.springframework.security.config.http.SessionCreationPolicy",

"description": "Session creation policy (always, never, if_required, stateless).",

"sourceType": "org.springframework.boot.autoconfigure.security.SecurityProperties",

"defaultValue": "stateless"

},

{

"name": "security.user.name",

"type": "java.lang.String",

"description": "Default user name.",

"sourceType": "org.springframework.boot.autoconfigure.security.SecurityProperties$User",

"defaultValue": "user"

},

{

"name": "security.user.password",

"type": "java.lang.String",

"description": "Password for the default user name.",

"sourceType": "org.springframework.boot.autoconfigure.security.SecurityProperties$User"

},

{

"name": "security.user.role",

"type": "java.util.List<java.lang.String>",

"description": "Granted roles for the default user name.",

"sourceType": "org.springframework.boot.autoconfigure.security.SecurityProperties$User"

},
(一)、Spring Security OAuth2 五种授权方式介绍
1、简介
OAuth 2.0定义了五种授权方式。
RFC规范链接
- authorization_code:授权码类型,授权系统针对登录用户下发code,应用系统拿着code去授权系统换取token。
- implicit:隐式授权类型。authorization_code的简化类型,授权系统针对登录系统直接下发token,302 跳转到应用系统url。
- password:资源所有者(即用户)密码类型。应用系统采集到用户名密码,调用授权系统获取token。
- client_credentials:客户端凭据(客户端ID以及Key)类型。没有用户参与,应用系统单纯的使用授权系统分配的凭证访问授权系统。
- refresh_token:通过授权获得的刷新令牌 来获取 新的令牌。
2、请求说明
2.1、相关配置
2.1.1、授权服务支持客户端
自动授权client
client_id=client_id
client_secret=client_secret
非自动授权client
client_id=client2
client_secret=client2
2.1.2、相关属性说明
- clientId:(必须的)用来标识客户的Id。
- secret:(需要值得信任的客户端)客户端安全码,如果有的话。
- scope:用来限制客户端的访问范围,如果为空(默认)的话,那么客户端拥有全部的访问范围。
- authorizedGrantTypes:此客户端可以使用的授权类型,默认为空。
- authorities:此客户端可以使用的权限(基于Spring Security authorities)。
- jti:TOKEN_ID ,refreshToken标识
- ati:ACCESS_TOKEN_ID,accessToken 标识
2.1.3、相关接口说明:
- /oauth/authorize:授权端点。
- /oauth/token:令牌端点,获取token。
- /oauth/confirm_access:用户确认授权提交端点。
- /oauth/error:授权服务错误信息端点。
- /oauth/check_token:用于资源服务访问的令牌解析端点。
- /oauth/token_key:提供公有密匙的端点,如果你使用JWT(RSA)令牌的话。
2.1.4、demo参考:
2.2、授权码模式(authorization_code)
1、请求授权:
请求:
GET http://localhost:8080/uaa/oauth/authorize?client_id=client_id&redirect_uri=http://localhost:9999/dashboard/login&response_type=code&state=OVUbDY

跳转到uaa登录页面,采集用户信息。

登录成功之后:
1、如果是非自动授权client,跳转,进行授权:
http://localhost:8080/uaa/oauth/authorize?client_id=client2&redirect_uri=http://localhost:9999/dashboard/login&response_type=code&state=OVUbDY
授权之后,然后进入下一步。

2、如果是自动授权client,则跳过上一步,直接跳转:
http://localhost:9999/dashboard/login?code=d7MgkJ&state=OVUbDY
2、使用code换取token:
请求:
POST http://localhost:8080/uaa/oauth/token?grant_type=authorization_code&code=d7MgkJ&redirect_uri=http%3A%2F%2Flocalhost%3A9999%2Fdashboard%2Flogin

Authorization:Basic Y2xpZW50X2lkOmNsaWVudF9zZWNyZXQ=  (配置的授权客户端)


返回:
{
"access_token": "eyJhbGciOiJSUzI1NiIsInR5cCI6IkpXVCJ9.eyJleHAiOjE1NDg5NDIyMzAsInVzZXJfbmFtZSI6InVzZXIiLCJhdXRob3JpdGllcyI6WyJST0xFX1VTRVIiXSwianRpIjoiOWYzNDdkZDgtMTU3NC00ODg2LWE3MDctMmJjZmM0OWQwZjQzIiwiY2xpZW50X2lkIjoiY2xpZW50X2lkIiwic2NvcGUiOlsib3BlbmlkIl19.FXDbopN4Bjae61DHNqdOQTlygtnNI8ys7cZItCU_Ken3wWNH2SahjVZjuGU7oLqoG3lWvWuvlJfYiApvMvMuLUE9Zsj_7qr3A9LWzaedkCROd3EHNP-zFfmg2PxKVpTWIgPMKxjvMS-1Crbf4DUFQiYPuqYVWANHnlqnP9LsrF7xFxrNSnyO73KHIs0703STAaOO2pPaXq2Nm97o9PUs9822vmUatSliherEQM3ZcQrJ5D_Pcjz2nKQO4wuYEqwDlO63cqnGRIytXhAcfGy85gnRyMPr_hGmxEVhgnUhsrlcJTZea9g5-R4OTgO9eymLUVKHyaBVPkvSd6OOV6qbfw",
"token_type": "bearer",
"refresh_token": "eyJhbGciOiJSUzI1NiIsInR5cCI6IkpXVCJ9.eyJ1c2VyX25hbWUiOiJ1c2VyIiwic2NvcGUiOlsib3BlbmlkIl0sImF0aSI6IjlmMzQ3ZGQ4LTE1NzQtNDg4Ni1hNzA3LTJiY2ZjNDlkMGY0MyIsImV4cCI6MTU1MTQ5MTAzMCwiYXV0aG9yaXRpZXMiOlsiUk9MRV9VU0VSIl0sImp0aSI6IjU5YjljOWEzLWI3MTktNGExNi1iOWRlLTdkNTRkOTUwOTJhZiIsImNsaWVudF9pZCI6ImNsaWVudF9pZCJ9.W-zTUM6C4URSGJWAFU03WnkdCkyUoO6T_lL-uOITZw5wR75lKD9VsE9NecQe19564kNCFflNIBnI5vlejT3DYEzHChXyYLR38cXNk2QJU28udDU8Xnhd4AWcFTbSDQCiX9jeOlEupMgAoMgFZHCzgvL4A4a4jYEcFyJ6IuJ5IjXzlRI_-PNY8oQvXUGioDO9GFjbhcGoh_IigtuvqGQ9rz5dkbmh5nd23StMAO8wWEkXSCCXhidrKfXJ2s8dJSuHvQ7JwEtv4DA5D89yheL9GagjYfQxNj7eGOjiBhZZR7UrqyoZb2-mFdeyOVfj_zzb0VYg_CHkqdixuPWb0jIpgA",
"expires_in": 43199,
"scope": "openid",
"jti": "9f347dd8-1574-4886-a707-2bcfc49d0f43"
}
2.3、客户端模式(client credentials)
获取token:
请求:
POST http://localhost:8080/uaa/oauth/token?grant_type=client_credentials&scope=openid

Authorization:Basic Y2xpZW50X2lkOmNsaWVudF9zZWNyZXQ=  (配置的授权客户端)

返回:
{
"access_token": "eyJhbGciOiJSUzI1NiIsInR5cCI6IkpXVCJ9.eyJzY29wZSI6WyJvcGVuaWQiXSwiZXhwIjoxNTQ4OTQyNzU3LCJqdGkiOiJlMGNkY2I2ZS03MzdlLTRjNzYtOGVmYi03MTNlNWVkMzZmMmUiLCJjbGllbnRfaWQiOiJjbGllbnRfaWQifQ.VJJ-4ZXWBVQ7UuK3euI5pd_ixciXPzzltXeM6DAI9i72nX5s0KtiJwJifxDg21f1MMUEu8723Oicer7C8WSWx5jGIEKthji-TJT-IGU5fBXwB5l0J1XR9Ssi0OW7-PL1hzK8_l-CP4VLjstVAs0MjLuHPfmZtLojKcHIzDpXMnvouTITRmz55wCAEc5lI3zzkSY2ACTsEPNDW_mCAzVWDqaXdPURE9cUPLF7Xv8XNJj4c934TkOf0fNimA3JLAcMPUem4C2Q796GGzVsbx7x508iTy8pQ7wlIfhjRVWcsmO4BUeRm8LvT-Bju_mr8qebbbMqMOPzNZ26Bkg-RrqjKw",
"token_type": "bearer",
"expires_in": 43199,
"scope": "openid",
"jti": "e0cdcb6e-737e-4c76-8efb-713e5ed36f2e"
}
2.4、密码模式(password)
根据用户名、密码换取token
请求:
POST http://localhost:8080/uaa/oauth/token?grant_type=password&username=admin&password=123456

Authorization:Basic Y2xpZW50X2lkOmNsaWVudF9zZWNyZXQ=  (配置的授权客户端)

返回:
{
"access_token": "eyJhbGciOiJSUzI1NiIsInR5cCI6IkpXVCJ9.eyJleHAiOjE1NDg5NDI5ODcsInVzZXJfbmFtZSI6ImFkbWluIiwiYXV0aG9yaXRpZXMiOlsiL2FkbWluL2luZGV4Il0sImp0aSI6IjRkN2YyMzRjLTc4MGMtNDVlNC1iYjViLWZmYWJlNmI2YzQ5ZiIsImNsaWVudF9pZCI6ImNsaWVudF9pZCIsInNjb3BlIjpbIm9wZW5pZCJdfQ.BFipbmjUpnD8fdbg3lF8t0f65uPWycqBKYnwGLgUd3FdMctDISHQmuq341E9fP8uOWOvqLoBioPhBSALMfBK2AWYPtr7P442TH-GxbiNOPDuppwDKR9vEn5ELGwvFGwMfE6s-P5yWFULD78Q65EujuWURLJYwi03kpyvUBLeI_vGIIjqMbTFA7HnGYriQew5IpWzxaDv4JVy1LmWYQi--8eDMeOlr4HQZIqQdUp09x4vN2CrQRZ6lWxhdgTe8LOwW9xG5yrWrBDdYbPF4vnqt_S8inVzUP06mlEb_ZRwP4riHwAq-JS95yAdZQaZ5OY37Hx5yR3odLqiNMc-gN5VVA",
"token_type": "bearer",
"refresh_token": "eyJhbGciOiJSUzI1NiIsInR5cCI6IkpXVCJ9.eyJ1c2VyX25hbWUiOiJhZG1pbiIsInNjb3BlIjpbIm9wZW5pZCJdLCJhdGkiOiI0ZDdmMjM0Yy03ODBjLTQ1ZTQtYmI1Yi1mZmFiZTZiNmM0OWYiLCJleHAiOjE1NTE0OTE3ODcsImF1dGhvcml0aWVzIjpbIi9hZG1pbi9pbmRleCJdLCJqdGkiOiI3OGI3ZjlkMi1mNmQ2LTQwZTctOGRlYS0yOTllYzBmYzI3YjUiLCJjbGllbnRfaWQiOiJjbGllbnRfaWQifQ.L8N7HE1pLolFPrWFxfy892ngnYWdpq9BOnZaSXX-7YQs2g6lFRfelHvn7TDd-qI34_8rkNOhn_OkrPMADf-2AqJejoSDpcj3YvUym9Jj7vTvcmgeXVlhneBb5Ma75t0AwSeTcYbRhMgJh7Th2bNtH4TmMWqghYUrx4qyrJIr_NQ26nPt_uE-2Hj9UhFgM46PjbmY3T8G4WfOlUDxcZCR2iEBqPiQA2mkH1HJq4--3b4oY4ZmqTT-sbx7JWq_1TePteLVx86NGwK7s9-J9zWLk3fUTo8cQIzG51ZR6JpQcoOiuJFyoyKhpNXKTnlbyJEtj1RI2H8Zq6aSR-TTez4J1A",
"expires_in": 43199,
"scope": "openid",
"jti": "4d7f234c-780c-45e4-bb5b-ffabe6b6c49f"
}
2.5、简化模式(implicit)
请求获取token
请求:
GET http://localhost:8080/uaa/oauth/authorize?client_id=client_id&redirect_uri=http://localhost:9999/dashboard/login&response_type=token

跳转到uaa登录页面,采集用户信息。

登录成功之后跳转:
http://localhost:9999/dashboard/login#access_token=eyJhbGciOiJSUzI1NiIsInR5cCI6IkpXVCJ9.eyJleHAiOjE1NDg5NDMxODcsInVzZXJfbmFtZSI6InVzZXIiLCJhdXRob3JpdGllcyI6WyJST0xFX1VTRVIiXSwianRpIjoiYWQ4M2UyMTQtMmE0Mi00ZTEzLTkzYTgtZDY2ZmVhMmZiMGI0IiwiY2xpZW50X2lkIjoiY2xpZW50X2lkIiwic2NvcGUiOlsib3BlbmlkIl19.FBNgVZSG8AkpxRvmU0q-_sFnUGlTmuESAIQ_nHGDD5DaUPSlMsTEQjAvbbCfKu5r9glsu7TVkisg-tepm6a0CMbOB_3tkaFja8bHCpM2MsbQcof9eo3sfSwzR0qqO6vjg2Ptcb7i9JoThkTZBna-iOMqXGgUKbWrQr40ZrWeT-JMq2j8S1-D8HBMHwZCMRADHyHh05jBD6sFppVR4tRrRhYyhZADdsNi8mXhdcerdRGLfo5COHcLjjC0T_IcliCorXw7StmzBUMjG6O9SuhPf5aRQNqSnwxddIZ_NpOT7_6YZo6n3D3mOGxzKCsHfNVCEJsu2_CaU9Cxh7BuS1yOnA&token_type=bearer&expires_in=43199&scope=openid&jti=ad83e214-2a42-4e13-93a8-d66fea2fb0b4
2.6、刷新令牌(refresh_token)
请求:
POST:
curl -u client_id:client_secret http://localhost:8080/uaa/oauth/token -d grant_type=refresh_token -d refresh_token=eyJhbGciOiJSUzI1NiIsInR5cCI6IkpXVCJ9.eyJ1c2VyX25hbWUiOiJhZG1pbiIsInNjb3BlIjpbIm9wZW5pZCJdLCJhdGkiOiI0ZDdmMjM0Yy03ODBjLTQ1ZTQtYmI1Yi1mZmFiZTZiNmM0OWYiLCJleHAiOjE1NTE0OTE3ODcsImF1dGhvcml0aWVzIjpbIi9hZG1pbi9pbmRleCJdLCJqdGkiOiI3OGI3ZjlkMi1mNmQ2LTQwZTctOGRlYS0yOTllYzBmYzI3YjUiLCJjbGllbnRfaWQiOiJjbGllbnRfaWQifQ.L8N7HE1pLolFPrWFxfy892ngnYWdpq9BOnZaSXX-7YQs2g6lFRfelHvn7TDd-qI34_8rkNOhn_OkrPMADf-2AqJejoSDpcj3YvUym9Jj7vTvcmgeXVlhneBb5Ma75t0AwSeTcYbRhMgJh7Th2bNtH4TmMWqghYUrx4qyrJIr_NQ26nPt_uE-2Hj9UhFgM46PjbmY3T8G4WfOlUDxcZCR2iEBqPiQA2mkH1HJq4--3b4oY4ZmqTT-sbx7JWq_1TePteLVx86NGwK7s9-J9zWLk3fUTo8cQIzG51ZR6JpQcoOiuJFyoyKhpNXKTnlbyJEtj1RI2H8Zq6aSR-TTez4J1A


-u client_id:client_secret 等同于
Authorization:Basic Y2xpZW50X2lkOmNsaWVudF9zZWNyZXQ= (配置的授权客户端)

返回:
{
"access_token":"eyJhbGciOiJSUzI1NiIsInR5cCI6IkpXVCJ9.eyJleHAiOjE1NDg5NDQzMzIsInVzZXJfbmFtZSI6ImFkbWluIiwiYXV0aG9yaXRpZXMiOlsiL2FkbWluL2luZGV4Il0sImp0aSI6ImU1ZjVmZjRlLTJhMmUtNDA1My1iNzhlLTIxZjVjZTQwOWQ3MCIsImNsaWVudF9pZCI6ImNsaWVudF9pZCIsInNjb3BlIjpbIm9wZW5pZCJdfQ.m57JmhzjrleR-bL302yarKqHSQOn4-smW99Yp1epn_SbGW29sfhwgKR8r9HtvIoGETbc4kSpMKySsGtzmDCE2_CuEE9WPp6KomSFFtPaM-rh17lSXphJu3hvLli_Od3gx4Q_9AdrYMP6eM4pl90GYgPFpceCb7-MMpWqyIkpqK0Ldrd04SpRZTqf4wsZdPDO_EhWUfvRHVRv-F1ftdfw801GqVVahDYpWVj4TBKMGePb7bkDtM3w37jX_stvhvUpwRZHdW_5RoWbuG1oLE8oTDyVPtBiQVqjsv3adFp1tplMEghtQ_Q42qQNtbN5IuM8VpfqoUxcnyGIVev8ZS1Buw",
"token_type":"bearer",
"refresh_token":"eyJhbGciOiJSUzI1NiIsInR5cCI6IkpXVCJ9.eyJ1c2VyX25hbWUiOiJhZG1pbiIsInNjb3BlIjpbIm9wZW5pZCJdLCJhdGkiOiJlNWY1ZmY0ZS0yYTJlLTQwNTMtYjc4ZS0yMWY1Y2U0MDlkNzAiLCJleHAiOjE1NTE0OTE3ODcsImF1dGhvcml0aWVzIjpbIi9hZG1pbi9pbmRleCJdLCJqdGkiOiI3OGI3ZjlkMi1mNmQ2LTQwZTctOGRlYS0yOTllYzBmYzI3YjUiLCJjbGllbnRfaWQiOiJjbGllbnRfaWQifQ.d2eQVxhylXSuaMQneUf3cvtT2Zstw9GRbhPkYkC1zFn55QLyY-HvgWxwPZXYJbLCi1kisnyF6v86oi3mzG9wgXF1Re6-jlPphjJOqG7ur8Q6-8I1PEZwNIS0wWjZ0LK6fcg763eMgLk200BSU23yO3n3CM7B_KxW4s7Xu7H4fk7le3FjWT6l42TXWxtQ92YTrw_hIpMaKt1neH2bZq1l55_bFap0s0kdqQaviMSLMIgILz_qseld3D9bZkjFHZuZU5WqE1pfnMRB5Xl3C8R8DlQunmUfCMoOLVNNZ_wDLxACq8mtd2dXIV9ANgGzvFlrjtiDKt84f8iGTYg4qUMJDQ",
"expires_in":43199,
"scope":"openid",
"jti":"e5f5ff4e-2a2e-4053-b78e-21f5ce409d70"
}
查看token
请求:
POST:
curl -u client_id:client_secret http://localhost:8080/uaa/oauth/check_token  -d token=eyJhbGciOiJSUzI1NiIsInR5cCI6IkpXVCJ9.eyJleHAiOjE1NDg5NDQzMzIsInVzZXJfbmFtZSI6ImFkbWluIiwiYXV0aG9yaXRpZXMiOlsiL2FkbWluL2luZGV4Il0sImp0aSI6ImU1ZjVmZjRlLTJhMmUtNDA1My1iNzhlLTIxZjVjZTQwOWQ3MCIsImNsaWVudF9pZCI6ImNsaWVudF9pZCIsInNjb3BlIjpbIm9wZW5pZCJdfQ.m57JmhzjrleR-bL302yarKqHSQOn4-smW99Yp1epn_SbGW29sfhwgKR8r9HtvIoGETbc4kSpMKySsGtzmDCE2_CuEE9WPp6KomSFFtPaM-rh17lSXphJu3hvLli_Od3gx4Q_9AdrYMP6eM4pl90GYgPFpceCb7-MMpWqyIkpqK0Ldrd04SpRZTqf4wsZdPDO_EhWUfvRHVRv-F1ftdfw801GqVVahDYpWVj4TBKMGePb7bkDtM3w37jX_stvhvUpwRZHdW_5RoWbuG1oLE8oTDyVPtBiQVqjsv3adFp1tplMEghtQ_Q42qQNtbN5IuM8VpfqoUxcnyGIVev8ZS1Buw

返回:
{
"exp":1548944332,
"user_name":"admin",
"authorities":["/admin/index"],
"jti":"e5f5ff4e-2a2e-4053-b78e-21f5ce409d70",
"client_id":"client_id",
"scope":["openid"]
}
(二)、Spring Security OAuth2 四个常用注解说明
1、模块说明:
- 资源服务:提供资源访问
- 认证授权服务:提供认证和授权服务
- 客户端:请求资源服务的OAuth2 客户端
- 应用系统:提供应用能力的系统,在单点登录sso场景下,每一个需要认证授权服务认证授权的系统,就是一个应用系统。
2、常用注解:
spring security oauth2 提供了四个常用注解,来辅助oauth2功能的实现。
1、@EnableOAuth2Client:客户端,提供OAuth2RestTemplate,用于客户端访问资源服务。
简要步骤:客户端访问资源->客户端发现没有资源访问token->客户端根据授权类型生成跳转url->浏览器 302 到认证授权服务进行认证、授权。
2、@EnableOAuth2Sso:应用系统,使用远端认证授权服务,替换应用自身的用户登录鉴权security逻辑,实现单点登录功能。
简要步骤:访问应用系统资源-> 应用系统发现未登录-> 302 跳转到登录页面(登录页面地址已经与获取token逻辑自动关联)-> 应用系统发现符合获取token条件,根据授权类型拼装url->302 跳转到认证授权地址(认证授权服务提供)进行认证、授权。
3、@EnableAuthorizationServer:认证授权服务,提供用于获取token,解析token相关功能,实现认证、授权功能。
具体见 Spring Security 文章目录中的 Spring Cloud OAuth2 五种授权方式介绍。
4、@EnableResourceServer:资源服务,提供基于token的资源访问功能。
3、@EnableOAuth2Client 加载过程
3.1、加载流程:
3.2、流程说明:
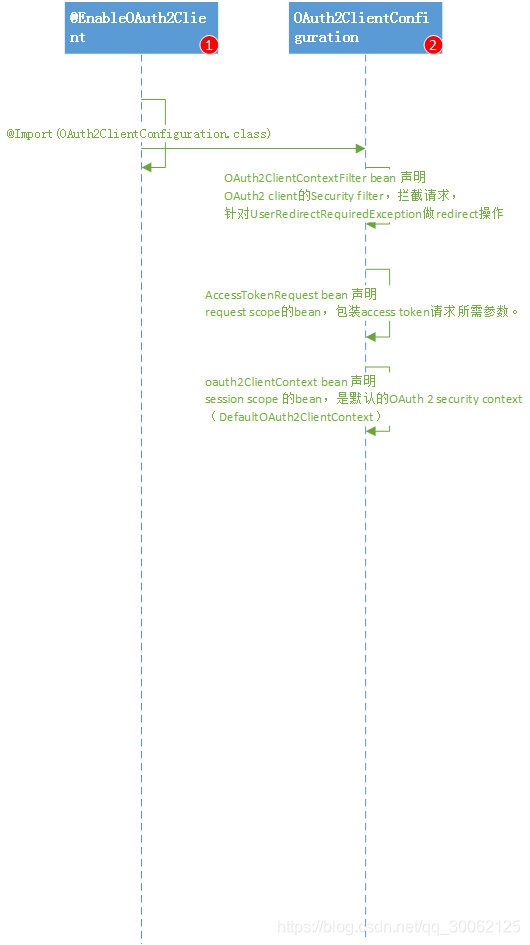
1、@EnableOAuth2Client
@Import(OAuth2ClientConfiguration.class)
2、OAuth2ClientConfiguration说明
2.1、OAuth2ClientContextFilter bean 声明
OAuth2 client的Security filter,拦截请求,针对UserRedirectRequiredException做redirect操作。
实际请求由OAuth2RestTemplate控制权限跳转。
2.2、AccessTokenRequest bean 声明
request scope的bean,包装access token请求所需参数。
2.3、oauth2ClientContext bean 声明
session scope 的bean,是默认的OAuth 2 security context(DefaultOAuth2ClientContext)。
3.3、简要分析:
1、spring boot :
通过org.springframework.boot.autoconfigure.security.oauth2.client.OAuth2RestOperationsConfiguration.SessionScopedConfiguration#oauth2ClientFilterRegistration实现filter声明。
通过OAuth2ProtectedResourceDetailsConfiguration自定义认证类型。
4、@EnableOAuth2Sso加载过程
4.1、流程说明:
1、@EnableOAuth2Sso
@Import({ OAuth2SsoDefaultConfiguration.class, OAuth2SsoCustomConfiguration.class,
ResourceServerTokenServicesConfiguration.class })
@EnableOAuth2Client
@EnableConfigurationProperties(OAuth2SsoProperties.class)
2、OAuth2SsoDefaultConfiguration说明:
如果不存在 带@EnableOAuth2Sso注解的WebSecurityConfigurerAdapter声明,当前类创建一个默认的拦截所有请求的WebSecurityConfigurerAdapter。
3、OAuth2SsoCustomConfiguration说明:
如果存在 带@EnableOAuth2Sso注解的WebSecurityConfigurerAdapter声明,生成当前bean。
3.1、重写WebSecurityConfigurerAdapter的init方法:
给WebSecurityConfigurerAdapter做动态代理,在init方法中实现 SsoSecurityConfigurer的configure逻辑。
追加OAuth2ClientAuthenticationConfigurer到http中,最终添加OAuth2ClientAuthenticationProcessingFilter到SecurityContext filter中,实现oauth getAccessToken等相关逻辑。
只处理指定的请求,通过配置security.oauth2.sso.loginPath控制。
3.2、追加LoginUrlAuthenticationEntryPoint和HttpStatusEntryPoint:
ExceptionTranslationFilter中拦截AuthenticationException跳转到security.oauth2.sso.loginPath地址,进入 OAuth2ClientAuthenticationProcessingFilter拦截,实现 token逻辑。
4、ResourceServerTokenServicesConfiguration 说明:
授权服务在其他应用时生效,通过OAuth2RestTemplate去远程调用授权服务。同时提供JwtTokenServicesConfiguration相关逻辑,提供jwt token pulic key获取等相关处理。
5、OAuth2RestOperationsConfiguration说明:
默认的client配置,基于security.oauth2.client配置提供OAuth2ProtectedResourceDetails和OAuth2ClientContext默认声明。
4.2、简要分析:
1、通过流程可以看出来,核心在于OAuth2ClientAuthenticationProcessingFilter实现本地应用登录请求和远端认证授权服务的自动跳转。
2、通知提供jwt相关支撑。
3、本地应用判断是否登录,默认通过session控制。
5、@EnableAuthorizationServer 加载过程
5.1、加载流程:

5.2、流程说明:
1、@EnableAuthorizationServer
@Import({AuthorizationServerEndpointsConfiguration.class, AuthorizationServerSecurityConfiguration.class})
2、AuthorizationServerEndpointsConfiguration说明:
2.1、@Import(TokenKeyEndpointRegistrar.class)
- TokenKeyEndpointRegistrar: 如果存在JwtAccessTokenConverter bean,就创建TokenKeyEndpoint bean。
2.2、authorizationEndpoint bean声明:用来作为请求者获得授权的服务
2.2.1、/oauth/confirm_access 用户确认授权提交端点。
2.2.2、/oauth/error 授权服务错误信息端点。
2.2.3、/oauth/authorize 请求授权端点。
2.2.4、代码块如下:
-
@Bean
-
-
public AuthorizationEndpoint authorizationEndpoint() throws Exception {
-
-
// 默认URL是/oauth/authorize(请求授权端点)
-
-
AuthorizationEndpoint authorizationEndpoint = new AuthorizationEndpoint();
-
-
FrameworkEndpointHandlerMapping mapping = getEndpointsConfigurer().getFrameworkEndpointHandlerMapping();
-
-
authorizationEndpoint.setUserApprovalPage(extractPath(mapping, "/oauth/confirm_access"));
-
-
authorizationEndpoint.setProviderExceptionHandler(exceptionTranslator());
-
-
authorizationEndpoint.setErrorPage(extractPath(mapping, "/oauth/error"));
-
-
authorizationEndpoint.setTokenGranter(tokenGranter());
-
-
authorizationEndpoint.setClientDetailsService(clientDetailsService);
-
-
authorizationEndpoint.setAuthorizationCodeServices(authorizationCodeServices());
-
-
authorizationEndpoint.setOAuth2RequestFactory(oauth2RequestFactory());
-
-
authorizationEndpoint.setOAuth2RequestValidator(oauth2RequestValidator());
-
-
authorizationEndpoint.setUserApprovalHandler(userApprovalHandler());
-
-
return authorizationEndpoint;
-
-
}
2.3、tokenEndpoint bean 声明:用来作为请求者获得令牌(Token)的服务。
2.3.1、/oauth/token 请求令牌端点
2.3.2、核心代码:
-
-
-
public TokenEndpoint tokenEndpoint() throws Exception {
-
-
TokenEndpoint tokenEndpoint = new TokenEndpoint();
-
-
tokenEndpoint.setClientDetailsService(clientDetailsService);
-
-
tokenEndpoint.setProviderExceptionHandler(exceptionTranslator());
-
-
tokenEndpoint.setTokenGranter(tokenGranter());
-
-
tokenEndpoint.setOAuth2RequestFactory(oauth2RequestFactory());
-
-
tokenEndpoint.setOAuth2RequestValidator(oauth2RequestValidator());
-
-
tokenEndpoint.setAllowedRequestMethods(allowedTokenEndpointRequestMethods());
-
-
return tokenEndpoint;
-
-
}
2.4 CheckTokenEndpoint bean 声明:资源服务访问的令牌解析服务。
2.4.1、/oauth/check_token:用于资源服务访问的令牌解析端点。
2.4.2、核心代码:
-
-
-
public CheckTokenEndpoint checkTokenEndpoint() {
-
-
CheckTokenEndpoint endpoint = new CheckTokenEndpoint(getEndpointsConfigurer().getResourceServerTokenServices());
-
-
endpoint.setAccessTokenConverter(getEndpointsConfigurer().getAccessTokenConverter());
-
-
endpoint.setExceptionTranslator(exceptionTranslator());
-
-
return endpoint;
-
-
}
2.5 WhitelabelApprovalEndpoint bean 声明: 用户确认授权提交服务
2.5.1、/oauth/confirm_access:用户确认授权提交端点。
2.5.2、核心代码:
-
-
-
public WhitelabelApprovalEndpoint whitelabelApprovalEndpoint() {
-
-
return new WhitelabelApprovalEndpoint();
-
-
}
2.6 WhitelabelErrorEndpoint bean 声明:授权服务错误信息服务
2.6.1、/oauth/error:授权服务错误信息端点。
2.6.2、核心代码:
-
-
-
public WhitelabelErrorEndpoint whitelabelErrorEndpoint() {
-
-
return new WhitelabelErrorEndpoint();
-
-
}
2.7 ConsumerTokenServices ban声明:提供revokeToken支撑
2.8 AuthorizationServerTokenServices bean声明:token操作相关服务。
3、AuthorizationServerSecurityConfiguration说明
3.1、@Import({ ClientDetailsServiceConfiguration.class, AuthorizationServerEndpointsConfiguration.class })
- ClientDetailsServiceConfiguration:根据configurer生成 ClientDetailsService bean,通过重写org.springframework.security.oauth2.config.annotation.web.configuration.AuthorizationServerConfigurer#configure(org.springframework.security.oauth2.config.annotation.configurers.ClientDetailsServiceConfigurer)自定义实现。
- AuthorizationServerEndpointsConfiguration:同2.
3.2 、继承WebSecurityConfigurerAdapter,实现认证服务请求的授权控制。
通过声明AuthorizationServerConfigurer bean实现配置修改。
3.3、核心http配置如下:
-
@Override
-
-
protected void configure(HttpSecurity http) throws Exception {
-
-
AuthorizationServerSecurityConfigurer configurer = new AuthorizationServerSecurityConfigurer();
-
-
FrameworkEndpointHandlerMapping handlerMapping = endpoints.oauth2EndpointHandlerMapping();
-
-
http.setSharedObject(FrameworkEndpointHandlerMapping.class, handlerMapping);
-
-
configure(configurer);
-
-
http.apply(configurer);
-
-
// 请求令牌端点。
-
-
String tokenEndpointPath = handlerMapping.getServletPath("/oauth/token");
-
-
// 提供公有密匙的端点,如果你使用JWT令牌的话
-
-
String tokenKeyPath = handlerMapping.getServletPath("/oauth/token_key");
-
-
// 用于资源服务访问的令牌解析端点。
-
-
String checkTokenPath = handlerMapping.getServletPath("/oauth/check_token");
-
-
if (!endpoints.getEndpointsConfigurer().isUserDetailsServiceOverride()) {
-
-
UserDetailsService userDetailsService = http.getSharedObject(UserDetailsService.class);
-
-
endpoints.getEndpointsConfigurer().userDetailsService(userDetailsService);
-
-
}
-
-
// @formatter:off
-
-
http
-
-
.authorizeRequests()
-
-
.antMatchers(tokenEndpointPath).fullyAuthenticated()
-
-
.antMatchers(tokenKeyPath).access(configurer.getTokenKeyAccess())
-
-
.antMatchers(checkTokenPath).access(configurer.getCheckTokenAccess())
-
-
.and()
-
-
.requestMatchers()
-
-
.antMatchers(tokenEndpointPath, tokenKeyPath, checkTokenPath)
-
-
.and()
-
-
.sessionManagement().sessionCreationPolicy(SessionCreationPolicy.NEVER);
-
-
// @formatter:on
-
-
http.setSharedObject(ClientDetailsService.class, clientDetailsService);
-
-
}
4、AuthorizationServerConfigurer提供的三个覆盖点如下:
configure(AuthorizationServerSecurityConfigurer security)
configure(ClientDetailsServiceConfigurer clients)
configure(AuthorizationServerEndpointsConfigurer endpoints)
5.3、简要分析:
1、通过流程可以看出来,核心在AuthorizationServerConfigurer方法的重写,提供业务支撑。
2、spring boot 集成了AuthorizationServerProperties 和 OAuth2AuthorizationServerConfiguration实现了通用的oauth2配置。OAuth2AuthorizationServerConfiguration就是AuthorizationServerConfigurer的实现。
3、/oauth/authorize请求,通过 登录相关WebSecurityConfigurerAdapter(最基本的spring security使用)处理,未登录就跳转到登陆界面,该拦截基本包含所有必要的请求。优先级在AuthorizationServerSecurity之后。
4、登录成功后,通过获取保存在session的上一步url,进行页面跳转控制。具体见SavedRequestAwareAuthenticationSuccessHandler。
5、授权服务器本身的登录保持,默认通过session来控制。
6、@EnableResourceServer加载过程
6.1、流程说明:
1、@EnableResourceServer
@Import(ResourceServerConfiguration.class)
2、ResourceServerConfiguration说明:
提供WebSecurityConfigurerAdapter, 追加ResourceServerSecurityConfigurer配置,主要追加OAuth2AuthenticationEntryPoint、OAuth2AccessDeniedHandler、OAuth2WebSecurityExpressionHandler等配置,控制token验证相关逻辑。
OAuth2AuthenticationProcessingFilter是核心逻辑,控制token解析相关。
3、一个filter 列表展示:
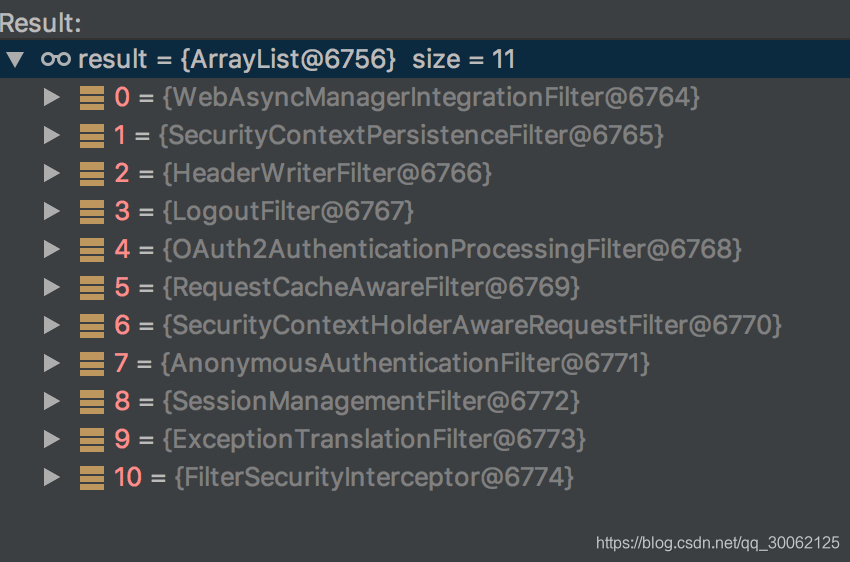
6.2、简要分析:
1、主要是通过多个WebSecurityConfigurerAdapter加载,实现不同的filter chain匹配。
2、资源请求,需要保证不能被前面的WebSecurityConfigurerAdapter包含,否则,无法走到token解析逻辑中。
(三)、基于Spring Security OAuth2 实现 implicit + jwt 方式的单点登录
1、简介
某些场景下 单点登录系统sso 和 应用系统sso-client直接网络无法联通,可以考虑直接使用implicit方式的oauth2 + jwt 进行实现。
实现目标:
- 多应用系统单点登录功能(一次登录,访问多个系统,默认通过sso会话实现登录保持,集群环境可以考虑将session也转成token)。
- 应用系统 token 鉴权访问,一个token,可以访问所有应用系统资源。
注:authorization_code 方式,多了code换取token步骤,需要应用系统能够访问到单点登录系统。
1.1、oauth2 简介:
需要注意几个角色:
- 授权系统:发放token的系统,就是我们的sso。
- 资源系统(应用系统):使用token校验权限的系统,就是我们的sso-client。
- 用户:页面操作人,持有用户名、密码。
五种场景
- authorization_code:授权码类型,授权系统针对登录用户下发code,应用系统拿着code去授权系统换取token。
- implicit:隐式授权类型。authorization_code的简化类型,授权系统针对登录系统直接下发token,302 跳转到应用系统url。
- password:资源所有者(即用户)密码类型。应用系统采集到用户名密码,调用授权系统获取token。
- client_credentials:客户端凭据(客户端ID以及Key)类型。没有用户参与,应用系统单纯的使用授权系统分配的凭证访问授权系统。
- refresh_token:通过授权获得的刷新令牌 来获取 新的令牌。
1.1、implicit 简单介绍
参考: RFC规范
流程图如下:
 +----------+
 | Resource |
 |  Owner   |
 |          |
 +----------+
      ^
      |
     (B)
 +----|-----+          Client Identifier     +---------------+
 |         -+----(A)-- & Redirection URI --->|               |
 |  User-   |                                | Authorization |
 |  Agent  -|----(B)-- User authenticates -->|     Server    |
 |          |                                |               |
 |          |<---(C)--- Redirection URI ----<|               |
 |          |          with Access Token     +---------------+
 |          |            in Fragment
 |          |                                +---------------+
 |          |----(D)--- Redirection URI ---->|   Web-Hosted  |
 |          |          without Fragment      |     Client    |
 |          |                                |    Resource   |
 |     (F)  |<---(E)------- Script ---------<|               |
 |          |                                +---------------+
 +-|--------+
   |    |
  (A)  (G) Access Token
   |    |
   ^    v
 +---------+
 |         |
 |  Client |
 |         |
 +---------+
简要说明:
- Resource Owner:用户,用户名、密码持有人。
- User-Agent:可以简要理解为浏览器。
- Client:资源调用请求发起方,对于我们的demo来说,发起请求的浏览器就是客户端。
- Authorization Server:授权系统,包含用户名密码采集和验证。
- Web-Hosted Client Resource:资源系统,提供受保护的资源。
所以,对于我们来说,实际流程大体为:
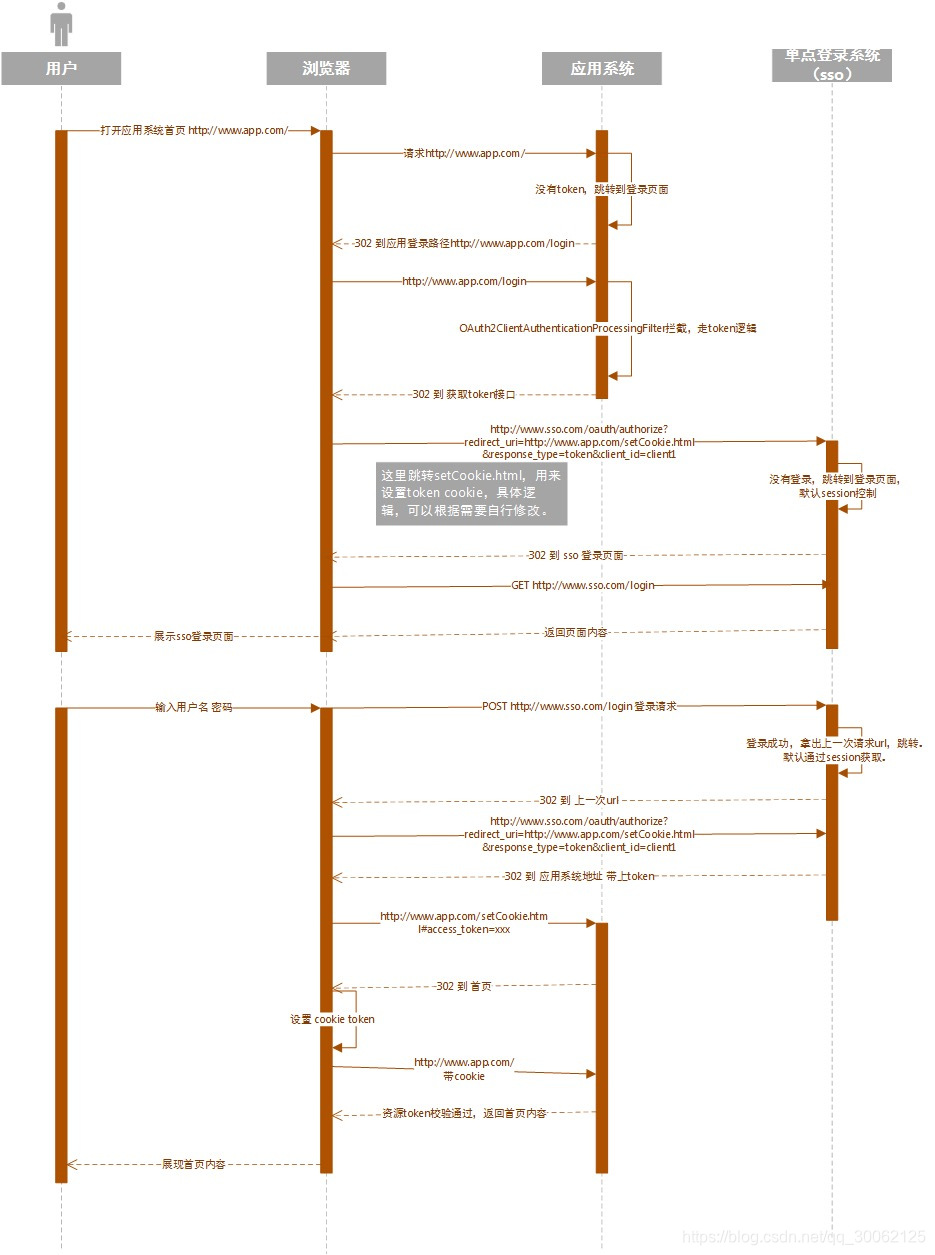
其中 sso的 登录判断 和 上一步的url 默认都是通过session来实现的,如果想要集群化,可以将这两步改造成外部缓存(如 redis),或者交给客户端保持(如:jwt 生成 token 存放在 cookie )。
2、 实现
关键步骤说明:
- sso login WebSecurityConfigurerAdapter 配置:拦截所有请求,未登录,需要登录。
- sso @EnableAuthorizationServer 实现授权服务:拦截部分oauth请求,优先级在login WebSecurityConfigurerAdapter纸上。
- sso 自定义UserDetailsService 处理用户校验和权限获取。
- sso-client @EnableOAuth2Sso 实现拦截资源到sso登录界面。
- sso-client 自定义implicit相关,完成流程。
- sso-client @EnableResourceServer 实现资源访问 token解析。
2.1 sso login WebSecurityConfigurerAdapter 配置
@Configuration
	@Order(ManagementServerProperties.ACCESS_OVERRIDE_ORDER)
	//如果优先级在AuthorizationServerSecurity之前,则走不到AuthorizationServerSecurityfilter中。
	protected static class LoginConfig extends WebSecurityConfigurerAdapter {

		@Autowired
		private AuthenticationManager authenticationManager;


		@Override
		protected void configure(HttpSecurity http) throws Exception {
			http.formLogin().loginPage("/login")
				.permitAll().and()
				.authorizeRequests()
				.anyRequest().authenticated().and().cors().and().csrf().disable()
				.logout().logoutUrl("/logout");


		}


		/**
		 * 1、用户验证,指定多个AuthenticationProvider
		 * 实际执行时候根据provider的supports方法判断是否走逻辑
		 *
		 * 2、如果不覆盖,优先会获取AuthenticationProvider bean作为provider;
		 * 如果没有bean,默认提供DaoAuthenticationProvider
		 *
		 * @param auth
		 */
		@Override
		protected void configure(AuthenticationManagerBuilder auth) throws Exception {
			auth.parentAuthenticationManager(authenticationManager);
		}


		@Override
		public void configure(WebSecurity web) throws Exception {
			//忽略请求 不走security filters
			web.ignoring().antMatchers(HttpMethod.GET, "/login").antMatchers(HttpMethod.OPTIONS, "/oauth/**").antMatchers("/css/**","/info","/health","/hystrix.stream");
		}


		@Bean
		public MyUserDetailsService myUserDetailsService() {
			return new MyUserDetailsService();
		}

	}
2.2、sso @EnableAuthorizationServer 实现授权服务
// 处理oauth2相关。
	@Configuration
	@EnableAuthorizationServer
	protected static class OAuth2Config extends AuthorizationServerConfigurerAdapter {

		@Autowired
		private AuthenticationManager authenticationManager;

		@Bean
		public JwtAccessTokenConverter jwtAccessTokenConverter() {
			// 自定义 jwt 加密的参数
			JwtAccessTokenConverter converter = new JwtAccessTokenConverter();

			KeyPair keyPair = new KeyStoreKeyFactory(
				new ClassPathResource("keystore.jks"), "foobar".toCharArray())
				.getKeyPair("test");
			converter.setKeyPair(keyPair);
			return converter;
		}

		@Override
		public void configure(ClientDetailsServiceConfigurer clients) throws Exception {
			clients.inMemory()
					.withClient(SsoContants.DEFAULT_CLIENT_ID).autoApprove(true)
					.secret(SsoContants.DEFAULT_CLIENT_SECRET)
					.authorizedGrantTypes("implicit", "authorization_code", "refresh_token",
							"password").scopes("openid");
		}

		@Override
		public void configure(AuthorizationServerEndpointsConfigurer endpoints)
				throws Exception {
			endpoints.authenticationManager(authenticationManager)
				.accessTokenConverter(
					jwtAccessTokenConverter());
		}

		@Override
		public void configure(AuthorizationServerSecurityConfigurer oauthServer)
				throws Exception {
			oauthServer.tokenKeyAccess("permitAll()").checkTokenAccess(
					"isAuthenticated()");
		}

	}
2.3、sso 自定义UserDetailsService 处理用户校验和权限获取
public class MyUserDetailsService implements UserDetailsService {

    private Logger logger = LoggerFactory.getLogger(getClass());

    @Override public UserDetails loadUserByUsername(String username) throws UsernameNotFoundException {
        logger.info("用户的用户名: {}", username);

        List<GrantedAuthority> list = new ArrayList<GrantedAuthority>();


        // 模拟下逻辑,简单处理下。
        if ("admin".equals(username)) {
            // 自定义权限实现
            UrlGrantedAuthority authority = new UrlGrantedAuthority(null, "/admin/index");
            list.add(authority);
            // 封装用户信息,并返回。参数分别是:用户名,密码,用户权限
            User user = new MyUser(username, "123456", list);
            ((MyUser) user).setUserId("111");

            return user;
        }
        else if ("user".equals(username)) {
            list.add(new SimpleGrantedAuthority("ROLE_USER"));
            User user = new MyUser(username, "123456", list);
            ((MyUser) user).setUserId("222");

            return user;
        }
        else {
            throw new DisabledException("用户不存在");
        }

    }
}
2.4、sso-client @EnableOAuth2Sso 实现拦截资源到sso登录界面
@Component
	@EnableOAuth2Sso
	public static class LoginConfigurer extends WebSecurityConfigurerAdapter {

		@Value("${security.oauth2.client.ssoLogoutUri}")
		private String ssoLogoutUrl;

		// 这个地方的url 判断是否登录 还是根据session会话保持来的(逻辑可见SecurityContextPersistenceFilter,
		// 可以通过重写SecurityContextRepository实现外部回话保持。)
		@Override
		public void configure(HttpSecurity http) throws Exception {
			// 拦截多个请求,放行其他的。
			List<RequestMatcher> matchers = new ArrayList<RequestMatcher>();
			matchers.add(new AntPathRequestMatcher("/dashboard/login"));
			// 退出逻辑,可以自定义处理。这里就简单清除掉token,跳转到sso登出接口
			matchers.add(new AntPathRequestMatcher("/dashboard/logout"));

			http.requestMatcher(new OrRequestMatcher(matchers)).authorizeRequests()
					.anyRequest().authenticated()
					.and()
					.csrf().disable()
					.sessionManagement().sessionCreationPolicy(SessionCreationPolicy.NEVER).and()
                    .cors().and()
					.logout().logoutSuccessUrl(ssoLogoutUrl).deleteCookies("accessToken").logoutUrl("/dashboard/logout").permitAll();
		}


	}
2.5 sso-client 自定义implicit相关,完成流程
Implicit自定义配置
@Configuration
public class ImplicitConfig {

    @Resource
    @Qualifier("accessTokenRequest")
    AccessTokenRequest accessTokenRequest;

    // 使用implicit方式
    @Bean
    @ConfigurationProperties(prefix = "security.oauth2.client")
    public ImplicitResourceDetails implicitResourceDetails() {
        return new ImplicitResourceDetails();
    }

    // implicit方式,使用request 作用域的OAuth2ClientContext
    @Bean
    @Scope(value = "request", proxyMode = ScopedProxyMode.INTERFACES)
    @Primary
    public OAuth2ClientContext myOAuth2ClientContext() {
        return new DefaultOAuth2ClientContext(accessTokenRequest);
    }

    @Bean
    public OAuth2RestTemplate myOAuth2RestTemplate(@Qualifier("implicitResourceDetails")
        OAuth2ProtectedResourceDetails resource) {
        return new OAuth2RestTemplate(resource, myOAuth2ClientContext());
    }
}
自定义 OAuth2RestTemplate,支持 implicit
@Component
public class ImplicitUserInfoRestTemplateFactory implements UserInfoRestTemplateFactory {


    @Resource
    @Qualifier("myOAuth2RestTemplate")
    OAuth2RestTemplate oAuth2RestTemplate;


    /**
     * Return the {@link OAuth2RestTemplate} used for extracting user info during
     * authentication if none is available.
     *
     * @return the OAuth2RestTemplate used for authentication
     */
    @Override
    public OAuth2RestTemplate getUserInfoRestTemplate() {
        OAuth2RestTemplate oauth2RestTemplate = oAuth2RestTemplate;
        ImplicitAccessTokenProvider accessTokenProvider = new MyImplicitAccessTokenProvider();
        oauth2RestTemplate.getInterceptors()
            .add(new AcceptJsonRequestInterceptor());
        accessTokenProvider.setTokenRequestEnhancer(new AcceptJsonRequestEnhancer());

        oauth2RestTemplate.setAccessTokenProvider(accessTokenProvider);
        return oauth2RestTemplate;
    }

    static class AcceptJsonRequestInterceptor implements ClientHttpRequestInterceptor {

        @Override
        public ClientHttpResponse intercept(HttpRequest request, byte[] body,
            ClientHttpRequestExecution execution) throws IOException {
            request.getHeaders().setAccept(Arrays.asList(MediaType.APPLICATION_JSON));
            return execution.execute(request, body);
        }

    }

    static class AcceptJsonRequestEnhancer implements RequestEnhancer {

        @Override
        public void enhance(AccessTokenRequest request,
            OAuth2ProtectedResourceDetails resource,
            MultiValueMap<String, String> form, HttpHeaders headers) {
            headers.setAccept(Arrays.asList(MediaType.APPLICATION_JSON));
        }

    }


}
自定义 ImplicitAccessTokenProvider,没有token时候302跳到sso获取token
public class MyImplicitAccessTokenProvider extends ImplicitAccessTokenProvider {

    public OAuth2AccessToken obtainAccessToken(OAuth2ProtectedResourceDetails details, AccessTokenRequest request)
        throws UserRedirectRequiredException, AccessDeniedException, OAuth2AccessDeniedException {

        ImplicitResourceDetails resource = (ImplicitResourceDetails) details;
            // 直接生成到客户端 302 url

            // 追加跳转参数。
            String redirectUri = resource.getRedirectUri(request);
            if (redirectUri == null) {
                throw new IllegalStateException("No redirect URI available in request");
            }

            Map paramMap = request.toSingleValueMap();
            // 交给这个页面设置下 cookie。
            paramMap.put("redirect_uri", redirectUri.replace("/dashboard/login", "/setCookie.html"));
            paramMap.put("response_type", "token");
            paramMap.put("client_id", resource.getClientId());

            if (resource.isScoped()) {

                StringBuilder builder = new StringBuilder();
                List<String> scope = resource.getScope();

                if (scope != null) {
                    Iterator<String> scopeIt = scope.iterator();
                    while (scopeIt.hasNext()) {
                        builder.append(scopeIt.next());
                        if (scopeIt.hasNext()) {
                            builder.append(' ');
                        }
                    }
                }

                paramMap.put("scope", builder.toString());
            }

            // ... but if it doesn't then capture the request parameters for the redirect
            // 最终在 OAuth2ClientContextFilter 中处理跳转。
            throw new UserRedirectRequiredException(resource.getUserAuthorizationUri(), paramMap);

    }
}
2.6、sso-client @EnableResourceServer 实现资源访问 token解析。
@RestController
@Configuration
// 资源api相关
@RequestMapping("/api")
@EnableResourceServer // 默认 order 为3
public class ResourceController {

    private final static Logger log = LoggerFactory.getLogger(ResourceController.class);

    @RequestMapping("/message")
    public Map<String, Object> dashboard() {
        return Collections.<String, Object> singletonMap("message....", "Yay!");
    }

    @Autowired
    private ResourceServerProperties resource;

    @Autowired
    private MyOAuth2AuthenticationEntryPoint oAuth2AuthenticationEntryPoint;


    @Bean
    public ResourceServerConfigurer resourceServer() {
        return new ResourceSecurityConfigurer(this.resource, oAuth2AuthenticationEntryPoint);
    }

    // 重写spring boot 自带的,
    // 实现一些资源自定义处理。
    protected static class ResourceSecurityConfigurer
        extends ResourceServerConfigurerAdapter implements ApplicationContextAware {

        private ResourceServerProperties resource;

        private ConfigurableApplicationContext applicationContext;
        MyOAuth2AuthenticationEntryPoint oAuth2AuthenticationEntryPoint;

        public ResourceSecurityConfigurer(ResourceServerProperties resource, MyOAuth2AuthenticationEntryPoint oAuth2AuthenticationEntryPoint) {
            this.resource = resource;
            this.oAuth2AuthenticationEntryPoint = oAuth2AuthenticationEntryPoint;
        }

        @Override
        public void configure(ResourceServerSecurityConfigurer resources)
            throws Exception {
            resources.resourceId(this.resource.getResourceId());
            // 使用自带的,支持从cookie header parameter attribute 4中方式获取token。
            resources.tokenExtractor(new MyBearerTokenExtractor());
            // 未登录,直接跳转到 登录页面,走 token 申请逻辑。
            resources.authenticationEntryPoint(oAuth2AuthenticationEntryPoint);
            // 资源403 定制
            resources.accessDeniedHandler(new MyOAuth2AccessDeniedHandler());
        }

        @Override
        public void configure(HttpSecurity http) throws Exception {
            http.authorizeRequests().anyRequest().authenticated();
        }

        @Override public void setApplicationContext(ApplicationContext applicationContext) throws BeansException {
            //将applicationContext转换为ConfigurableApplicationContext
            this.applicationContext = (ConfigurableApplicationContext) applicationContext;
        }
    }
}
3. 新证书生成步骤
3.1 生成Keystore
keytool -genkeypair -alias test -keyalg RSA -validity 365000 -keystore keystore.jks -storepass foobar -keypass foobar -keysize 1024 -v -dname “C=CN,ST=AnHui,L=HeFei,O=Wondertek,OU=prod,CN=www.*.com”
3.2 从jks获取公钥内容
keytool -list -alias test -rfc --keystore keystore.jks -storepass foobar | openssl x509 -inform pem -pubkey
Spring Boot Security
(一)、spring boot security 认证–自定义登录实现
(二)、spring boot security 授权–自定义授权实现
(三)、spring boot security 加载流程简介
(四)、spring boot security 请求流程 和 filter 说明
(五)、spring boot security SecurityProperties 配置说明
Spring Security OAuth2
(一)、Spring Security OAuth2 五种授权方式介绍
(二)、Spring Security OAuth2 四个常用注解说明
(三)、基于Spring Security OAuth2 实现 implicit + jwt 方式的单点登录
微信扫一扫关注该公众号
JWT RS256加解密、JWK获取PublicKey和PrivateKey、从已存在公私钥加解密JWT_jwt key-CSDN博客
JWT的简介就没什么必要了, https://jwt.io/ 官网在这, 直接重点, 在alg=RS256时, 怎么从现有的JWK中获取到公私钥?拿到公私钥后如何加密解密? 背景是在使用kong网关时, 使用jwt插件遇到的问题.
https://mkjwk.org/ jwk在线生成
https://jwt.io/ jwt官网
http://jwt.calebb.net/ jwt反解
背景, 从其他网关切换到kong后, 有关jwt的配置需要从现有的jwk配置获取, jwk的形式如下, 可从https://mkjwk.org/ 生成, RSA tab页
-
{
-
"kty": "RSA",
-
"e": "AQAB",
-
"use": "sig",
-
"kid": "c24a15f4-5b4e-4749-8e1b-9a11221fd31d",
-
"alg": "RS256",
-
"n": "uUvDQSrvTJIfPsDhNo-6C_i2ZLhsU3T3ZQDqrCMSdkcUOiu0oI28NCkicRIKeV4AZaar9vVk_uhMv4KLKYV441HX-OqHgqVqBPxtWHuZFkHGODg90VFGTPAxG90mkJsz7CcsvujTnPQeTVzYJ5mFga-VH7ZwSUiu5byQJUJeGmvfl3eVt8rc29SSbCHV4cDDqMwJIYMA_Quhppw_LkqGJ9Mz7gh7kw5FxA9IJli13dAE5rx9nr8J5-iXBwM8yAADSDd45PHKkKYi_IYfuAvG1vXwJtjsExOgyVEugv4i7D_gM6Ch2gRrpgxNiP7QnzRDZtmDq37O0kTzppWc9zVX3w"
-
}
jwk只是存储公私钥的一个形式, 可以从上面的key中获取到publicKey, demo如下
-
static String getPublicKeyFromJwk(String value) throws Exception {
-
PublicKeyJwk publicKeyJwk = new ObjectMapper().readValue(value, PublicKeyJwk.class);
-
CkJsonObject json = new CkJsonObject();
-
json.UpdateString("kty",publicKeyJwk.getKty());
-
json.UpdateString("n",publicKeyJwk.getN());
-
json.UpdateString("e",publicKeyJwk.getE());
-
json.UpdateString("kid", publicKeyJwk.getKid());
-
json.put_EmitCompact(false);
-
-
String jwkStr = json.emit();
-
CkPublicKey pubKey = new CkPublicKey();
-
boolean success = pubKey.LoadFromString(jwkStr);
-
if (!success) {
-
System.out.println(pubKey.lastErrorText());
-
throw new Exception(pubKey.lastErrorText());
-
}
-
boolean bPreferPkcs1 = false;
-
String pem = pubKey.getPem(bPreferPkcs1);
-
System.out.println(pem);
-
-
return pem;
-
}
-
@Data@JsonIgnoreProperties(ignoreUnknown = true)
-
private static class PublicKeyJwk {
-
String kty;
-
String e;
-
String kid;
-
String n;
-
}
需添加依赖,
-
<dependency>
-
<groupId>dingding</groupId>
-
<artifactId>dingding</artifactId>
-
<version>2.8</version>
-
<scope>system</scope>
-
<systemPath>${project.basedir}/chilkat.jar</systemPath>
-
</dependency>
下载地址: http://www.chilkatsoft.com/java.asp,下载文件中有个lib库, 需要启动时指定java.library.path, Idea在run Configuration中制定vm Options, 如下:
-Djava.library.path=xxx类库也提供了从jwk中获取私钥的功能, 这时的jwk
-
{
-
"p": "7L7sjNqx5mqIg9fbEiiv06XNyZDJjrHXAsrypOq4n5-m7qP1V0M8J4hBvHkXuAcccBA0d_5tKJYVKhRWzyS3IcAODKVSo_eZRp0fHAhkFBL4g3FrNpn9BHF67W12d6yRqITeP231FQ37751P0xEdIq9B-HGe5TufncAAsAwbKC0",
-
"kty": "RSA",
-
"q": "yF2lio448krpFzZlEtEvV_lU57dY56S_BVsWXEzb4F_ufjQPyv7fWW2UK8gRDVaPwHWCWoiKTKy_0UU_xPNfTTArxdADCGVdot9rMVbo7cVXGVm7IBwWzaSQPYVxnVdp8JdJzIbjzpg0wizxcCcn3KfXXqaP1-IgxlT3-6fTW7s",
-
"d": "qzC34AlOtKt7enqwl7wJ4u2RdVR9oE08E3DZXte4QtZAdc3TP1IzQu2OCHDmhGK4czGdRrhI6sirv3NYJrBNk5cVtb7YG3e_j4O3cjwen1V9UIuFcVFpZcOzW07iRk9dlRxMVsS8XRGcvVS9zzgjBEG3wGjJLKueClo_wmyijDzxqkFEhJKqwtxENdRBoLnnwWVW6FotPsT_YK6oXLqmzZ7lxAysBAGGmhCf7BpyU7DGkiyueXXGewy2k28EGiHvD6wkjJDrxkxpDzkUiTEWxz3bXaiMHjOoQDC7Me9uQdxy4dhihCvHpja6mWp-rU74zqR5ilA7S0_9ZEZfEAzr4Q",
-
"e": "AQAB",
-
"use": "sig",
-
"kid": "c24a15f4-5b4e-4749-8e1b-9a11221fd31d",
-
"qi": "e9xK1naCfXL7YGnkRN8oqK380o57484ZNTL6k-cPAJov4C-H63nmWNWMhlLHHdEWcEpQyHfHa3gT2XWyGHkKkDSwXNjYm6kmUI-smH4nrKYgY_oa2aXNulnjxd9eQH8YsyhybCNc40uWlBWqwPAQYEeDkxpTre4OUzCNJ2tOdSs",
-
"dp": "hH3xGn8F0qLKVabG5mm4xOTkvyp1cpNadiioFN17h3Gs1Z8Sncx17NXXnCfUu1vXcWvQQVs1MeKUY6FQV8r_Zjb6Zd9b2YGm2RrznxefEpDvXXhq_Pq-2-66UgfRpfYA6mO5kZvy7d6OoTHTy5anTJLyg5zqxPVSRdF_UQblZ90",
-
"alg": "RS256",
-
"dq": "PuEcrXHarzcRFWbNq20YdXxax-lDLlcGV5DxYIACVNTmTJbcCfGYeEEqSd8cctoifNyjzvOgq1VfUTZxP8a8tsWSRx7zhLQDAbUpt681pEDVB7CgSABoq5qkZZo2QJGJPqbL0zLV1STxEar3DiJLoTTPIvYUmERv0q4hsMlHTDc",
-
"n": "uUvDQSrvTJIfPsDhNo-6C_i2ZLhsU3T3ZQDqrCMSdkcUOiu0oI28NCkicRIKeV4AZaar9vVk_uhMv4KLKYV441HX-OqHgqVqBPxtWHuZFkHGODg90VFGTPAxG90mkJsz7CcsvujTnPQeTVzYJ5mFga-VH7ZwSUiu5byQJUJeGmvfl3eVt8rc29SSbCHV4cDDqMwJIYMA_Quhppw_LkqGJ9Mz7gh7kw5FxA9IJli13dAE5rx9nr8J5-iXBwM8yAADSDd45PHKkKYi_IYfuAvG1vXwJtjsExOgyVEugv4i7D_gM6Ch2gRrpgxNiP7QnzRDZtmDq37O0kTzppWc9zVX3w"
-
}
java demo
-
static String getPrivateKeyFromJwk(String value) throws Exception{
-
KeyPairJwk jwk = new ObjectMapper().readValue(value, KeyPairJwk.class);
-
CkJsonObject json = new CkJsonObject();
-
json.UpdateString("kty",jwk.getKty());
-
json.UpdateString("n",jwk.getN());
-
json.UpdateString("e",jwk.getE());
-
json.UpdateString("d",jwk.getD());
-
json.UpdateString("p",jwk.getP());
-
json.UpdateString("q",jwk.getQ());
-
json.UpdateString("dp",jwk.getDp());
-
json.UpdateString("dq",jwk.getDq());
-
json.UpdateString("qi",jwk.getQi());
-
json.put_EmitCompact(false);
-
-
String jwkStr = json.emit();
-
-
CkPrivateKey privKey = new CkPrivateKey();
-
boolean success = privKey.LoadJwk(jwkStr);
-
if (!success) {
-
System.out.println("load error: \n" + privKey.lastErrorText());
-
throw new Exception(privKey.lastErrorText());
-
}
-
String secret = privKey.getRsaPem();
-
System.out.println(secret);
-
return secret;
-
}
现在就已经拿到公私钥了, 接下来可以用在kong上尝试配置一下能否加解密成功, 不想手动写代码生成Token可以用在线工具: https://jwt.io/ 选择RS256, publickey和privatekey填上刚才生成的, 如果一切正常, 左侧会出现token, 左侧下部会提示Signature Verified
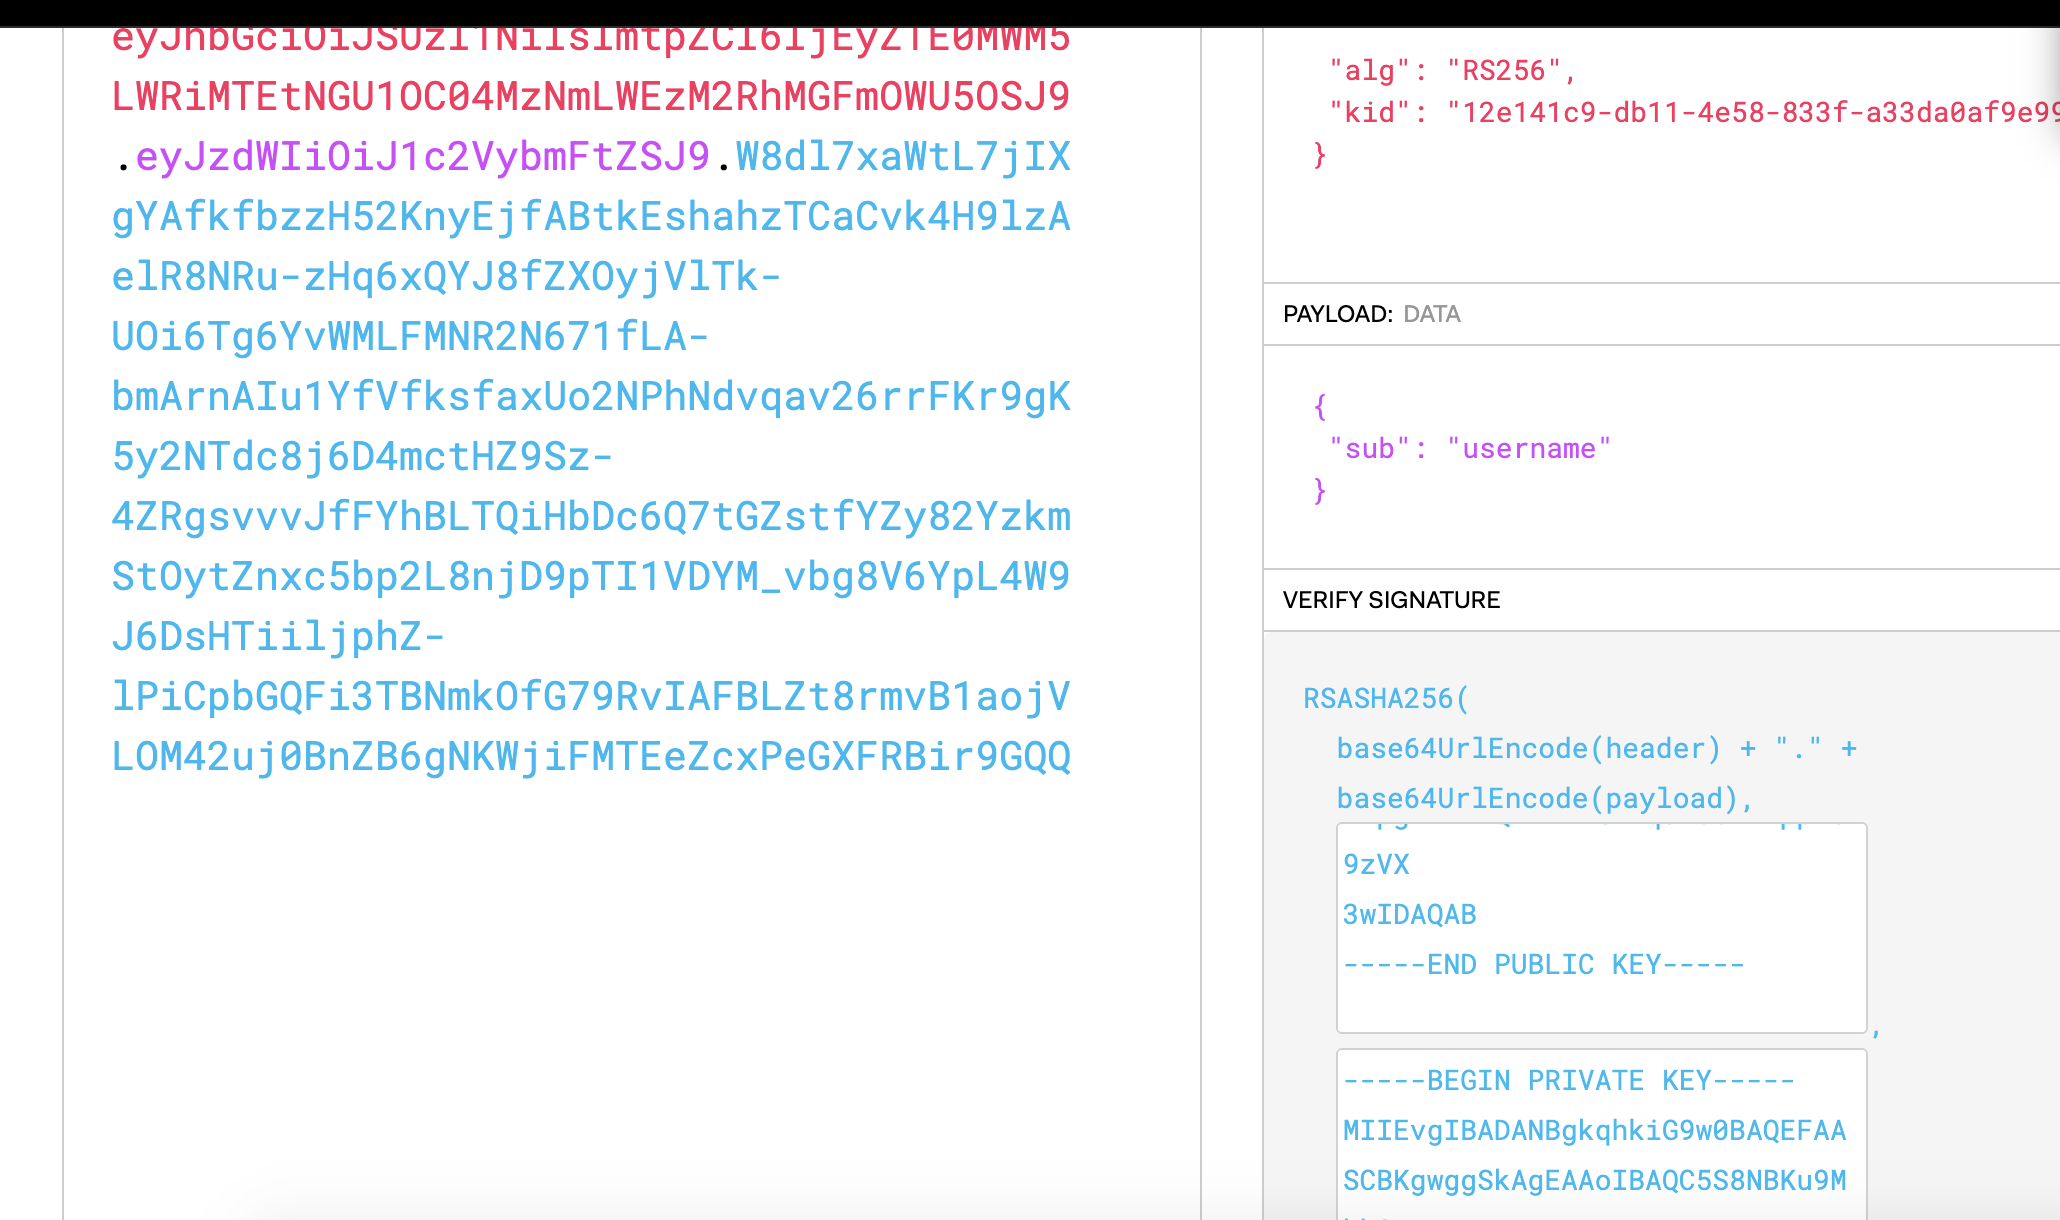
然后就可以在kong上配置公钥, 配置Consumer, 具体kong的配置先不说了
kong的校验结束后, 如果我们想在java端加解密, 还需要注意密钥的填充格式的问题, 现在获取出来的密钥是pkcs1的, 如果希望用下面的方式获取PrivateKey, 在根据这个PrivateKey加密得到jwt, 那么需要转化为pkcs8填充方式
-
private static PrivateKey getPrivateKey(String privateKey) throws Exception {
-
privateKey = privateKey.replaceAll("-*BEGIN.*KEY-*", "")
-
.replaceAll("-*END.*KEY-*", "")
-
.replaceAll("\\s+","");
-
-
byte[] encodedKey = Base64.decodeBase64(privateKey);
-
PKCS8EncodedKeySpec keySpec = new PKCS8EncodedKeySpec(encodedKey);
-
-
KeyFactory kf = KeyFactory.getInstance("RSA");
-
PrivateKey privKey = kf.generatePrivate(keySpec);
-
return privKey;
-
}
-
-----BEGIN RSA PRIVATE KEY----- pkcs1
-
-----BEGIN PRIVATE KEY----- pkcs8
如果不转化会报错
java.security.spec.InvalidKeySpecException: java.security.InvalidKeyException: IOException : algid parse error, not a sequence从pkcs1转为pkcs8的命令为
openssl pkcs8 -topk8 -inform PEM -in ${in_path} -outform pem -nocrypt -out ${out_path}之后就可以用pkcs8格式的密钥生成token, 用publicKey解密了. 全部demo如下, 在resources/jwk下放这几个文件, PublicKey是从生成JWK的网站上拷贝的 Public Key 部分的数据, PublicAndPrivateKeyPair是拷贝的Public and Private Keypair部分的数据, JwtBody.json如下

-
JwtBody.json
-
{
-
"header" : {
-
"alg": "RS256",
-
"kid": null
-
},
-
"body" : {
-
"exp": 1598424022,
-
"sub": "username"
-
}
-
}
-
-
-
import com.chilkatsoft.CkJsonObject;
-
import com.chilkatsoft.CkPrivateKey;
-
import com.chilkatsoft.CkPublicKey;
-
import com.fasterxml.jackson.annotation.JsonIgnoreProperties;
-
import com.fasterxml.jackson.databind.ObjectMapper;
-
import io.jsonwebtoken.Claims;
-
import io.jsonwebtoken.Jws;
-
import io.jsonwebtoken.Jwts;
-
import io.jsonwebtoken.SignatureAlgorithm;
-
import lombok.Data;
-
import org.apache.commons.codec.binary.Base64;
-
import org.apache.commons.io.FileUtils;
-
import org.apache.commons.io.IOUtils;
-
-
import java.io.BufferedReader;
-
import java.io.File;
-
import java.io.FileInputStream;
-
import java.io.FileOutputStream;
-
import java.io.InputStreamReader;
-
import java.net.URL;
-
import java.security.KeyFactory;
-
import java.security.PrivateKey;
-
import java.security.PublicKey;
-
import java.security.spec.PKCS8EncodedKeySpec;
-
import java.security.spec.X509EncodedKeySpec;
-
import java.text.SimpleDateFormat;
-
import java.util.Date;
-
import java.util.Map;
-
-
// vm options -Djava.library.path=/Users/fengzhikui/data/fzknotebook/fzk-custom-project/fzk-encode
-
public class JwkRs256Generator {
-
static {
-
try {
-
System.loadLibrary("chilkat");
-
} catch (Exception e) {
-
e.printStackTrace();
-
System.exit(1);
-
}
-
}
-
static final String JWT_BODY_PATH = "jwk/JwtBody.json";
-
static final String PUBLIC_KEY_PATH = "jwk/PublicKey";
-
static final String PAIR_KEY_PATH = "jwk/PublicAndPrivateKeypair";
-
-
static final String RESULT_PATH = "/src/main/resources/result/%s-%s/";//相对当前路径的存放路径
-
-
static String kid = null;
-
static String path = null;
-
static String publicKeyPath = null;
-
static String privatePkcs1Path = null;
-
static String privatePkcs8Path = null;
-
static String tokenPath = null;
-
-
public static void main(String[] args) throws Exception {
-
initPath();
-
String publicKeyStr = FileUtil.read(PUBLIC_KEY_PATH);
-
String publicKeyFromJwk = getPublicKeyFromJwk(publicKeyStr);
-
-
String privateKeyStr = FileUtil.read(PAIR_KEY_PATH);
-
String privateKeyFromJwk = getPrivateKeyFromJwk(privateKeyStr);
-
-
FileUtil.write(publicKeyFromJwk, publicKeyPath);
-
FileUtil.write(privateKeyFromJwk, privatePkcs1Path);
-
pkcs1ToPkcs8();
-
-
PrivateKey privateKey = getPrivateKeyFromExist(privatePkcs1Path);
-
String token = generateToken(privateKey);
-
FileUtil.write(token, tokenPath);
-
-
PublicKey publicKey = getPublicKeyFromExist(publicKeyPath);
-
Jws<Claims> claimsJws = Jwts.parser().setSigningKey(publicKey).parseClaimsJws(token);
-
System.out.println(claimsJws);
-
FileUtil.write("\n" + claimsJws.toString(), tokenPath, true);
-
}
-
-
public static String generateToken(PrivateKey privateKey) throws Exception {
-
String jwtBody = FileUtil.read(JWT_BODY_PATH);
-
JwtContent jwt = new ObjectMapper().readValue(jwtBody, JwtContent.class);
-
jwt.getHeader().put("kid", kid);
-
-
String token = Jwts.builder()
-
.setHeader(jwt.getHeader())
-
.setClaims(jwt.getBody())
-
.signWith(privateKey, SignatureAlgorithm.RS256)
-
.compact();
-
System.out.println(token);
-
return token;
-
}
-
-
private static PrivateKey getPrivateKeyFromExist(String path) throws Exception {
-
return getPrivateKey(FileUtil.read(path));
-
}
-
-
private static PrivateKey getPrivateKey(String privateKey) throws Exception {
-
privateKey = privateKey.replaceAll("-*BEGIN.*KEY-*", "")
-
.replaceAll("-*END.*KEY-*", "")
-
.replaceAll("\\s+","");
-
-
byte[] encodedKey = Base64.decodeBase64(privateKey);
-
PKCS8EncodedKeySpec keySpec = new PKCS8EncodedKeySpec(encodedKey);
-
-
KeyFactory kf = KeyFactory.getInstance("RSA");
-
PrivateKey privKey = kf.generatePrivate(keySpec);
-
return privKey;
-
}
-
-
-
private static PublicKey getPublicKeyFromExist(String path) throws Exception {
-
String s = FileUtil.read(path);
-
return getPublicKey(s);
-
}
-
-
private static PublicKey getPublicKey(String publicKeyBase64) throws Exception {
-
String pem = publicKeyBase64
-
.replaceAll("-*BEGIN.*KEY-*", "")
-
.replaceAll("-*END.*KEY-*", "")
-
.replaceAll("\\s+","");
-
X509EncodedKeySpec pubKeySpec = new X509EncodedKeySpec(Base64.decodeBase64(pem));
-
KeyFactory keyFactory = KeyFactory.getInstance("RSA");
-
-
PublicKey publicKey = keyFactory.generatePublic(pubKeySpec);
-
return publicKey;
-
}
-
-
static void pkcs1ToPkcs8() throws Exception {
-
String cmd = "openssl pkcs8 -topk8 -inform PEM -in %s -outform pem -nocrypt -out %s";
-
cmd = String.format(cmd, privatePkcs1Path, privatePkcs8Path);
-
BufferedReader br = null;
-
try {
-
Process p = Runtime.getRuntime().exec(cmd);
-
br = new BufferedReader(new InputStreamReader(p.getInputStream()));
-
String line = null;
-
while ((line = br.readLine()) != null) {
-
System.out.println(line);
-
}
-
p.waitFor();
-
} finally {
-
if (br != null) { br.close(); }
-
}
-
}
-
-
static void initPath() throws Exception{
-
String absolutePath = FileUtil.getAbsolutePath(PUBLIC_KEY_PATH);
-
String publicKeyStr = FileUtil.read(PUBLIC_KEY_PATH);
-
PublicKeyJwk publicKeyJwk = new ObjectMapper().readValue(publicKeyStr, PublicKeyJwk.class);
-
path = String.format(RESULT_PATH,
-
publicKeyJwk.getKid() == null ? "" : publicKeyJwk.getKid().substring(0, 8),
-
new SimpleDateFormat("yyyyMMddHHmmss").format(new Date()));
-
path = new File("").getAbsolutePath() + path;
-
kid = publicKeyJwk.getKid();
-
publicKeyPath = path + "public-key.pem";
-
privatePkcs1Path = path + "private-key-pkcs1.pem";
-
privatePkcs8Path = path + "private-key-pkcs8.pem";
-
tokenPath = path + "token.txt";
-
}
-
-
-
static String getPublicKeyFromJwk(String value) throws Exception {
-
PublicKeyJwk publicKeyJwk = new ObjectMapper().readValue(value, PublicKeyJwk.class);
-
CkJsonObject json = new CkJsonObject();
-
json.UpdateString("kty",publicKeyJwk.getKty());
-
json.UpdateString("n",publicKeyJwk.getN());
-
json.UpdateString("e",publicKeyJwk.getE());
-
json.UpdateString("kid", publicKeyJwk.getKid());
-
json.put_EmitCompact(false);
-
-
String jwkStr = json.emit();
-
CkPublicKey pubKey = new CkPublicKey();
-
boolean success = pubKey.LoadFromString(jwkStr);
-
if (!success) {
-
System.out.println(pubKey.lastErrorText());
-
throw new Exception(pubKey.lastErrorText());
-
}
-
boolean bPreferPkcs1 = false;
-
String pem = pubKey.getPem(bPreferPkcs1);
-
System.out.println(pem);
-
-
return pem;
-
}
-
-
static String getPrivateKeyFromJwk(String value) throws Exception{
-
KeyPairJwk jwk = new ObjectMapper().readValue(value, KeyPairJwk.class);
-
CkJsonObject json = new CkJsonObject();
-
json.UpdateString("kty",jwk.getKty());
-
json.UpdateString("n",jwk.getN());
-
json.UpdateString("e",jwk.getE());
-
json.UpdateString("d",jwk.getD());
-
json.UpdateString("p",jwk.getP());
-
json.UpdateString("q",jwk.getQ());
-
json.UpdateString("dp",jwk.getDp());
-
json.UpdateString("dq",jwk.getDq());
-
json.UpdateString("qi",jwk.getQi());
-
json.put_EmitCompact(false);
-
-
String jwkStr = json.emit();
-
-
CkPrivateKey privKey = new CkPrivateKey();
-
boolean success = privKey.LoadJwk(jwkStr);
-
if (!success) {
-
System.out.println("load error: \n" + privKey.lastErrorText());
-
throw new Exception(privKey.lastErrorText());
-
}
-
String secret = privKey.getRsaPem();
-
System.out.println(secret);
-
return secret;
-
}
-
-
static class FileUtil {
-
static String read(String filename) throws Exception {
-
if (filename.startsWith("/")) {
-
File file = new File(filename);
-
return IOUtils.toString(new FileInputStream(file));
-
} else {
-
URL url = JwkRs256Generator.class.getClassLoader().getResource(filename);
-
File file = new File(url.getFile());
-
return IOUtils.toString(new FileInputStream(file));
-
}
-
}
-
static void write(String value, String filename) throws Exception {
-
File file = new File(filename);
-
FileUtils.touch(file);
-
IOUtils.write(value, new FileOutputStream(file));
-
}
-
static void write(String value, String filename, boolean append) throws Exception {
-
File file = new File(filename);
-
FileUtils.touch(file);
-
FileUtils.write(file, value,"UTF-8", append);
-
}
-
static String getAbsolutePath(String path) {
-
ClassLoader classLoader = JwkRs256Generator.class.getClassLoader();
-
URL url = classLoader.getResource(path);
-
File file = new File(url.getFile());
-
return file.getAbsolutePath();
-
}
-
}
-
-
@Data@JsonIgnoreProperties(ignoreUnknown = true)
-
private static class KeyPairJwk {
-
String p;
-
String kty;
-
String q;
-
String d;
-
String e;
-
String kid;
-
String qi;
-
String dp;
-
String dq;
-
String n;
-
}
-
@Data@JsonIgnoreProperties(ignoreUnknown = true)
-
private static class PublicKeyJwk {
-
String kty;
-
String e;
-
String kid;
-
String n;
-
}
-
@Data@JsonIgnoreProperties(ignoreUnknown = true)
-
private static class JwtContent {
-
Map<String, Object> header;
-
Map<String, Object> body;
-
}
-
}
-
-
-
<dependency>
-
<groupId>io.jsonwebtoken</groupId>
-
<artifactId>jjwt-api</artifactId>
-
<version>0.11.2</version>
-
</dependency>
-
<dependency>
-
<groupId>io.jsonwebtoken</groupId>
-
<artifactId>jjwt-impl</artifactId>
-
<version>0.11.2</version>
-
<scope>runtime</scope>
-
</dependency>
-
<dependency>
-
<groupId>io.jsonwebtoken</groupId>
-
<artifactId>jjwt-jackson</artifactId> <!-- or jjwt-gson if Gson is preferred -->
-
<version>0.11.2</version>
-
<scope>runtime</scope>
-
</dependency>
-
<dependency>
-
<groupId>commons-codec</groupId>
-
<artifactId>commons-codec</artifactId>
-
<version>1.10</version>
-
</dependency>
-
<dependency>
-
<groupId>org.apache.commons</groupId>
-
<artifactId>commons-lang3</artifactId>
-
<version>3.4</version>
-
</dependency>
-
<dependency>
-
<groupId>org.projectlombok</groupId>
-
<artifactId>lombok</artifactId>
-
<scope>provided</scope>
-
<version>1.16.20</version>
-
</dependency>
-
<dependency>
-
<groupId>commons-io</groupId>
-
<artifactId>commons-io</artifactId>
-
<version>2.4</version>
-
</dependency>
https://www.example-code.com/java/publickey_rsa_load_jwk.asp Load RSA Public Key from JWK Format (JSON Web Key)
https://github.com/jwtk/jjwt jwt工具

 浙公网安备 33010602011771号