JavaSSM框架-MyBatis 框架-【MybatisPlus】SpringBoot3整合MybatisPlus
JavaSSM框架-MyBatis 框架(六)-CSDN博客
10. MyBatis的缓存
10.1 MyBatis的一级缓存
一级缓存是SqlSession级别的,通过同一个SqlSession查询的数据会被缓存,下次查询相同的数据,就会从缓存中直接获取,不会从数据库重新访问
使一级缓存失效的四种情况:
-
不同的SqlSession对应不同的一级缓存
-
同一个SqlSession但是查询条件不同
-
同一个SqlSession两次查询期间执行了任何一次增删改操作
-
同一个SqlSession两次查询期间手动清空了缓存
举例说明:
@Test
public void testGetEmpById() {
    SqlSession sqlSession1 = SqlSessionUtil.getSqlSession();
    CacheMapper mapper1 = sqlSession1.getMapper(CacheMapper.class);
    Emp emp1 = mapper1.getEmpById(1);
    System.out.println(emp1);
    // 同一个SqlSession两次查询期间执行了任何一次增删改操作
    //mapper1.insertEmp(new Emp(null,"小红",25,"女"));
    // 同一个SqlSession两次查询期间手动清空了缓存
    //sqlSession1.clearCache();
    Emp emp2 = mapper1.getEmpById(1);
    System.out.println(emp2);
    //SqlSession sqlSession2 = SqlSessionUtil.getSqlSession();
    //CacheMapper mapper2 = sqlSession2.getMapper(CacheMapper.class);
    //Emp emp3 = mapper2.getEmpById(1);
    //System.out.println(emp3);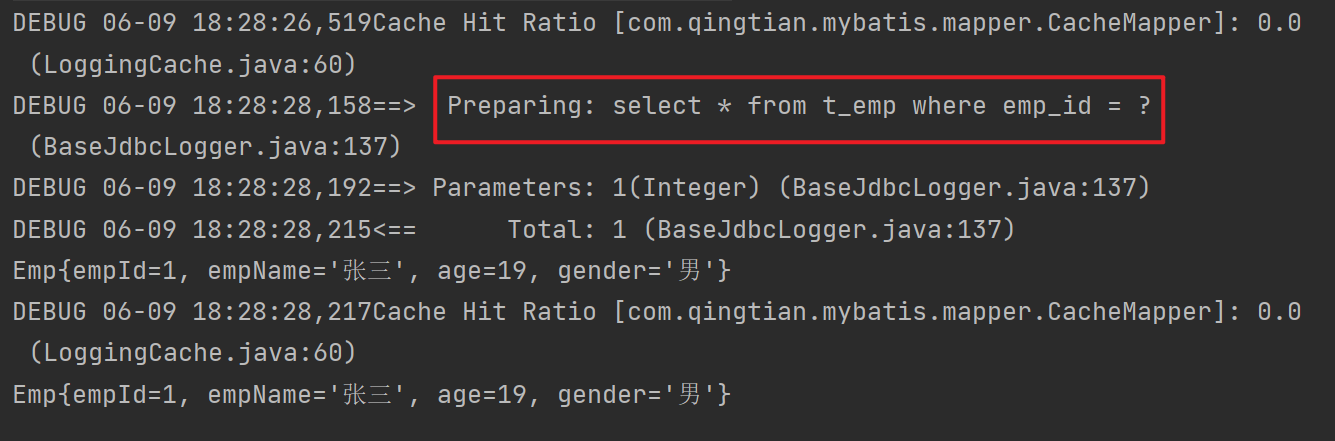
}上述代码执行结果如下图所示,SQL语句只执行了一次,可通过SQL语句执行的次数判断是从数据库中还是缓存中进行读取的。
10.2 MyBatis的二级缓存
二级缓存是SqlSessionFactory级别,通过同一个SqlSessionFactory创建的SqlSession查询的结果会被缓存;此后若再次执行相同的查询语句,结果就会从缓存中获取。
二级缓存开启的条件:
-
在核心配置文件中,设置全局配置属性
cacheEnabled="true",默认为true,不需要设置 -
在
mapper.xml映射文件中设置标签<cache/>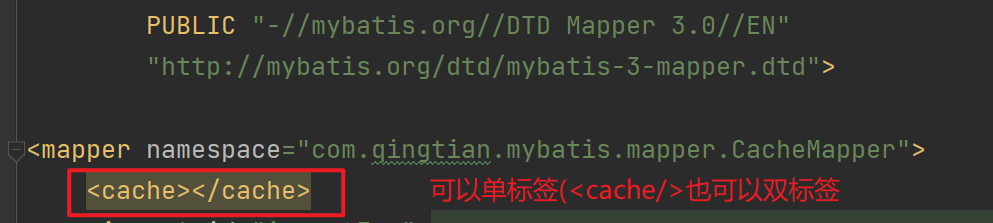
-
二级缓存必须在SqlSession关闭或提交之后有效,只有将SqlSession关闭之后,通过该SqlSession创建的一级缓存才会加载为二级缓存,即从SqlSession级别变成SqlSessionFactory级别

-
查询的数据所转换的
实体类类型必须实现序列化的接口如下图所示,实现该接口
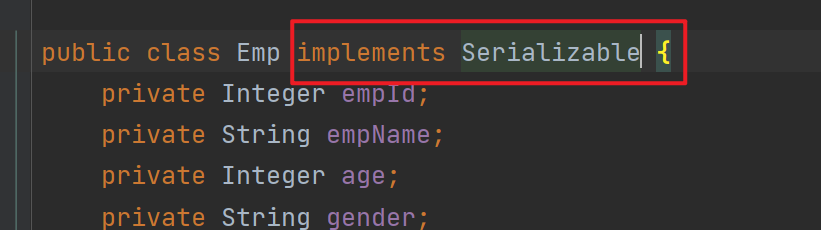
如果没有实现该接口,将会报以下错误

使二级缓存失效的情况:
- 两次查询之间执行了任意的增删改,会使一级和二级缓存同时失效
10.3 二级缓存的相关配置
在mapper配置文件中添加的cache标签可以设置一些属性:
-
eviction属性:缓存回收策略,默认的是 LRU。
- LRU(Least Recently Used) – 最近最少使用的:移除最长时间不被使用的对象。
- FIFO(First in First out) – 先进先出:按对象进入缓存的顺序来移除它们。
- SOFT – 软引用:移除基于垃圾回收器状态和软引用规则的对象。
- WEAK – 弱引用:更积极地移除基于垃圾收集器状态和弱引用规则的对象。
-
flushInterval属性:刷新间隔,单位毫秒
默认情况是不设置,也就是没有刷新间隔,缓存仅仅调用语句时刷新
-
size属性:引用数目,正整数
代表缓存最多可以存储多少个对象,太大容易导致内存溢出
-
readOnly属性:只读, true/false
- true:只读缓存;会给所有调用者返回缓存对象的相同实例。因此这些对象不能被修改。这提供了 很重要的性能优势。
- false:读写缓存;会返回缓存对象的拷贝(通过序列化)。这会慢一些,但是安全,因此默认是false。
当该属性为true时,通过缓存得到的对象,可以理解为是一个真正指向该对象的一个指针,如果修改了,即相当于修改了缓存中存的该对象,那么下次得到通过sql查询如果是通过缓存得到的,那么数据将变成修改过的,即导致了从数据库中查询出来的和缓存中的存的数据不一致,所以才只能读,而如果是false的话,那么相当于得到的是副本,无论怎么改都不会影响原来缓存中存的,但是性能肯定会变差,因为得进行拷贝等操作。
10.4 MyBatis缓存查询的顺序
先查询二级缓存,因为二级缓存中可能会有其他程序已经查出来的数据,可以拿来直接使用。
如果二级缓存没有命中,再查询一级缓存
如果一级缓存也没有命中,则查询数据库
SqlSession关闭之后,一级缓存中的数据会写入二级缓存
10.5 整合第三方缓存EHCache(了解)
10.5.1 添加依赖
<!-- Mybatis EHCache整合包 -->
<dependency>
    <groupId>org.mybatis.caches</groupId>
    <artifactId>mybatis-ehcache</artifactId>
    <version>1.2.1</version>
</dependency>
<!-- slf4j日志门面的一个具体实现 -->
<dependency>
    <groupId>ch.qos.logback</groupId>
    <artifactId>logback-classic</artifactId>
    <version>1.2.3</version>
</dependency>| jar包名称 | 作用 |
|---|---|
| mybatis-ehcache | Mybatis和EHCache的整合包 |
| ehcache | EHCache核心包 |
| slf4j-api | SLF4J日志门面包 |
| logback-classic | 支持SLF4J门面接口的一个具体实现 |
10.5.3 创建EHCache的配置文件
注意:名称必须为ehcache.xml
<?xml version="1.0" encoding="utf-8" ?>
<ehcache xmlns:xsi="http://www.w3.org/2001/XMLSchema-instance"
xsi:noNamespaceSchemaLocation="../config/ehcache.xsd">
	<!-- 磁盘保存路径 -->
	<diskStore path="D:\ehcache"/>
	<defaultCache
        maxElementsInMemory="1000"
        maxElementsOnDisk="10000000"
        eternal="false"
        overflowToDisk="true"
        timeToIdleSeconds="120"
        timeToLiveSeconds="120"
        diskExpiryThreadIntervalSeconds="120"
        memoryStoreEvictionPolicy="LRU">
	</defaultCache>
</ehcache>10.5.4 设置二级缓存的类型
在mapper.xml映射文件中的<cache>标签中添加type属性
<cache type="org.mybatis.caches.ehcache.EhcacheCache"/>10.5.5 加入logback日志
存在SLF4J时,作为简易日志的log4j将失效,此时我们需要借助SLF4J的具体实现logback来打印日志。 创建logback的配置文件logback.xml
<?xml version="1.0" encoding="UTF-8"?>
<configuration debug="true">
	<!-- 指定日志输出的位置 -->
	<appender name="STDOUT" class="ch.qos.logback.core.ConsoleAppender">
		<encoder>
            <!-- 日志输出的格式 -->
            <!-- 按照顺序分别是: 时间、日志级别、线程名称、打印日志的类、日志主体内容、换行-->
			<pattern>[%d{HH:mm:ss.SSS}] [%-5level] [%thread] [%logger][%msg]%n</pattern>
		</encoder>
	</appender>
    <!-- 设置全局日志级别。日志级别按顺序分别是: DEBUG、INFO、WARN、ERROR -->
    <!-- 指定任何一个日志级别都只打印当前级别和后面级别的日志。 -->
    <root level="DEBUG">
		<!-- 指定打印日志的appender,这里通过“STDOUT”引用了前面配置的appender -->
		<appender-ref ref="STDOUT" />
	</root>
	<!-- 根据特殊需求指定局部日志级别 -->
	<logger name="com.qingtian.mybatis.mapper" level="DEBUG"/>
</configuration>10.5.6 EHCache配置文件说明
| 属性名 | 是否必须 | 作用 |
|---|---|---|
| maxElementsInMemory | 是 | 在内存中缓存的element的最大数目 |
| maxElementsOnDisk | 是 | 在磁盘上缓存的element的最大数目,若是0表示无穷大 |
| eternal | 是 | 设定缓存的elements是否永远不过期。 如果为true,则缓存的数据始终有效, 如果为false那么还要根据timeToIdleSeconds、timeToLiveSeconds判断 |
| overflowToDisk | 是 | 设定当内存缓存溢出的时候是否将过期的element缓存到磁盘上 |
| timeToIdleSeconds | 否 | 当缓存在EhCache中的数据前后两次访问的时间超过timeToIdleSeconds的属性取值时, 这些数据便会删除,默认值是0,也就是可闲置时间无穷大 |
| timeToLiveSeconds | 否 | 缓存element的有效生命期,默认是0.,也就是element存活时间无穷大 |
| diskSpoolBufferSizeMB | 否 | DiskStore(磁盘缓存)的缓存区大小。默认是30MB。每个Cache都应该有自己的一个缓冲区 |
| diskPersistent | 否 | 在VM重启的时候是否启用磁盘保存EhCache中的数据,默认是false。 |
| diskExpiryThreadIntervalSeconds | 否 | 磁盘缓存的清理线程运行间隔,默认是120秒。每个120s, 相应的线程会进行一次EhCache中数据的清理工作 |
| memoryStoreEvictionPolicy | 否 | 当内存缓存达到最大,有新的element加入的时候, 移除缓存中element的策略。 默认是LRU (最近最少使用),可选的有LFU (最不常使用)和FIFO (先进先出) |
注意这个整合第三方EHCache是在二级缓存的基础上弄的,实现的功能跟二级缓存是一样的,只是内部实现不同,可能进行了改进或者优化之类的
【MybatisPlus】SpringBoot3整合MybatisPlus_mybatisplus springboot3-CSDN博客
一、依赖
-
<!-- springboot3 / mybatis-plus 配置,mybatis使用 3.5.16 版本,避免版本冲突 -->
-
<dependency>
-
<groupId>org.mybatis</groupId>
-
<artifactId>mybatis</artifactId>
-
<version>3.5.16</version>
-
</dependency>
-
<dependency>
-
<groupId>com.baomidou</groupId>
-
<artifactId>mybatis-plus-spring-boot3-starter</artifactId>
-
<version>${mybatis-plus-spring-boot3.version}</version>
-
</dependency>
-
<dependency>
-
<groupId>com.baomidou</groupId>
-
<artifactId>mybatis-plus-jsqlparser</artifactId>
-
<version>${mybatis-plus-spring-boot3.version}</version>
-
</dependency>
<mybatis-plus-spring-boot3.version>3.5.10</mybatis-plus-spring-boot3.version>二、yml 配置
application.yml
-
# MyBatis配置
-
#mybatis:
-
# # 搜索指定包别名
-
# typeAliasesPackage: com.leslie.**.domain
-
# # 配置mapper的扫描,找到所有的mapper.xml映射文件
-
# mapperLocations: classpath*:mapper/**/*Mapper.xml
-
# # 加载全局的配置文件
-
# configLocation: classpath:mybatis/mybatis-config.xml
-
-
# mybatis-plus配置
-
mybatis-plus:
-
# 配置mapper的扫描,找到所有的mapper.xml映射文件
-
mapper-locations: classpath*:mapper/**/*Mapper.xml
-
# 搜索指定包别名,多个用【;】分隔
-
type-aliases-package: com.leslie.**.domain;
-
global-config:
-
#数据库相关配置
-
db-config:
-
#主键类型 AUTO:"数据库ID自增", INPUT:"用户输入ID", ID_WORKER:"全局唯一ID (数字类型唯一ID)", UUID:"全局唯一ID UUID";
-
id-type: AUTO
-
logic-delete-value: 1 # 逻辑删除时,is_delete 为删除的值
-
logic-not-delete-value: 0 # 逻辑删除时,is_delete 为未删除的值
-
banner: false
-
#原生配置
-
configuration:
-
map-underscore-to-camel-case: true
-
cache-enabled: false
-
call-setters-on-nulls: true
-
# log-impl: org.apache.ibatis.logging.stdout.StdOutImpl #日志输出
-
-
# PageHelper分页插件
-
pagehelper:
-
helperDialect: mysql
-
supportMethodsArguments: true
-
params: count=countSql
三、xml 配置
mybatis-config.xml
-
-
-
PUBLIC "-//mybatis.org//DTD Config 3.0//EN"
-
"http://mybatis.org/dtd/mybatis-3-config.dtd">
-
<configuration>
-
<!-- 全局参数 -->
-
<settings>
-
<!-- 使全局的映射器启用或禁用缓存 -->
-
<setting name="cacheEnabled" value="true" />
-
<!-- 允许JDBC 支持自动生成主键 -->
-
<setting name="useGeneratedKeys" value="true" />
-
<!-- 配置默认的执行器.SIMPLE就是普通执行器;REUSE执行器会重用预处理语句(prepared statements);BATCH执行器将重用语句并执行批量更新 -->
-
<setting name="defaultExecutorType" value="SIMPLE" />
-
<!-- 指定 MyBatis 所用日志的具体实现 -->
-
<setting name="logImpl" value="SLF4J" />
-
<!-- 使用驼峰命名法转换字段 -->
-
<!-- <setting name="mapUnderscoreToCamelCase" value="true"/> -->
-
</settings>
-
-
</configuration>
四、config 配置
MybatisPlusConfig.java
-
import com.baomidou.mybatisplus.annotation.DbType;
-
import com.baomidou.mybatisplus.extension.plugins.MybatisPlusInterceptor;
-
import com.baomidou.mybatisplus.extension.plugins.inner.BlockAttackInnerInterceptor;
-
import com.baomidou.mybatisplus.extension.plugins.inner.OptimisticLockerInnerInterceptor;
-
import com.baomidou.mybatisplus.extension.plugins.inner.PaginationInnerInterceptor;
-
import org.springframework.context.annotation.Bean;
-
import org.springframework.context.annotation.Configuration;
-
import org.springframework.transaction.annotation.EnableTransactionManagement;
-
-
/**
-
* Mybatis Plus 配置
-
*/
-
-
-
public class MybatisPlusConfig {
-
-
public MybatisPlusInterceptor mybatisPlusInterceptor() {
-
MybatisPlusInterceptor interceptor = new MybatisPlusInterceptor();
-
// 分页插件
-
interceptor.addInnerInterceptor(paginationInnerInterceptor());
-
// 乐观锁插件
-
interceptor.addInnerInterceptor(optimisticLockerInnerInterceptor());
-
// 阻断插件
-
interceptor.addInnerInterceptor(blockAttackInnerInterceptor());
-
return interceptor;
-
}
-
-
/**
-
* 分页插件,自动识别数据库类型 <a href="https://baomidou.com/guide/interceptor-pagination.html">...</a>
-
*/
-
public PaginationInnerInterceptor paginationInnerInterceptor() {
-
PaginationInnerInterceptor paginationInnerInterceptor = new PaginationInnerInterceptor();
-
// 设置数据库类型为mysql
-
paginationInnerInterceptor.setDbType(DbType.MYSQL);
-
// 设置最大单页限制数量,默认 500 条,-1 不受限制
-
paginationInnerInterceptor.setMaxLimit(-1L);
-
return paginationInnerInterceptor;
-
}
-
-
/**
-
* 乐观锁插件 <a href="https://baomidou.com/guide/interceptor-optimistic-locker.html">...</a>
-
*/
-
public OptimisticLockerInnerInterceptor optimisticLockerInnerInterceptor() {
-
return new OptimisticLockerInnerInterceptor();
-
}
-
-
/**
-
* 如果是对全表的删除或更新操作,就会终止该操作 <a href="https://baomidou.com/guide/interceptor-block-attack.html">...</a>
-
*/
-
public BlockAttackInnerInterceptor blockAttackInnerInterceptor() {
-
return new BlockAttackInnerInterceptor();
-
}
-
}
五、使用
实体类
-
import com.alibaba.excel.annotation.ExcelIgnoreUnannotated;
-
import com.alibaba.excel.annotation.ExcelProperty;
-
import com.baomidou.mybatisplus.annotation.IdType;
-
import com.baomidou.mybatisplus.annotation.TableId;
-
import com.baomidou.mybatisplus.annotation.TableLogic;
-
import com.baomidou.mybatisplus.annotation.TableName;
-
import lombok.Data;
-
-
import java.io.Serial;
-
import java.io.Serializable;
-
import java.time.LocalDate;
-
-
/**
-
* @author Leslie Lee
-
* @version 2003/04/01
-
* @date 1956/09/12
-
*/
-
-
-
-
public class TestEntity implements Serializable {
-
-
private static final long serialVersionUID = 1L;
-
-
// @TableId(type = IdType.AUTO)
-
private Integer id;
-
-
-
private String name;
-
-
-
private String sex;
-
-
private LocalDate createTime;
-
-
private LocalDate updateTime;
-
-
-
private Integer isDelete;
-
-
}
@TableName("表名") :当实体类名与数据库表名不一致时,需用此注解来标明对应的表
@TableId(type = IdType.AUTO):如果 id 为自增,可用此注解进行标识
Mapper.java
-
import com.baomidou.mybatisplus.core.mapper.BaseMapper;
-
import com.leslie.ai.domain.TestEntity;
-
import org.apache.ibatis.annotations.Mapper;
-
-
import java.util.List;
-
-
/**
-
* Mapper 测试
-
*
-
* @author Leslie Lee
-
* @TIME 1956/09/12
-
* @Version 2003/04/01
-
*/
-
-
public interface TestEntityMapper extends BaseMapper<TestEntity> {
-
List<TestEntity> queryTestEntityList(TestEntity o);
-
}
@Mapper:动态代理,与 Mapper.xml 对应
extends BaseMapper<实体类>:提供基本的增删改查方法
Service.java
里面的方法需与 Mapper.java 中对应,deleteById 方法实现是用的自带的删除方法,所以不对应也不影响,但是需要重写 sql 语句的方法都要对应
-
import com.leslie.ai.domain.TestEntity;
-
-
import java.util.List;
-
-
/**
-
* Service
-
*
-
* @author Leslie Lee
-
* @TIME 1956/09/12
-
* @Version 2003/04/01
-
*/
-
public interface TestEntityService {
-
List<TestEntity> queryTestEntityList(TestEntity o);
-
int deleteById(Integer id);
-
}
ServiceImpl.java
直接使用 this.baseMapper 可以拿到Mapper.java 中对应的方法
-
import com.leslie.ai.domain.TestEntity;
-
import com.leslie.ai.mapper.TestEntityMapper;
-
import com.leslie.ai.service.TestEntityService;
-
import org.springframework.beans.factory.annotation.Autowired;
-
import org.springframework.stereotype.Service;
-
import com.baomidou.mybatisplus.extension.service.impl.ServiceImpl;
-
-
import java.util.List;
-
-
/**
-
* ServiceImpl
-
*
-
* @author Leslie Lee
-
* @TIME 1956/09/12
-
* @Version 2003/04/01
-
*/
-
-
public class TestEntityServiceImpl extends ServiceImpl<TestEntityMapper, TestEntity> implements TestEntityService {
-
-
-
public List<TestEntity> queryTestEntityList(TestEntity o) {
-
return this.baseMapper.queryTestEntityList(o);
-
}
-
-
-
public int deleteById(Integer id) {
-
return this.baseMapper.deleteById(id);
-
}
-
}
Mapper.xml
此类文件放在 resources 文件夹下,建议文件路径与实体类一致
namespace:对应实体类全路径
resultMap:方法返回参数,实体类使用表字段名驼峰命名时,不需要再写字段对应关系
-
-
-
PUBLIC "-//mybatis.org//DTD Mapper 3.0//EN"
-
"http://mybatis.org/dtd/mybatis-3-mapper.dtd">
-
<mapper namespace="com.leslie.ai.mapper.TestEntityMapper">
-
<!-- 实体类 -->
-
<resultMap type="TestEntity" id="TestEntityResult">
-
<!-- <result property="createTime" column="create_time" jdbcType="TIMESTAMP"/>-->
-
</resultMap>
-
-
<!-- sql语句 -->
-
<sql id="selectTestEntityList">
-
-
</sql>
-
-
<!-- 方法 -->
-
<select id="queryTestEntityList" parameterType="TestEntity" resultMap="TestEntityResult">
-
<include refid="selectTestEntityList"/>
-
<where>
-
<if test="fieldName != null and fieldName != ''"> and tableFieldName like concat('%', #{fieldName}, '%')</if>
-
<if test="startDate != null and startDate != ''">and applicationDate >= #{startDate}</if>
-
<if test="endDate != null and endDate != ''">and applicationDate <= #{endDate}</if>
-
</where>
-
</select>
-
</mapper>
六、逻辑删除
通过更改表的某一字段状态,区分是否删除
实体类
实体类增加字段:isDelete ===> 对应表字段 is_delete (也可以用其他字段,对应就行)
添加注解:@TableLogic
-
-
private Integer isDelete;
还可以添加两个字段:创建时间、修改时间
-
private LocalDate createTime; // create_time
-
-
private LocalDate updateTime; // update_time
yml 配置
-
logic-delete-value: 1 # 逻辑删除时,is_delete 为删除的值
-
logic-not-delete-value: 0 # 逻辑删除时,is_delete 为未删除的值
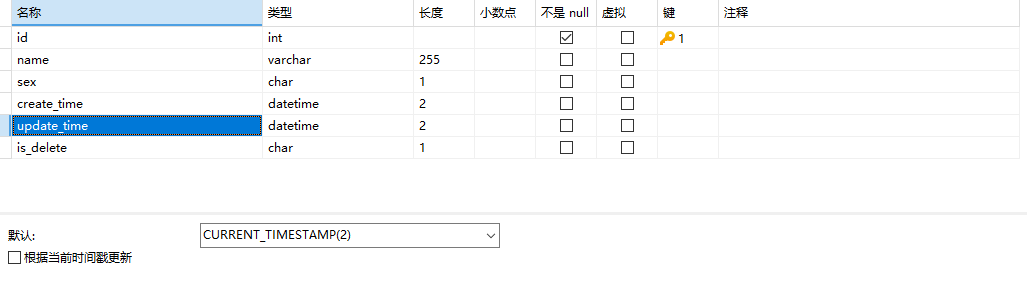
数据库
创建时间、修改时间,字段名就用下面的两个,
然后设置默认值 CURRENT_TIMESTAMP(2)
修改时间会在表数据变动时自动更新

 浙公网安备 33010602011771号