主板芯片组和内存映射
主板芯片组和内存映射
I’m going to write a few posts about computer internals with the goal of explaining how modern kernels work. I hope to make them useful to enthusiasts and programmers who are interested in this stuff but don’t have experience with it.
我将写一些有关计算机内部结构的文章,目的是解释现代内核的工作原理。我希望它们对那些对这些东西感兴趣但没有经验的爱好者和程序员有用。
The focus is on Linux, Windows, and Intel processors. Internals are a hobby for me, I have written a fair bit of kernel-mode code but haven’t done so in a while.
重点是 Linux、Windows 和 Intel 处理器。内部结构对我来说是一种爱好,我已经编写了相当多的内核模式代码,但有一段时间没有这样做了。
This first post describes the layout of modern Intel-based motherboards, how the CPU accesses memory and the system memory map.
第一篇文章介绍了现代基于 Intel 的主板的布局、CPU 如何访问内存以及系统内存映射。
To start off let’s take a look at how an Intel computer is wired up nowadays. The diagram below shows the main components in a motherboard and dubious color taste:
首先,让我们看一下现在的英特尔计算机是如何连接的。下图显示了主板中的主要组件和可疑的颜色味道:
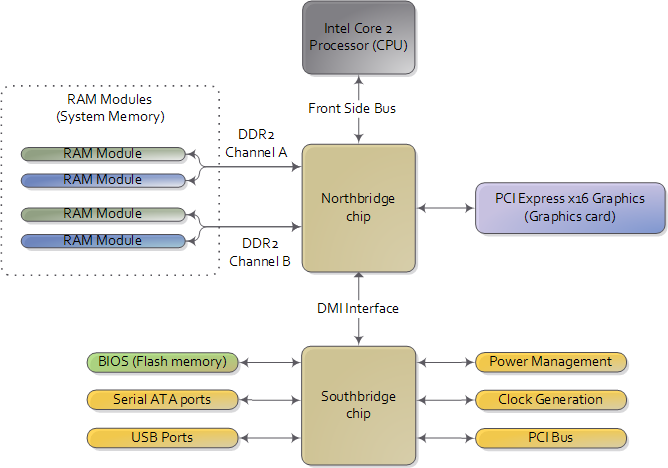
Diagram for modern motherboard. The northbridge and southbridge make up the chipset.
现代主板图。北桥和南桥组成了芯片组。
As you look at this, the crucial thing to keep in mind is that the CPU doesn’t really know anything about what it’s connected to. It talks to the outside world through its pins but it doesn’t care what that outside world is. It might be a motherboard in a computer but it could be a toaster, network router, brain implant, or CPU test bench.
当您看到这一点时,要记住的关键一点是 CPU 并不真正了解它所连接的内容。它通过引脚与外部世界对话,但它并不关心外部世界是什么。它可能是计算机中的主板,也可能是烤面包机、网络路由器、大脑植入物或 CPU 测试台。
There are three main ways by which the CPU and the outside communicate: memory address space, I/O address space, and interrupts. We only worry about motherboards and memory for now.
CPU与外界通信的方式主要有三种:内存地址空间、I/O地址空间和中断。我们现在只担心主板和内存。
In a motherboard the CPU’s gateway to the world is the front-side bus connecting it to the northbridge. Whenever the CPU needs to read or write memory it does so via this bus.
在主板中,CPU 通往世界的门户是将其连接到北桥的前端总线。每当 CPU 需要读取或写入内存时,它都会通过该总线进行。
It uses some pins to transmit the physical memory address it wants to write or read, while other pins send the value to be written or receive the value being read.
它使用一些引脚来传输它想要写入或读取的物理内存地址,而其他引脚则发送要写入的值或接收正在读取的值。
An Intel Core 2 QX6600 has 33 pins to transmit the physical memory address (so there are 2^33^ choices of memory locations) and 64 pins to send or receive data (so data is transmitted in a 64-bit data path, or 8-byte chunks).
Intel Core 2 QX6600 有 33 个引脚用于传输物理内存地址(因此有 2^33^ 种内存位置选择)和 64 个引脚用于发送或接收数据(因此数据在 64 位数据路径中传输,即 8 -字节块)。
This allows the CPU to physically address 64 gigabytes of memory (2^33^ locations * 8 bytes) although most chipsets only handle up to 8 gigs of RAM.
这使得 CPU 能够对 64 GB 内存进行物理寻址(2^33^ 位置 * 8 字节),尽管大多数芯片组最多只能处理 8 GB RAM。
Now comes the rub. We’re used to thinking of memory only in terms of RAM, the stuff programs read from and write to all the time. And indeed most of the memory requests from the processor are routed to RAM modules by the northbridge. But not all of them.
现在麻烦来了。我们习惯于仅从 RAM 的角度来考虑内存,而 RAM 是程序始终读取和写入的东西。事实上,来自处理器的大部分内存请求都通过北桥路由到 RAM 模块。但不是全部。
Physical memory addresses are also used for communication with assorted devices on the motherboard (this communication is called memory-mapped I/O). These devices include video cards, most PCI cards (say, a scanner or SCSI card), and also the flash memory that stores the BIOS.
物理内存地址还用于与主板上的各种设备进行通信(这种通信称为内存映射 I/O)。这些设备包括视频卡、大多数 PCI 卡(例如扫描仪或 SCSI 卡)以及存储 BIOS 的闪存。
When the northbridge receives a physical memory request it decides where to route it: should it go to RAM? Video card maybe? This routing is decided via the memory address map. For each region of physical memory addresses, the memory map knows the device that owns that region.
当北桥收到物理内存请求时,它会决定将其路由到何处:是否应该发送到 RAM?也许是视频卡?该路由是通过内存地址映射决定的。对于物理内存地址的每个区域,内存映射都知道拥有该区域的设备。
The bulk of the addresses are mapped to RAM, but when they aren’t the memory map tells the chipset which device should service requests for those addresses. This mapping of memory addresses away from RAM modules causes the classic hole in PC memory between 640KB and 1MB.
大部分地址都映射到 RAM,但当它们没有映射到 RAM 时,内存映射会告诉芯片组哪个设备应该为这些地址的请求提供服务。这种内存地址与 RAM 模块的映射导致 PC 内存中出现 640KB 到 1MB 之间的经典漏洞。
A bigger hole arises when memory addresses are reserved for video cards and PCI devices. This is why 32-bit OSes have problems using 4 gigs of RAM. In Linux the file /proc/iomem neatly lists these address range mappings. The diagram below shows a typical memory map for the first 4 gigs of physical memory addresses in an Intel PC:
当内存地址为显卡和 PCI 设备保留时,就会出现更大的漏洞。这就是 32 位操作系统在使用 4 GB RAM 时出现问题的原因。在 Linux 中,文件 /proc/iomem 整齐地列出了这些地址范围映射。下图显示了 Intel PC 中前 4 GB 物理内存地址的典型内存映射:
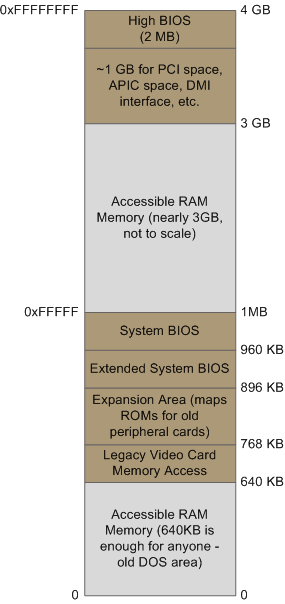
Memory layout for the first 4 gigabytes in an Intel system.
Intel 系统中前 4 GB 的内存布局。
Actual addresses and ranges depend on the specific motherboard and devices present in the computer, but most Core 2 systems are pretty close to the above. All of the brown regions are mapped away from RAM. Remember that these are physical addresses that are used on the motherboard buses. Inside the CPU (for example, in the programs we run and write), the memory addresses are logical and they must be translated by the CPU into a physical address before memory is accessed on the bus.
实际地址和范围取决于计算机中存在的特定主板和设备,但大多数 Core 2 系统与上述非常接近。所有棕色区域都远离 RAM 进行映射。请记住,这些是主板总线上使用的物理地址。在CPU内部(例如,在我们运行和编写的程序中),内存地址是逻辑地址,在总线上访问内存之前,它们必须由CPU转换为物理地址。
The rules for translation of logical addresses into physical addresses are complex and they depend on the mode in which the CPU is running (real mode, 32-bit protected mode, and 64-bit protected mode). Regardless of the translation mechanism, the CPU mode determines how much physical memory can be accessed.
逻辑地址到物理地址的转换规则很复杂,并且取决于CPU运行的模式(实模式、32位保护模式和64位保护模式)。无论采用何种转换机制,CPU 模式都决定了可以访问多少物理内存。
For example, if the CPU is running in 32-bit mode, then it is only capable of physically addressing 4 GB (well, there is an exception called physical address extension, but ignore it for now). Since the top 1 GB or so of physical addresses are mapped to motherboard devices the CPU can effectively use only ~3 GB of RAM (sometimes less - I have a Vista machine where only 2.4 GB are usable). If the CPU is in real mode, then it can only address 1 megabyte of physical RAM (this is the only mode early Intel processors were capable of). On the other hand, a CPU running in 64-bit mode can physically access 64GB (few chipsets support that much RAM though).
例如,如果CPU运行在32位模式下,那么它只能物理寻址4GB(好吧,有一个例外,称为物理地址扩展,但现在忽略它)。由于顶部 1 GB 左右的物理地址映射到主板设备,CPU 只能有效使用约 3 GB 的 RAM(有时更少 - 我有一台 Vista 机器,其中只有 2.4 GB 可用)。如果 CPU 处于实模式,则它只能寻址 1 MB 的物理 RAM(这是早期 Intel 处理器能够处理的唯一模式)。另一方面,运行在 64 位模式下的 CPU 可以物理访问 64GB(但很少有芯片组支持这么多 RAM)。
In 64-bit mode it is possible to use physical addresses above the total RAM in the system to access the RAM regions that correspond to physical addresses stolen by motherboard devices. This is called reclaiming memory and it’s done with help from the chipset.
在 64 位模式下,可以使用系统中总 RAM 之上的物理地址来访问与主板设备窃取的物理地址相对应的 RAM 区域。这称为回收内存,它是在芯片组的帮助下完成的。
That’s all the memory we need for the next post, which describes the boot process from power up until the boot loader is about to jump into the kernel. If you’d like to learn more about this stuff, I highly recommend the Intel manuals.
这就是我们下一篇文章所需的全部内存,它描述了从加电到引导加载程序即将跳转到内核的引导过程。如果您想了解更多有关这些内容的信息,我强烈推荐英特尔手册。
I’m big into primary sources overall, but the Intel manuals in particular are well written and accurate. Here are some:
总的来说,我很喜欢原始资料,但英特尔手册尤其写得很好而且很准确。这里有一些:
- Datasheet for Intel G35 Chipset documents a representative chipset for Core 2 processors. This is the main source for this post.
Intel G35 芯片组数据表记录了 Core 2 处理器的代表性芯片组。这是这篇文章的主要来源。 - Datasheet for Intel Core 2 Quad-Core Q6000 Sequence is a processor datasheet. It documents each pin in the processor (there aren’t that many actually, and after you group them there’s really not a lot to it). Fascinating stuff, though some bits are arcane.
Intel Core 2 四核 Q6000 序列的数据表是处理器数据表。它记录了处理器中的每个引脚(实际上没有那么多,将它们分组后,实际上并没有很多)。令人着迷的东西,尽管有些部分是神秘的。 - The Intel Software Developer’s Manuals are outstanding. Far from arcane, they explain beautifully all sorts of things about the architecture. Volumes 1 and 3A have the good stuff (don’t be put off by the name, the “volumes” are small and you can read selectively).
英特尔软件开发人员手册非常出色。它们绝非晦涩难懂,而是精美地解释了有关建筑的各种事情。第 1 卷和第 3A 卷有好东西(不要被名字吓倒,“卷”很小,你可以选择性地阅读)。 - Pádraig Brady suggested that I link to Ulrich Drepper’s excellent paper on memory. It’s great stuff. I was waiting to link to it in a post about memory, but the more the merrier.
Pádraig Brady 建议我链接到 Ulrich Drepper 关于记忆的优秀论文。这是很棒的东西。我正在等待在一篇关于记忆的帖子中链接到它,但越多越好。
CPU Rings, Privilege, and Protection
You probably know intuitively that applications have limited powers in Intel x86 computers and that only operating system code can perform certain tasks, but do you know how this really works? This post takes a look at x86 privilege levels, the mechanism whereby the OS and CPU conspire to restrict what user-mode programs can do.
您可能凭直觉知道应用程序在 Intel x86 计算机中的能力有限,并且只有操作系统代码才能执行某些任务,但您知道这实际上是如何工作的吗?这篇文章探讨了 x86 特权级别,这是操作系统和 CPU 共同限制用户模式程序可以执行的操作的机制。
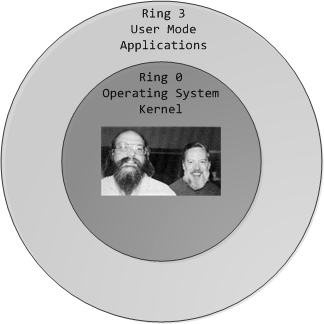
There are four privilege levels, numbered 0 (most privileged) to 3 (least privileged), and three main resources being protected: memory, I/O ports, and the ability to execute certain machine instructions.
有四个权限级别,编号为 0(最高权限)到 3(最低权限),以及受保护的三个主要资源:内存、I/O 端口以及执行某些机器指令的能力。
At any given time, an x86 CPU is running in a specific privilege level, which determines what code can and cannot do. These privilege levels are often described as protection rings, with the innermost ring corresponding to highest privilege.
在任何给定时间,x86 CPU 都以特定的权限级别运行,这决定了代码可以做什么和不能做什么。这些特权级别通常被描述为保护环,最内层的环对应于最高特权。
Most modern x86 kernels use only two privilege levels, 0 and 3:
大多数现代 x86 内核仅使用两个特权级别:0 和 3:
x86 Protection Rings
x86 保护环
About 15 machine instructions, out of dozens, are restricted by the CPU to ring zero. Many others have limitations on their operands. These instructions can subvert the protection mechanism or otherwise foment chaos if allowed in user mode, so they are reserved to the kernel.
CPU 限制数十条机器指令中的约 15 条为环零。许多其他人对其操作数都有限制。如果在用户模式下允许,这些指令可能会破坏保护机制或以其他方式引发混乱,因此它们被保留给内核。
An attempt to run them outside of ring zero causes a general-protection exception, like when a program uses invalid memory addresses. Likewise, access to memory and I/O ports is restricted based on privilege level. But before we look at protection mechanisms, let's see exactly how the CPU keeps track of the current privilege level, which involves the segment selectors from the previous post. Here they are:
尝试在环零之外运行它们会导致一般保护异常,就像程序使用无效内存地址时一样。同样,对内存和 I/O 端口的访问也根据权限级别受到限制。但在我们研究保护机制之前,让我们先看看 CPU 如何跟踪当前的特权级别,这涉及到上一篇文章中的段选择器。他们来了:
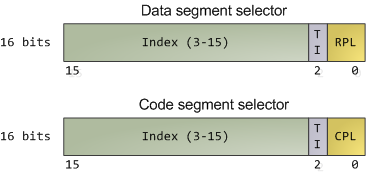
Segment Selectors - Data and Code
段选择器 - 数据和代码
The full contents of data segment selectors are loaded directly by code into various segment registers such as ss (stack segment register) and ds (data segment register). This includes the contents of the Requested Privilege Level (RPL) field, whose meaning we tackle in a bit.
数据段选择器的全部内容通过代码直接加载到各种段寄存器中,例如ss(堆栈段寄存器)和ds(数据段寄存器)。这包括请求权限级别 (RPL) 字段的内容,我们稍后会讨论其含义。
The code segment register (cs) is, however, magical. First, its contents cannot be set directly by load instructions such as mov, but rather only by instructions that alter the flow of program execution, like call.
然而,代码段寄存器(cs)很神奇。首先,它的内容不能直接由加载指令(如 mov)设置,而只能由改变程序执行流程的指令(如 call)设置。
Second, and importantly for us, instead of an RPL field that can be set by code, cs has a Current Privilege Level (CPL) field maintained by the CPU itself. This 2-bit CPL field in the code segment register is always equal to the CPU's current privilege level. The Intel docs wobble a little on this fact, and sometimes online documents confuse the issue, but that's the hard and fast rule.
其次,对我们来说重要的是,cs 没有可以通过代码设置的 RPL 字段,而是有一个由 CPU 本身维护的当前权限级别 (CPL) 字段。代码段寄存器中的这个 2 位 CPL 字段始终等于 CPU 的当前特权级别。英特尔文档在这一事实上有些摇摆不定,有时在线文档混淆了这个问题,但这是硬性规定。
At any time, no matter what's going on in the CPU, a look at the CPL in cs will tell you the privilege level code is running with.
任何时候,无论 CPU 发生什么情况,查看 cs 中的 CPL 都会告诉您代码正在运行的权限级别。
Keep in mind that the CPU privilege level has nothing to do with operating system users. Whether you're root, Administrator, guest, or a regular user, it does not matter. All user code runs in ring 3 and all kernel code runs in ring 0, regardless of the OS user on whose behalf the code operates.
请记住,CPU 权限级别与操作系统用户无关。无论您是 root、管理员、来宾还是普通用户,都没有关系。所有用户代码都在环 3 中运行,所有内核代码在环 0 中运行,无论代码代表哪个操作系统用户运行。
Sometimes certain kernel tasks can be pushed to user mode, for example user-mode device drivers in Windows Vista, but these are just special processes doing a job for the kernel and can usually be killed without major consequences.
有时某些内核任务可以推送到用户模式,例如 Windows Vista 中的用户模式设备驱动程序,但这些只是为内核执行工作的特殊进程,通常可以被终止而不会产生重大后果。
Due to restricted access to memory and I/O ports, user mode can do almost nothing to the outside world without calling on the kernel. It can't open files, send network packets, print to the screen, or allocate memory. User processes run in a severely limited sandbox set up by the gods of ring zero. That's why it's impossible, by design, for a process to leak memory beyond its existence or leave open files after it exits.
由于对内存和 I/O 端口的访问受到限制,用户模式在不调用内核的情况下几乎无法对外界执行任何操作。它无法打开文件、发送网络数据包、打印到屏幕或分配内存。用户进程在零环诸神设置的严格限制的沙箱中运行。这就是为什么按照设计,进程不可能泄漏超出其存在范围的内存或在退出后留下打开的文件。
All of the data structures that control such things - memory, open files, etc - cannot be touched directly by user code; once a process finishes, the sandbox is torn down by the kernel.
所有控制此类事物的数据结构——内存、打开的文件等——都不能被用户代码直接触及;一旦进程完成,沙箱就会被内核拆除。
That's why our servers can have 600 days of uptime - as long as the hardware and the kernel don't crap out, stuff can run for ever.
这就是为什么我们的服务器可以有 600 天的正常运行时间 - 只要硬件和内核不崩溃,东西就可以永远运行。
This is also why Windows 95 / 98 crashed so much: it's not because "M$ sucks" but because important data structures were left accessible to user mode for compatibility reasons. It was probably a good trade-off at the time, albeit at high cost.
这也是 Windows 95 / 98 如此频繁崩溃的原因:并不是因为“M$ 很糟糕”,而是因为出于兼容性原因,重要的数据结构被保留给用户模式访问。这在当时可能是一个很好的权衡,尽管成本很高。
The CPU protects memory at two crucial points: when a segment selector is loaded and when a page of memory is accessed with a linear address. Protection thus mirrors memory address translation where both segmentation and paging are involved. When a data segment selector is being loaded, the check below takes place:
CPU 在两个关键点保护内存:加载段选择器时以及使用线性地址访问内存页时。因此,保护反映了涉及分段和分页的内存地址转换。当加载数据段选择器时,会进行以下检查:

x86 Segment Protection
x86 段保护
Since a higher number means less privilege, MAX() above picks the least privileged of CPL and RPL, and compares it to the descriptor privilege level (DPL). If the DPL is higher or equal, then access is allowed.
由于数字越大意味着特权越少,因此上面的 MAX() 选择 CPL 和 RPL 中特权最小的一个,并将其与描述符特权级别 (DPL) 进行比较。如果 DPL 更高或相等,则允许访问。
The idea behind RPL is to allow kernel code to load a segment using lowered privilege. For example, you could use an RPL of 3 to ensure that a given operation uses segments accessible to user-mode.
RPL 背后的想法是允许内核代码使用降低的权限加载段。例如,您可以使用 RPL 3 来确保给定操作使用用户模式可访问的段。
The exception is for the stack segment register ss, for which the three of CPL, RPL, and DPL must match exactly.
堆栈段寄存器 ss 是个例外,CPL、RPL 和 DPL 三者必须完全匹配。
In truth, segment protection scarcely matters because modern kernels use a flat address space where the user-mode segments can reach the entire linear address space. Useful memory protection is done in the paging unit when a linear address is converted into a physical address.
事实上,段保护几乎不重要,因为现代内核使用平面地址空间,其中用户模式段可以到达整个线性地址空间。当线性地址转换为物理地址时,在分页单元中完成有用的内存保护。
Each memory page is a block of bytes described by a page table entry containing two fields related to protection: a supervisor flag and a read/write flag. The supervisor flag is the primary x86 memory protection mechanism used by kernels. When it is on, the page cannot be accessed from ring 3. While the read/write flag isn't as important for enforcing privilege, it's still useful.
每个内存页都是由页表条目描述的字节块,其中包含与保护相关的两个字段:管理员标志和读/写标志。 Supervisor 标志是内核使用的主要 x86 内存保护机制。当它打开时,无法从环 3 访问该页。虽然读/写标志对于强制执行权限并不那么重要,但它仍然很有用。
When a process is loaded, pages storing binary images (code) are marked as read only, thereby catching some pointer errors if a program attempts to write to these pages. This flag is also used to implement copy on write when a process is forked in Unix. Upon forking, the parent's pages are marked read only and shared with the forked child.
加载进程时,存储二进制图像(代码)的页面被标记为只读,从而在程序尝试写入这些页面时捕获一些指针错误。当在 Unix 中分叉进程时,该标志还用于实现写入时复制。分叉后,父级页面被标记为只读并与分叉的子级共享。
If either process attempts to write to the page, the processor triggers a fault and the kernel knows to duplicate the page and mark it read/write for the writing process.
如果任一进程尝试写入该页面,处理器就会触发错误,并且内核知道复制该页面并将其标记为可读写以供写入进程使用。
Finally, we need a way for the CPU to switch between privilege levels. If ring 3 code could transfer control to arbitrary spots in the kernel, it would be easy to subvert the operating system by jumping into the wrong (right?) places. A controlled transfer is necessary.
最后,我们需要一种让 CPU 在特权级别之间切换的方法。如果环 3 代码可以将控制权转移到内核中的任意位置,那么通过跳转到错误(对吗?)的位置来破坏操作系统就很容易了。受控转移是必要的。
This is accomplished via gate descriptors and via the sysenter instruction. A gate descriptor is a segment descriptor of type system, and comes in four sub-types: call-gate descriptor, interrupt-gate descriptor, trap-gate descriptor, and task-gate descriptor.
这是通过门描述符和 sysenter 指令完成的。门描述符是类型系统的段描述符,有四种子类型:调用门描述符、中断门描述符、陷阱门描述符和任务门描述符。
Call gates provide a kernel entry point that can be used with ordinary call and jmp instructions, but they aren't used much so I'll ignore them. Task gates aren't so hot either (in Linux, they are only used in double faults, which are caused by either kernel or hardware problems).
调用门提供了一个内核入口点,可以与普通的 call 和 jmp 指令一起使用,但它们使用得不多,所以我将忽略它们。任务门也不是那么热门(在 Linux 中,它们仅用于由内核或硬件问题引起的双重故障)。
That leaves two juicier ones: interrupt and trap gates, which are used to handle hardware interrupts (e.g., keyboard, timer, disks) and exceptions (e.g., page faults, divide by zero). I'll refer to both as an "interrupt". These gate descriptors are stored in the Interrupt Descriptor Table (IDT). Each interrupt is assigned a number between 0 and 255 called a vector, which the processor uses as an index into the IDT when figuring out which gate descriptor to use when handling the interrupt. Interrupt and trap gates are nearly identical. Their format is shown below along with the privilege checks enforced when an interrupt happens.
剩下两个更有趣的:中断门和陷阱门,它们用于处理硬件中断(例如键盘、定时器、磁盘)和异常(例如页面错误、除以零)。我将两者都称为“中断”。这些门描述符存储在中断描述符表(IDT)中。每个中断都被分配一个 0 到 255 之间的数字,称为向量,处理器在确定处理中断时使用哪个门描述符时,将其用作 IDT 的索引。中断门和陷阱门几乎相同。它们的格式以及中断发生时强制执行的权限检查如下所示。
I filled in some values for the Linux kernel to make things concrete.
我为 Linux 内核填充了一些值以使事情变得具体。

Interrupt Descriptor with Privilege Check
带权限检查的中断描述符
Both the DPL and the segment selector in the gate regulate access, while segment selector plus offset together nail down an entry point for the interrupt handler code. Kernels normally use the segment selector for the kernel code segment in these gate descriptors.
门中的 DPL 和段选择器都调节访问,而段选择器加上偏移量共同确定中断处理程序代码的入口点。内核通常在这些门描述符中使用内核代码段的段选择器。
An interrupt can never transfer control from a more-privileged to a less-privileged ring. Privilege must either stay the same (when the kernel itself is interrupted) or be elevated (when user-mode code is interrupted).
中断永远无法将控制权从特权较高的环转移到特权较低的环。权限必须保持不变(当内核本身被中断时)或提升(当用户模式代码被中断时)。
In either case, the resulting CPL will be equal to to the DPL of the destination code segment; if the CPL changes, a stack switch also occurs. If an interrupt is triggered by code via an instruction like int n, one more check takes place: the gate DPL must be at the same or lower privilege as the CPL. This prevents user code from triggering random interrupts. If these checks fail - you guessed it - a general-protection exception happens.
无论哪种情况,生成的 CPL 将等于目标代码段的 DPL;如果CPL发生变化,也会发生堆栈切换。如果代码通过 int n 等指令触发中断,则会进行另一项检查:门 DPL 必须具有与 CPL 相同或更低的特权。这可以防止用户代码触发随机中断。如果这些检查失败——你猜对了——就会发生一般保护异常。
All Linux interrupt handlers end up running in ring zero.
所有 Linux 中断处理程序最终都在零环中运行。
During initialization, the Linux kernel first sets up an IDT in setup_idt() that ignores all interrupts. It then uses functions in include/asm-x86/desc.h to flesh out common IDT entries in arch/x86/kernel/traps_32.c. In Linux, a gate descriptor with "system" in its name is accessible from user mode and its set function uses a DPL of 3. A "system gate" is an Intel trap gate accessible to user mode. Otherwise, the terminology matches up.
在初始化过程中,Linux 内核首先在 setup_idt() 中设置一个 IDT,忽略所有中断。然后,它使用 include/asm-x86/desc.h 中的函数充实 arch/x86/kernel/traps_32.c 中的常见 IDT 条目。在 Linux 中,名称中带有“系统”的门描述符可从用户模式访问,其设置函数使用 DPL 3。“系统门”是用户模式可访问的 Intel 陷阱门。否则,术语就会匹配。
Hardware interrupt gates are not set here however, but instead in the appropriate drivers.
然而,硬件中断门不是在这里设置的,而是在适当的驱动程序中设置的。
Three gates are accessible to user mode: vectors 3 and 4 are used for debugging and checking for numeric overflows, respectively. Then a system gate is set up for the SYSCALL_VECTOR, which is 0x80 for the x86 architecture. This was the mechanism for a process to transfer control to the kernel, to make a system call, and back in the day I applied for an "int 0x80" vanity license plate :). Starting with the Pentium Pro, the sysenter instruction was introduced as a faster way to make system calls. It relies on special-purpose CPU registers that store the code segment, entry point, and other tidbits for the kernel system call handler.
用户模式可访问三个门:向量 3 和 4 分别用于调试和检查数字溢出。然后为SYSCALL_VECTOR设置一个系统门,对于x86架构来说是0x80。这是进程将控制权转移到内核、进行系统调用的机制,回到我申请“int 0x80”虚荣牌照的那天:)。从 Pentium Pro 开始,引入了 sysenter 指令作为进行系统调用的更快方式。它依赖于专用 CPU 寄存器来存储内核系统调用处理程序的代码段、入口点和其他花絮。
When sysenter is executed the CPU does no privilege checking, going immediately into CPL 0 and loading new values into the registers for code and stack (cs, eip, ss, and esp). Only ring zero can load the sysenter setup registers, which is done in enable_sep_cpu().
执行 sysenter 时,CPU 不进行特权检查,而是立即进入 CPL 0 并将新值加载到代码和堆栈寄存器(cs、eip、ss 和 esp)中。只有ring 0 可以加载sysenter 设置寄存器,这是在enable_sep_cpu() 中完成的。
Finally, when it's time to return to ring 3, the kernel issues an iret or sysexit instruction to return from interrupts and system calls, respectively, thus leaving ring 0 and resuming execution of user code with a CPL of 3. Vim tells me I'm approaching 1,900 words, so I/O port protection is for another day. This concludes our tour of x86 rings and protection.
最后,当返回到环 3 时,内核发出 iret 或 sysexit 指令分别从中断和系统调用返回,从而离开环 0 并恢复执行 CPL 为 3 的用户代码。Vim 告诉我我'我接近 1,900 个字,所以 I/O 端口保护改天再说。我们的 x86 环和保护之旅到此结束。
Memory Translation and Segmentation
This post is the first in a series about memory and protection in Intel-compatible (x86) computers, going further down the path of how kernels work. As in the boot series, I'll link to Linux kernel sources but give Windows examples as well (sorry, I'm ignorant about the BSDs and the Mac, but most of the discussion applies). Let me know what I screw up.
这篇文章是有关 Intel 兼容 (x86) 计算机内存和保护的系列文章中的第一篇,进一步探讨了内核的工作原理。与引导系列中一样,我将链接到 Linux 内核源代码,但也会提供 Windows 示例(抱歉,我对 BSD 和 Mac 不了解,但大多数讨论都适用)。让我知道我搞砸了什么。
In the chipsets that power Intel motherboards, memory is accessed by the CPU via the front side bus, which connects it to the northbridge chip. The memory addresses exchanged in the front side bus are physical memory addresses, raw numbers from zero to the top of the available physical memory. These numbers are mapped to physical RAM sticks by the northbridge. Physical addresses are concrete and final - no translation, no paging, no privilege checks - you put them on the bus and that's that.
在为英特尔主板供电的芯片组中,CPU 通过前端总线访问内存,前端总线将内存连接到北桥芯片。在前端总线中交换的内存地址是物理内存地址,是从零到可用物理内存顶部的原始数字。这些数字通过北桥映射到物理 RAM 棒。物理地址是具体的、最终的——没有转换、没有分页、没有特权检查——你把它们放在总线上就这样了。
Within the CPU, however, programs use logical memory addresses, which must be translated into physical addresses before memory access can take place. Conceptually address translation looks like this:
然而,在 CPU 内,程序使用逻辑内存地址,在进行内存访问之前必须将其转换为物理地址。从概念上讲,地址转换如下所示:
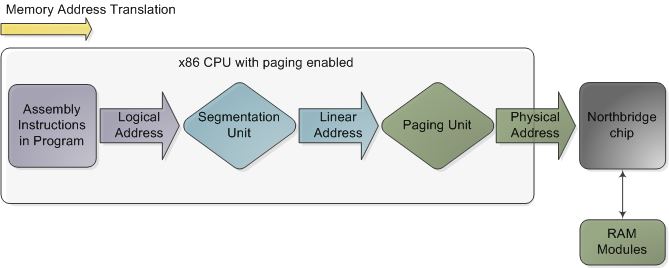
Memory address translation in x86 CPUs with paging enabled
启用分页的 x86 CPU 中的内存地址转换
This is not a physical diagram, only a depiction of the address translation process, specifically for when the CPU has paging enabled. If you turn off paging, the output from the segmentation unit is already a physical address; in 16-bit real mode that is always the case.
这不是物理图,只是地址转换过程的描述,特别是当 CPU 启用分页时。如果关闭分页,分段单元的输出已经是物理地址;在 16 位实模式下总是如此。
Translation starts when the CPU executes an instruction that refers to a memory address. The first step is translating that logic address into a linear address. But why go through this step instead of having software use linear (or physical) addresses directly? For roughly the same reason humans have an appendix whose primary function is getting infected. It's a wrinkle of evolution.
当 CPU 执行引用内存地址的指令时,翻译就会开始。第一步是将逻辑地址转换为线性地址。但是为什么要执行此步骤而不是让软件直接使用线性(或物理)地址呢?出于大致相同的原因,人类有一个阑尾,其主要功能是被感染。这是进化的一个皱纹。
To really make sense of x86 segmentation we need to go back to 1978.
要真正理解 x86 分段,我们需要回到 1978 年。
The original 8086 had 16-bit registers and its instructions used mostly 8-bit or 16-bit operands. This allowed code to work with 216 bytes, or 64K of memory, yet Intel engineers were keen on letting the CPU use more memory without expanding the size of registers and instructions. So they introduced segment registers as a means to tell the CPU which 64K chunk of memory a program's instructions were going to work on.
最初的8086有16位寄存器,其指令大多使用8位或16位操作数。这允许代码使用 2 16 字节或 64K 内存,但英特尔工程师热衷于让 CPU 使用更多内存,而不扩展寄存器和指令的大小。因此,他们引入了段寄存器,作为告诉 CPU 程序指令将处理哪个 64K 内存块的方法。
It was a reasonable solution: first you load a segment register, effectively saying "here, I want to work on the memory chunk starting at X"; afterwards, 16-bit memory addresses used by your code are interpreted as offsets into your chunk, or segment.
这是一个合理的解决方案:首先加载一个段寄存器,有效地表示“在这里,我想处理从 X 开始的内存块”;之后,代码使用的 16 位内存地址将被解释为块或段的偏移量。
There were four segment registers: one for the stack (ss), one for program code (cs), and two for data (ds, es). Most programs were small enough back then to fit their whole stack, code, and data each in a 64K segment, so segmentation was often transparent.
有四个段寄存器:一个用于堆栈(ss),一个用于程序代码(cs),两个用于数据(ds,es)。当时大多数程序都足够小,可以将整个堆栈、代码和数据放入 64K 段中,因此分段通常是透明的。
Nowadays segmentation is still present and is always enabled in x86 processors. Each instruction that touches memory implicitly uses a segment register.
如今,分段仍然存在,并且在 x86 处理器中始终启用。每条涉及内存的指令都隐式使用段寄存器。
For example, a jump instruction uses the code segment register (cs) whereas a stack push instruction uses the stack segment register (ss). In most cases you can explicitly override the segment register used by an instruction. Segment registers store 16-bit segment selectors; they can be loaded directly with instructions like MOV. The sole exception is cs, which can only be changed by instructions that affect the flow of execution, like CALL or JMP. Though segmentation is always on, it works differently in real mode versus protected mode.
例如,跳转指令使用代码段寄存器(cs),而堆栈推送指令使用堆栈段寄存器(ss)。在大多数情况下,您可以显式覆盖指令使用的段寄存器。段寄存器存储16位段选择器;它们可以直接用 MOV 等指令加载。唯一的例外是 cs,它只能由影响执行流程的指令(例如 CALL 或 JMP)更改。尽管分段始终处于打开状态,但它在实模式和保护模式下的工作方式有所不同。
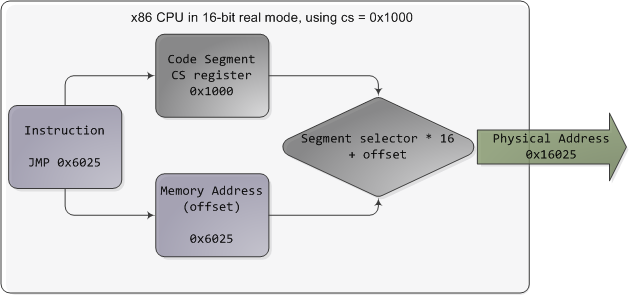
In real mode, such as during early boot, the segment selector is a 16-bit number specifying the physical memory address for the start of a segment. This number must somehow be scaled, otherwise it would also be limited to 64K, defeating the purpose of segmentation.
在实模式下,例如在早期引导期间,段选择器是一个 16 位数字,指定段开头的物理内存地址。这个数字必须以某种方式缩放,否则它也会被限制为 64K,从而达不到分段的目的。
For example, the CPU could use the segment selector as the 16 most significant bits of the physical memory address (by shifting it 16 bits to the left, which is equivalent to multiplying by 216). This simple rule would enable segments to address 4 gigs of memory in 64K chunks, but it would increase chip packaging costs by requiring more physical address pins in the processor. So Intel made the decision to multiply the segment selector by only 24 (or 16), which in a single stroke confined memory to about 1MB and unduly complicated translation. Here's an example showing a jump instruction where cs contains 0x1000:
例如,CPU 可以使用段选择器作为物理内存地址的 16 个最高有效位(通过将其向左移动 16 位,相当于乘以 2 16 )。这个简单的规则将使段能够对 64K 块中的 4 GB 内存进行寻址,但由于需要处理器中更多的物理地址引脚,因此会增加芯片封装成本。因此,Intel 决定将段选择器仅乘以 2 4 (或 16),这一下子就把内存限制在大约 1MB 左右,并且转换过于复杂。下面是一个显示跳转指令的示例,其中 cs 包含 0x1000:
Real mode segmentation
实模式分割
Real mode segment starts range from 0 all the way to 0xFFFF0 (16 bytes short of 1 MB) in 16-byte increments. To these values you add a 16-bit offset (the logical address) between 0 and 0xFFFF. It follows that there are multiple segment/offset combinations pointing to the same memory location, and physical addresses fall above 1MB if your segment is high enough (see the infamous A20 line). Also, when writing C code in real mode a far pointer is a pointer that contains both the segment selector and the logical address, which allows it to address 1MB of memory. Far indeed. As programs started getting bigger and outgrowing 64K segments, segmentation and its strange ways complicated development for the x86 platform.
实模式段的起始范围从 0 一直到 0xFFFF0(不足 1 MB 的 16 个字节),以 16 字节为增量。您可以在这些值中添加 0 到 0xFFFF 之间的 16 位偏移量(逻辑地址)。由此可见,有多个段/偏移量组合指向同一内存位置,如果您的段足够高,则物理地址将低于 1MB(请参见臭名昭著的 A20 行)。此外,在实模式下编写 C 代码时,远指针是包含段选择器和逻辑地址的指针,这允许它寻址 1MB 的内存。确实很远。随着程序开始变得越来越大,超过 64K 段,分段及其奇怪的方式使 x86 平台的开发变得复杂。
This may all sound quaintly odd now but it has driven programmers into the wretched depths of madness.
现在这一切听起来可能很奇怪,但它已经让程序员陷入了疯狂的深渊。
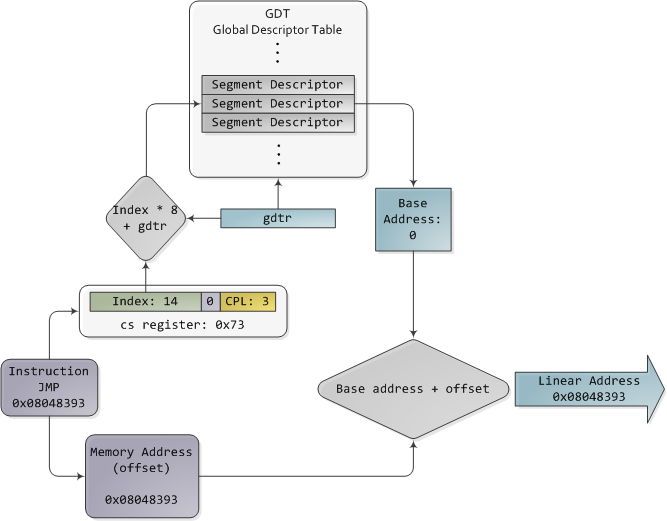
In 32-bit protected mode, a segment selector is no longer a raw number, but instead it contains an index into a table of segment descriptors. The table is simply an array containing 8-byte records, where each record describes one segment and looks thus:
在 32 位保护模式中,段选择器不再是原始数字,而是包含段描述符表的索引。该表只是一个包含 8 字节记录的数组,其中每条记录描述一个段,如下所示:

Segment descriptor 段描述符
There are three types of segments: code, data, and system. For brevity, only the common features in the descriptor are shown here. The base address is a 32-bit linear address pointing to the beginning of the segment, while the limit specifies how big the segment is. Adding the base address to a logical memory address yields a linear address. DPL is the descriptor privilege level; it is a number from 0 (most privileged, kernel mode) to 3 (least privileged, user mode) that controls access to the segment.
段分为三种类型:代码段、数据段和系统段。为了简洁起见,这里仅显示描述符中的共同特征。基地址是指向段开头的32位线性地址,而限制指定了段的大小。将基地址添加到逻辑存储器地址会产生线性地址。 DPL是描述符特权级别;它是一个从 0(最高特权,内核模式)到 3(最低特权,用户模式)的数字,用于控制对段的访问。
These segment descriptors are stored in two tables: the Global Descriptor Table (GDT) and the Local Descriptor Table (LDT). Each CPU (or core) in a computer contains a register called gdtr which stores the linear memory address of the first byte in the GDT. To choose a segment, you must load a segment register with a segment selector in the following format:
这些段描述符存储在两个表中:全局描述符表(GDT)和局部描述符表(LDT)。计算机中的每个CPU(或核心)都包含一个名为gdtr的寄存器,它存储GDT中第一个字节的线性内存地址。要选择段,必须使用以下格式的段选择器加载段寄存器:

Segment Selector 段选择器
The TI bit is 0 for the GDT and 1 for the LDT, while the index specifies the desired segment selector within the table. We'll deal with RPL, Requested Privilege Level, later on.
对于 GDT,TI 位为 0,对于 LDT,TI 位为 1,而索引指定表中所需的段选择器。稍后我们将处理 RPL(请求的特权级别)。
Now, come to think of it, when the CPU is in 32-bit mode registers and instructions can address the entire linear address space anyway, so there's really no need to give them a push with a base address or other shenanigan. So why not set the base address to zero and let logical addresses coincide with linear addresses?
现在,想想看,当 CPU 处于 32 位模式时,寄存器和指令无论如何都可以寻址整个线性地址空间,因此实际上没有必要给它们提供基址或其他恶作剧。那么为什么不将基地址设置为零并让逻辑地址与线性地址一致呢?
Intel docs call this "flat model" and it's exactly what modern x86 kernels do (they use the basic flat model, specifically). Basic flat model is equivalent to disabling segmentation when it comes to translating memory addresses.
英特尔文档将此称为“平面模型”,这正是现代 x86 内核所做的事情(特别是它们使用基本平面模型)。基本平面模型相当于在转换内存地址时禁用分段。
So in all its glory, here's the jump example running in 32-bit protected mode, with real-world values for a Linux user-mode app:
因此,这里是在 32 位保护模式下运行的跳转示例,其中包含 Linux 用户模式应用程序的真实值:
Protected Mode Segmentation
保护模式分段
The contents of a segment descriptor are cached once they are accessed, so there's no need to actually read the GDT in subsequent accesses, which would kill performance.
段描述符的内容一旦被访问就会被缓存,因此在后续访问中不需要实际读取 GDT,这会降低性能。
Each segment register has a hidden part to store the cached descriptor that corresponds to its segment selector. For more details, including more info on the LDT, see chapter 3 of the Intel System Programming Guide Volume 3a.
每个段寄存器都有一个隐藏部分来存储与其段选择器对应的缓存描述符。有关更多详细信息,包括有关 LDT 的更多信息,请参阅《英特尔系统编程指南》第 3a 卷第 3 章。
Volumes 2a and 2b, which cover every x86 instruction, also shed light on the various types of x86 addressing operands - 16-bit, 16-bit with segment selector (which can be used by far pointers), 32-bit, etc.
第 2a 卷和第 2b 卷涵盖了每条 x86 指令,还阐明了各种类型的 x86 寻址操作数 - 16 位、带段选择器的 16 位(可用于远指针)、32 位等。
In Linux, only 3 segment descriptors are used during boot. They are defined with the GDT_ENTRY macro and stored in the boot_gdt array. Two of the segments are flat, addressing the entire 32-bit space: a code segment loaded into cs and a data segment loaded into the other segment registers. The third segment is a system segment called the Task State Segment.
在 Linux 中,引导期间仅使用 3 个段描述符。它们使用 GDT_ENTRY 宏定义并存储在 boot_gdt 数组中。其中两个段是平坦的,寻址整个 32 位空间:一个加载到 cs 中的代码段,一个加载到其他段寄存器中的数据段。第三段是称为任务状态段的系统段。
After boot, each CPU has its own copy of the GDT. They are all nearly identical, but a few entries change depending on the running process. You can see the layout of the Linux GDT in segment.h and its instantiation is here. There are four primary GDT entries: two flat ones for code and data in kernel mode, and another two for user mode. When looking at the Linux GDT, notice the holes inserted on purpose to align data with CPU cache lines - an artifact of the von Neumann bottleneck that has become a plague. Finally, the classic "Segmentation fault" Unix error message is not due to x86-style segments, but rather invalid memory addresses normally detected by the paging unit - alas, topic for an upcoming post.
启动后,每个 CPU 都有自己的 GDT 副本。它们几乎都是相同的,但一些条目会根据运行的进程而变化。你可以在segment.h中看到Linux GDT的布局,它的实例化在这里。有四个主要的 GDT 条目:两个平面条目用于内核模式中的代码和数据,另外两个用于用户模式。查看 Linux GDT 时,请注意故意插入的漏洞,以便将数据与 CPU 缓存行对齐 - 这是冯·诺依曼瓶颈的产物,现已成为一种瘟疫。最后,经典的“分段错误”Unix 错误消息不是由 x86 样式的段引起的,而是由分页单元通常检测到的无效内存地址引起的 - 唉,这是即将发布的帖子的主题。
Intel deftly worked around their original segmentation kludge, offering a flexible way for us to choose whether to segment or go flat.
英特尔巧妙地解决了他们最初的分割问题,为我们提供了一种灵活的方式来选择是分割还是扁平化。
Since coinciding logical and linear addresses are simpler to handle, they became standard, such that 64-bit mode now enforces a flat linear address space.
由于一致的逻辑地址和线性地址更容易处理,因此它们成为标准,因此 64 位模式现在强制执行平坦的线性地址空间。
But even in flat mode segments are still crucial for x86 protection, the mechanism that defends the kernel from user-mode processes and every process from each other. It's a dog eat dog world out there!
但即使在平面模式下,段对于 x86 保护仍然至关重要,这种机制可以保护内核免受用户模式进程以及每个进程之间的影响。这是一个狗咬狗的世界!
In the next post, we'll take a peek at protection levels and how segments implement them.
在下一篇文章中,我们将了解保护级别以及段如何实现它们。
Page Cache, the Affair Between Memory and Files
Previously we looked at how the kernel manages virtual memory for a user process, but files and I/O were left out. This post covers the important and often misunderstood relationship between files and memory and its consequences for performance.
之前我们研究了内核如何管理用户进程的虚拟内存,但忽略了文件和 I/O。这篇文章介绍了文件和内存之间重要且经常被误解的关系及其对性能的影响。
Two serious problems must be solved by the OS when it comes to files. The first one is the mind-blowing slowness of hard drives, and disk seeks in particular, relative to memory. The second is the need to load file contents in physical memory once and share the contents among programs. If you use Process Explorer to poke at Windows processes, you’ll see there are ~15MB worth of common DLLs loaded in every process. My Windows box right now is running 100 processes, so without sharing I’d be using up to ~1.5 GB of physical RAM just for common DLLs. No good. Likewise, nearly all Linux programs need ld.so and libc, plus other common libraries.
当涉及到文件时,操作系统必须解决两个严重的问题。第一个是硬盘驱动器的速度令人难以置信,尤其是相对于内存而言磁盘寻道。第二个是需要将文件内容一次加载到物理内存中并在程序之间共享内容。如果您使用 Process Explorer 来查看 Windows 进程,您会发现每个进程中加载了大约 15MB 的常用 DLL。我的 Windows 机器现在正在运行 100 个进程,因此如果不共享,我将使用高达约 1.5 GB 的物理 RAM 来运行常见的 DLL。不好。同样,几乎所有 Linux 程序都需要 ld.so 和 libc,以及其他常用库。
Happily, both problems can be dealt with in one shot: the page cache, where the kernel stores page-sized chunks of files. To illustrate the page cache, I’ll conjure a Linux program named render, which opens file scene.dat and reads it 512 bytes at a time, storing the file contents into a heap-allocated block. The first read goes like this:
令人高兴的是,这两个问题都可以一次性解决:页面缓存,内核在其中存储页面大小的文件块。为了说明页面缓存,我将想象一个名为 render 的 Linux 程序,它打开文件 scene.dat 并一次读取 512 个字节,将文件内容存储到堆分配的块中。第一次阅读是这样的:
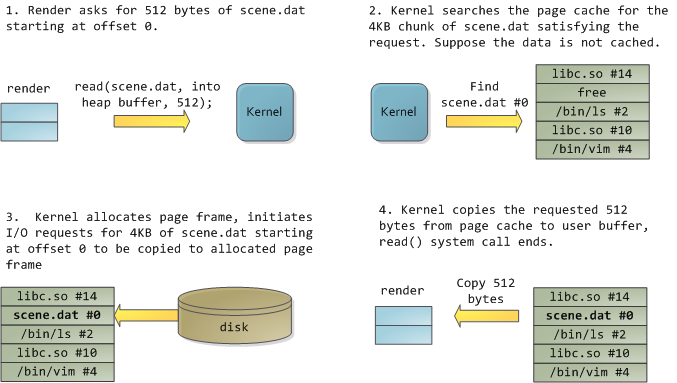
After 12KB have been read, render's heap and the relevant page frames look thus:
读取 12KB 后, render 的堆和相关页框如下所示:
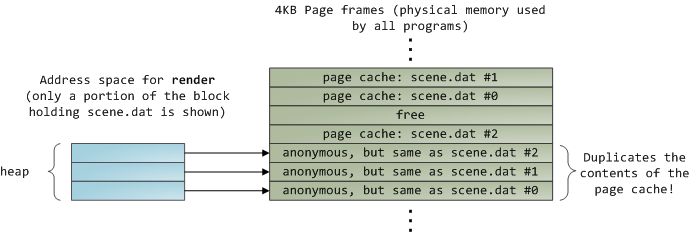
This looks innocent enough, but there’s a lot going on. First, even though this program uses regular read calls, three 4KB page frames are now in the page cache storing part of scene.dat. People are sometimes surprised by this, but all regular file I/O happens through the page cache. In x86 Linux, the kernel thinks of a file as a sequence of 4KB chunks. If you read a single byte from a file, the whole 4KB chunk containing the byte you asked for is read from disk and placed into the page cache.
这看起来很无辜,但其中发生了很多事情。首先,即使该程序使用常规 read 调用,三个 4KB 页面框架现在位于存储 scene.dat 部分的页面缓存中。人们有时会对此感到惊讶,但所有常规文件 I/O 都是通过页面缓存进行的。在 x86 Linux 中,内核将文件视为 4KB 块的序列。如果您从文件中读取单个字节,则包含您请求的字节的整个 4KB 块将从磁盘读取并放入页面缓存中。
This makes sense because sustained disk throughput is pretty good and programs normally read more than just a few bytes from a file region. The page cache knows the position of each 4KB chunk within the file, depicted above as #0, #1, etc. Windows uses 256KB views analogous to pages in the Linux page cache.
这是有道理的,因为持续的磁盘吞吐量非常好,并且程序通常从文件区域读取的不仅仅是几个字节。页面缓存知道文件中每个 4KB 块的位置,如上面所示为 #0、#1 等。Windows 使用 256KB 视图,类似于 Linux 页面缓存中的页面。
Sadly, in a regular file read the kernel must copy the contents of the page cache into a user buffer, which not only takes cpu time and hurts the cpu caches, but also wastes physical memory with duplicate data. As per the diagram above, the scene.dat contents are stored twice, and each instance of the program would store the contents an additional time. We’ve mitigated the disk latency problem but failed miserably at everything else. Memory-mapped files are the way out of this madness:
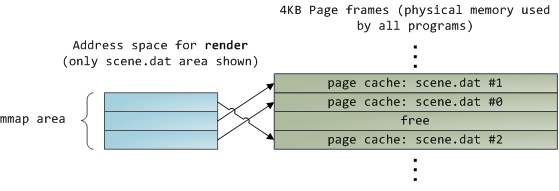
遗憾的是,在常规文件读取中,内核必须将页面缓存的内容复制到用户缓冲区中,这不仅占用 cpu 时间并损害 cpu 缓存,而且还会因重复数据而浪费物理内存。如上图所示, scene.dat 内容被存储了两次,并且程序的每个实例都会额外存储一次内容。我们已经缓解了磁盘延迟问题,但在其他方面都惨遭失败。内存映射文件是摆脱这种疯狂的方法:
When you use file mapping, the kernel maps your program’s virtual pages directly onto the page cache. This can deliver a significant performance boost: Windows System Programming reports run time improvements of 30% and up relative to regular file reads, while similar figures are reported for Linux and Solaris in Advanced Programming in the Unix Environment. You might also save large amounts of physical memory, depending on the nature of your application.
当您使用文件映射时,内核将程序的虚拟页面直接映射到页面缓存上。这可以带来显着的性能提升:Windows 系统编程报告称,相对于常规文件读取,运行时间提高了 30% 甚至更高,而 Linux 和 Solaris 的 Unix 环境中的高级编程也报告了类似的数字。您还可以节省大量物理内存,具体取决于应用程序的性质。
As always with performance, measurement is everything, but memory mapping earns its keep in a programmer’s toolbox. The API is pretty nice too, it allows you to access a file as bytes in memory and does not require your soul and code readability in exchange for its benefits. Mind your address space and experiment with mmap in Unix-like systems, CreateFileMapping in Windows, or the many wrappers available in high level languages. When you map a file its contents are not brought into memory all at once, but rather on demand via page faults. The fault handler maps your virtual pages onto the page cache after obtaining a page frame with the needed file contents. This involves disk I/O if the contents weren’t cached to begin with.
与往常一样,对于性能而言,测量就是一切,但内存映射在程序员的工具箱中占有一席之地。 API 也非常好,它允许您以内存中的字节形式访问文件,并且不需要您的灵魂和代码可读性来换取它的好处。注意您的地址空间,并在类 Unix 系统中尝试 mmap、Windows 中的 CreateFileMapping 或高级语言中可用的许多包装器。当您映射文件时,其内容不会立即全部带入内存,而是通过页面错误按需带入内存。在获得包含所需文件内容的页框后,故障处理程序将虚拟页映射到页缓存上。如果内容一开始就没有缓存,这会涉及到磁盘 I/O。
Now for a pop quiz. Imagine that the last instance of our render program exits. Would the pages storing scene.dat in the page cache be freed immediately? People often think so, but that would be a bad idea. When you think about it, it is very common for us to create a file in one program, exit, then use the file in a second program. The page cache must handle that case. When you think more about it, why should the kernel ever get rid of page cache contents? Remember that disk is 5 orders of magnitude slower than RAM, hence a page cache hit is a huge win. So long as there’s enough free physical memory, the cache should be kept full. It is therefore not dependent on a particular process, but rather it’s a system-wide resource. If you run render a week from now and scene.dat is still cached, bonus! This is why the kernel cache size climbs steadily until it hits a ceiling. It’s not because the OS is garbage and hogs your RAM, it’s actually good behavior because in a way free physical memory is a waste.
现在进行一个小测验。想象一下我们的 render 程序的最后一个实例退出。页面缓存中存储 scene.dat 的页面会立即释放吗?人们常常这么想,但这不是一个好主意。仔细想想,我们在一个程序中创建一个文件,退出,然后在第二个程序中使用该文件是很常见的。页面缓存必须处理这种情况。当您进一步思考时,为什么内核应该删除页面缓存内容?请记住,磁盘比 RAM 慢 5 个数量级,因此页面缓存命中是一个巨大的胜利。只要有足够的可用物理内存,缓存就应该保持满。因此,它不依赖于特定的进程,而是系统范围的资源。如果您一周后运行 render 并且 scene.dat 仍然被缓存,那么奖励!这就是内核缓存大小稳步攀升直至达到上限的原因。这并不是因为操作系统是垃圾并占用了你的 RAM,这实际上是一个很好的行为,因为在某种程度上,空闲的物理内存是一种浪费。
Better use as much of the stuff for caching as possible.
最好尽可能多地使用缓存的东西。
Due to the page cache architecture, when a program calls write() bytes are simply copied to the page cache and the page is marked dirty. Disk I/O normally does not happen immediately, thus your program doesn’t block waiting for the disk. On the downside, if the computer crashes your writes will never make it, hence critical files like database transaction logs must be fsync()ed (though one must still worry about drive controller caches, oy!). Reads, on the other hand, normally block your program until the data is available. Kernels employ eager loading to mitigate this problem, an example of which is read ahead where the kernel preloads a few pages into the page cache in anticipation of your reads. You can help the kernel tune its eager loading behavior by providing hints on whether you plan to read a file sequentially or randomly (see madvise(), readahead(), Windows cache hints ). Linux does read-ahead for memory-mapped files, but I’m not sure about Windows. Finally, it’s possible to bypass the page cache using O_DIRECT in Linux or NO_BUFFERING in Windows, something database software often does.
由于页缓存架构的原因,当程序调用 write() 时,字节会被简单地复制到页缓存中,并且该页会被标记为脏页。磁盘 I/O 通常不会立即发生,因此您的程序不会阻塞等待磁盘。不利的一面是,如果计算机崩溃,您的写入将永远无法成功,因此必须对数据库事务日志等关键文件进行 fsync() 处理(尽管人们仍然必须担心驱动器控制器缓存,哦!)。另一方面,读取通常会阻塞程序,直到数据可用为止。内核采用急切加载来缓解此问题,其中一个示例是预读,其中内核将一些页面预加载到页面缓存中以预测您的读取。您可以通过提供有关您计划顺序读取文件还是随机读取文件的提示来帮助内核调整其急切加载行为(请参阅 madvise()、readahead()、Windows 缓存提示)。 Linux 会预读内存映射文件,但我不确定 Windows 是否如此。最后,可以使用 Linux 中的 O_DIRECT 或 Windows 中的 NO_BUFFERING 绕过页面缓存,数据库软件经常这样做。
A file mapping may be private or shared. This refers only to updates made to the contents in memory: in a private mapping the updates are not committed to disk or made visible to other processes, whereas in a shared mapping they are. Kernels use the copy on write mechanism, enabled by page table entries, to implement private mappings. In the example below, both render and another program called render3d (am I creative or what?) have mapped scene.dat privately. Render then writes to its virtual memory area that maps the file:
文件映射可以是私有的或共享的。这仅指对内存中的内容进行的更新:在私有映射中,更新不会提交到磁盘或对其他进程可见,而在共享映射中则如此。内核使用页表条目启用的写时复制机制来实现私有映射。在下面的示例中, render 和另一个名为 render3d 的程序(我有创意还是什么?)都已私下映射了 scene.dat 。 Render 然后写入映射该文件的虚拟内存区域:
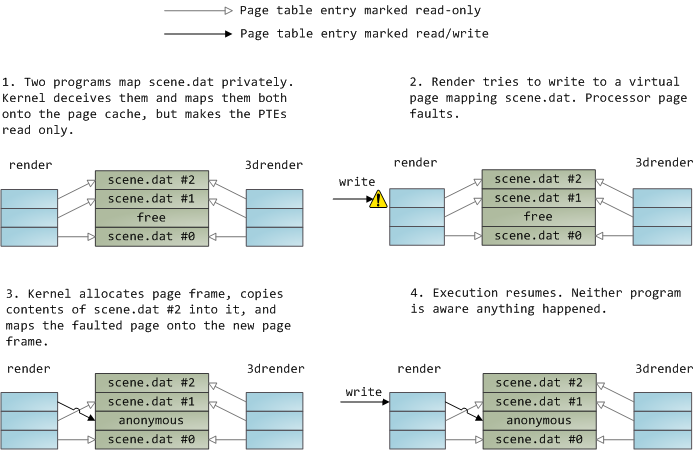
The read-only page table entries shown above do not mean the mapping is read only, they’re merely a kernel trick to share physical memory until the last possible moment. You can see how ‘private’ is a bit of a misnomer until you remember it only applies to updates.
上面显示的只读页表条目并不意味着映射是只读的,它们只是共享物理内存直到最后一刻的内核技巧。您会发现“私有”这个词有点用词不当,直到您记住它仅适用于更新。
A consequence of this design is that a virtual page that maps a file privately sees changes done to the file by other programs as long as the page has only been read from. Once copy-on-write is done, changes by others are no longer seen. This behavior is not guaranteed by the kernel, but it’s what you get in x86 and makes sense from an API perspective. By contrast, a shared mapping is simply mapped onto the page cache and that’s it.
这种设计的结果是,只要该页面仅被读取,映射文件的虚拟页面就可以私下看到其他程序对该文件所做的更改。一旦写时复制完成,其他人的更改就不再可见。这种行为不是由内核保证的,但它是 x86 中得到的,并且从 API 角度来看是有意义的。相比之下,共享映射只是简单地映射到页面缓存上,仅此而已。
Updates are visible to other processes and end up in the disk. Finally, if the mapping above were read-only, page faults would trigger a segmentation fault instead of copy on write.
更新对其他进程可见,并最终保存在磁盘中。最后,如果上面的映射是只读的,则页面错误将触发分段错误,而不是写入时复制。
Dynamically loaded libraries are brought into your program’s address space via file mapping. There’s nothing magical about it, it’s the same private file mapping available to you via regular APIs.
动态加载的库通过文件映射引入程序的地址空间。它没有什么神奇之处,它与您通过常规 API 提供的私有文件映射相同。
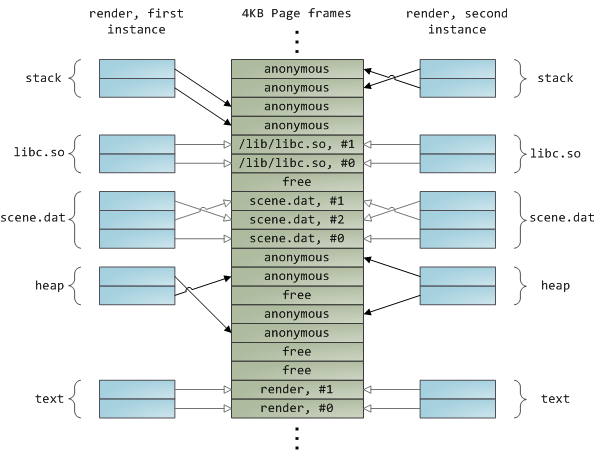
Below is an example showing part of the address spaces from two running instances of the file-mapping render program, along with physical memory, to tie together many of the concepts we’ve seen.
下面的示例显示了文件映射 render 程序的两个正在运行的实例的部分地址空间以及物理内存,以将我们已经看到的许多概念联系在一起。
This concludes our 3-part series on memory fundamentals. I hope the series was useful and provided you with a good mental model of these OS topics.
我们的内存基础知识系列由 3 部分组成,到此结束。我希望该系列有用,并为您提供有关这些操作系统主题的良好思维模型。

 浙公网安备 33010602011771号