gRPC Java代码生成
本文讲述protocol buffer编译器会由协议定义文件生成什么样的代码。proto2和proto3的区别将被高亮——注意,本文说的是存在于生成代码中的区别,不是基本的消息类/接口——它们在这两个版本中是一样的。在开始本文之前,你应该先看一下proto2的语言指南和proto3语言指南。
编译器调用
Protocol buffer 编译器在遇到 –java_out= 命令行标识时会产生Java输出。
–java_out=选项参数指定编译器的输出目录。编译器为每一个.proto文件创建一个.java文件。这个文件包含一个java外部类,其中定义了一些基于.proto文件中声明的内部类和一些静态字段。
外部类的名产生规则:如果.proto文件包含了如下的一行:
option java_outer_classname = "Foo";外部类的名字将会是 Foo。否则,外部类的名字会变成由.proto文件名转换而成的驼峰形式。例如,foo_bar.proto将会变成FooBar。如果该文件中已经有一个消息有同样的名字,“OuterClass”将会被追加到外部类的名字后边。例如,如果foo_bar.proto包含一个叫FooBar的消息,外部类会变成FooBarOuterClass。
Java的包名会由下边的Package来决定。
输出什么样的文件完全由–java_out选项,包名 ( .s 被替换成 /s),和.java文件名来决定。
举个例子,你可以像下边这样调用编译器:
protoc --proto_path=src --java_out=build/gen src/foo.proto如果foo.proto的java包是com.example,它的外部类名是FooProtos,那么protocol buffer编译器会生成文件:build/gen/com/example/FooProtos.java。Protocol buffer编译器将会自动创建build/gen/com/example目录,如果需要的话。但是,它不会创建build/gen或者build目录;它们必须已经存在。你可以在单个命令调用中指定多个.proto文件;所有输出文件会一次生成。
protoc的使用:
$ protoc.exe -h
Usage: D:\DEV\grpc\protoc-3.0.0-win32\bin\protoc.exe [OPTION] PROTO_FILES
Parse PROTO_FILES and generate output based on the options given:
  -IPATH, --proto_path=PATH   Specify the directory in which to search for
                              imports.  May be specified multiple times;
                              directories will be searched in order.  If not
                              given, the current working directory is used.
  --version                   Show version info and exit.
  -h, --help                  Show this text and exit.
  --encode=MESSAGE_TYPE       Read a text-format message of the given type
                              from standard input and write it in binary
                              to standard output.  The message type must
                              be defined in PROTO_FILES or their imports.
  --decode=MESSAGE_TYPE       Read a binary message of the given type from
                              standard input and write it in text format
                              to standard output.  The message type must
                              be defined in PROTO_FILES or their imports.
  --decode_raw                Read an arbitrary protocol message from
                              standard input and write the raw tag/value
                              pairs in text format to standard output.  No
                              PROTO_FILES should be given when using this
                              flag.
  -oFILE,                     Writes a FileDescriptorSet (a protocol buffer,
    --descriptor_set_out=FILE defined in descriptor.proto) containing all of
                              the input files to FILE.
  --include_imports           When using --descriptor_set_out, also include
                              all dependencies of the input files in the
                              set, so that the set is self-contained.
  --include_source_info       When using --descriptor_set_out, do not strip
                              SourceCodeInfo from the FileDescriptorProto.
                              This results in vastly larger descriptors that
                              include information about the original
                              location of each decl in the source file as
                              well as surrounding comments.
  --dependency_out=FILE       Write a dependency output file in the format
                              expected by make. This writes the transitive
set本文使用gRPC框架Java语言版本构建一个helloworld项目。涉及到的内容有:
① 通过.proto文件生成Java代码的方法。
② 以及服务端和客户端代码使用示例。
本文先不讲解代码细节,只用来帮助自己构造一个Java版本的gRPC项目。后续系列文章再说,最后把代码放到github上。
一、环境准备
1.1 安装protocbuf
首先需要安装protocbuf 3.x版本。本文中,我以3.17.2版本为例。
把下面代码复制到一个shell脚本中,然后执行,就可以安装protocbuf-3.17.2。
#!/bin/bash
export CXXFLAGS="-I/usr/local/include" LDFLAGS="-L/usr/local/lib"
PROTOBUF_VERSION=3.17.2
curl -LO https://github.com/protocolbuffers/protobuf/releases/download/v$PROTOBUF_VERSION/protobuf-all-$PROTOBUF_VERSION.tar.gz
tar xzf protobuf-all-$PROTOBUF_VERSION.tar.gz
cd protobuf-$PROTOBUF_VERSION
./configure --disable-shared
make   # You may want to pass -j to make this run faster; see make --help
sudo make install
最后执行protoc --version来验证是否安装成功

1.2 安装Maven
使用IDEA内置的maven即可。如果不想用IDEA自带的maven,可以随便到网上找个教程。(最好找版本比较新的,我用的是3.5.2版本,大家可以安装比这个更新的版本)

二、gRPC项目构建
2.1 新建maven项目并修改pom.xml
首先用IDEA新建一个maven项目。
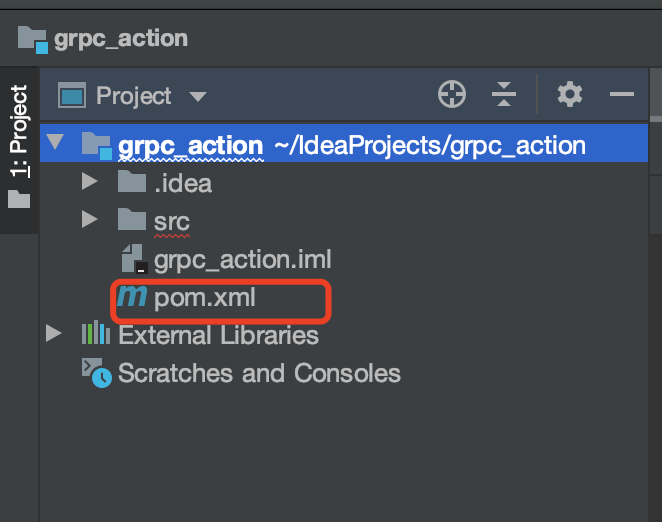
接着在pom.xml中添加如下代码,注意这个build标签和properties标签都是project标签的直接子标签。
    <properties>
        <protobuf.version>3.17.2</protobuf.version>
        <protoc.version>3.17.2</protoc.version>
        <grpc.version>1.41.0</grpc.version>
    </properties>

    <build>
        <extensions>
            <extension>
                <groupId>kr.motd.maven</groupId>
                <artifactId>os-maven-plugin</artifactId>
                <version>1.6.2</version>
            </extension>
        </extensions>
        <plugins>
            <plugin>
                <groupId>org.xolstice.maven.plugins</groupId>
                <artifactId>protobuf-maven-plugin</artifactId>
                <version>0.6.1</version>
                <configuration>
                    <protocArtifact>com.google.protobuf:protoc:${protoc.version}:exe:${os.detected.classifier}</protocArtifact>
                    <pluginId>grpc-java</pluginId>
                    <pluginArtifact>io.grpc:protoc-gen-grpc-java:${grpc.version}:exe:${os.detected.classifier}</pluginArtifact>
                    <protoSourceRoot>src/main/proto</protoSourceRoot>
                </configuration>
                <executions>
                    <execution>
                        <goals>
                            <goal>compile</goal>
                            <goal>compile-custom</goal>
                        </goals>
                    </execution>
                </executions>
            </plugin>
        </plugins>
    </build>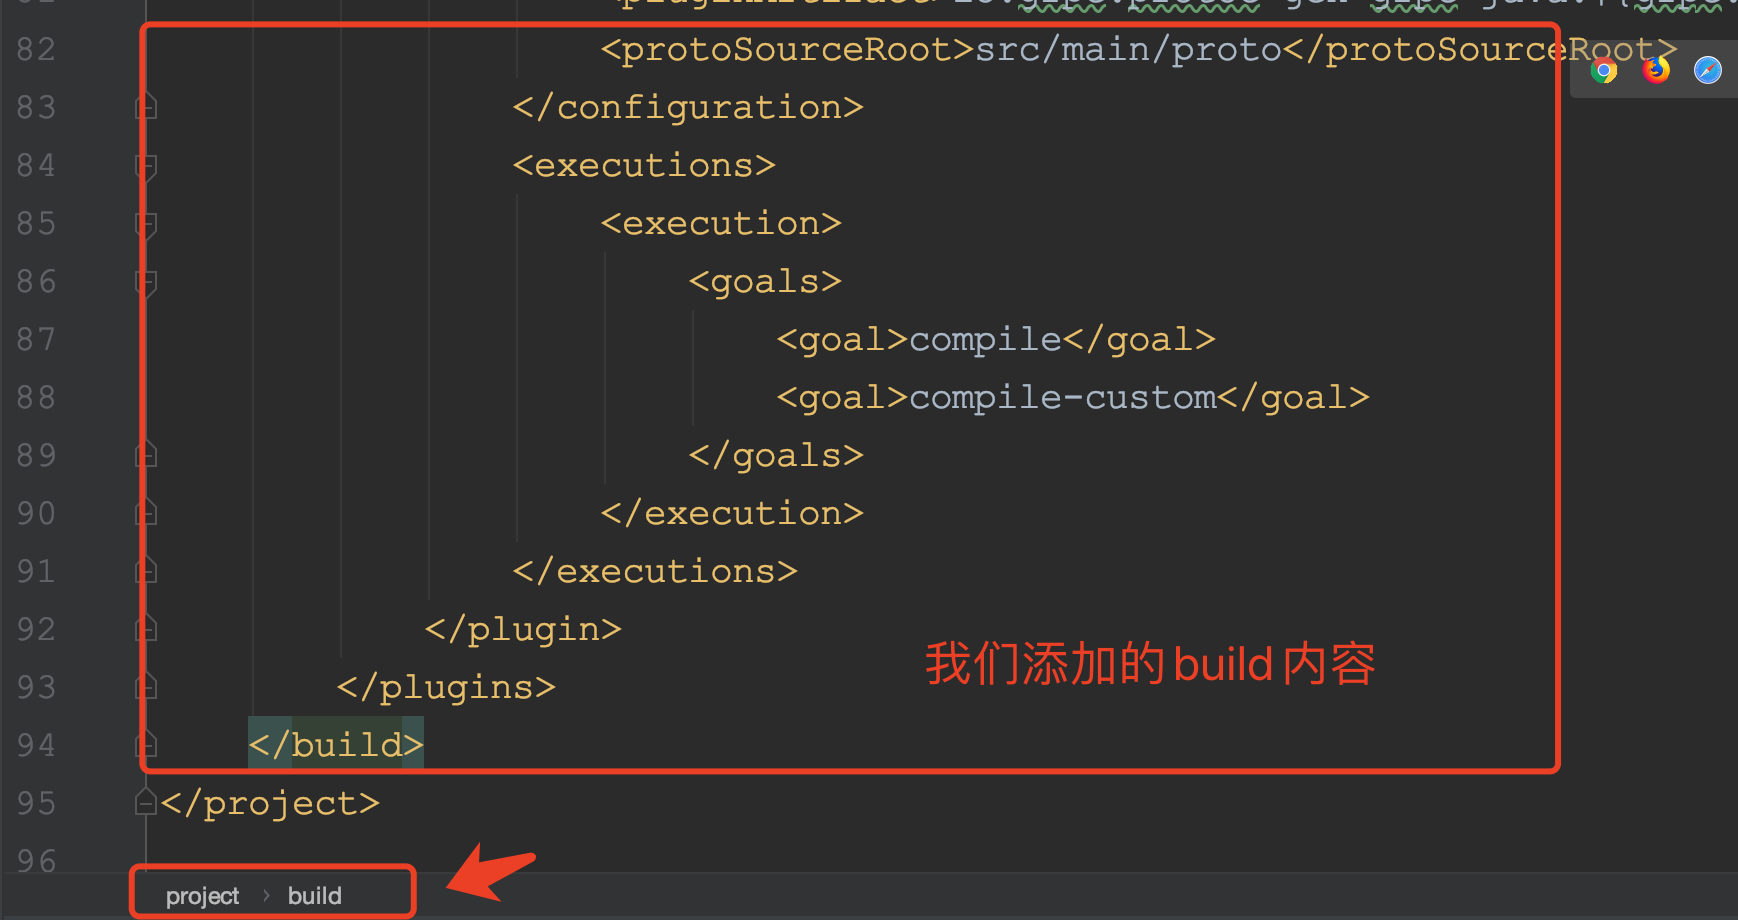
再接着我们继续在pom.xml中添加一些,这些依赖是构造gRPC-java项目必须用到的(来自官方文档)。
        <dependency>
            <groupId>io.grpc</groupId>
            <artifactId>grpc-netty-shaded</artifactId>
            <version>1.41.0</version>
        </dependency>
        <dependency>
            <groupId>io.grpc</groupId>
            <artifactId>grpc-protobuf</artifactId>
            <version>1.41.0</version>
        </dependency>
        <dependency>
            <groupId>io.grpc</groupId>
            <artifactId>grpc-stub</artifactId>
            <version>1.41.0</version>
        </dependency>
        <dependency>
            <groupId>com.google.protobuf</groupId>
            <artifactId>protobuf-java-util</artifactId>
            <version>${protobuf.version}</version>
        </dependency>
        <dependency> <!-- necessary for Java 9+ -->
            <groupId>org.apache.tomcat</groupId>
            <artifactId>annotations-api</artifactId>
            <version>6.0.53</version>
            <scope>provided</scope>
        </dependency>
2.2 添加.proto文件
proto文件用来描述rpc请求体、响应体、以及rpc提供的服务。通过插件可以根据.proto文件生成Java类。
这里面有个非常重要的点要注意,就是proto文件存放的位置。一定要在和src/main/java源文件目录同级的proto源文件目录才可以。如下图所示:

我们添加一个proto文件:helloworld.proto
// Copyright 2015 The gRPC Authors
//
// Licensed under the Apache License, Version 2.0 (the "License");
// you may not use this file except in compliance with the License.
// You may obtain a copy of the License at
//
//     http://www.apache.org/licenses/LICENSE-2.0
//
// Unless required by applicable law or agreed to in writing, software
// distributed under the License is distributed on an "AS IS" BASIS,
// WITHOUT WARRANTIES OR CONDITIONS OF ANY KIND, either express or implied.
// See the License for the specific language governing permissions and
// limitations under the License.
syntax = "proto3";

option java_multiple_files = true;
option java_package = "com.zhb.grpc.examples.helloworld";
option java_outer_classname = "HelloWorldProto";
option objc_class_prefix = "HLW";

package helloworld;

// The greeting service definition.
service Greeter {
  // Sends a greeting
  rpc SayHello (HelloRequest) returns (HelloReply) {}
}

// The request message containing the user's name.
message HelloRequest {
  string name = 1;
}

// The response message containing the greetings
message HelloReply {
  string message = 1;
}这里面还有一个小细节,就是proto文件中有一行代码是:option java_package = "com.zhb.grpc.examples.helloworld";
这个代表生成的代码属于哪个package。
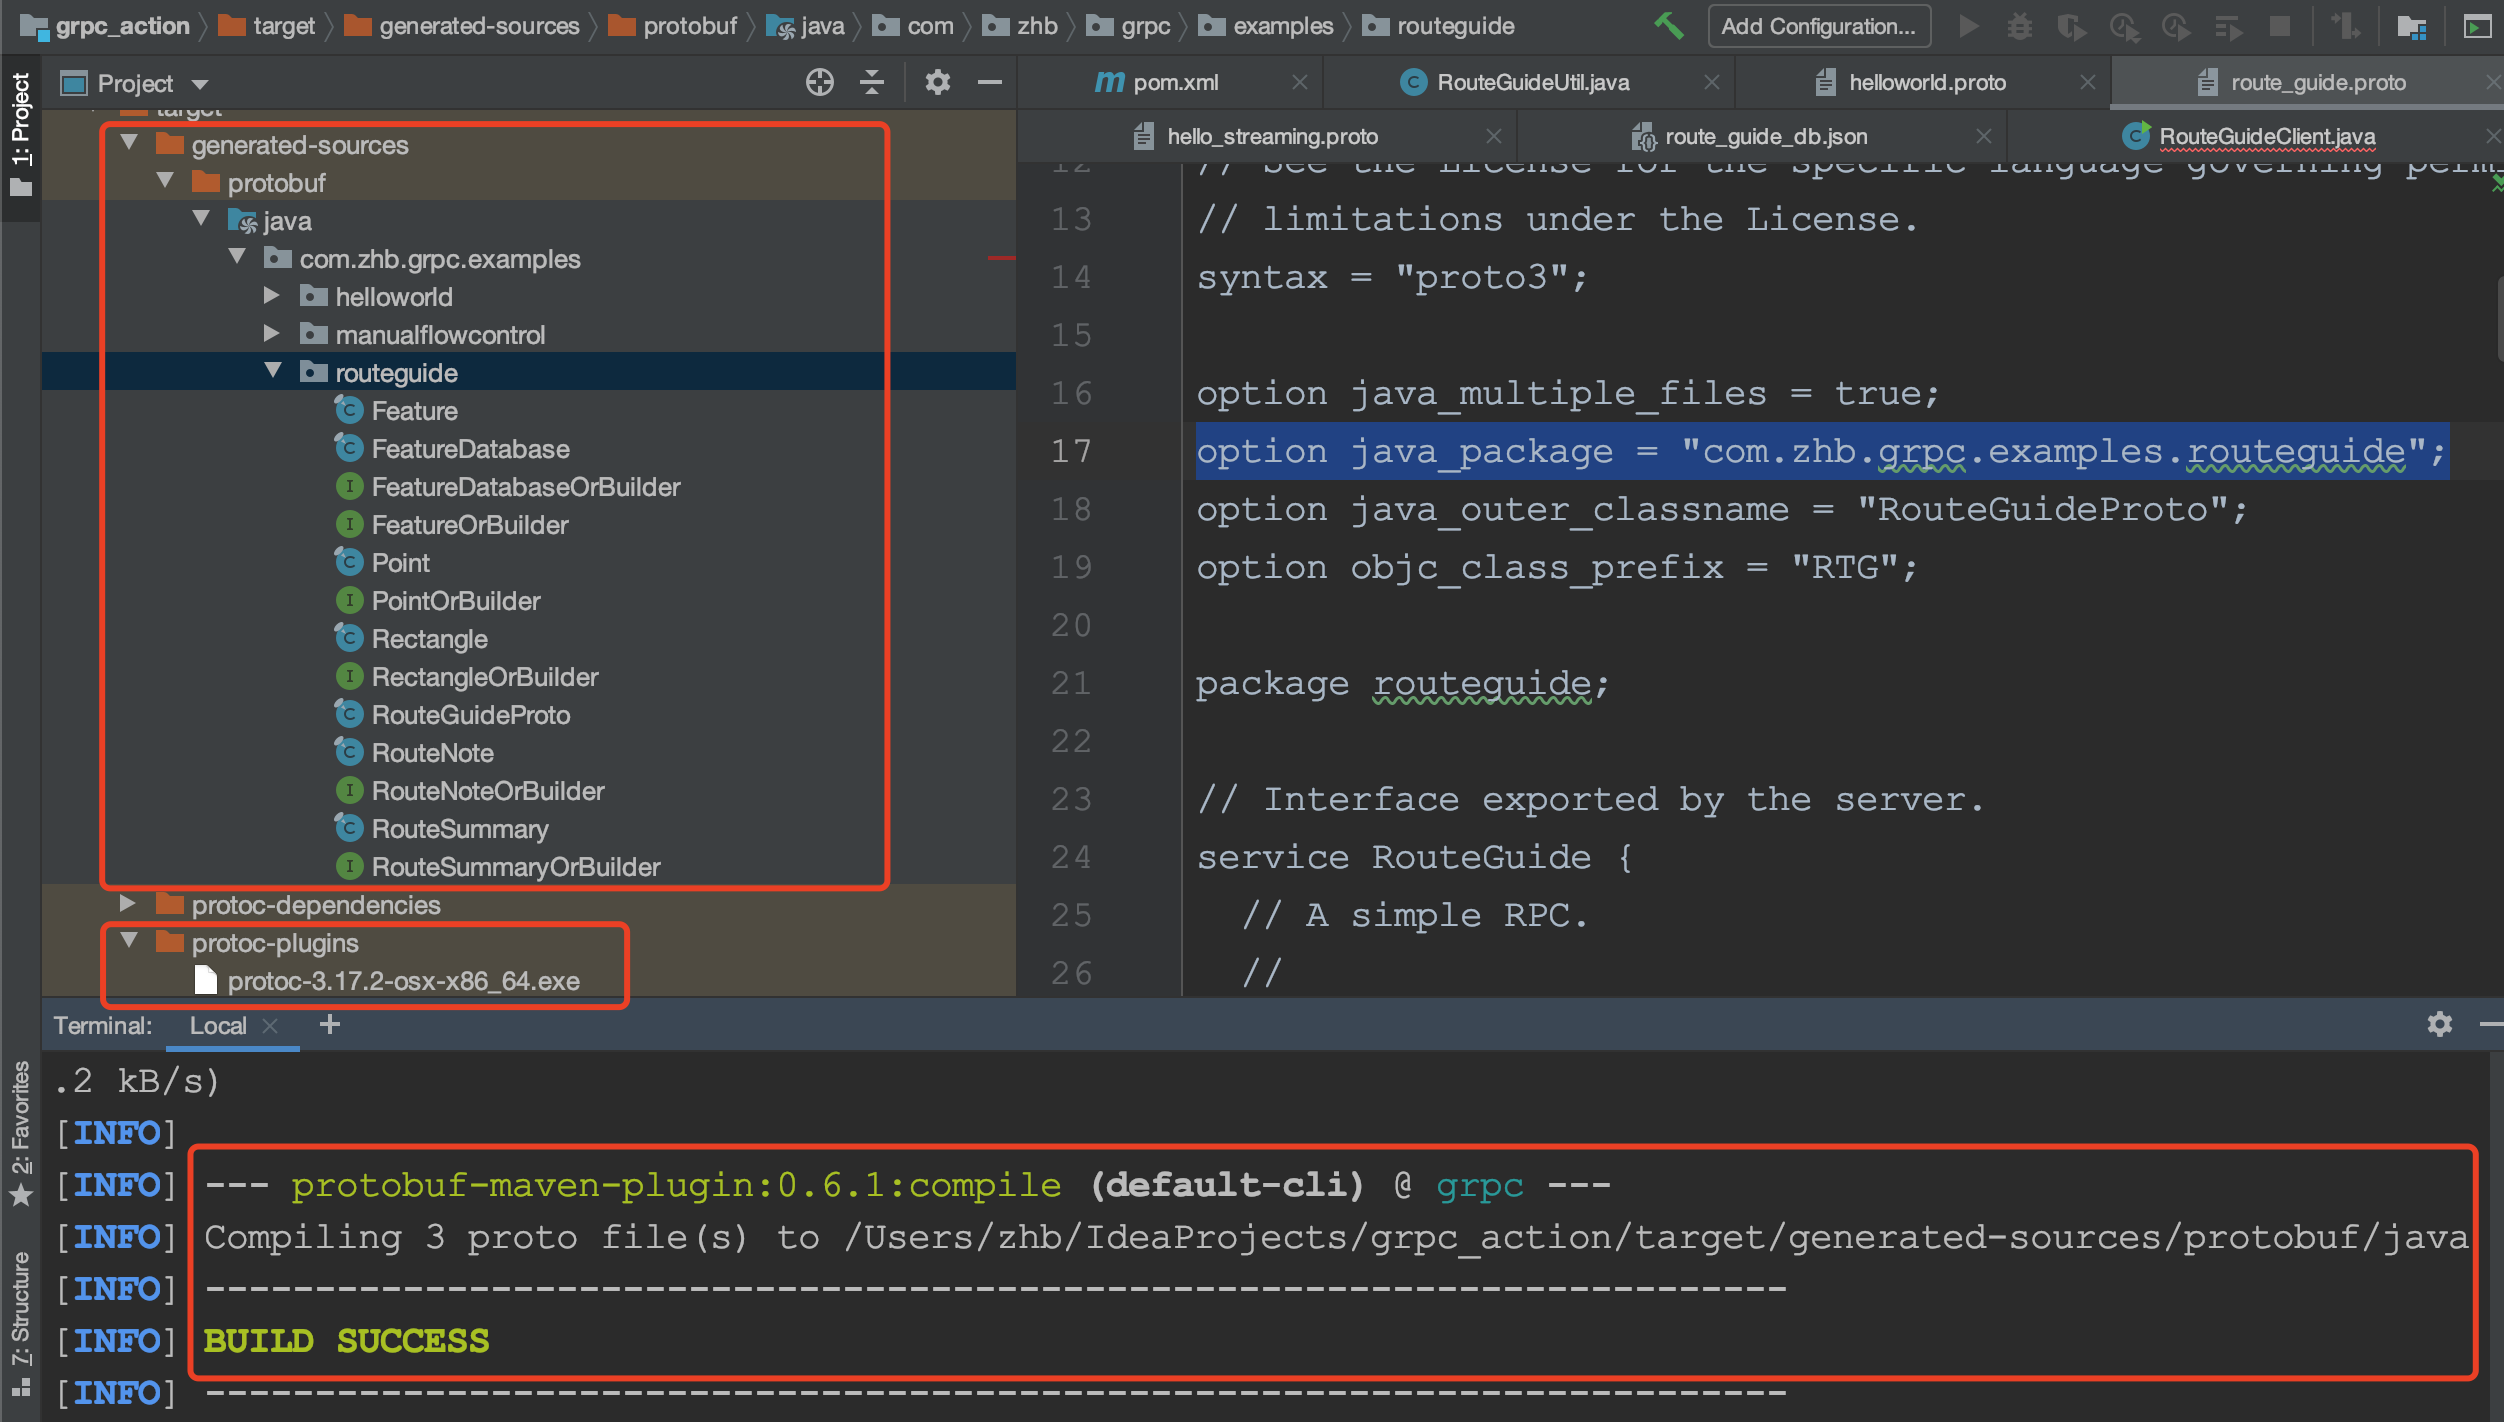
2.3 根据.proto文件生成消息体类文件和XXXGrpc类文件
在第一步修改的pom.xml的路径下,首先执行:
mvn protobuf:compile 生成消息体类文件:
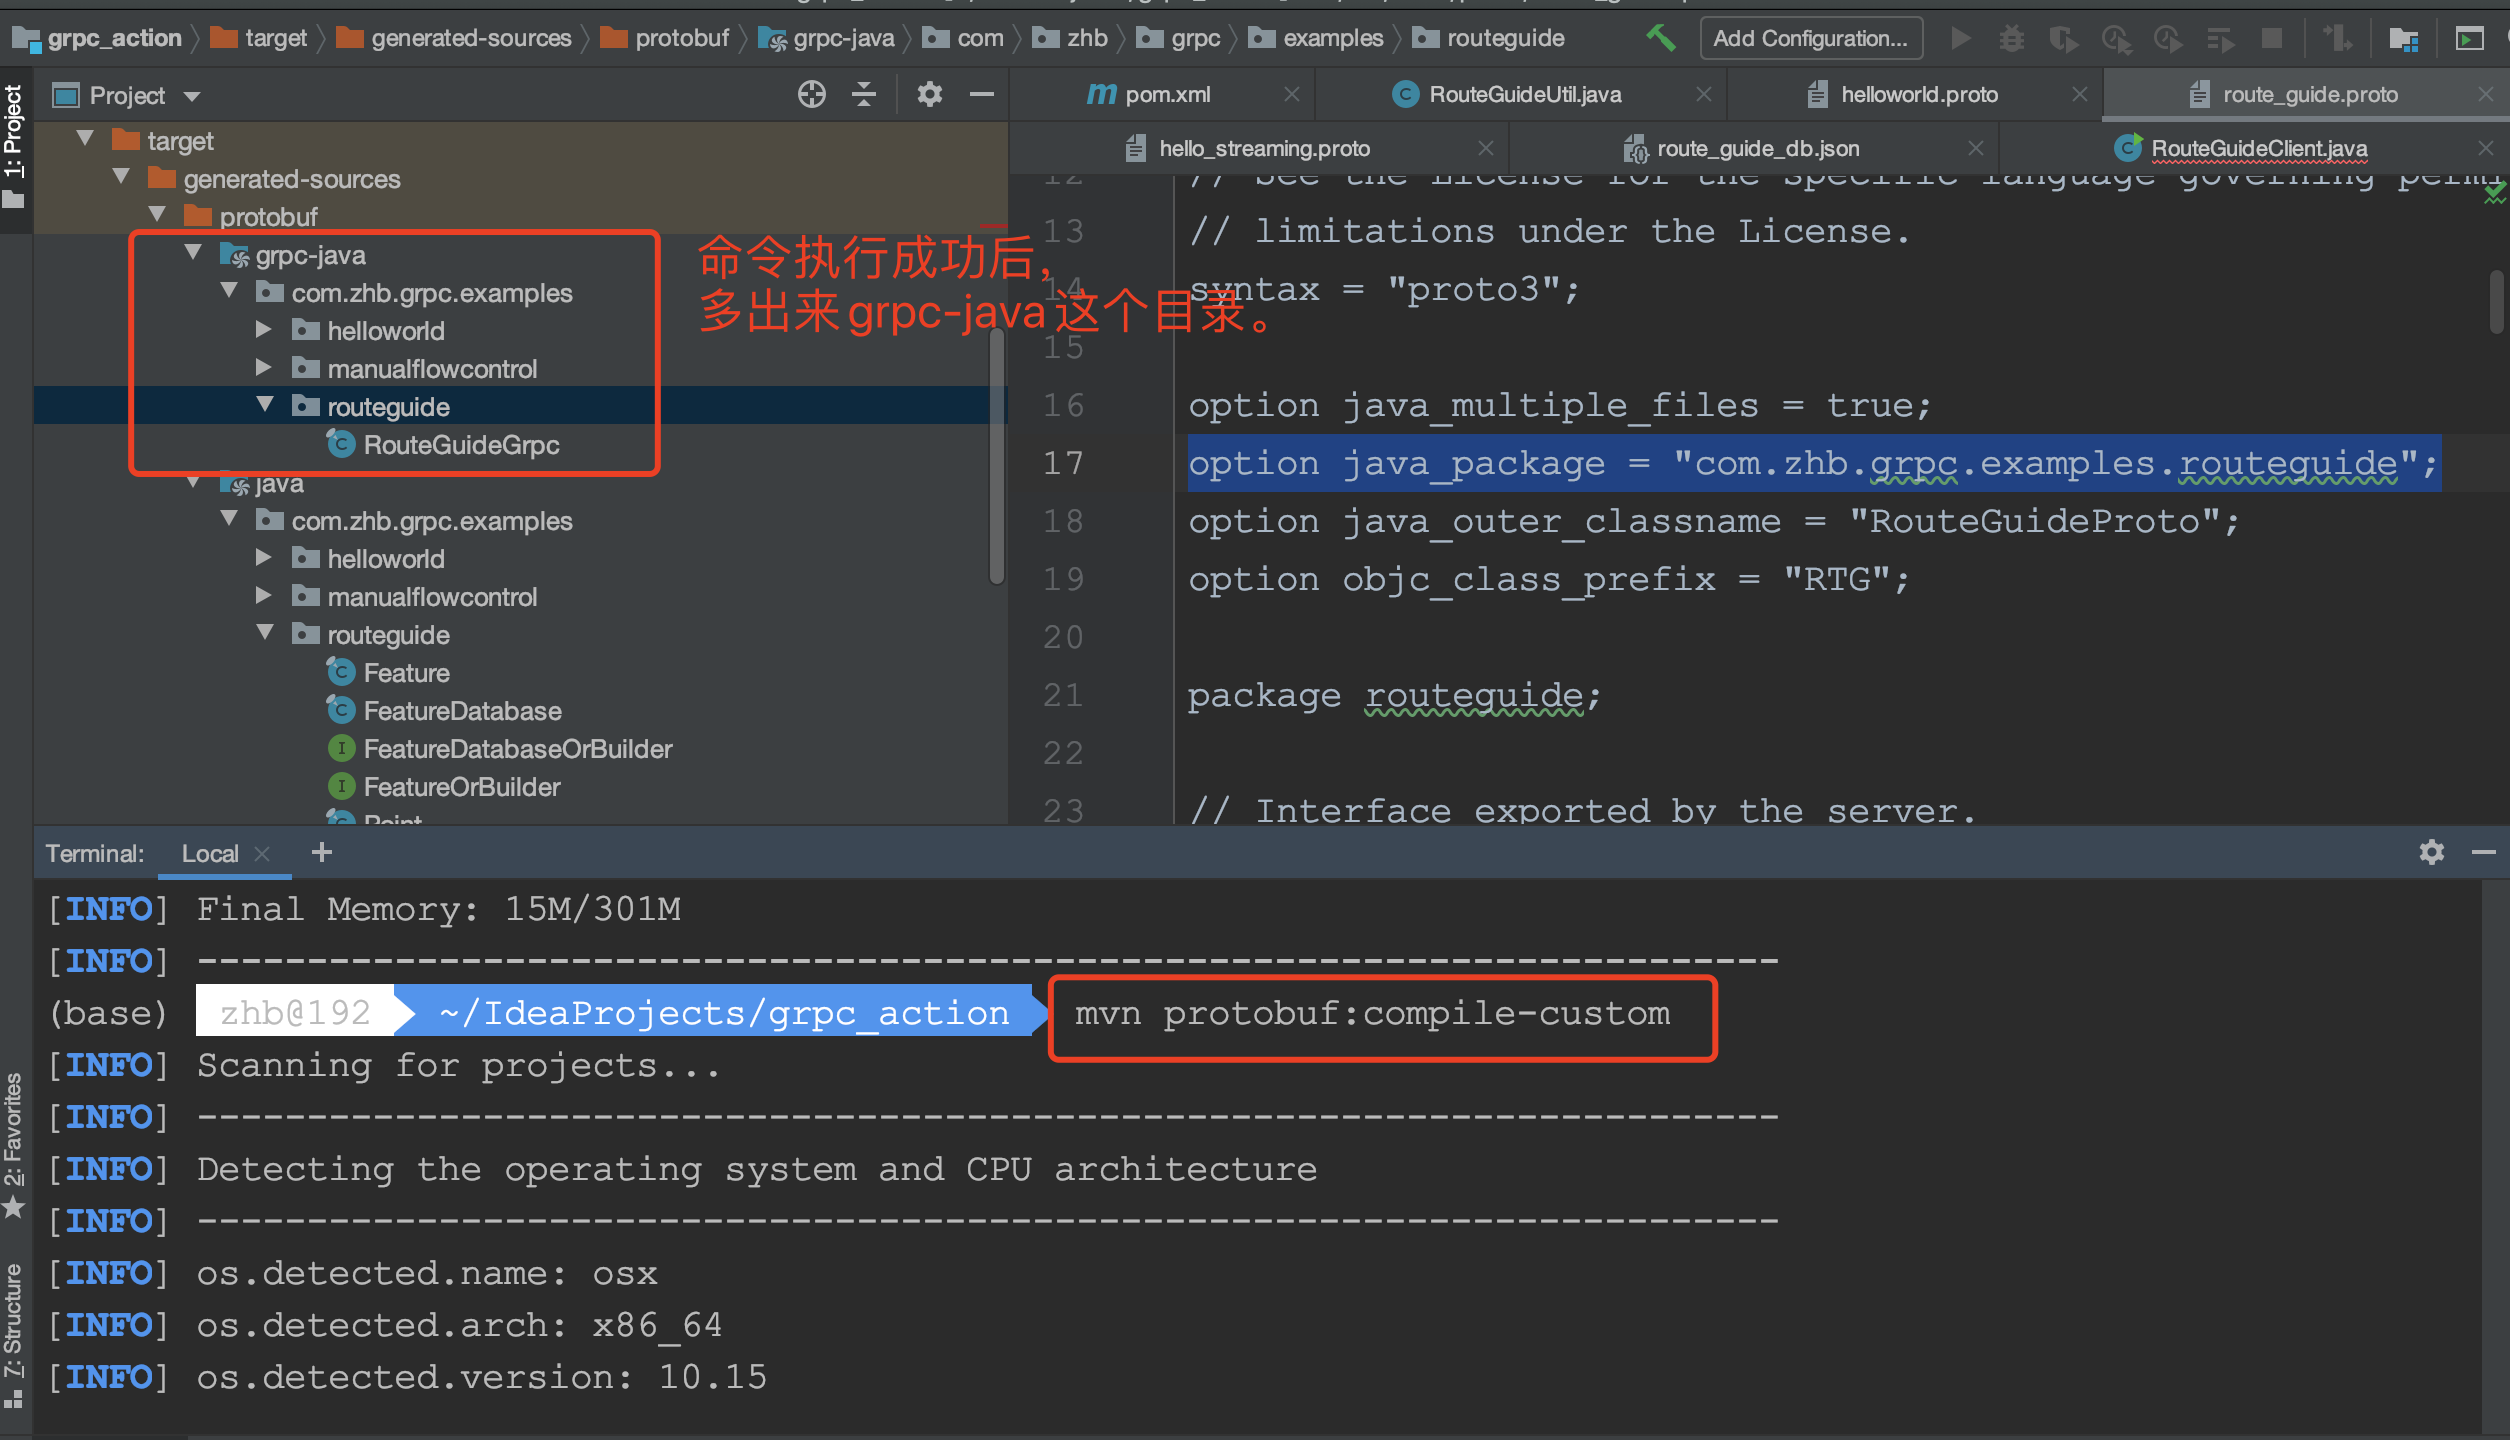
接着执行:
mvn protobuf:compile-custom 生成XXXGrpc类文件:
2.4 编写业务代码
经过2.1–2.3的步骤之后,我们的准备工作都做完了。该生成的代码也都生成了,接下来就是编写业务代码了。
ps:注意下Java类所属的package
服务端代码:
/*
 * Copyright 2015 The gRPC Authors
 *
 * Licensed under the Apache License, Version 2.0 (the "License");
 * you may not use this file except in compliance with the License.
 * You may obtain a copy of the License at
 *
 *     http://www.apache.org/licenses/LICENSE-2.0
 *
 * Unless required by applicable law or agreed to in writing, software
 * distributed under the License is distributed on an "AS IS" BASIS,
 * WITHOUT WARRANTIES OR CONDITIONS OF ANY KIND, either express or implied.
 * See the License for the specific language governing permissions and
 * limitations under the License.
 */

package com.zhb.grpc.examples.helloworld;

import io.grpc.Server;
import io.grpc.ServerBuilder;
import io.grpc.stub.StreamObserver;
import java.io.IOException;
import java.util.concurrent.TimeUnit;
import java.util.logging.Logger;

/**
 * Server that manages startup/shutdown of a {@code Greeter} server.
 */
public class HelloWorldServer {
  private static final Logger logger = Logger.getLogger(HelloWorldServer.class.getName());

  private Server server;

  private void start() throws IOException {
    /* The port on which the server should run */
    int port = 50051;
    server = ServerBuilder.forPort(port)
        .addService(new GreeterImpl())
        .build()
        .start();
    logger.info("Server started, listening on " + port);
    Runtime.getRuntime().addShutdownHook(new Thread() {
      @Override
      public void run() {
        // Use stderr here since the logger may have been reset by its JVM shutdown hook.
        System.err.println("*** shutting down gRPC server since JVM is shutting down");
        try {
          HelloWorldServer.this.stop();
        } catch (InterruptedException e) {
          e.printStackTrace(System.err);
        }
        System.err.println("*** server shut down");
      }
    });
  }

  private void stop() throws InterruptedException {
    if (server != null) {
      server.shutdown().awaitTermination(30, TimeUnit.SECONDS);
    }
  }

  /**
   * Await termination on the main thread since the grpc library uses daemon threads.
   */
  private void blockUntilShutdown() throws InterruptedException {
    if (server != null) {
      server.awaitTermination();
    }
  }

  /**
   * Main launches the server from the command line.
   */
  public static void main(String[] args) throws IOException, InterruptedException {
    final HelloWorldServer server = new HelloWorldServer();
    server.start();
    server.blockUntilShutdown();
  }

  static class GreeterImpl extends GreeterGrpc.GreeterImplBase {

    @Override
    public void sayHello(HelloRequest req, StreamObserver<HelloReply> responseObserver) {
      HelloReply reply = HelloReply.newBuilder().setMessage("Hello " + req.getName()).build();
      responseObserver.onNext(reply);
      responseObserver.onCompleted();
    }
  }
}
客户端代码:
/*
 * Copyright 2015 The gRPC Authors
 *
 * Licensed under the Apache License, Version 2.0 (the "License");
 * you may not use this file except in compliance with the License.
 * You may obtain a copy of the License at
 *
 *     http://www.apache.org/licenses/LICENSE-2.0
 *
 * Unless required by applicable law or agreed to in writing, software
 * distributed under the License is distributed on an "AS IS" BASIS,
 * WITHOUT WARRANTIES OR CONDITIONS OF ANY KIND, either express or implied.
 * See the License for the specific language governing permissions and
 * limitations under the License.
 */

package com.zhb.grpc.examples.helloworld;

import io.grpc.Channel;
import io.grpc.ManagedChannel;
import io.grpc.ManagedChannelBuilder;
import io.grpc.StatusRuntimeException;
import java.util.concurrent.TimeUnit;
import java.util.logging.Level;
import java.util.logging.Logger;

/**
 * A simple client that requests a greeting from the {@link HelloWorldServer}.
 */
public class HelloWorldClient {
  private static final Logger logger = Logger.getLogger(HelloWorldClient.class.getName());

  private final GreeterGrpc.GreeterBlockingStub blockingStub;

  /** Construct client for accessing HelloWorld server using the existing channel. */
  public HelloWorldClient(Channel channel) {
    // 'channel' here is a Channel, not a ManagedChannel, so it is not this code's responsibility to
    // shut it down.

    // Passing Channels to code makes code easier to test and makes it easier to reuse Channels.
    blockingStub = GreeterGrpc.newBlockingStub(channel);
  }

  /** Say hello to server. */
  public void greet(String name) {
    logger.info("Will try to greet " + name + " ...");
    HelloRequest request = HelloRequest.newBuilder().setName(name).build();
    HelloReply response;
    try {
      response = blockingStub.sayHello(request);
    } catch (StatusRuntimeException e) {
      logger.log(Level.WARNING, "RPC failed: {0}", e.getStatus());
      return;
    }
    logger.info("Greeting: " + response.getMessage());
  }

  /**
   * Greet server. If provided, the first element of {@code args} is the name to use in the
   * greeting. The second argument is the target server.
   */
  public static void main(String[] args) throws Exception {
    String user = "world";
    // Access a service running on the local machine on port 50051
    String target = "localhost:50051";
    // Allow passing in the user and target strings as command line arguments
    if (args.length > 0) {
      if ("--help".equals(args[0])) {
        System.err.println("Usage: [name [target]]");
        System.err.println("");
        System.err.println("  name    The name you wish to be greeted by. Defaults to " + user);
        System.err.println("  target  The server to connect to. Defaults to " + target);
        System.exit(1);
      }
      user = args[0];
    }
    if (args.length > 1) {
      target = args[1];
    }

    // Create a communication channel to the server, known as a Channel. Channels are thread-safe
    // and reusable. It is common to create channels at the beginning of your application and reuse
    // them until the application shuts down.
    ManagedChannel channel = ManagedChannelBuilder.forTarget(target)
        // Channels are secure by default (via SSL/TLS). For the example we disable TLS to avoid
        // needing certificates.
        .usePlaintext()
        .build();
    try {
      HelloWorldClient client = new HelloWorldClient(channel);
      client.greet(user);
    } finally {
      // ManagedChannels use resources like threads and TCP connections. To prevent leaking these
      // resources the channel should be shut down when it will no longer be used. If it may be used
      // again leave it running.
      channel.shutdownNow().awaitTermination(5, TimeUnit.SECONDS);
    }
  }
}
然后先启动Server:

再启动Client:
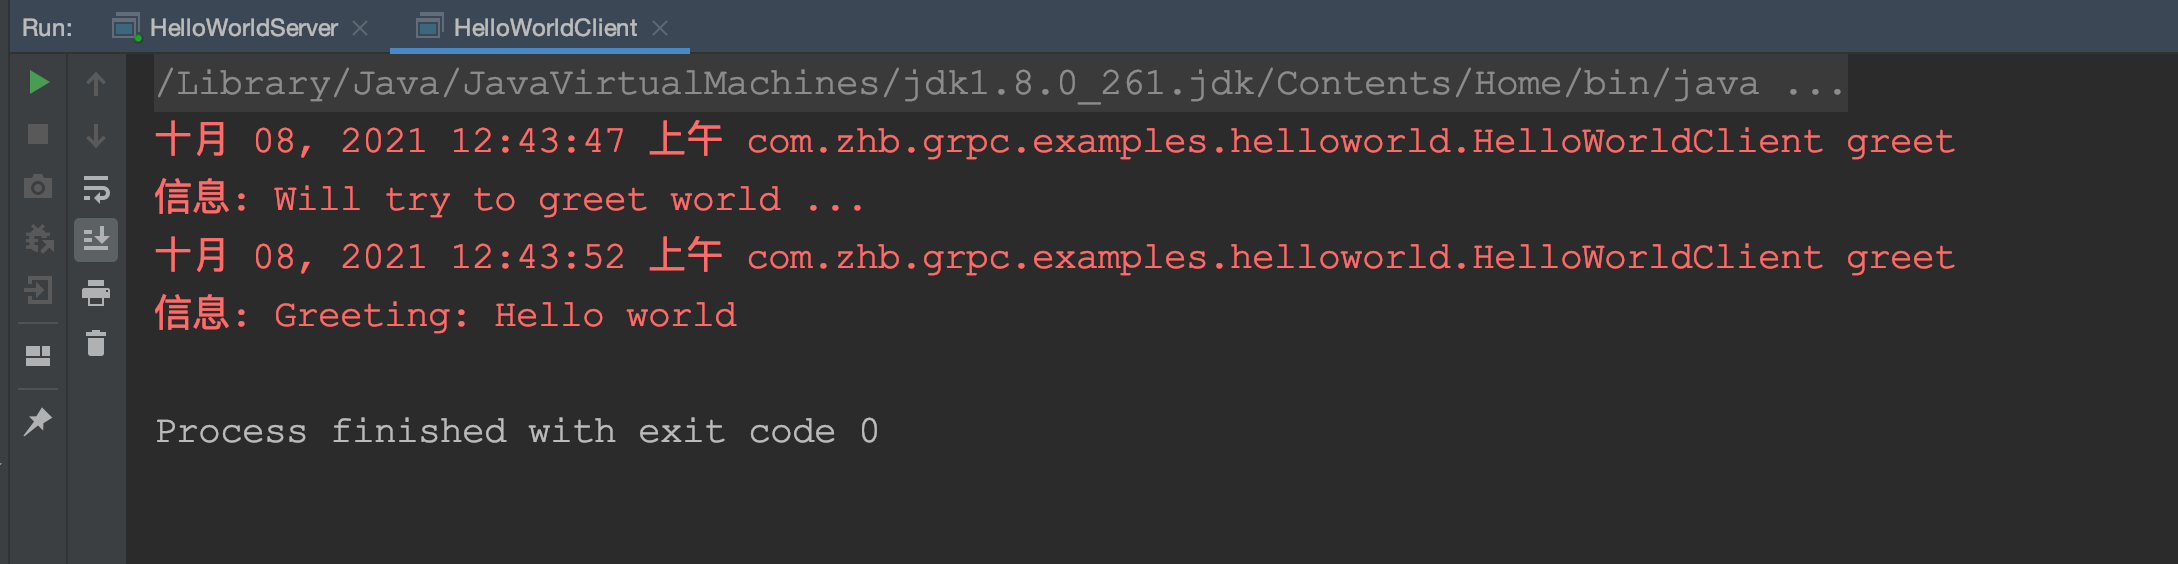
可以看到执行成功。一个简单的gRPC helloworld工程就搭建好了。
参考
https://grpc.io/docs/languages/java/
本文使用gRPC框架Java语言版本构建一个helloworld项目。涉及到的内容有:
① 通过.proto文件生成Java代码的方法。
② 以及服务端和客户端代码使用示例。
本文先不讲解代码细节,只用来帮助自己构造一个Java版本的gRPC项目。后续系列文章再说,最后把代码放到github上。
一、环境准备
1.1 安装protocbuf
首先需要安装protocbuf 3.x版本。本文中,我以3.17.2版本为例。
把下面代码复制到一个shell脚本中,然后执行,就可以安装protocbuf-3.17.2。
#!/bin/bash
export CXXFLAGS="-I/usr/local/include" LDFLAGS="-L/usr/local/lib"
PROTOBUF_VERSION=3.17.2
curl -LO https://github.com/protocolbuffers/protobuf/releases/download/v$PROTOBUF_VERSION/protobuf-all-$PROTOBUF_VERSION.tar.gz
tar xzf protobuf-all-$PROTOBUF_VERSION.tar.gz
cd protobuf-$PROTOBUF_VERSION
./configure --disable-shared
make   # You may want to pass -j to make this run faster; see make --help
sudo make install
最后执行protoc --version来验证是否安装成功
1.2 安装Maven
使用IDEA内置的maven即可。如果不想用IDEA自带的maven,可以随便到网上找个教程。(最好找版本比较新的,我用的是3.5.2版本,大家可以安装比这个更新的版本)
二、gRPC项目构建
2.1 新建maven项目并修改pom.xml
首先用IDEA新建一个maven项目。
接着在pom.xml中添加如下代码,注意这个build标签和properties标签都是project标签的直接子标签。
    <properties>
        <protobuf.version>3.17.2</protobuf.version>
        <protoc.version>3.17.2</protoc.version>
        <grpc.version>1.41.0</grpc.version>
    </properties>

    <build>
        <extensions>
            <extension>
                <groupId>kr.motd.maven</groupId>
                <artifactId>os-maven-plugin</artifactId>
                <version>1.6.2</version>
            </extension>
        </extensions>
        <plugins>
            <plugin>
                <groupId>org.xolstice.maven.plugins</groupId>
                <artifactId>protobuf-maven-plugin</artifactId>
                <version>0.6.1</version>
                <configuration>
                    <protocArtifact>com.google.protobuf:protoc:${protoc.version}:exe:${os.detected.classifier}</protocArtifact>
                    <pluginId>grpc-java</pluginId>
                    <pluginArtifact>io.grpc:protoc-gen-grpc-java:${grpc.version}:exe:${os.detected.classifier}</pluginArtifact>
                    <protoSourceRoot>src/main/proto</protoSourceRoot>
                </configuration>
                <executions>
                    <execution>
                        <goals>
                            <goal>compile</goal>
                            <goal>compile-custom</goal>
                        </goals>
                    </execution>
                </executions>
            </plugin>
        </plugins>
    </build>
再接着我们继续在pom.xml中添加一些,这些依赖是构造gRPC-java项目必须用到的(来自官方文档)。
        <dependency>
            <groupId>io.grpc</groupId>
            <artifactId>grpc-netty-shaded</artifactId>
            <version>1.41.0</version>
        </dependency>
        <dependency>
            <groupId>io.grpc</groupId>
            <artifactId>grpc-protobuf</artifactId>
            <version>1.41.0</version>
        </dependency>
        <dependency>
            <groupId>io.grpc</groupId>
            <artifactId>grpc-stub</artifactId>
            <version>1.41.0</version>
        </dependency>
        <dependency>
            <groupId>com.google.protobuf</groupId>
            <artifactId>protobuf-java-util</artifactId>
            <version>${protobuf.version}</version>
        </dependency>
        <dependency> <!-- necessary for Java 9+ -->
            <groupId>org.apache.tomcat</groupId>
            <artifactId>annotations-api</artifactId>
            <version>6.0.53</version>
            <scope>provided</scope>
        </dependency>
2.2 添加.proto文件
proto文件用来描述rpc请求体、响应体、以及rpc提供的服务。通过插件可以根据.proto文件生成Java类。
这里面有个非常重要的点要注意,就是proto文件存放的位置。一定要在和src/main/java源文件目录同级的proto源文件目录才可以。如下图所示:
我们添加一个proto文件:helloworld.proto
// Copyright 2015 The gRPC Authors
//
// Licensed under the Apache License, Version 2.0 (the "License");
// you may not use this file except in compliance with the License.
// You may obtain a copy of the License at
//
//     http://www.apache.org/licenses/LICENSE-2.0
//
// Unless required by applicable law or agreed to in writing, software
// distributed under the License is distributed on an "AS IS" BASIS,
// WITHOUT WARRANTIES OR CONDITIONS OF ANY KIND, either express or implied.
// See the License for the specific language governing permissions and
// limitations under the License.
syntax = "proto3";

option java_multiple_files = true;
option java_package = "com.zhb.grpc.examples.helloworld";
option java_outer_classname = "HelloWorldProto";
option objc_class_prefix = "HLW";

package helloworld;

// The greeting service definition.
service Greeter {
  // Sends a greeting
  rpc SayHello (HelloRequest) returns (HelloReply) {}
}

// The request message containing the user's name.
message HelloRequest {
  string name = 1;
}

// The response message containing the greetings
message HelloReply {
  string message = 1;
}这里面还有一个小细节,就是proto文件中有一行代码是:option java_package = "com.zhb.grpc.examples.helloworld";
这个代表生成的代码属于哪个package。
2.3 根据.proto文件生成消息体类文件和XXXGrpc类文件
在第一步修改的pom.xml的路径下,首先执行:
mvn protobuf:compile 生成消息体类文件:
接着执行:
mvn protobuf:compile-custom 生成XXXGrpc类文件:
2.4 编写业务代码
经过2.1–2.3的步骤之后,我们的准备工作都做完了。该生成的代码也都生成了,接下来就是编写业务代码了。
ps:注意下Java类所属的package
服务端代码:
/*
 * Copyright 2015 The gRPC Authors
 *
 * Licensed under the Apache License, Version 2.0 (the "License");
 * you may not use this file except in compliance with the License.
 * You may obtain a copy of the License at
 *
 *     http://www.apache.org/licenses/LICENSE-2.0
 *
 * Unless required by applicable law or agreed to in writing, software
 * distributed under the License is distributed on an "AS IS" BASIS,
 * WITHOUT WARRANTIES OR CONDITIONS OF ANY KIND, either express or implied.
 * See the License for the specific language governing permissions and
 * limitations under the License.
 */

package com.zhb.grpc.examples.helloworld;

import io.grpc.Server;
import io.grpc.ServerBuilder;
import io.grpc.stub.StreamObserver;
import java.io.IOException;
import java.util.concurrent.TimeUnit;
import java.util.logging.Logger;

/**
 * Server that manages startup/shutdown of a {@code Greeter} server.
 */
public class HelloWorldServer {
  private static final Logger logger = Logger.getLogger(HelloWorldServer.class.getName());

  private Server server;

  private void start() throws IOException {
    /* The port on which the server should run */
    int port = 50051;
    server = ServerBuilder.forPort(port)
        .addService(new GreeterImpl())
        .build()
        .start();
    logger.info("Server started, listening on " + port);
    Runtime.getRuntime().addShutdownHook(new Thread() {
      @Override
      public void run() {
        // Use stderr here since the logger may have been reset by its JVM shutdown hook.
        System.err.println("*** shutting down gRPC server since JVM is shutting down");
        try {
          HelloWorldServer.this.stop();
        } catch (InterruptedException e) {
          e.printStackTrace(System.err);
        }
        System.err.println("*** server shut down");
      }
    });
  }

  private void stop() throws InterruptedException {
    if (server != null) {
      server.shutdown().awaitTermination(30, TimeUnit.SECONDS);
    }
  }

  /**
   * Await termination on the main thread since the grpc library uses daemon threads.
   */
  private void blockUntilShutdown() throws InterruptedException {
    if (server != null) {
      server.awaitTermination();
    }
  }

  /**
   * Main launches the server from the command line.
   */
  public static void main(String[] args) throws IOException, InterruptedException {
    final HelloWorldServer server = new HelloWorldServer();
    server.start();
    server.blockUntilShutdown();
  }

  static class GreeterImpl extends GreeterGrpc.GreeterImplBase {

    @Override
    public void sayHello(HelloRequest req, StreamObserver<HelloReply> responseObserver) {
      HelloReply reply = HelloReply.newBuilder().setMessage("Hello " + req.getName()).build();
      responseObserver.onNext(reply);
      responseObserver.onCompleted();
    }
  }
}
客户端代码:
/*
 * Copyright 2015 The gRPC Authors
 *
 * Licensed under the Apache License, Version 2.0 (the "License");
 * you may not use this file except in compliance with the License.
 * You may obtain a copy of the License at
 *
 *     http://www.apache.org/licenses/LICENSE-2.0
 *
 * Unless required by applicable law or agreed to in writing, software
 * distributed under the License is distributed on an "AS IS" BASIS,
 * WITHOUT WARRANTIES OR CONDITIONS OF ANY KIND, either express or implied.
 * See the License for the specific language governing permissions and
 * limitations under the License.
 */

package com.zhb.grpc.examples.helloworld;

import io.grpc.Channel;
import io.grpc.ManagedChannel;
import io.grpc.ManagedChannelBuilder;
import io.grpc.StatusRuntimeException;
import java.util.concurrent.TimeUnit;
import java.util.logging.Level;
import java.util.logging.Logger;

/**
 * A simple client that requests a greeting from the {@link HelloWorldServer}.
 */
public class HelloWorldClient {
  private static final Logger logger = Logger.getLogger(HelloWorldClient.class.getName());

  private final GreeterGrpc.GreeterBlockingStub blockingStub;

  /** Construct client for accessing HelloWorld server using the existing channel. */
  public HelloWorldClient(Channel channel) {
    // 'channel' here is a Channel, not a ManagedChannel, so it is not this code's responsibility to
    // shut it down.

    // Passing Channels to code makes code easier to test and makes it easier to reuse Channels.
    blockingStub = GreeterGrpc.newBlockingStub(channel);
  }

  /** Say hello to server. */
  public void greet(String name) {
    logger.info("Will try to greet " + name + " ...");
    HelloRequest request = HelloRequest.newBuilder().setName(name).build();
    HelloReply response;
    try {
      response = blockingStub.sayHello(request);
    } catch (StatusRuntimeException e) {
      logger.log(Level.WARNING, "RPC failed: {0}", e.getStatus());
      return;
    }
    logger.info("Greeting: " + response.getMessage());
  }

  /**
   * Greet server. If provided, the first element of {@code args} is the name to use in the
   * greeting. The second argument is the target server.
   */
  public static void main(String[] args) throws Exception {
    String user = "world";
    // Access a service running on the local machine on port 50051
    String target = "localhost:50051";
    // Allow passing in the user and target strings as command line arguments
    if (args.length > 0) {
      if ("--help".equals(args[0])) {
        System.err.println("Usage: [name [target]]");
        System.err.println("");
        System.err.println("  name    The name you wish to be greeted by. Defaults to " + user);
        System.err.println("  target  The server to connect to. Defaults to " + target);
        System.exit(1);
      }
      user = args[0];
    }
    if (args.length > 1) {
      target = args[1];
    }

    // Create a communication channel to the server, known as a Channel. Channels are thread-safe
    // and reusable. It is common to create channels at the beginning of your application and reuse
    // them until the application shuts down.
    ManagedChannel channel = ManagedChannelBuilder.forTarget(target)
        // Channels are secure by default (via SSL/TLS). For the example we disable TLS to avoid
        // needing certificates.
        .usePlaintext()
        .build();
    try {
      HelloWorldClient client = new HelloWorldClient(channel);
      client.greet(user);
    } finally {
      // ManagedChannels use resources like threads and TCP connections. To prevent leaking these
      // resources the channel should be shut down when it will no longer be used. If it may be used
      // again leave it running.
      channel.shutdownNow().awaitTermination(5, TimeUnit.SECONDS);
    }
  }
}
然后先启动Server:
再启动Client:
可以看到执行成功。一个简单的gRPC helloworld工程就搭建好了。
参考
https://grpc.io/docs/languages/java/
gRPC-Java(二):一个Demo熟悉gRPC的四种模式-CSDN博客
gRPC提供了四种提供服务的模式,它们分别是:
① 简单模式(Unary RPCs);
② 客户端流模式(Client streaming RPCs);
③ 服务端流模式(Server streaming RPCs);
④ 双向流模式(Bidirectional streaming RPCs )
- 简单模式:客户端发出单个请求,服务端返回单个响应。
- 客户端流模式:客户端将连续的数据流发送到服务端,服务端返回一个响应;用在客户端发送多次请求到服务端情况,如分段上传图片场景等。
- 服务端流模式:客户端发起一个请求到服务端,服务端返回连续的数据流;一般用在服务端分批返回数据的情况,客户端能持续接收服务端的数据。
- 双向流模式:双向流就是服务端流和客户端流的整合,请求和返回都可以通过流的方式交互。
接下来,我们将通过官网的一个例子来学习一下这四种模式。
还是用到gRPC-Java(一):构建一个使用Java语言的gRPC工程中已经创建好的项目,完整项目链接附在文末。
##一、编写.proto文件并生成代码
这里面涉及到一些protocol-buffers的语法,可以暂时不用深究,不影响理解大局。
下面的router_guide.proto文件中,使用service关键字定义了一个名为RouteGuide的服务,这个RouteGuide服务中又提供了四个使用rpc关键字定义的RPC方法,分别是:
简单模式:GetFeature;
服务端流模式:ListFeatures;
客户端流模式:RecordRoute;
双向流模式:RouteChat。
区别这四种模式的方式就是,在流模式的rpc方法参数前面加stream。举个例子:
服务端流模式ListFeatures,是这么定义的:rpc ListFeatures(Rectangle) returns (stream Feature) {}
响应体Feature前面加了stream。
客户端流模式RecordRoute,是这么定义的:rpc RecordRoute(stream Point) returns (RouteSummary) {}
请求体Point前面加了stream。
双向流模式RouteChat,则是在请求和响应体之前都加stream:rpc RouteChat(stream RouteNote) returns (stream RouteNote) {}
OK,了解了proto文件里面的基本内容之后,我们继续。本文中实例程序所需要的完整的route_guide.proto文件如下:
syntax = "proto3";
option java_multiple_files = true;
option java_package = "com.zhb.grpc.examples.routeguide";
option java_outer_classname = "RouteGuideProto";
option objc_class_prefix = "RTG";
package routeguide;
// service关键字描述一个RPC Server,里面的rpc关键字描述一个RPC方法
service RouteGuide {
// A simple RPC.
//
// Obtains the feature at a given position.
//
// A feature with an empty name is returned if there's no feature at the given
// position.
rpc GetFeature(Point) returns (Feature) {}
// A server-to-client streaming RPC.
//
// Obtains the Features available within the given Rectangle. Results are
// streamed rather than returned at once (e.g. in a response message with a
// repeated field), as the rectangle may cover a large area and contain a
// huge number of features.
rpc ListFeatures(Rectangle) returns (stream Feature) {}
// A client-to-server streaming RPC.
//
// Accepts a stream of Points on a route being traversed, returning a
// RouteSummary when traversal is completed.
rpc RecordRoute(stream Point) returns (RouteSummary) {}
// A Bidirectional streaming RPC.
//
// Accepts a stream of RouteNotes sent while a route is being traversed,
// while receiving other RouteNotes (e.g. from other users).
rpc RouteChat(stream RouteNote) returns (stream RouteNote) {}
}
// Points are represented as latitude-longitude pairs in the E7 representation
// (degrees multiplied by 10**7 and rounded to the nearest integer).
// Latitudes should be in the range +/- 90 degrees and longitude should be in
// the range +/- 180 degrees (inclusive).
message Point {
int32 latitude = 1;
int32 longitude = 2;
}
// A latitude-longitude rectangle, represented as two diagonally opposite
// points "lo" and "hi".
message Rectangle {
// One corner of the rectangle.
Point lo = 1;
// The other corner of the rectangle.
Point hi = 2;
}
// A feature names something at a given point.
//
// If a feature could not be named, the name is empty.
message Feature {
// The name of the feature.
string name = 1;
// The point where the feature is detected.
Point location = 2;
}
// Not used in the RPC. Instead, this is here for the form serialized to disk.
message FeatureDatabase {
repeated Feature feature = 1;
}
// A RouteNote is a message sent while at a given point.
message RouteNote {
// The location from which the message is sent.
Point location = 1;
// The message to be sent.
string message = 2;
}
// A RouteSummary is received in response to a RecordRoute rpc.
//
// It contains the number of individual points received, the number of
// detected features, and the total distance covered as the cumulative sum of
// the distance between each point.
message RouteSummary {
// The number of points received.
int32 point_count = 1;
// The number of known features passed while traversing the route.
int32 feature_count = 2;
// The distance covered in metres.
int32 distance = 3;
// The duration of the traversal in seconds.
int32 elapsed_time = 4;
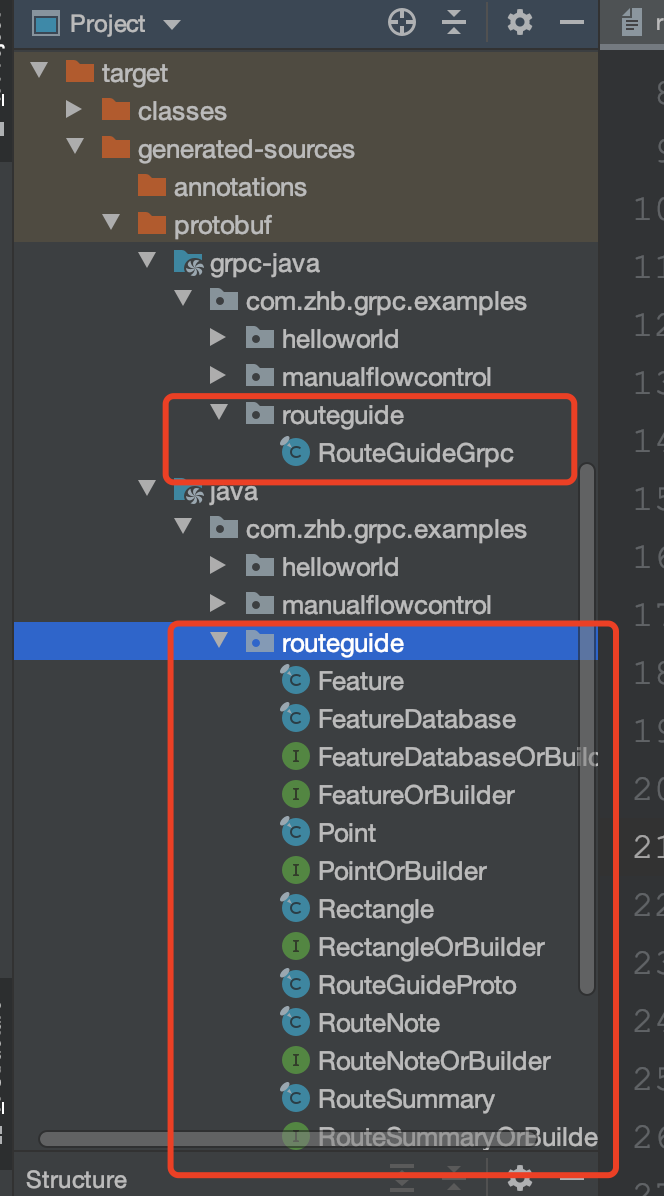
}然后按照上一篇文章中的那样,使用protobuf-maven-plugin根据proto文件生成Java代码。执行如下两条命令:
mvn protobuf:compile
mvn protobuf:compile-custom
生成如下图两个包中的类。
二、编写RPC Server端
在第一步生成代码的基础上编写一个RPC Server端,并让Server端运行起来,大致可分为如下步骤:
① 重写生成的xxxGrpc.xxxImplBase类的rpc方法,做真正的业务逻辑。
② 创建一个RPC Server,并监听指定的端口。稍微具体点来说就是,使用ServerBuilder.forPort(port)得到一个ServerBuilder对象,然后在此ServerBuilder对象上调用addService方法,方法的参数为①中的类。再调用build方法,建造出一个真正的包含了监听端口信息、提供的服务信息的RPC Server端。
③ 调用②中server的start方法,启动RPC Server。
那我们接下来就一步一步按照这个流程编写一个RPC Server吧:
第一步,重写自动生成的xxxImplBase类里面的rpc方法。如下,我们重写了在proto文件中定义的4个rpc方法。关于这4种rpc的参数类型和返回值类型我们后面再讲。
private static class RouteGuideService extends RouteGuideGrpc.RouteGuideImplBase {
    private final Collection<Feature> features;
    private final ConcurrentMap<Point, List<RouteNote>> routeNotes =
        new ConcurrentHashMap<Point, List<RouteNote>>();

    RouteGuideService(Collection<Feature> features) {
      this.features = features;
    }

    /**
     * Gets the {@link Feature} at the requested {@link Point}. If no feature at that location
     * exists, an unnamed feature is returned at the provided location.
     *
     * @param request          the requested location for the feature.
     * @param responseObserver the observer that will receive the feature at the requested point.
     */
    @Override
    public void getFeature(Point request, StreamObserver<Feature> responseObserver) {
      responseObserver.onNext(checkFeature(request));
      responseObserver.onCompleted();
    }

    /**
     * Gets all features contained within the given bounding {@link Rectangle}.
     *
     * @param request          the bounding rectangle for the requested features.
     * @param responseObserver the observer that will receive the features.
     */
    @Override
    public void listFeatures(Rectangle request, StreamObserver<Feature> responseObserver) {
      int left = min(request.getLo().getLongitude(), request.getHi().getLongitude());
      int right = max(request.getLo().getLongitude(), request.getHi().getLongitude());
      int top = max(request.getLo().getLatitude(), request.getHi().getLatitude());
      int bottom = min(request.getLo().getLatitude(), request.getHi().getLatitude());

      for (Feature feature : features) {
        if (!RouteGuideUtil.exists(feature)) {
          continue;
        }

        int lat = feature.getLocation().getLatitude();
        int lon = feature.getLocation().getLongitude();
        if (lon >= left && lon <= right && lat >= bottom && lat <= top) {
          responseObserver.onNext(feature);
        }
      }
      responseObserver.onCompleted();
    }

    /**
     * Gets a stream of points, and responds with statistics about the "trip": number of points,
     * number of known features visited, total distance traveled, and total time spent.
     *
     * @param responseObserver an observer to receive the response summary.
     * @return an observer to receive the requested route points.
     */
    @Override
    public StreamObserver<Point> recordRoute(final StreamObserver<RouteSummary> responseObserver) {
      return new StreamObserver<Point>() {
        int pointCount;
        int featureCount;
        int distance;
        Point previous;
        final long startTime = System.nanoTime();

        @Override
        public void onNext(Point point) {
          pointCount++;
          if (RouteGuideUtil.exists(checkFeature(point))) {
            featureCount++;
          }
          // For each point after the first, add the incremental distance from the previous point to
          // the total distance value.
          if (previous != null) {
            distance += calcDistance(previous, point);
          }
          previous = point;
        }

        @Override
        public void onError(Throwable t) {
          logger.log(Level.WARNING, "recordRoute cancelled");
        }

        @Override
        public void onCompleted() {
          long seconds = NANOSECONDS.toSeconds(System.nanoTime() - startTime);
          responseObserver.onNext(RouteSummary.newBuilder().setPointCount(pointCount)
                                      .setFeatureCount(featureCount).setDistance(distance)
                                      .setElapsedTime((int) seconds).build());
          responseObserver.onCompleted();
        }
      };
    }

    /**
     * Receives a stream of message/location pairs, and responds with a stream of all previous
     * messages at each of those locations.
     *
     * @param responseObserver an observer to receive the stream of previous messages.
     * @return an observer to handle requested message/location pairs.
     */
    @Override
    public StreamObserver<RouteNote> routeChat(final StreamObserver<RouteNote> responseObserver) {
      return new StreamObserver<RouteNote>() {
        @Override
        public void onNext(RouteNote note) {
          List<RouteNote> notes = getOrCreateNotes(note.getLocation());

          // Respond with all previous notes at this location.
          for (RouteNote prevNote : notes.toArray(new RouteNote[0])) {
            responseObserver.onNext(prevNote);
          }

          // Now add the new note to the list
          notes.add(note);
        }

        @Override
        public void onError(Throwable t) {
          logger.log(Level.WARNING, "routeChat cancelled");
        }

        @Override
        public void onCompleted() {
          responseObserver.onCompleted();
        }
      };
    }

    /**
     * Get the notes list for the given location. If missing, create it.
     */
    private List<RouteNote> getOrCreateNotes(Point location) {
      List<RouteNote> notes = Collections.synchronizedList(new ArrayList<RouteNote>());
      List<RouteNote> prevNotes = routeNotes.putIfAbsent(location, notes);
      return prevNotes != null ? prevNotes : notes;
    }

    /**
     * Gets the feature at the given point.
     *
     * @param location the location to check.
     * @return The feature object at the point. Note that an empty name indicates no feature.
     */
    private Feature checkFeature(Point location) {
      for (Feature feature : features) {
        if (feature.getLocation().getLatitude() == location.getLatitude()
            && feature.getLocation().getLongitude() == location.getLongitude()) {
          return feature;
        }
      }

      // No feature was found, return an unnamed feature.
      return Feature.newBuilder().setName("").setLocation(location).build();
    }

    /**
     * Calculate the distance between two points using the "haversine" formula.
     * The formula is based on http://mathforum.org/library/drmath/view/51879.html.
     *
     * @param start The starting point
     * @param end   The end point
     * @return The distance between the points in meters
     */
    private static int calcDistance(Point start, Point end) {
      int r = 6371000; // earth radius in meters
      double lat1 = toRadians(RouteGuideUtil.getLatitude(start));
      double lat2 = toRadians(RouteGuideUtil.getLatitude(end));
      double lon1 = toRadians(RouteGuideUtil.getLongitude(start));
      double lon2 = toRadians(RouteGuideUtil.getLongitude(end));
      double deltaLat = lat2 - lat1;
      double deltaLon = lon2 - lon1;

      double a = sin(deltaLat / 2) * sin(deltaLat / 2)
          + cos(lat1) * cos(lat2) * sin(deltaLon / 2) * sin(deltaLon / 2);
      double c = 2 * atan2(sqrt(a), sqrt(1 - a));

      return (int) (r * c);
    }
  }
第②步,创建一个RPC Server对象。
看第二个构造方法,使用ServerBuilder.forPort得到一个SeverBuilder对象,然后传给第三个构造方法去使用。先忽略第三个构造方法中features参数,这个参数是我们自己程序从文件中读出来的的信息,与gRPC框架关系不大。
private final int port;
private final Server server;

public RouteGuideServer(int port) throws IOException {
    this(port, RouteGuideUtil.getDefaultFeaturesFile());
  }

  /**
   * Create a RouteGuide server listening on {@code port} using {@code featureFile} database.
   */
  public RouteGuideServer(int port, URL featureFile) throws IOException {
    this(ServerBuilder.forPort(port), port, RouteGuideUtil.parseFeatures(featureFile));
  }

  /**
   * Create a RouteGuide server using serverBuilder as a base and features as data.
   */
  public RouteGuideServer(ServerBuilder<?> serverBuilder, int port, Collection<Feature> features) {
    this.port = port;
    server = serverBuilder.addService(new RouteGuideService(features))
        .build();
  }
第③步:调用第②步中创建的Server对象的start方法,启动服务端。
  public void start() throws IOException {
    // 启动服务端
    server.start();
    logger.info("Server started, listening on " + port);
    Runtime.getRuntime().addShutdownHook(new Thread() {
      @Override
      public void run() {
        // Use stderr here since the logger may have been reset by its JVM shutdown hook.
        System.err.println("*** shutting down gRPC server since JVM is shutting down");
        try {
          RouteGuideServer.this.stop();
        } catch (InterruptedException e) {
          e.printStackTrace(System.err);
        }
        System.err.println("*** server shut down");
      }
    });
  }
成功启动服务端:

三、编写RPC Client端
编写完并启动RPC Server后,我们继续编写客户端。
编写客户端也是有范式的,主要有如下几步:
① 创建一个stub(存根),用来像调用本地方法一样调用RPC方法。
② 调用远程Rpc方法,处理响应。
好,我们先进行第一步创建stub,stub的话有两种,一种是blocking/synchronous stub;另一种是non-blocking/asynchronous stub。顾名思义,第一种是同步阻塞的stub,第二种是非阻塞异步的stub。在使用客户端流模式和双向流模式时,必须用asynchronous stub。也很好理解,因为如果不是异步的话,发送一个请求就必须同步地等待服务器响应,那就违反了客户端流模式和双向流模式的初衷了。
public RouteGuideClient(String host, int port) {
  // 创建stub需要用到此ChannelBuilder构造出来的Channel
  this(ManagedChannelBuilder.forAddress(host, port).usePlaintext());
}

/** Construct client for accessing RouteGuide server using the existing channel. */
public RouteGuideClient(ManagedChannelBuilder<?> channelBuilder) {
  channel = channelBuilder.build();
  // 同步stub
  blockingStub = RouteGuideGrpc.newBlockingStub(channel);
  // 异步stub
  asyncStub = RouteGuideGrpc.newStub(channel);
}
第②步,调用RPC方法,并处理响应。
下面的代码演示了对四种模式的rpc方法该如何调用。其中的参数类型和返回值类型,我们后面再讲
简单模式:
// 构造请求体
Point request = Point.newBuilder().setLatitude(lat).setLongitude(lon).build();
Feature feature;
try {
   // 调用RPC方法获得返回值对象
  feature = blockingStub.getFeature(request);
} catch (StatusRuntimeException e) {
  logger.log(Level.WARNING, "RPC failed: {0}", e.getStatus());
  return;
}
服务端流模式:
// 构造请求体
Rectangle request =
    Rectangle.newBuilder()
        .setLo(Point.newBuilder().setLatitude(lowLat).setLongitude(lowLon).build())
        .setHi(Point.newBuilder().setLatitude(hiLat).setLongitude(hiLon).build()).build();
// 使用Iterator对象接收响应。
Iterator<Feature> features;
try {
  features = blockingStub.listFeatures(request);
} catch (StatusRuntimeException e) {
  logger.log(Level.WARNING, "RPC failed: {0}", e.getStatus());
  return;
}
客户端流模式:
这个代码需要对照服务端的recordRoute方法一起看。
客户端一侧的responseObserver对象是用来处理服务端响应的,asyncStub调用RPC方法recordRoute用responseObserver对象作为参数,方法返回一个StreamObserver对象requestObserver,返回的这个requestObserver对象的onNext和onCompleted等方法的具体逻辑都在服务器端被重写过。使用requestObserver对象的onNext方法来向服务端发送多次请求,使用requestObserver对象的onCompleted标识发送数据结束。然后服务端根据重写的逻辑执行
public void recordRoute(List<Feature> features, int numPoints) throws InterruptedException {
info("*** RecordRoute");
final CountDownLatch finishLatch = new CountDownLatch(1);
StreamObserver<RouteSummary> responseObserver = new StreamObserver<RouteSummary>() {
@Override
public void onNext(RouteSummary summary) {
info("Finished trip with {0} points. Passed {1} features. "
+ "Travelled {2} meters. It took {3} seconds.", summary.getPointCount(),
summary.getFeatureCount(), summary.getDistance(), summary.getElapsedTime());
}
@Override
public void onError(Throwable t) {
Status status = Status.fromThrowable(t);
logger.log(Level.WARNING, "RecordRoute Failed: {0}", status);
finishLatch.countDown();
}
@Override
public void onCompleted() {
info("Finished RecordRoute");
finishLatch.countDown();
}
};
StreamObserver<Point> requestObserver = asyncStub.recordRoute(responseObserver);
try {
// Send numPoints points randomly selected from the features list.
Random rand = new Random();
for (int i = 0; i < numPoints; ++i) {
int index = rand.nextInt(features.size());
Point point = features.get(index).getLocation();
info("Visiting point {0}, {1}", RouteGuideUtil.getLatitude(point),
RouteGuideUtil.getLongitude(point));
requestObserver.onNext(point);
// Sleep for a bit before sending the next one.
Thread.sleep(rand.nextInt(1000) + 500);
if (finishLatch.getCount() == 0) {
// RPC completed or errored before we finished sending.
// Sending further requests won't error, but they will just be thrown away.
return;
}
}
} catch (RuntimeException e) {
// Cancel RPC
requestObserver.onError(e);
throw e;
}
// Mark the end of requests
requestObserver.onCompleted();
// Receiving happens asynchronously
finishLatch.await(1, TimeUnit.MINUTES);
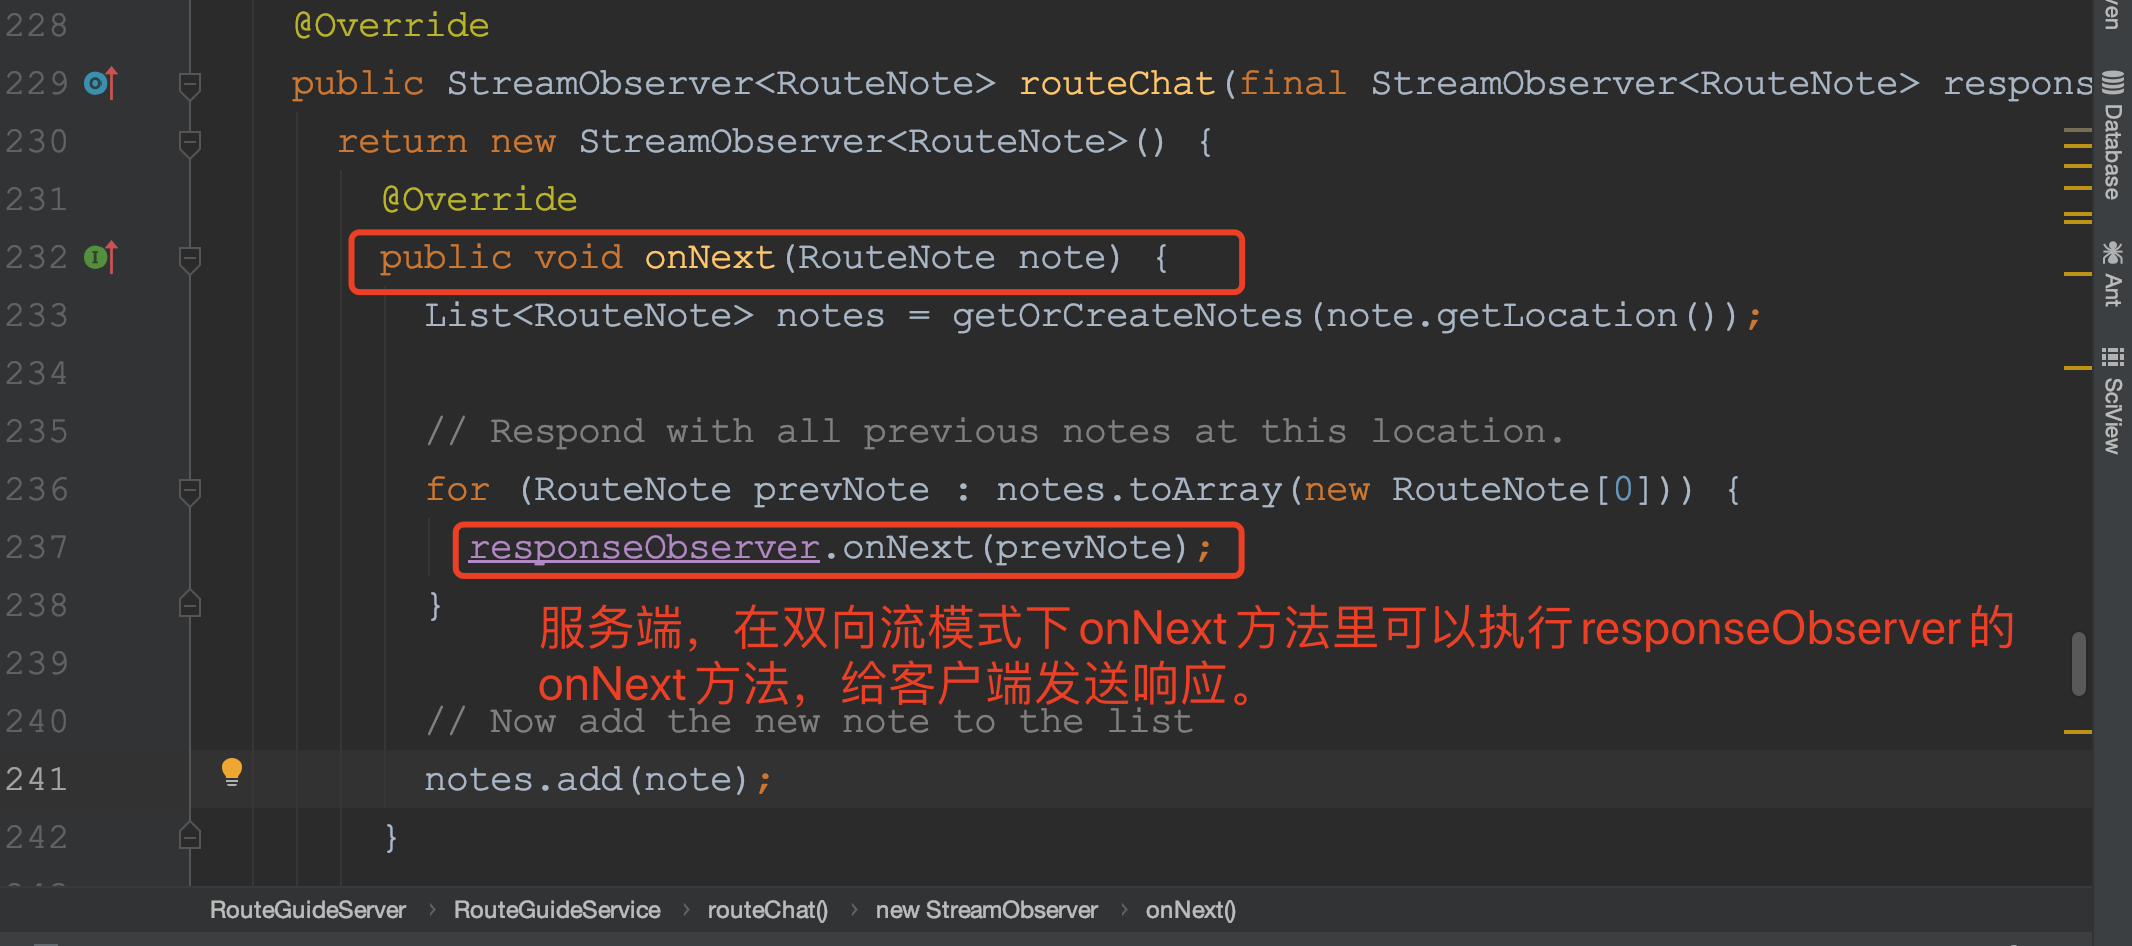
}双向流模式:
双向流模式的客户端侧代码与客户端流模式一样,区别在于服务端的代码。在客户端流模式下,服务端的onNext()会处理请求参数,然后会在客户端调用onCompleted方法后才返回响应。但是双向流模式下,服务端不必等到客户端调用onCompleted方法后再返回响应,可以直接在onNext方法里就调用传进来的responseObserver的onNext方法返回给客户端响应。如下图:
public void routeChat() throws Exception {
info("*** RoutChat");
final CountDownLatch finishLatch = new CountDownLatch(1);
StreamObserver<RouteNote> requestObserver =
asyncStub.routeChat(new StreamObserver<RouteNote>() {
@Override
public void onNext(RouteNote note) {
info("Got message \"{0}\" at {1}, {2}", note.getMessage(), note.getLocation()
.getLatitude(), note.getLocation().getLongitude());
}
@Override
public void onError(Throwable t) {
Status status = Status.fromThrowable(t);
logger.log(Level.WARNING, "RouteChat Failed: {0}", status);
finishLatch.countDown();
}
@Override
public void onCompleted() {
info("Finished RouteChat");
finishLatch.countDown();
}
});
try {
RouteNote[] requests =
{newNote("First message", 0, 0), newNote("Second message", 0, 1),
newNote("Third message", 1, 0), newNote("Fourth message", 1, 1)};
for (RouteNote request : requests) {
info("Sending message \"{0}\" at {1}, {2}", request.getMessage(), request.getLocation()
.getLatitude(), request.getLocation().getLongitude());
requestObserver.onNext(request);
}
} catch (RuntimeException e) {
// Cancel RPC
requestObserver.onError(e);
throw e;
}
// Mark the end of requests
requestObserver.onCompleted();
// Receiving happens asynchronously
finishLatch.await(1, TimeUnit.MINUTES);
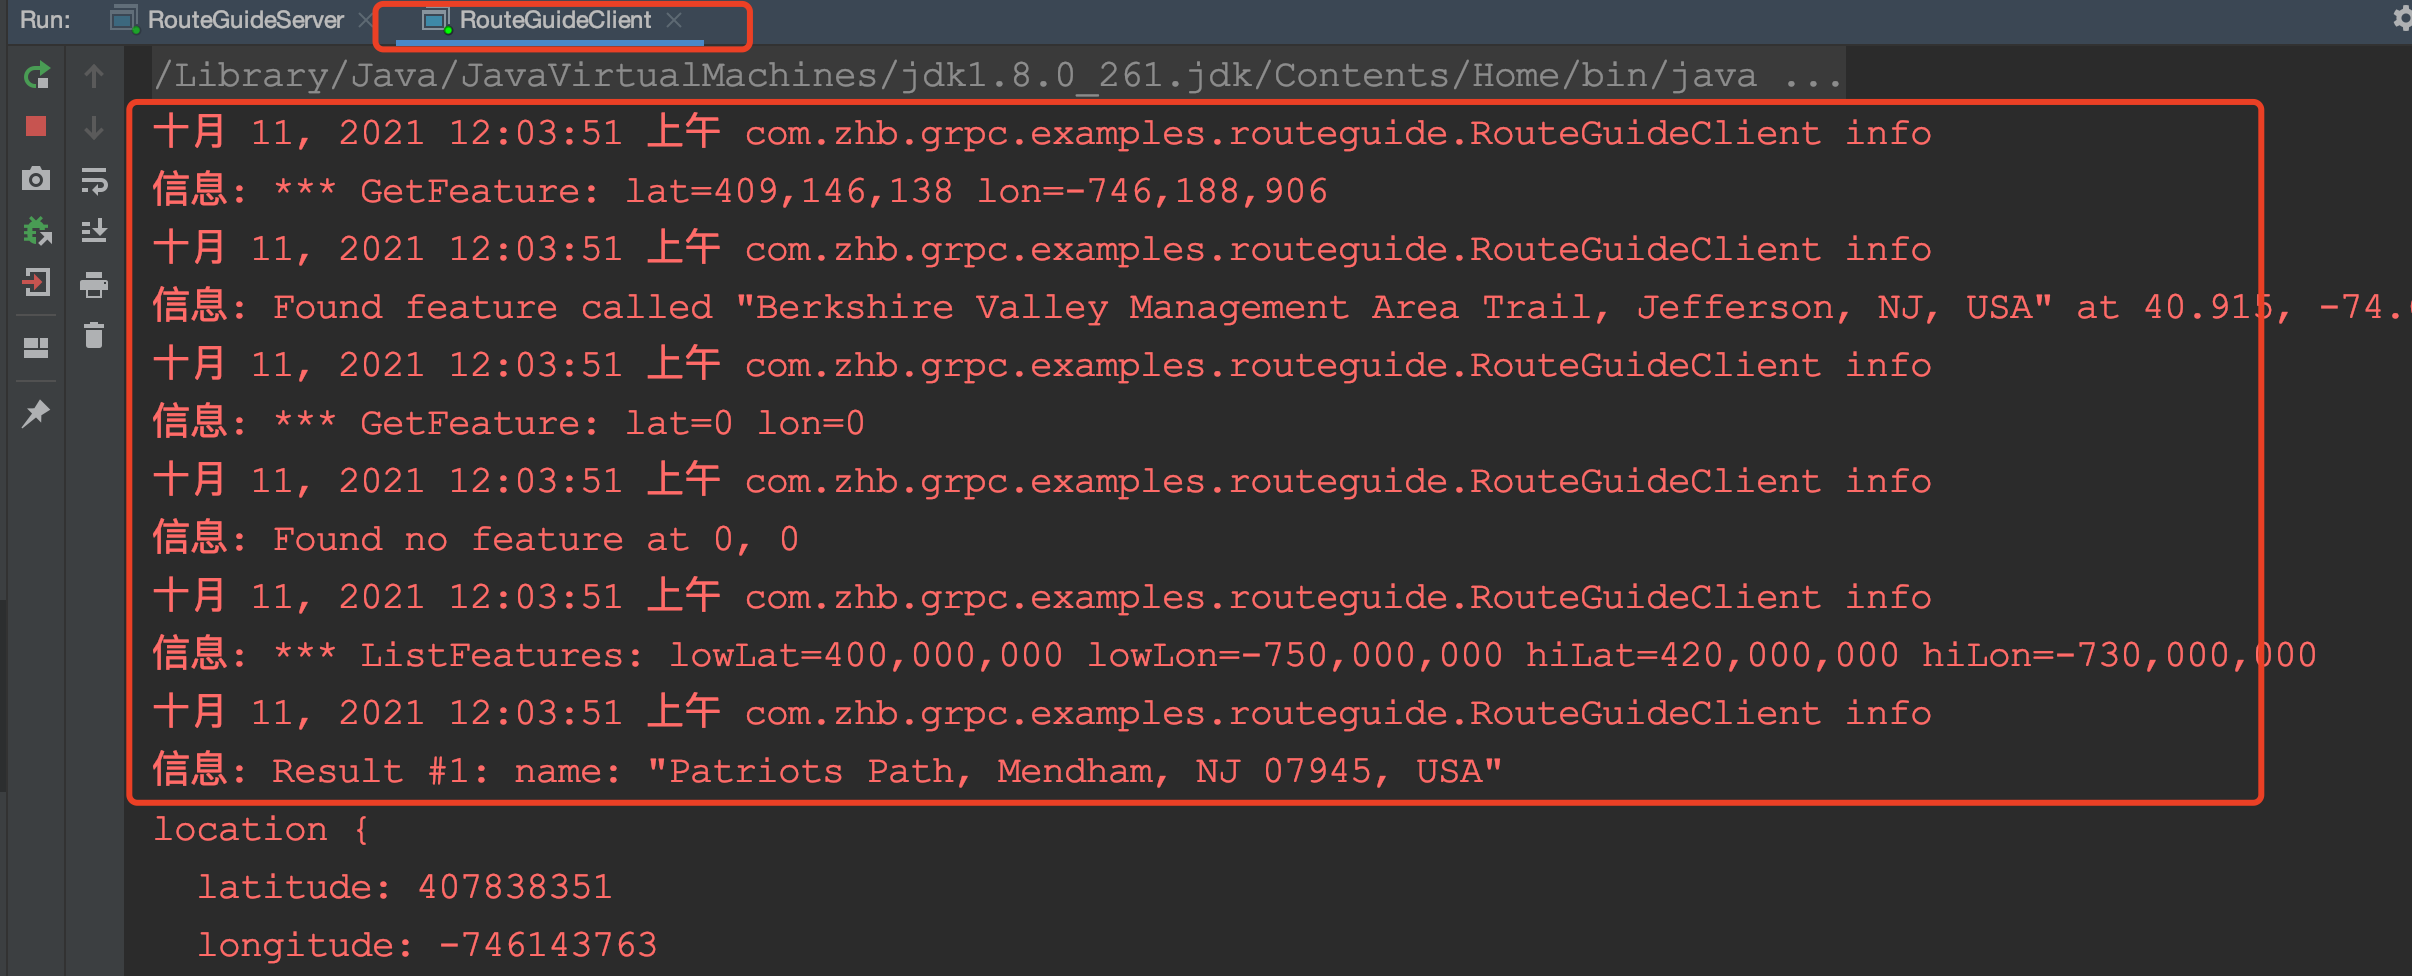
}以下是客户端调用四个方法的截图:
完整工程链接:
链接: https://pan.baidu.com/s/1s7uDWJZq3AK4jZmGJZHYfw 提取码: cntr
参考
https://grpc.io/docs/languages/java/basics/一、什么是gRPC
gRPC是一个高性能、通用的开源 RPC 框架,其由 Google 主要面向移动应用开发并基于HTTP/2协议标准而设计,基于ProtoBuf(Protocol Buffers) 序列化协议开发,且支持众多开发语言。gRPC 提供了一种简单的方法来精确地定义服务和为 iOS、Android 和后台支持服务自动生成可靠性很强的客户端功能库。客户端充分利用高级流和链接功能,从而有助于节省带宽、降低的 TCP 链接次数、节省 CPU 使用、和电池寿命。
gRPC使用 ProtoBuf 来定义服务,ProtoBuf 是由 Google 开发的一种数据序列化协议(类似于 XML、JSON、hessian)。ProtoBuf 能够将数据进行序列化,并广泛应用在数据存储、通信协议等方面。不过,当前 gRPC 仅支持 Protobuf ,且不支持在浏览器中使用。由于 gRPC 的设计能够支持支持多种数据格式。
二、首先搭建maven项目
1.然后在src/main目录下的proto目录
2.设置把proto设置成java的sources,选择file->project structure->modules
3.创建hello_service.proto的文件
4.hello_service.proto与hello.proto
4.1、hello.protosyntax = "proto3"; package com.xxx.tutorial.demo.grpc; option java_multiple_files = true; option java_package = "com.xxx.tutorial.model"; option java_outer_classname = "Hello"; message HelloRequest{ string name = 1; int32 id = 2; } message HelloResponse{ string message = 1; }4.2、hello_service.proto
syntax = "proto3";

package com.xxx.tutorial.demo.grpc;


option java_multiple_files = true;
option java_package = "com.xxx.tutorial.service";
option java_outer_classname = "GreetingService";

import "hello.proto";

service HelloService{
    rpc sayHello(HelloRequest) returns (HelloResponse);
}
5.需要导入一个IDEA插件Protobuf
6.使用maven进行编译
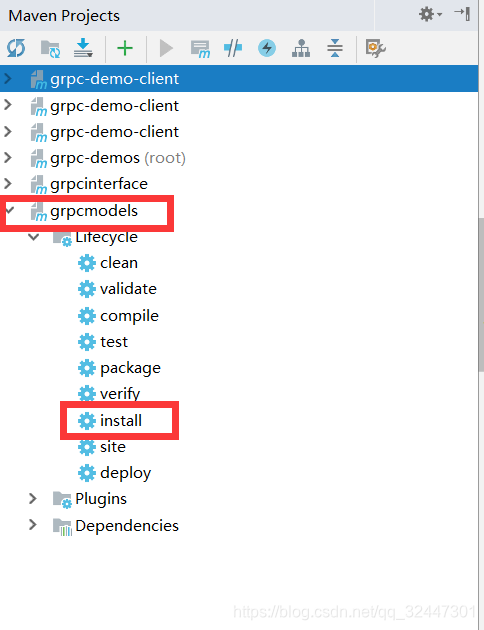
7.选择install等待一会进行生成GRPC代码
三、应用springboot搭建GRPC项目
8.比如说创建简单的helloworld.protosyntax = "proto3"; option java_multiple_files = true; //定义输出的目录,生成的目录就是“net/devh/examples/grpc/lib”下面 option java_package = "net.devh.examples.grpc.lib"; //定义输出的文件名称,生成在lib下的就是HelloWorldProto.class option java_outer_classname = "HelloWorldProto"; // The greeting service definition. //定义的接口的类,这里会生成一个SimpleGrpc.class,服务端需要来实现的 service Simple { //定义接口方法 rpc SayHello (HelloRequest) returns (HelloReply) { } } //请求参数 message HelloRequest { string name = 1; } //返回结果 message HelloReply { string message = 1; }9.将gradle转换成maven
注意此代码是gradle转写maven的gradle文件,并非项目文件。进行gradle打包需要将此代码注释apply plugin: 'maven' task writeNewPom << { pom { project { inceptionYear '2018' licenses { license { name 'The Apache Software License, Version 2.0' url 'http://www.apache.org/licenses/LICENSE-2.0.txt' distribution 'repo' } } } }.writeTo("pom.xml") }
再运行右侧 gradle writeNewPom 即可在当前项目中生成pom.xml文件。
10.创建springboot的依赖
build.gradleapply plugin: 'java' apply plugin: 'com.google.protobuf' apply plugin: 'idea' repositories { maven { url "https://plugins.gradle.org/m2/" } } dependencies { compile "io.grpc:grpc-netty:1.10.0" compile "io.grpc:grpc-protobuf:1.10.0" compile "io.grpc:grpc-stub:1.10.0" } protobuf { protoc { // The artifact spec for the Protobuf Compiler artifact = 'com.google.protobuf:protoc:3.0.0' } plugins { // Optional: an artifact spec for a protoc plugin, with "grpc" as // the identifier, which can be referred to in the "plugins" // container of the "generateProtoTasks" closure. grpc { artifact = 'io.grpc:protoc-gen-grpc-java:1.0.0-pre2' } } generateProtoTasks { ofSourceSet('main')*.plugins { // Apply the "grpc" plugin whose spec is defined above, without // options. Note the braces cannot be omitted, otherwise the // plugin will not be added. This is because of the implicit way // NamedDomainObjectContainer binds the methods. grpc { } } } } buildscript { repositories { maven { url "https://plugins.gradle.org/m2/" } } dependencies { classpath 'com.google.protobuf:protobuf-gradle-plugin:0.8.4' } }进行编译
11.创建客户端项目
build.gradlebuildscript { ext { springBootVersion = '2.0.2.RELEASE' } repositories { mavenCentral() } dependencies { classpath("org.springframework.boot:spring-boot-gradle-plugin:${springBootVersion}") } } apply plugin: 'java' apply plugin: 'eclipse' apply plugin: 'org.springframework.boot' apply plugin: 'io.spring.dependency-management' //apply plugin: 'maven' group = 'com.example' version = '0.0.1-SNAPSHOT' sourceCompatibility = 1.8 repositories { mavenCentral() } dependencies { compile project(':grpc-lib') compile("net.devh:grpc-client-spring-boot-starter:1.4.0.RELEASE") compile('org.springframework.boot:spring-boot-starter-web') } // //task writeNewPom << { // pom { // project { // inceptionYear '2018' // licenses { // license { // name 'The Apache Software License, Version 2.0' // url 'http://www.apache.org/licenses/LICENSE-2.0.txt' // distribution 'repo' // } // } // } // }.writeTo("pom.xml") //} as StringGRPCClientApplication
import org.springframework.boot.SpringApplication;
import org.springframework.boot.autoconfigure.SpringBootApplication;

@SpringBootApplication
public class GRpcClientApplication {

	public static void main(String[] args) {
		SpringApplication.run(GRpcClientApplication.class, args);
	}
}
GrpcClientController
import org.springframework.beans.factory.annotation.Autowired;
import org.springframework.web.bind.annotation.RequestMapping;
import org.springframework.web.bind.annotation.RequestParam;
import org.springframework.web.bind.annotation.RestController;

@RestController
public class GrpcClientController {
    @Autowired
    private GrpcClientService grpcClientService;

    @RequestMapping("/")
    public String printMessage(@RequestParam(defaultValue = "Michael") String name) {
        return grpcClientService.sendMessage(name);
    }
}
GrpcClientService
import io.grpc.Channel;
import net.devh.examples.grpc.lib.HelloReply;
import net.devh.examples.grpc.lib.HelloRequest;
import net.devh.examples.grpc.lib.SimpleGrpc;
import net.devh.springboot.autoconfigure.grpc.client.GrpcClient;
import org.springframework.stereotype.Service;

@Service
public class GrpcClientService {
    @GrpcClient("local-grpc-server")
    private Channel serverChannel;

    public String sendMessage(String name) {
        SimpleGrpc.SimpleBlockingStub stub = SimpleGrpc.newBlockingStub(serverChannel);
        HelloReply response = stub.sayHello(HelloRequest.newBuilder().setName(name).build());
        return response.getMessage();
    }
}
application.properties
server.port=8080
spring.application.name=local-grpc-client
grpc.client.local-grpc-server.host=127.0.0.1
grpc.client.local-grpc-server.port=9898
grpc.client.local-grpc-server.enableKeepAlive=true
grpc.client.local-grpc-server.keepAliveWithoutCalls=true
12.服务端项目
build.gradlebuildscript { ext { springBootVersion = '2.0.2.RELEASE' } repositories { mavenCentral() } dependencies { classpath("org.springframework.boot:spring-boot-gradle-plugin:${springBootVersion}") } } apply plugin: 'java' apply plugin: 'eclipse' apply plugin: 'org.springframework.boot' apply plugin: 'io.spring.dependency-management' group = 'com.example' version = '0.0.1-SNAPSHOT' sourceCompatibility = 1.8 repositories { mavenCentral() } dependencies { compile('org.springframework.boot:spring-boot-starter-web') compile 'net.devh:grpc-server-spring-boot-starter:1.4.0.RELEASE' //注意,需要依赖grpc-lib项目 compile project(':grpc-lib') testCompile('org.springframework.boot:spring-boot-starter-test') } buildscript { dependencies { classpath("org.springframework.boot:spring-boot-gradle-plugin:0.8.4") } }GRpcApplication
import org.springframework.boot.SpringApplication;
import org.springframework.boot.autoconfigure.SpringBootApplication;

@SpringBootApplication
public class GRpcApplication {

	public static void main(String[] args) {
		SpringApplication.run(GRpcApplication.class, args);
	}
}
GrpcServerService
import io.grpc.stub.StreamObserver;
import net.devh.examples.grpc.lib.HelloReply;
import net.devh.examples.grpc.lib.HelloRequest;
import net.devh.examples.grpc.lib.SimpleGrpc;
import net.devh.springboot.autoconfigure.grpc.server.GrpcService;

@GrpcService(SimpleGrpc.class)
public class GrpcServerService extends SimpleGrpc.SimpleImplBase{
    @Override
    public void sayHello(HelloRequest req, StreamObserver<HelloReply> responseObserver) {
        HelloReply reply = HelloReply.newBuilder().setMessage("Hello =============> " + req.getName()).build();
        responseObserver.onNext(reply);
        responseObserver.onCompleted();
    }
}
application.properties
#服务端名称
spring.application.name=local-grpc-server
#服务端运行端口
server.port=8888
#grpc通信端口
grpc.server.port=9898
13.大功告成。
14.待续…
15.https://github.com/863473007/springboot-gRPC/tree/master/springboot-grpc


 浙公网安备 33010602011771号