
GFS-Google 文件系统
GFS分布式文件系统
1. 简介
GFS是一个可扩展的分布式文件系统,用于大型的、分布式的、对大量数据进行访问的应用。它运行于廉价的普通硬件上,并提供容错功能。它可以给大量的用户提供总体性能较高的服务。
GFS由三个组件组成
①存储服务器(Brick Server)
② 客户端(不在本地)(且,有客户端,也会有服务端,这点类似于 NFS,但是更为复杂)
③ 存储网关(NFS/Samaba)
无元数据服务器:
元数据是核心,描述对象的信息,影响其属性;
例如NFS,存放数据本身,是一个典型的元数据服务器可能存在单点故障,故要求服务器性能较高,服务器一旦出现故障就会导致数据丢失;
反过来看,所以无元数据服务不会有单点故障。
那么数据存放在哪里呢?会借用分布式的原则,分散存储,不会有一个统一的数据服务器
1.1 特点
-
扩展性和高性能:可扩展性,扩展节点,通过多节点提高性能
Scale-Out架构允许通过简单地增加存储节点的方式来提高存储容量和性能(磁盘、计算和I/0资源都可以独立增加),支持10GbE和InfiniBand 等高速网络互联。
Gluster弹性哈希(ElasticHash) 解决了GlusterFS对元数据服务器的依赖,改善了单点故障和性能瓶颈,真正实现了并行化数据访问。GlusterFS采用弹性哈希算法在存储池中可以智能地定位任意数据分片(将数据分片存储在不同节点上),不需要查看索引或者向元数据服务器查询。 -
高可用性:不存在单点故障,有备份机制,类似Raid的容灾机制
GlusterFS可以对文件进行自动复制,如镜像或多次复制,从而确保数据总是可以访问,甚至是在硬件故障的情况下也能正常访问当数据出现不一致时,自我修复功能能够把数据恢复到正确的状态,数据的修复是以增量的方式在后台执行,几乎不会产生性能负载。
GlusterFS可以支持所有的存储,因为它没有设计自己的私有数据文件格式,而是采用操作系统中主流标准的磁盘文件系统( 如EXT3、XFS等)来存储文件,因此数据可以使用传统访问磁盘的方式被访问。
-
全局统一命名空间:类比 API 的性质/概念,系统里根据他命名所定义的隔离区域,是一个独立空间;统一的名称空间,与客户端交互,把请求存放至后端的块数据服务器
-
弹性卷管理:方便扩容及对后端存储集群的管理与维护,较为复杂。
GlusterFS通过将数据储存在逻辑卷中,逻辑卷从逻辑存储池进行独立逻辑划分而得到。
逻辑存储池可以在线进行增加和移除,不会导致业务中断。逻辑卷可以根据需求在线增长和缩减,并可以在多个节点中实现负载均衡。
文件系统配置也可以实时在线进行更改并应用,从而可以适应工作负载条件变化或在线性能调优。 -
基于标准协议:基于标准化的文件使用协议,让 CentOS 兼容 GFS。
GlusterFS通过将数据储存在逻辑卷中,逻辑卷从逻辑存储池进行独立逻辑划分而得到。
逻辑存储池可以在线进行增加和移除,不会导致业务中断。逻辑卷可以根据需求在线增长和缩减,并可以在多个节点中实现负载均衡。
文件系统配置也可以实时在线进行更改并应用,从而可以适应工作负载条件变化或在线性能调优。
1.2 术语
- Brick 存储服务器:实际存储用户数据的服务器
- Volume:本地文件系统的"分区”
- FUSE:用户 空间的文件系统(类比EXT4),“这是一个伪文件系统”;以本地文件系统为例,用户想要读写一个文件,会借助于EXT4文件系统,然后把数据写在磁盘上;而如果是远端的GFS,客户端的请求则应该交给FUSE(为文件系统),就可以实现跨界点存储在GFS上
- VFS(虚拟端口) :内核态的虚拟文件系统,用户是先提交请求交给VFS然后VFS交给FUSE,再交给GFS客户端,最后由客户端交给远端的存储
- Glusterd(服务):是允许在存储节点的进程
1.3 工作流程
- 客户端或应用程序通过GlusterFS的挂载点访问数据。
- linux系统内核通过VFS API收到请求并处理。
- VES将数据递交给FUSE 内核文件系统,并向系统注册一个实际的文件系统FUSE, 而FUSE 文件系统则是将数据通过/dev/fuse 设备文件递交给了GlusterFS client端。可以将FUSE 文件系统理解为一个代理。
- GlusterFS client 收到数据后,client 根据配置文件的配置对数据进行处理。
- 经过GlusterFS client处理后,通过网络将数据传递至远端的GlusterFS Server,并且将数据写入到服务器存储设备上。
1.4 七种类型的 GlusterFS 卷
GlusterFs支持七种卷,即分布式卷、条带卷、复制卷、分布式条带卷、分布式复制卷、条带复制卷和分布式条带复制卷。
1.4.1 分布式卷
1)分布式卷的介绍
- 文件通过HASH算法分布到所有Brick Server. 上,这种卷是GlusterFS 的默认卷;以文件为单位根据HASH算法散列到不同的Brick,其实只是扩大了磁盘空间,如果有一块磁盘损坏,数据也将丢失,属于文件级的RAIDO,不具有容错能力。
- 在该模式下,并没有对文件进行分块处理,文件直接存储在某个Server节点上。
- 由于直接使用本地文件系统进行文件存储,所以存取效率并没有提高,反而会因为网络通信的原因而有所降低。
示例:
File1 和File2存放在Server1, 而File3存放在Server2,文件都是随机存储,一个文件(如File1)要么在Server1上,要么在Server2. 上,不能分块同时存放在Server1和Server2上。
2)分布式卷特点
- 文件分布在不同的服务器,不具备冗余性。
- 更容易和廉价地扩"展卷的大小。
- 单点故障会造成数据丢失。
- 依赖底层的数据保护。
#创建一个名为dis-volume的分布式卷,文件将根据HASH分布在server1 : /dir1、server2:/dir2 和server3:/dir3中.
gluster volume create dis-volume server1:/dir1 server2:/dir2 server3:/dir3
1.4.2 条带卷
1)条带卷的介绍
- 类似RAID0,文件被分成数据块并以轮询的方式分布到多个BrickServer上,文件存储以数据块为单位,支持大文件存储,文件越大,读取效率越高,但是不具备冗余性。
File 被分割为6段,1、3、5放在Server1, 2、4、6放在Server2。
2)条带卷特点
- 数据被分割成更小块分布到块服务器群中的不同条带区。
- 分布减少了负载且更小的文件加速了存取的速度。
- 没有数据冗余。
#创建了一个名为stripe-volume的条带卷,文件将被分块轮询的存储在Server1 :/dir1和Server2:/dir2两个Brick中
gluster volume create stripe-volume stripe 2 transport tcp server1:/dir1 server2:/dir2
1.4.3 复制卷
1)复制卷的介绍
- 将文件同步到多个Brick 上,使其具备多个文件副本,属于文件级RAID 1,具有容错能力。因为数据分散在多个Brick 中,所以读性能得到很大提升,但写性能下降。
- 复制卷具备冗余性,即使一个节点损坏,也不影响数据的正常使用。但因为要保存副本,所以磁盘利用率较低。
#创建名为rep-volume的复制卷,文件将同时存储两个副本,分别在Server1:/dir1和Server2:/dir2两个Brick中
gluster volume create rep-volume replica 2 transport tcp server1:/dir1 server2:/dir2
1.4.4 分布式条带卷
1)分布式条带卷的介绍
- BrickServer数量是条带数(数据块分布的Brick数量)的倍数,兼具分布式卷和条带卷的特点。
- 主要用于大文件访问处理,创建一个分布式条带卷最少需要4台服务器。
#创建一个名为dis-stripe的分布式条带卷,配置分布式的条带卷时,卷中Brick所包含的存储服务器数必须是条带数的倍数(>=2倍)。
Brick的数量是4 ( Server1:/dir1、 Server2: /dir2、 Server3:/dir3 和Server4:/dir4),条带数为2 (stripe 2 )

gluster volume create dis-stripe stripe 2 transport tcp server1:/dir1 server2:/dir2 server3:/dir3 server4:/dir4
创建卷时,存储服务器的数量如果等于条带或复制数,那么创建的是条带卷或者复制卷;如果存储服务器的数量是条带或复制数的2倍甚至更多,那么将创建的是分布式条带卷或分布式复制卷。
1.4.5 分布式复制卷
1)分布式复制卷的介绍
- Brick Server数量是镜像数(数据副本数量)的倍数,兼具分布式卷和复制卷的特点。主要用于需要冗余的情况下。
示例原理:
File1和File2 通过分布式卷的功能分别定位到Server1 和Server2。
在存放File1 时,File1 根据复制卷的特性,将存在两个相同的副本,分别是Server1 中的exp1 目录和Server2 中的exp2目录。
在存放File2时,File2 根据复制卷的特性,也将存在两个相同的副本,分别是Server3 中的exp3 目录和Server4 中的exp4 目录。
1.4.6 条带复制卷
1)条带复制卷的介绍
- 类似RAID10,同时具有条带卷和复制卷的特点。
1.4.7 分布式条带复制卷
1)分布式条带复制卷的介绍
- 三种基本卷的复合卷,通常用于类Map Reduce 应用。
2. 部署实践
环境准备
| 服务器类型 | 系统和IP地址 | 需要安装的组件 |
|---|---|---|
| node1服务器 | CentOS7.6(64 位) 192.168.80.20 | 添加4块20G硬盘 |
| node2服务器 | CentOS7.6(64 位) 192.168.80.25 | 添加4块20G硬盘 |
| node3服务器 | CentOS7.6(64 位) 192.168.80.30 | 添加4块20G硬盘 |
| node4服务器 | CentOS7.4(64 位) 192.168.80.35 | 添加4块20G硬盘 |
为啥是20G呢,因为VMware虚拟机里Centos7系统默认添加硬盘大小是20G,然后一顺溜点下去很解压

1.关闭所有节点的防火墙与selinux / 修改主机名
systemctl disable --now firewalld
setenforce 0

hostnamectl set-hostname node1/2/3/4
su
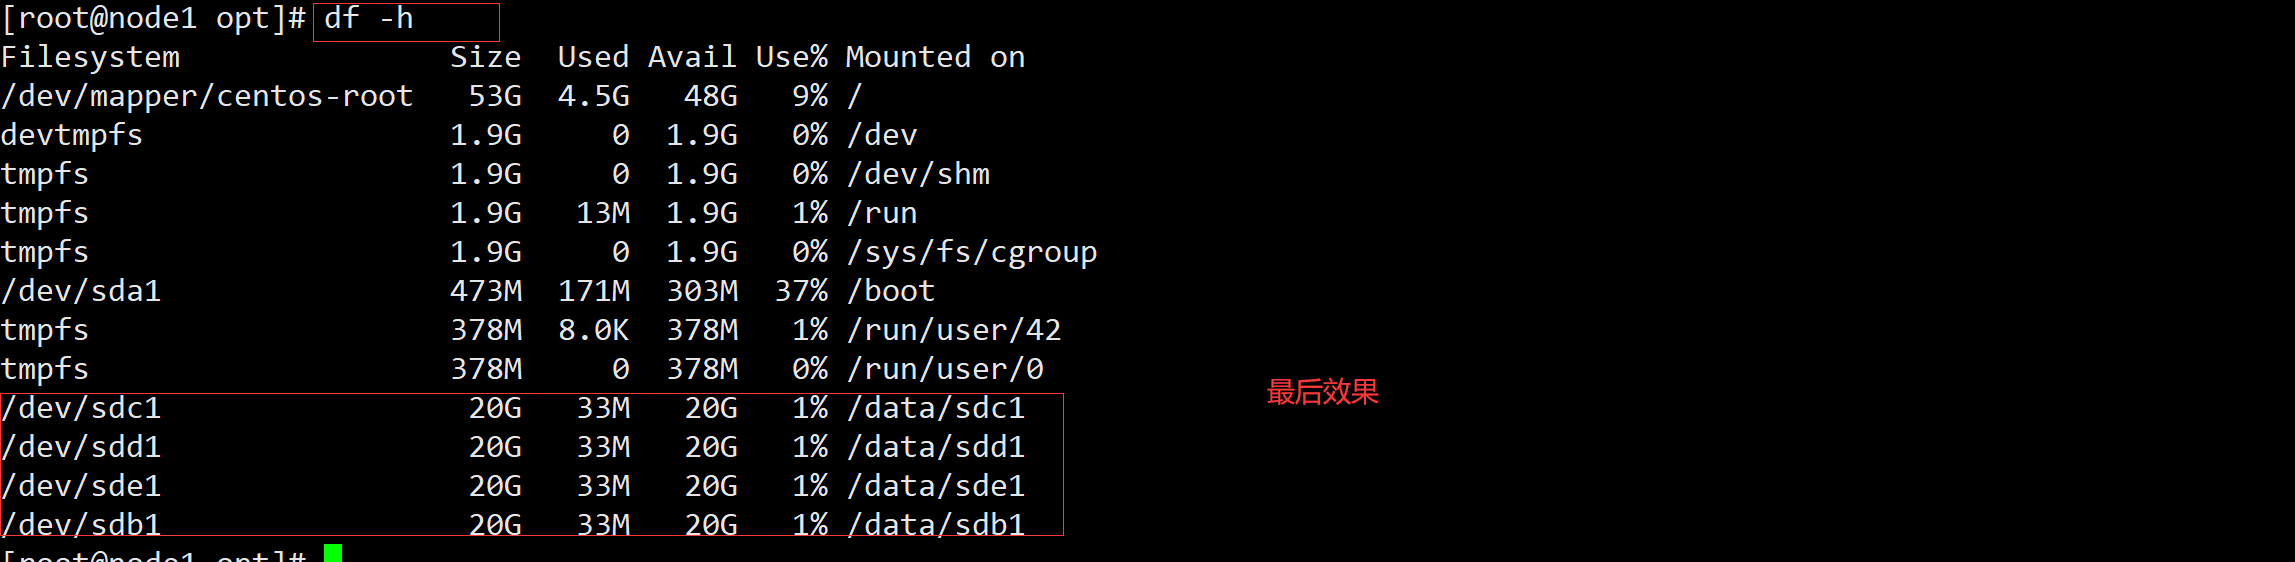
2.挂载硬盘/安装GFS(以node1节点为例)
(1)脚本准备:
[root@node1 ~] # vim /opt/fdisk.sh

#!/bin/bash
NEWDEV=`ls /dev/sd* | grep -o 'sd[b-z]' | uniq`
for VAR in $NEWDEV
do
   echo -e "n\np\n\n\n\nw\n" | fdisk /dev/$VAR &> /dev/null
   mkfs.xfs /dev/${VAR}"1" &> /dev/null
   mkdir -p /data/${VAR}"1" &> /dev/null
   echo "/dev/${VAR}"1" /data/${VAR}"1" xfs defaults 0 0" >> /etc/fstab
done
mount -a &> /dev/null

(2)执行脚本,挂载硬盘
chmod +x /opt/fdisk.sh
cd /opt/
./fdisk.sh
mount -a
df -h
--------------------------------------------------------------------------------------------------------
文件系统        容量  已用  可用 已用% 挂载点
...				 ...   ...   ...    ...
/dev/sdb1        20G   33M   20G    1% /data/sdb1
/dev/sdc1        20G   33M   20G    1% /data/sdc1
/dev/sdd1        20G   33M   20G    1% /data/sdd1
/dev/sde1        20G   33M   20G    1% /data/sde1


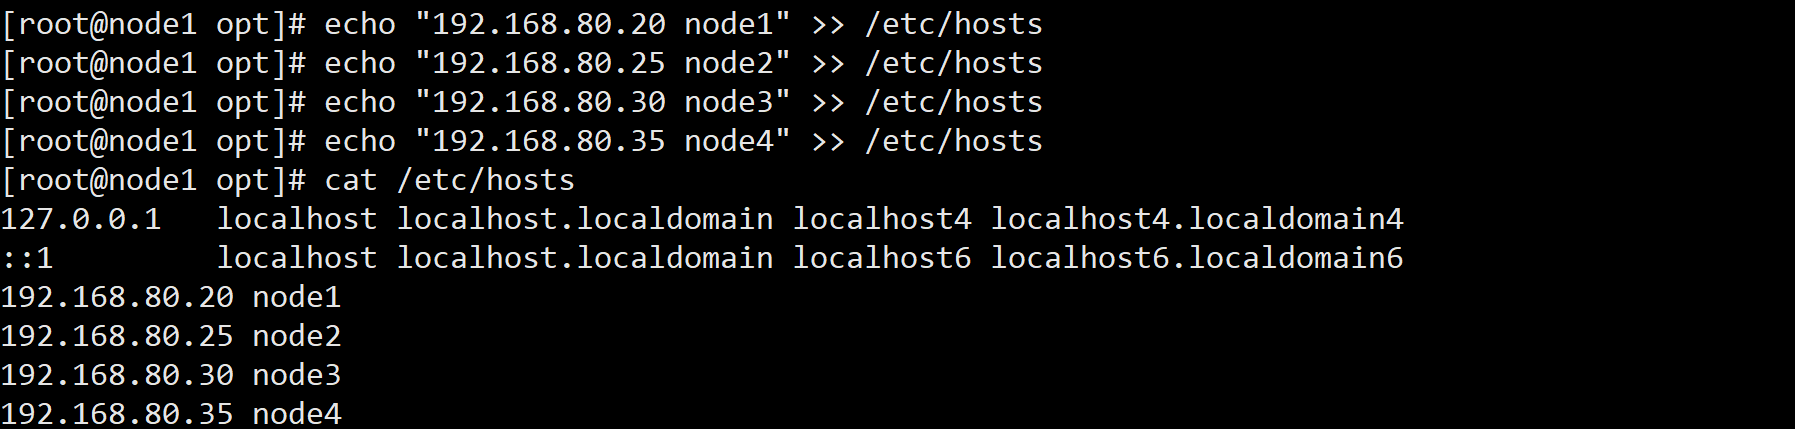
(3)添加临时DNS域名解析
echo "192.168.80.20 node1" >> /etc/hosts
echo "192.168.80.25 node2" >> /etc/hosts
echo "192.168.80.30 node3" >> /etc/hosts
echo "192.168.80.35 node4" >> /etc/hosts
cat /etc/hosts
(4) 放入gfsrepo.zip安装包解压,然后创建glfs.repo配置文件
unzip gfsrepo.zip
cd /etc/yum.repos.d/
mv * repos.bak/
mv: 无法将目录"repos.bak" 移动至自身的子目录"repos.bak/repos.bak" 下
[root@node1 /etc/yum.repos.d] # ls
repos.bak

[root@node1 /etc/yum.repos.d] # vim glfs.repo			#创建glfs.repo配置文件内容如下
[glfs]
name=glfs
baseurl=file:///opt/gfsrepo
gpgcheck=0
enabled=1

yum clean all && yum makecache


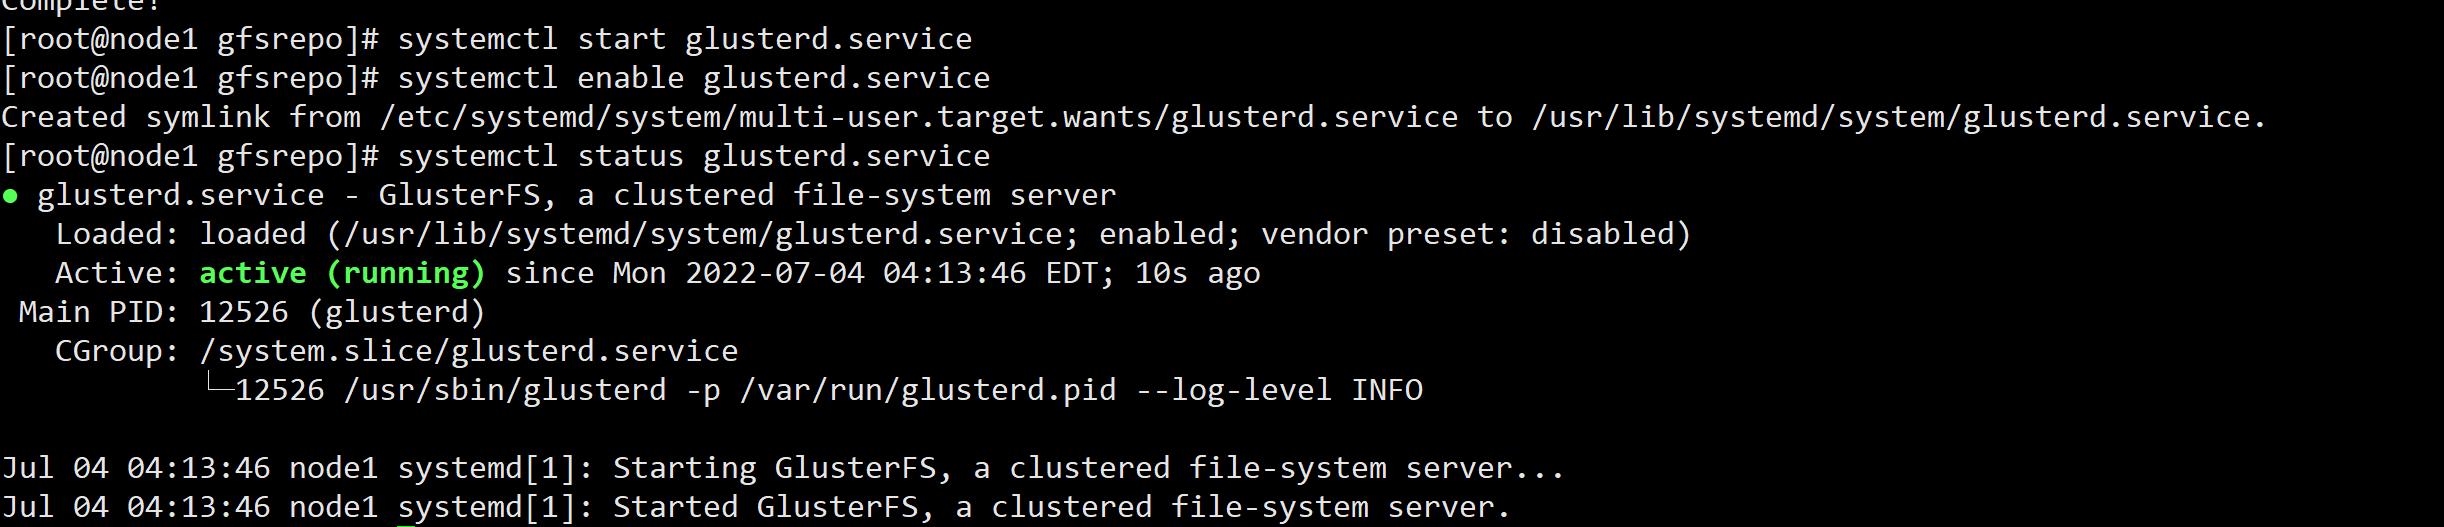
(5)安装gfs相关程序,然后开启服务
如果在线源没有删除干净,会产生由于依赖包版本不一致导致安装失败
glusterfs——yum本地源安装时因为依赖包版本不一致导致无法安装成功的报错
yum -y install glusterfs glusterfs-server glusterfs-fuse glusterfs-rdma
systemctl start glusterd.service
systemctl enable glusterd.service
systemctl status glusterd.service

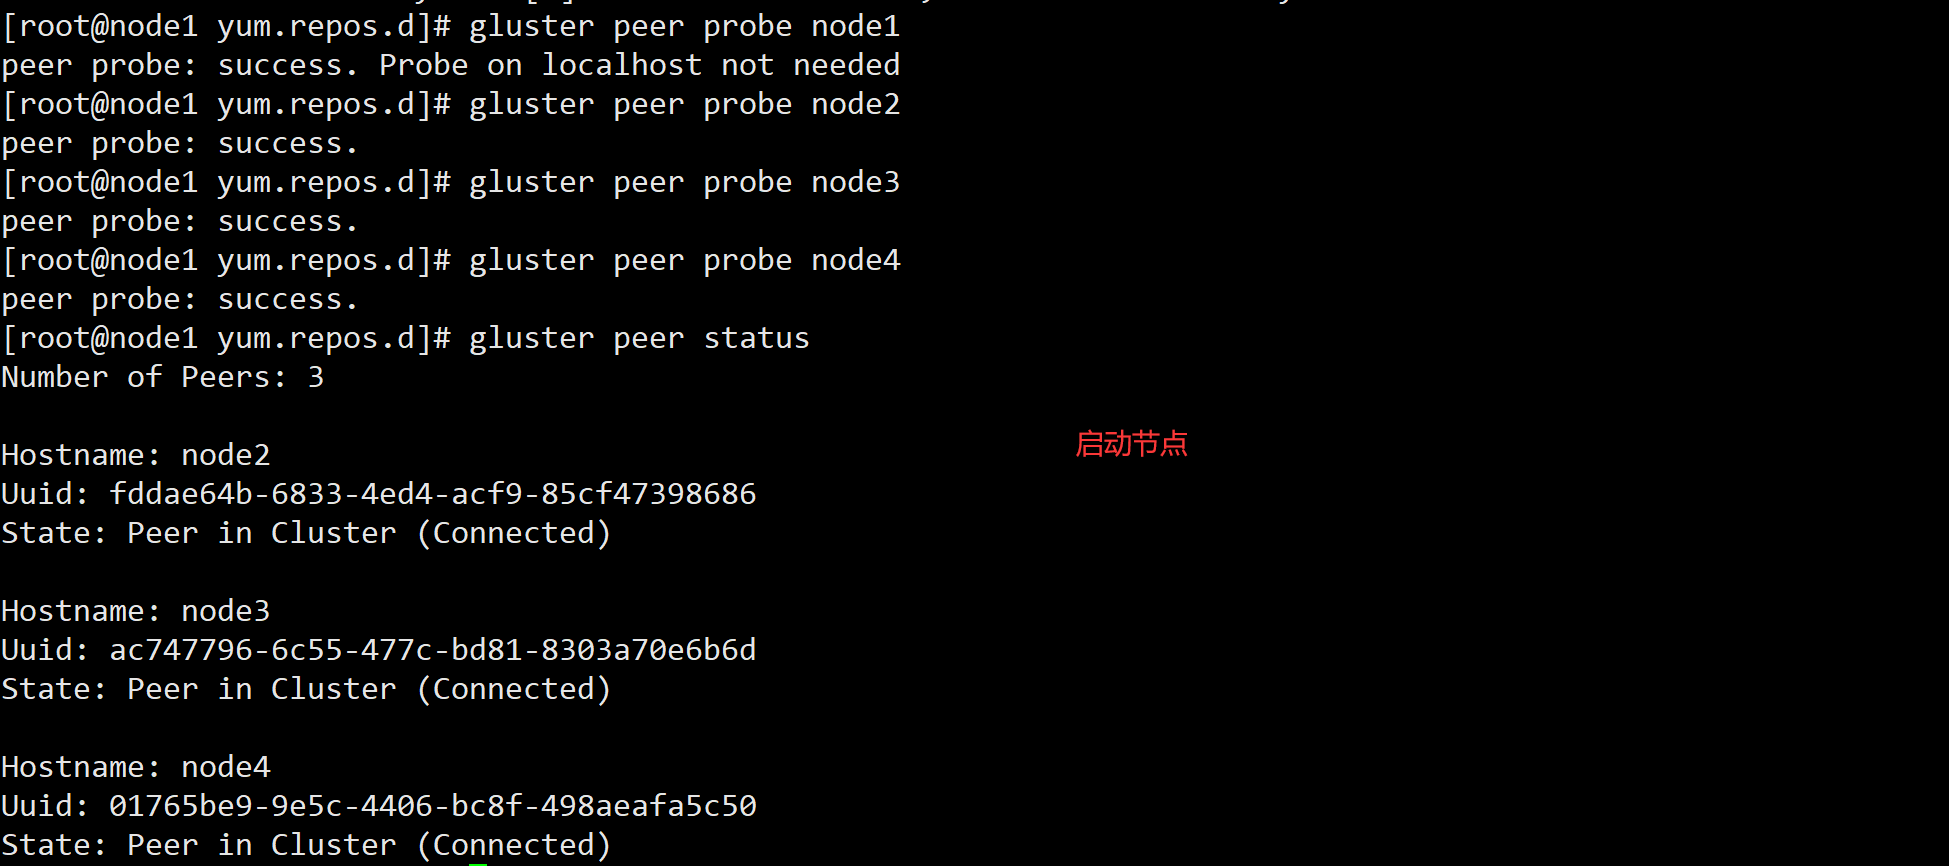
3.创建集群
[root@node1 yum.repos.d]# gluster peer probe node1			#添加node1
peer probe: success. Probe on localhost not needed
[root@node1 yum.repos.d]# gluster peer probe node2			#添加node2
peer probe: success.
[root@node1 yum.repos.d]# gluster peer probe node3			#添加node3
peer probe: success.
[root@node1 yum.repos.d]# gluster peer probe node4			#添加node4
peer probe: success.
[root@node1 yum.repos.d]# gluster peer status 				#查看状态
Number of Peers: 3

Hostname: node2
Uuid: ac9137b9-8ca5-43a1-8e4c-5af058fedc4e
State: Peer in Cluster (Connected)

Hostname: node3
Uuid: 4816542a-2425-4ccb-83e5-ee08e0fd0188
State: Peer in Cluster (Connected)

Hostname: node4
Uuid: 87dfb325-b90a-4a8c-9204-8013754ba49b
State: Peer in Cluster (Connected)
3. 创建不同卷
卷名称 			   卷类型				Brick
dis-volume			分布式卷			node1(/data/sdb1)、node2(/data/sdb1)
stripe-volume		条带卷			     node1(/data/sdc1)、node2(/data/sdc1)
rep-volume			复制卷			     node3(/data/sdb1)、node4(/data/sdb1)
dis-stripe			分布式条带卷		   node1(/data/sdd1)、node2(/data/sdd1)、node3(/data/sdd1)、node4(/data/sdd1)
dis-rep				分布式复制卷		   node1(/data/sde1)、node2(/data/sde1)、node3(/data/sde1)、node4(/data/sde1)
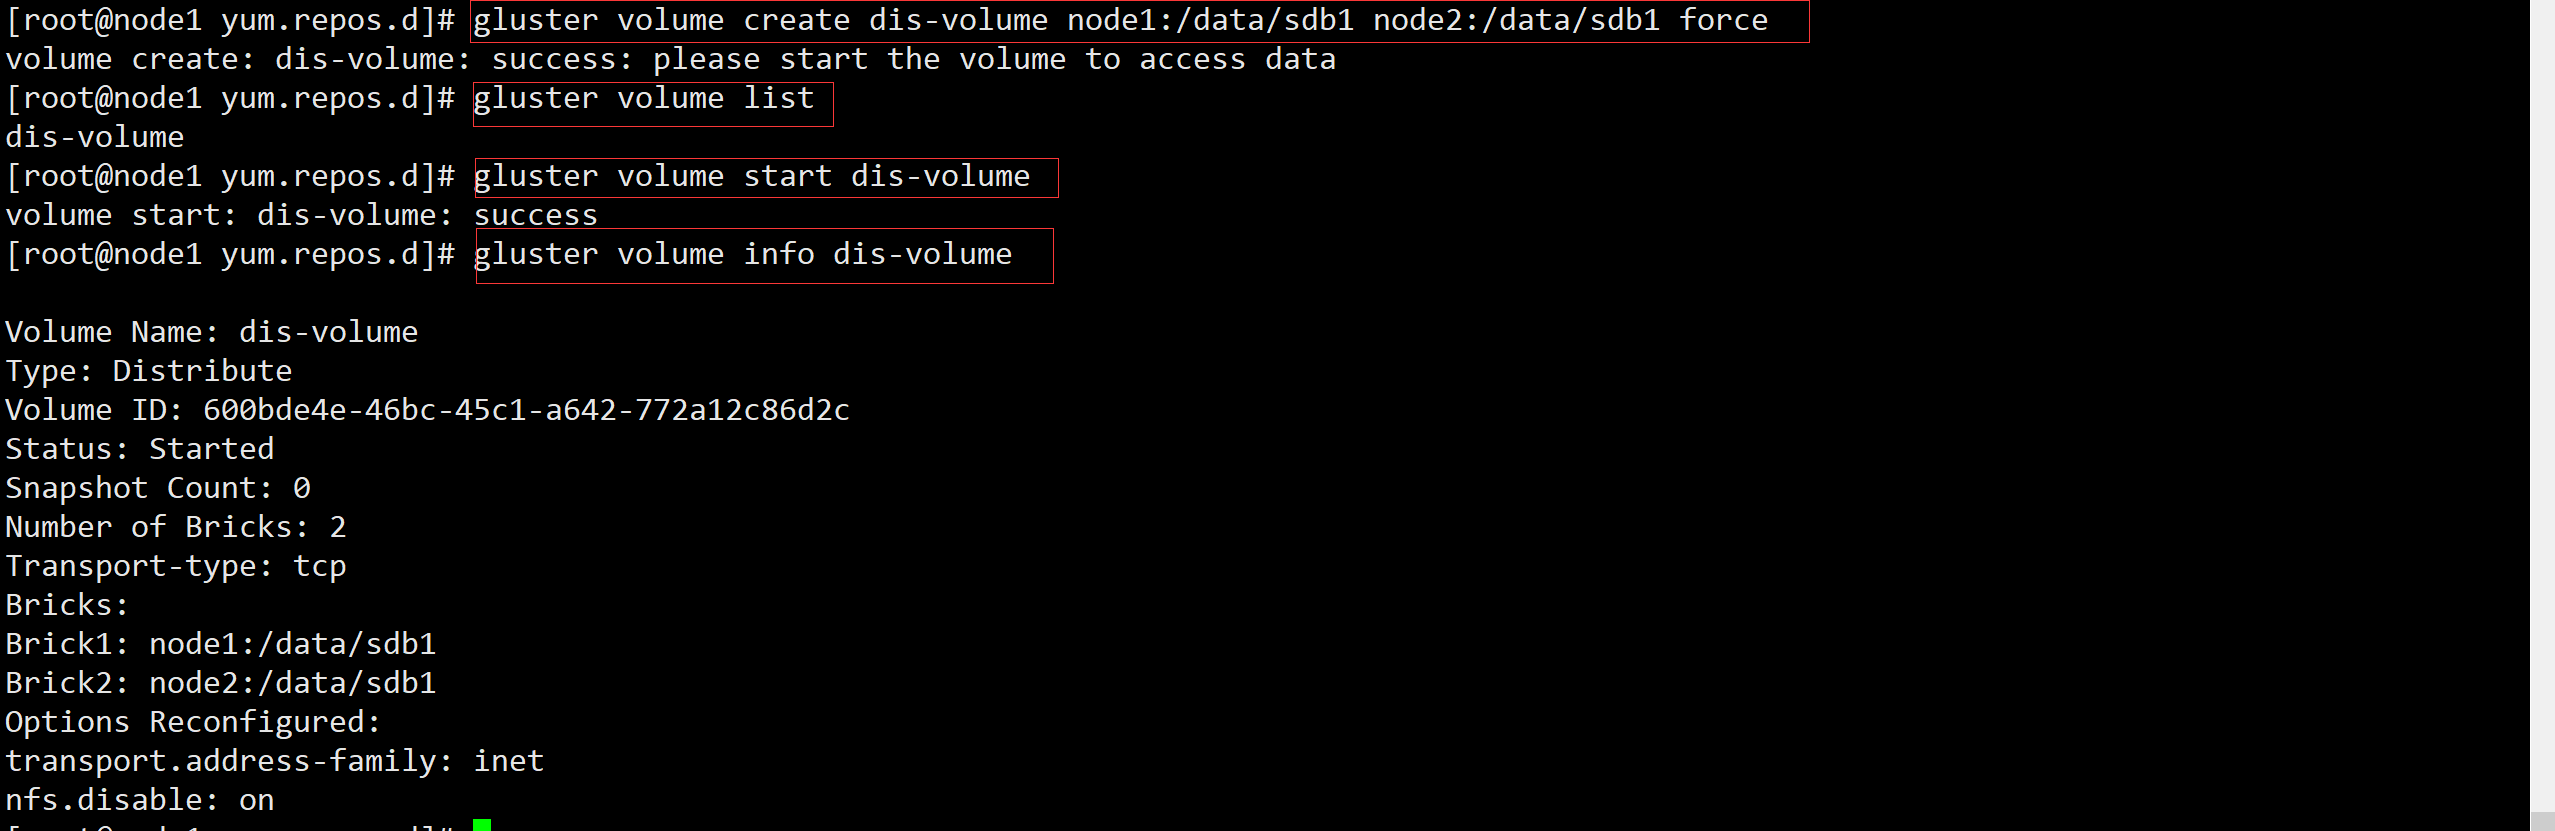
3.1 创建分布式卷
创建分布式卷,没有指定类型,默认创建的是分布式卷
[root@node1 yum.repos.d]# gluster volume create dis-volume node1:/data/sdb1 node2:/data/sdb1 force
volume create: dis-volume: success: please start the volume to access data
[root@node1 yum.repos.d]# gluster volume list
dis-volume
[root@node1 yum.repos.d]# gluster volume start dis-volume
volume start: dis-volume: success
[root@node1 yum.repos.d]# gluster volume info dis-volume

Volume Name: dis-volume
Type: Distribute
Volume ID: 057d9ba4-800d-477b-904b-e43f136e4297
Status: Started
Snapshot Count: 0
Number of Bricks: 2
Transport-type: tcp
Bricks:
Brick1: node1:/data/sdb1
Brick2: node2:/data/sdb1
Options Reconfigured:
transport.address-family: inet
nfs.disable: on
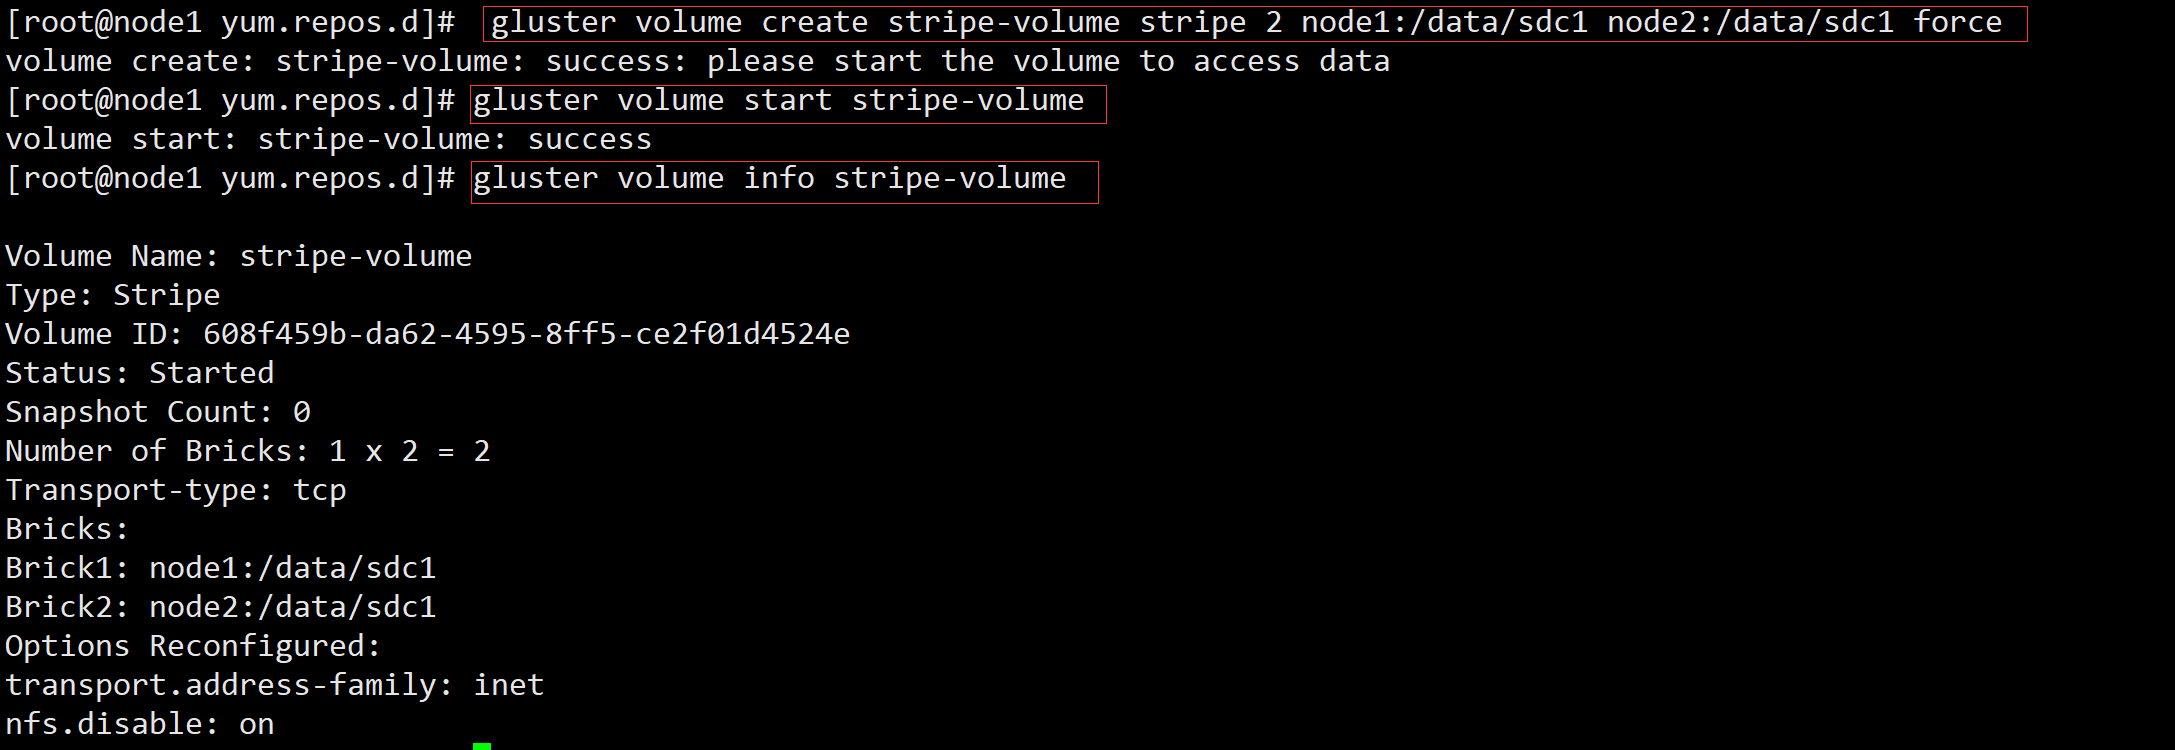
3.2 创建条带卷
指定类型为 stripe,数值为 2,且后面跟了 2 个 Brick Server,所以创建的是条带卷
[root@node1 yum.repos.d]# gluster volume create stripe-volume stripe 2 node1:/data/sdc1 node2:/data/sdc1 force
volume create: stripe-volume: success: please start the volume to access data
[root@node1 yum.repos.d]# gluster volume start stripe-volume
volume start: stripe-volume: success
[root@node1 yum.repos.d]# gluster volume info stripe-volume

Volume Name: stripe-volume
Type: Stripe
Volume ID: ab23d1af-941e-4310-842b-2b4c4c89e50d
Status: Started
Snapshot Count: 0
Number of Bricks: 1 x 2 = 2
Transport-type: tcp
Bricks:
Brick1: node1:/data/sdc1
Brick2: node2:/data/sdc1
Options Reconfigured:
transport.address-family: inet
nfs.disable: on
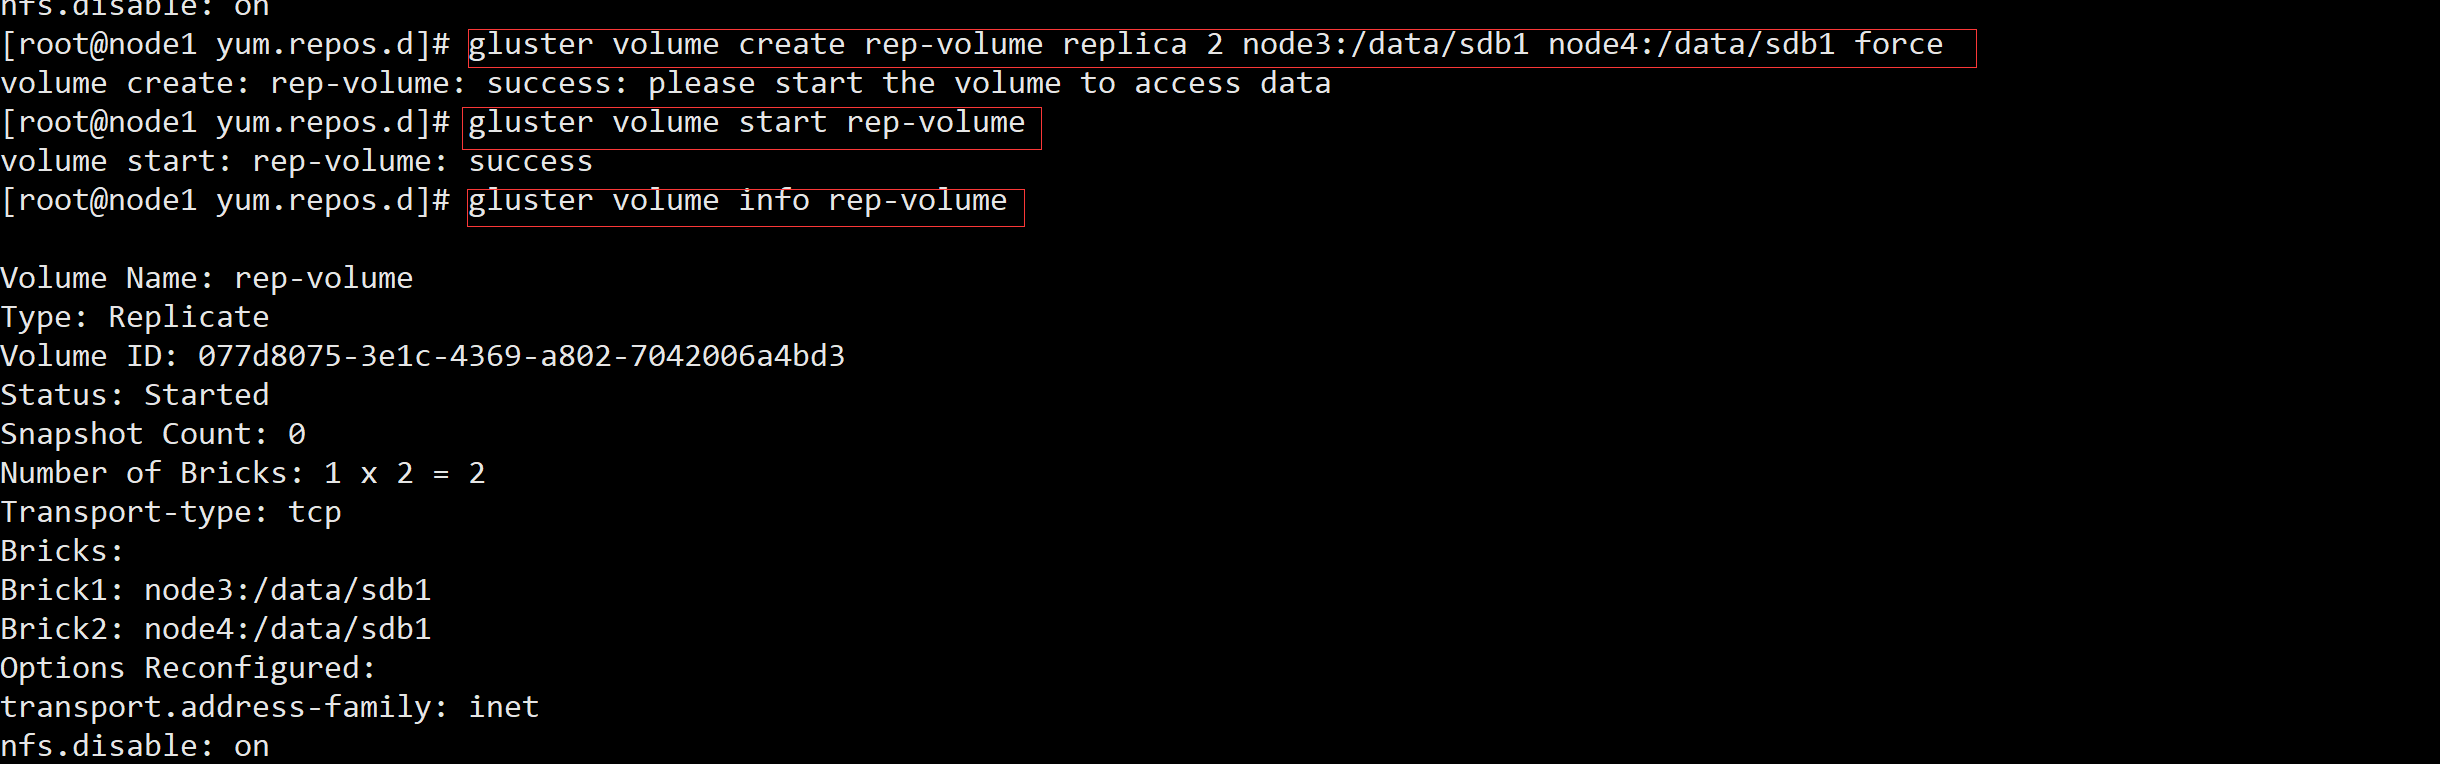
3.3 创建复制卷
指定类型为 replica,数值为 2,且后面跟了 2 个 Brick Server,所以创建的是复制卷
[root@node1 yum.repos.d]# gluster volume create rep-volume replica 2 node3:/data/sdb1 node4:/data/sdb1 force
volume create: rep-volume: success: please start the volume to access data
[root@node1 yum.repos.d]# gluster volume start rep-volume
volume start: rep-volume: success
[root@node1 yum.repos.d]# gluster volume info rep-volume

Volume Name: rep-volume
Type: Replicate
Volume ID: d511d0f1-e61f-4b43-8d59-354071846e9f
Status: Started
Snapshot Count: 0
Number of Bricks: 1 x 2 = 2
Transport-type: tcp
Bricks:
Brick1: node3:/data/sdb1
Brick2: node4:/data/sdb1
Options Reconfigured:
transport.address-family: inet
nfs.disable: on
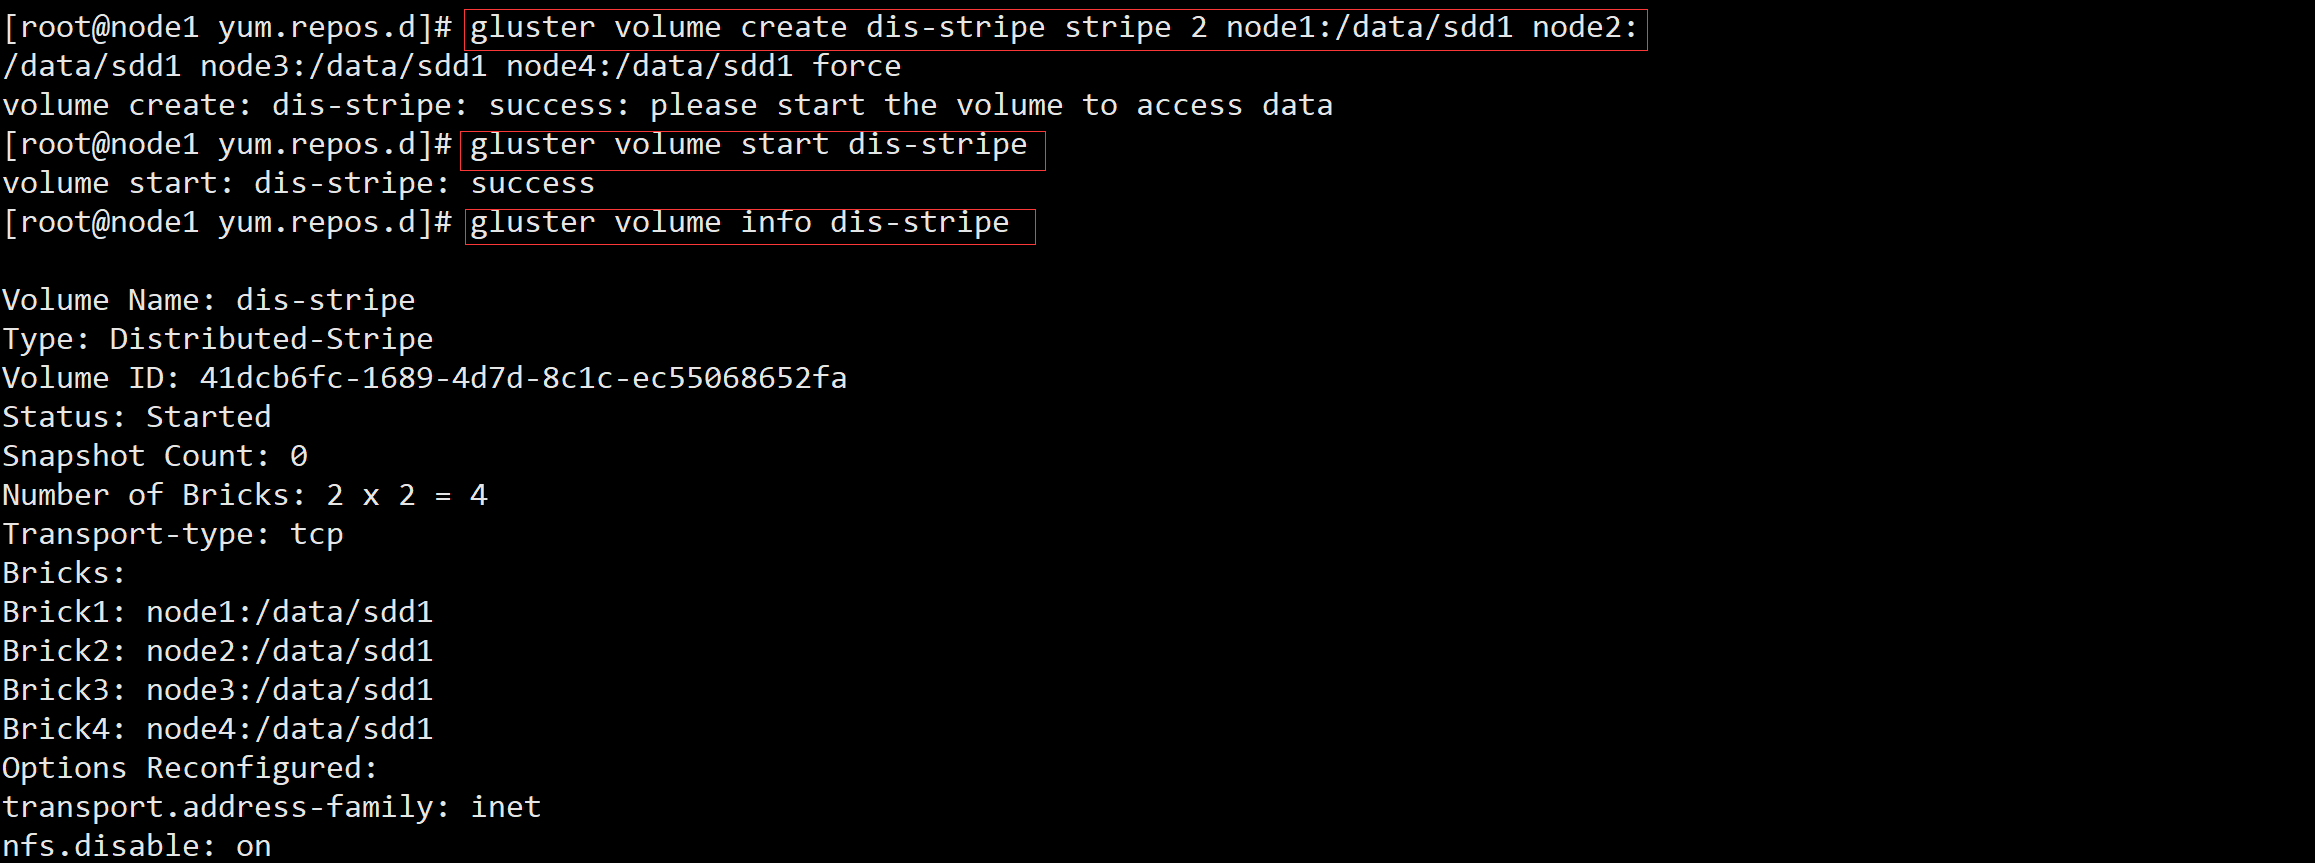
3.4 创建分布式条带卷
指定类型为 stripe,数值为 2,而且后面跟了 4 个 Brick Server,是 2 的两倍,所以创建的是分布式条带卷
[root@node1 yum.repos.d]# gluster volume create dis-stripe stripe 2 node1:/data/sdd1 node2:/data/sdd1 node3:/data/sdd1 node4:/data/sdd1 force
volume create: dis-stripe: success: please start the volume to access data
[root@node1 yum.repos.d]# gluster volume start dis-stripe
volume start: dis-stripe: success
[root@node1 yum.repos.d]# gluster volume info dis-stripe

Volume Name: dis-stripe
Type: Distributed-Stripe
Volume ID: 9ac553dd-ae1a-447b-8fab-e502003adb17
Status: Started
Snapshot Count: 0
Number of Bricks: 2 x 2 = 4
Transport-type: tcp
Bricks:
Brick1: node1:/data/sdd1
Brick2: node2:/data/sdd1
Brick3: node3:/data/sdd1
Brick4: node4:/data/sdd1
Options Reconfigured:
transport.address-family: inet
nfs.disable: on
3.5 创建分布式复制卷
指定类型为 replica,数值为 2,而且后面跟了 4 个 Brick Server,是 2 的两倍,所以创建的是分布式复制卷
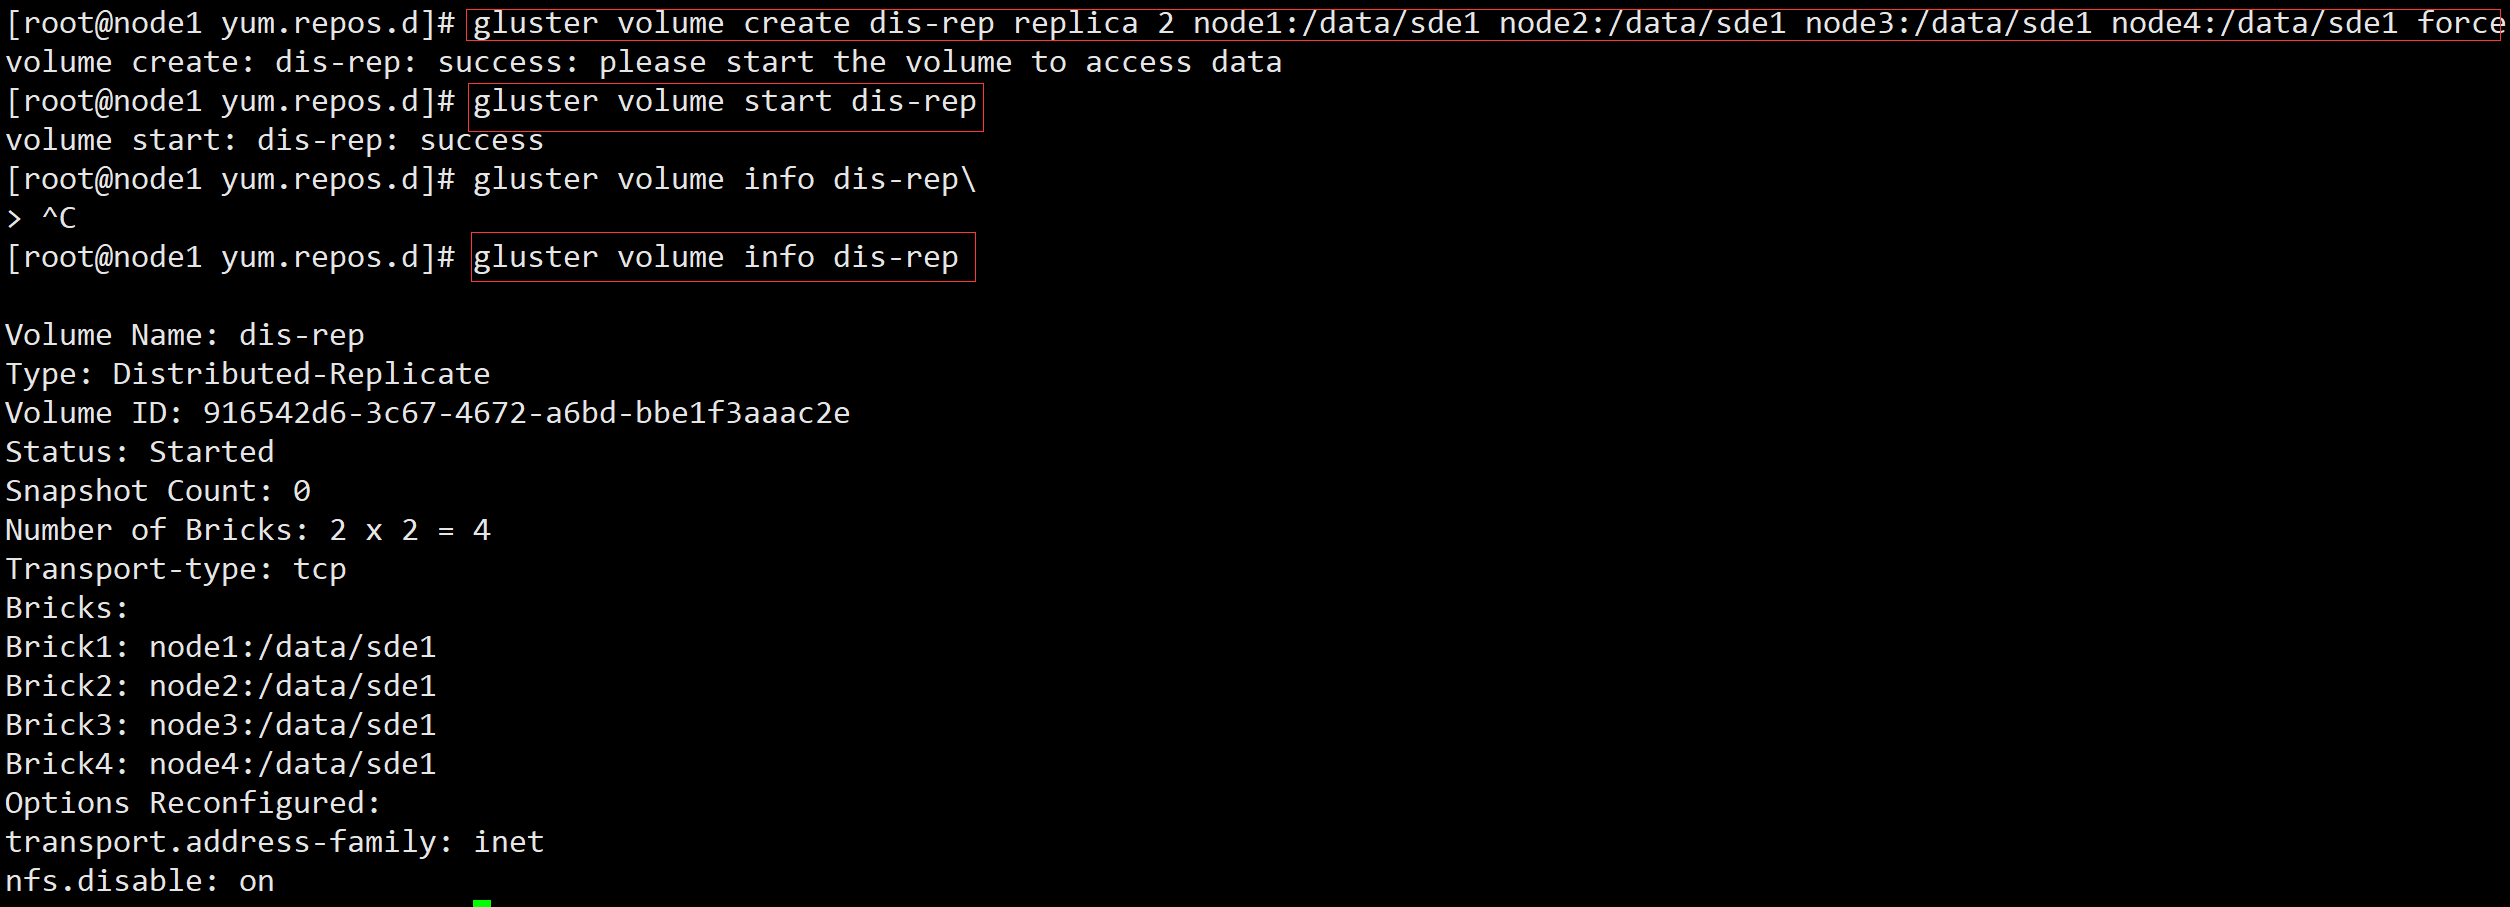
[root@node1 yum.repos.d]# gluster volume create dis-rep replica 2 node1:/data/sde1 node2:/data/sde1 node3:/data/sde1 node4:/data/sde1 force
volume create: dis-rep: success: please start the volume to access data
[root@node1 yum.repos.d]# gluster volume start dis-rep
volume start: dis-rep: success
[root@node1 yum.repos.d]# gluster volume info dis-rep

Volume Name: dis-rep
Type: Distributed-Replicate
Volume ID: c6576656-f6c6-4eb1-a96c-ad8c12daf624
Status: Started
Snapshot Count: 0
Number of Bricks: 2 x 2 = 4
Transport-type: tcp
Bricks:
Brick1: node1:/data/sde1
Brick2: node2:/data/sde1
Brick3: node3:/data/sde1
Brick4: node4:/data/sde1
Options Reconfigured:
transport.address-family: inet
nfs.disable: on
[root@node1 yum.repos.d]# gluster volume list
dis-rep
dis-stripe
dis-volume
rep-volume
stripe-volume
4.部署客户端并创建测试文件
1.关闭防火墙与selinux
[root@client ~]# systemctl disable --now firewalld
[root@client ~]# setenforce 0

2.放入压缩包并解压
[root@client ~]# cd /opt/
[root@client opt]# ls
gfsrepo.zip  rh
[root@client opt]# unzip gfsrepo.zip

3.备份之前的本地yum源,创建glfs源
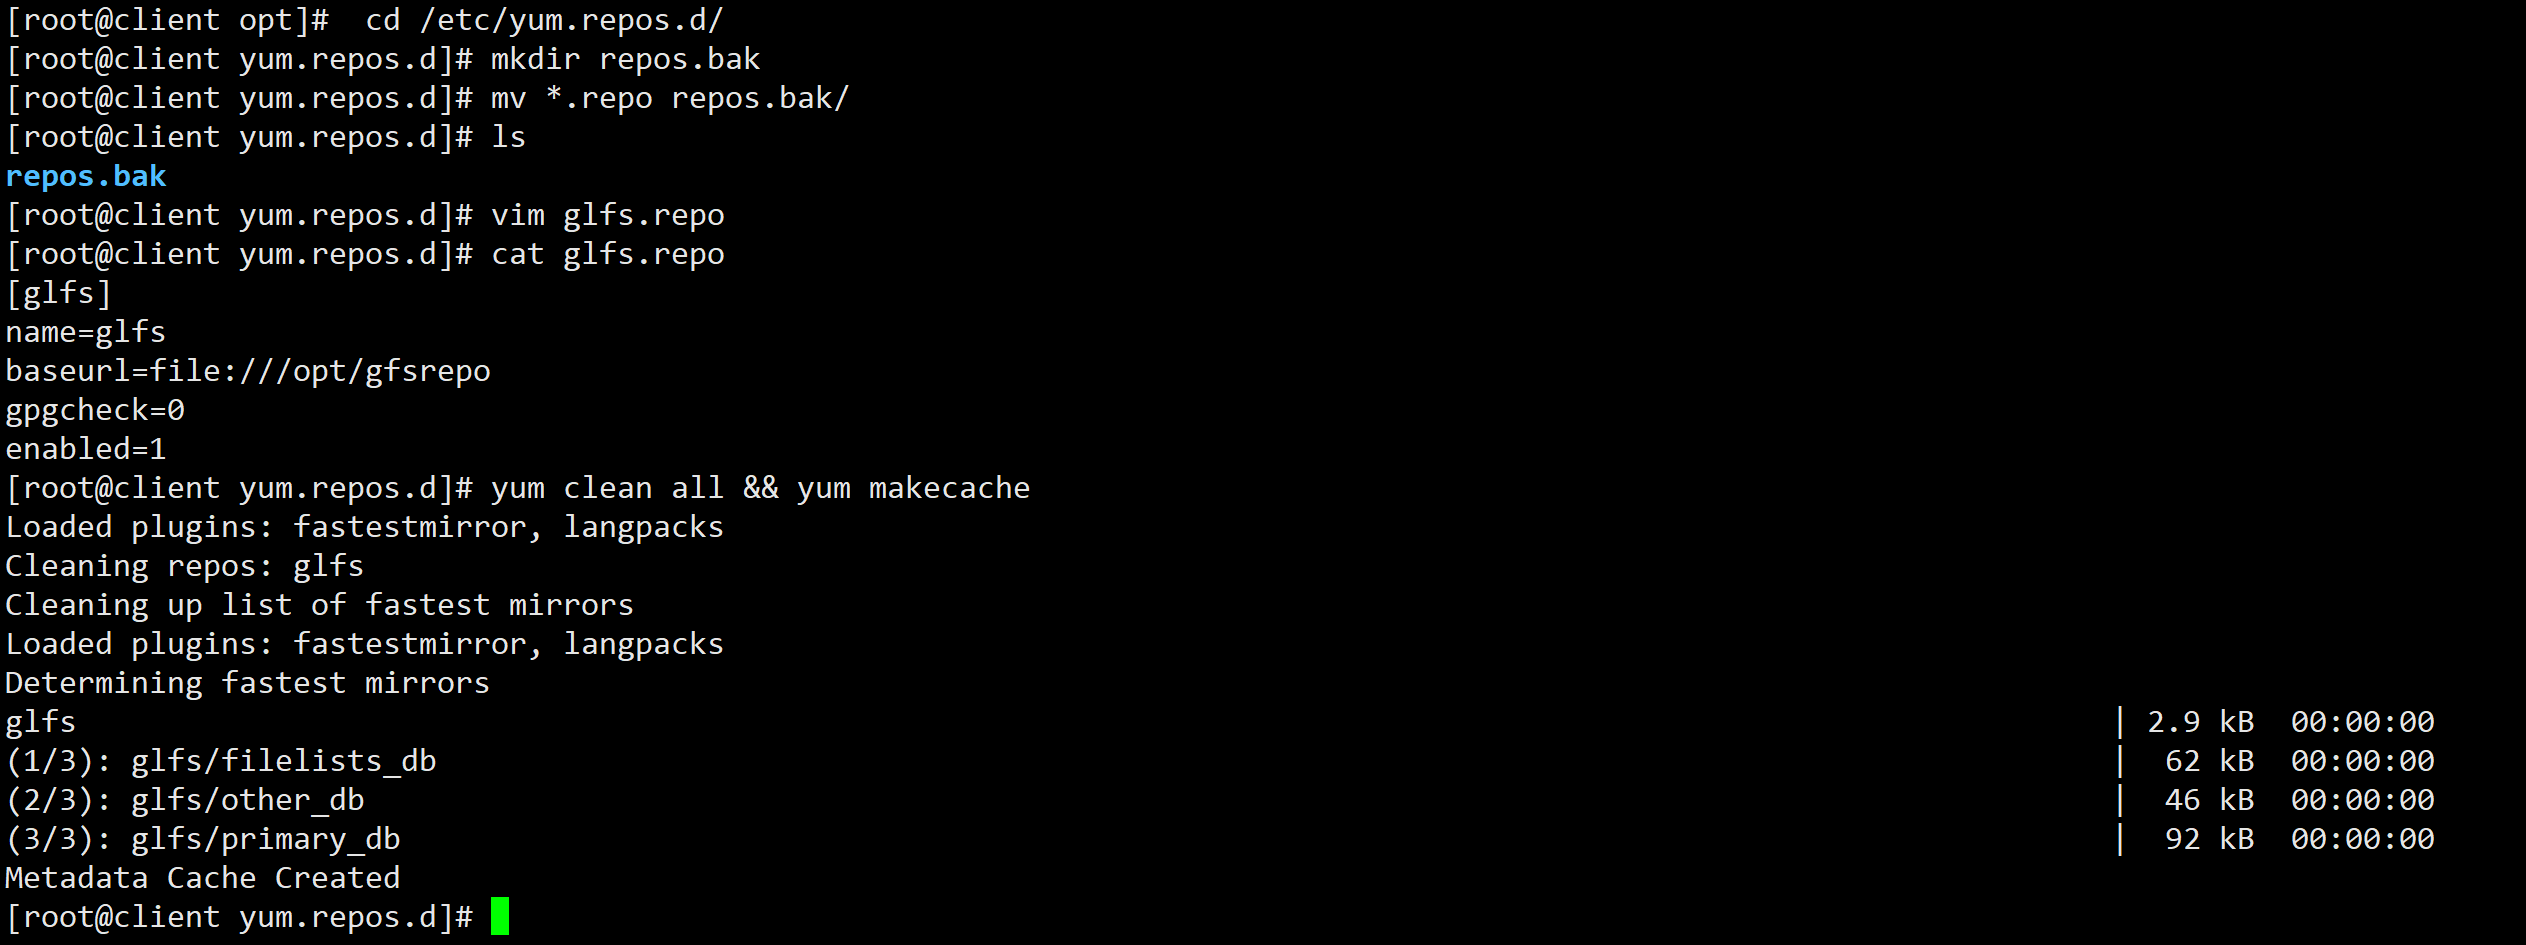
[root@client opt]#  cd /etc/yum.repos.d/
[root@client yum.repos.d]# mkdir repos.bak
[root@client yum.repos.d]# mv *.repo repos.bak/
[root@client yum.repos.d]# ls
repos.bak
[root@client yum.repos.d]# vim glfs.repo
[root@client yum.repos.d]# cat glfs.repo
[glfs]
name=glfs
baseurl=file:///opt/gfsrepo
gpgcheck=0
enabled=1
[root@client yum.repos.d]# yum clean all && yum makecache
[root@client yum.repos.d]# yum -y install glusterfs glusterfs-fuse

4.创建目录(用于后面挂载),添加DNF临时域名解析
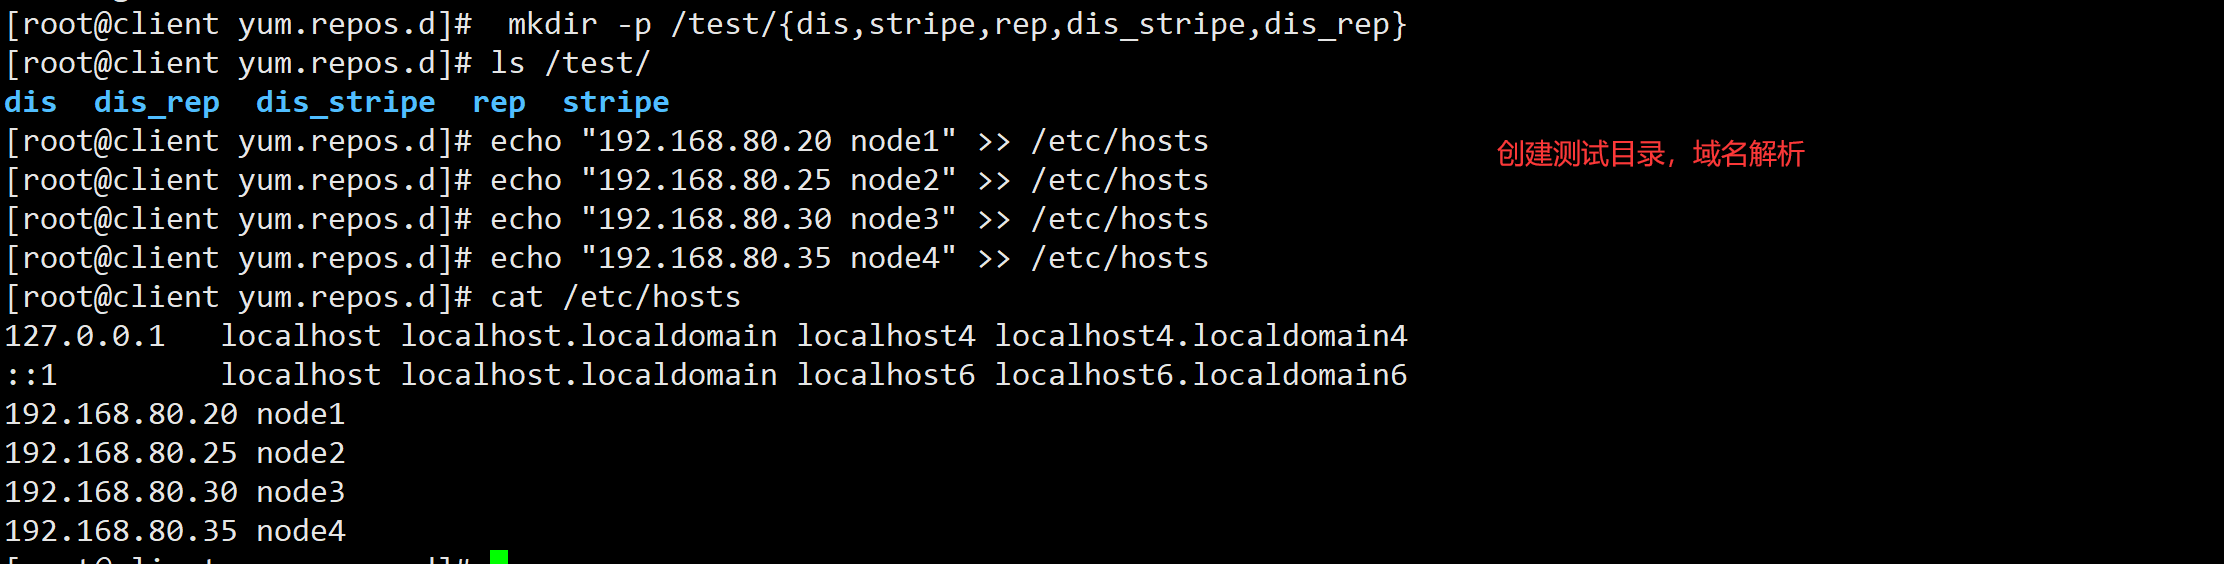
[root@client yum.repos.d]# mkdir -p /test/{dis,stripe,rep,dis_stripe,dis_rep}
[root@client yum.repos.d]# ls /test/
dis  dis_rep  dis_stripe  rep  stripe
[root@client yum.repos.d]# echo "192.168.80.20 node1" >> /etc/hosts
[root@client yum.repos.d]# echo "192.168.80.25 node2" >> /etc/hosts
[root@client yum.repos.d]# echo "192.168.80.30 node3" >> /etc/hosts
[root@client yum.repos.d]# echo "192.168.80.35 node4" >> /etc/hosts
[root@client yum.repos.d]# cat /etc/hosts
127.0.0.1   localhost localhost.localdomain localhost4 localhost4.localdomain4
::1         localhost localhost.localdomain localhost6 localhost6.localdomain6
192.168.80.20 node1
192.168.80.25 node2
192.168.80.30 node3
192.168.80.35 node4
5.挂载之前创建的卷
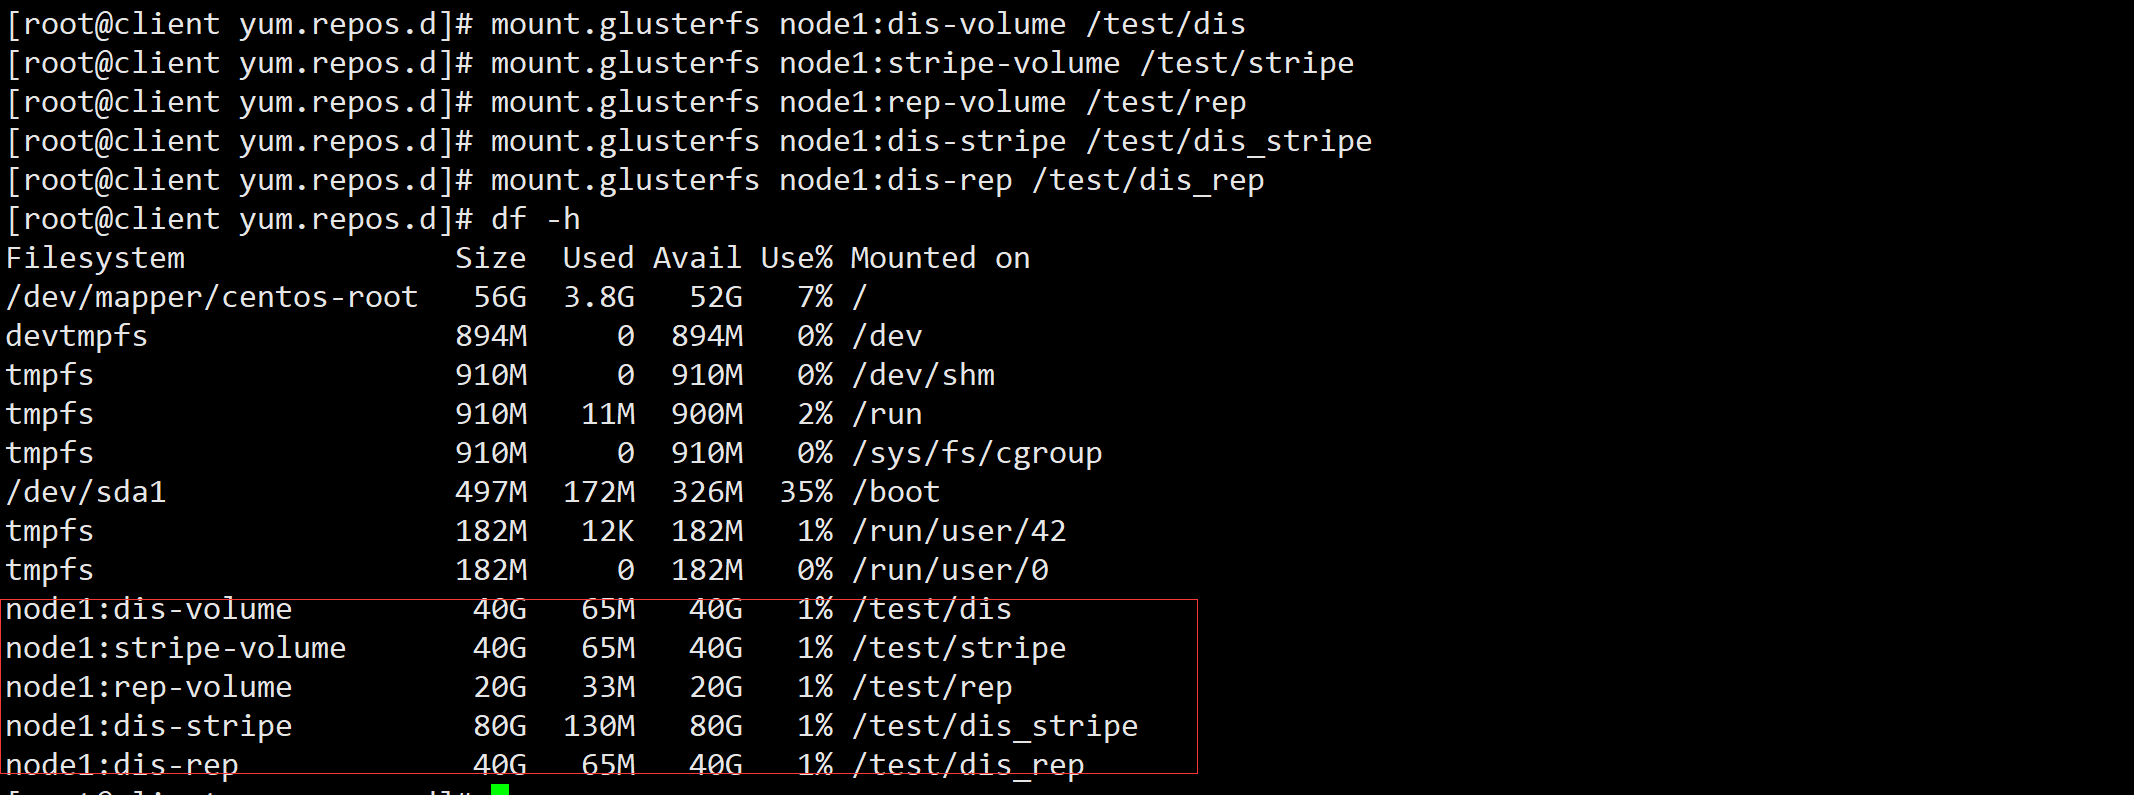
[root@client yum.repos.d]# mount.glusterfs node1:dis-volume /test/dis
[root@client yum.repos.d]# mount.glusterfs node1:stripe-volume /test/stripe
[root@client yum.repos.d]# mount.glusterfs node1:rep-volume /test/rep
[root@client yum.repos.d]# mount.glusterfs node1:dis-stripe /test/dis_stripe
[root@client yum.repos.d]# mount.glusterfs node1:dis-rep /test/dis_rep
[root@client yum.repos.d]# df -h
文件系统             容量  已用  可用 已用% 挂载点
....				...	    ....   ....	....
node1:dis-volume      40G   65M   40G    1% /test/dis
node1:stripe-volume   40G   65M   40G    1% /test/stripe
node1:rep-volume      20G   33M   20G    1% /test/rep
node1:dis-stripe      80G  130M   80G    1% /test/dis_stripe
node1:dis-rep         40G   65M   40G    1% /test/dis_rep
[root@client yum.repos.d]#
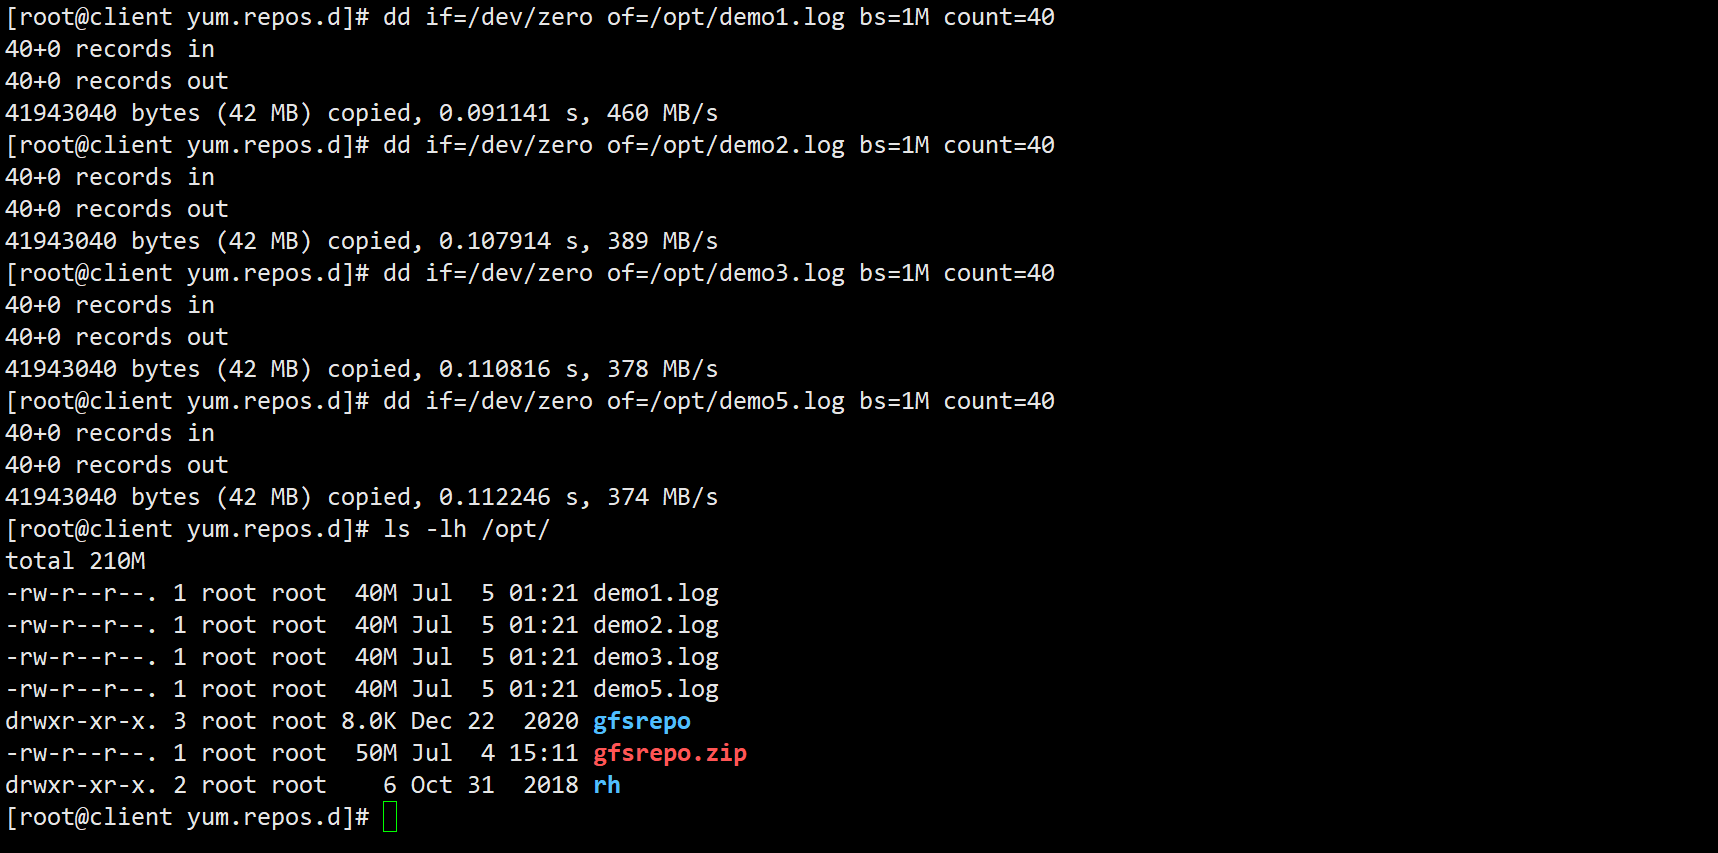
6.使用dd命令从/dev/zero文件中复制40M的数据到测试文件中
[root@client yum.repos.d]# dd if=/dev/zero of=/opt/demo1.log bs=1M count=40
40+0 records in
40+0 records out
41943040 bytes (42 MB) copied, 0.091141 s, 460 MB/s
[root@client yum.repos.d]# dd if=/dev/zero of=/opt/demo2.log bs=1M count=40
40+0 records in
40+0 records out
41943040 bytes (42 MB) copied, 0.107914 s, 389 MB/s
[root@client yum.repos.d]# dd if=/dev/zero of=/opt/demo3.log bs=1M count=40
40+0 records in
40+0 records out
41943040 bytes (42 MB) copied, 0.110816 s, 378 MB/s
[root@client yum.repos.d]# dd if=/dev/zero of=/opt/demo4.log bs=1M count=40
40+0 records in
40+0 records out
41943040 bytes (42 MB) copied, 0.0171147 s, 2.5 GB/s
[root@client yum.repos.d]# dd if=/dev/zero of=/opt/demo5.log bs=1M count=40
40+0 records in
40+0 records out
41943040 bytes (42 MB) copied, 0.112246 s, 374 MB/s
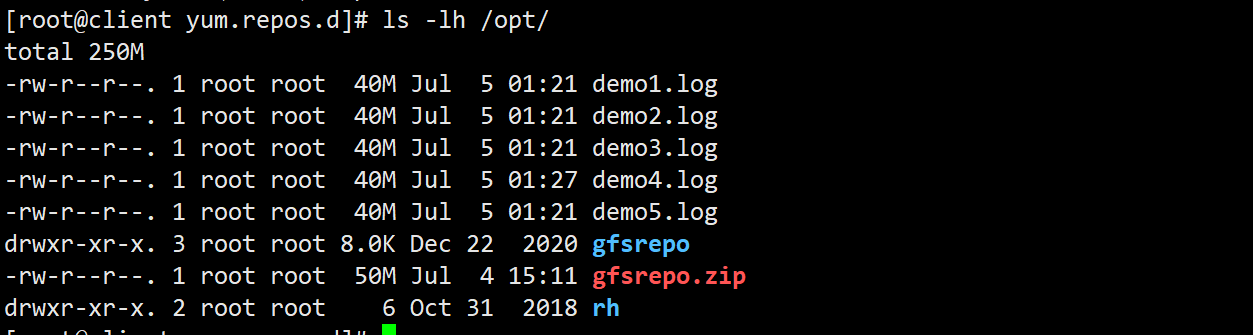
[root@client yum.repos.d]# ls -lh /opt/
total 210M
-rw-r--r--. 1 root root 40M Jul 5 01:21 demo1.log
-rw-r--r--. 1 root root 40M Jul 5 01:21 demo2.log
-rw-r--r--. 1 root root 40M Jul 5 01:21 demo3.log
-rw-r--r--. 1 root root 40M Jul 5 01:21 demo5.log
drwxr-xr-x. 3 root root 8.0K Dec 22 2020 gfsrepo
-rw-r--r--. 1 root root 50M Jul 4 15:11 gfsrepo.zip
drwxr-xr-x. 2 root root 6 Oct 31 2018 rh

7.将测试文件分别复制到各个卷中
[root@client yum.repos.d]# cp /opt/demo* /test/dis
[root@client yum.repos.d]# cp /opt/demo* /test/stripe/
[root@client yum.repos.d]# cp /opt/demo* /test/rep/
[root@client yum.repos.d]# cp /opt/demo* /test/dis_stripe/
[root@client yum.repos.d]# cp /opt/demo* /test/dis_rep/

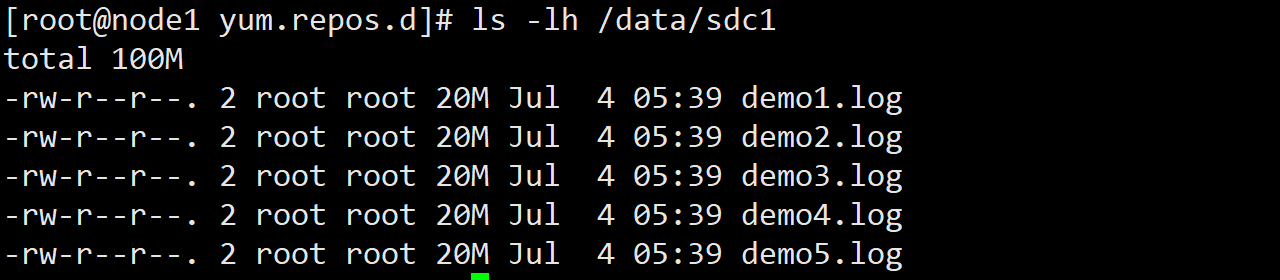
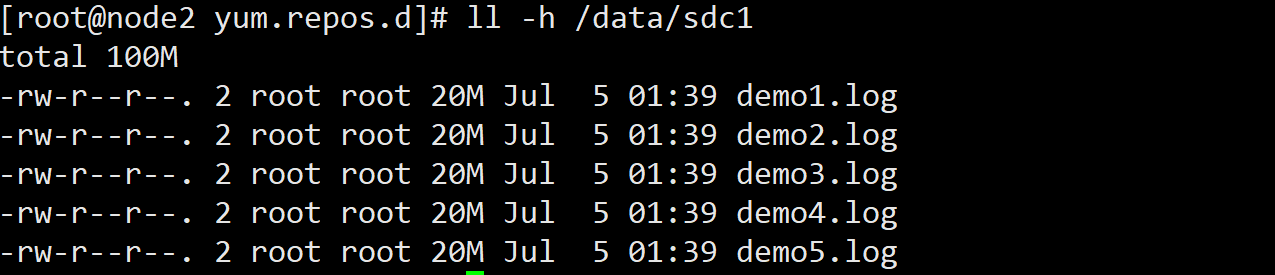
5.查看卷对应磁盘中的测试文件
1.查看分布式文件分布(node1:/dev/sdb1、node2:/dev/sdb1)


2.查看条带卷文件分布(node1:/dev/sdc1、node2:/dev/sdc1)
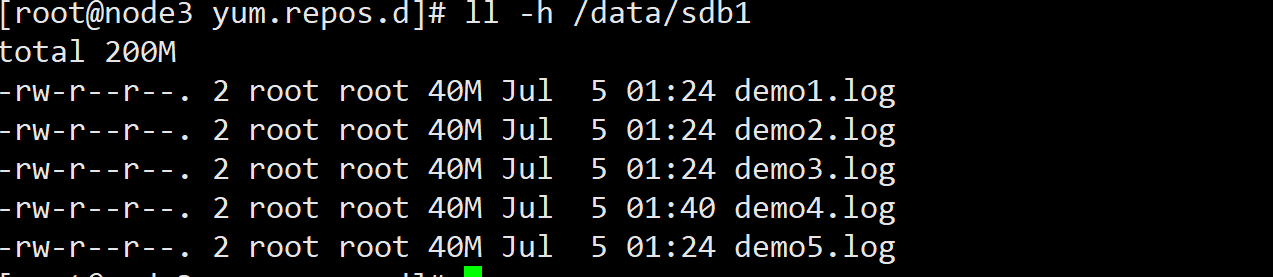
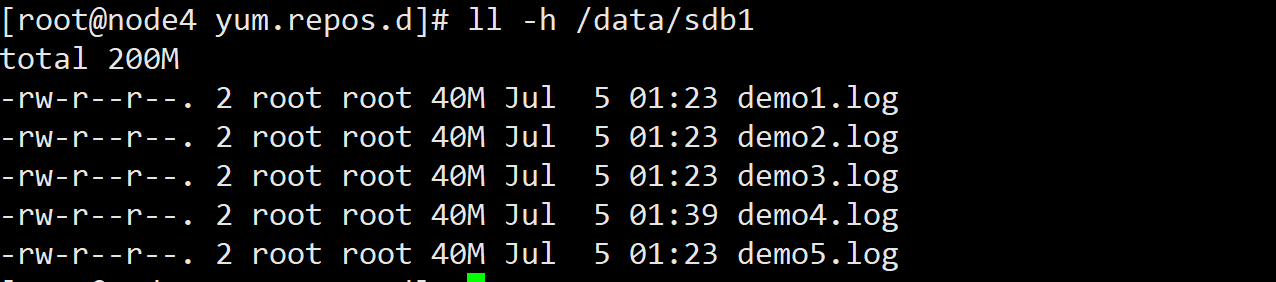
3.查看复制卷文件分布(node3:/dev/sdb1、node4:/dev/sdb1)
4.查看分布式条带卷分布(node1:/dev/sdd1、node2:/dev/sdd1、node3:/dev/sdd1、node4:/dev/sdd1)


5.查看分布式复制卷分布(node1:/dev/sde1、node2:/dev/sde1、node3:/dev/sde1、node4:/dev/sde1)


6.冗余测试
1.分布式卷数据查看,缺少demo5,这是在node2上的,不具备冗余
挂起 node2 节点或者关闭glusterd服务来模拟故障
[root@node2 ~]# init 0

[root@client ~]# ll /test/dis
总用量 163840
-rw-r--r--. 1 root root 41943040 7月  25 00:59 demo1.log
-rw-r--r--. 1 root root 41943040 7月  25 00:59 demo2.log
-rw-r--r--. 1 root root 41943040 7月  25 00:59 demo3.log
-rw-r--r--. 1 root root 41943040 7月  25 00:59 demo4.log


2、条带卷,数据都没了,不具备冗余
[root@client ~]# ll /test/stripe/
总用量 0
[root@client ~]#

3.复制卷,在node3和node4上的,关闭node4进行测试,具有冗余
[root@node4 ~]#init 0

客户端所有数据仍然存在
[root@client ~]# ll /test/rep/
总用量 204800
-rw-r--r--. 1 root root 41943040 7月  25 00:59 demo1.log
-rw-r--r--. 1 root root 41943040 7月  25 00:59 demo2.log
-rw-r--r--. 1 root root 41943040 7月  25 00:59 demo3.log
-rw-r--r--. 1 root root 41943040 7月  25 00:59 demo4.log
-rw-r--r--. 1 root root 41943040 7月  25 00:59 demo5.log


4.分布式条带卷,不具备冗余
[root@client ~]# ll /test/dis_stripe/
总用量 0

5.分布式复制卷,具有冗余
[root@client ~]# ll /test/dis_rep/
总用量 204800
-rw-r--r--. 1 root root 41943040 7月  25 01:01 demo1.log
-rw-r--r--. 1 root root 41943040 7月  25 01:01 demo2.log
-rw-r--r--. 1 root root 41943040 7月  25 01:01 demo3.log
-rw-r--r--. 1 root root 41943040 7月  25 01:01 demo4.log
-rw-r--r--. 1 root root 41943040 7月  25 01:01 demo5.log

常用维护命令
1.查看GlusterFS卷
gluster volume list

2.查看所有卷的信息
gluster volume info

3.查看所有卷的状态
gluster volume status

4.停止一个卷
gluster volume stop dis-stripe

5.删除一个卷,注意:删除卷时,需要先停止卷,且信任池中不能有主机处于宕机状态,否则删除不成功
gluster volume delete dis-stripe

6.设置卷的访问控制 #仅拒绝
gluster volume set dis-rep auth.allow 192.168.80.100
#仅允许
gluster volume set dis-rep auth.allow 192.168.80.*	  #设置192.168.80.0网段的所有IP地址都能访问dis-rep卷(分布式复制卷)

 浙公网安备 33010602011771号