springboot1
1、toString就是获取对象中的数据
public class Student {
    private String name;
    private  int age;
    private boolean sex;
    private Date birthday;
    private Map<String,Object> location;
    private String[] hobbies;
    private List<String> skills;
    private Pet pet;

    public String getName() {
        return name;
    }

    public void setName(String name) {
        this.name = name;
    }

    public int getAge() {
        return age;
    }

    public void setAge(int age) {
        this.age = age;
    }

    public boolean isSex() {
        return sex;
    }

    public void setSex(boolean sex) {
        this.sex = sex;
    }

    public Date getBirthday() {
        return birthday;
    }

    public void setBirthday(Date birthday) {
        this.birthday = birthday;
    }

    public Map<String, Object> getLocation() {
        return location;
    }

    public void setLocation(Map<String, Object> location) {
        this.location = location;
    }

    public String[] getHobbies() {
        return hobbies;
    }

    public void setHobbies(String[] hobbies) {
        this.hobbies = hobbies;
    }

    public List<String> getSkills() {
        return skills;
    }

    public void setSkills(List<String> skills) {
        this.skills = skills;
    }

    public Pet getPet() {
        return pet;
    }

    public void setPet(Pet pet) {
        this.pet = pet;
    }

    @Override
    public String toString() {
        return "Student{" +
                "name='" + name + '\'' +
                ", age=" + age +
                ", sex=" + sex +
                ", birthday=" + birthday +
                ", location=" + location +
                ", hobbies=" + Arrays.toString(hobbies) +
                ", skills=" + skills +
                ", pet=" + pet +
                '}';
    }
}
隐式调用方法
 Student student; 或者Student student = new Student();
 System.out.println(student);
2、idea一直报 "无效的源发行版11“”
①修改setting - java complier中的对应数据
② 修改project structor 中对应Jdk 版本,应与①统一
③ 直接在pom文件中将11改成8

3、通过yaml给对象注入值:
①注入值
yml文件
student:
  name: zs
  age: 23
  sex: true
  birthday: 1990/09/12
②绑定
@Component  //将此javabean
@ConfigurationProperties(prefix="student")或者@value
public class Student
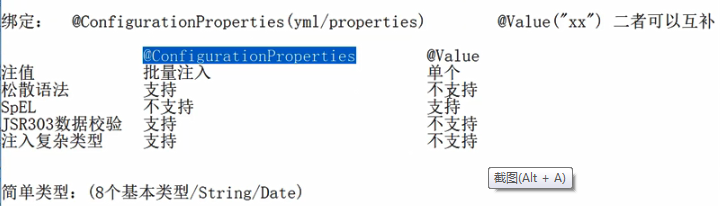
4、注入@ConfigurationProperties(prefix="student")或者@value 的区别
5、@PropertySource(value={“classpath:文件名”}):默认加载application.proerties/application.yml文件(这两个文件是默认文件)中的数据
加载其他配置文件,只能配置properties文件,不能加载yml文件
6、@ImportResource(不推荐手写配置文件)
默认spring boot自动装配,如果自己编写则需要在spring boot主配置类通过@ImportResource 指定配置文件路径
7、推荐注解方式进行配置,写类,@Configuration @Bean
@Configuration
public class AppConfig {
    @Bean
    public StudentService studentService(){
        StudentService  stuService = new StudentService();
        return stuService;
    }
}
8、spring 容器
ApplicationContext  context;
(classname)context.getBean("classname")
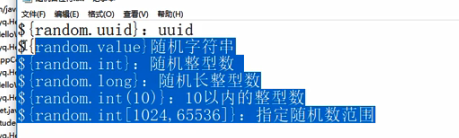
9、占位符表达式
(1)随机数
(2)引用变量值,(“无名”字符串为默认值,前面字符串不存在的情况)
yml文件:name: ${student.user.name1,无名}
propertites: student.user.name=lssds
10、(1)application默认访问application.properties配置文件,多个环境可以建立多个文件
application-环境名1.properties
application-环境名2.properties
切换方法:在application.properties在定义 spring.profiles.active=环境名
(2)yml文件
---
server:
    port: 8888
spring:
    profiles:
    active: dev  //指定本次采用的环境
---
11、如果maven配置出现问题,可以在pom.xml中加入镜像库
<repositories>
        <repository>
            <id>JBoss repository</id>
            <url>https://repository.jboss.org/nexus/content/repositories/releases/</url>
        </repository>
    </repositories>
无提示,可加入
<dependency>
            <groupId>org.springframework.boot</groupId>
            <artifactId>spring-boot-configuration-processor</artifactId>
        </dependency>
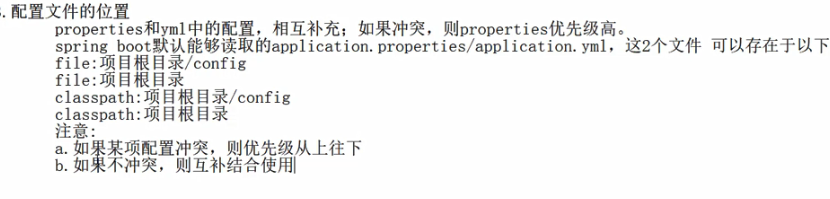
12、springboot默认读取application.properties/application.yml ,classpath表示构建文件路径


 浙公网安备 33010602011771号