
UIBezierPath绘图基础教程
1、介绍
- 用于创建基于矢量的路径,如圆形、椭圆形和矩形,或者由多个直线和曲线组成的形状。
- 绘图步骤:
- ①重写drawRect方法
- ②创建UIBezierPath对象
- ③设置绘图属性,lineWidth
- ④渲染
2、绘制
-
2.1 画线
-
①直线
- (void)drawRect:(CGRect)rect { // 设置线条颜色 [[UIColor yellowColor] set]; // 创建路径对象 UIBezierPath *path = [UIBezierPath bezierPath]; // 设置线宽 path.lineWidth = 5; // 第一个点 [path moveToPoint:CGPointMake(10, 10)]; // 连接点 [path addLineToPoint:CGPointMake(80, 60)]; [path addLineToPoint:CGPointMake(120, 20)]; // 绘制路径 [path stroke]; }- 效果

- 效果
-
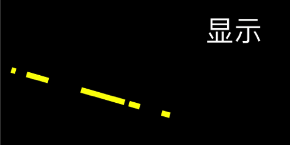
②虚线
- 静态虚线
- (void)drawRect:(CGRect)rect { // 设置线条颜色 [[UIColor yellowColor] set]; // 创建路径 UIBezierPath *path = [UIBezierPath bezierPath]; // 第一个点 [path moveToPoint:CGPointMake(10, 10)]; // 连接点 [path addLineToPoint:CGPointMake(150, 50)]; // 虚线样式:实线4-空10-实线20-空30-实线40-实线4 CGFloat pattern[] = {4, 10, 20, 30, 40}; /** * pattern: 虚线的长度组成 * count: 虚线的长度组成的个数 * phase: 忽略多少长度 */ [path setLineDash:pattern count:sizeof(pattern) / sizeof(pattern[0]) phase:0]; // 线宽 path.lineWidth = 5; // 绘制线 [path stroke]; }- 效果
- 动态虚线
- (instancetype)initWithFrame:(CGRect)frame { self = [super initWithFrame:frame]; if (self) { self.backgroundColor = [UIColor whiteColor]; CADisplayLink *link = [CADisplayLink displayLinkWithTarget:self selector:@selector(update)]; [link addToRunLoop:[NSRunLoop mainRunLoop] forMode:NSDefaultRunLoopMode]; } return self; } - (void)update { self.phase -= 0.25; } - (void)setPhase:(CGFloat)phase { _phase = phase; [self setNeedsDisplay]; } - (void)drawRect:(CGRect)rect { [[UIColor purpleColor] set]; UIBezierPath *path = [UIBezierPath bezierPathWithRect:CGRectMake(100, 100, 100, 100)]; CGFloat lengths[2] = { 10, 5 }; [path setLineDash:lengths count:2 phase:_phase]; path.lineWidth = 3; [path stroke]; }- 效果

- ③曲线
-
-
2.2 画矩形、圆角矩形
-
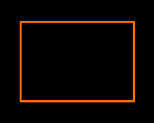
①矩形
- (void)drawRect:(CGRect)rect { // 绘制矩形 UIBezierPath *path = [UIBezierPath bezierPathWithRect:CGRectMake(50, 100, 100, 70)]; // 设置线宽 path.lineWidth = 2; // 线条拐角 path.lineCapStyle = kCGLineCapRound; // 终点处理 path.lineJoinStyle = kCGLineJoinRound; // 线条颜色 [[UIColor orangeColor] set]; // 根据坐标点连线 [path stroke]; }- 效果
- 填充效果
- (void)drawRect:(CGRect)rect { // 绘制矩形 UIBezierPath *path = [UIBezierPath bezierPathWithRect:CGRectMake(50, 100, 100, 70)]; // 设置线宽 path.lineWidth = 2; // 线条拐角 path.lineCapStyle = kCGLineCapRound; // 终点处理 path.lineJoinStyle = kCGLineJoinRound; // // 线条颜色 // [[UIColor orangeColor] set]; // // 根据坐标点连线 // [path stroke]; // 设置填充颜色 [[UIColor orangeColor] setFill]; // 根据矩形填充 [path fill]; }- 效果

- 效果
-
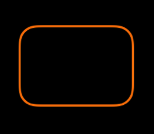
②圆角矩形
- 全角
- (void)drawRect:(CGRect)rect { // 绘制路径 UIBezierPath *path = [UIBezierPath bezierPathWithRoundedRect:CGRectMake(50, 50, 100, 70) cornerRadius:15]; // 线宽 path.lineWidth = 2; // 线条颜色 [[UIColor orangeColor] set]; // 根据坐标点连线 [path stroke]; }- 效果
- 非全角
- (void)drawRect:(CGRect)rect { // 绘制路径 UIBezierPath *path = [UIBezierPath bezierPathWithRoundedRect:CGRectMake(50, 50, 100, 70) byRoundingCorners:UIRectCornerTopLeft | UIRectCornerTopRight cornerRadii:CGSizeMake(20, 5)]; // 线宽 path.lineWidth = 2; // 线条颜色 [[UIColor orangeColor] set]; // 根据坐标点连线 [path stroke]; }- 效果

-
-
2.3 画圆、椭圆
- (void)drawRect:(CGRect)rect { // 正圆 // 设置路径颜色 [[UIColor yellowColor] set]; // 创建圆形路径对象 UIBezierPath *path = [UIBezierPath bezierPathWithOvalInRect:CGRectMake(50, 50, 100, 100)]; // 线宽 path.lineWidth = 5.f; // 绘制 [path stroke]; // 椭圆 // 创建圆形路径对象 UIBezierPath *path2 = [UIBezierPath bezierPathWithOvalInRect:CGRectMake(180, 75, 100, 60)]; // 线宽 path2.lineWidth = 5.f; // 绘制 [path2 fill]; }- 效果
-
2.4 画扇形
-
①绘制弧形
- (void)drawRect:(CGRect)rect { // 设置路径颜色 [[UIColor brownColor] set]; // 创建弧线路径对象 UIBezierPath *path = [UIBezierPath bezierPathWithArcCenter:CGPointMake(100, 100) radius:70 startAngle:M_PI endAngle:M_PI * 3 / 2 clockwise:YES]; // 路径宽度 path.lineWidth = 5.f; // 绘制 [path stroke]; }- 参数介绍
- center:弧线圆心坐标
- radius:弧线半径
- startAngle:弧线起始角度
- endAngle:弧线结束角度
- clockwise:是否顺时针绘制

-
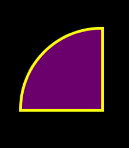
②绘制扇形
- (void)drawRect:(CGRect)rect { // 设置路径颜色 [[UIColor yellowColor] set]; // 创建弧线路径对象 UIBezierPath *path = [UIBezierPath bezierPathWithArcCenter:CGPointMake(100, 100) radius:70 startAngle:M_PI endAngle:M_PI * 3 / 2 clockwise:YES]; // 路径宽度 path.lineWidth = 5.f; // 添加路径到圆点 [path addLineToPoint:CGPointMake(100, 100)]; // 关闭路径 [path closePath]; // 绘制 [path stroke]; // 设置路径颜色 [[UIColor purpleColor] setFill]; // 绘制填充 [path fill]; }- 效果
-
-
2.5 画二阶贝塞尔曲线
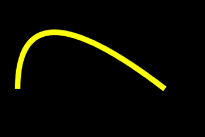
- (void)drawRect:(CGRect)rect { // 设置路径颜色 [[UIColor yellowColor] set]; // 创建弧线路径对象 UIBezierPath *path = [UIBezierPath bezierPath]; // 路径宽度 path.lineWidth = 5.f; // 设置起始点 [path moveToPoint:CGPointMake(20, 100)]; // 给定终点和控制点绘制贝塞尔曲线 [path addQuadCurveToPoint:CGPointMake(150, 100) controlPoint:CGPointMake(20, 0)]; // 绘制路径 [path stroke]; }- 原理示意图
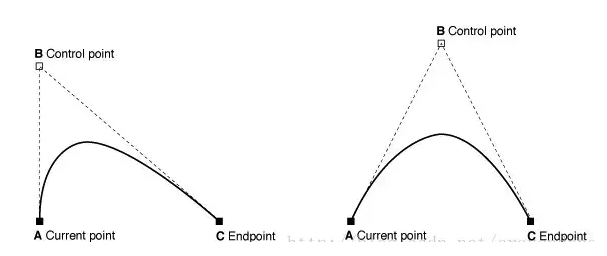
- 效果
- 原理示意图
-
2.6 画三阶贝塞尔曲线
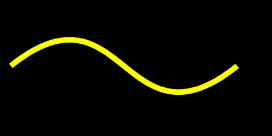
- (void)drawRect:(CGRect)rect{ // 设置路径颜色 [[UIColor yellowColor] set]; // 创建弧线路径对象 UIBezierPath *path = [UIBezierPath bezierPath]; // 路径宽度 path.lineWidth = 5.f; // 设置起始点 [path moveToPoint:CGPointMake(20, 100)]; // 给定终点和两个控制点绘制贝塞尔曲线 [path addCurveToPoint:CGPointMake(220, 100) controlPoint1:CGPointMake(120, 20) controlPoint2:CGPointMake(120, 180)]; // 绘制路径 [path stroke]; }- 原理示意图
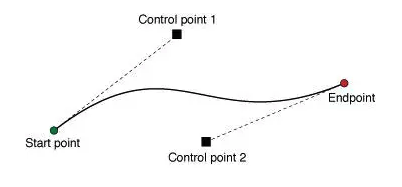
- 效果
- 原理示意图
-
2.6 剪裁控件
-
①控件削圆角
- 全角(四个角都做裁剪)
/** 全角裁剪控件(四个角都做裁剪) @param view 裁剪的控件 @param cornerRadius 圆角的大小 */ - (void)cutCornerRadius:(UIView *)view andRadius:(CGFloat)cornerRadius { UIBezierPath *maskPath = [UIBezierPath bezierPathWithRoundedRect:view.bounds cornerRadius:cornerRadius]; CAShapeLayer *maskLayer = [[CAShapeLayer alloc] init]; maskLayer.frame = view.bounds; maskLayer.path = maskPath.CGPath; view.layer.mask = maskLayer; }- 指定一个角来裁剪
/** 指定一个角来裁剪 @param view 裁剪的控件 @param cornerRadii 圆角的大小 @param corners 圆角的位置 */ - (void)cutCornerRadius:(UIView *)view andCornerRadii:(CGSize)cornerRadii andAtRectCorner:(UIRectCorner)corners { UIBezierPath *maskPath = [UIBezierPath bezierPathWithRoundedRect:view.bounds byRoundingCorners:corners cornerRadii:cornerRadii]; CAShapeLayer *maskLayer = [[CAShapeLayer alloc] init]; maskLayer.frame = view.bounds; maskLayer.path = maskPath.CGPath; view.layer.mask = maskLayer; }- 调用
UIView *redView = [[UIView alloc] init]; redView.backgroundColor = [UIColor redColor]; [self.view addSubview:redView]; redView.frame = CGRectMake(50, 50, 100, 70); //[self cutCornerRadius:redView andRadius:20]; [self cutCornerRadius:redView andCornerRadii:CGSizeMake(15, 20) andAtRectCorner:UIRectCornerTopLeft | UIRectCornerBottomLeft];- 效果
 **
** 
-
-
②限制图片展示区
- 原理说明
- 设置剪裁路径之后,往后绘制的UI有超出部分将会被剪裁掉
- 剪裁前
- (void)drawRect:(CGRect)rect { // 绘制路径 UIBezierPath *path = [UIBezierPath bezierPathWithRoundedRect:CGRectMake(50, 50, 100, 70) cornerRadius:15]; // 线宽 path.lineWidth = 2; // 线条颜色 [[UIColor orangeColor] setFill]; // 根据坐标点连线 [path fill]; }- 加入剪裁
- (void)drawRect:(CGRect)rect { // 设置裁剪的路径 UIBezierPath *clipPath = [UIBezierPath bezierPathWithRect:CGRectMake(50, 50, 60, 70)]; // 实现裁剪 [clipPath addClip]; // 绘制路径 UIBezierPath *path = [UIBezierPath bezierPathWithRoundedRect:CGRectMake(50, 50, 100, 70) cornerRadius:15]; // 线宽 path.lineWidth = 2; // 线条颜色 [[UIColor orangeColor] setFill]; // 根据坐标点连线 [path fill]; }- 效果对比
 **
** 
绘制配置
- 原理说明
3、UIBezierPath属性说明
-
3.1 CGPathRef CGPath
- 将UIBezierPath类转换成CGPath,类似于UIColor的CGColor
-
3.2 BOOL empty
- 只读类型,路径上是否有有效的元素
-
3.3 CGRect bounds
- 和view的bounds是不一样的,它获取path的X坐标、Y坐标、宽度,但是高度为0
-
3.4 CGPoint currentPoint
- 当前path的位置,可以理解为path的终点
-
3.5 CGFloat lineWidth
- path宽度
-
3.6 CGLineCap lineCapStyle
- path端点样式,有3种样式:
- ① kCGLineCapButt:无端点
- ② kCGLineCapRound:圆形端点
- ③ kCGLineCapSquare:方形端点(样式上和kCGLineCapButt是一样的,但是比kCGLineCapButt长一点)
- 效果图:
- path端点样式,有3种样式:
-
3.7 CGLineJoin lineJoinStyle
- 拐角样式
- ① kCGLineJoinMiter:尖角
- ② kCGLineJoinRound:圆角
- ③ kCGLineJoinBevel:缺角
- 拐角样式
-
3.8 CGFloat miterLimit
- 最大斜接长度(只有在使用kCGLineJoinMiter是才有效), 边角的角度越小,斜接长度就会越大
- 为了避免斜接长度过长,使用lineLimit属性限制,如果斜接长度超过miterLimit,边角就会以KCALineJoinBevel类型来显示
-
3.9 CGFloat flatness
- 弯曲路径的渲染精度,默认为0.6,越小精度越高,相应的更加消耗性能。
-
3.10 BOOL usesEvenOddFillRule
- 单双数圈规则是否用于绘制路径,默认是NO。
4、系统提供方法介绍
//创建并且返回一个新的 `UIBezierPath` 对象
+ (instancetype) bezierPath;
/**
  * 该方法将会创建一个闭合路径, 起始点是 rect 参数的的 origin, 并且按照顺时针方向添加直线, 最终形成矩形
  * @param rect 矩形路径的 Frame
  */
+ (instancetype)bezierPathWithRect:(CGRect)rect;
/**
  * 该方法将会创建一个闭合路径,  该方法会通过顺时针的绘制贝塞尔曲线, 绘制出一个近似椭圆的形状. 如果 rect 参数指定了一个正方形, 那么该 UIBezierPath 对象将会描述一个圆形.
  * @param rect 矩形路径的 Frame
  */
+ (instancetype)bezierPathWithOvalInRect:(CGRect)rect;
/**
  * 该方法将会创建一个闭合路径,  该方法会顺时针方向连续绘制直线和曲线.  当 rect 为正方形时且 cornerRadius 等于边长一半时, 则该方法会描述一个圆形路径.
  * @param rect 矩形路径的 Frame
  * @param cornerRadius 矩形的圆角半径
  */
+ (instancetype) bezierPathWithRoundedRect:(CGRect)rect
                              cornerRadius:(CGFloat)cornerRadius;
/**
  * 该方法将会创建一个闭合路径,  该方法会顺时针方向连续绘制直线和曲线.
  * @param rect 矩形路径的 Frame
  * @param corners UIRectCorner 枚举类型, 指定矩形的哪个角变为圆角
  * @param cornerRadii 矩形的圆角半径
  */
+ (instancetype) bezierPathWithRoundedRect:(CGRect)rect
                         byRoundingCorners:(UIRectCorner)corners
                               cornerRadii:(CGSize)cornerRadii;
/**
  * 该方法会创建出一个开放路径, 创建出来的圆弧是圆的一部分. 在默认的坐标系统中, 开始角度 和 结束角度 都是基于单位圆的(看下面这张图). 调用这个方法之后, currentPoint 将会设置为圆弧的结束点.
  * 举例来说: 指定其实角度为0, 指定结束角度为π, 设置 clockwise 属性为 YES, 将会绘制出圆的下半部分.
  * 然而当我们不修改起始角度 和 结束角度, 我们仅仅将 clockwise 角度设置为 NO, 则会绘制出来一个圆的上半部分.
  * @param center 圆心
  * @param radius 半径
  * @param startAngle 起始角度
  * @param endAngle 结束角度
  * @param clockwise 是否顺时针绘制
  */
+ (instancetype) bezierPathWithArcCenter:(CGPoint)center
                                  radius:(CGFloat)radius
                              startAngle:(CGFloat)startAngle
                                endAngle:(CGFloat)endAngle
                               clockwise:(BOOL)clockwise;
//通过一个 CGPath, 创建并且返回一个新的 `UIBezierPath` 对象
+ (instancetype) bezierPathWithCGPath:(CGPathRef)CGPath;
/**
  * 通过该方法反转一条路径, 并不会修改该路径的样子. 它仅仅是修改了绘制的方向
  * @return: 返回一个新的 UIBezierPath 对象, 形状和原来路径的形状一样,
  *          但是绘制的方向相反.
  */
- (UIBezierPath *) bezierPathByReversingPath;
/**
  * 如果当前有正在绘制的子路径, 该方法则会隐式的结束当前路径,
  * 并将 currentPoint 设置为指定点. 当上一条子路径被终止, 该方法
  * 实际上并不会去闭合上一条子路径. 所以上一条自路径的起始点 和
  * 结束点并没有被链接.
  * 对于大多数构造路径相关的方法而言, 在你绘制直线或曲线之前, 需要先调用这个方法.
  * @param point 当前坐标系统中的某一点
  */
- (void)moveToPoint:(CGPoint)point;
/**
  * 该方法将会从 currentPoint 到 指定点 链接一条直线.
  * Note: 在追加完这条直线后, 该方法将会更新 currentPoint 为 指定点
  *       调用该方法之前, 你必须先设置 currentPoint. 如果当前绘制路径
  *       为空, 并且未设置 currentPoint, 那么调用该方法将不会产生任何
  *       效果.
  * @param point:   绘制直线的终点坐标, 当前坐标系统中的某一点
  */
- (void)addLineToPoint:(CGPoint)point;
/**
  * 该方法将会从 currentPoint 添加一条指定的圆弧.
  * 该方法的介绍和构造方法中的一样. 请前往上文查看
  * @param center 圆心
  * @param radius 半径
  * @param startAngle 起始角度
  * @param endAngle 结束角度
  * @param clockwise 是否顺时针绘制
  */
- (void)addArcWithCenter:(CGPoint)center
                  radius:(CGFloat)radius
              startAngle:(CGFloat)startAngle
                endAngle:(CGFloat)endAngle
               clockwise:(BOOL)clockwise NS_AVAILABLE_IOS(4_0);
/**
  * 该方法将会从 currentPoint 到 指定的 endPoint 追加一条三次贝塞尔曲线.
  * 三次贝塞尔曲线的弯曲由两个控制点来控制. 如下图所示
  * Note: 调用该方法前, 你必须先设置 currentPoint, 如果路径为空,
  *       并且尚未设置 currentPoint, 调用该方法则不会产生任何效果.
  *       当添加完贝塞尔曲线后, 该方法将会自动更新 currentPoint 为
  *       指定的结束点
  * @param endPoint 终点
  * @param controlPoint1 控制点1
  * @param controlPoint2 控制点2
  */
- (void)addCurveToPoint:(CGPoint)endPoint
          controlPoint1:(CGPoint)controlPoint1
          controlPoint2:(CGPoint)controlPoint2;
/**
  * 该方法将会从 currentPoint 到 指定的 endPoint 追加一条二次贝塞尔曲线.
  * currentPoint、endPoint、controlPoint 三者的关系最终定义了二次贝塞尔曲线的形状.
  * 二次贝塞尔曲线的弯曲由一个控制点来控制. 如下图所示
  * Note 调用该方法前, 你必须先设置 currentPoint, 如果路径为空,
  *      并且尚未设置 currentPoint, 调用该方法则不会产生任何效果.
  *      当添加完贝塞尔曲线后, 该方法将会自动更新 currentPoint 为
  *      指定的结束点
  * @param endPoint 终点
  * @param controlPoint 控制点
  */
- (void)addQuadCurveToPoint:(CGPoint)endPoint
               controlPoint:(CGPoint)controlPoint;
/**
  * 该方法将会从 currentPoint 到子路经的起点 绘制一条直线,
  * 以此来关闭当前的自路径. 紧接着该方法将会更新 currentPoint
  * 为 刚添加的这条直线的终点, 也就是当前子路经的起点.
  */
- (void)closePath;
/**
  * 该方法将会在当前 UIBezierPath 对象的路径中追加
  * 指定的 UIBezierPath 对象中的内容.
  */
- (void)appendPath:(UIBezierPath *)bezierPath;
/**
  * @param pattern 该属性是一个 C 语言的数组, 其中每一个元素都是 CGFloat
  *                数组中的元素代表着线段每一部分的长度, 第一个元素代表线段的第一条线,
  *                第二个元素代表线段中的第一个间隙. 这个数组中的值是轮流的. 来解释一下
  *                什么叫轮流的.
  *                举个例子: 声明一个数组 CGFloat dash[] = @{3.0, 1.0};
  *                这意味着绘制的虚线的第一部分长度为3.0, 第一个间隙长度为1.0, 虚线的
  *                第二部分长度为3.0, 第二个间隙长度为1.0. 以此类推.

  * @param count 这个参数是 pattern 数组的个数
  * @param phase 这个参数代表着, 虚线从哪里开始绘制.
  *                举个例子: 这是 phase 为 6. pattern[] = @{5, 2, 3, 2}; 那么虚线将会
  *                第一个间隙的中间部分开始绘制, 如果不是很明白就请继续往下看,
  *                下文实战部分会对虚线进行讲解.
  */
- (void)setLineDash:(const CGFloat *)pattern
              count:(NSInteger)count
              phase:(CGFloat)phase;
/**
  * 该方法可以重新获取之前设置过的虚线样式.
  *  Note:  pattern 这个参数的容量必须大于该方法返回数组的容量.
  *         如果无法确定数组的容量, 那么可以调用两次该方法, 第一次
  *         调用该方法的时候, 传入 count 参数, 然后在用 count 参数
  *         来申请 pattern 数组的内存空间. 然后再第二次正常的调用该方法
  */
- (void)getLineDash:(CGFloat *)pattern
              count:(NSInteger *)count
              phase:(CGFloat *)phase;
/**
  * 该方法当前的填充颜色 和 绘图属性对路径的封闭区域进行填充.
  * 如果当前路径是一条开放路径, 该方法将会隐式的将路径进行关闭后进行填充
  * 该方法在进行填充操作之前, 会自动保存当前绘图的状态, 所以我们不需要
  * 自己手动的去保存绘图状态了.
  */
- (void)fill;
/**
  * 该方法当前的填充颜色 和 绘图属性 (外加指定的混合模式 和 透明度)
  * 对路径的封闭区域进行填充. 如果当前路径是一条开放路径, 该方法将
  * 会隐式的将路径进行关闭后进行填充
  * 该方法在进行填充操作之前, 会自动保存当前绘图的状态, 所以我们不需要
  * 自己手动的去保存绘图状态了.
  *
  * @param blendMode 混合模式决定了如何和已经存在的被渲染过的内容进行合成
  * @param alpha 填充路径时的透明度
  */
- (void)fillWithBlendMode:(CGBlendMode)blendMode
                    alpha:(CGFloat)alpha;
//绘制路径
- (void)stroke;
/**
  * @param blendMode 混合模式决定了如何和已经存在的被渲染过的内容进行合成
  * @param alpha 填充路径时的透明度
  */
- (void)strokeWithBlendMode:(CGBlendMode)blendMode
                      alpha:(CGFloat)alpha;
/**
  *  该方法将会修改当前绘图上下文的可视区域.
  *  当调用这个方法之后, 会导致接下来所有的渲染
  *  操作, 只会在剪切下来的区域内进行, 区域外的
  *  内容将不会被渲染.
  *  如果你希望执行接下来的绘图时, 删除剪切区域,
  *  那么你必须在调用该方法前, 先使用 CGContextSaveGState 方法
  *  保存当前的绘图状态, 当你不再需要这个剪切区域
  *  的时候, 你只需要使用 CGContextRestoreGState 方法
  *  来恢复之前保存的绘图状态就可以了.
  * @param blendMode 混合模式决定了如何和
  *                  已经存在的被渲染过的内容进行合成
  * @param alpha 填充路径时的透明度
  */
- (void)addClip;
/**
  *  该方法返回一个布尔值, 当曲线的覆盖区域包含
  * 指定的点(内部点), 则返回 YES, 否则返回 NO.
  * Note: 如果当前的路径是一个开放的路径, 那么
  *       就算指定点在路径覆盖范围内, 该方法仍然会
  *       返回 NO, 所以如果你想判断一个点是否在一个
  *       开放路径的范围内时, 你需要先Copy一份路径,
  *       并调用 -(void)closePath; 将路径封闭, 然后
  *       再调用此方法来判断指定点是否是内部点.
  * @param point 指定点.
  */
- (BOOL) containsPoint:(CGPoint)point;
/**
  * 该方法将会直接对路径中的所有点进行指定的放射
  * 变换操作.
  */
- (void)applyTransform:(CGAffineTransform)transform;

 浙公网安备 33010602011771号