
VirtualBox网络配置使用案例
VirtualBox
VirtualBox is a powerful x86 and AMD64/Intel64 virtualization product for enterprise as well as home use. Not only is VirtualBox an extremely feature rich, high performance product for enterprise customers, it is also the only professional solution that is freely available as Open Source Software under the terms of the GNU General Public License (GPL) version 2. See "About VirtualBox" for an introduction.
Presently, VirtualBox runs on Windows, Linux, Macintosh, and Solaris hosts and supports a large number of guest operating systems including but not limited to Windows (NT 4.0, 2000, XP, Server 2003, Vista, Windows 7, Windows 8, Windows 10), DOS/Windows 3.x, Linux (2.4, 2.6, 3.x and 4.x), Solaris and OpenSolaris, OS/2, and OpenBSD.
VirtualBox is being actively developed with frequent releases and has an ever growing list of features, supported guest operating systems and platforms it runs on. VirtualBox is a community effort backed by a dedicated company: everyone is encouraged to contribute while Oracle ensures the product always meets professional quality criteria.
诸多新技术的出现,善于折腾个的伙伴总是想方设法的搭建出来一个环境来尝鲜。譬如:openstack,k8s,opendaylight等等环境的搭建均需要用到多台虚机。为了能够兼容快捷和成本的特性,VirtualBox则提供出了一种不错的方式来解决该问题。
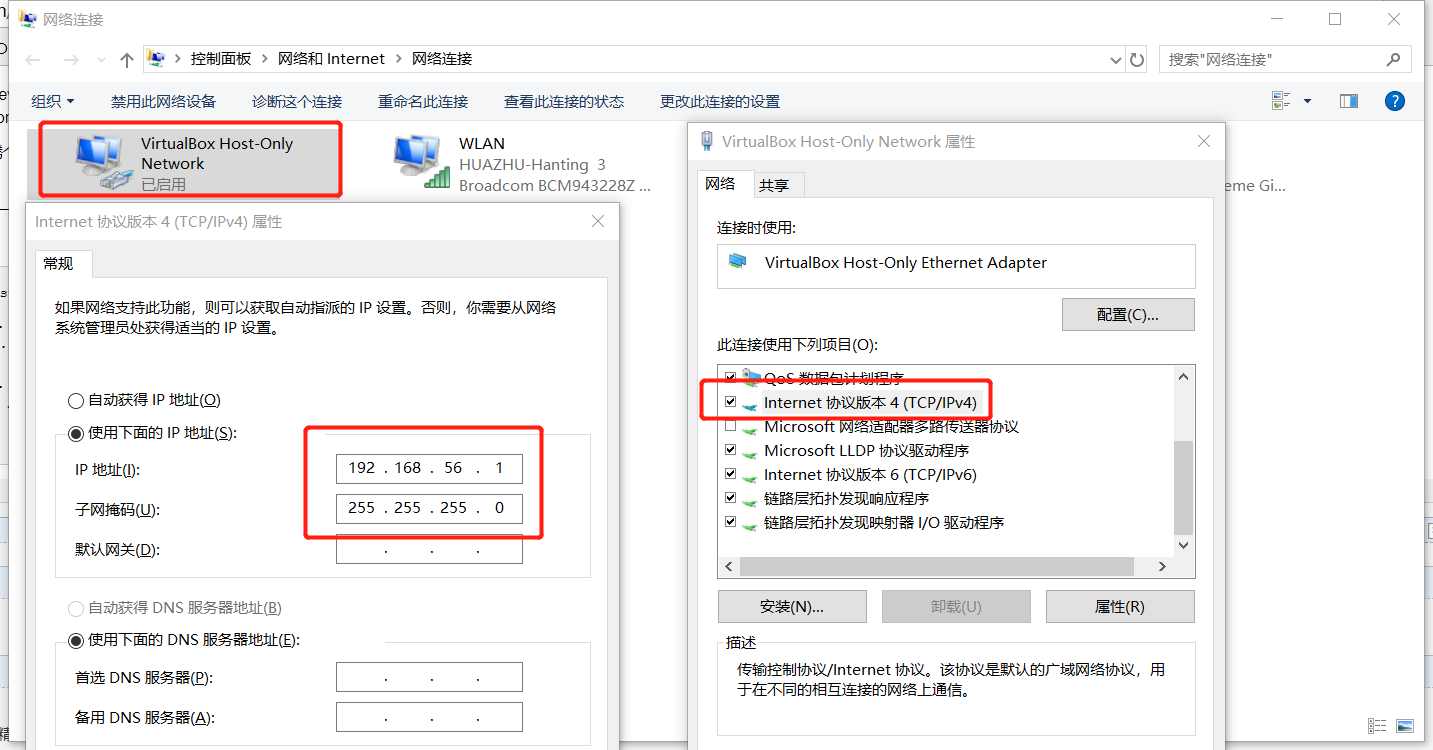
VirtualBox安装时顺带安装了一块虚拟网卡[VirtualBox Host-Only Network]
1.关于该虚拟网卡:
以太网适配器 VirtualBox Host-Only Network:
连接特定的 DNS 后缀 . . . . . . . :
本地链接 IPv6 地址. . . . . . . . : fe80::f561:c34e:2a2:5f97%15
IPv4 地址 . . . . . . . . . . . . : 192.168.56.1
子网掩码 . . . . . . . . . . . . : 255.255.255.0
默认网关. . . . . . . . . . . . . :
该网卡实际上实现了一个虚拟的二层交换机。所以,为了能使我们能够ssh到虚机中,可以给该虚机添加一块host-only的网卡:
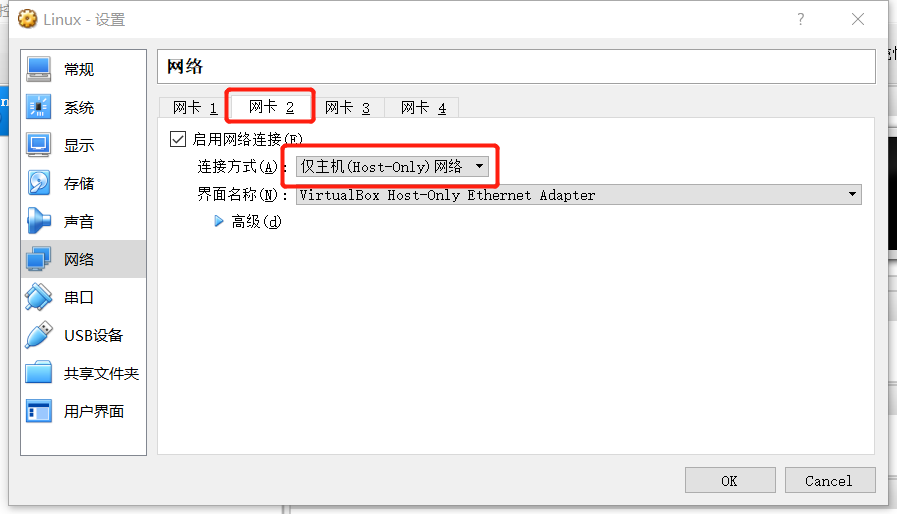
这样当系统装好以后,系统就会分配到一个192.168.56.xx/24的地址,这时候,我们就可以在本地通过192.168.56.0/24这个网段ssh到虚拟。如果为了使地址重启不会变化,我们可以在相对应的网卡文件中做配置。具体的配置目录为:
[root@localhost ~]# cd /etc/sysconfig/network-scripts/
如果对应的网卡文件不存在就手工编辑一个。【编辑的标准是以ifconfig查看出来的结果为准】
比如:
[root@localhost network-scripts]# ifconfig
docker0: flags=4099<UP,BROADCAST,MULTICAST> mtu 1500
inet 172.17.0.1 netmask 255.255.0.0 broadcast 0.0.0.0
ether 02:42:54:26:9b:3e txqueuelen 0 (Ethernet)
RX packets 0 bytes 0 (0.0 B)
RX errors 0 dropped 0 overruns 0 frame 0
TX packets 0 bytes 0 (0.0 B)
TX errors 0 dropped 0 overruns 0 carrier 0 collisions 0
enp0s3: flags=4163<UP,BROADCAST,RUNNING,MULTICAST> mtu 1500
inet 10.0.2.15 netmask 255.255.255.0 broadcast 10.0.2.255
inet6 fe80::a00:27ff:feac:a051 prefixlen 64 scopeid 0x20<link>
ether 08:00:27:ac:a0:51 txqueuelen 1000 (Ethernet)
RX packets 1 bytes 590 (590.0 B)
RX errors 0 dropped 0 overruns 0 frame 0
TX packets 9 bytes 990 (990.0 B)
TX errors 0 dropped 0 overruns 0 carrier 0 collisions 0
enp0s8: flags=4163<UP,BROADCAST,RUNNING,MULTICAST> mtu 1500
inet 192.168.56.2 netmask 255.255.255.0 broadcast 192.168.56.255
inet6 fe80::8f94:43c1:2fa6:d3c9 prefixlen 64 scopeid 0x20<link>
ether 08:00:27:37:81:93 txqueuelen 1000 (Ethernet)
RX packets 106 bytes 12192 (11.9 KiB)
RX errors 0 dropped 0 overruns 0 frame 0
TX packets 106 bytes 19973 (19.5 KiB)
TX errors 0 dropped 0 overruns 0 carrier 0 collisions 0
lo: flags=73<UP,LOOPBACK,RUNNING> mtu 65536
inet 127.0.0.1 netmask 255.0.0.0
inet6 ::1 prefixlen 128 scopeid 0x10<host>
loop txqueuelen 1 (Local Loopback)
RX packets 0 bytes 0 (0.0 B)
RX errors 0 dropped 0 overruns 0 frame 0
TX packets 0 bytes 0 (0.0 B)
TX errors 0 dropped 0 overruns 0 carrier 0 collisions 0
[root@localhost network-scripts]#
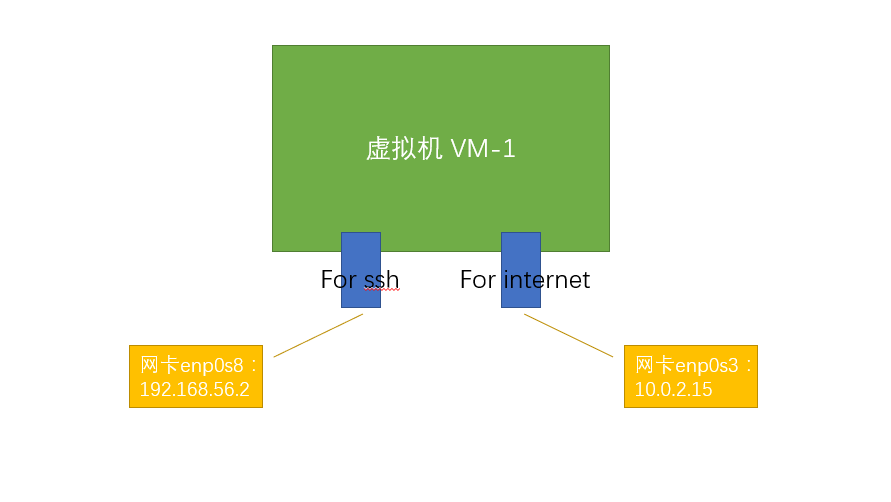
这里边有两块网卡: enp0s3和enp0s8。其中enp0s8为后手工添加。
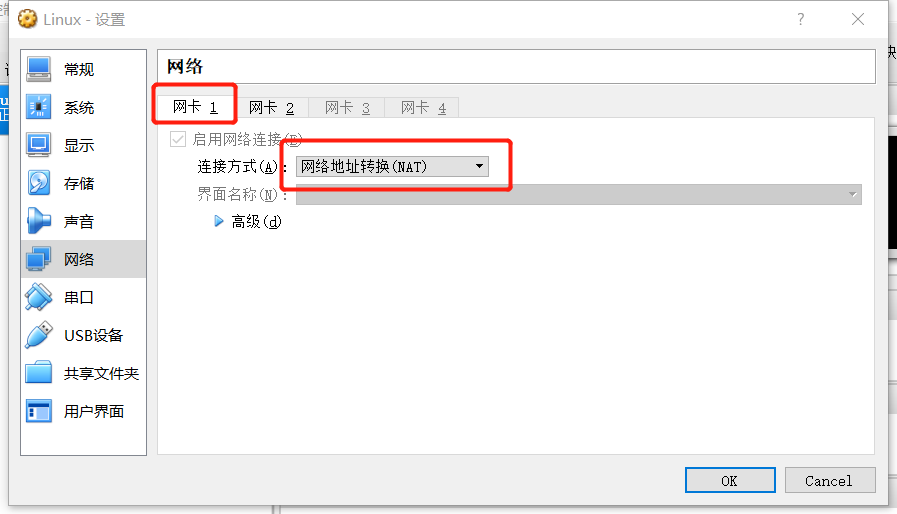
该host-only的网卡解决了本地ssh到虚机的一种方案,但是多数情况下,虚机是有连接外网的需求,这时候可用桥接可用nat模式,首先这里推荐使用nat模式,关于桥接模式回随着外部的宿主机的网络的变化而变化,所以每次都需要修改,相当的不方便。而使用NAT模式,则可独立于宿主机的网络,从而实现连接外网的需求。
用于实现本地ssh网卡地址为:192.168.56.2
用于实现连接外网的网卡地址为:10.0.2.15
其中NAT网卡见:
总体的实现机制为:
Note:这样做的好处:
1.本地虚机之间的互联互通可通过192.168.56.0/24网段来实现,而该二层交换是在本地实现的,所以效率很高。
2.虚机连接外网用NAT网卡,这样不用去适配外部宿主机上的网络变化。
3.不用占用外部网络地址。
2.如有疑问
########################################################################
#Date:2018-03-012                                       Author:BurlyLuo#
#Mail:olaf.luo@foxmail.com                              Version:v1.0   #
########################################################################

非商业用途转载无需作者授权,但务必在文章标题下面注明作者 罗伟(Burly Luo)以及可点击的本博客地址超级链接 http://www.cnblogs.com/BurlyLuo/,谢谢合作.

 浙公网安备 33010602011771号