CuTe DSL(CUTLASS Python)的初步实践ing
CuTe DSL 是以CuTe抽象为中心的Python DSL,Triton DSL是以BLOCK tile为中心的Python DSL。CuTe DSL写起来更像CUDA,Triton DSL要更Pythonic,上层的接口也很Python。英伟达会推出 cuTile 来和 Triton竞争。
一、CuTe DSL介绍
今年的GTC25对CuTe DSL 做了非常精彩的介绍,gtc25-s74639。
很大的一块收益是编译速度的显著提升,你不用在编译CUTLASS时等待很久。提升>100x,在去掉C++模版类实例化使用MLIR后,8kx8kx8k GEMM从C++编译时间的27997ms来到了241ms,十分惊人。

带来的收益还有Pytorch的集成,这点对我这种CUTLASS小白是非常友好的。
-
支持DLPack接口,我可以直接用Pytorch申请的tensor,直接check答案。当然其他AI框架也可以,零拷贝、跨框架的数据互操作的收益很大。
-
将静态layout转换为动态layout,通过
mark_layout_dynamic来避免JIT functions的重复编译。 -
直接集成到AI模型中,你可以把你的算子直接替换进去,这也是Pythonic带来的收益。这也是为什么Pytorch、vllm、sglang都集成了Triton的原因,无感接入的感觉很爽。

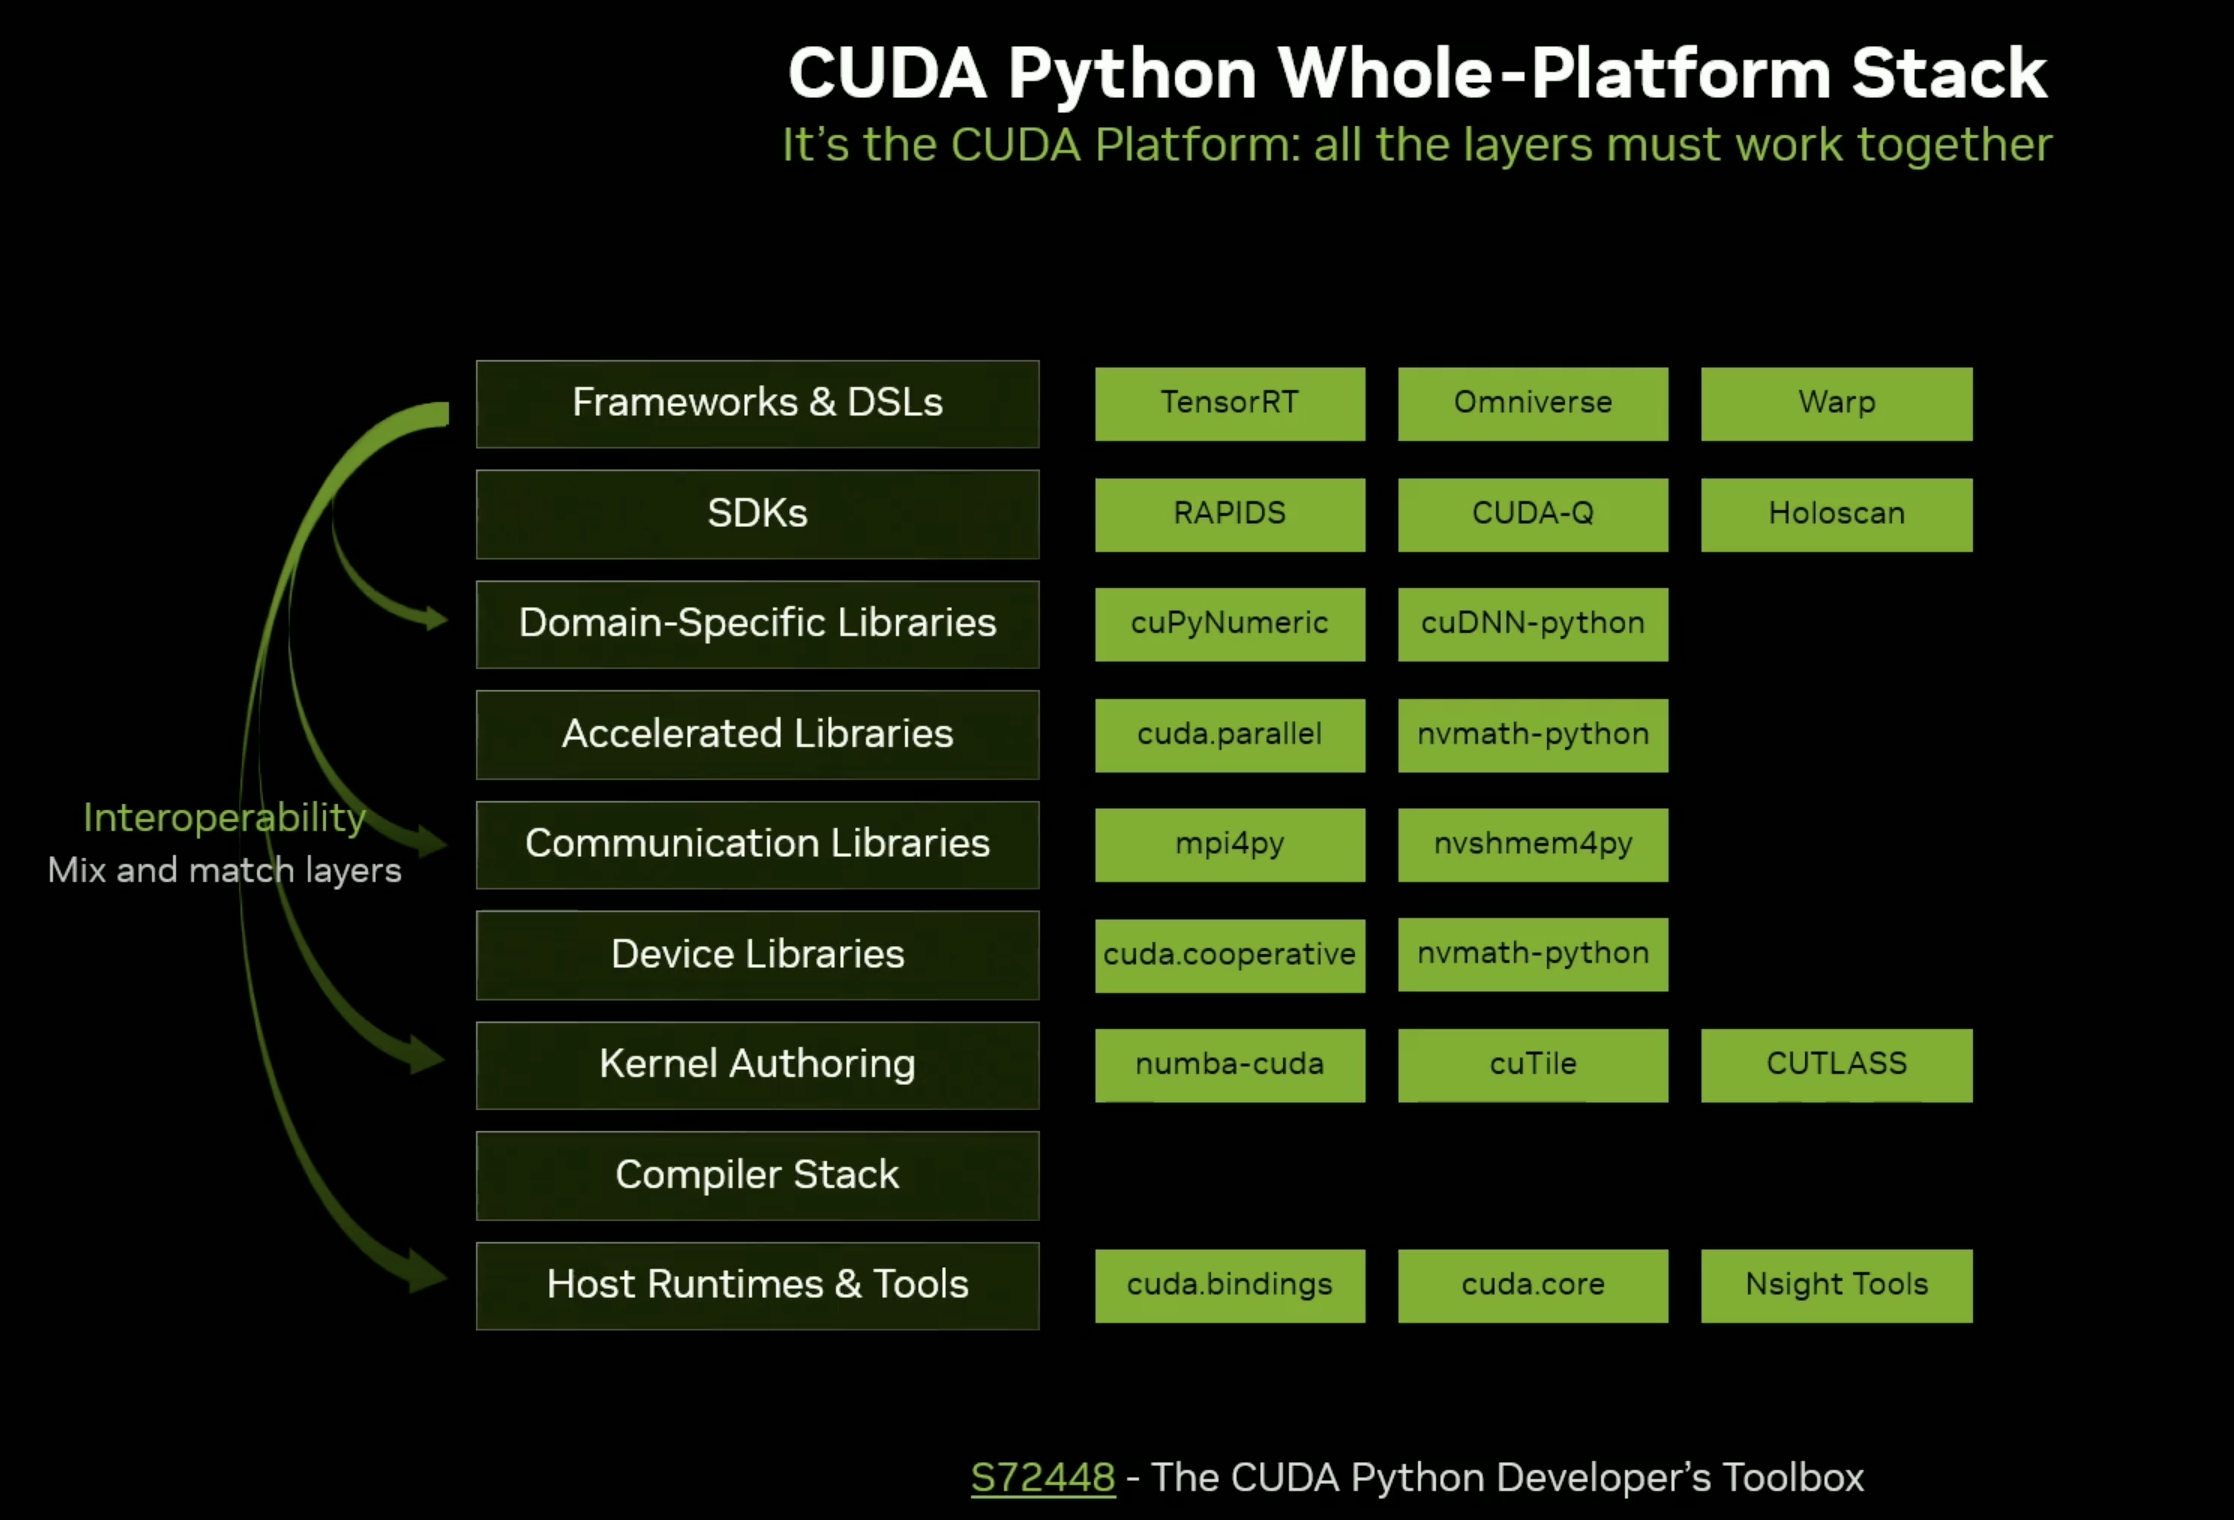
CUTLASS Python的软件层级如下图所示,在CUDA编译栈之上。只要NVVM IR支持,lower就没问题,可惜是闭源的。

现阶段Python版本并不比C++版本慢了,能快得更多吗,这是个问题,个人猜测随着时间的投入肯定更快。

在这里我也说一个我的猜测,CuTeDSL 很可能成为 cuTile 淘汰 Triton 的关键部分,是在铺路。面向高性能的和面向开箱即用的DSL看起来关系不大,但是都是AI前端编译器。CuTeDSL的优化思路可以固化在cuTile中,且都是MLIR,兼容性会很好。跨公司的dialect无法适配,相信一个公司内问题不大,何况是nv,现在bar高的很。在其他厂商Triton性能还没做好的时候,Nvidia的动作无疑是非常快的。这是我非常欣赏Nvidia的一点,对技术的走向把控非常精准,拥抱和支持开源社区的工作,并内化成对手高不可攀的护城河。
二、实践感受(更新ing)
官方示例还是蛮多的,我这里在Tesla T
4上也跑通了向量加,我看看能不能捞点东西出来。python/CuTeDSL 这些代码可以看到,如果安装Python包,一些MLIR的interface也会暴露。OpenMLIR/CuTeDSLSource。自己尝试可以参考下一章节环境安装来自己动手写CuTeDSL kernel。
1、cute layout
2、host和device code分离
host和device分离了,这点很好,当然Triton要优化的话也可以用C/C++重写下runtime调用部分。
3、ctypes封装
限制Python版本的原因找到了,因为用了ctypes做了binding。个人感觉ctypes不太稳定,有点坑。可以试试nanobind,pybind太重了。
4、方便的输出
看着这些输出内容,感觉调试方便多了,确实也真的很方便,host和device的print都很丝滑
Running Elementwise Add test with:
Tensor dimensions: [1024, 1024]
Input and Output Data type: Float32
Input tensor shapes:
a: torch.Size([1024, 1024]), dtype: torch.float32
b: torch.Size([1024, 1024]), dtype: torch.float32
c: torch.Size([1024, 1024]), dtype: torch.float32

Compiling kernel with cute.compile ...
[DSL INFO] Input Tensors:
[DSL INFO]   mA = !cute.memref<f32, gmem, "(?,?):(?,1)">
[DSL INFO]   mB = !cute.memref<f32, gmem, "(?,?):(?,1)">
[DSL INFO] Tiling Parameters:
[DSL INFO]   tiler_mn = (16, 128) per thread block
[DSL INFO]   tv_layout = ((32,4),(4,4)):((64,4),(16,1))
[DSL INFO] Tiled Tensors:
[DSL INFO]   gA = !cute.memref<f32, gmem, "((16,128),(?,?)):((?,1),(?{div=16},128))">
[DSL INFO]   gB = !cute.memref<f32, gmem, "((16,128),(?,?)):((?,1),(?{div=16},128))">
[DSL INFO]   gC = !cute.memref<f32, gmem, "((16,128),(?,?)):((?,1),(?{div=16},128))">
[DSL INFO]   coord tensor = !cute.counting_tensor<"(0,0)", "((16,128),(?,?)):((1@0,1@1),(16@0,128@1))">
[DSL INFO] Sliced Tensors per thread block:
[DSL INFO]   blkA = !cute.memref<f32, gmem, "(16,128):(?,1)">
[DSL INFO]   blkB = !cute.memref<f32, gmem, "(16,128):(?,1)">
[DSL INFO]   blkC = !cute.memref<f32, gmem, "(16,128):(?,1)">
[DSL INFO]   blkCrd = !cute.counting_tensor<"(?{div=16},?{div=128})", "(16,128):(1@0,1@1)">
[DSL INFO] Sliced Tensors per thread:
[DSL INFO]   thrA = !cute.memref<f32, gmem, "((1,(4,4)),1,1):((0,(1,?)),0,0)">
[DSL INFO]   thrB = !cute.memref<f32, gmem, "((1,(4,4)),1,1):((0,(1,?)),0,0)">
[DSL INFO]   thrC = !cute.memref<f32, gmem, "((1,(4,4)),1,1):((0,(1,?)),0,0)">
[DSL INFO]   thrCrd = !cute.counting_tensor<"(?{div=4},?{div=4})", "((1,(4,4)),1,1):((0,(1@1,1@0)),0,0)">
Compilation time: 1.2564 seconds
Executing vector add kernel...
Verifying results...
Results verified successfully!

PASS
三、环境安装
需要CUDA12.9,Python版本是3.12。
1、安装conda
wget https://repo.anaconda.com/archive/Anaconda3-2025.06-1-Linux-x86_64.sh
bash Anaconda3-2024.10-1-Linux-x86_64.sh
3、创建虚拟环境
conda create --name cutedsl python=3.12
conda activate cutedsl
3、安装CUDA12.9
wget https://developer.download.nvidia.com/compute/cuda/repos/ubuntu2004/x86_64/cuda-keyring_1.1-1_all.deb
sudo dpkg -i cuda-keyring_1.1-1_all.deb
sudo apt-get update
sudo apt-get -y install cuda-toolkit-12-9
# 升级后还需要`path`和`LD_LIBRARY_PATH`环境变量的修改
echo 'export PATH=/usr/local/cuda-12.9/bin:$PATH' >> ~/.bashrc
echo 'export LD_LIBRARY_PATH=/usr/local/cuda-12.9/lib64:$LD_LIBRARY_PATH' >> ~/.bashrc
source ~/.bashrc
4、driver升级
我在ubuntu22.04 上install时提示Depends: libssl1.1 (>= 1.1.0) but it is not installable,所以还有换源的操作,更新完dirver需要重启。
# 以下几行你也许不需要
echo "deb http://security.ubuntu.com/ubuntu focal-security main"   | sudo tee /etc/apt/sources.list.d/focal-security.list
sudo apt update
sudo apt install libssl1.1
sudo rm /etc/apt/sources.list.d/focal-security.list

# 这行是安装驱动,需要重启
sudo apt install nvidia-driver-575
5、测试
然后安装下Python包就可以hello world了,Python包发布地址,June 6 release的。
pip install nvidia-cutlass-dsl
示例Python code
import cutlass
import cutlass.cute as cute

@cute.kernel
def kernel():
    # Get the x component of the thread index (y and z components are unused)
    tidx, _, _ = cute.arch.thread_idx()
    # Only the first thread (thread 0) prints the message
    if tidx == 0:
        cute.printf("Hello world")

@cute.jit
def hello_world():

    # Print hello world from host code
    cute.printf("hello world")

    # Launch kernel
    kernel().launch(
        grid=(1, 1, 1),   # Single thread block
        block=(32, 1, 1)  # One warp (32 threads) per thread block
    )

cutlass.cuda.initialize_cuda_context()
hello_world()
将上述文件命令为hello_world.py,直接Python运行,会看到控制台输出两次hello world
python hello_world.py
四、结语
Pythonic is future!
附录
GTC2025会议(可以下载PDF):Enable Tensor Core Programming in Python with CUTLASS 4.0
本文来自博客园,作者:暴力都不会的蒟蒻,转载请注明原文链接:https://www.cnblogs.com/BobHuang/p/18935616

 浙公网安备 33010602011771号