
BoneBlack am335x can0 通讯配置与测试
准备工具:
1、内核3.14.65,u-boot、文件系统
2、boneblack开发板
3、串口线、电源线,测试线,测试夹
一、配置内核支持CAN通讯
[*] Networking support ->
   <*|M> CAN bus subsystem support ->
      <*|M> Raw CAN Protocol (raw access with CAN-ID filtering)
      <*|M> Broadcast Manager CAN Protocol (with content filtering)
      <*|M> CAN Gateway/Router (with netlink configuration)
         CAN Device Drivers ->
            <*|M>   Platform CAN drivers with Netlink support
            [*]     CAN bit-timing calculation
            <*|M>   Bosch C_CAN/D_CAN devices ->
               <M> Generic Platform Bus based C_CAN/D_CAN driver
can通讯的内核配置我选择的是直接加载,并不是以模块化的方式将can模块加载进内核的。
配置完之后编译内核。
二 配置内核的设备树文件,使其支持CAN0,也可以根据自己的硬件选择不同的引脚配置。
在am335x-bone-common.dtsi的文件下的am33xx_pinmux节点下添加can0的引脚配置
dcan0_pins_default: dcan0_pins_default {
        pinctrl-single,pins = <
            0x178 (PIN_OUTPUT | MUX_MODE2) /* uart1_ctsn.d_can0_tx */
            0x17c (PIN_INPUT_PULLDOWN | MUX_MODE2) /* uart1_rtsn.d_can0_rx */
        >;
我选择Boneblack上的uart1_ctsn作为can0的发送引脚,uart1_rtsn作为can0的接收引脚
然后在am335x-bone-common.dtsi文件的最下面添加can0的节点
&dcan0 {
    status = "okay";    /* 这里要为okay,如果是disable的话当系统启动起来之后利用命令ifconfig -a或ipaddr会看不到can0的 */
    pinctrl-names = "default";
    pinctrl-0 = <&dcan0_pins_default>;
};
修改之后保存,然后编译设备树。
三、将生成的内核,和设备树下载到Boneblack开发板中,如何下载前面有介绍。
启动开发板,启动log如下:
U-Boot SPL 2016.03 (Oct 19 2017 - 13:39:57)

preloader_console_init()
>>spl:SDRAM_init()
>>spl:board_init_r()
 MAIN_OSC: 24Mhz
 DPLL_Mpu_Freq: 300MHz
 DPLL_Core_Freq: 100MHz
 DPLL_Per_Freq_usb_phy_clk: 960MHz
 DPLL_Per_Freq_PRU_ICSS_Uart_moduclk: 192MHz
 DPLL_Per_Freq_MMC_moduclk: 96MHz
 DPLL_Per_Freq_SPI_moduclk: 48MHz
 DPLL_Per_Freq_UART_moduclk: 48MHz
 DPLL_Per_Freq_I2C_moduclk: 48MHz
 This is sure,only I think
/arch/arm/cpu/armv7/omap-common/save_omap_boot_params
/arch/arm/cpu/armv7/omap-common/gpmc_init
/arch/arm/cpu/armv7/omap-common/i2c_init
/arch/arm/cpu/armv7/omap-common/arch_misc_init()
/arch/arm/cpu/armv7/omap-common/hw_watchdog_init()
/arch/arm/cpu/armv7/omap-common/am33xx_spl_board_init()
Trying to boot from MMC
MMC->xxxx/drivers/mmc/mmc.c2
reading args
spl_load_image_fat_os: error reading image args, err - -1
reading u-boot.img
reading u-boot.img


U-Boot 2016.03 (Oct 19 2017 - 13:39:57 +0800)

U-Boot code: 80800000 -> 808DA324  BSS_END: -> 80926BBC
       Watchdog enabled
I2C:   ready
DRAM:  512 MiB
NAND:  0 MiB
nand_init->xxxx/drivers/mtd/nand/nand.c
MMC:   OMAP SD/MMC: 0, OMAP SD/MMC: 1
MMC->xxxx/drivers/mmc/mmc.c1
MMC->xxxx/drivers/mmc/mmc.c2
xxxx/common/env_common.c
*** Error - No Valid Environment Area found
*** Warning - bad CRC, using default environment

xxxx/common/env_common.c
Net:   xxx/board/ti/am335x/board_eth_init--->,6be7
xxx/board/ti/am335x/board_eth_init--->,5fab5ef4
<ethaddr> not set. Validating first E-fuse MAC
Here at xxx/drivers/net/cpsw.c
phy_reg---> 3000
phy_reg---> 7809
phy_reg---> 7
phy_reg---> c0f1
phy_reg---> 1e1
phy_reg---> 1
phy_reg---> 0
phy_reg---> ffff
phy_reg---> ffff
phy_reg---> ffff
phy_reg---> ffff
phy_reg---> ffff
phy_reg---> ffff
phy_reg---> ffff
phy_reg---> ffff
phy_reg---> 0
phy_reg---> 40
phy_reg---> 2
phy_reg---> e0
phy_reg---> ffff
phy_reg---> 0
phy_reg---> 0
phy_reg---> 0
phy_reg---> 0
phy_reg---> ffff
phy_reg---> ffff
phy_reg---> 0
phy_reg---> 0
phy_reg---> 0
phy_reg---> 90
phy_reg---> 0
phy_reg---> 40
End
xxx/Board/Ti/Am335x/Board.c:---->Ethernet_init
maria: ----> 40070106
maria: ----> 410000ff
maria: ----> 1
maria: ----> 0
maria: ----> 0
maria: ----> 0
maria: ----> 1
maria: ----> 0
maria: ----> 0
maria: ----> 0
maria: ----> 23e00040
maria: ----> 0
maria: ----> 0
maria: ----> 0
xxx/Board/Ti/Am335x/Board.c:---->Ethernet_init
cpsw, usb_ether
NET: -> xxxx/net/eth_legacy.c
Press SPACE to abort autoboot in 5 seconds
## Error: "envboot" not defined
 lcd reset
Card did not respond to voltage select!
Card did not respond to voltage select!
Card did not respond to voltage select!
switch to partitions #0, OK
mmc1(part 0) is current device
Scanning mmc 1:1...
switch to partitions #0, OK
mmc1(part 0) is current device
SD/MMC found on device 1
reading boot.scr
** Unable to read file boot.scr **
reading uEnv.txt
194 bytes read in 3 ms (62.5 KiB/s)
Loaded environment from uEnv.txt
Importing environment from mmc ...
Running uenvcmd ...
reading uImage
4447520 bytes read in 256 ms (16.6 MiB/s)
reading am335x-boneblack.dtb
29320 bytes read in 8 ms (3.5 MiB/s)
## Booting kernel from Legacy Image at 82000000 ...
   Image Name:   Linux-3.14.65
   Created:      2018-03-07  10:00:42 UTC
   Image Type:   ARM Linux Kernel Image (uncompressed)
   Data Size:    4447456 Bytes = 4.2 MiB
   Load Address: 80008000
   Entry Point:  80008000
   Verifying Checksum ... OK
## Flattened Device Tree blob at 83000000
   Booting using the fdt blob at 0x83000000
   Loading Kernel Image ... OK
   Loading Device Tree to 8fff5000, end 8ffff287 ... OK

Starting kernel ...

[    0.000000] Booting Linux on physical CPU 0x0
[    0.000000] Linux version 3.14.65 (zyr@ubuntu) (gcc version 4.6.3 (Ubuntu/Linaro 4.6.3-1ubuntu5) ) #15 SMP Wed Mar 7 17:59:54 CST 2018
[    0.000000] CPU: ARMv7 Processor [413fc082] revision 2 (ARMv7), cr=10c5387d
[    0.000000] CPU: PIPT / VIPT nonaliasing data cache, VIPT aliasing instruction cache
[    0.000000] Machine model: TI AM335x BeagleBone
[    0.000000] cma: CMA: reserved 16 MiB at 9e800000
[    0.000000] Memory policy: Data cache writeback
[    0.000000] CPU: All CPU(s) started in SVC mode.
[    0.000000] AM335X ES2.1 (sgx neon )
[    0.000000] PERCPU: Embedded 9 pages/cpu @dfad5000 s13184 r8192 d15488 u36864
[    0.000000] Built 1 zonelists in Zone order, mobility grouping on.  Total pages: 129792
[    0.000000] Kernel command line: console=ttyO0,115200n8 root=/dev/mmcblk0p2 rootwait
[    0.000000] PID hash table entries: 2048 (order: 1, 8192 bytes)
[    0.000000] Dentry cache hash table entries: 65536 (order: 6, 262144 bytes)
[    0.000000] Inode-cache hash table entries: 32768 (order: 5, 131072 bytes)
[    0.000000] Memory: 487504K/523264K available (5840K kernel code, 665K rwdata, 2252K rodata, 376K init, 5528K bss, 35760K reserved, 0K highmem)
[    0.000000] Virtual kernel memory layout:
[    0.000000]     vector  : 0xffff0000 - 0xffff1000   (   4 kB)
[    0.000000]     fixmap  : 0xfff00000 - 0xfffe0000   ( 896 kB)
[    0.000000]     vmalloc : 0xe0800000 - 0xff000000   ( 488 MB)
[    0.000000]     lowmem  : 0xc0000000 - 0xe0000000   ( 512 MB)
[    0.000000]     pkmap   : 0xbfe00000 - 0xc0000000   (   2 MB)
[    0.000000]     modules : 0xbf000000 - 0xbfe00000   (  14 MB)
[    0.000000]       .text : 0xc0008000 - 0xc07ef538   (8094 kB)
[    0.000000]       .init : 0xc07f0000 - 0xc084e380   ( 377 kB)
[    0.000000]       .data : 0xc0850000 - 0xc08f66f0   ( 666 kB)
[    0.000000]        .bss : 0xc08f66f0 - 0xc0e5c760   (5529 kB)
[    0.000000] Hierarchical RCU implementation.
[    0.000000]  RCU restricting CPUs from NR_CPUS=2 to nr_cpu_ids=1.
[    0.000000] RCU: Adjusting geometry for rcu_fanout_leaf=16, nr_cpu_ids=1
[    0.000000] NR_IRQS:16 nr_irqs:16 16
[    0.000000] IRQ: Found an INTC at 0xfa200000 (revision 5.0) with 128 interrupts
[    0.000000] Total of 128 interrupts on 1 active controller
[    0.000000] OMAP clockevent source: timer2 at 24000000 Hz
[    0.000011] sched_clock: 32 bits at 24MHz, resolution 41ns, wraps every 178956969942ns
[    0.000054] OMAP clocksource: timer1 at 24000000 Hz
[    0.000817] Console: colour dummy device 80x30
[    0.000870] Lock dependency validator: Copyright (c) 2006 Red Hat, Inc., Ingo Molnar
[    0.000879] ... MAX_LOCKDEP_SUBCLASSES:  8
[    0.000887] ... MAX_LOCK_DEPTH:          48
[    0.000894] ... MAX_LOCKDEP_KEYS:        8191
[    0.000901] ... CLASSHASH_SIZE:          4096
[    0.000908] ... MAX_LOCKDEP_ENTRIES:     16384
[    0.000915] ... MAX_LOCKDEP_CHAINS:      32768
[    0.000922] ... CHAINHASH_SIZE:          16384
[    0.000929]  memory used by lock dependency info: 3695 kB
[    0.000937]  per task-struct memory footprint: 1152 bytes
[    0.000981] Calibrating delay loop... 996.14 BogoMIPS (lpj=4980736)
[    0.079212] pid_max: default: 32768 minimum: 301
[    0.079561] Security Framework initialized
[    0.079673] Mount-cache hash table entries: 1024 (order: 0, 4096 bytes)
[    0.079686] Mountpoint-cache hash table entries: 1024 (order: 0, 4096 bytes)
[    0.097314] CPU: Testing write buffer coherency: ok
[    0.098550] CPU0: thread -1, cpu 0, socket -1, mpidr 0
[    0.098618] Setting up static identity map for 0x80589728 - 0x80589798
[    0.101696] Brought up 1 CPUs
[    0.101716] SMP: Total of 1 processors activated (996.14 BogoMIPS).
[    0.101725] CPU: All CPU(s) started in SVC mode.
[    0.104396] devtmpfs: initialized
[    0.114023] VFP support v0.3: implementor 41 architecture 3 part 30 variant c rev 3
[    0.147246] omap_hwmod: tptc0 using broken dt data from edma
[    0.147599] omap_hwmod: tptc1 using broken dt data from edma
[    0.147940] omap_hwmod: tptc2 using broken dt data from edma
[    0.155419] omap_hwmod: debugss: _wait_target_disable failed
[    0.214523] pinctrl core: initialized pinctrl subsystem
[    0.218479] regulator-dummy: no parameters
[    0.221997] NET: Registered protocol family 16
[    0.227066] DMA: preallocated 256 KiB pool for atomic coherent allocations
[    0.244733] platform 49000000.edma: alias fck already exists
[    0.244771] platform 49000000.edma: alias fck already exists
[    0.244791] platform 49000000.edma: alias fck already exists
[    0.248902] OMAP GPIO hardware version 0.1
[    0.263090] platform 481cc000.d_can: alias fck already exists
[    0.276209] No ATAGs?
[    0.276233] hw-breakpoint: debug architecture 0x4 unsupported.
[    0.337682] bio: create slab <bio-0> at 0
[    0.376739] edma-dma-engine edma-dma-engine.0: TI EDMA DMA engine driver
[    0.378748] vmmcsd_fixed: 3300 mV
[    0.386634] SCSI subsystem initialized
[    0.388876] usbcore: registered new interface driver usbfs
[    0.389483] usbcore: registered new interface driver hub
[    0.390255] usbcore: registered new device driver usb
[    0.393015] omap_i2c 44e0b000.i2c: could not find pctldev for node /pinmux@44e10800/pinmux_i2c0_pins, deferring probe
[    0.393061] platform 44e0b000.i2c: Driver omap_i2c requests probe deferral
[    0.400884] Switched to clocksource timer1
[    0.554499] NET: Registered protocol family 2
[    0.556485] TCP established hash table entries: 4096 (order: 2, 16384 bytes)
[    0.556668] TCP bind hash table entries: 4096 (order: 5, 147456 bytes)
[    0.558032] TCP: Hash tables configured (established 4096 bind 4096)
[    0.558191] TCP: reno registered
[    0.558216] UDP hash table entries: 256 (order: 2, 20480 bytes)
[    0.558408] UDP-Lite hash table entries: 256 (order: 2, 20480 bytes)
[    0.559365] NET: Registered protocol family 1
[    0.560715] RPC: Registered named UNIX socket transport module.
[    0.561225] RPC: Registered udp transport module.
[    0.561239] RPC: Registered tcp transport module.
[    0.561249] RPC: Registered tcp NFSv4.1 backchannel transport module.
[    0.562421] hw perfevents: enabled with ARMv7 Cortex-A8 PMU driver, 5 counters available
[    0.569877] futex hash table entries: 256 (order: 2, 16384 bytes)
[    0.718162] VFS: Disk quotas dquot_6.5.2
[    0.718360] Dquot-cache hash table entries: 1024 (order 0, 4096 bytes)
[    0.720305] NFS: Registering the id_resolver key type
[    0.720663] Key type id_resolver registered
[    0.720682] Key type id_legacy registered
[    0.721147] jffs2: version 2.2. (NAND) (SUMMARY)  © 2001-2006 Red Hat, Inc.
[    0.721595] msgmni has been set to 984
[    0.724558] io scheduler noop registered
[    0.724580] io scheduler deadline registered
[    0.724637] io scheduler cfq registered (default)
[    0.727518] pinctrl-single 44e10800.pinmux: 142 pins at pa f9e10800 size 568
[    0.734508] Serial: 8250/16550 driver, 4 ports, IRQ sharing enabled
[    0.742089] omap_uart 44e09000.serial: no wakeirq for uart0
[    0.743346] 44e09000.serial: ttyO0 at MMIO 0x44e09000 (irq = 88, base_baud = 3000000) is a OMAP UART0
[    1.406745] console [ttyO0] enabled
[    1.415576] omap_rng 48310000.rng: OMAP Random Number Generator ver. 20
[    1.424997] [drm] Initialized drm 1.1.0 20060810
[    1.459283] brd: module loaded
[    1.480634] loop: module loaded
[    1.490200] mtdoops: mtd device (mtddev=name/number) must be supplied
[    1.502074] vcan: Virtual CAN interface driver
[    1.506739] CAN device driver interface
[    1.514879] c_can_platform 481cc000.d_can: c_can_platform device registered (regs=fa1cc000, irq=68)
[    1.528370] usbcore: registered new interface driver asix
[    1.534839] usbcore: registered new interface driver ax88179_178a
[    1.541734] usbcore: registered new interface driver cdc_ether
[    1.548248] usbcore: registered new interface driver smsc95xx
[    1.554951] usbcore: registered new interface driver net1080
[    1.561350] usbcore: registered new interface driver cdc_subset
[    1.567904] usbcore: registered new interface driver zaurus
[    1.574429] usbcore: registered new interface driver cdc_ncm
[    1.582422] usbcore: registered new interface driver cdc_wdm
[    1.588799] usbcore: registered new interface driver usb-storage
[    1.595802] usbcore: registered new interface driver usbtest
[    1.605474] mousedev: PS/2 mouse device common for all mice
[    1.616897] omap_rtc 44e3e000.rtc: rtc core: registered 44e3e000.rtc as rtc0
[    1.625795] i2c /dev entries driver
[    1.629823] Driver for 1-wire Dallas network protocol.
[    1.640500] omap_wdt: OMAP Watchdog Timer Rev 0x01: initial timeout 60 sec
[    1.652349] 48060000.mmc supply vmmc_aux not found, using dummy regulator
[    1.701827] 481d8000.mmc supply vmmc_aux not found, using dummy regulator
[    1.763545] usbcore: registered new interface driver usbhid
[    1.769376] usbhid: USB HID core driver
[    1.778960] oprofile: using arm/armv7
[    1.783604] TCP: cubic registered
[    1.787077] Initializing XFRM netlink socket
[    1.791757] NET: Registered protocol family 17
[    1.796480] NET: Registered protocol family 15
[    1.801326] can: controller area network core (rev 20120528 abi 9)
[    1.807934] NET: Registered protocol family 29
[    1.812825] can: raw protocol (rev 20120528)
[    1.817364] can: broadcast manager protocol (rev 20120528 t)
[    1.823345] can: netlink gateway (rev 20130117) max_hops=1
[    1.829411] Key type dns_resolver registered
[    1.836526] ThumbEE CPU extension supported.
[    1.841217] Registering SWP/SWPB emulation handler
[    1.851007] regulator-dummy: disabling
[    1.856231] slave hdmi.6: could not get i2c
[    1.861179] platform hdmi.6: Driver slave requests probe deferral
[    1.867702] mmc1: BKOPS_EN bit is not set
[    1.873326] platform 4830e000.lcdc: Driver tilcdc requests probe deferral
[    1.889725] mmc1: new high speed MMC card at address 0001
[    1.901557] mmcblk0: mmc1:0001 P1XXXX 3.60 GiB
[    1.907269] mmcblk0boot0: mmc1:0001 P1XXXX partition 1 16.0 MiB
[    1.914572] DCDC1: at 1500 mV
[    1.918019] mmcblk0boot1: mmc1:0001 P1XXXX partition 2 16.0 MiB
[    1.930456]  mmcblk0: p1 p2
[    1.936355] vdd_mpu: 925 <--> 1325 mV at 1325 mV
[    1.947265] vdd_core: 925 <--> 1150 mV at 1125 mV
[    1.954052]  mmcblk0boot1: unknown partition table
[    1.962997] LDO1: at 1800 mV
[    1.967575]  mmcblk0boot0: unknown partition table
[    1.975804] LDO2: at 3300 mV
[    1.981973] LDO3: 1800 mV
[    1.986787] LDO4: at 3300 mV
[    1.992033] tps65217 0-0024: TPS65217 ID 0xe version 1.2
[    1.997673] omap_i2c 44e0b000.i2c: bus 0 rev0.11 at 400 kHz
[    2.134211] tilcdc 4830e000.lcdc: found TDA19988
[    2.141196] [drm] Supports vblank timestamp caching Rev 2 (21.10.2013).
[    2.148118] [drm] No driver support for vblank timestamp query.
[    2.155218] tilcdc 4830e000.lcdc: No connectors reported connected with modes
[    2.162777] [drm] Cannot find any crtc or sizes - going 1024x768
[    2.183488] Console: switching to colour frame buffer device 128x48
[    2.195393] tilcdc 4830e000.lcdc: fb0:  frame buffer device
[    2.201258] tilcdc 4830e000.lcdc: registered panic notifier
[    2.207150] [drm] Initialized tilcdc 1.0.0 20121205 on minor 0
[    2.280799] davinci_mdio 4a101000.mdio: davinci mdio revision 1.6
[    2.287187] davinci_mdio 4a101000.mdio: detected phy mask fffffffe
[    2.296447] libphy: 4a101000.mdio: probed
[    2.300661] davinci_mdio 4a101000.mdio: phy[0]: device 4a101000.mdio:00, driver SMSC LAN8710/LAN8720
[    2.311980] Detected MACID = f4:5e:ab:5f:e7:6b
[    2.321178] omap_rtc 44e3e000.rtc: setting system clock to 2000-01-01 00:00:01 UTC (946684801)
[    2.356287] EXT3-fs (mmcblk0p2): recovery required on readonly filesystem
[    2.363582] EXT3-fs (mmcblk0p2): write access will be enabled during recovery
[    2.707789] kjournald starting.  Commit interval 5 seconds
[    2.719324] EXT3-fs (mmcblk0p2): recovery complete
[    2.724420] EXT3-fs (mmcblk0p2): mounted filesystem with ordered data mode
[    2.731774] VFS: Mounted root (ext3 filesystem) readonly on device 179:2.
[    2.742040] devtmpfs: mounted
[    2.745722] Freeing unused kernel memory: 376K (c07f0000 - c084e000)
INIT: version 2.88 booting
Starting udev
[    3.331908] udev[705]: starting version 164
[    7.904301] random: nonblocking pool is initialized
Starting Bootlog daemon: bootlogd: cannot allocate pseudo tty: No such file or directory
bootlogd.
[    8.828499] EXT3-fs (mmcblk0p2): using internal journal
Configuring network interfaces... [    9.599426] net eth0: initializing cpsw version 1.12 (0)
[    9.681574] net eth0: phy found : id is : 0x7c0f1
[    9.686639] libphy: PHY 4a101000.mdio:01 not found
[    9.691691] net eth0: phy 4a101000.mdio:01 not found on slave 1
done.
Mon Feb 17 19:03:00 UTC 2014
INIT: Entering runlevel: 5
Starting syslogd/klogd: done
Stopping Bootlog daemon: bootlogd.

 _____                    _____           _         _
|  _  |___ ___ ___ ___   |  _  |___ ___  |_|___ ___| |_
|     |  _| .'| . | . |  |   __|  _| . | | | -_|  _|  _|
|__|__|_| |__,|_  |___|  |__|  |_| |___|_| |___|___|_|
              |___|                    |___|

Arago Project http://arago-project.org zyr-am335x ttyO0

Arago 2013.05 zyr-am335x ttyO0

zyr-am335x login:
四、为了方便can的测试需要使用的iproute2-2.6.39和canutils与libsocketcan-0.0.10
A 配置ip命令
下载iproute2-2.6.39链接地址:
解压iproute2-2.6.39进入目录:
方法一:修改Makefile文件
在31行 改为 CC = arm-linux-gnueabihf-gcc
在39行 改为 SUBDIRS=lib ip 以为我们只要ip命令所以之编译ip即可。
修改之后make,将在ip目录里生成的ip可执行文件copy 到Boneblack开发板的文件系统/bin或者/sbin中。前提是将板子上的已经有的ip给重命名掉,比如改为ip- busybox(原先的ip命令是busybox生成的不能控制can)。
可以参考网站:http://emb.hqyj.com/Column/Column596.htm
方法二:修改Makefile文件
    - DESTDIR=/usr/
    + #DESTDIR=/usr/
    ROOTDIR=$(DESTDIR)
    LIBDIR=/usr/lib/
    # Path to db_185.h include
    - DBM_INCLUDE:=$(ROOTDIR)/usr/include
    + #DBM_INCLUDE:=$(ROOTDIR)/usr/include
    - CC = gcc
    + #CC = gcc
    保存退出。

  然后在iproute2-2.6.39加入以下配置脚本build.sh
#!/bin/sh
 # create by myir tom 2015-01-28
 # put this file under the ip source root dir
 FILESYS_PATH=/home/zyr/Source_code/CAN_Utilities/iproute2-2.6.39/Filesystem
 #TOOL_CHAIN_PATH=/home/zyr/Source_code/CAN_Utilities/iproute2-2.6.39/tool_chain

 cp misc/Makefile{,.orig}
 sed '/^TARGETS/s@arpd@@g' misc/Makefile.orig > misc/Makefile
 export GNUEABI=arm-linux-gnueabi
 export CC=$GNUEABI-gcc
 export LD=$GNUEABI-ld
 export NM=$GNUEABI-nm
 export AR=$GNUEABI-ar
 export RANLIB=$GNUEABI-ranlib
 export CXX=$GNUEABI-c++
 export PREFIX=$FILESYS_PATH/usr
 export CROSS_COMPILE_PREFIX=$PREFIX
 export PATH=$TOOL_CHAIN_PATH/bin:$PATH
 export DBM_INCLUDE=/usr/include
 export INCLUDES=/usr/include
 export DESTDIR=$PREFIX/

 #echo $PREFIX
 #echo $PATH
 #echo $DESTDIR

 ./configure --host=arm-linux-gnueabi --prefix=$PREFIX --enable-debug
运行配置脚本是:sh build.sh
编译文件:make
将在ip目录里生成的ip可执行文件copy 到Boneblack开发板的文件系统/bin或者/sbin中。前提是将板子上的已经有的ip给重命名掉,比如改为ip-busybox(原先的ip命令是busybox生成的不能控制can)。
可以参考网站:http://processors.wiki.ti.com/index.php/AM335X_DCAN_Driver_Guide#CAN_Utilities
这样配置IP的命令已经做好了。
B、配置can-utils (参考网址:http://processors.wiki.ti.com/index.php/Linux_Core_DCAN_User%27s_Guide)
1、下载canutils 4.0.6 https://public.pengutronix.de/software/socket-can/canutils/v4.0/
2、配置编译canutils需要库文件libsocketcan-0.0.10 https://public.pengutronix.de/software/libsocketcan/
3、解压canutils和libsocketcan-0.0.10
进入libsocketcan-0.0.10目录添加build.sh配置脚本:
#!/bin/sh

#libsocketcan cross compilation
#Environment variables
#Make sure that TOOL CHAIN path (TOOL_CHAIN_PATH) and target file system (INSTALL_PATH) paths are exported along with #these variables. Example INSTALL_PATH is PWD/install (present working directory is LIBSOCKETCAN_PATH).

#Note, create "install" directory under LIBSOCKETCAN_PATH

export GNUEABI=arm-linux-gnueabi
export CC=$GNUEABI-gcc
export LD=$GNUEABI-ld
export NM=$GNUEABI-nm
export AR=$GNUEABI-ar
export RANLIB=$GNUEABI-ranlib
export CXX=$GNUEABI-c++
export INSTALL_PATH=$PWD/install
export PREFIX=$INSTALL_PATH/
export CROSS_COMPILE_PREFIX=$PREFIX
export PATH=/usr/arm-linux-gnueabi/bin:$PATH   #好像这个变量也可以不要

./configure --host=arm-linux-gnueabi --prefix=$PREFIX --enable-debug
 make
 make install
运行脚本sh build.sh 会在libsocketcan-0.0.10目录下生成install文件夹,里边有生成的对应的库。将生成的install里的lib文件复制到BoneBlack的文件系统中的lib中,并将 install中的头文件复制到can-utils目录中的include中。
4、进入canutils目录,在此目录添加build.sh脚本
#!/bin/sh

LIBSOCKETCAN_PATH=/home/zyr/Source_code/CAN_Utilities/libsocketcan-0.0.10

export GNUEABI=arm-linux-gnueabi
export CC=$GNUEABI-gcc
export LD=$GNUEABI-ld
export NM=$GNUEABI-nm
export AR=$GNUEABI-ar
export RANLIB=$GNUEABI-ranlib
export CXX=$GNUEABI-c++
export PREFIX=$PWD/usrzhu
export CROSS_COMPILE_PREFIX=$PREFIX
export PATH=/usr/arm-linux-gnueabi/bin:$PATH
export LIBSOCKETCAN_INSTALL_DIR=$LIBSOCKETCAN_PATH/install
export PKG_CONFIG_PATH=$LIBSOCKETCAN_PATH/config
export LD_LIBRARY_PATH=${LIBDIR}:${LD_LIBRARY_PATH}
export LD_RAN_PATH=${LIBDIR}:${LD_RAN_PATH}
export LDFLAGS="-Wl,--rpath -Wl,$LIBSOCKETCAN_INSTALL_DIR/lib"
export INCLUDES="-I$LIBSOCKETCAN_INSTALL_DIR/include"

./configure --host=arm-linux-gnueabi --prefix=$PREFIX

make
make install
运行脚本会在该目录下生成usrzhu文件夹,里边对应的目录里有canconfig、candump、cansend、canecho、cansequence等可知执行文件,并将其复制到对应的开发板的文件系统的目录中。
或者参考这个网站:http://emb.hqyj.com/Column/Column596.htm
https://www.cnblogs.com/chenfulin5/p/6797756.html
问题:1、根据以上的步骤都可以生成canconfig、candump、cansend、canecho、cansequence但是都不能在Bonblack开发板是运行,运行./canconfig就会报no such file或者no command find。没办法了,不知道为什么编译好的可执行文件不能运行的,用的编译器就是交叉编译器理论上生成的可执行文件可以在arm上跑的呀,网上翻资料有可能是连接库的问题,于是写了个简单的1+1程序,用arm-linux-gnueabi交叉编译,将生成的可执行文件下载到开发板中,可以运行。于是就在pc上查看1+1程序是怎么链接的。
zyr@ubuntu:~/Source_code/text/gcc-test$ readelf -l test

Elf file type is EXEC (Executable file)
Entry point 0x831d
There are 9 program headers, starting at offset 52

Program Headers:
  Type           Offset   VirtAddr   PhysAddr   FileSiz MemSiz  Flg Align
  EXIDX          0x000418 0x00008418 0x00008418 0x00008 0x00008 R   0x4
  PHDR           0x000034 0x00008034 0x00008034 0x00120 0x00120 R E 0x4
  INTERP         0x000154 0x00008154 0x00008154 0x00019 0x00019 R   0x1
      [Requesting program interpreter: /lib/ld-linux-armhf.so.3]
  LOAD           0x000000 0x00008000 0x00008000 0x00424 0x00424 R E 0x8000
  LOAD           0x000f0c 0x00010f0c 0x00010f0c 0x0011c 0x00120 RW  0x8000
  DYNAMIC        0x000f18 0x00010f18 0x00010f18 0x000e8 0x000e8 RW  0x4
  NOTE           0x000170 0x00008170 0x00008170 0x00044 0x00044 R   0x4
  GNU_STACK      0x000000 0x00000000 0x00000000 0x00000 0x00000 RW  0x4
  GNU_RELRO      0x000f0c 0x00010f0c 0x00010f0c 0x000f4 0x000f4 R   0x1

 Section to Segment mapping:
  Segment Sections...
   00     .ARM.exidx
   01
   02     .interp
   03     .interp .note.ABI-tag .note.gnu.build-id .gnu.hash .dynsym .dynstr .gnu.version .gnu.version_r .rel.dyn .rel.plt .init .plt .text .fini .rodata .ARM.exidx .eh_frame
   04     .init_array .fini_array .jcr .dynamic .got .data .bss
   05     .dynamic
   06     .note.ABI-tag .note.gnu.build-id
   07
   08     .init_array .fini_array .jcr .dynamic
zyr@ubuntu:~/Source_code/text/gcc-test$
得知这个可执行文件是连接在/lib/ld-linux-armhf.so.3这里的。
2、网上资料搜索得知识动态库的链接不正确。所以利用命令查看cansend的链接库(在PC上查看之前生成的cansend的链接目标):
readelf -l cansend
zyr@ubuntu:~/Source_code/CAN_Utilities/canutils-4.0.6/usrzhu/bin$ ls
candump  canecho  cansend  cansequence
zyr@ubuntu:~/Source_code/CAN_Utilities/canutils-4.0.6/usrzhu/bin$ readelf -l cansend

Elf file type is EXEC (Executable file)
Entry point 0x8a99
There are 9 program headers, starting at offset 52

Program Headers:
  Type           Offset   VirtAddr   PhysAddr   FileSiz MemSiz  Flg Align
  EXIDX          0x000fc4 0x00008fc4 0x00008fc4 0x00008 0x00008 R   0x4
  PHDR           0x000034 0x00008034 0x00008034 0x00120 0x00120 R E 0x4
  INTERP         0x000154 0x00008154 0x00008154 0x00013 0x00013 R   0x1
      [Requesting program interpreter: /lib/ld-linux.so.3]
  LOAD           0x000000 0x00008000 0x00008000 0x00fd0 0x00fd0 R E 0x8000
  LOAD           0x001efc 0x00011efc 0x00011efc 0x0016c 0x00184 RW  0x8000
  DYNAMIC        0x001f08 0x00011f08 0x00011f08 0x000f8 0x000f8 RW  0x4
  NOTE           0x000168 0x00008168 0x00008168 0x00044 0x00044 R   0x4
  GNU_STACK      0x000000 0x00000000 0x00000000 0x00000 0x00000 RW  0x4
  GNU_RELRO      0x001efc 0x00011efc 0x00011efc 0x00104 0x00104 R   0x1

 Section to Segment mapping:
  Segment Sections...
   00     .ARM.exidx
   01
   02     .interp
   03     .interp .note.ABI-tag .note.gnu.build-id .gnu.hash .dynsym .dynstr .gnu.version .gnu.version_r .rel.dyn .rel.plt .init .plt .text .fini .rodata .ARM.exidx .eh_frame
   04     .init_array .fini_array .jcr .dynamic .got .data .bss
   05     .dynamic
   06     .note.ABI-tag .note.gnu.build-id
   07
   08     .init_array .fini_array .jcr .dynamic
zyr@ubuntu:~/Source_code/CAN_Utilities/canutils-4.0.6/usrzhu/bin$
得知cansend链接在了lib/ld-linux.so.3这个文件。但是查看BoneBlack的文件系统的/lib中并没有ld-linux.so.3这个文件。没有的话怎么办呢,做一个吧。抱着试一试的态度做了一个这样的链接:
ln -s ld-linux.so.3 ld-linux-armhf.so.3
将ld-linux.so.3复制到开发板的lib目录下。
然后将新的文件系统下载到BoneBlack中,没想到竟然成功了。但是canconfig这个命令依然不能运行,没办法,好像要链接到libsockecan-0.0.10生成的库中的。我就没有再搞了,因为ip命令完全可以代替canconfig的。
五、配置can0
1、查看ip版本 ip -V
iroot@zyr-am335x:~# ip -V
ip utility, iproute2-ss110629
2、配置can0的波特率为125000hz并使其进入loopback模式
首先关闭can0,然后在配置波特率
root@zyr-am335x:~# ip link set can0 down
root@zyr-am335x:~# ip link set can0 type can bitrate 125000 loopback 0n
Error: argument of "loopback" must be "on" or "off"
root@zyr-am335x:~# ip link set can0 type can bitrate 125000 loopback on
root@zyr-am335x:~#
3、查看can0的状态 有三种方式可以查看
root@zyr-am335x:~# ip -d -s link show can0
2: can0: <NOARP,ECHO> mtu 16 qdisc noop state DOWN qlen 10
    link/can
    can <LOOPBACK> state STOPPED (berr-counter tx 0 rx 0) restart-ms 0
    bitrate 125000 sample-point 0.875
    tq 500 prop-seg 6 phase-seg1 7 phase-seg2 2 sjw 1
    c_can: tseg1 2..16 tseg2 1..8 sjw 1..4 brp 1..1024 brp-inc 1
    clock 24000000
    re-started bus-errors arbit-lost error-warn error-pass bus-off
    0          0          0          0          0          0
    RX: bytes  packets  errors  dropped overrun mcast
    0          0        0       0       0       0
    TX: bytes  packets  errors  dropped carrier collsns
    0          0        0       0       0       0
root@zyr-am335x:~# ip -details link show can0
2: can0: <NOARP,ECHO> mtu 16 qdisc noop state DOWN qlen 10
    link/can
    can <LOOPBACK> state STOPPED (berr-counter tx 0 rx 0) restart-ms 0
    bitrate 125000 sample-point 0.875
    tq 500 prop-seg 6 phase-seg1 7 phase-seg2 2 sjw 1
    c_can: tseg1 2..16 tseg2 1..8 sjw 1..4 brp 1..1024 brp-inc 1
    clock 24000000
root@zyr-am335x:~# cat /proc/net/can/stats

        0 transmitted frames (TXF)
        0 received frames (RXF)
        0 matched frames (RXMF)

        0 % total match ratio (RXMR)
        0 frames/s total tx rate (TXR)
        0 frames/s total rx rate (RXR)

        0 % current match ratio (CRXMR)
        0 frames/s current tx rate (CTXR)
        0 frames/s current rx rate (CRXR)

        0 % max match ratio (MRXMR)
        0 frames/s max tx rate (MTXR)
        0 frames/s max rx rate (MRXR)

        0 current receive list entries (CRCV)
        0 maximum receive list entries (MRCV)

root@zyr-am335x:~#
从以上知道can0 在loopback模式,can0stopped,波特率125000hz,接收0发送0.
4、开启can0
root@zyr-am335x:~# ip link set can0 up
[ 6316.441829] c_can_platform 481cc000.d_can can0: setting BTR=1c0b BRPE=0000
root@zyr-am335x:~# ip -d -s link show can0
2: can0: <NOARP,UP,LOWER_UP,ECHO> mtu 16 qdisc pfifo_fast state UNKNOWN qlen 10
    link/can
    can <LOOPBACK> state ERROR-ACTIVE (berr-counter tx 0 rx 0) restart-ms 0
    bitrate 125000 sample-point 0.875
    tq 500 prop-seg 6 phase-seg1 7 phase-seg2 2 sjw 1
    c_can: tseg1 2..16 tseg2 1..8 sjw 1..4 brp 1..1024 brp-inc 1
    clock 24000000
    re-started bus-errors arbit-lost error-warn error-pass bus-off
    0          0          0          0          0          0
    RX: bytes  packets  errors  dropped overrun mcast
    0          0        0       0       0       0
    TX: bytes  packets  errors  dropped carrier collsns
    0          0        0       0       0       0
root@zyr-am335x:~#
5、在loopback模式发送数据然后在接收
root@zyr-am335x:~# cansend can0 -i 0xAA 0x55 0x55 0x55 0x55
interface = can0, family = 29, type = 3, proto = 1
root@zyr-am335x:~# candump can0
interface = can0, family = 29, type = 3, proto = 1

root@zyr-am335x:~# ip -d -s link show can0
2: can0: <NOARP,UP,LOWER_UP,ECHO> mtu 16 qdisc pfifo_fast state UNKNOWN qlen 10
    link/can
    can <LOOPBACK> state ERROR-ACTIVE (berr-counter tx 0 rx 0) restart-ms 0
    bitrate 125000 sample-point 0.875
    tq 500 prop-seg 6 phase-seg1 7 phase-seg2 2 sjw 1
    c_can: tseg1 2..16 tseg2 1..8 sjw 1..4 brp 1..1024 brp-inc 1
    clock 24000000
    re-started bus-errors arbit-lost error-warn error-pass bus-off
    0          0          0          0          0          0
    RX: bytes  packets  errors  dropped overrun mcast
    4          1        0       0       0       0
    TX: bytes  packets  errors  dropped carrier collsns
    4          1        0       0       0       0
root@zyr-am335x:~# cat /proc/net/can/stats

        1 transmitted frames (TXF)
        2 received frames (RXF)
        0 matched frames (RXMF)

        0 % total match ratio (RXMR)
        0 frames/s total tx rate (TXR)
        0 frames/s total rx rate (RXR)

        0 % current match ratio (CRXMR)
        0 frames/s current tx rate (CTXR)
        0 frames/s current rx rate (CRXR)

        0 % max match ratio (MRXMR)
        1 frames/s max tx rate (MTXR)
        2 frames/s max rx rate (MRXR)

        0 current receive list entries (CRCV)
        1 maximum receive list entries (MRCV)

root@zyr-am335x:~#
发现控制台并没接收到数据,但是查看can0的状态可以得知我们发送了也接收到了。同时用示波器可以看到d_can0_tx脚的波形。可参考can总线的帧格式来看示波器的波形。根据波形可以分析出ID为0xAA,中间的数据正好是0x55 0x55 0x55 0x55.这就说明我们的can0的内核驱动是正确的。
6、修改can0的工作模式trile-sampling
root@zyr-am335x:~# ip link set can0 down
root@zyr-am335x:~# ip -details link show can0
2: can0: <NOARP,ECHO> mtu 16 qdisc pfifo_fast state DOWN qlen 10
    link/can
    can <LOOPBACK> state STOPPED (berr-counter tx 0 rx 0) restart-ms 0
    bitrate 125000 sample-point 0.875
    tq 500 prop-seg 6 phase-seg1 7 phase-seg2 2 sjw 1
    c_can: tseg1 2..16 tseg2 1..8 sjw 1..4 brp 1..1024 brp-inc 1
    clock 24000000
root@zyr-am335x:~# ip link set can0 type can bitrate 125000 loopback off
root@zyr-am335x:~# ip -details link show can0
2: can0: <NOARP,ECHO> mtu 16 qdisc pfifo_fast state DOWN qlen 10
    link/can
    can state STOPPED (berr-counter tx 0 rx 0) restart-ms 0
    bitrate 125000 sample-point 0.875
    tq 500 prop-seg 6 phase-seg1 7 phase-seg2 2 sjw 1
    c_can: tseg1 2..16 tseg2 1..8 sjw 1..4 brp 1..1024 brp-inc 1
    clock 24000000
root@zyr-am335x:~# ip link set can0 type can bitrate 125000 trile-sampling on
can: what is "trile-sampling"?
Usage: ip link set DEVICE type can
        [ bitrate BITRATE [ sample-point SAMPLE-POINT] ] |
        [ tq TQ prop-seg PROP_SEG phase-seg1 PHASE-SEG1
          phase-seg2 PHASE-SEG2 [ sjw SJW ] ]

        [ loopback { on | off } ]
        [ listen-only { on | off } ]
        [ triple-sampling { on | off } ]
        [ one-shot { on | off } ]
        [ berr-reporting { on | off } ]

        [ restart-ms TIME-MS ]
        [ restart ]

        Where: BITRATE       := { 1..1000000 }
               SAMPLE-POINT  := { 0.000..0.999 }
               TQ            := { NUMBER }
               PROP-SEG      := { 1..8 }
               PHASE-SEG1    := { 1..8 }
               PHASE-SEG2    := { 1..8 }
               SJW           := { 1..4 }
               RESTART-MS    := { 0 | NUMBER }
root@zyr-am335x:~# ip link set can0 type can bitrate 125000 triple-sampling on
root@zyr-am335x:~# ip -details link show can0
2: can0: <NOARP,ECHO> mtu 16 qdisc pfifo_fast state DOWN qlen 10
    link/can
    can <TRIPLE-SAMPLING> state STOPPED (berr-counter tx 0 rx 0) restart-ms 0
    bitrate 125000 sample-point 0.875
    tq 500 prop-seg 6 phase-seg1 7 phase-seg2 2 sjw 1
    c_can: tseg1 2..16 tseg2 1..8 sjw 1..4 brp 1..1024 brp-inc 1
    clock 24000000
root@zyr-am335x:~#
7、通过can0的triple-sampling模式发送数据
a、以标准ID 0x80 发送数据 0x55 0x55 0x55 0x55 0xaa 0xaa 0xaa 0xaa
发送方:
root@zyr-am335x:~# ip link set can0 type can bitrate 125000 triple-sampling on
root@zyr-am335x:~# ip link set can0 up
[ 3747.621957] c_can_platform 481cc000.d_can can0: setting BTR=1c0b BRPE=0000
root@zyr-am335x:~# cansend can0 -i 0x80 0x55 0x55 0x55 0x55 0xaa 0xaa 0xaa 0xaa
interface = can0, family = 29, type = 3, proto = 1
root@zyr-am335x:~# cansend can0 -i 0x80 0x55 0x55 0x55 0x55 0xaa 0xaa 0xaa 0xaa --loop=10
interface = can0, family = 29, type = 3, proto = 1
root@zyr-am335x:~#
接收方:
root@zyr-am335x:~# candump can0
interface = can0, family = 29, type = 3, proto = 1
<0x080> [8] 55 55 55 55 aa aa aa aa
<0x080> [8] 55 55 55 55 aa aa aa aa
<0x080> [8] 55 55 55 55 aa aa aa aa
<0x080> [8] 55 55 55 55 aa aa aa aa
<0x080> [8] 55 55 55 55 aa aa aa aa
<0x080> [8] 55 55 55 55 aa aa aa aa
<0x080> [8] 55 55 55 55 aa aa aa aa
<0x080> [8] 55 55 55 55 aa aa aa aa
<0x080> [8] 55 55 55 55 aa aa aa aa
<0x080> [8] 55 55 55 55 aa aa aa aa
<0x080> [8] 55 55 55 55 aa aa aa aa
b、以扩展ID方式发送数据
发送方:
root@zyr-am335x:~# cansend can0 -i 0x800 0x55 0x55 0x55 0x55 0xaa 0xaa 0xaa 0xaa -e --loop=10
interface = can0, family = 29, type = 3, proto = 1
root@zyr-am335x:~#
接收方:
root@zyr-am335x:~# candump can0
interface = can0, family = 29, type = 3, proto = 1
<0x00000800> [8] 55 55 55 55 aa aa aa aa
<0x00000800> [8] 55 55 55 55 aa aa aa aa
<0x00000800> [8] 55 55 55 55 aa aa aa aa
<0x00000800> [8] 55 55 55 55 aa aa aa aa
<0x00000800> [8] 55 55 55 55 aa aa aa aa
<0x00000800> [8] 55 55 55 55 aa aa aa aa
<0x00000800> [8] 55 55 55 55 aa aa aa aa
<0x00000800> [8] 55 55 55 55 aa aa aa aa
<0x00000800> [8] 55 55 55 55 aa aa aa aa
<0x00000800> [8] 55 55 55 55 aa aa aa aa
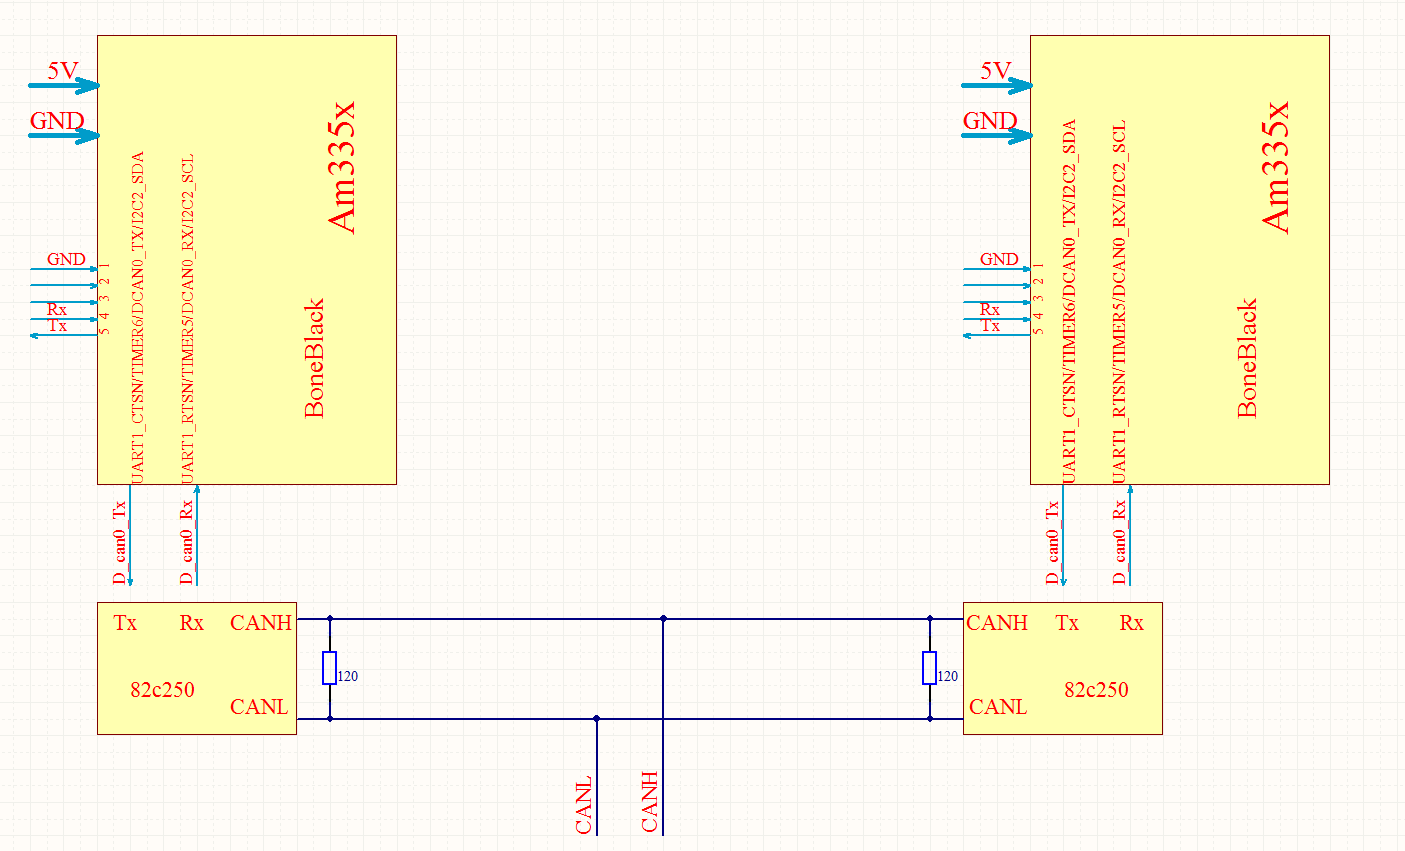
六:硬件电路的连接:

 浙公网安备 33010602011771号