
图像识别算法--VGG16
前言:人类科技就是不断烧开水(发电)、丢石头(航天等)。深度学习就是一个不断解方程的过程(参数量格外大的方程)
本文内容:
1、介绍VGG16基本原理
2、VGG16 pytorch复现
图像识别算法--VGG16
1、参考文献
VGG16:[1]SIMONYAN K, ZISSERMAN A. Very Deep Convolutional Networks for Large-Scale Image Recognition[M/OL]. arXiv, 2015[2023-04-07]. http://arxiv.org/abs/1409.1556.
Dropout:[2]SRIVASTAVA N, HINTON G, KRIZHEVSKY A, 等. Dropout: A Simple Way to Prevent Neural Networks from Overfitting[J].
2、VGG16理论
2.1 VGG16 优点
1、使用3x3的卷积核而非7x7的卷积核
First, we incorporate three non-linear rectification layers instead of a single one, which makes the decision function more discriminative. Second, we decrease the number of parameters.
也就是说VGG16一方面减少了参数(相对于7x7),另外一方面通过3非线性层,更加具有非线性表达能力
2.2 VGG16网络结构图
VGG设计的神经网络结构图:
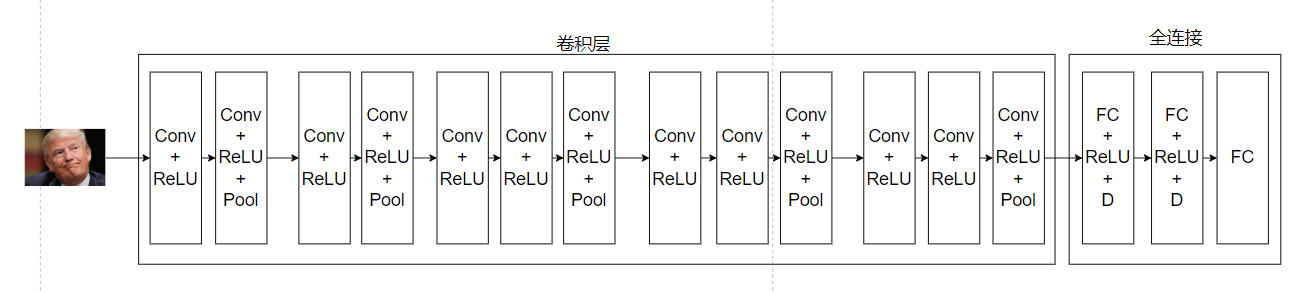
D:dropout
图片变化过程:
1:输入我们的川建国(224x224x3)--->224x224x64--->112x112x64
2:112x112x64--->112x112x128--->56x56x128
3:56x56x128--->56x56x256--->56x56x256--->28x28x256
4:28x28x256--->28x28x512--->28x28x512--->14x14x512
5:14x14x512--->14x14x512--->14x14x512--->7x7x512
变化过程第一个数字代表输入,最后一个数字代表这一层的输出,下一层的输入
全连接层:
1、输入:7x7x512(25088),输出:4096
2、输入:4096,输出4096
3、输入:4096,输出1000 (因为进行的是1000个分类)
在参考文献1中作者同时比较了下面几种不同结构(VGG11、VGG16与VGG19):

建议:
we have found that our conceptually much simpler scheme already provides a speedup of 3.75 times on an off-the-shelf 4-GPU system, as compared to using a single GPU. On a system equipped with four NVIDIA Titan Black GPUs, training a single net took 2–3 weeks depending on the architecture.
我们发现,与使用单个GPU相比,我们在概念上更简单的方案已经在现成的4 - GPU系统上提供了3.75倍的加速比。在搭载4个NVIDIA Titan Black GPU的系统上,根据架构的不同,训练单个网络需要2 ~ 3周。
访问链接:https://www.image-net.org/challenges/LSVRC/2012/index.php
如果想复现VGG16,直接使用论文作者数据是不要切合实际的:1、数据过大;2、没有这么高的电脑配置。
推荐使用数据集:https://download.pytorch.org/tutorial/hymenoptera_data.zip
url = "https://download.pytorch.org/tutorial/hymenoptera_data.zip"
save_path = os.path.join(data_dir, "hymenoptera_data.zip")

if not os.path.exists(save_path):
    urllib.request.urlretrieve(url, save_path)
    zip = zipfile.ZipFile(save_path)
    zip.extractall(data_dir)
    zip.close()
    os.remove(save_path)
pytorch官方数据,主要是实现蜜蜂和蚂蚁分类,不过在使用前必须对图片进行处理,因为他提供的图片并非都是224x224x3,所以需要对图片进行转换。
"""
图片预处理:
1、图片裁剪
2、标准化
3、图片旋转
"""
class ImageTransform():
    def __init__(self, resize, mean, std):
        self.data_transform = {
            'train': transforms.Compose([
                transforms.RandomResizedCrop(resize, scale=(0.5, 1.0)),
                #scale在调整大小之前,指定裁剪的随机区域的下限和上限。规模是相对于原始图像的面积来定义的
                transforms.RandomHorizontalFlip(), #以给定的概率随机水平翻转给定的图像

                transforms.ToTensor(), #将图片转化为张量
                transforms.Normalize(mean, std) #将图片进行正则化
            ]),
            'val': transforms.Compose([
                transforms.Resize(resize), #改变尺寸
                transforms.CenterCrop(resize), #中心裁剪图像

                transforms.ToTensor(),
                transforms.Normalize(mean, std)
            ])
        }
    def __call__(self, img, phase='train'):
        return self.data_transform[phase](img)
上述代码涉及到一个理论:在卷积神经网络中(VGG也是一种卷积神经网络),在对于训练集数据不足的时候,可以尝试对图片进行旋转等操作来补充训练集数据。比如我们川建国,我旋转他就相当于又增加了一个训练集数据。
如果实验室电脑配置不够:建议直接租算力(如果只是轻微使用深度学习+实验室没钱)
推荐网站:AutoDL-品质GPU租用平台-租GPU就上AutoDL,学生认证价格也还ok。网站提供GPU(部分):

多尺度评价的实验结果:

作者操作过程中还使用了:1、\(L_{2}\)范数;2、设置0.5的dropout
2.2.1 复现代码
#定义训练网络 VGG-16
import torch.nn.functional as F
class vgg16(nn.Module):
    def __init__(self):
        super().__init__()
        #开始定义网络结构
        self.conv1 = torch.nn.Conv2d(3, 64, 3, padding=(1,1))
        self.conv2 = torch.nn.Conv2d(64, 64, 3, padding=(1, 1))
        self.pool1 = torch.nn.MaxPool2d((2, 2), padding=(1, 1)) #64x112x112

        self.conv3 = torch.nn.Conv2d(64, 128,3,padding=(1,1))
        self.conv4 = torch.nn.Conv2d(128, 128, 3, padding=(1, 1))
        self.pool2 = torch.nn.MaxPool2d((2, 2), padding=(1, 1))

        self.conv5 = torch.nn.Conv2d(128, 256,3, padding=(1,1))
        self.conv6 = torch.nn.Conv2d(256, 256,3, padding=(1, 1))
        self.conv7 = torch.nn.Conv2d(256, 256,3, padding=(1, 1))
        self.pool3 = torch.nn.MaxPool2d((2,2), padding=(1, 1))

        self.conv8 = torch.nn.Conv2d(256, 512,3, padding=(1,1))
        self.conv9 = torch.nn.Conv2d(512, 512,3, padding=(1, 1))
        self.conv10 = torch.nn.Conv2d(512, 512,3, padding=(1, 1))
        self.pool4 = torch.nn.MaxPool2d((2,2),padding=(1, 1))

        self.conv11 = torch.nn.Conv2d(512, 512,3)
        self.conv12 = torch.nn.Conv2d(512, 512,3, padding=(1, 1))
        self.conv13 = torch.nn.Conv2d(512, 512,3, padding=(1, 1))
        self.pool5 = torch.nn.MaxPool2d((2,2),padding=(1, 1))

        self.fc1 = nn.Linear(512*7*7, 4096)
        self.dropout1 = nn.Dropout(0.5)
        self.fc2 = nn.Linear(4096, 4096)
        self.dropout2 = nn.Dropout(0.5)
        self.fc3 = nn.Linear(4096, 2)
    def forward(self, x):
        insize = x.size(0)
        out = F.relu(self.conv1(x))
        out = self.pool1(F.relu(self.conv2(out)))

        out = F.relu(self.conv3(out))
        out = self.pool2(F.relu(self.conv4(out)))

        out = F.relu(self.conv5(out))
        out = F.relu(self.conv6(out))
        out = self.pool3(F.relu(self.conv7(out)))

        out = F.relu(self.conv8(out))
        out = F.relu(self.conv9(out))
        out = self.pool4(F.relu(self.conv10(out)))

        out = F.relu(self.conv11(out))
        out = F.relu(self.conv12(out))
        out = self.pool5(F.relu(self.conv13(out)))

        out = out.view(insize, -1) #这里对于不同数据处理会有不一样,-1位于后面相当于直接将数据进行平铺-->1*n;
        # -1位于前面则--->n*1
        out = self.dropout1(self.act1(self.fc1(out)))
        out = self.dropout2(self.act1(self.fc2(out)))
        out = self.fc3(out)
        out = F.log_softmax(out, dim=1)
        return out

device = torch.device('cuda:0' if torch.cuda.is_available() else 'CPU')
vgg = vgg16()
x = torch.rand(size=(4, 3, 224, 224)) #相当于4张224x224的图片,所以旋转out.view(insize, -1)
"""
x = torch.rand(size=(3, 224, 224)) out.view(224*224*3, -1)
"""
vgg(x)

 浙公网安备 33010602011771号