
客户端模式(Client Credentials Grant)
Tips:本篇已加入,.Net core 3.1 使用IdentityServer4 实现 OAuth2.0 --阅读目录 可点击查看更多相关文章。
前言
本篇会详细刨析客户端模式的流程图,罗列一下此模式的利弊,适用场景。最后会用代码进行实现,此外还会额外参杂一些相关知识的彩蛋。
流程图
客户端模式(Client Credentials Grant) 是所有模式中最简单的模式,所以我会尽可能的把 一些细小的,可能后面文章也会涉及到的点,都归纳在此篇中。
对于一些名词解释,忘记的同学可以看一下之前一篇文章,打开传送门
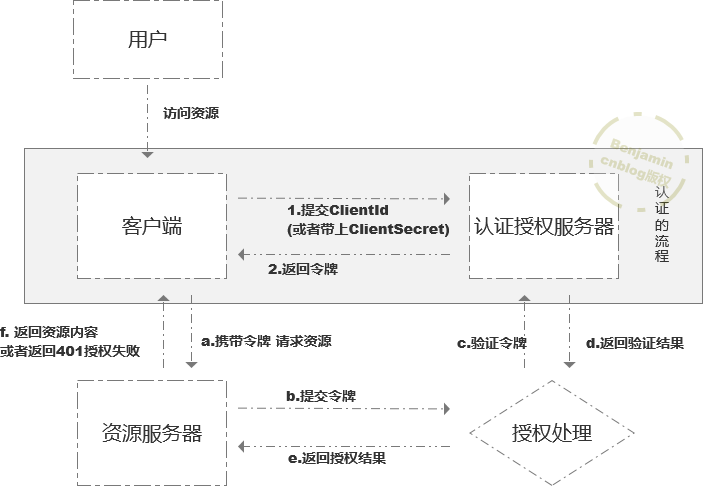
业务场景:用户使用客户端模式去访问一个资源(我们可以理解成这个资源是查看数据)
上图是用户访问资源的整体流程,其实除了灰色的部分,认证的流程不一样,用户访问资源,资源服务器是否授权客户端资源都是一样的,所以之后的文章中我会只画出灰色的认证流程部分大家要注意一下。
用文字描述一下 客户端模式的流程就是:
|
1.客户端 访问授权服务器,提交clientid,或者clientSecret(密码可以提交也可以不提交,具体由代码控制) 2.授权服务器 校验clientid (和 clientSecret)是否可以通过身份认证,通过后返回 访问令牌(此令牌可以访问资源服务器) |
代码篇
我们按照官方文档的实现步骤,实现一遍代码。
官方实现的步骤如下:
|
如果是 使用IdentityServer4 4.x版本的话,就算按照以上步骤实现完,你会发现请求访问总是401。
|
要注意一下!!! ID4 4.x版本需要定义api的作用域,之前的版本作用域不定义的话都是默认与资源名称相同。 在这里我额外的加了一个步骤:
|
接下来 我们上手操作一遍:
先看一下目录结构:
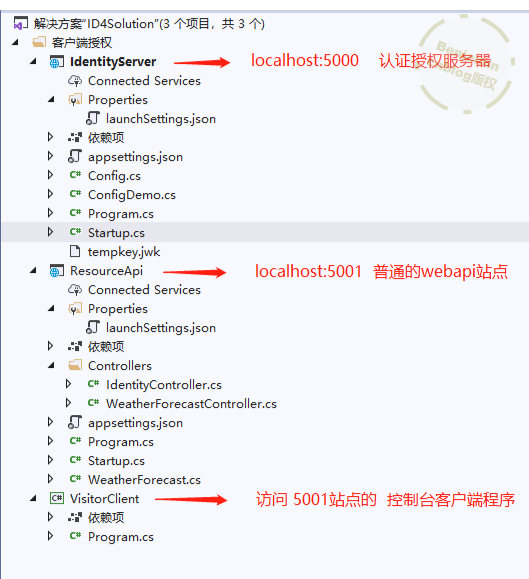
前面步骤说到的 定义api资源,定义作用域,定义客户端,我们全部写在 5000站点项目里的 Config文件。
大家想一下,我们要保护资源总要告诉认证授权服务器,保护资源的名称,哪些客户端可以看到(而客户端权限是作用在作用域上的,作用域又将api资源分组归类,那么这样也就定义了哪些客户端可以看到哪些api资源了)
    public static class Config
    {
        /// <summary>
        /// Defining an API Resource
        /// </summary>
        public static IEnumerable<ApiResource> Apis =>
            new List<ApiResource>
            {
                new ApiResource("api1", "My API")
            };

        /// <summary>
        /// Defining the scope
        /// </summary>
        /// <returns></returns>
        public static IEnumerable<ApiScope> ApiScopes =>
           new ApiScope[]
           {
                new ApiScope("api1"),
           };

        /// <summary>
        /// Defining the client
        /// </summary>
        public static IEnumerable<Client> Clients =>
            new List<Client>
            {
                new Client
                {
                    ClientId = "client",

                    // no interactive user, use the clientid/secret for authentication
                    AllowedGrantTypes = GrantTypes.ClientCredentials,

                    // secret for authentication
                    ClientSecrets =
                    {
                        new Secret("secret".Sha256())
                    },

                    // scopes that client has access to
                    AllowedScopes = { "api1" }
                }
            };
    }
接下来要完成的步骤就是: Configuring IdentityServer 配置ID4 服务端
修改一下 IdentityServer项目中的 Startup 文件,为了让认证授权服务启动的时候能知道 资源相关的定义,并且启用一下 ID4中间件。
    public class Startup
    {
        // This method gets called by the runtime. Use this method to add services to the container.
        // For more information on how to configure your application, visit https://go.microsoft.com/fwlink/?LinkID=398940
        public void ConfigureServices(IServiceCollection services)
        {
            //程序启动的时候加载 受保护的api资源,api作用域,客户端定义
            var builder = services.AddIdentityServer()
                .AddDeveloperSigningCredential() //
                .AddInMemoryApiResources(Config.Apis)
                .AddInMemoryApiScopes(Config.ApiScopes)
                .AddInMemoryClients(Config.Clients);
        }

        // This method gets called by the runtime. Use this method to configure the HTTP request pipeline.
        public void Configure(IApplicationBuilder app, IWebHostEnvironment env)
        {
            if (env.IsDevelopment())
            {
                app.UseDeveloperExceptionPage();
            }

            app.UseRouting();
            app.UseIdentityServer();//使用ID4中间件

            app.UseEndpoints(endpoints =>
            {
                endpoints.MapGet("/", async context =>
                {
                    await context.Response.WriteAsync("Hello World!");
                });
            });
        }
    }
ID4 提供了 内存级别读取资源,作用域和客户端的方法 .AddInMemoryXXXXX() 上面案例中我们都是读取的 Config类中的写死的资源,当然也可以从配置文件中读取,

至此,认证授权的服务器全部完工。接下去我们写一个最基本的api,在ResourceApi中我们新增一个 IdentityController。
using System;
using System.Collections.Generic;
using System.Linq;
using System.Threading.Tasks;
using Microsoft.AspNetCore.Authorization;
using Microsoft.AspNetCore.Http;
using Microsoft.AspNetCore.Mvc;

namespace ResourceApi.Controllers
{
    [Authorize]
    public class IdentityController : Controller
    {
        [HttpGet]
        public IActionResult Get()
        {
            return new JsonResult(from c in User.Claims select new { c.Type, c.Value });
        }
    }
}
我们给 IdentityController 加一个 用户身份验证 标签 [Authorize] 这样进来的请求就需要经过 .netcore的 身份认证。
我们修改一下 ResourceApi的 Startup文件 :
|
    public class Startup
    {
        public Startup(IConfiguration configuration)
        {
            Configuration = configuration;
        }

        public IConfiguration Configuration { get; }

        // This method gets called by the runtime. Use this method to add services to the container.
        public void ConfigureServices(IServiceCollection services)
        {
            services.AddMvc().AddNewtonsoftJson(options =>
            {
                // 忽略循环引用
                options.SerializerSettings.ReferenceLoopHandling = ReferenceLoopHandling.Ignore;
                // 不使用驼峰
                options.SerializerSettings.ContractResolver = new DefaultContractResolver();
                // 设置时间格式
                options.SerializerSettings.DateFormatString = "yyyy-MM-dd HH:mm:ss";
                // 如字段为null值,该字段不会返回到前端
                // options.SerializerSettings.NullValueHandling = NullValueHandling.Ignore;
            });

            //将认证服务注册到容器中,并且配置默认token的方案名为 Bearer
            services.AddAuthentication("Bearer")
            .AddJwtBearer("Bearer", options =>
            {
                options.Authority = "http://localhost:5000";//授权服务器地址
                options.RequireHttpsMetadata = false;
                options.Audience = "api1";//token能访问的 受众群体(这个定义要和授权服务器定义的资源名称一样)
            });
        }

        // This method gets called by the runtime. Use this method to configure the HTTP request pipeline.
        public void Configure(IApplicationBuilder app, IWebHostEnvironment env)
        {
            if (env.IsDevelopment())
            {
                app.UseDeveloperExceptionPage();
            }

            app.UseHttpsRedirection();

            app.UseAuthentication();

            app.UseRouting();

            app.UseAuthorization();

            app.UseEndpoints(endpoints =>
            {
                endpoints.MapControllerRoute(
                    name: "default",
                    pattern: "api/{controller}/{action}");
            });
        }
    }
到这里,授权服务器代码也好了,资源api服务也好了。剩下的就是 客户端代码了,我们看一下 VisitorClient这个控制台应用:
class Program
    {
        static void Main(string[] args)
        {
            // discover endpoints from metadata
            var client = new HttpClient();
            var disco = client.GetDiscoveryDocumentAsync("http://localhost:5000").Result;//IdentityModel.Client 中对client的扩展
            if (disco.IsError)
            {
                Console.WriteLine(disco.Error);
                return;
            }

            // request token  client的扩展方法 使用 客户端模式 请求token
            var tokenResponse = client.RequestClientCredentialsTokenAsync(new ClientCredentialsTokenRequest
            {
                Address = disco.TokenEndpoint,

                ClientId = "client",
                ClientSecret = "secret",
                Scope = "api1"
            }).Result;

            if (tokenResponse.IsError)
            {
                Console.WriteLine(tokenResponse.Error);
                return;
            }

            Console.WriteLine(tokenResponse.Json);

            // call api
            client.SetBearerToken(tokenResponse.AccessToken);

            var response = client.GetAsync("http://localhost:5001/api/Identity/Get").Result;
            if (!response.IsSuccessStatusCode)
            {
                Console.WriteLine(response.StatusCode);
            }
            else
            {
                var content = response.Content.ReadAsStringAsync().Result;
                Console.WriteLine(JArray.Parse(content));
            }

            Console.ReadLine();
        }
    }
运行下来获取token 没问题,但是访问 5001 api报错了
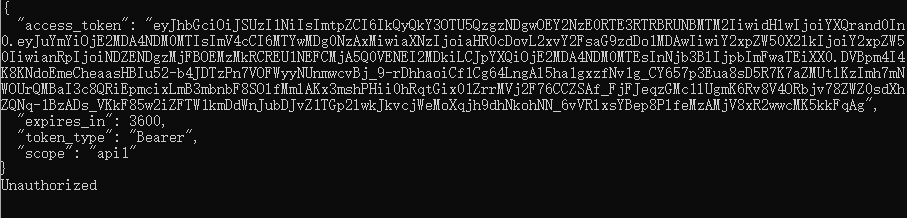
我们虽然是按照 文档去实现的,却总还是磕磕盼盼,这其实是好事情,我们看一下错误原因,有助于我们更加了解ID4
{StatusCode: 401, ReasonPhrase: 'Unauthorized', Version: 1.1, Content: System.Net.Http.HttpConnectionResponseContent, Headers:
{
Date: Wed, 23 Sep 2020 06:47:44 GMT
Server: Kestrel
WWW-Authenticate: Bearer error="invalid_token", error_description="The audience 'empty' is invalid"
Content-Length: 0
}}
报错原因是这样的,经过分析token是没问题的,但是无效,最后想了好久,The audience 'empty' is invalid 还记不记得之前我说过 ID4 4.x版本多了一个 scope的定义,
其实我们定义api资源的时候也要告诉授权服务器,这个api的scope,我们需要改一下 5000站点里 Config文件里的定义api字段那段代码。
/// <summary>
/// Defining an API Resource
/// </summary>
public static IEnumerable<ApiResource> Apis =>
  new List<ApiResource>
    {
      new ApiResource("api1", "My API")
      {
        Scopes = {
          new string("api1")
        }
      }
    };
把作用域给加上,然后我们再运行一下 VisitorClient控制台程序。
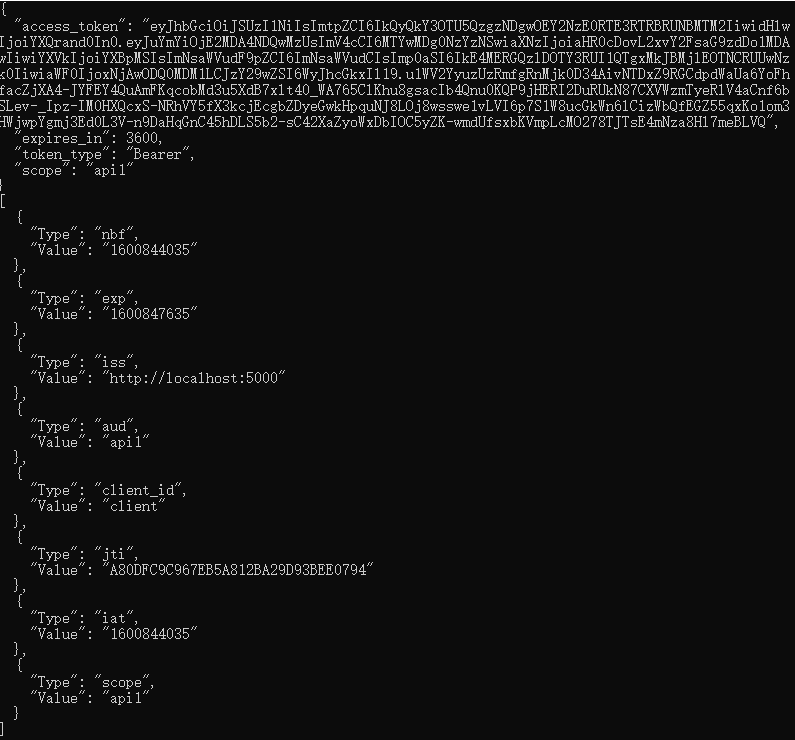
大功告成 !!
我们成功访问了被保护的api并输出了 User.Claims 的信息。
总结
这篇文章 从授权的流程到代码,完整的输出了一个 客户端模式的验证案例,
代码之后会完整的上传 github,如果我忘记了 可以留言里提醒我一下,
那么就这么结束了吗?并没有,里面还有一写概念,比如最终输出的 User.Claims 是个啥,token是怎么获取到的(我们现在只知道 配了一点东西,然后用了client的扩展方法)等等等。
我会再写一篇 补充篇 在那里完善,敬请期待~(●'◡'●)
| 如果觉得本篇随笔对你有帮助,请点击右下方的 【推荐👍】,或者给作者 【打赏】,感谢大家的支持,这将成为作者继续写作的动力。 |

 浙公网安备 33010602011771号