
将 Flutter module 集成到 iOS 项目
将 Flutter module 集成到 iOS 项目
集成到现有应用chevron_right在 iOS 中集成 Flutterchevron_right集成 Flutter
Flutter UI components can be incrementally added into your existing iOS application as embedded frameworks. To embed Flutter in your existing application, consider one of the following three methods.
| Embedding Method | Methodology | Benefit |
|---|---|---|
| Use CocoaPods (Recommended) | Install and use the Flutter SDK and CocoaPods. Flutter compiles the flutter_module from source each time Xcode builds the iOS app. |
Least complicated method to embed Flutter into your app. |
| Use iOS frameworks | Create iOS frameworks for Flutter components, embed them into your iOS, and update your existing app's build settings. | Doesn't require every developer to install the Flutter SDK and CocoaPods on their local machines. |
| Use iOS frameworks and CocoaPods | Embed the frameworks for your iOS app and the plugins in Xcode, but distribute the Flutter engine as a CocoaPods podspec. | Provides an alternative to distributing the large Flutter engine (Flutter.xcframework) library. |
When you add Flutter to your existing iOS app, it increases the size of your iOS app.
For examples using an app built with UIKit, see the iOS directories in the add_to_app code samples. For an example using SwiftUI, consult the iOS directory in News Feed App.
Development system requirements
Your development environment must meet the macOS system requirements for Flutter with Xcode installed. Flutter supports Xcode 15 or later and CocoaPods 1.16 or later.
Create a Flutter module
To embed Flutter into your existing application with any method, create a Flutter module first. Use the following command to create a Flutter module.
cd /path/to/my_flutter
flutter create --template module my_flutter
content_copy
Flutter creates module project under /path/to/my_flutter/. If you use the CocoaPods method, save the module in the same parent directory as your existing iOS app.
From the Flutter module directory, you can run the same flutter commands you would in any other Flutter project, like flutter run or flutter build ios. You can also run the module in VS Code or Android Studio/IntelliJ with the Flutter and Dart plugins. This project contains a single-view example version of your module before embedding it in your existing iOS app. This helps when testing the Flutter-only parts of your code.
Organize your module
The my_flutter module directory structure resembles a typical Flutter app.
my_flutter/
├── .ios/
│   ├── Runner.xcworkspace
│   └── Flutter/podhelper.rb
├── lib/
│   └── main.dart
├── test/
└── pubspec.yaml
content_copy
Your Dart code should be added to the lib/ directory. Your Flutter dependencies, packages, and plugins must be added to the pubspec.yaml file.
The .ios/ hidden subfolder contains an Xcode workspace where you can run a standalone version of your module. This wrapper project bootstraps your Flutter code. It contains helper scripts to facilitate building frameworks or embedding the module into your existing application with CocoaPods.
info提示
- Add custom iOS code to your own existing application's project or to a plugin, not to the module's
.ios/directory. Changes made in your module's.ios/directory don't appear in your existing iOS project using the module, and might be overwritten by Flutter. - Exclude the
.ios/directory from source control as it's autogenerated. - Before building the module on a new machine, run
flutter pub getin themy_flutterdirectory. This regenerates the.ios/directory before building the iOS project that uses the Flutter module.
Embed a Flutter module in your iOS app
After you have developed your Flutter module, you can embed it using the methods described in the table at the top of the page.
You can run in Debug mode on a simulator or a real device, and Release mode on a real device.
info提示
Learn more about Flutter's build modes.
To use Flutter debugging features such as hot reload, consult Debugging your add-to-app module.
Use CocoaPods and the Flutter SDK
Approach
This first method uses CocoaPods to embed the Flutter modules. CocoaPods manages dependencies for Swift projects, including Flutter code and plugins. Each time Xcode builds the app, CocoaPods embeds the Flutter modules.
This allows rapid iteration with the most up-to-date version of your Flutter module without running additional commands outside of Xcode.
To learn more about CocoaPods, consult the CocoaPods getting started guide.
Watch the video
If watching a video helps you learn, this video covers adding Flutter to an iOS app:
Step by step on how to add Flutter to an existing iOS app
Requirements
Every developer working on your project must have a local version of the Flutter SDK and CocoaPods installed.
Example project structure
This section assumes that your existing app and the Flutter module reside in sibling directories. If you have a different directory structure, adjust the relative paths. The example directory structure resembles the following:
/path/to/MyApp
├── my_flutter/
│   └── .ios/
│       └── Flutter/
│         └── podhelper.rb
└── MyApp/
    └── Podfile
content_copy
Update your Podfile
Add your Flutter modules to your Podfile configuration file. This section presumes you called your Swift app MyApp.
-
(Optional) If your existing app lacks a
Podfileconfig file, navigate to the root of your app directory. Use thepod initcommand to create thePodfilefile.lightbulb小提示
If the
pod initcommand errors, check that you're on the latest version of CocoaPods. -
Update your
Podfileconfig file.-
Add the following lines after the
platformdeclaration.MyApp/Podfile
ruby
flutter_application_path = '../my_flutter'
load File.join(flutter_application_path, '.ios', 'Flutter', 'podhelper.rb')
content_copy
-
For each Podfile target that needs to embed Flutter, add a call to the
install_all_flutter_pods(flutter_application_path)method. Add these calls after the settings in the previous step.MyApp/Podfile
ruby
target 'MyApp' do
  install_all_flutter_pods(flutter_application_path)
end
content_copy
-
In the
Podfile'spost_installblock, add a call toflutter_post_install(installer). This block should be the last block in thePodfileconfig file.MyApp/Podfile
ruby
post_install do |installer|
  flutter_post_install(installer) if defined?(flutter_post_install)
end
content_copy
-
To review an example Podfile, consult this Flutter Podfile sample.
Embed your frameworks
At build time, Xcode packages your Dart code, each Flutter plugin, and the Flutter engine into their own *.xcframework bundles. CocoaPod's podhelper.rb script then embeds these *.xcframework bundles into your project.
Flutter.xcframeworkcontains the Flutter engine.App.xcframeworkcontains the compiled Dart code for this project.<plugin>.xcframeworkcontains one Flutter plugin.
To embed the Flutter engine, your Dart code, and your Flutter plugins into your iOS app, complete the following procedure.
-
Refresh your Flutter plugins.
If you change the Flutter dependencies in the
pubspec.yamlfile, runflutter pub getin your Flutter module directory. This refreshes the list of plugins that thepodhelper.rbscript reads.flutter pub getcontent_copy
-
Embed the plugins and frameworks with CocoaPods.
-
Navigate to your iOS app project at
/path/to/MyApp/MyApp. -
Use the
pod installcommand.pod installcontent_copy
Your iOS app's Debug and Release build configurations embed the corresponding Flutter components for that build mode.
-
-
Build the project.
-
Open
MyApp.xcworkspacein Xcode.Verify that you're opening
MyApp.xcworkspaceand not openingMyApp.xcodeproj. The.xcworkspacefile has the CocoaPod dependencies, the.xcodeprojdoesn't. -
Select Product > Build or press Cmd + B.
-
Set local network privacy permissions
On iOS 14 and later, enable the Dart multicast DNS service in the Debug version of your iOS app. This adds debugging functionalities such as hot-reload and DevTools using flutter attach.
warning请注意
Never enable this service in the Release version of your app. The Apple App Store might reject your app.
To set local network privacy permissions only in the Debug version of your app, create a separate Info.plist per build configuration. SwiftUI projects start without an Info.plist file. If you need to create a property list, you can do so through Xcode or text editor. The following instructions assume the default Debug and Release. Adjust the names as needed depending on your app's build configurations.
-
Create a new property list.
- Open your project in Xcode.
- In the Project Navigator, click on the project name.
- From the Targets list in the Editor pane, click on your app.
- Click the Info tab.
- Expand Custom iOS Target Properties.
- Right-click on the list and select Add Row.
- From the dropdown menu, select Bonjour Services. This creates a new property list in the project directory called
Info. This displays asInfo.plistin the Finder.
-
Rename the
Info.plisttoInfo-Debug.plist- Click on Info file in the project list at the left.
- In the Identity and Type panel at the right, change the Name from
Info.plisttoInfo-Debug.plist.
-
Create a Release property list.
- In the Project Navigator, click on
Info-Debug.plist. - Select File > Duplicate....
You can also press Cmd + Shift + S. - In the dialog box, set the Save As: field to
Info-Release.plistand click Save.
- In the Project Navigator, click on
-
Add the necessary properties to the Debug property list.
-
In the Project Navigator, click on
Info-Debug.plist. -
Add the String value
_dartVmService._tcpto the Bonjour Services array. -
(Optional) To set your desired customized permission dialog text, add the key Privacy - Local Network Usage Description.
![The property list with the Bonjour Services and Privacy - Local Network Usage Description keys added]()
TheInfo-Debugproperty list with the Bonjour Services and Privacy - Local Network Usage Description keys added
-
-
Set the target to use different property lists for different build modes.
-
In the Project Navigator, click on your project.
-
Click the Build Settings tab.
-
Click All and Combined sub-tabs.
-
In the Search box, type
plist.
This limits the settings to those that include property lists. -
Scroll through the list until you see Packaging.
-
Click on the Info.plist File setting.
-
Change the Info.plist File value from
path/to/Info.plisttopath/to/Info-$(CONFIGURATION).plist.![Updating the build setting to use build mode-specific property lists]()
Updating theInfo.plistbuild setting to use build mode-specific property listsThis resolves to the path Info-Debug.plist in Debug and Info-Release.plist in Release.
![The updated Info.plist File build setting displaying the configuration variations]()
The updated Info.plist File build setting displaying the configuration variations
-
-
Remove the Release property list from the Build Phases.
-
In the Project Navigator, click on your project.
-
Click the Build Phases tab.
-
Expand Copy Bundle Resources.
-
If this list includes
Info-Release.plist, click on it and then click the - (minus sign) under it to remove the property list from the resources list.![The Copy Bundle build phase displaying the Info-Release.plist setting. Remove this setting.]()
The Copy Bundle build phase displaying the Info-Release.plist setting. Remove this setting.
-
-
The first Flutter screen your Debug app loads prompts for local network permission.
Click OK.
(Optional) To grant permission before the app loads, enable Settings > Privacy > Local Network > Your App.


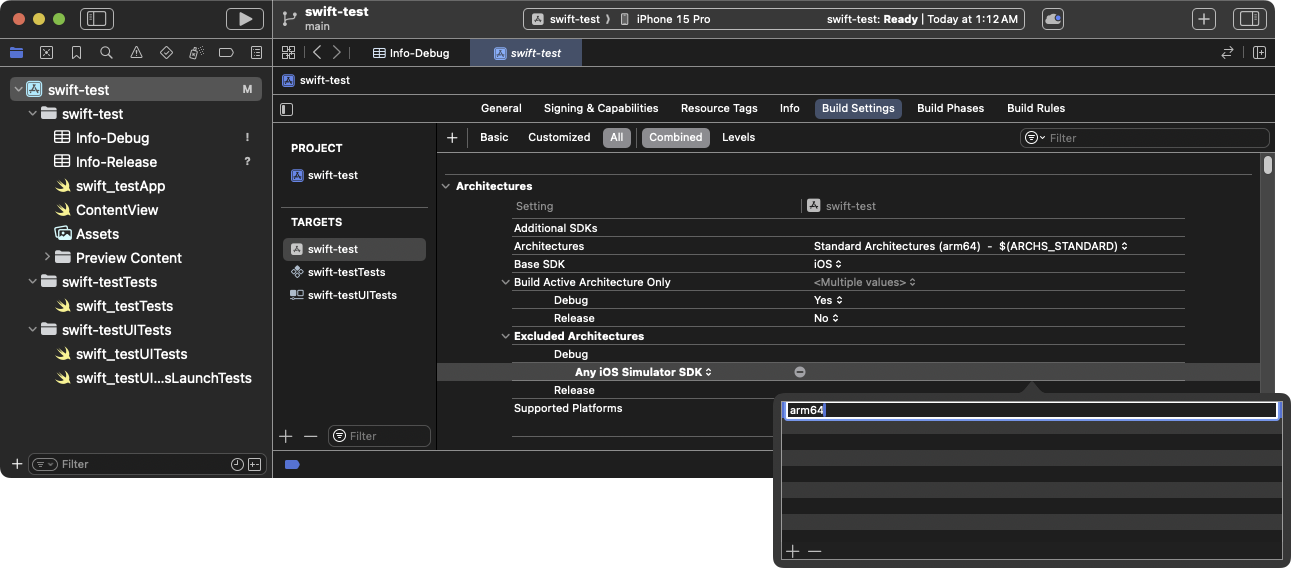
Mitigate known issue with Apple Silicon Macs
On Macs running Apple Silicon, the host app builds for an arm64 simulator. While Flutter supports arm64 simulators, some plugins might not. If you use one of these plugins, you might see a compilation error like Undefined symbols for architecture arm64. If this occurs, exclude arm64 from the simulator architectures in your host app.
-
In the Project Navigator, click on your project.
-
Click the Build Settings tab.
-
Click All and Combined sub-tabs.
-
Under Architectures, click on Excluded Architectures.
-
Expand to see the available build configurations.
-
Click Debug.
-
Click the + (plus sign).
-
Select iOS Simulator.
-
Double-click in the value column for Any iOS Simulator SDK.
-
Click the + (plus sign).
-
Type
arm64in the Debug > Any iOS Simulator SDK dialog box.![Add as an excluded architecture for your app]()
Addarm64as an excluded architecture for your app -
Press Esc to close this dialog box.
-
Repeat these steps for the Release build mode.
-
Repeat for any iOS unit test targets.

 浙公网安备 33010602011771号