


编写并运行集成测试
通过集成测试检查应用的功能
测试 Flutter 应用chevron_right通过集成测试检查应用的功能
This recipe describes how to use the integration_test package to run integration tests. The Flutter SDK includes the integration_test package. Integration tests using this package have the following properties.
- Use the
flutter drivecommand to run tests on a physical device or emulator. - Run on Firebase Test Lab, to automate testing on a variety of devices.
- Use flutter_test APIs to enable tests to be written in a style similar to widget tests
In this recipe, learn how to test a counter app.
- how to set up integration tests
- how to verify if an app displays specific text
- how to tap specific widgets
- how to run integration tests
This recipe uses the following steps:
- Create an app to test.
- Add the
integration_testdependency. - Create the test files.
- Write the integration test.
- Run the integration test.
Create a new app to test
Integration testing requires an app to test. This example uses the built-in Counter App example that Flutter produces when you run the flutter create command. The counter app allows a user to tap on a button to increase a counter.
-
To create an instance of the built-in Flutter app, run the following command in your terminal:
flutter create counter_appcontent_copy
-
Change into the
counter_appdirectory. -
Open
lib/main.dartin your preferred IDE. -
Add a
keyparameter to thefloatingActionButton()widget with an instance of aKeyclass with a string value ofincrement.dart
 floatingActionButton: FloatingActionButton(
   key: const ValueKey('increment'),
   onPressed: _incrementCounter,
   tooltip: 'Increment',
   child: const Icon(Icons.add),
 ),
content_copy
-
Save your
lib/main.dartfile.
After these changes, the lib/main.dart file should resemble the following code.
lib/main.dart
dart
import 'package:flutter/material.dart';

void main() => runApp(const MyApp());

class MyApp extends StatelessWidget {
  const MyApp({super.key});

  @override
  Widget build(BuildContext context) {
    return const MaterialApp(
      title: 'Counter App',
      home: MyHomePage(title: 'Counter App Home Page'),
    );
  }
}

class MyHomePage extends StatefulWidget {
  const MyHomePage({super.key, required this.title});

  final String title;

  @override
  State<MyHomePage> createState() => _MyHomePageState();
}

class _MyHomePageState extends State<MyHomePage> {
  int _counter = 0;

  void _incrementCounter() {
    setState(() {
      _counter++;
    });
  }

  @override
  Widget build(BuildContext context) {
    return Scaffold(
      appBar: AppBar(
        title: Text(widget.title),
      ),
      body: Center(
        child: Column(
          mainAxisAlignment: MainAxisAlignment.center,
          children: <Widget>[
            const Text(
              'You have pushed the button this many times:',
            ),
            Text(
              '$_counter',
              style: Theme.of(context).textTheme.headlineMedium,
            ),
          ],
        ),
      ),
      floatingActionButton: FloatingActionButton(
        // Provide a Key to this button. This allows finding this
        // specific button inside the test suite, and tapping it.
        key: const Key('increment'),
        onPressed: _incrementCounter,
        tooltip: 'Increment',
        child: const Icon(Icons.add),
      ),
    );
  }
}
content_copy
Add the integration_test dependency
You need to add the testing packages to your new app.
To add integration_test and flutter_test packages as dev_dependencies using sdk: flutter, run following command.
flutter pub add 'dev:integration_test:{"sdk":"flutter"}'
content_copy
Output:
Building flutter tool...
Resolving dependencies...
Got dependencies.
Resolving dependencies...
+ file 7.0.0
+ flutter_driver 0.0.0 from sdk flutter
+ fuchsia_remote_debug_protocol 0.0.0 from sdk flutter
+ integration_test 0.0.0 from sdk flutter
...
  test_api 0.6.1 (0.7.1 available)
  vm_service 13.0.0 (14.2.1 available)
+ webdriver 3.0.3
Changed 8 dependencies!
7 packages have newer versions incompatible with dependency constraints.
Try `flutter pub outdated` for more information.
content_copy
Updated pubspec.yaml file:
pubspec.yaml
yaml
# ...
dev_dependencies:
  # ... added dependencies
  flutter_test:
    sdk: flutter
  flutter_lints: ^5.0.0
  integration_test:
    sdk: flutter
# ...
content_copy
Create the integration test files
Integration tests reside in a separate directory inside your Flutter project.
- Create a new directory named
integration_test. - Add empty file named
app_test.dartin that directory.
The resulting directory tree should resemble the following:
counter_app/
  lib/
    main.dart
  integration_test/
    app_test.dart
content_copy
Write the integration test
The integration test file consists of a Dart code file with dependencies on integration_test, flutter_test, and your app's Dart file.
-
Open your
integration_test/app_test.dartfile in your preferred IDE. -
Copy the following code and paste it into your
integration_test/app_test.dartfile. The last import should point to themain.dartfile of yourcounter_app. (Thisimportpoints to the example app calledintroduction.)integration_test/counter_test.dart
dart
import 'package:flutter/material.dart';
import 'package:flutter_test/flutter_test.dart';
import 'package:how_to/main.dart';
import 'package:integration_test/integration_test.dart';

void main() {
  IntegrationTestWidgetsFlutterBinding.ensureInitialized();

  group('end-to-end test', () {
    testWidgets('tap on the floating action button, verify counter',
        (tester) async {
      // Load app widget.
      await tester.pumpWidget(const MyApp());

      // Verify the counter starts at 0.
      expect(find.text('0'), findsOneWidget);

      // Finds the floating action button to tap on.
      final fab = find.byKey(const ValueKey('increment'));

      // Emulate a tap on the floating action button.
      await tester.tap(fab);

      // Trigger a frame.
      await tester.pumpAndSettle();

      // Verify the counter increments by 1.
      expect(find.text('1'), findsOneWidget);
    });
  });
}
content_copy
This example goes through three steps:
- Initialize
IntegrationTestWidgetsFlutterBinding. This singleton service executes tests on a physical device. - Interact and test widgets using the
WidgetTesterclass. - Test the important scenarios.
Run integration tests
The integration tests that run vary depending on the platform on which you test.
- To test a desktop platform, use the command line or a CI system.
- To test a mobile platform, use the command line or Firebase Test Lab.
- To test in a web browser, use the command line.
Test on a desktop platform
Expand if you test Linux apps using a CI system
To test on a macOS, Windows, or Linux platform, complete the following tasks.
-
Run the following command from the root of the project.
flutter test integration_test/app_test.dartcontent_copy
-
If offered a choice of platform to test, choose the desktop platform. Type
1to choose the desktop platform.
Based on platform, the command result should resemble the following output.
PS C:\path\to\counter_app> flutter test .\integration_test\app_test.dart
Resolving dependencies...
Downloading packages...
  flutter_lints 3.0.2 (4.0.0 available)
  leak_tracker 10.0.4 (10.0.5 available)
  leak_tracker_flutter_testing 3.0.3 (3.0.5 available)
  lints 3.0.0 (4.0.0 available)
  material_color_utilities 0.8.0 (0.11.1 available)
  meta 1.12.0 (1.15.0 available)
  test_api 0.7.0 (0.7.1 available)
  vm_service 14.2.1 (14.2.2 available)
Got dependencies!
8 packages have newer versions incompatible with dependency constraints.
Try `flutter pub outdated` for more information.

Connected devices:

Windows (desktop) • windows • windows-x64    • Microsoft Windows [Version 10.0.22631.3593]
Chrome (web)      • chrome  • web-javascript • Google Chrome 124.0.6367.207
Edge (web)        • edge    • web-javascript • Microsoft Edge 124.0.2478.97

[1]: Windows (windows)
[2]: Chrome (chrome)
[3]: Edge (edge)

Please choose one (or "q" to quit): 1

00:00 +0: loading C:/path/to/counter_app/integration_test/app_test.dart               B
00:29 +0: loading C:/path/to/counter_app/counter_app/integration_test/app_test.dart   29.1s
√ Built build\windows\x64\runner\Debug\counter_app.exe
00:31 +1: All tests passed!
content_copy
Test on a mobile device
To test on a real iOS or Android device, complete the following tasks.
-
Connect the device.
-
Run the following command from the root of the project.
flutter test integration_test/app_test.dartcontent_copy
The result should resemble the following output. This example uses iOS.
flutter test integration_test/app_test.dart
00:04 +0: loading /path/to/counter_app/integration_test/app_test.dart
00:15 +0: loading /path/to/counter_app/integration_test/app_test.dart
00:18 +0: loading /path/to/counter_app/integration_test/app_test.dart   2,387ms
Xcode build done.                                           13.5s
00:21 +1: All tests passed!
content_copy
-
Verify that the test removed the Counter App when it finished. If not, subsequent tests fail. If needed, press on the app and choose Remove App from the context menu.
Test in a web browser
To test in a web browser, perform the following steps.
-
Install ChromeDriver into the directory of your choice.
npx @puppeteer/browsers install chromedriver@stablecontent_copy
To simplify the install, this command uses the
@puppeteer/browsersNode library. -
Add the path to ChromeDriver to your
$PATHenvironment variable. -
Verify the ChromeDriver install succeeded.
chromedriver --version
ChromeDriver 124.0.6367.60 (8771130bd84f76d855ae42fbe02752b03e352f17-refs/branch-heads/6367@{#798})
content_copy
-
In your
counter_appproject directory, create a new directory namedtest_driver.mkdir test_drivercontent_copy
-
In this directory, create a new file named
integration_test.dart. -
Copy the following code and paste it into your
integration_test.dartfile.test_driver/integration_test.dart
dart
import 'package:integration_test/integration_test_driver.dart';

Future<void> main() => integrationDriver();
content_copy
-
Launch
chromedriveras follows:chromedriver --port=4444content_copy
-
From the root of the project, run the following command:
flutter drive \
  --driver=test_driver/integration_test.dart \
  --target=integration_test/app_test.dart \
  -d chrome
content_copy
The response should resemble the following output:
Resolving dependencies...
  leak_tracker 10.0.0 (10.0.5 available)
  leak_tracker_flutter_testing 2.0.1 (3.0.5 available)
  leak_tracker_testing 2.0.1 (3.0.1 available)
  material_color_utilities 0.8.0 (0.11.1 available)
  meta 1.11.0 (1.14.0 available)
  test_api 0.6.1 (0.7.1 available)
  vm_service 13.0.0 (14.2.1 available)
Got dependencies!
7 packages have newer versions incompatible with dependency constraints.
Try `flutter pub outdated` for more information.
Launching integration_test/app_test.dart on Chrome in debug mode...
Waiting for connection from debug service on Chrome...             10.9s
This app is linked to the debug service: ws://127.0.0.1:51523/3lofIjIdmbs=/ws
Debug service listening on ws://127.0.0.1:51523/3lofIjIdmbs=/ws
00:00 +0: end-to-end test tap on the floating action button, verify counter
00:01 +1: (tearDownAll)
00:01 +2: All tests passed!
All tests passed.
Application finished.
content_copy
To run this as a headless test, run
flutter drivewith-d web-serveroption:flutter drive \ --driver=test_driver/integration_test.dart \ --target=integration_test/app_test.dart \ -d web-servercontent_copy
To learn more, see the Running Flutter driver tests with web wiki page.
Test using the Firebase Test Lab
To test both Android and iOS targets, you can use the Firebase Test Lab.
Android setup
Follow the instructions in the Android Device Testing section of the README.
iOS setup
Follow the instructions in the iOS Device Testing section of the README.
Test Lab project setup
-
Launch your Firebase Console.
-
Create a new Firebase project if necessary.
-
Navigate to Quality > Test Lab.
Upload an Android APK
-
Create an APK using Gradle.
pushd android
# flutter build generates files in android/ for building the app
flutter build apk
./gradlew app:assembleAndroidTest
./gradlew app:assembleDebug -Ptarget=integration_test/<name>_test.dart
popd
content_copy
Where
<name>_test.dartis the file created in the Project Setup section.
info提示
To use --dart-define with `gradlew:
-
Encode all parameters with
base64. -
Pass the parameters to gradle in a comma-separated list.
./gradlew project:task -Pdart-defines="{base64 (key=value)},[...]"content_copy
To start a Robo test and run other tests, drag the "debug" APK from <flutter_project_directory>/build/app/outputs/apk/debug into the Android Robo Test target on the web page.
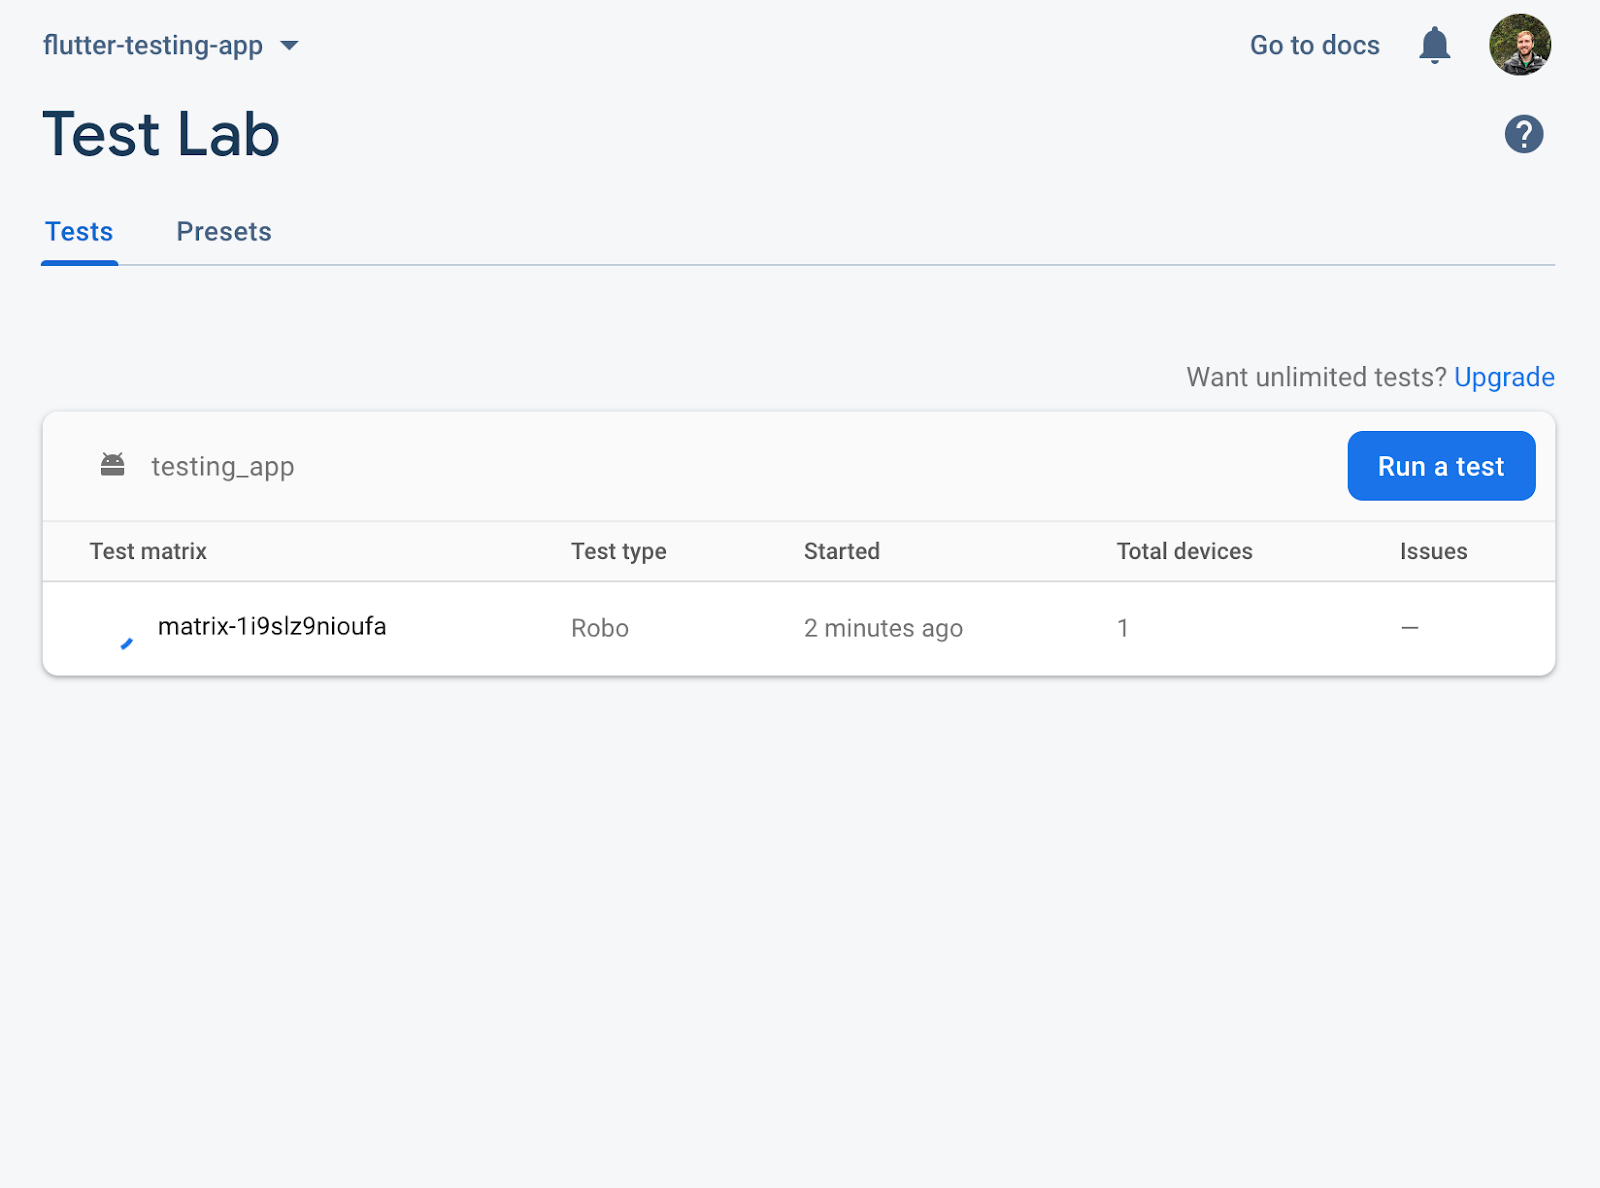
-
Click Run a test.
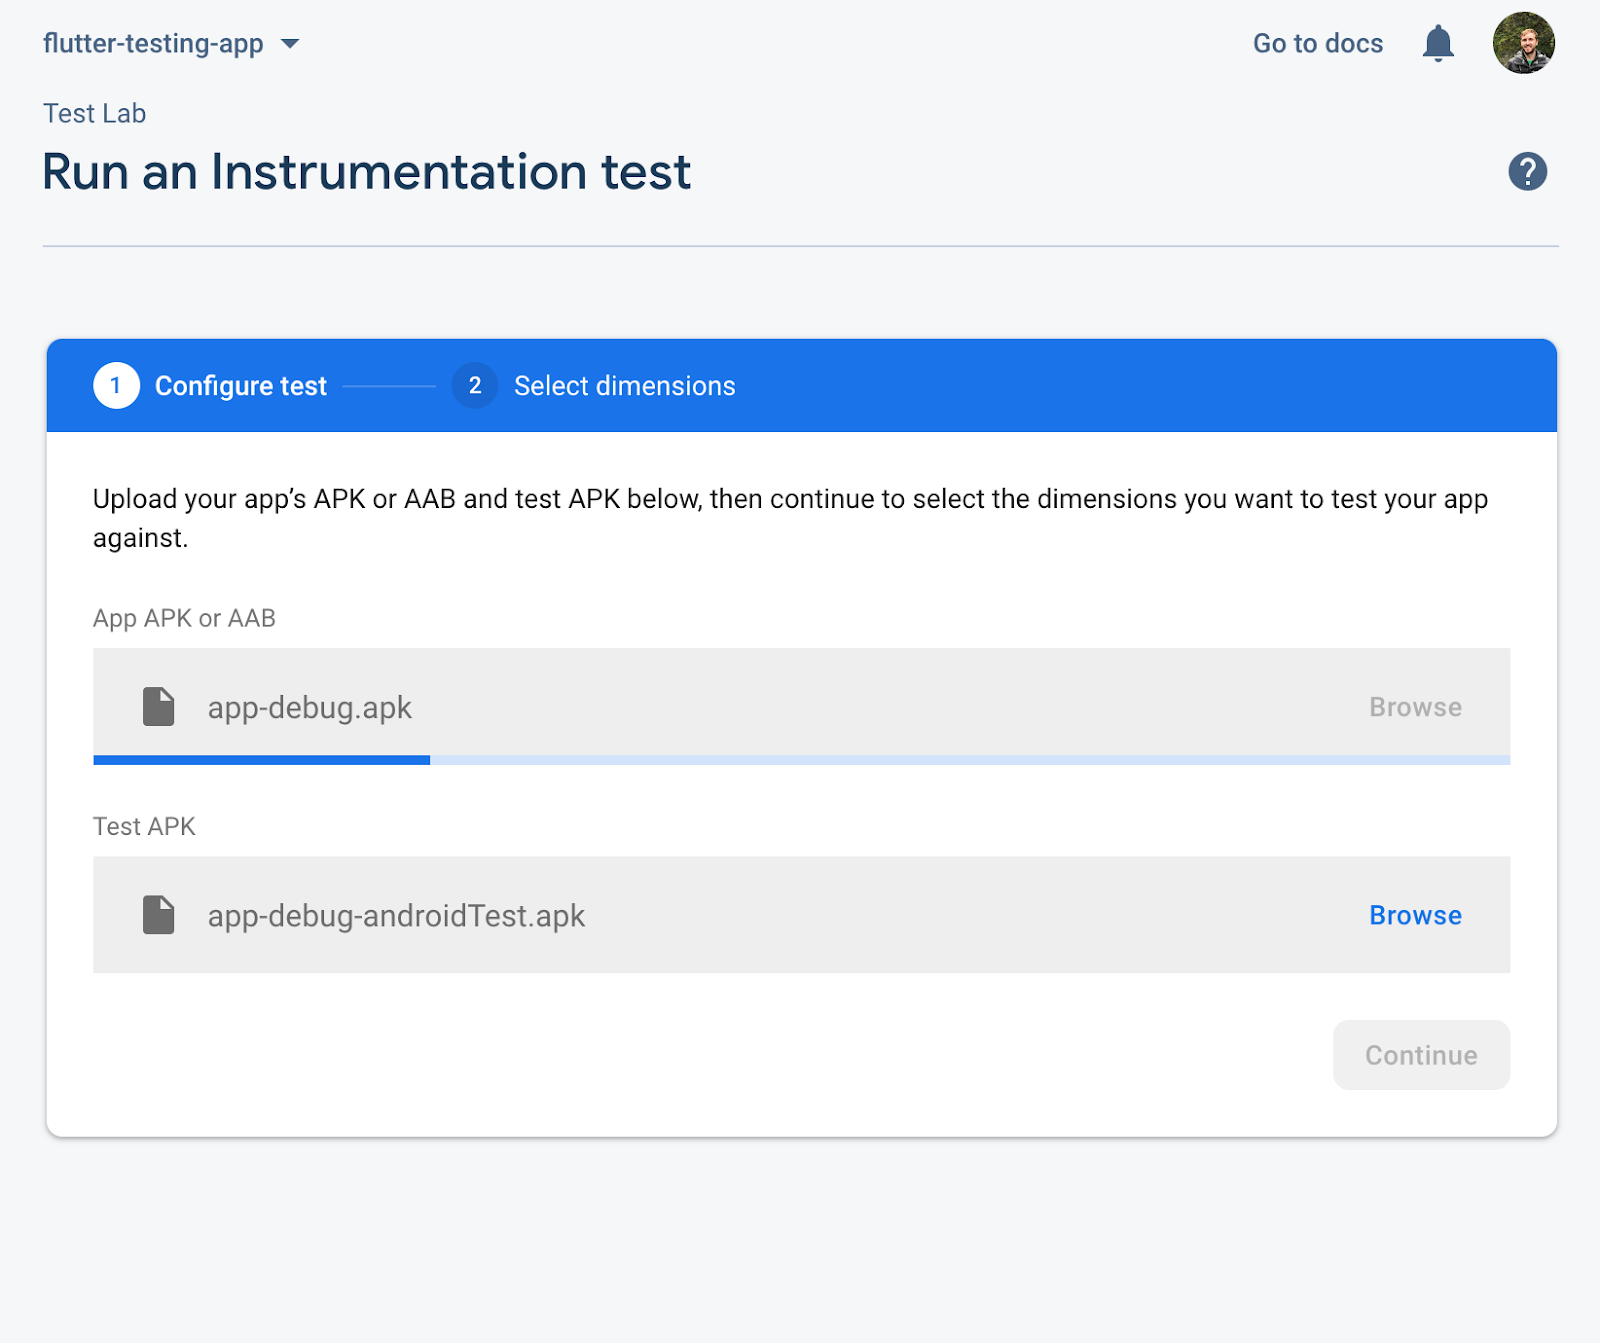
-
Select the Instrumentation test type.
-
Add the App APK to the App APK or AAB box.
<flutter_project_directory>/build/app/outputs/apk/debug/<file>.apk -
Add the Test APK to the Test APK box.
<flutter_project_directory>/build/app/outputs/apk/androidTest/debug/<file>.apk
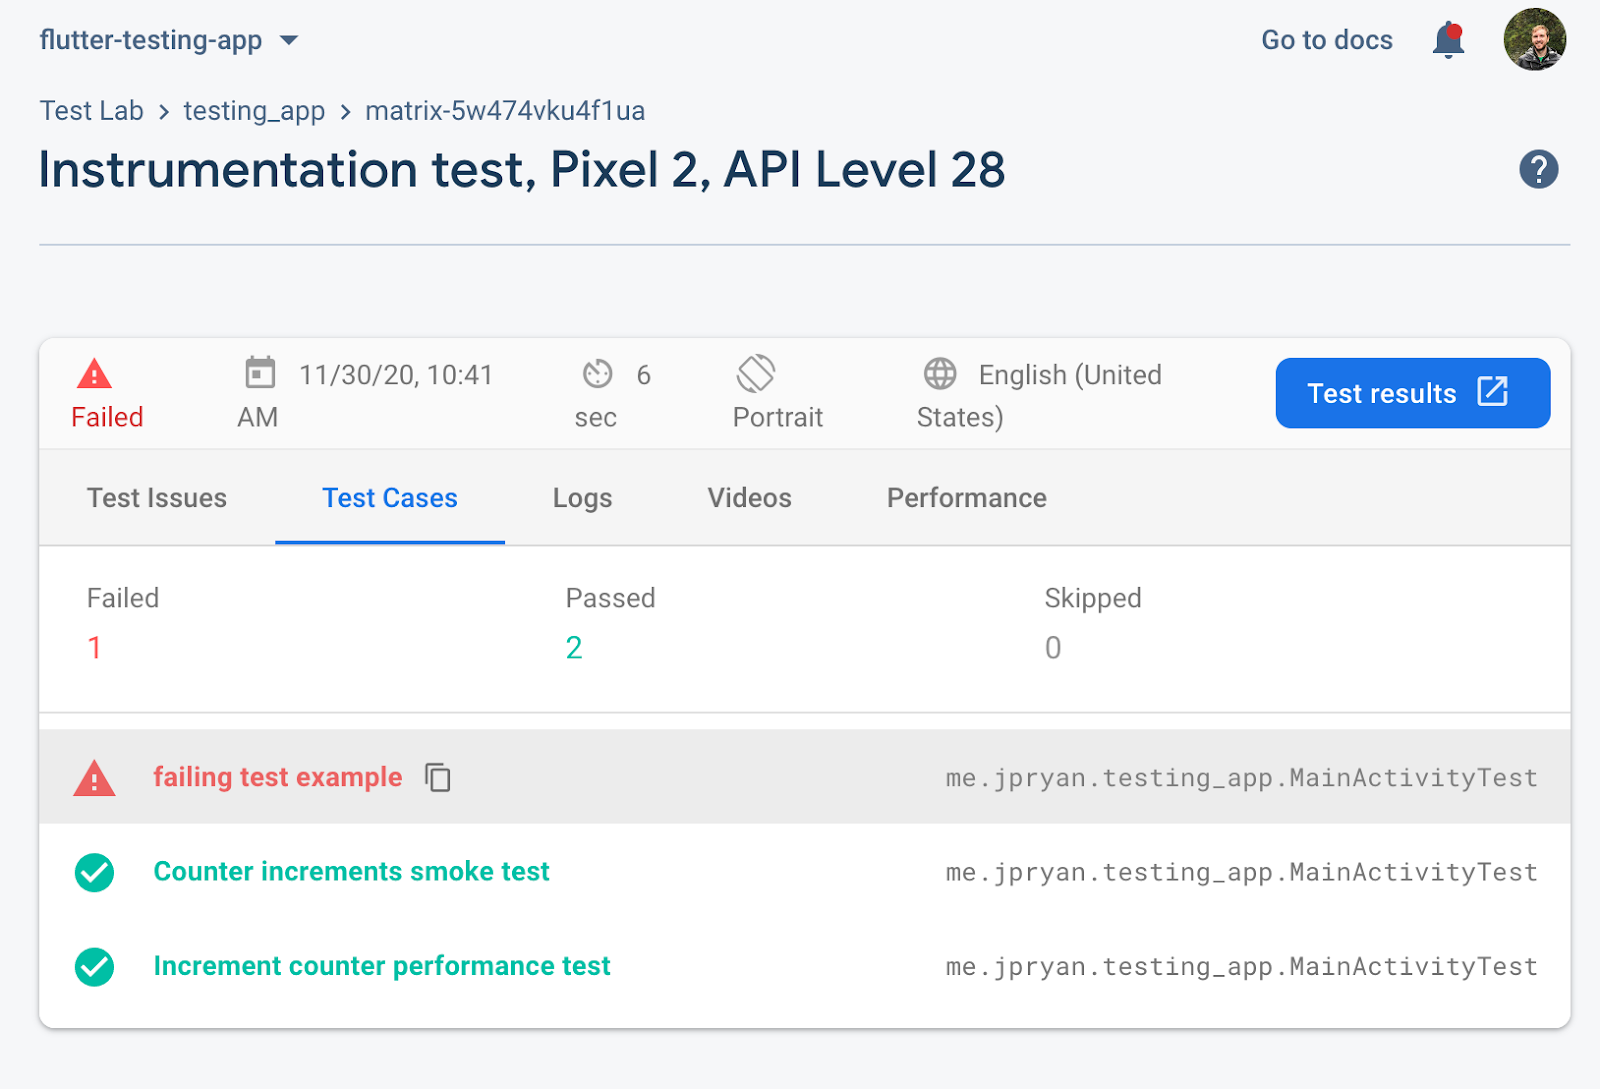
If a failure occurs, click the red icon to view the output:
Upload an Android APK from the command line
See the Firebase Test Lab section of the README for instructions on uploading the APKs from the command line.
Upload Xcode tests
To learn how to upload the .zip file, consult the Firebase TestLab iOS instructions on the Firebase TestLab section of the Firebase Console.


 浙公网安备 33010602011771号