


Swift Package Manager - 针对插件作者
Swift Package Manager for plugin authors
Packages & pluginschevron_rightSwift Package Manager for Flutterchevron_rightSwift Package Manager for plugin authors
warning请注意
Flutter is migrating to Swift Package Manager to manage iOS and macOS native dependencies. Flutter's support of Swift Package Manager is under development. The implementation might change in the future. Swift Package Manager support is only available on the main channel. Flutter continues to support CocoaPods.
Flutter's Swift Package Manager integration has several benefits:
- Access to the Swift package ecosystem. Flutter plugins can use the growing ecosystem of Swift packages!
- Simplifies Flutter installation. Swift Package Manager is bundled with Xcode. In the future, you won’t need to install Ruby and CocoaPods to target iOS or macOS.
If you find a bug in Flutter's Swift Package Manager support, open an issue.
How to turn on Swift Package Manager
Flutter's Swift Package Manager support is turned off by default. To turn it on:
-
Switch to Flutter's
mainchannel:sh
flutter channel main --no-cache-artifactscontent_copy
-
Upgrade to the latest Flutter SDK and download artifacts:
sh
flutter upgradecontent_copy
-
Turn on the Swift Package Manager feature:
sh
flutter config --enable-swift-package-managercontent_copy
Using the Flutter CLI to run an app migrates the project to add Swift Package Manager integration. This makes your project download the Swift packages that your Flutter plugins depend on. An app with Swift Package Manager integration requires Flutter version 3.24 or higher. To use an older Flutter version, you will need to remove Swift Package Manager integration from the app.
Flutter falls back to CocoaPods for dependencies that do not support Swift Package Manager yet.
How to turn off Swift Package Manager
Plugin authors
Plugin authors need to turn on and off Flutter's Swift Package Manager support for testing. App developers do not need to disable Swift Package Manager support, unless they are running into issues.
If you find a bug in Flutter's Swift Package Manager support, open an issue.
Disabling Swift Package Manager causes Flutter to use CocoaPods for all dependencies. However, Swift Package Manager remains integrated with your project. To remove Swift Package Manager integration completely from your project, follow the How to remove Swift Package Manager integration instructions.
Turn off for a single project
In the project's pubspec.yaml file, under the flutter section, add disable-swift-package-manager: true.
pubspec.yaml
yaml
# The following section is specific to Flutter packages.
flutter:
  disable-swift-package-manager: true
content_copy
This turns off Swift Package Manager for all contributors to this project.
Turn off globally for all projects
Run the following command:
sh
flutter config --no-enable-swift-package-manager
content_copy
This turns off Swift Package Manager for the current user.
If a project is incompatible with Swift Package Manager, all contributors need to run this command.
How to add Swift Package Manager support to an existing Flutter plugin
This guide shows how to add Swift Package Manager support to a plugin that already supports CocoaPods. This ensures the plugin is usable by all Flutter projects.
Flutter plugins should support both Swift Package Manager and CocoaPods until further notice.
Swift Package Manager adoption will be gradual. Plugins that don't support CocoaPods won't be usable by projects that haven't migrated to Swift Package Manager yet. Plugins that don't support Swift Package Manager can cause problems for projects that have migrated.
Replace plugin_name throughout this guide with the name of your plugin. The example below uses ios, replace ios with macos/darwin as applicable.
-
Start by creating a directory under the
ios,macos, and/ordarwindirectories. Name this new directory the name of the platform package.plugin_name/ios/ ├── ... └── plugin_name/ -
Within this new directory, create the following files/directories:
Package.swift(file)Sources(directory)Sources/plugin_name(directory)
Your plugin should look like:
plugin_name/ios/ ├── ... └── plugin_name/ ├── Package.swift └── Sources/plugin_name/ -
Use the following template in the
Package.swiftfile:Package.swift
swift
// swift-tools-version: 5.9
// The swift-tools-version declares the minimum version of Swift required to build this package.

import PackageDescription

let package = Package(
    // TODO: Update your plugin name.
    name: "plugin_name",
    platforms: [
        // TODO: Update the platforms your plugin supports.
        // If your plugin only supports iOS, remove `.macOS(...)`.
        // If your plugin only supports macOS, remove `.iOS(...)`.
        .iOS("12.0"),
        .macOS("10.14")
    ],
    products: [
        // TODO: Update your library and target names.
        // If the plugin name contains "_", replace with "-" for the library name.
        .library(name: "plugin-name", targets: ["plugin_name"])
    ],
    dependencies: [],
    targets: [
        .target(
            // TODO: Update your target name.
            name: "plugin_name",
            dependencies: [],
            resources: [
                // TODO: If your plugin requires a privacy manifest
                // (e.g. if it uses any required reason APIs), update the PrivacyInfo.xcprivacy file
                // to describe your plugin's privacy impact, and then uncomment this line.
                // For more information, see:
                // https://developer.apple.com/documentation/bundleresources/privacy_manifest_files
                // .process("PrivacyInfo.xcprivacy"),

                // TODO: If you have other resources that need to be bundled with your plugin, refer to
                // the following instructions to add them:
                // https://developer.apple.com/documentation/xcode/bundling-resources-with-a-swift-package
            ]
        )
    ]
)
content_copy
-
Update the supported platforms in your
Package.swiftfile.Package.swift
swift
    platforms: [
        // TODO: Update the platforms your plugin supports.
        // If your plugin only supports iOS, remove `.macOS(...)`.
        // If your plugin only supports macOS, remove `.iOS(...)`.
        .iOS("12.0"),
        .macOS("10.14")
    ],
content_copy
-
Update the package, library, and target names in your
Package.swiftfile.Package.swift
swift
let package = Package(
    // TODO: Update your plugin name.
    name: "plugin_name",
    platforms: [
        .iOS("12.0"),
        .macOS("10.14")
    ],
    products: [
        // TODO: Update your library and target names.
        // If the plugin name contains "_", replace with "-" for the library name
        .library(name: "plugin-name", targets: ["plugin_name"])
    ],
    dependencies: [],
    targets: [
        .target(
            // TODO: Update your target name.
            name: "plugin_name",
            dependencies: [],
            resources: [
                // TODO: If your plugin requires a privacy manifest
                // (e.g. if it uses any required reason APIs), update the PrivacyInfo.xcprivacy file
                // to describe your plugin's privacy impact, and then uncomment this line.
                // For more information, see:
                // https://developer.apple.com/documentation/bundleresources/privacy_manifest_files
                // .process("PrivacyInfo.xcprivacy"),

                // TODO: If you have other resources that need to be bundled with your plugin, refer to
                // the following instructions to add them:
                // https://developer.apple.com/documentation/xcode/bundling-resources-with-a-swift-package
            ]
        )
    ]
)
content_copy
info提示
If the plugin name contains
_, the library name must be a-separated version of the plugin name. -
If your plugin has a
PrivacyInfo.xcprivacyfile, move it toios/plugin_name/Sources/plugin_name/PrivacyInfo.xcprivacyand uncomment the resource in thePackage.swiftfile.Package.swift
swift
            resources: [
                // TODO: If your plugin requires a privacy manifest
                // (e.g. if it uses any required reason APIs), update the PrivacyInfo.xcprivacy file
                // to describe your plugin's privacy impact, and then uncomment this line.
                // For more information, see:
                // https://developer.apple.com/documentation/bundleresources/privacy_manifest_files
                .process("PrivacyInfo.xcprivacy"),

                // TODO: If you have other resources that need to be bundled with your plugin, refer to
                // the following instructions to add them:
                // https://developer.apple.com/documentation/xcode/bundling-resources-with-a-swift-package
            ],
content_copy
-
Move any resource files from
ios/Assetstoios/plugin_name/Sources/plugin_name(or a subdirectory). Add the resource files to yourPackage.swiftfile, if applicable. For more instructions, see https://developer.apple.com/documentation/xcode/bundling-resources-with-a-swift-package. -
Move all files from
ios/Classestoios/plugin_name/Sources/plugin_name. -
The
ios/Assets,ios/Resources, andios/Classesdirectories should now be empty and can be deleted. -
If your plugin uses Pigeon, update your Pigeon input file.
pigeons/messages.dart
dart
kotlinOptions: KotlinOptions(),
javaOut: 'android/app/src/main/java/io/flutter/plugins/Messages.java',
javaOptions: JavaOptions(),
swiftOut: 'ios/Classes/messages.g.swift',
swiftOut: 'ios/plugin_name/Sources/plugin_name/messages.g.swift',
swiftOptions: SwiftOptions(),
content_copy
-
Update your
Package.swiftfile with any customizations you might need.-
Open the
ios/plugin_name/directory in Xcode. -
In Xcode, open your
Package.swiftfile. Verify Xcode doesn't produce any warnings or errors for this file.lightbulb小提示
If Xcode doesn't show any files, quit Xcode (Xcode > Quit Xcode) and reopen.
If Xcode doesn't update after you make a change, try clicking File > Packages > Reset Package Caches.
-
If your
ios/plugin_name.podspecfile has CocoaPodsdependencys, add the corresponding Swift Package Manager dependencies to yourPackage.swiftfile. -
If your package must be linked explicitly
staticordynamic(not recommended by Apple), update the Product to define the type:Package.swift
swift
products: [
    .library(name: "plugin-name", type: .static, targets: ["plugin_name"])
],
content_copy
-
Make any other customizations. For more information on how to write a
Package.swiftfile, see https://developer.apple.com/documentation/packagedescription.lightbulb小提示
If you add targets to your
Package.swiftfile, use unique names. This avoids conflicts with targets from other packages.
-
-
Update your
ios/plugin_name.podspecto point to new paths.ios/plugin_name.podspec
ruby
s.source_files = 'Classes/**/*.swift'
s.resource_bundles = {'plugin_name_privacy' => ['Resources/PrivacyInfo.xcprivacy']}
s.source_files = 'plugin_name/Sources/plugin_name/**/*.swift'
s.resource_bundles = {'plugin_name_privacy' => ['plugin_name/Sources/plugin_name/PrivacyInfo.xcprivacy']}
content_copy
-
Update loading of resources from bundle to use
Bundle.module.swift
#if SWIFT_PACKAGE
     let settingsURL = Bundle.module.url(forResource: "image", withExtension: "jpg")
#else
     let settingsURL = Bundle(for: Self.self).url(forResource: "image", withExtension: "jpg")
#endif
content_copy
info提示
Bundle.moduleonly works if there are resources defined in thePackage.swiftfile or [automatically included by Xcode](https://developer.apple.com/documentation/xcode/bundling-resources-with-a-swift-package#:~:text=Xcode detects common resource types for Apple platforms and treats them as a resource automatically)). Otherwise, usingBundle.moduleresults in an error. -
Commit your plugin's changes to your version control system.
-
Verify the plugin still works with CocoaPods.
-
Turn off Swift Package Manager.
sh
flutter config --no-enable-swift-package-managercontent_copy
-
Navigate to the plugin's example app.
sh
cd path/to/plugin/example/content_copy
-
Ensure the plugin's example app builds and runs.
sh
flutter runcontent_copy
-
Navigate to the plugin's top-level directory.
sh
cd path/to/plugin/content_copy
-
Run CocoaPods validation lints.
sh
pod lib lint ios/plugin_name.podspec --configuration=Debug --skip-tests --use-modular-headers --use-librariescontent_copy
sh
pod lib lint ios/plugin_name.podspec --configuration=Debug --skip-tests --use-modular-headerscontent_copy
-
-
Verify the plugin works with Swift Package Manager.
-
Turn on Swift Package Manager.
sh
flutter config --enable-swift-package-managercontent_copy
-
Navigate to the plugin's example app.
sh
cd path/to/plugin/example/content_copy
-
Ensure the plugin's example app builds and runs.
sh
flutter runcontent_copy
info提示
Using the Flutter CLI to run the plugin's example app with the Swift Package Manager feature turned on migrates the project to add Swift Package Manager integration.
This raises the example app's Flutter SDK requirement to version 3.24 or higher.
If you'd like to run the example app using an older Flutter SDK version, do not commit the migration's changes to your version control system. If needed, you can always undo the Swift Package Manager migration.
-
Open the plugin's example app in Xcode. Ensure that Package Dependencies shows in the left Project Navigator.
-
-
Verify tests pass.
- If your plugin has native unit tests (XCTest), make sure you also update unit tests in the plugin's example app.
- Follow instructions for testing plugins.
How to update unit tests in a plugin's example app
If your plugin has native XCTests, you might need to update them to work with Swift Package Manager if one of the following is true:
- You're using a CocoaPod dependency for the test.
- Your plugin is explicitly set to
type: .dynamicin itsPackage.swiftfile.
To update your unit tests:
-
Open your
example/ios/Runner.xcworkspacein Xcode. -
If you were using a CocoaPod dependency for tests, such as
OCMock, you'll want to remove it from yourPodfilefile.ios/Podfile
ruby
target 'RunnerTests' do
  inherit! :search_paths

  pod 'OCMock', '3.5'
end
content_copy
Then in the terminal, run
pod installin theplugin_name_ios/example/iosdirectory. -
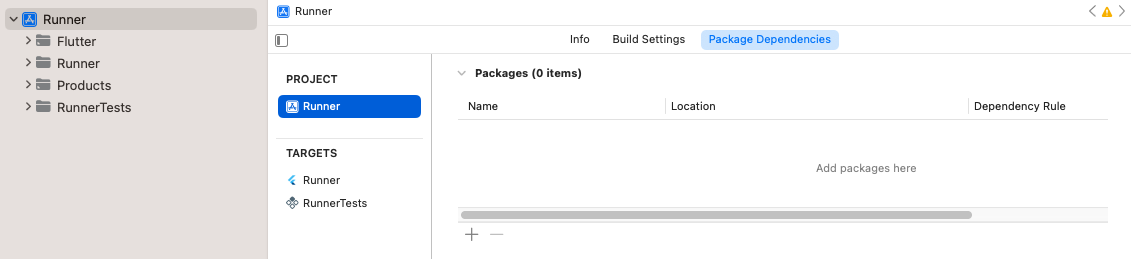
Navigate to Package Dependencies for the project.
![The project's package dependencies]()
The project's package dependencies -
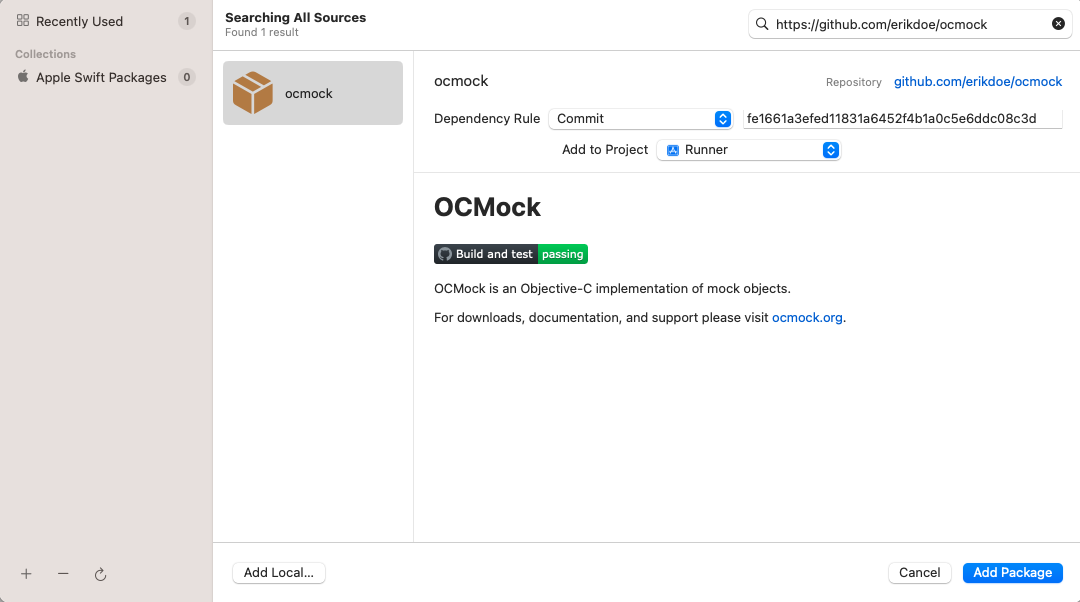
Click the + button and add any test-only dependencies by searching for them in the top right search bar.
![Search for test-only dependencies]()
Search for test-only dependenciesinfo提示
OCMock uses unsafe build flags and can only be used if targeted by commit.
fe1661a3efed11831a6452f4b1a0c5e6ddc08c3dis the commit for the 3.9.3 version. -
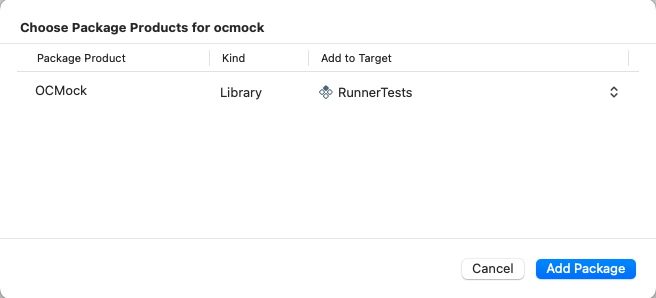
Ensure the dependency is added to the
RunnerTestsTarget.![Ensure the dependency is added to the target]()
Ensure the dependency is added to theRunnerTeststarget -
Click the Add Package button.
-
If you've explicitly set your plugin's library type to
.dynamicin itsPackage.swiftfile (not recommended by Apple), you'll also need to add it as a dependency to theRunnerTeststarget.-
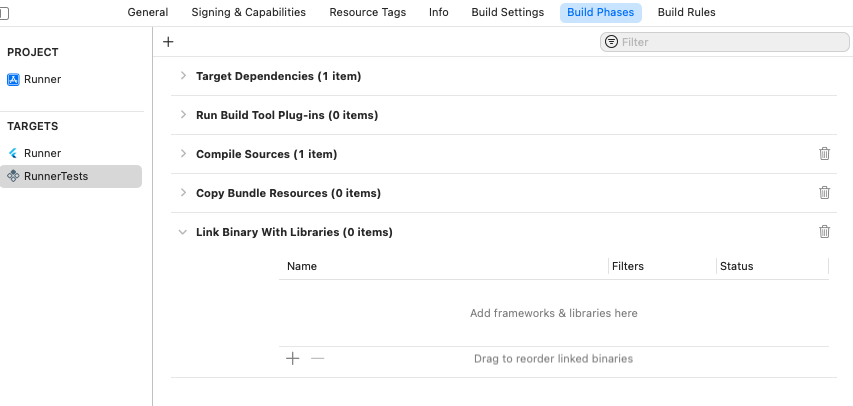
Ensure
RunnerTestsBuild Phases has a Link Binary With Libraries build phase:![The Build Phase in the target]()
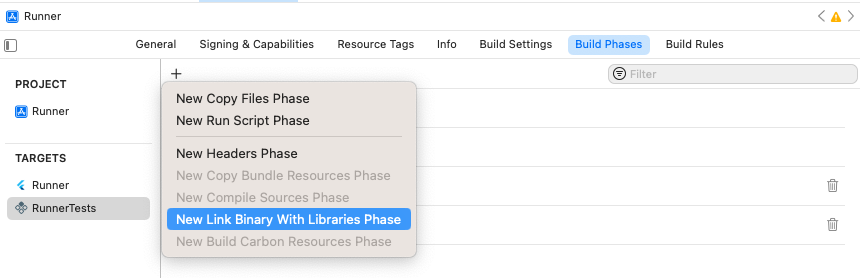
TheLink Binary With LibrariesBuild Phase in theRunnerTeststargetIf the build phase doesn't exist already, create one. Click the add and then click New Link Binary With Libraries Phase.
![Add Build Phase]()
AddLink Binary With LibrariesBuild Phase -
Navigate to Package Dependencies for the project.
-
Click add.
-
In the dialog that opens, click the Add Local... button.
-
Navigate to
plugin_name/plugin_name_ios/ios/plugin_name_iosand click the Add Package button. -
Ensure that it's added to the
RunnerTeststarget and click the Add Package button.
-
-
Ensure tests pass Product > Test.


 浙公网安备 33010602011771号