Java流
流分类
| 字节流 | 字符流 | |
输入流 |
InputStream | Reader |
输出流 |
OutputStream | Writer |
InputStream:BufferedInputStream、DataInputStream、ObjectInputStream
OutputStream:BufferedOutputStream、DataOutputStream、ObjectOutputStream、PrintStream
标准流:
System.in 、System.out 、System.err
重定向标准输入流、标准输出流、标准错误输出流
Reader:InputStreamReader、FileReader、BufferedReader、LineNumberReader
Writer:OutputStreamWriter、FileWriter、BufferedWriter、PrintWriter
字节流和字符流的区别
(1)读写单位不同:字节流以字节(8bit)为单位,字符流以字符为单位,根据码表映射字符,一次可能读多个字节。
(2)处理对象不同:字节流能处理所有类型的数据(如图片、avi等),而字符流只能处理字符类型的数据。
(3)字节流在操作的时候本身是不会用到缓冲区的,是文件本身的直接操作的;而字符流在操作的时候下后是会用到缓冲区的,是通过缓冲区来操作文件,我们将在下面验证这一点。
输入流和输出流的区别
(1)对输入流只能进行读操作,对输出流只能进行写操作,程序中需要根据待传输数据的不同特性而使用不同的流。
字节流结构图
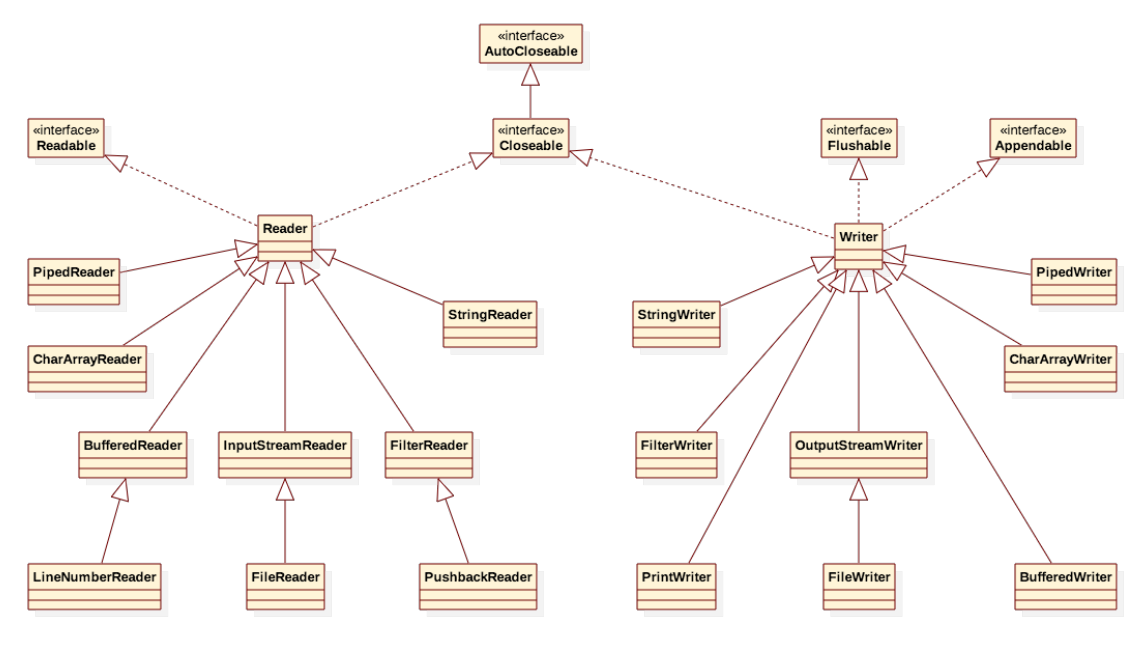
字节流常用类
1、FileInputStream和FileOutputStream
FileInputStream测试案例一:
package ecut.streams;

import java.io.FileInputStream;
import java.io.IOException;
import java.io.InputStream;

public class FileInputStreamTest1 {

    public static void main(String[] args) throws IOException {
        // 创建一个用来读取JavaAdvanced.txt文件的输入流
        InputStream in = new FileInputStream( "JavaAdvanced.txt" );//需要抛出FileNotFoundException
        // 声明一个变量用来记录读取到的单个字节
        int b ;
        // 每循环以次读取一个字节,并将读取到的字节赋值给 变量 n ,当到达流末尾时返回-1。
        //read()需要抛出IOException,IOException是FileNotFoundException的父类。
        while( ( b = in.read() ) != -1 ) {
            //(char)b将读取到的字节转换成字符类型,以便于在控制台中输出后查看
            char c = (char) b ;
            // 将每个字节对应的字符输出到控制台上(⽂件中的换⾏符号会当作换行处理,因此输出时不需要带换行)
            System.out.print(c );//中文可能会乱码
        }

        in.close();
    }

}
运行结果:
1ãFile and Stream :
InputStream : BufferedInputStream ãDataInputStream ãObjectInputStream
OuputStream : BufferedOuputStream ãDataOutputStream ãPrintStream ãObjectOutputStream
Reader : InputStreamReader ãFileReader ãBufferedReader ãLineNumberReader
Writer : OutputStreamWriter ãFileWriter ãBufferdWriter ãPrintWriter
..............
6ãProxy : 代ç
7ãjava.lang.annotation.Annotation
FileInputStream测试案例二:
package ecut.streams;

import java.io.FileInputStream;
import java.io.IOException;
import java.io.InputStream;

/**
 * FileInputStream 用于读取诸如图像数据之类的原始字节流,字节流不擅长读字符文件擅长 字节文件,要读取字符流,请考虑使用 FileReader。
 */
public class FileInputStreamTest2 {

    public static void main(String[] args) throws IOException {
        // 创建一个用来读取JavaAdvanced.txt文件的输入流
        InputStream in = new FileInputStream( "JavaAdvanced.txt" );//1388byte
        //false 不支持mark方法(  在此输入流中标记当前的位置)和reset方法(将此流重新定位到最后一次对此输入流调用 mark 方法时的位置。)因为没有缓冲区。
        System.out.print( in.markSupported());
        // 声明⼀个变量⽤来统计读取到的字节数
        int n ;
        // 声明并创建一个数组⽤来保存读取到的字节
        byte[] bytes = new byte[ 100 ];
        // 从 输入流中 读取 字节 到 数组中,并返回 实际读取到的 字节数,当到达流末尾时返回-1
        while( ( n = in.read( bytes ) ) != -1 ) {
            // 将 bytes 数组中的 [ 0 , n ) 之间的字节根据 平台默认编码构造字符串对象
            //不要调用String(byte bytes[])构造方法,若调用此构造方法最后一次会有12个byte读到之前的内容。
            String s = new String( bytes , 0 , n  );
            // 将本次读取到的字符串输出到控制台(文件中的换行符号会当作换行处理,因此输出时不需要带换行)
            System.out.print( s );
        }

        in.close();

    }

}
运行结果:
false

1、File and Stream :

    InputStream : BufferedInputStream 、DataInputStream 、ObjectInputStream

    OuputStream : BufferedOuputStream 、DataOutputStream 、PrintStream 、ObjectOutputStream

    Reader : InputStreamReader 、FileReader 、BufferedReader 、LineNumberReader

    Writer : OutputStreamWriter 、FileWriter 、BufferdWriter 、PrintWriter


    NIO :  1.4 ~ 1.6
    Buffer :  ByteBuffer 、CharBuffer 、MappedByteBuffer
    Charset :
    Channel : FileChannel


    1.7 :
    java.nio.file : Path 、Paths 、Files

2、Thread

      java.lang.Runnable
      java.lang.Thread

      线程调度: 优先级、sleep 、join 、yeild 、精灵线程

      线程同步: 同步代码块 、同步方法

      线程通信: 数据传递 ��协调运行( notify 、 wait )

      定时任务

..............

7、java.lang.annotation.Annotation
FileOutputStream测试案例一:
package ecut.streams;

import java.io.FileOutputStream;
import java.io.IOException;
import java.io.OutputStream;

public class FileOutputStreamTest1 {

    public static void main(String[] args) throws IOException {

        OutputStream out = new FileOutputStream( "abc.txt" );//默认创建到在当前工程底下
        //eclipse环境下所有的当前路径除了java.lang.Class 类的 getResourceAsStream 方法是类路径底下都是当前工程底下

        for( int i = 'A' ; i<= 'Z' ; i++ ){
            out.write( i );//写出的是字节,打开的时候eclipse文本工具将字节转换成了字符文件的
        }

        out.close();

    }

}
运行结果:
在当前工程下新增了acb.txt文件,文件内的内容是ABCDEFGHIJKLMNOPQRSTUVWXYZ
FileOutputStream测试案例二:
package ecut.streams;

import java.io.FileOutputStream;
import java.io.IOException;
import java.io.OutputStream;

public class FileOutputStreamTest2 {

    public static void main(String[] args) throws IOException {
        // 创建文件输出流
        OutputStream out = new FileOutputStream( "abc.txt" );
        // 声明一个字符串,这个字符串中的内容将被输出到指定文件中
        String s = "今天好热,热死了" ;
        System.out.println( s.length() );//8
        //byte[] bytes = s.getBytes("GBK"); //16
        // 根据平台默认字符集将给定的字符串编码为 byte 序列(一个byte数组)
        byte[] bytes = s.getBytes(); //24
        System.out.println( bytes.length );
        // 将 bytes 数组中的 [ 0 , 0 + 15 ) 之间的字节写出   今天好热,
        out.write( bytes , 0 , 15 );
        out.close();// 关闭文件输出流

    }

}
运行结果:
acb.txt文件内的内容变为 今天好热,
文件复制测试案例:
package ecut.streams;

import java.io.FileInputStream;
import java.io.FileOutputStream;
import java.io.IOException;
import java.io.InputStream;
import java.io.OutputStream;

public class CopyFile {

    public static void main(String[] args) throws IOException {

        InputStream in = new FileInputStream( "D:/JavaAdvancedTutorial_01_Files_and_Streams.pdf" );
        OutputStream out = new FileOutputStream( "JavaAdvancedTutorial_01_Files_and_Streams.pdf") ;

        long start = System.currentTimeMillis() ; // 程序执行到 当前行对应的时间 (毫秒)

        int n ;
        final byte[] bytes = new byte[ 1 << 20 ]; // 1024 : 1 < 10 ; 反复利用缓冲区
        while( ( n = in.read(bytes) ) != -1  ){
            out.write( bytes ,  0 ,  n );
        }

        long end = System.currentTimeMillis() ; // 程序执行到 当前行对应的时间 (毫秒)

        long duration = end - start ;

        System.out.println( "复制文件用时: " + duration + "ms." );

        out.close();//后开的先关
        in.close();//先开的后关

    }

}
运行结果如下:
复制文件用时: 80ms.
当前工程多了文件JavaAdvancedTutorial_01_Files_and_Streams.pdf
2、BufferedInputStream和BufferedOutputStream
BufferedInputStream测试案例一:
package ecut.streams;

import java.io.BufferedInputStream;
import java.io.FileInputStream;
import java.io.IOException;
import java.io.InputStream;

public class BufferedInputStreamTest1 {

    public static void main(String[] args) throws IOException {
        // 创建一个文件输入流
        InputStream in = new FileInputStream("./src/ecut/streams/BufferedInputStreamTest1.java");

        // 创建字节缓冲输入流。BufferedInputStream 内部有一个 默认 容量是 8192 字节数组 用来缓存 读取到的内容
        BufferedInputStream bis = new BufferedInputStream(in);
        // 声明一个变量用来记录读取到的字节数
        int n;
        // 声明并创建一个数组用来存储被读取到的字节
        byte[] bytes = new byte[8192];
        // 从字节缓冲输入流中读取数据到 字节数组中,并记录读取到的实际字节数,当到达流末尾时返回 -1
        while ((n = bis.read(bytes)) != -1) {
            // 将读取到的有效字节构造成字符串
            String s = new String(bytes, 0, n);
            System.out.print(s);
        }

        bis.close();// 关闭字节缓冲输人流
        in.close();// 关闭字节输入流

    }

}
部分源码:
    private static int DEFAULT_BUFFER_SIZE = 8192;

    public BufferedInputStream(InputStream in) {
        this(in, DEFAULT_BUFFER_SIZE);
    }

    public BufferedInputStream(InputStream in, int size) {
        super(in);
        if (size <= 0) {
            throw new IllegalArgumentException("Buffer size <= 0");
        }
        buf = new byte[size];
    }

    protected FilterInputStream(InputStream in) {
        this.in = in;
    }
BufferedInputStream 是具有缓冲功能的字节输入流。
每个 BufferedInputStream 对象内部都有一个字节数组用来缓存读取到的字节。
BufferedInputStream 是一个过滤流(包装流),它继承自 FilterInputStream 类。
运行结果如下:
package ecut.streams;

import java.io.BufferedInputStream;
import java.io.FileInputStream;
import java.io.IOException;
import java.io.InputStream;

public class BufferedInputStreamTest1 {

    public static void main(String[] args) throws IOException {
        // 创建一个文件输入流
        InputStream in = new FileInputStream("./src/ecut/streams/BufferedInputStreamTest1.java");

        // 创建字节缓冲输入流。BufferedInputStream 内部有一个 默认 容量是 8192 字节数组 用来缓存 读取到的内容
        BufferedInputStream bis = new BufferedInputStream(in);
        // 声明一个变量用来记录读取到的字节数
        int n;
        // 声明并创建一个数组用来存储被读取到的字节
        byte[] bytes = new byte[8192];
        // 从字节缓冲输入流中读取数据到 字节数组中,并记录读取到的实际字节数,当到达流末尾时返回 -1
        while ((n = bis.read(bytes)) != -1) {
            // 将读取到的有效字节构造成字符串
            String s = new String(bytes, 0, n);
            System.out.print(s);
        }

        bis.close();// 关闭字节缓冲输人流
        in.close();// 关闭字节输入流

    }

}
BufferedInputStream测试案例二:
package ecut.streams;

import java.io.BufferedInputStream;
import java.io.FileInputStream;
import java.io.IOException;
import java.io.InputStream;

/**
 * markSupported() 、mark( readlimit ) 、reset()
 */
public class BufferedInputStreamTest2 {

    public static void main(String[] args) throws IOException {

        InputStream in = new FileInputStream( "./src/ecut/streams/BufferedInputStreamTest2.java" );

        // BufferedInputStream 内部有一个 默认 容量是 8192 字节数组 用来缓存 读取到的内容
        BufferedInputStream bis = new BufferedInputStream( in );

        int b ;
        while( ( b = bis.read( ) ) != -1 ) {
            char ch = (char) b ;
            System.out.print( ch );
            if( ch == 'w'){
                 //在此输入流中标记当前的位置。
                bis.mark( 24250 ); // 在 当前位置处留下标记 ( markpos = pos ; )readlimit意义不大,注意clean flip rewind 三个方法。
            }
        }

        System.out.println( "\n~~~~~~~~~~~~~~~~~~~~~~~~" );
         //将此流重新定位到最后一次对此输入流调用 mark 方法时的位置
        bis.reset(); // 回到 做标记的位置

        while( ( b = bis.read( ) ) != -1 ) {
            char ch = (char) b ;
            System.out.print( ch );
        }

        bis.close();
        in.close();


    }

}
运行结果如下:
package ecut.streams;
import java.io.BufferedInputStream;
import java.io.FileInputStream;
import java.io.IOException;
import java.io.InputStream;
/**
* markSupported() ãmark( readlimit ) ãreset()
*/
public class BufferedInputStreamTest2 {
public static void main(String[] args) throws IOException {
InputStream in = new FileInputStream( "./src/ecut/streams/BufferedInputStreamTest2.java" );
// BufferedInputStream å é¨æä¸ä¸ª é»è®¤ 容éæ¯ 8192 åèæ°ç» ç¨æ¥ç¼å 读åå°çå 容
BufferedInputStream bis = new BufferedInputStream( in );
int b ;
while( ( b = bis.read( ) ) != -1 ) {
char ch = (char) b ;
System.out.print( ch );
if( ch == 'w'){
//å¨æ¤è¾å ¥æµä¸æ è®°å½åçä½ç½®ã
bis.mark( 24250 ); // å¨ å½åä½ç½®å¤çä¸æ è®° ( markpos = pos ; )readlimitæä¹ä¸å¤§ï¼æ³¨æclean flip rewind ä¸ä¸ªæ¹æ³ã
}
}
System.out.println( "\n~~~~~~~~~~~~~~~~~~~~~~~~" );
//å°æ¤æµéæ°å®ä½å°æåä¸æ¬¡å¯¹æ¤è¾å ¥æµè°ç¨ mark æ¹æ³æ¶çä½ç½®
bis.reset(); // åå° åæ è®°çä½ç½®
while( ( b = bis.read( ) ) != -1 ) {
char ch = (char) b ;
System.out.print( ch );
}
bis.close();
in.close();
}
}
~~~~~~~~~~~~~~~~~~~~~~~~
hile( ( b = bis.read( ) ) != -1 ) {
char ch = (char) b ;
System.out.print( ch );
}
bis.close();
in.close();
}
}
BufferedOutputStream测试案例:
package ecut.streams;

import java.io.BufferedOutputStream;
import java.io.FileOutputStream;
import java.io.IOException;
import java.io.OutputStream;

public class BufferedOuputStreamTest {

    public static void main(String[] args) throws IOException {

        OutputStream out = new FileOutputStream("buffer.txt");

        // 内部有一个 默认是 8192 大小的字节数组
        BufferedOutputStream bos = new BufferedOutputStream(out);

        byte[] bytes = "i am sinaean !".getBytes();
        // 好像并没有直接写磁盘减少对磁盘的读写次数,实际上最终还是将传入的out流一个字节一个字节的写出并没有提高多少效率
        bos.write(bytes); // 将 字节内容 写入 BufferedOutputStream 内部的缓冲区 ( byte 数组默认
                            // 大小是 8192)
        // bos.flush(); // 将 缓冲区中的内容 刷出 到 底层输出流

        bos.close(); // close 操作导致将 最后写入到 缓冲区的内容 刷出

        out.close();

    }

}
BufferedOutputStream 是具有缓冲功能的字节输出流。
每个 BufferedOutputStream 对象内部都有一个字节数组用来缓存将要输出的字节。
BufferedOutputStream 是一个过滤流(包装流),它继承自 FilterOutputStream 类。
部分源码:
public void write(byte b[]) throws IOException {
        write(b, 0, b.length);
    }

    public void write(byte b[], int off, int len) throws IOException {
        if ((off | len | (b.length - (len + off)) | (off + len)) < 0)
            throw new IndexOutOfBoundsException();

        for (int i = 0; i < len; i++) {
            write(b[off + i]);
        }
    }

    public void write(int b) throws IOException {
        out.write(b);
    }

    @SuppressWarnings("try")
    public void close() throws IOException {
        try (OutputStream ostream = out) {
            flush();
        }
    }
运行结果如下:
当前工程多了文件buffer.txt
3、DataInputStream和DataOutputStream
DataOutputStream测试案例:
package ecut.streams;

import java.io.DataOutputStream;
import java.io.FileOutputStream;
import java.io.IOException;
import java.io.OutputStream;
import java.util.Arrays;

/**
 * DataOutput 接口 用于将 任意 Java 基本类型转换为一系列字节,并将这些字节写入二进制流
 * DataOutputStream 类 实现了 DataOutput 接口
 */
public class DataOutputStreamTest {

    public static void main(String[] args) throws IOException{

        OutputStream out = new FileOutputStream( "binary.data" );//读写都是二进制数据

        DataOutputStream oos = new DataOutputStream( out );

        final byte[] nameBytes = new byte[32] ; // 假设一个人的姓名最多占32字节

        String name = "张三丰" ;
        byte[] bytes1 = name.getBytes();
        System.arraycopy( bytes1 ,  0 ,  nameBytes ,  0 , bytes1.length );

        oos.write( nameBytes ); // 将 nameBytes 数组 32 个字节 写入到 数据输出流中

        // char 占 2 个字节 ( byte )
        char gender = '男' ; // char类型的范围\u0000 ~ \uFFFF
        oos.writeChar( gender ); // 将一个 字符 对应的 2 个字节写入到 数据输出流

        // boolean 占 1 个 bit ( 写出到文件后占 1 个字节 )
        boolean married = false ;
        oos.writeBoolean( married ); // 将一个 boolean 值 对应的 1 个字节写入到 数据输出流

        System.out.println( "~~~~~~~~~~~~~~~~~~~~~" );

        name = "灭绝" ;
        byte[] bytes2 = name.getBytes();
        Arrays.fill( nameBytes , (byte)0 );//nemeBytes上次的时候占了9个字节“张三丰”,放入灭绝时候会变成灭绝丰因此需要还原一下数组
        System.arraycopy( bytes2 ,  0 ,  nameBytes ,  0 , bytes2.length );
        oos.write( nameBytes );
        gender = '女' ;
        oos.writeChar( gender );
        married = false ;
        oos.writeBoolean( married );

        oos.close();
        out.close();


    }

}
运行结果如下:
当前工程多了文件binary.data
DataInputStream测试案例:
package ecut.streams;

import java.io.DataInputStream;
import java.io.FileInputStream;
import java.io.IOException;
import java.io.InputStream;

public class DataInputStreamTest {

    public static void main(String[] args) throws IOException {
        InputStream in = new FileInputStream( "binary.data" );
        DataInputStream dis = new DataInputStream( in );

        final int size = dis.available();
        final int unit = 35 ;

        final int n = size / unit ;

        // final byte b = 0 ;
        final byte[] nameBytes = new byte[32] ;

        for( int i = 0 ; i < n ; i++ ){

            dis.read( nameBytes ); // 读取 32 个字节到 数组中

            String name = new String( nameBytes );
            System.out.println( name.trim() );

            char gender = dis.readChar(); // 读取 2 个字节构造成 char 类型
            System.out.println( gender );

            boolean married = dis.readBoolean() ; // 读取 1 个字节 构造成 booolean 类型数值
            System.out.println( married );

        }

        dis.close();
        in.close();
    }

}
运行结果如下:
张三丰
男
false
灭绝
女
fals
4、ObjectInputStream和ObjectOutputStream
序列化和反序列化:
序列化将 :JVM 中的 Java 对象转换为字节序列的过程称为对象的序列化( Serialization )。
反序列化:把字节序列恢复为 JVM 中的 Java 对象的过程称为对象的反序列化( Deserialization )。

在 Java 中可以通过实现 Serializable 或 Externalizable 接⼝口来⽀支持序列化操作,也可以⾃自定义序列化
源码:
package java.io;
public interface Serializable {
/** 序列化接⼜没有⽅法或字段,仅⽤于标识可序列化的语义 */
}
类通过实现 java.io.Serializable 接⼝口以启⽤用其序列化功能,未实现此接⼝口的类将⽆无法使其任何状态序列化或反序列化
实现 Serializable 接⼝口通常需要添加⼀一个 serialVersionUID 属性,每个类的该属性取值应尽量量与其它类的该属性值不不同。
ObjectOutputStream实现了接口ObejectOutput
ObejectOutput继承DataOutput(ObjectOutput 扩展 DataOutput 接⼝以包含对象的写入操作
DataOutput 包括基本类型的输出⽅方法,ObjectOutput 扩展了该接⼝,以包含对象、数组和 String 的输出⽅方法)
DataOutputStream是DataOutput的实现类
ObjectOutputStream测试案例:
package ecut.streams;

import java.io.Serializable;
import java.util.Date;

public class Student implements Serializable {

    private static final long serialVersionUID = 6570982037942763733L;//用于鉴别类,相当于身份证

    private Integer id;
    private String name;
    private char gender;

    private transient Date birthdate ;//被transient修饰的都不支持序列化操作

    public Student() {
        super();
    }

    public Student(Integer id, String name, char gender) {
        super();
        this.id = id;
        this.name = name;
        this.gender = gender;
    }

    public Integer getId() {
        return id;
    }

    public void setId(Integer id) {
        this.id = id;
    }

    public String getName() {
        return name;
    }

    public void setName(String name) {
        this.name = name;
    }

    public char getGender() {
        return gender;
    }

    public void setGender(char gender) {
        this.gender = gender;
    }

    public Date getBirthdate() {
        return birthdate;
    }

    public void setBirthdate(Date birthdate) {
        this.birthdate = birthdate;
    }

}
package ecut.streams;

import java.io.FileOutputStream;
import java.io.IOException;
import java.io.ObjectOutputStream;
import java.io.OutputStream;
import java.util.Calendar;
import java.util.Date;

public class SerializationTest {

    public static void main(String[] args) throws IOException {

        Calendar c = Calendar.getInstance();

        c.set( 1996 , 4 , 11 );//1996.5.11 月份从

        Date birthdate = c.getTime();


        // 创建一个可以输出到本地操作系统中指定文件的文件输出流(字节输出流)
        OutputStream out = new FileOutputStream( "student.ser" );
        //ObjectOutputStream处理流包装流
        /** 创建一个 可以将 JVM 中的指定对象 转换成 字节序列的流 ( 它只转换,不负责最终输出 )*/
        ObjectOutputStream oos = new ObjectOutputStream( out );//ObjectOutputStream实现了接口ObejectOutput,ObejectOutput继承DataOutput

        Student s = new Student( 100 , "张三丰" , '男' );

        s.setBirthdate( birthdate );

        // 将一个 支持 序列化的 类的对象 ,转换成 字节序列 写入 ObjectOuputStream 中
        oos.writeObject( s );

        oos.close();

        out.close();

    }

}
运行结果如下:
当前工程底下增加文件student.ser
ObjectInputStream测试案例:
package ecut.streams;

import java.io.FileInputStream;
import java.io.IOException;
import java.io.InputStream;
import java.io.ObjectInputStream;

public class DeserializationTest {

    public static void main(String[] args) throws IOException, ClassNotFoundException {

        // 读取指定文件中的字节序列的 字节输入流
        InputStream in = new FileInputStream("student.ser");

        /** 创建一个 可以将 字节序列 转换成 JVM 中的对象的 输入流 ( 转换流 ) */
        ObjectInputStream ois = new ObjectInputStream(in);

        // 从 ObjectInputStream 中读取字节序列并 "重构" 成 JVM 中的对象
        Object o = ois.readObject();// ClassNotFoundException
        System.out.println(o);// ecut.streams.Student@119d7047
        // instanceof用于安全转换,判断o是不是Student类型
        if (o instanceof Student) {
            Student s = (Student) o;
            System.out.println(s.getName());
            System.out.println(s.getBirthdate());//被transient修饰的都不支持序列化操作
        }
        ois.close();

        in.close();

    }

}
运行结果如下:
ecut.streams.Student@119d7047
张三丰
null
serialVersionUID 用于鉴别类,相当于身份证,只改变serialVersionUID不改变student.ser会抛出java.io.InvalidClassException,版本号不同就是不同的类
5、PrintStream
部分源码:
public
class FilterOutputStream extends OutputStream {

    protected OutputStream out;
.....................
public class PrintStream extends FilterOutputStream
    implements Appendable, Closeable
{

    private final boolean autoFlush;
    private boolean trouble = false;
    private Formatter formatter;


    private BufferedWriter textOut;
    private OutputStreamWriter charOut;
.......................
PrintStream 类继承了 FilterOutputStream 类 并 实现了 Appendable 接口,PrintStream 内部通过 OutputStreamWriter 将字节流转换成字符流,通过 BufferedWriter 将所要打印的内容缓存,从而支持 append 操作,与其它流不同,PrintStream 永远不会抛出 IOException(内部有checkError方法,异常情况仅设置可通过 checkError 方法测试的内部标志)。尽管 PrintStream 和 PrintWriter 都是 打印流,但是 应该尽量使用 PrintStream 除非是在 Servlet 中 才使用 PrintWriter ,否则尽量使用 PrintStream。
PrintStream测试案例:
package ecut.streams;

import java.io.FileNotFoundException;
import java.io.PrintStream;
import java.io.UnsupportedEncodingException;
//过滤流
public class PrintStreamTest {

    public static void main(String[] args) throws FileNotFoundException, UnsupportedEncodingException {

        PrintStream ps = new PrintStream( "print.txt" , "UTF-8" );

        ps.println( true );

        ps.print( 'A' );

        ps.println( "Z" ) ;

        ps.append( '东' );

        ps.append( "华理工" );//实现了Appendable接口

        ps.println();

        ps.close();

    }

}
运行结果如下:
在当前工程底下增加print.txt。
6、标准流
标准输入流测试案例:
package ecut.streams;

import java.io.BufferedReader;
import java.io.IOException;
import java.io.InputStream;
import java.io.InputStreamReader;
import java.util.Scanner;

public class StandardInputStreamTest {

    public static void main(String[] args) throws IOException {

        InputStream in = System.in ;// 标准输入流 ( 默认是读取 键盘输入 )
        /*Scanner s = new Scanner(in);
        String str;
        while((str = s.nextLine())!=null){
            System.out.print(str);
        }
        s.close();*/
        // 将 字节输入流 包装成 字符输入流
        InputStreamReader reader = new InputStreamReader( in );

        // 将 "字符输入流" 包装成 "带有缓冲功能的字符输入流"
        BufferedReader br = new BufferedReader( reader );

        String s ;
        System.out.println( "请输入数据: " );
        while( ( s = br.readLine() ) != null ) {
            System.out.println( "你输入的是: " + s );
            System.out.println( "请输入数据: " );
        }

        br.close();
        reader.close();
        in.close();
    }

}
运行结果如下:
请输入数据:
ddddd
你输入的是: ddddd
请输入数据:
fdjfj
你输入的是: fdjfj
请输入数据:
fdf
你输入的是: fdf
请输入数据:
vvvvv
你输入的是: vvvvv
请输入数据:

你输入的是:
请输入数据:
   d
你输入的是:    d
请输入数据:
vvv
你输入的是: vvv
请输入数据:
标准输出流错误输出流测试案例:
package ecut.streams;

public class StandardOutputStreamTest {

    public static void main(String[] args) {

        System.out.println( "Standard OutputStream" );

        System.err.println( "Standard Error OutputStream" );

    }

}
运行结果如下:
Standard OutputStreamStandard Error OutputStream
部分源码:
public final static PrintStream out = null;

public static void setOut(PrintStream out) {
        checkIO();
        setOut0(out);

}
private static native void setOut0(PrintStream out);
System 类中 setOut 方法的实现:调用了一个私有的本地方方法这个本地方法完成流的重新分配。由虚拟机完成最底层的方法去修改。
重定向标准输入流测试案例:
package ecut.streams;

import java.io.FileNotFoundException;
import java.io.PrintStream;

public class RedirectStandardStreamTest {

    public static void main(String[] args) throws FileNotFoundException {

        // 将标准输入流的默认输出位置保存起来
        final PrintStream defaultOut = System.out ;
        // 创建一个可以向指定文件中输出内容的打印流
        PrintStream out = new PrintStream( "standard.txt" );
        // 这句将输出到控制台中
        System.out.println( "redirect...." );
        // 重定向 "标准" 输出流到指定的打印流
        System.setOut( out );
        // 这句将输出到指定的打印流中
        System.out.println( "hello , print stream ." );
        // 这句将输出到指定的打印流中
        System.out.println( "back..." );

        // 将 标准输出流 改回默认的输出位置
        System.setOut( defaultOut );
        // 这句将输出到控制台中
        System.out.println( "i am back." );

    }

}
运行结果如下:
redirect....
i am back.
当前工程底下增加了文件standard.txt,内容是
hello , print stream .
back...
字符流结构图
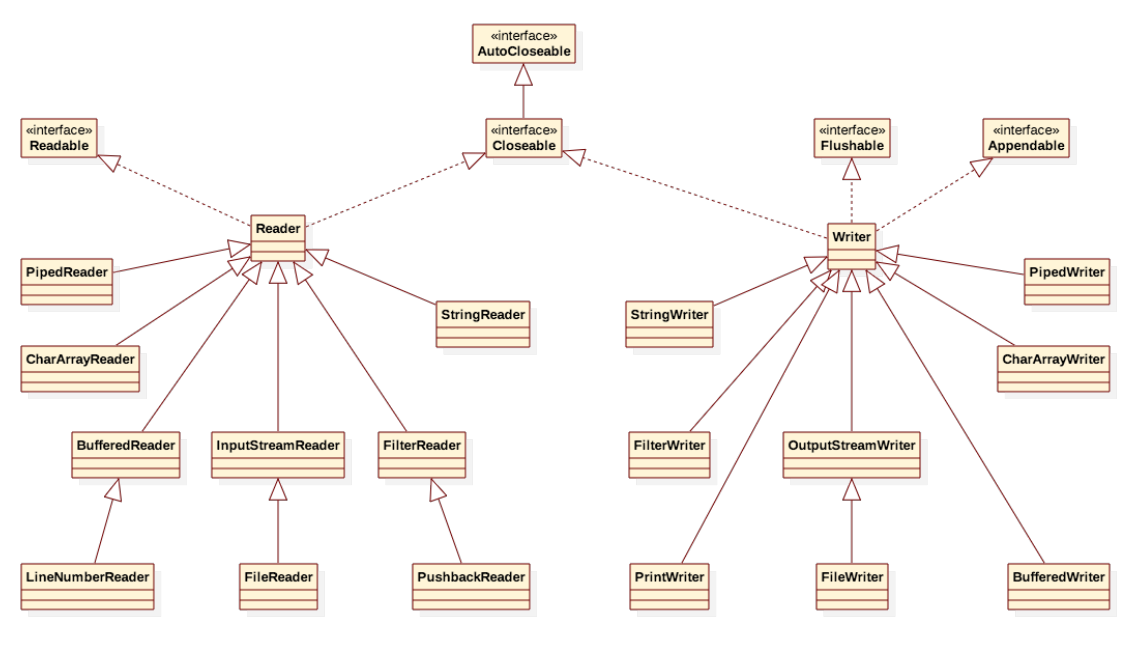
字符流常用类
1、InputStreamReader和OutputStreamWriter
InputStreamReader是一个转换流可以将字节输入转换为字符输入
InputStreamReader测试案例:
package ecut.streams;

import java.io.FileInputStream;
import java.io.IOException;
import java.io.InputStream;
import java.io.InputStreamReader;
import java.io.Reader;

public class InputStreamReaderTest {

    public static void main(String[] args) throws IOException {

        // 创建一个读取指定文件的 字节输入流
        InputStream in = new FileInputStream( "JavaAdvanced.txt" );
        // 一个字节字节的图会出现乱码现象
        /*
        int n ;
        byte[] bytes = new byte[ 32 ];
        while( ( n = in.read( bytes ) ) != -1 ){
            String s = new String( bytes , 0 , n ) ;
            System.out.print( s );
        }*/

        // 将 字节输入流  包装成 字符输入流
        Reader reader = new  InputStreamReader( in , "UTF-8" );//实现AutoCloseable(1.7出现的)最好指定编码格式


        /*
        int ch ;
        while( ( ch = reader.read() ) != -1 ){
            char c = (char) ch ;
            System.out.print( c );
        }*/
        int n ;
        char[] chars = new char[100] ;
        while( ( n = reader.read( chars ) ) != -1 ){
            String s = new String( chars , 0 , n );
            System.out.print( s );
        }


        in.close();

    }

}
运行结果如下:
1、File and Stream :

    InputStream : BufferedInputStream 、DataInputStream 、ObjectInputStream

    OuputStream : BufferedOuputStream 、DataOutputStream 、PrintStream 、ObjectOutputStream

    Reader : InputStreamReader 、FileReader 、BufferedReader 、LineNumberReader

    Writer : OutputStreamWriter 、FileWriter 、BufferdWriter 、PrintWriter


    NIO :  1.4 ~ 1.6
    Buffer :  ByteBuffer 、CharBuffer 、MappedByteBuffer
    Charset :
    Channel : FileChannel


    1.7 :
    java.nio.file : Path 、Paths 、Files

2、Thread

      java.lang.Runnable
      java.lang.Thread

      线程调度: 优先级、sleep 、join 、yeild 、精灵线程

      线程同步: 同步代码块 、同步方法

      线程通信: 数据传递 、协调运行( notify 、 wait )

      定时任务

....................
OutputStreamWriter可以将以字符为单位的输出数据转换成字节输出流。
OutputStreamWriter测试案例:
package ecut.streams;

import java.io.FileOutputStream;
import java.io.IOException;
import java.io.OutputStream;
import java.io.OutputStreamWriter;
import java.io.Writer;

public class OutputStreamWriterTest {

    public static void main(String[] args) throws IOException {

        // 创建一个可以输出到指定文件的 字节输出流
        OutputStream out = new FileOutputStream( "utf8.txt" );

        // 将 字符输出流 按照指定的 字符编码 转换成 字节输出流
        Writer w = new OutputStreamWriter( out , "UTF-8" );

        // 写出 字符串 中的字符,OutputStreamWriter 会将每个字符 根据指定的编码转换成字节序列
        w.write( "今天天气孬" );

        w.close();

        out.close();

    }

}
运行结果如下:
当前工程下增加了文件utf8.txt。
2、FileReader和FileWriter
FileReader测试案例:
package ecut.streams;

import java.io.FileWriter;
import java.io.IOException;
import java.io.Writer;

public class FileWriterTest {

    public static void main(String[] args) throws IOException {

        Writer w = new FileWriter( "file.txt" , true );

        w.append( "hello" );

        w.write( "world." );

        w.write( '\n' );

        w.close();

    }

}
Writer w = new FileWriter( "file.txt" , true );和InputStreamReaderTest中的InputStream in = new FileInputStream( "JavaAdvanced.txt" );Reader reader = new InputStreamReader( in , "UTF-8" );
一样。
运行结果如下:
1、File and Stream :

    InputStream : BufferedInputStream 、DataInputStream 、ObjectInputStream

    OuputStream : BufferedOuputStream 、DataOutputStream 、PrintStream 、ObjectOutputStream

    Reader : InputStreamReader 、FileReader 、BufferedReader 、LineNumberReader

    Writer : OutputStreamWriter 、FileWriter 、BufferdWriter 、PrintWriter


    NIO :  1.4 ~ 1.6
    Buffer :  ByteBuffer 、CharBuffer 、MappedByteBuffer
    Charset :
    Channel : FileChannel


    1.7 :
    java.nio.file : Path 、Paths 、Files

2、Thread

      java.lang.Runnable
      java.lang.Thread

      线程调度: 优先级、sleep 、join 、yeild 、精灵线程

   ..................
FileWriter测试案例:
package ecut.streams;

import java.io.FileWriter;
import java.io.IOException;
import java.io.Writer;

public class FileWriterTest {

    public static void main(String[] args) throws IOException {

        Writer w = new FileWriter( "file.txt" , true );//指定是否追加

        w.append( "hello" );

        w.write( "world." );

        w.write( '\n' );

        w.close();

    }

}
运行结果如下:
当前工程下新增文件file.txt。
字符编码转换测试案例:
package ecut.streams;

import java.io.File;
import java.io.FileInputStream;
import java.io.FileOutputStream;
import java.io.IOException;
import java.io.InputStream;
import java.io.InputStreamReader;
import java.io.OutputStream;
import java.io.OutputStreamWriter;

public class EncodingConverter {

    public static void main(String[] args) throws IOException {

        final File source = new File( "gbk.txt" );
        final String sourceEncoding = "GBK" ;

        InputStream in = new FileInputStream( source );
        InputStreamReader reader = new InputStreamReader( in , sourceEncoding ) ;

        final File dest = new File( "dest.txt" );
        final String destEncoding = "UTF-8" ;

        OutputStream out = new FileOutputStream( dest );
        OutputStreamWriter writer = new OutputStreamWriter( out ,  destEncoding );

        int n ;
        char[] chars = new char[ 100 ];
        while( ( n = reader.read( chars ) ) != -1 ){
            writer.write( chars ,  0 ,  n );
            writer.flush();
        }

        writer.close();
        out.close();

        reader.close();
        in.close();

    }

}
运行结果如下:
当前工程下新增文件dest.txt。
3、BufferedReader和BufferedWriter
BufferedReader测试案例:
package ecut.streams;

import java.io.BufferedReader;
import java.io.FileReader;
import java.io.IOException;
import java.io.Reader;

/**
 * 因为 BufferedReader 有缓冲区,因此支持 mark 和 reset 操作
 * 注意自己指定 缓冲区 大小
 */
public class BufferedReaderTest {

    public static void main(String[] args) throws IOException {
        // 创建一个可以读取指定文件内容的字符输入流
        Reader reader = new FileReader( "./src/ecut/streams/BufferedReaderTest.java" )  ;
        // 将指定的字符输入流包装成 字符缓冲输入流
        BufferedReader br = new BufferedReader( reader );

        /*
        int ch ;
        // 每次读取一个字符,连换行符 ( \n 或 10 ) 也要读取
        while( ( ch = br.read() ) != -1 ){
            System.out.print( (char) ch );
        }*/
        // 声明一个变量用来接收从缓冲输入流中读取到的字符串
        String s ;
        // 从字符缓冲输入流中读取一行数据( 遇到换行符即停止),当到达流末尾时返回 null
        while( ( s = br.readLine() ) != null ) {
            // 将读取到的字符串输出到控制台
            System.out.println( s );
        }

        br.close();

        reader.close();

    }

}
BufferedReader 类内部采用 char 数组(默认大小为8192)来缓存读入的字符。
BufferedReader 从字符输入流中读取文本,缓冲各个字符,从而实现字符、数组和行的高效读取
BufferedReader 类几乎重写了 Reader 中的所有方法,另外增加了 readLine 方法
运行结果如下:
package ecut.streams;

import java.io.BufferedReader;
import java.io.FileReader;
import java.io.IOException;
import java.io.Reader;

/**
 * 因为 BufferedReader 有缓冲区,因此支持 mark 和 reset 操作
 * 注意自己指定 缓冲区 大小
 */
public class BufferedReaderTest {

    public static void main(String[] args) throws IOException {
        // 创建一个可以读取指定文件内容的字符输入流
        Reader reader = new FileReader( "./src/ecut/streams/BufferedReaderTest.java" )  ;
        // 将指定的字符输入流包装成 字符缓冲输入流
        BufferedReader br = new BufferedReader( reader );

        /*
        int ch ;
        // 每次读取一个字符,连换行符 ( \n 或 10 ) 也要读取
        while( ( ch = br.read() ) != -1 ){
            System.out.print( (char) ch );
        }*/
        // 声明一个变量用来接收从缓冲输入流中读取到的字符串
        String s ;
        // 从字符缓冲输入流中读取一行数据( 遇到换行符即停止),当到达流末尾时返回 null
        while( ( s = br.readLine() ) != null ) {
            // 将读取到的字符串输出到控制台
            System.out.println( s );
        }

        br.close();

        reader.close();

    }

}
BufferedWriter测试案例:
package ecut.streams;

import java.io.BufferedWriter;
import java.io.FileWriter;
import java.io.IOException;
import java.io.Writer;

public class BufferdWriterTest {

    public static void main(String[] args) throws IOException {

        Writer writer = new FileWriter( "writer.txt" );

        BufferedWriter bw = new BufferedWriter( writer );

        bw.write( "hello" );

        //bw.flush();

        bw.close();
        writer.close();

    }

}
BufferedWriter 类内部采用 char 数组(默认大小为8192)来缓存将要被输出的字符。
BufferedWriter 将文本写入字符输出流,缓冲各个字符,从而提供单个字符、数组和字符串的高效写入。
BufferedWriter 类另外增加了 newLine 方法,用来向输出缓冲区中写入一个行分隔符。
运行结果如下:
当前工程下新增文件writer.txt。
4、LineNumberReader
LineNumberReader测试案例:
package ecut.streams;

import java.io.FileReader;
import java.io.IOException;
import java.io.LineNumberReader;
import java.io.Reader;

public class LineNumberReaderTest {

    public static void main(String[] args) throws IOException{

        Reader reader = new FileReader( "./src/ecut/streams/LineNumberReaderTest.java" )  ;

        LineNumberReader br = new LineNumberReader( reader );

        String s ;
        // 每次读取一行内容 ( 遇到换行符即停止 )
        while( ( s = br.readLine() ) != null ) {
            System.out.println( br.getLineNumber() + " : " + s );
        }

        br.close();

        reader.close();

    }

}
运行结果如下:
1 : package ecut.streams;
2 :
3 : import java.io.FileReader;
4 : import java.io.IOException;
5 : import java.io.LineNumberReader;
6 : import java.io.Reader;
7 :
8 : public class LineNumberReaderTest {
9 :
10 :     public static void main(String[] args) throws IOException{
11 :
12 :         Reader reader = new FileReader( "./src/ecut/streams/LineNumberReaderTest.java" )  ;
13 :
14 :         LineNumberReader br = new LineNumberReader( reader );
15 :
16 :         String s ;
17 :         // 每次读取一行内容 ( 遇到换行符即停止 )
18 :         while( ( s = br.readLine() ) != null ) {
19 :             System.out.println( br.getLineNumber() + " : " + s );
20 :         }
21 :
22 :         br.close();
23 :
24 :         reader.close();
25 :
26 :     }
27 :
28 : }
5、PrintWriter
PrintWriter测试案例:
package ecut.streams;

import java.io.FileNotFoundException;
import java.io.PrintWriter;
import java.io.UnsupportedEncodingException;

public class PrintWriterTest {

    public static void main(String[] args) throws FileNotFoundException, UnsupportedEncodingException {

        PrintWriter pw = new PrintWriter( "pw.txt" , "UTF-8");

        pw.append( "hello , " );

        pw.println( " world " );

        pw.print( '!' );

        pw.close();

    }

}
尽管 PrintStream 和 PrintWriter 都是 打印流,但是 应该尽量使用 PrintStream除非是在 Servlet 中 才使用 PrintWriter ,否则尽量使用 PrintStream。
运行结果如下:
当前工程下新增文件pw.txt。
RandomAccessFile类
RandomAccessFile不是流但是可以读写文件, 没有继承 InputStream 、OutputStream 、Reader 、Writer ,但是 RandomAccessFile 实现了 DataOutput , DataInput , Closeable。
RandomAccessFile测试案例:
package ecut.streams;

import java.io.IOException;
import java.io.RandomAccessFile;
import java.util.Arrays;

public class RandomAccessFileTest1 {

    public static void main(String[] args) throws IOException {

        final byte b = 0 ;
        final byte[] nameBytes = new byte[32] ;

        String name = "" ;
        char gender ;
        boolean married = false ; // 表示是否结婚的变量 ( JVM 中 boolean 占 1 个 位 ( 1 bit ) )


        String filename = "student.data" ;
        String mode = "rw" ;//     打开以便读取和写入
        RandomAccessFile raf = new RandomAccessFile( filename , mode );
        raf.setLength( 70 );

        raf.seek( 35 ); // 将 文件指针 调整到 35

        name = "奥斯特洛夫斯基" ;
        byte[] bytes = name.getBytes(); // 长度是 21
        Arrays.fill( nameBytes ,  b );//将数组填充为初始状态
        System.arraycopy( bytes , 0 , nameBytes,  0 , bytes.length );//bytes拷贝到nameBytes
        raf.write( nameBytes ); // 写出一个 长度为 32 字节的数组

        gender = '男' ;
        raf.writeChar( gender ); // 写出一个 字符 占 2 个字节

        married = true ;
        raf.writeBoolean( married ); // 写出一个 boolean 值,占 1 字节

        long pointer = raf.getFilePointer() ; // 获得  "文件指针" 的 当前位置
        System.out.println( "pointer :" + pointer );

        System.out.println( "~~~~~~~~~~~~~~~~~~~~~~~~~~~~");

        raf.seek( 35 );

        raf.read( nameBytes );  // 读取 32 个字节到数组中
        name = new String( nameBytes ).trim() ;

        gender = raf.readChar(); // 读取 2 个字节 并重构成 char 类数值

        married = raf.readBoolean() ; // 读取 1 个字节,并根据这个字节中的那一个位重构 boolean 数值

        System.out.println( name + " , " + gender + " , " + married ) ;

        pointer = raf.getFilePointer() ; // 获得  "文件指针" 的 当前位置
        System.out.println( "pointer :" + pointer );


        raf.close();

    }

}
RandomAccessFile 类的实例支持对随机访问文件的读取和写入,任意访问文件的行为类似存储在文件系统中的一个大型 byte 数组,存在指向该隐含数组的光标或索引,称为文件指针,可以通过getFilePointer()来获取它或用seek()来设置它输入操作从文件指针开始读取字节,并随着对字节的读取而前移此文件指针,如果是读写模式,也可以从文件指针开始写入字节,并随着对字节的写入而前移此文件指针。如果此类中的所有读取例程在读取所需数量的字节之前已到达文件末尾,则抛出 EOFException(是一种 IOException)。
运行结果如下:
pointer :70
~~~~~~~~~~~~~~~~~~~~~~~~~~~~
奥斯特洛夫斯基 , 男 , true
pointer :70
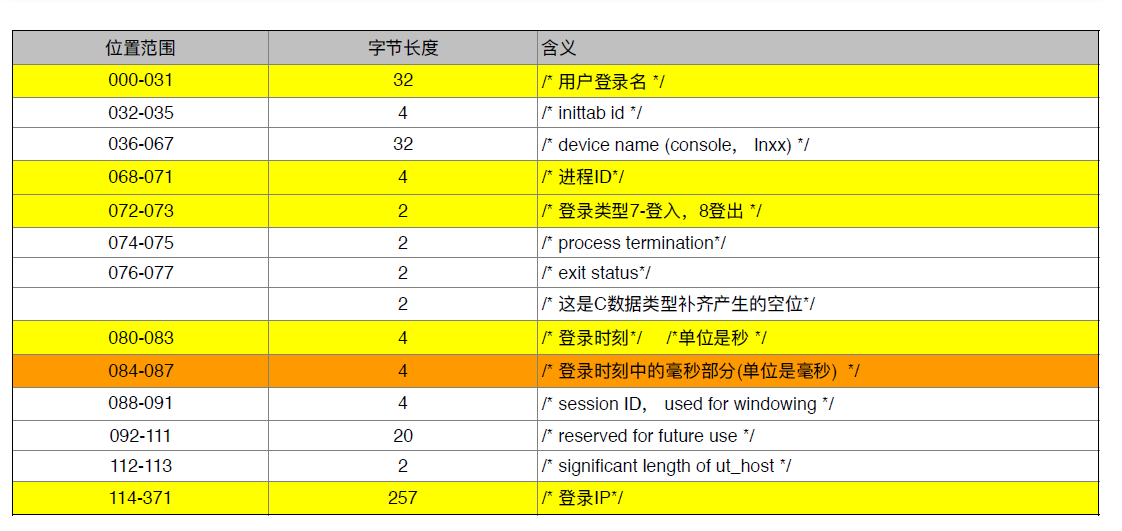
mywtmpx文件是 Unix 系统中记录每个用户登入、登出等数据的日志文件,该文件中 每 372 个字节表格一个用户的记录,每 372 个字节的含义如上表示。
用RandomAccessFile读取wtmpx 文件测试案例:
package ecut.streams;

import java.io.IOException;
import java.io.PrintStream;
import java.io.RandomAccessFile;

public class RandomAccessFileTest2 {

    public static void main(String[] args) throws IOException {

        PrintStream ps = new PrintStream( "mywtmpx.txt" );

        RandomAccessFile raf = new RandomAccessFile( "mywtmpx" ,  "r" ) ;

        final long size = raf.length() ;  // 获得文件大小
        final int unit = 372 ; // 指定每条记录所占的字节数
        final long n = size / unit ; // 计算总记录数
        System.out.println( "总记录数: " + n  );

        final byte[] nameBytes = new byte[32] ;
        final byte[] ipBytes = new byte[257] ;

        long start = System.currentTimeMillis() ;

        for( long i = 0 ; i < n ; i++ ){
            raf.seek( i * unit );

            raf.read( nameBytes ) ; // 32
            String name = new String( nameBytes ).trim() ;
            ps.append( name );
            ps.append( " , " ) ;

            raf.seek( raf.getFilePointer() + 36 ) ; //raf.skipBytes( 36 );

            int pid = raf.readInt() ; // 4
            ps.append( pid + "" );
            ps.append( " , " ) ;

            short type = raf.readShort() ; // 2
            ps.append( type + "" );
            ps.append( " , " ) ;

            raf.seek( raf.getFilePointer() + 6 ) ; // 6

            int s = raf.readInt() ; // 4
            int ms = raf.readInt() ; // 4

            long time = s * 1000L + ms ;
            ps.append( time + "" );
            ps.append( " , " ) ;

            raf.seek( raf.getFilePointer() + 26 ) ; // 26

            raf.read( ipBytes ) ;
            String ip = new String( ipBytes ).trim() ;
            ps.println( ip );

        }

        long end = System.currentTimeMillis();

        System.out.println( "解析时间: " + ( end - start )  );


        raf.close();

        ps.close();

    }

}
运行结果如下:
当前工程下新增文件mywtmpx.txt。
NIO(new input/output)
jdk1.4开始提供的:(nio)
java.nio:Buffer
java.nio.channels:Channel 、Selector
java.nio.charset:Charset
jdk1.7开始提供:(nio 2)
java.nio.file:Path、 Paths、File
Java.nio.attribute:BasicFileAttributes
1、Charset
Charset测试案例一:
package ecut.streams.nio;

import java.nio.ByteBuffer;
import java.nio.CharBuffer;
import java.nio.charset.Charset;
import java.util.Arrays;

public class CharsetTest1 {

    public static void main(String[] args) {

        // Java 语言中默认采用 UNICODE 来表示 字符
        char ch = '东' ; // 2 字节

        Charset cs = Charset.defaultCharset() ; // 获得 默认的 字符编码 对应的 Charset 对象
        System.out.println( "当前编码: " + cs.displayName()  );

        // 将 字符串 按照 当前的字符编码集 来【编码】成相应的 字节序列
        ByteBuffer buffer = cs.encode( ch + "" );

        byte[] bytes = buffer.array();

        System.out.println(  Arrays.toString( bytes ) );

        System.out.println( "~~~~~~~~~~~~~~~~~~~~~~" );

        // 将 指定的字节序列(字节缓冲区) 按照 当前的字符编码集 【解码】成 字符 ( 字符缓冲区 )
        CharBuffer charBuffer = cs.decode( buffer );
        System.out.println( charBuffer );

    }

}
运行结果如下:
当前编码: UTF-8
[-28, -72, -100]
~~~~~~~~~~~~~~~~~~~~~~
东
Charset测试案例二:
package ecut.streams.nio;

import java.nio.charset.Charset;
import java.util.Iterator;
import java.util.Map.Entry;
import java.util.Set;
import java.util.SortedMap;

public class CharsetTest2 {

    public static void main(String[] args) {
        // 构造从规范 charset 名称到 charset 对象的有序映射。
        SortedMap<String, Charset> charsets = Charset.availableCharsets();

        Set< Entry<String, Charset> > entries = charsets.entrySet();

        Iterator< Entry<String, Charset> > itor =  entries.iterator();

        while( itor.hasNext() ){
            Entry<String, Charset> entry = itor.next();
            System.out.print( entry.getKey() );
            System.out.print( " , " );
            System.out.println( entry.getValue() );
        }

    }

}
运行结果如下:
Big5 , Big5
Big5-HKSCS , Big5-HKSCS
........
x-windows-874 , x-windows-874
x-windows-949 , x-windows-949
x-windows-950 , x-windows-950
x-windows-iso2022jp , x-windows-iso2022jp
Charset测试案例三:
package ecut.streams.nio;

import java.nio.charset.Charset;

public class CharsetTest3 {

    public static void main(String[] args) {

        String charsetName = "UTF-8" ;
        // 通知是否支持指定的 charset。
        boolean support = Charset.isSupported( charsetName ) ;

        System.out.println( support );

        if( support ){
            // 返回指定 charset 的 charset 对象。
            Charset charset = Charset.forName( charsetName );

            System.out.println( charset );

        }

    }

}
运行结果如下:
true
UTF-8
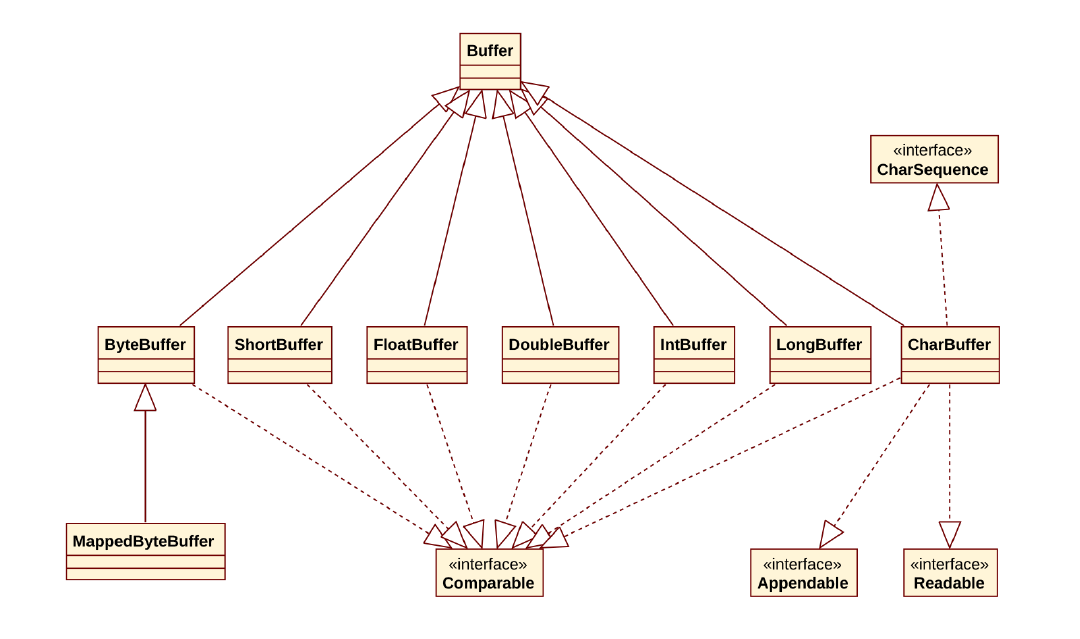
2、Buffer
部分源码:
public abstract class Buffer {

    /**
     * The characteristics of Spliterators that traverse and split elements
     * maintained in Buffers.
     */
    static final int SPLITERATOR_CHARACTERISTICS =
        Spliterator.SIZED | Spliterator.SUBSIZED | Spliterator.ORDERED;

    // Invariants: mark <= position <= limit <= capacity
    private int mark = -1;
    private int position = 0;
    private int limit;
    private int capacity;
  .............................
public abstract class CharBuffer
    extends Buffer
    implements Comparable<CharBuffer>, Appendable, CharSequence, Readable
{

    // These fields are declared here rather than in Heap-X-Buffer in order to
    // reduce the number of virtual method invocations needed to access these
    // values, which is especially costly when coding small buffers.
    //
    final char[] hb;                  // Non-null only for heap buffers
    final int offset;
    boolean isReadOnly;
...................................
XxxBuffer里面的数组就是xxx类型。
Buffer中定义的属性:
capacity表示缓冲区容量 缓冲区的容量 是它所包含的元素的数量。缓冲区的容量不能为负并且不能更改。
limit表示缓冲区的限制 缓冲区的限制 是第一个不应该读取或写入的元素的索引。缓冲区的限制不能为负,并且不能大于其容量。
position表示缓冲区的当前位置 缓冲区的位置 是下一个要读取或写入的元素的索引。缓冲区的位置不能为负,并且不能大于其限制。
mark 表示缓冲区的标志位置
Buffer中定义的方法:
int capacity()返回此缓冲区的容量
int limit()返回此缓冲区的限制位置
Buffer limit(int newLimit) 设置此缓冲区的限制。
int position()返回此缓冲区的位置
Buffer position(int newPosition)设置此缓冲区的位置。
Buffer mark() 将缓冲区中的当前位置作为标记位置(做标记)
Buffer reset() 将此缓冲区的当前位置重置为以前标记的位置(回到从前做标记的地方)
Buffer 类中定义的对缓冲区进行控制的方法
Buffer flip() 反转缓冲区("锁定"缓冲区中的有效数据)
Buffer clear() "清除"缓冲区(将缓冲区的状态调整到初始状态,并没有清除缓冲区的数据)
Buffer rewind() 重绕此缓冲区("倒带")
CharBuffer类继承了Buffer类的所有方法,并在内部提供了一个char数组来缓冲字符,可以调用allocate方法来获取实例。
CharBuffer测试案例一:
package ecut.streams.nio;

import java.nio.CharBuffer;

public class CharBufferTest1 {

    public static void main(String[] args) {

        // 获得 CharBuffer 实例
        CharBuffer buffer = CharBuffer.allocate( 10 );
        show( buffer );

        buffer.put( 'A' );
        buffer.put( 'B' );
        buffer.put( 'C' ) ;

        show( buffer );

        // 判断 从 当前位置 到限制位置 之间是否有元素可以读取
        System.out.println( buffer.hasRemaining() );
        // 获得 从当前位置 到 限制位置 之间的 元素个数
        System.out.println( buffer.remaining() );

        System.out.println( buffer );

        // 重新设置 限制位置 为 当前位置
        buffer.limit( buffer.position() ) ;
        // 将 当期位置 设置为 开始位置
        buffer.position( 0 ) ;

        System.out.println( buffer.toString() );

        show( buffer );

        //相对 get 方法。读取此缓冲区当前位置的字符,然后该位置递增。
        char ch = buffer.get();
        System.out.println( ch );
        show( buffer );

        ch = buffer.get();
        System.out.println( ch );
        show( buffer );

        ch = buffer.get();
        System.out.println( ch );
        show( buffer );

    }

    public static void show( CharBuffer buffer ) {
        System.out.print( "position : " + buffer.position() );
        System.out.print( " , " );
        System.out.print( "limit : " + buffer.limit() );
        System.out.print( " , " );
        System.out.println( "capacity : " + buffer.capacity() );
    }

}
运行结果如下:
position : 0 , limit : 10 , capacity : 10
position : 3 , limit : 10 , capacity : 10
true
7

ABC
position : 0 , limit : 3 , capacity : 10
A
position : 1 , limit : 3 , capacity : 10
B
position : 2 , limit : 3 , capacity : 10
C
position : 3 , limit : 3 , capacity : 10
CharBuffer测试案例二:
package ecut.streams.nio;

import java.nio.CharBuffer;

public class CharBufferTest2 {

    public static void main(String[] args) {

        // 获得 CharBuffer 实例
        CharBuffer buffer = CharBuffer.allocate( 10 );

        show( buffer );

        buffer.put( 'A' );
        buffer.put( 'B' );
        buffer.put( 'C' ) ;

        show( buffer );

        buffer.flip(); // 1、limit = position ; 2、position = 0 ;  3、mark = -1;

        System.out.println( buffer );

        show( buffer );

        buffer.clear(); // 1、 position = 0; 2、limit = capacity; 3、 mark = -1;

        System.out.println( buffer );

        show( buffer ) ;


    }

    public static void show( CharBuffer buffer ) {
        System.out.print( "position : " + buffer.position() );
        System.out.print( " , " );
        System.out.print( "limit : " + buffer.limit() );
        System.out.print( " , " );
        System.out.println( "capacity : " + buffer.capacity() );
    }

}
部分源码:
      public final Buffer clear() {
        position = 0;// 1、将当前位置调整到起始位置
        limit = capacity;// 2、并将当前位置更改为容量对应的数值
        mark = -1;// 3、清楚标记
    }

    public final Buffer flip() {
        limit = position;// 1、将当前位置当做限制位置
        position = 0;// 2、并将当前位置调整到起始位置
        mark = -1;// 3、清除标记
    }
运行结果如下:
position : 0 , limit : 10 , capacity : 10
position : 3 , limit : 10 , capacity : 10
ABC
position : 0 , limit : 3 , capacity : 10
ABC
CharBuffer测试案例三:
package ecut.streams.nio;

import java.nio.CharBuffer;

public class CharBufferTest3 {

    public static void main(String[] args) {

        // 获得 CharBuffer 实例
        CharBuffer buffer = CharBuffer.allocate( 10 );

        show( buffer );

        buffer.put( 'A' );
        buffer.put( 'B' );
        buffer.put( 'C' ) ;

        show( buffer );

        buffer.flip(); // 1、limit = position ; 2、position = 0 ;  3、mark = -1;

        for( int i = buffer.position() , n = buffer.limit() ; i < n ; i++ ){
            char ch = buffer.get();
            System.out.println( ch );
        }

        System.out.println( "~~~~~~~~~~~~~~~~~" );
        show( buffer );
        buffer.rewind(); // "倒带"
        show( buffer );

        for( int i = buffer.position() , n = buffer.limit() ; i < n ; i++ ){
            char ch = buffer.get();
            System.out.println( ch );
        }


    }

    public static void show( CharBuffer buffer ) {
        System.out.print( "position : " + buffer.position() );
        System.out.print( " , " );
        System.out.print( "limit : " + buffer.limit() );
        System.out.print( " , " );
        System.out.println( "capacity : " + buffer.capacity() );
    }

}
部分源码:
  public final Buffer rewind() {
        position = 0;//1、将当前位置调整到起始位置
        mark = -1;//2、清除标记
        return this;
    }
运行结果如下:
position : 0 , limit : 10 , capacity : 10
position : 3 , limit : 10 , capacity : 10
A
B
C
~~~~~~~~~~~~~~~~~
position : 3 , limit : 3 , capacity : 10
position : 0 , limit : 3 , capacity : 10
A
B
C
ByteBuffer类继承了Buffer类的所有方法,并在内部提供了一个Byte数组来缓冲字符,可以调用allocate方法来获取实例。
ByteBufferTest测试案例:
package ecut.streams.nio;

import java.nio.ByteBuffer;

public class ByteBufferTest {

    public static void main(String[] args) {

        ByteBuffer buffer = ByteBuffer.allocate( 1024 );

        System.out.println( buffer );

        buffer.putInt( 100 ); // 将 int 数值 放入到 字节缓冲区中,并占用 4 个字节

        System.out.println( buffer );

        buffer.putChar( 'A' ) ; // 2 个字节

        System.out.println( buffer );

        /*int x = buffer.getInt();

        System.out.println( x );//输出0,pos=6然后 getInt 往后移动4个位置因此pos=10  x为0*/

        /*int x = buffer.getInt(0);

        System.out.println( x );//输出100,绝对的get从开始位置获取int post不变*/

        buffer.flip();

        int x = buffer.getInt();

        System.out.println( x );//输出100

        System.out.println( buffer );

        char ch = buffer.getChar();

        System.out.println( ch );

        System.out.println( buffer );

    }

}
运行结果如下:
java.nio.HeapByteBuffer[pos=0 lim=1024 cap=1024]
java.nio.HeapByteBuffer[pos=4 lim=1024 cap=1024]
java.nio.HeapByteBuffer[pos=6 lim=1024 cap=1024]
100
java.nio.HeapByteBuffer[pos=4 lim=6 cap=1024]
A
java.nio.HeapByteBuffer[pos=6 lim=6 cap=1024]
3、Channel
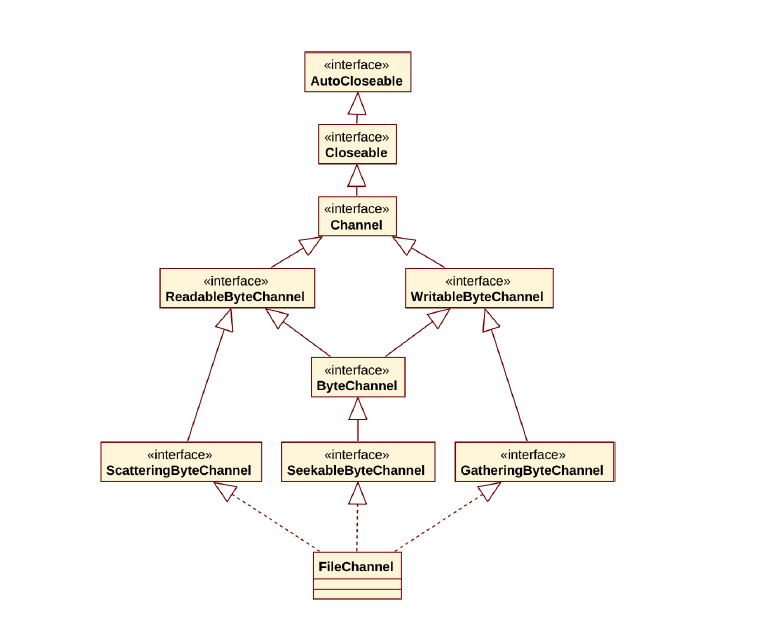
jdk 1.4获得Channel
FileInputStream fileIn = new FileInputStream();
FileChannel Channel = fileIn.getChannel(filename);
 FileOutputStream fileOut = new FileOutputStream(filename);
 FileChannel Channel = fileOut.getChannel();
jdk 1.7 使用 Files直接获得通道
 //打开或创建一个文件,返回一个seekable字节通道来访问该文件
 static SeekablstaticeByteChannel newByteChannel(Path path, OpenOption... options)
传统的io中
1、最终以字节为单位读写数据,效率低下-----> 新的IO提供Buffer、Channel就可以以"块"为单位读写
2、传统流的读写操作都是阻塞式的 -----> 新的IO体系中提供Selector来解决阻塞问题
Path接口表示一个目录或一个文件对应的路径(它可以定位本地系统中的一个文件或目录)
Paths类是一个工具类,其中定义了两个静态方法,专门用来返回Path对象:
static Path get(String first, String... more)
转换的路径字符串,或一个字符串序列,当加入形成一个路径字符串, Path。
static Path get(URI uri)
将给定的URI转换为 Path对象。
Path测试案例一:
package ecut.streams.nio;

import java.nio.file.Path;
import java.nio.file.Paths;
import java.util.Iterator;

public class PathTest1 {

    public static void main(String[] args) {

        Path path = Paths.get( "D:/" , "Amy" ,"C++" , "c++API.chm"  );

        System.out.println( path );

        System.out.println( "是否是绝对路径 : " + path.isAbsolute() );

        System.out.println( "文件 或 目录 名称: " + path.getFileName()  );

        // 对可变长参数部分的各个 Path 进行迭代的迭代器
        Iterator<Path> itor = path.iterator();

        while( itor.hasNext() ){
            System.out.println( itor.next() );
        }

    }

}
运行结果如下:
D:\Amy\C++\c++API.chm
是否是绝对路径 : true
文件 或 目录 名称: c++API.chm
Amy
C++
c++API.chm
File类是一个工具类,提供了对文件或目录进行操作的大量静态方法
static boolean exists(Path path, LinkOption... options)
测试文件是否存在。 如果path表示的文件或目录存在则返回true,否则返回false
static boolean notExists(Path path, LinkOption... options)
测试文件是否通过这个路径不存在。 如果path表示的文件或目录不存在则返回true,否则返回false
static boolean isDirectory(Path path, LinkOption... options)
测试文件是否是一个目录。 如果oath所表示的是一个目录则返回true否则返回false
static boolean isRegularFile(Path path, LinkOption... options)
测试文件是否与不透明的常规文件内容。 如果path所表示的是一个"正常"的文件则返回true,否则返回false
static boolean isSymbolicLink(Path path)
测试是否文件是一个符号链接。 如果path所表示的是一个"符号"文件则返回true(Linux环境下对应的是链接)
static Path copy(Path source, Path target, CopyOption... options)
复制一个文件到目标文件。
Path测试案例二:
package ecut.streams.nio;

import java.nio.file.Files;
import java.nio.file.Path;
import java.nio.file.Paths;

public class PathTest2 {

    public static void main(String[] args) {

        //将给定的URI转换为 Path对象。
        Path path = Paths.get( "D:/Amy/C++/c++API.chm"  );
        //测试文件是否存在。如果path表示的文件或目录存在则返回true,否则返回false。
        System.out.println( Files.exists( path ) );
        //测试文件是否是一个目录。
        System.out.println( Files.isDirectory( path ) );
        //测试文件是否与不透明的常规文件内容。
        System.out.println( Files.isRegularFile( path ) );

    }

}
运行结果如下:
true
false
true
OpenOption接口用来表示打开文件或目录的选项
StandardOpenOption 枚举
LinkOption 枚举
FileChannel测试案例一:
package ecut.streams.nio;

import java.io.IOException;
import java.io.PrintStream;
import java.nio.ByteBuffer;
import java.nio.channels.FileChannel;
import java.nio.channels.SeekableByteChannel;
import java.nio.file.Files;
import java.nio.file.Path;
import java.nio.file.Paths;
import java.nio.file.StandardOpenOption;

public class FileChannelTest1 {


    public static void main(String[] args) throws IOException {

        PrintStream ps = new PrintStream( "m.txt" );

        // 获得指定名称的文件对应的 Path 实例
        Path path = Paths.get( "mywtmpx" );

        // 如果指定 path 存在并且是一个文件
        if( Files.exists( path ) && Files.isRegularFile( path ) ){
            // 用只读方式 打开到 path 的通道
            SeekableByteChannel channel = Files.newByteChannel( path , StandardOpenOption.READ );
            // 判断 channel 是否是一个 FileChannel
            if( channel instanceof FileChannel ){
                // 如果是,就强制类型转换
                FileChannel fileChannel = (FileChannel) channel ;

                final ByteBuffer buffer = ByteBuffer.allocate( 37200000 ) ;
                final int unit = 372 ;

                final byte[] nameBytes = new byte[32] ;
                final byte[] ipBytes = new byte[257] ;
                // 通道并不能直接读取数据,通道的作用是 将 文件中的 部分 或 全部 数据 "映射" 到 缓冲区
                int n ;
                while( ( n = fileChannel.read( buffer )  ) != -1 ) {
                    buffer.flip(); // "锁定" 缓冲区

                    int x = n / unit ; // 计算本次读取到的 记录数

                    for( int i = 0 ; i < x ; i++ ){
                        // 参考 RandomAccessFileTest2 中的代码,补充这个循环
                        buffer.position( i * unit );

                        buffer.get(nameBytes);
                        String name = new String( nameBytes ).trim() ;
                        ps.append( name );
                        ps.append( " , " ) ;

                        buffer.position(buffer.position()+36);

                        int pid = buffer.getInt() ; // 4
                        ps.append( pid + "" );
                        ps.append( " , " ) ;

                        short type = buffer.getShort() ; // 2
                        ps.append( type + "" );
                        ps.append( " , " ) ;

                        buffer.position( buffer.position() + 6 ) ; // 6

                        int s = buffer.getInt() ; // 4
                        int ms = buffer.getInt() ; // 4

                        long time = s * 1000L + ms ;
                        ps.append( time + "" );
                        ps.append( " , " ) ;

                        buffer.position( buffer.position() + 26 ) ; // 26

                        buffer.get( ipBytes ) ;
                        String ip = new String( ipBytes ).trim() ;
                        ps.println( ip );
                        }
                    buffer.clear(); // "释放" 缓冲区,以便于下次 从通道中 "提取"
                }

            }
        }
        ps.close(); // 关闭打印流
    }

}
运行结果如下:
当前工程下增加文件m.txt。
SeekablstaticeByteChannel 的其中的一个实现类java.nio.channels.FileChannel,FileChannel中的一个方法:
abstract MappedByteBuffer map(FileChannel.MapMode mode, long position, long size)Map区域直接这个通道的文件到内存中。
FileChannel测试案例二:
package ecut.streams.nio;

import java.io.IOException;
import java.io.PrintStream;
import java.nio.MappedByteBuffer;
import java.nio.channels.FileChannel;
import java.nio.channels.SeekableByteChannel;
import java.nio.file.Files;
import java.nio.file.Path;
import java.nio.file.Paths;

public class FileChannelTest2 {

    public static void main(String[] args) throws IOException {

        PrintStream ps = new PrintStream( "my.txt" );

        // 如果没有指定明确的绝对路径,则从 当前路径读取
        // 在 Eclipse 环境下普通 Java 工程中,默认的当前路径是 当前工程
        Path path = Paths.get( "mywtmpx" );

        // 接口类型的 引用变量 引用了 实现类类型的 一个 实例
        SeekableByteChannel channel = Files.newByteChannel( path );

        // 判断 channel 变量在运行期 所引用的那个实例 是否是 FileChannel 类型
        if( channel instanceof FileChannel ){
            FileChannel fc = (FileChannel) channel ;//fc和channel地址相同
            final long size = fc.size() ; // 获得 通道对应的 文件的 大小
            final int unit = 372 ;
            final long n = size / unit ;

            MappedByteBuffer buffer = fc.map( FileChannel.MapMode.READ_ONLY, 0 , size );//把数据映射到内存缓冲区,直接对文件的映射

            final byte[] nameBytes = new byte[32] ;
            final byte[] ipBytes = new byte[257] ;

            for( long i = 0 ; i < n ; i++ ) {

                buffer.get(nameBytes); // 32
                String name = new String( nameBytes ).trim() ;
                ps.append( name );
                ps.append( " , " ) ;

                buffer.position( buffer.position() + 36 ); //raf.skipBytes( 36 );

                int pid = buffer.getInt() ; // 4
                ps.append( pid + "" );
                ps.append( " , " ) ;

                short type = buffer.getShort() ; // 2
                ps.append( type + "" );
                ps.append( " , " ) ;

                buffer.position( buffer.position() + 6 );  // 6

                int s = buffer.getInt() ; // 4
                int ms = buffer.getInt() ; // 4

                long time = s * 1000L + ms ;
                ps.append( time + "" );
                ps.append( " , " ) ;

                buffer.position( buffer.position() + 26 ); // 26

                buffer.get( ipBytes ) ;
                String ip = new String( ipBytes ).trim() ;
                ps.println( ip );

                buffer.get();

            }

            buffer = null ; // 让 buffer 本来引用 的那个 缓冲区 实例 不再被引用

            System.gc();//垃圾收集器运行。

            fc.close(); // 关闭通道

        }

        ps.close(); // 关闭打印流

    }

}
运行结果如下:
当前工程下增加文件my.txt。
StandardOpenOption 枚举 直接开启这个文件的有关选项
LinkOption 枚举 以连接的方式去开启或者创建一个连接 Linux见得比较多
CopyOption 接口用来表示复制文件或目录时的可选项, 实现了LinkOption和StandardCopyOption接口
利用Files实现文件复制测试案例:
package ecut.streams.nio;

import java.io.IOException;
import java.nio.file.Files;
import java.nio.file.Path;
import java.nio.file.Paths;
import java.nio.file.StandardCopyOption;

public class CopyFileByNio {

    public static void main(String[] args) throws IOException {

        Path source = Paths.get( "D:\\java_workspace\\zhongbang\\JavaAdvanced\\mywtmpx.txt" );

        String name = source.getFileName().toString() ;

        System.out.println("name:"+name );

        System.out.println("source:"+source );

        Path target = Paths.get( "D:/Amy" , name   );

        System.out.println("target:"+target );

        Files.copy( source ,  target , StandardCopyOption.REPLACE_EXISTING);

    }

}
运行结果如下:
D:\Amy目录下新增文件mywtmpx
name:mywtmpx.txt
source:D:\java_workspace\zhongbang\JavaAdvanced\mywtmpx.txt
target:D:\Amy\mywtmpx.txt
参考博客链接
http://blog.csdn.net/xiaodanpeng/article/details/50820868
转载请于明显处标明出处

 浙公网安备 33010602011771号