
解决SilverLight的图片裁剪问题
WPF有CroppedBitmap类,能够很方便的裁剪图片,可是SilverLight里面没有。这可麻烦了用SilverLight做游戏的同仁们。
虽然可以用一个Border包着一个Image来解决,但程序员往往喜欢用更简单的方法。
这里给出一个用转换器实现的裁剪案例
代码只保证SilverLight 4.0测试通过,其他版本未测试
    public class CroppedBitmapConverter : IValueConverter
    {
        public object Convert(object value, Type targetType, object parameter, System.Globalization.CultureInfo culture)
        {
            BitmapImage bi = value as BitmapImage;
            if (bi == null) return null;

            Rect rect;
            if (parameter is Rect)
            {
                rect = (Rect)parameter;
            }
            else
            {
                try
                {
                    string[] s = parameter.ToString().Split(',');
                    rect = new Rect(double.Parse(s[0]), double.Parse(s[1]), double.Parse(s[2]), double.Parse(s[3]));
                }
                catch
                {
                    rect = new Rect(0, 0, bi.PixelWidth, bi.PixelHeight);
                }
            }

            Image image = new Image();
            image.Stretch = Stretch.None;
            image.RenderTransform = new TranslateTransform { X = -rect.X, Y = -rect.Y };
            image.Source = bi;

            Canvas canvas = new Canvas();
            canvas.Width = rect.Width;
            canvas.Height = rect.Height;
            canvas.Children.Add(image);

            return new WriteableBitmap(canvas, null);
        }

        public object ConvertBack(object value, Type targetType, object parameter, System.Globalization.CultureInfo culture)
        {
            throw new NotSupportedException();
        }
    }
相应的前台代码:
<UserControl
    xmlns="http://schemas.microsoft.com/winfx/2006/xaml/presentation"
    xmlns:x="http://schemas.microsoft.com/winfx/2006/xaml"
    xmlns:local="clr-namespace:SilverlightApplication1"
    x:Class="SilverlightApplication1.MainPage"
    Width="640" Height="480">

    <UserControl.Resources>
        <local:CroppedBitmapConverter x:Key="CroppedBitmapConverter"/>
    </UserControl.Resources>

    <Grid x:Name="LayoutRoot" Background="#FF959595">
        <Image x:Name="image" Source="未命名.jpg" VerticalAlignment="Top" HorizontalAlignment="Left" Stretch="None" />
        <Image DataContext="{Binding Source, ElementName=image}"
               Source="{Binding ConverterParameter=180\,0\,130\,100, Converter={StaticResource CroppedBitmapConverter}, Mode=OneWay}"
               VerticalAlignment="Bottom" HorizontalAlignment="Left" Stretch="None" />
    </Grid>
</UserControl>
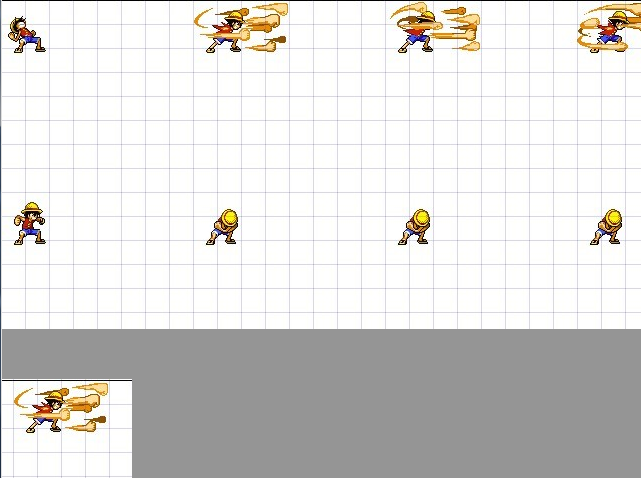
最终的效果

 浙公网安备 33010602011771号