
Elasticsearch安装
安装java8
下载地址:www.oracle.com/technetwork…
国内下载地址:https://mirrors.huaweicloud.com/elasticsearch/7.11.0/
1、解压缩包
$ tar -xvf jdk-8u231-linux-x64.tar
复制代码
2、配置jdk环境变量
将jdk配置到/etc/profile,可以在任何一个目录访问jdk
$ vim /etc/profile
复制代码
3、在/etc/profile文件尾部添加如下内容
export JAVA_HOME=/usr/local/webserver/soft/jdk1.8.0_231  #jdk安装目录

export JRE_HOME=${JAVA_HOME}/jre

export CLASSPATH=.:${JAVA_HOME}/lib:${JRE_HOME}/lib:$CLASSPATH

export JAVA_PATH=${JAVA_HOME}/bin:${JRE_HOME}/bin

export PATH=$PATH:${JAVA_PATH}
复制代码
4、source /etc/profile让profile文件立即生效
$ source /etc/profile
复制代码
5、查看Java版本
$ java -version
java version "1.8.0_231"
Java(TM) SE Runtime Environment (build 1.8.0_231-b11)
Java HotSpot(TM) 64-Bit Server VM (build 25.231-b11, mixed mode)
复制代码
安装Elasticsearch
1、解压缩包
$ tar -xvf elasticsearch-7.5.1-darwin-x86_64.tar

$ cd elasticsearch-7.5.1/bin
复制代码
2、启动
$ ./elasticsearch
future versions of Elasticsearch will require Java 11; your Java version from [/usr/local/webserver/soft/jdk1.8.0_231/jre] does not meet this requirement
[2020-01-07T16:07:14,532][WARN ][o.e.b.ElasticsearchUncaughtExceptionHandler] [kaluli-web-18-24] uncaught exception in thread [main]
org.elasticsearch.bootstrap.StartupException: java.lang.RuntimeException: can not run elasticsearch as root
	at org.elasticsearch.bootstrap.Elasticsearch.init(Elasticsearch.java:163) ~[elasticsearch-7.5.1.jar:7.5.1]
	at org.elasticsearch.bootstrap.Elasticsearch.execute(Elasticsearch.java:150) ~[elasticsearch-7.5.1.jar:7.5.1]
	at org.elasticsearch.cli.EnvironmentAwareCommand.execute(EnvironmentAwareCommand.java:86) ~[elasticsearch-7.5.1.jar:7.5.1]
	at org.elasticsearch.cli.Command.mainWithoutErrorHandling(Command.java:125) ~[elasticsearch-cli-7.5.1.jar:7.5.1]
	at org.elasticsearch.cli.Command.main(Command.java:90) ~[elasticsearch-cli-7.5.1.jar:7.5.1]
	at org.elasticsearch.bootstrap.Elasticsearch.main(Elasticsearch.java:115) ~[elasticsearch-7.5.1.jar:7.5.1]
	at org.elasticsearch.bootstrap.Elasticsearch.main(Elasticsearch.java:92) ~[elasticsearch-7.5.1.jar:7.5.1]
Caused by: java.lang.RuntimeException: can not run elasticsearch as root
	at org.elasticsearch.bootstrap.Bootstrap.initializeNatives(Bootstrap.java:105) ~[elasticsearch-7.5.1.jar:7.5.1]
	at org.elasticsearch.bootstrap.Bootstrap.setup(Bootstrap.java:172) ~[elasticsearch-7.5.1.jar:7.5.1]
	at org.elasticsearch.bootstrap.Bootstrap.init(Bootstrap.java:349) ~[elasticsearch-7.5.1.jar:7.5.1]
	at org.elasticsearch.bootstrap.Elasticsearch.init(Elasticsearch.java:159) ~[elasticsearch-7.5.1.jar:7.5.1]
	... 6 more

#以上错误解决方法:
#elasticsearch默认不能用root账户启动,所以可以添加其他账户或者给系统现有账户授权elasticsearch目录
$ useradd elasticsearch
$ chown -R elasticsearch:elasticsearch /usr/local/webserver/soft/elasticsearch-7.5.1
复制代码
[2020-01-07T16:19:46,688][WARN ][o.e.b.ElasticsearchUncaughtExceptionHandler] [kaluli-web-18-24] uncaught exception in thread [main]
org.elasticsearch.bootstrap.StartupException: ElasticsearchException[Failure running machine learning native code. This could be due to running on an unsupported OS or distribution, missing OS libraries, or a problem with the temp directory. To bypass this problem by running Elasticsearch without machine learning functionality set [xpack.ml.enabled: false].]
at org.elasticsearch.bootstrap.Elasticsearch.init(Elasticsearch.java:163) ~[elasticsearch-7.5.1.jar:7.5.1]
at org.elasticsearch.bootstrap.Elasticsearch.execute(Elasticsearch.java:150) ~[elasticsearch-7.5.1.jar:7.5.1]
at org.elasticsearch.cli.EnvironmentAwareCommand.execute(EnvironmentAwareCommand.java:86) ~[elasticsearch-7.5.1.jar:7.5.1]
at org.elasticsearch.cli.Command.mainWithoutErrorHandling(Command.java:125) ~[elasticsearch-cli-7.5.1.jar:7.5.1]
at org.elasticsearch.cli.Command.main(Command.java:90) ~[elasticsearch-cli-7.5.1.jar:7.5.1]
at org.elasticsearch.bootstrap.Elasticsearch.main(Elasticsearch.java:115) ~[elasticsearch-7.5.1.jar:7.5.1]
at org.elasticsearch.bootstrap.Elasticsearch.main(Elasticsearch.java:92) ~[elasticsearch-7.5.1.jar:7.5.1]
Caused by: org.elasticsearch.ElasticsearchException: Failure running machine learning native code. This could be due to running on an unsupported OS or distribution, missing OS libraries, or a problem with the temp directory. To bypass this problem by running Elasticsearch without machine learning functionality set [xpack.ml.enabled: false].
at org.elasticsearch.xpack.ml.MachineLearning.createComponents(MachineLearning.java:535) ~[?:?]
at org.elasticsearch.node.Node.lambda$new$9(Node.java:449) ~[elasticsearch-7.5.1.jar:7.5.1]
at java.util.stream.ReferencePipeline$7$1.accept(ReferencePipeline.java:267) ~[?:1.8.0_231]
at java.util.ArrayList$ArrayListSpliterator.forEachRemaining(ArrayList.java:1382) ~[?:1.8.0_231]
at java.util.stream.AbstractPipeline.copyInto(AbstractPipeline.java:482) ~[?:1.8.0_231]
at java.util.stream.AbstractPipeline.wrapAndCopyInto(AbstractPipeline.java:472) ~[?:1.8.0_231]
at java.util.stream.ReduceOps$ReduceOp.evaluateSequential(ReduceOps.java:708) ~[?:1.8.0_231]
at java.util.stream.AbstractPipeline.evaluate(AbstractPipeline.java:234) ~[?:1.8.0_231]
at java.util.stream.ReferencePipeline.collect(ReferencePipeline.java:499) ~[?:1.8.0_231]
#
at org.elasticsearch.node.Node.<init>(Node.java:452) ~[elasticsearch-7.5.1.jar:7.5.1]
at org.elasticsearch.node.Node.<init>(Node.java:253) ~[elasticsearch-7.5.1.jar:7.5.1]
at org.elasticsearch.bootstrap.Bootstrap$5.<init>(Bootstrap.java:221) ~[elasticsearch-7.5.1.jar:7.5.1]
at org.elasticsearch.bootstrap.Bootstrap.setup(Bootstrap.java:221) ~[elasticsearch-7.5.1.jar:7.5.1]
at org.elasticsearch.bootstrap.Bootstrap.init(Bootstrap.java:349) ~[elasticsearch-7.5.1.jar:7.5.1]
at org.elasticsearch.bootstrap.Elasticsearch.init(Elasticsearch.java:159) ~[elasticsearch-7.5.1.jar:7.5.1]
... 6 more
#以上错误解决方法:
#进入config目录在elasticsearch.yml添加一条配置
$ vim config/elasticsearch.yml
#新增配置
xpack.ml.enabled: false
#浏览器访问(取消network.host前注释)
network.host: 0.0.0.0
复制代码ERROR: [2] bootstrap checks failed
[1]: max virtual memory areas vm.max_map_count [65530] is too low, increase to at least [262144]
[2]: the default discovery settings are unsuitable for production use; at least one of [discovery.seed_hosts, discovery.seed_providers, cluster.initial_master_nodes] must be configured
[2020-01-07T16:44:09,071][INFO ][o.e.n.Node ] [kaluli-web-18-24] stopping ...
[2020-01-07T16:44:09,099][INFO ][o.e.n.Node ] [kaluli-web-18-24] stopped
[2020-01-07T16:44:09,099][INFO ][o.e.n.Node ] [kaluli-web-18-24] closing ...
[2020-01-07T16:44:09,129][INFO ][o.e.n.Node ] [kaluli-web-18-24] closed
#以上错误解决方法:切换到root用户执行命令
$ sysctl -w vm.max_map_count=262144
#查看结果
$ sysctl -a | grep vm.max_map_count
vm.max_map_count = 262144
#上述方法修改之后,重启虚拟机将失效
#解决办法:在 /etc/sysctl.conf 文件最后添加一行
vm.max_map_count=262144
复制代码ERROR: [1] bootstrap checks failed
[1]: the default discovery settings are unsuitable for production use; at least one of [discovery.seed_hosts, discovery.seed_providers, cluster.initial_master_nodes] must be configured
#以上错误解决方法:修改elasticsearch.yml,取消注释保留一个节点
cluster.initial_master_nodes: ["node-1"]
复制代码查看es版本
方法一
$ curl -XGET localhost:9200
{
  "name" : "kaluli-web-18-24",
  "cluster_name" : "elasticsearch",
  "cluster_uuid" : "SxI538JmRU6OHPcuxVd_-A",
  "version" : {
    "number" : "7.5.1",
    "build_flavor" : "default",
    "build_type" : "tar",
    "build_hash" : "3ae9ac9a93c95bd0cdc054951cf95d88e1e18d96",
    "build_date" : "2019-12-16T22:57:37.835892Z",
    "build_snapshot" : false,
    "lucene_version" : "8.3.0",
    "minimum_wire_compatibility_version" : "6.8.0",
    "minimum_index_compatibility_version" : "6.0.0-beta1"
  },
  "tagline" : "You Know, for Search"
}
复制代码
方法二
$ ps -ef | grep elasticsearch
root      1341   560  0 16:19 pts/0    00:00:00 su elasticsearch
elastic+  1570  1342 57 16:28 pts/0    00:00:49 /usr/local/webserver/soft/jdk1.8.0_231/bin/java -Des.networkaddress.cache.ttl=60 -Des.networkaddress.cache.negative.ttl=10 -XX:+AlwaysPreTouch -Xss1m -Djava.awt.headless=true -Dfile.encoding=UTF-8 -Djna.nosys=true -XX:-OmitStackTraceInFastThrow -Dio.netty.noUnsafe=true -Dio.netty.noKeySetOptimization=true -Dio.netty.recycler.maxCapacityPerThread=0 -Dio.netty.allocator.numDirectArenas=0 -Dlog4j.shutdownHookEnabled=false -Dlog4j2.disable.jmx=true -Djava.locale.providers=COMPAT -Xms1g -Xmx1g -XX:+UseConcMarkSweepGC -XX:CMSInitiatingOccupancyFraction=75 -XX:+UseCMSInitiatingOccupancyOnly -Djava.io.tmpdir=/tmp/elasticsearch-450302344215976032 -XX:+HeapDumpOnOutOfMemoryError -XX:HeapDumpPath=data -XX:ErrorFile=logs/hs_err_pid%p.log -XX:+PrintGCDetails -XX:+PrintGCDateStamps -XX:+PrintTenuringDistribution -XX:+PrintGCApplicationStoppedTime -Xloggc:logs/gc.log -XX:+UseGCLogFileRotation -XX:NumberOfGCLogFiles=32 -XX:GCLogFileSize=64m -XX:MaxDirectMemorySize=536870912 -Des.path.home=/usr/local/webserver/soft/elasticsearch-7.5.1 -Des.path.conf=/usr/local/webserver/soft/elasticsearch-7.5.1/config -Des.distribution.flavor=default -Des.distribution.type=tar -Des.bundled_jdk=true -cp /usr/local/webserver/soft/elasticsearch-7.5.1/lib/* org.elasticsearch.bootstrap.Elasticsearch
root      1741  1723  0 16:30 pts/1    00:00:00 grep --color=auto elasticsearch
报错
![]()

ulimit -a
![]()
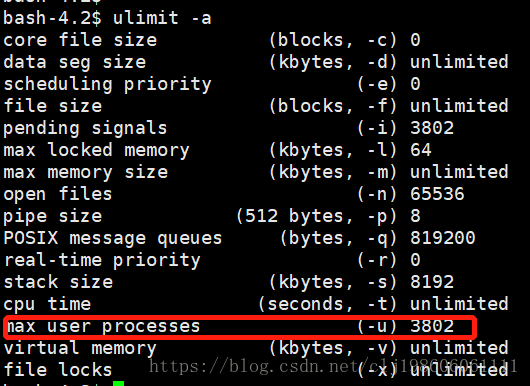
发现当前最大用户进程数被限制为3802,而ElasticSearch要求的最小进程数为4096,需要调大概值。
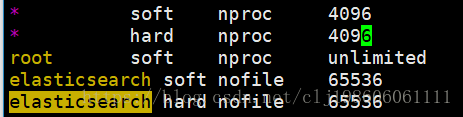
编辑/etc/security/limit.d/20-nproc.conf配置文件,改为如下配置。
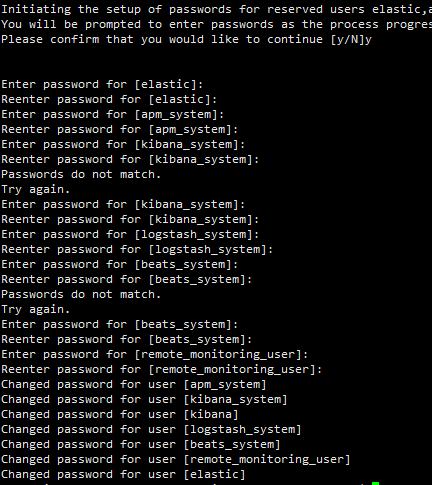
设置es密码
修改 config/elasticsearch.yml
http.cors.enabled: true
http.cors.allow-origin: "*"
http.cors.allow-headers: Authorization
xpack.security.enabled: true
xpack.security.transport.ssl.enabled: true
 执行elasticsearch-setup-passwords interactive
  输入各种密码
![]()
es集群配置
master
#集群名称 所有节点要保持一致
cluster.name: "es"
#本节点名称
node.name: master
#手动指定可以成为 mater 的所有节点的 name 或者 ip,这些配置将会在第一次选举中进行计算
cluster.initial_master_nodes: ["master"]
#作为master节点
node.master: true
#是否存储数据
node.data: true
#head插件设置,支持跨域访问
http.cors.enabled: true
http.cors.allow-origin: "*"
http.port: 9200
transport.tcp.port: 9300
#设置本机通信地址,用于其它节点和该节点交互的ip地址
network.host: 0.0.0.0
xpack.ml.enabled: false
xpack.security.enabled: true #设置密码
node-1
#集群名称 所有节点要保持一致
cluster.name: "es"
#本节点名称
node.name: node-1
#手动指定可以成为 mater 的所有节点的 name 或者 ip,这些配置将会在第一次选举中进行计算
cluster.initial_master_nodes: ["master"]
node.master: false
#是否存储数据
node.data: true
http.port: 9202
transport.tcp.port: 9302
#master地址
discovery.seed_hosts: ["192.168.2.200:9300"]
#设置本机通信地址,用于其它节点和该节点交互的ip地址
network.host: 0.0.0.0
xpack.ml.enabled: false
xpack.security.enabled: true #设置密码
node-2
#集群名称 所有节点要保持一致
cluster.name: "es"
#本节点名称
node.name: node-2
#手动指定可以成为 mater 的所有节点的 name 或者 ip,这些配置将会在第一次选举中进行计算
cluster.initial_master_nodes: ["master"]
node.master: false
#是否存储数据
node.data: true
http.port: 9203
transport.tcp.port: 9303
#master地址
discovery.seed_hosts: ["192.168.2.200:9300"]
network.host: 0.0.0.0
xpack.ml.enabled: false
xpack.security.enabled: true #设置密码
es单节点配置
配置内容如下
# ======================== Elasticsearch Configuration =========================
#
# NOTE: Elasticsearch comes with reasonable defaults for most settings.
#       Before you set out to tweak and tune the configuration, make sure you
#       understand what are you trying to accomplish and the consequences.
#
# The primary way of configuring a node is via this file. This template lists
# the most important settings you may want to configure for a production cluster.
#
# Please consult the documentation for further information on configuration options:
# https://www.elastic.co/guide/en/elasticsearch/reference/index.html
#
# ---------------------------------- Cluster -----------------------------------
#
# Use a descriptive name for your cluster:
#
#cluster.name: my-application
#
# ------------------------------------ Node ------------------------------------
#
# Use a descriptive name for the node:
#
node.name: node-1 #节点名称
#
# Add custom attributes to the node:
#
#node.attr.rack: r1
#
# ----------------------------------- Paths ------------------------------------
#
# Path to directory where to store the data (separate multiple locations by comma):
#
#path.data: /path/to/data
#
# Path to log files:
#
#path.logs: /path/to/logs
#
# ----------------------------------- Memory -----------------------------------
#
# Lock the memory on startup:
#
#bootstrap.memory_lock: true
#
# Make sure that the heap size is set to about half the memory available
# on the system and that the owner of the process is allowed to use this
# limit.
#
# Elasticsearch performs poorly when the system is swapping the memory.
#
# ---------------------------------- Network -----------------------------------
#
# Set the bind address to a specific IP (IPv4 or IPv6):
#
network.host: 192.168.2.200
#
# Set a custom port for HTTP:
#
#http.port: 9200
#
# For more information, consult the network module documentation.
#
# --------------------------------- Discovery ----------------------------------
#
# Pass an initial list of hosts to perform discovery when this node is started:
# The default list of hosts is ["127.0.0.1", "[::1]"]
#
#discovery.seed_hosts: ["host1", "host2"]
#
# Bootstrap the cluster using an initial set of master-eligible nodes:
#
cluster.initial_master_nodes: ["node-1"]  #如果要设置密码必须设置一个主节点
#
# For more information, consult the discovery and cluster formation module documentation.
#
# ---------------------------------- Gateway -----------------------------------
#
# Block initial recovery after a full cluster restart until N nodes are started:
#
#gateway.recover_after_nodes: 3
#
# For more information, consult the gateway module documentation.
#
# ---------------------------------- Various -----------------------------------
#
# Require explicit names when deleting indices:
#
#action.destructive_requires_name: true

xpack.ml.enabled: false  #不配置会报错
xpack.security.enabled: true  #设置登录

 浙公网安备 33010602011771号