菜鸟入门【ASP.NET Core】11:应用Jwtbearer Authentication、生成jwt token
准备工作
用VSCode新建webapi项目JwtAuthSample,并打开所在文件夹项目
dotnet new webapi --name JwtAuthSample
编辑JwtAuthSample.csproj,添加watch
<DotNetCliToolReference Include="Microsoft.DotNet.Watcher.Tools" Version="2.0.0" />
重新生成一下项目
dotnet restore
然后运行
dotnet watch run
这时候可以用postman来模拟访问一下webapi

配置Jwt
在ValuesController中添加引用
using Microsoft.AspNetCore.Authorization;
给控制器添加标签[Authorize]
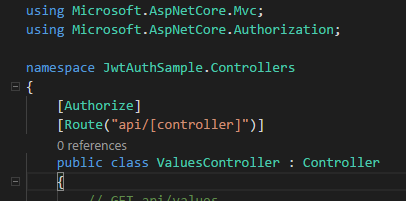
然后在Startup.cs中的Configure方法中配置使用Authentication
app.UseAuthentication();
添加JwtBearer引用
using Microsoft.AspNetCore.Authentication.JwtBearer;
接下来需要新建一个文件夹Models,在文件夹下面新建一个类JwtSettings.cs

namespace JwtAuthSample
{
    public class JwtSettings
    {
        //token是谁颁发的
        public string Issuer { get; set; }
        //token可以给哪些客户端使用
        public string Audience { get; set; }
        //加密的key
        public string SecretKey{get;set;}

    }
}
然后需要在appsettings.json中配置jwt参数的值 【注意】 SecretKey必须大于16个,是大于,不是大于等于
{
  "Logging": {
    "IncludeScopes": false,
    "Debug": {
      "LogLevel": {
        "Default": "Warning"
      }
    },
    "Console": {
      "LogLevel": {
        "Default": "Warning"
      }
    }
  },

  "JwtSettings":{
    "Issuer":"http://localhost:5000",
    "Audience":"http://localhost:5000",
    "SecretKey":"Hello-key-----wyt"
  }
}
这时候重新回到Startup.cs的ConfigureServices方法下,将appsettings.json中的文件读取到JwtSettings中,进行Bind,然后设置jwt参数
添加如下引用
using Microsoft.IdentityModel.Tokens;
using System.Text;
ConfigureServices代码
        public void ConfigureServices(IServiceCollection services)
        {
            //将appsettings.json中的JwtSettings部分文件读取到JwtSettings中,这是给其他地方用的
            services.Configure<JwtSettings>(Configuration.GetSection("JwtSettings"));

            //由于初始化的时候我们就需要用,所以使用Bind的方式读取配置
            //将配置绑定到JwtSettings实例中
            var jwtSettings=new JwtSettings();
            Configuration.Bind("JwtSettings",jwtSettings);

            services.AddAuthentication(options=>{
                //认证middleware配置
                options.DefaultAuthenticateScheme=JwtBearerDefaults.AuthenticationScheme;
                options.DefaultChallengeScheme=JwtBearerDefaults.AuthenticationScheme;
            })
            .AddJwtBearer(o=>{
                //主要是jwt  token参数设置
                o.TokenValidationParameters=new Microsoft.IdentityModel.Tokens.TokenValidationParameters{
            //Token颁发机构
                    ValidIssuer =jwtSettings.Issuer,
            //颁发给谁
                    ValidAudience =jwtSettings.Audience,
                    //这里的key要进行加密,需要引用Microsoft.IdentityModel.Tokens
                    IssuerSigningKey=new SymmetricSecurityKey(Encoding.UTF8.GetBytes(jwtSettings.SecretKey))
            //ValidateIssuerSigningKey=true,
            ////是否验证Token有效期,使用当前时间与Token的Claims中的NotBefore和Expires对比
            //ValidateLifetime=true,
            ////允许的服务器时间偏移量
            //ClockSkew=TimeSpan.Zero

                };
            });


            services.AddMvc();
        }
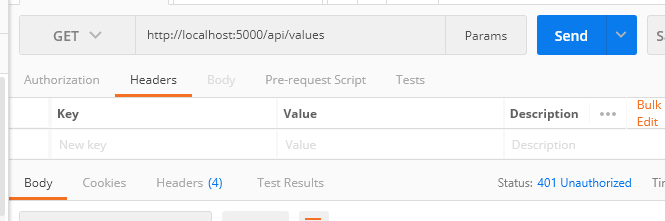
这时再通过postman访问5000端口,发现状态码为401(未授权)

生成 JWT Token
扩展安装
先安装几个重要的扩展
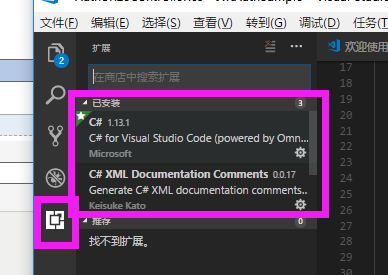
这时候可以在商店中搜索NuGet Package Manager进行安装,安装完成后点击重新加载即可。
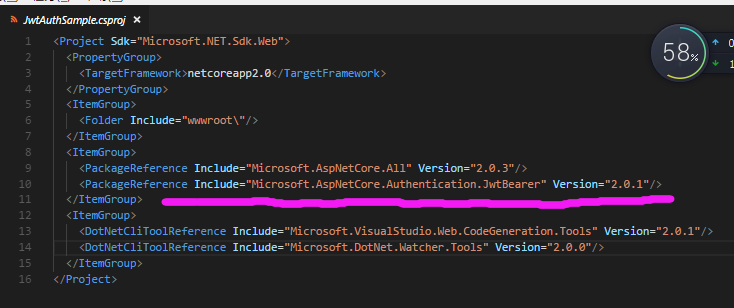
如果需要安装nuget包的话,只要在【查看】-》【命令面板】中输入NuGet Package Manager,即可进入package安装,输入Microsoft.AspNetCore.Authentication.JwtBearer即可进行安装

这时候查看项目文件发现已经安装成功
生成jwt token
首先新建一个ViewModel文件夹,并在ViewModel文件夹下面新建LoginViewModel.cs
using System.ComponentModel.DataAnnotations;

namespace JwtAuthSample
{
    public class LoginViewModel
    {
        //用户名
        [Required]
        public string User { get; set; }
        //密码
        [Required]
        public string Password { get; set; }

    }
}
接下来在Controllers文件夹下新建控制器AuthorizeController.cs,完整代码如下
using System;
using System.Collections.Generic;
using System.Linq;
using System.Threading.Tasks;
using Microsoft.AspNetCore.Mvc;

//引用命名空间
using System.Security.Claims;
using Microsoft.IdentityModel.Tokens;
using Microsoft.Extensions.Options;
using System.Text;
using System.IdentityModel.Tokens.Jwt;

namespace JwtAuthSample.Controllers
{
    [Route("api/[controller]")]
    public class AuthorizeController : Controller
    {
        private JwtSettings _jwtSettings;

        public AuthorizeController(IOptions<JwtSettings> _jwtSettingsAccesser)
        {
            _jwtSettings=_jwtSettingsAccesser.Value;
        }

        [HttpPost]
        public IActionResult Token([FromBody]LoginViewModel viewModel)
        {
            if(ModelState.IsValid)//判断是否合法
            {
                if(!(viewModel.User=="wyt"&&viewModel.Password=="123456"))//判断账号密码是否正确
                {
                    return BadRequest();
                }


                var claim=new Claim[]{
                    new Claim(ClaimTypes.Name,"wyt"),
                    new Claim(ClaimTypes.Role,"admin")
                };

                //对称秘钥
                var key=new SymmetricSecurityKey(Encoding.UTF8.GetBytes(_jwtSettings.SecretKey));
                //签名证书(秘钥,加密算法)
                var creds=new SigningCredentials(key,SecurityAlgorithms.HmacSha256);

                //生成token  [注意]需要nuget添加Microsoft.AspNetCore.Authentication.JwtBearer包,并引用System.IdentityModel.Tokens.Jwt命名空间
                var token=new JwtSecurityToken(_jwtSettings.Issuer,_jwtSettings.Audience,claim,DateTime.Now,DateTime.Now.AddMinutes(30),creds);

                return Ok(new {token=new JwtSecurityTokenHandler().WriteToken(token)});

            }

            return BadRequest();
        }
    }
}
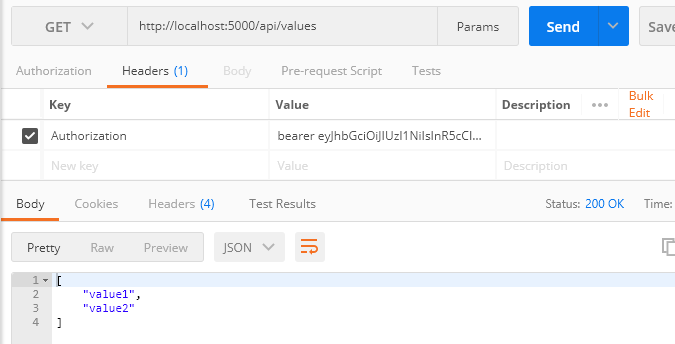
这时候用postman进行请求
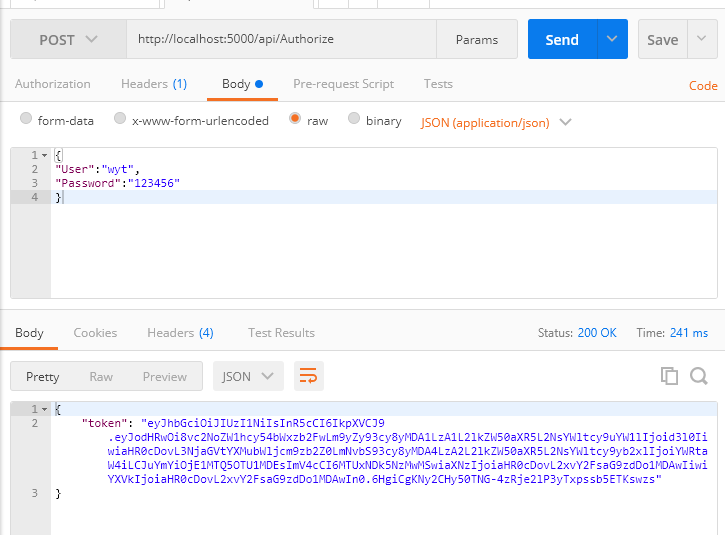
此时访问http://localhost:5000/api/values端口发现401无法访问
这时候加上token进行访问,访问成功
token校验
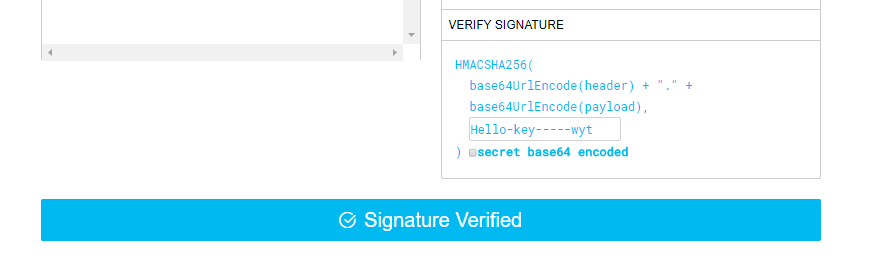
可以把生成的token放在官方网站上进行校验
官方网址:https://jwt.io/
这时候把的json粘贴进去会发现部分信息已经解析出来了,而由于secret只有自己填进去才能校验成功,否则校验失败。

这时我们填进去正确的secretkey:Hello-key-----wyt 校验成功
-------------------------------------------
个性签名:独学而无友,则孤陋而寡闻。做一个灵魂有趣的人!
如果觉得这篇文章对你有小小的帮助的话,记得在右下角点个“推荐”哦,博主在此感谢!
万水千山总是情,打赏一分行不行,所以如果你心情还比较高兴,也是可以扫码打赏博主,哈哈哈(っ•̀ω•́)っ✎⁾⁾!


您的资助是我最大的动力!
金额随意,欢迎来赏!


 浙公网安备 33010602011771号