

java发送http请求(jquery发送http请求,前后端看这一篇文章够了,很完整)
为什么写这篇博客?
1.目前很多系统使用了微服务架构,那么各个微服务之间进行内部通信一般采用http协议的方式,springcloud中提供了ribbon,feign,openFeign等组件。
但是这些组件底层无非就是基于java原生的代码发送http请求或者使用了RestTemplate来封装了像okHttp等这些开源组件,他们到底是如何工作的?
2.现在很多系统交互比较复杂,往往会有访问第三方api的场景,那么使用什么方式比较方便呢?
下面从几个方面来聊吧:
- java原生的发送Http请求的方式
- 使用apache的httpclient组件发送http请求
- 使用spring的RestTemplate发送http请求
- 使用okHttp组件发送http请求
一、java原生的发送Http请求的方式
1、首先我们先创建一个springboot项目提供一些常见的http接口。
这里数据就不存数据库了,先暂时存储了,目的是演示。
如果这些接口编写你比较熟悉,可以略过。
1.1 在springboot项目中,增加一个controller。
@RestController
public class MemberController {
    private static final String FILE_PATH = System.getProperty("user.dir");
    private static ConcurrentHashMap<Integer, Member> memberMap = new ConcurrentHashMap<>(16);
    private static ConcurrentHashMap<String, String> fileMap = new ConcurrentHashMap<>(16);

    static {
        Member m1 = new Member();
        m1.setId(1);
        m1.setBirthday(new Date());
        m1.setBalance(new BigDecimal("1000"));
        m1.setName("张三");
        memberMap.put(1, m1);
        m1 = new Member();
        m1.setId(2);
        m1.setBirthday(new Date());
        m1.setBalance(new BigDecimal("1000"));
        m1.setName("李四");
        memberMap.put(2, m1);
    }
}
使用memberMap来保存提交的会员数据。
使用fileMap来保存上传的文件名称信息和绝对路径。(因为业务开发中文件上传是常见的需求)
预制两个数据。
1.2 在MemberController中增加一下几个接口
(1)新增会员接口。(post + json方式)
@PostMapping("/member")
    public NormalResponseObject addMember(@RequestBody MemberVO memberVO) {
        if (memberMap.containsKey(memberVO.getId())) {
            return NormalResponseObject.fail("id不能重复");
        }
        memberMap.put(memberVO.getId(), Member.of(memberVO));
        return NormalResponseObject.sucess();
    }
(2)新增会员接口。(post + param方式)
    @PostMapping("/member/param")
    public NormalResponseObject addMemberUseParam(MemberVO memberVO) {
        return addMember(memberVO);
    }
(3)新增会员接口。(get + param方式)
    @GetMapping("/member/param")
    public NormalResponseObject addMemberUseParam2(MemberVO memberVO) {
        return addMember(memberVO);
    }
(4)查询会员详情接口。(get)
    @GetMapping("/member/{id}")
    public NormalResponseObject<MemberVO> getMember(@PathVariable("id") Integer id) {
        if (!memberMap.containsKey(id)) {
            return NormalResponseObject.fail("不存在对应会员信息");
        }
        return NormalResponseObject.sucess(Member.toMemberVO(memberMap.get(id)));
    }
(5)删除会员接口。(delete)
    @DeleteMapping("/member/{id}")
    public NormalResponseObject deleteMember(@PathVariable("id") Integer id) {
        memberMap.remove(id);
        return NormalResponseObject.sucess();
    }
(6)编辑会员接口。(put + param)
    @PutMapping("/member/{id}")
    public NormalResponseObject editMember(@PathVariable("id") Integer id, MemberVO memberVO) {
        if (!memberMap.containsKey(id)) {
            return NormalResponseObject.fail("不存在对应会员信息");
        }
        memberMap.put(id, Member.of(memberVO));
        return NormalResponseObject.sucess();
    }
(7)查询所有会员接口。(get)
    @GetMapping("/member")
    public NormalResponseObject<List<MemberVO>> getAllMember() {
        if(memberMap.size() == 0) {
            return NormalResponseObject.sucess(new ArrayList<>());
        }
        List<MemberVO> voList = memberMap.values().stream().map(Member::toMemberVO)
                .collect(Collectors.toList());
        return NormalResponseObject.sucess(voList);
    }
(8)文件上传接口。(post + multipar/form-data)
    @PostMapping("/member/fileUpload")
    public NormalResponseObject uploadFile(@RequestParam("file") MultipartFile multipartFile,
                                           @RequestParam("fileName") String fileName) {
        if(multipartFile == null || multipartFile.getSize() <= 0) {
            return NormalResponseObject.fail("文件为空");
        }
        System.out.println("上传的文件名为:" + multipartFile.getOriginalFilename());
        System.out.println("传入的fileName参数为:" + fileName);
        // 保存文件
        File file = Paths.get(FILE_PATH, fileName).toFile();
        if(!file.exists()) {
            try {
                file.createNewFile();
            } catch (IOException e) {
                e.printStackTrace();
                return NormalResponseObject.fail("文件操作异常");
            }
        }
        try (
                FileOutputStream fos = new FileOutputStream(file)
        ) {
            InputStream inputStream = multipartFile.getInputStream();
            byte[] buf = new byte[1024];
            int len = 0;
            while ((len = inputStream.read(buf)) > 0) {
                fos.write(buf, 0, len);
            }
        } catch (Exception e) {
            e.printStackTrace();
            return NormalResponseObject.fail("文件操作异常");
        }
        fileMap.put(fileName, file.getAbsolutePath());
        return NormalResponseObject.sucess();
    }
(9)文件名称列表查询接口。(get)
    @GetMapping("/member/files")
    public NormalResponseObject<List<FileObject>> getAllFiles() {
        if(fileMap.size() == 0) {
            return NormalResponseObject.sucess(new ArrayList<>());
        }
        List<FileObject> files = new ArrayList<>();
        fileMap.forEach((key, value) -> {
            FileObject fileObject = new FileObject();
            fileObject.setFileName(key);
            fileObject.setFileAbsolutePath(value);
            files.add(fileObject);
        });
        return NormalResponseObject.sucess(files);
    }
(10)文件下载接口。(get)
    @GetMapping("/member/file/download")
    public void doloadFile(@RequestParam("fileName") String fileName, HttpServletResponse response) {
        // 设置响应头
        try {
            response.setHeader("Content-disposition",
                    "attachment;filename=" + URLEncoder.encode(fileName, "utf-8"));
        } catch (UnsupportedEncodingException e) {
            e.printStackTrace();
        }
        response.setContentType("text/plain");
        // 输出文件
        if (fileMap.containsKey(fileName)) {
            String abs = fileMap.get(fileName);
            try (
                    FileInputStream fis = new FileInputStream(abs);
                    )
            {
                byte[] buf = new byte[1024];
                int len = 0;
                while ((len = fis.read(buf)) > 0) {
                    response.getOutputStream().write(buf, 0, len);
                }
            }catch (Exception e) {
                e.printStackTrace();
            }
        }
    }
2、验证这些接口是否正确。
为了方便,在页面就使用jquery来验证这些接口是否能正常工作。
下面就是 js发起这些请求的代码和截图,如果你对js熟悉或者不想关注,可以跳过。
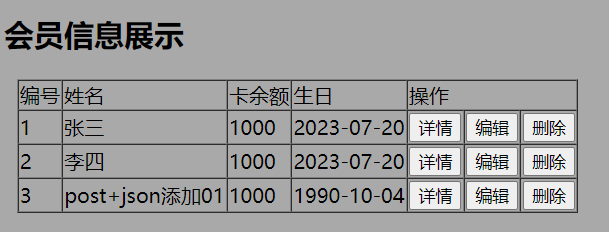
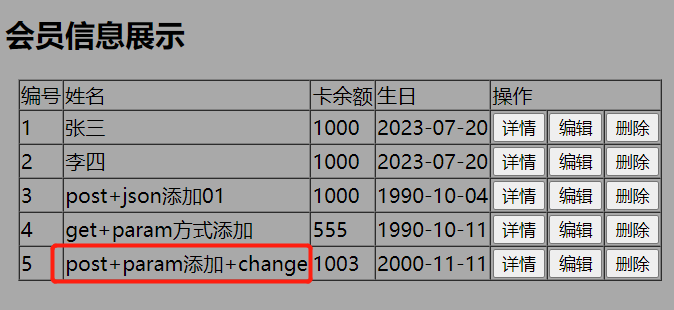
2.1 新增会员数据
首页页面加载,查询所有会员数据。
js代码如下:
function loadAllMembers() {
    let url = "/member";
    $.ajax(url, {
        method: "get",
        success: function (result) {
            let data = result.data;
            if(data) {
                var body = $("#dataTable tbody");
                body.empty();
                for(let index in data) {
                    let trHtml = "<tr>";
                    trHtml += "<td>" + data[index].id + "</td>";
                    trHtml += "<td>" + data[index].name + "</td>";
                    trHtml += "<td>" + data[index].balance + "</td>";
                    trHtml += "<td>" + data[index].birthday + "</td>";
                    trHtml += '<td>' + '<button class="detail" trid=' + data[index].id + '>详情</button>' + '</td>';
                    trHtml += '<td>' + '<button class="edit" trid=' + data[index].id + '>编辑</button>' + '</td>';
                    trHtml += '<td>' + '<button class="del" trid=' + data[index].id + '>删除</button>' + '</td>';
                    trHtml += "</tr>";
                    body.append($(trHtml));
                }
            }
        }
    })
}
这个table每行的按钮包含了详情,编辑,删除。

分别使用三种方式进行添加。
(1)post+json添加
代码如下:
function addMember01(event) {
    event.preventDefault();
    let url = "/member";
    let member = {};
    member.id = $('#addMemberForm [name="id"]').val();
    member.name = $('#addMemberForm [name="name"]').val();
    member.balance = $('#addMemberForm [name="balance"]').val();
    member.birthday = $('#addMemberForm [name="birthday"]').val();
    $.ajax(url, {
        method: "post",
        contentType: "application/json",
        data: JSON.stringify(member),
        success: function (result) {
            if (result.statusCode == 200) {
                $('#addMemberForm [name="id"]').val("");
                $('#addMemberForm [name="name"]').val("");
                $('#addMemberForm [name="balance"]').val("");
                $('#addMemberForm [name="birthday"]').val("");
                loadAllMembers();
            } else {
                window.alert(result.message);
            }
        }
    });
}
截图:

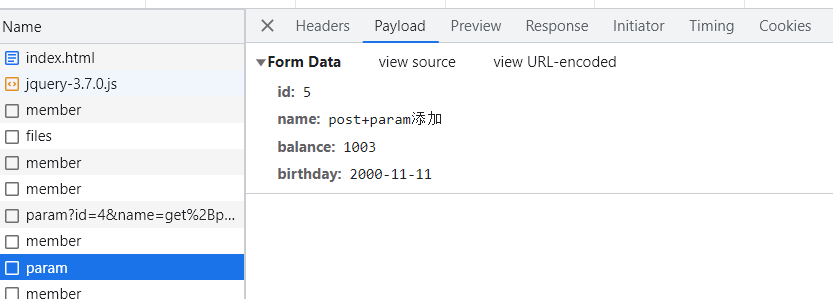
(2)其他两种方式添加的代码和截图。
function addMember02(event) {
    event.preventDefault();
    let url = "/member/param";
    let member = {};
    member.id = $('#addMemberForm [name="id"]').val();
    member.name = $('#addMemberForm [name="name"]').val();
    member.balance = $('#addMemberForm [name="balance"]').val();
    member.birthday = $('#addMemberForm [name="birthday"]').val();
    $.ajax(url, {
        method: "get",
        data: member,
        success: function (result) {
            if (result.statusCode == 200) {
                $('#addMemberForm [name="id"]').val("");
                $('#addMemberForm [name="name"]').val("");
                $('#addMemberForm [name="balance"]').val("");
                $('#addMemberForm [name="birthday"]').val("");
                loadAllMembers();
            } else {
                window.alert(result.message);
            }
        }
    });
}

function addMember03(event) {
    event.preventDefault();
    let url = "/member/param";
    let member = {};
    member.id = $('#addMemberForm [name="id"]').val();
    member.name = $('#addMemberForm [name="name"]').val();
    member.balance = $('#addMemberForm [name="balance"]').val();
    member.birthday = $('#addMemberForm [name="birthday"]').val();
    $.ajax(url, {
        method: "post",
        data: member,
        success: function (result) {
            if (result.statusCode == 200) {
                $('#addMemberForm [name="id"]').val("");
                $('#addMemberForm [name="name"]').val("");
                $('#addMemberForm [name="balance"]').val("");
                $('#addMemberForm [name="birthday"]').val("");
                loadAllMembers();
            } else {
                window.alert(result.message);
            }
        }
    });
}

2.2 修改会员数据,查询详情,删除
(1)对三个按钮的事件委托
修改会员数据其实就是查询回填,加修改。
由于table的行是动态生成的,所以需要对三个按钮进行事件委托,保证新加入的按钮事件也能得到响应。
js代码如下:
// 对table中的操作按钮进行事件委托
$("#dataTable tbody").on( "click", "button", function(event) {
    let id = $(event.target).attr("trid");
    let clz = $(event.target).attr("class");
    if("detail" == clz) {
        let url = "/member/" + id;
        $.ajax(url, {
            method: "get",
            success: function (result) {
                if(result.statusCode == 200) {
                    alert(JSON.stringify(result.data));
                } else {
                    alert(result.message);
                }
            }
        });
    } else if("del" == clz){
        let url = "/member/" + id;
        $.ajax(url, {
            method: "delete",
            success: function (result) {
                if(result.statusCode == 200) {
                    loadAllMembers();
                } else {
                    alert(result.message);
                }
            }
        });
    } else {
        let url = "/member/" + id;
        $.ajax(url, {
            method: "get",
            success: function (result) {
                if(result.statusCode == 200) {
                    $('#editMemberForm [name="id"]').val(result.data.id);
                    $('#editMemberForm [name="name"]').val(result.data.name);
                    $('#editMemberForm [name="balance"]').val(result.data.balance);
                    $('#editMemberForm [name="birthday"]').val(result.data.birthday);
                    $('#showOrHidden').show();
                } else {
                    alert(result.message);
                }
            }
        });
    }
});
上述代码中,完成了详情查看,编辑回填和删除操作。
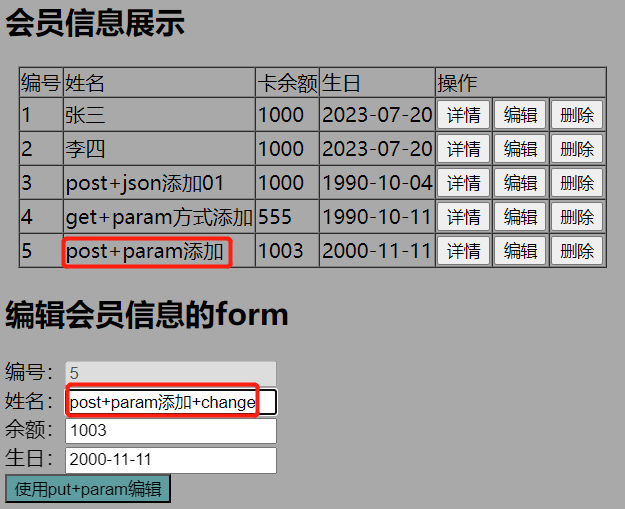
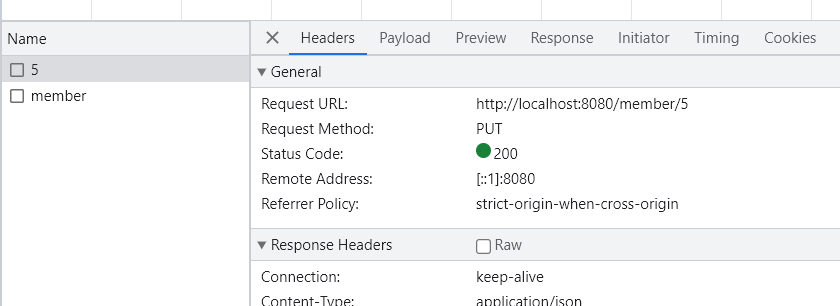
(2)执行修改操作
回填结束后,需要调用修改接口进行数据修改。
js代码如下:
function editMember(event) {
    event.preventDefault();
    let url = "/member/";
    let member = {};
    member.id = $('#editMemberForm [name="id"]').val();
    member.name = $('#editMemberForm [name="name"]').val();
    member.balance = $('#editMemberForm [name="balance"]').val();
    member.birthday = $('#editMemberForm [name="birthday"]').val();
    url += member.id;
    $.ajax(url, {
        method: "put",
        data: member,
        success: function (result) {
            if (result.statusCode == 200) {
                $("#showOrHidden").hide();
                loadAllMembers();
            } else {
                window.alert(result.message);
            }
        }
    });
}
截图如下:
2.3 文件上传和下载
后端在开发文件上传接口的时候需要引入maven依赖。
<!--文件上传需要该依赖-->
<dependency>
    <groupId>commons-fileupload</groupId>
    <artifactId>commons-fileupload</artifactId>
    <version>1.4</version>
</dependency>
对于前端,需要使用对应的特定form如下:
<h2>文件上传的form</h2>
<div>
    <form id="fileForm" action="/member/fileUpload" enctype="multipart/form-data">
        请选择文件:<input type="file" name="file"><br>
        输入后台存储的文件名称:<input type="text" name="fileName">
        <input type="submit" value="上传" onclick="uploadFile(event)">
    </form>
</div>
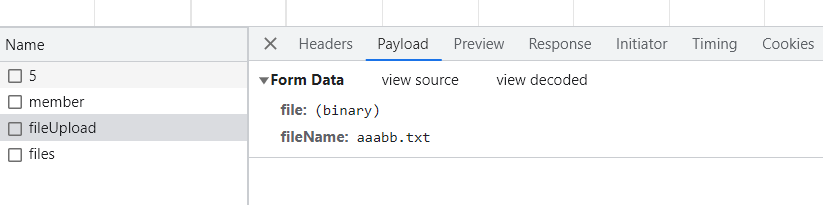
然后js代码中注意阻止默认事件就行了:
function uploadFile(event) {
    // 防止默认表单提交行为
    event.preventDefault();

    // 获取文件对象
    var file = $('input[type=file]')[0].files[0];
    if (!file) {
        alert('请选择文件!')
        return;
    }

    // 创建 FormData 对象
    var formData = new FormData();
    formData.append('file', file);
    formData.append("fileName", $('[name="fileName"]').val());

    // 发送 AJAX 请求
    $.ajax({
        url: '/member/fileUpload',
        type: 'POST',
        data: formData,
        processData: false,
        contentType: false,
        success: function (response) {
            alert('上传成功!');
            getAllUploadedFile();
        },
        error: function (xhr, status, error) {
            alert('上传失败:' + error);
        }
    });
}
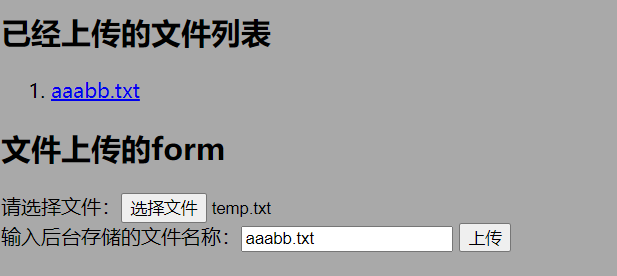
至于文件下载,前端只需要提供一个超链接去调用后端接口就行了。
这里需要注意的就是需要对url进行编码操作,js代码如下:
function getAllUploadedFile() {
    let url = "/member/files";
    $.ajax(url, {
        method: "get",
        success: function (result){
            if(result.statusCode == 200) {
                $("#fileOlList").empty();
                for(let index in result.data) {
                    let li = '<li><a href="/member/file/download?fileName='
                        + encodeURI(result.data[index].fileName) + '">'
                        + result.data[index].fileName + '</a></li>';
                    $("#fileOlList").append($(li))
                }
            } else {
                alert(result.message);
            }
        }
    });
}
由于后端接口已经使用了对应的响应头设置,浏览器就会下载文件:


到这里呢,既验证了接口的正确性,同时也将前端js如何发起ajax请求访问服务器进行了描述。
下面就是使用java来发送http请求了。
3、使用java原生方式发送http请求。
3.1 简单描述HttpUrlConnection
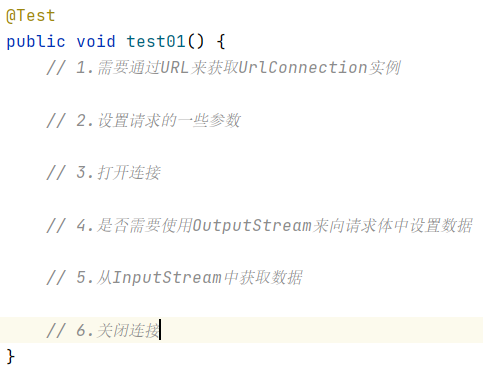
上面的截图就是使用HttpUrlConnection进行http请求发送的几个重要步骤。
还是挺复杂的。。。
3.2 发起get请求获取会员数据
代码如下:
@Test
public void test01() {
    // 1.需要通过URL来获取UrlConnection实例
    String url = "http://localhost:8080/member";
    URL urlObject = null;
    HttpURLConnection httpURLConnection = null;
    OutputStream os = null;
    InputStream is = null;
    ByteArrayOutputStream baos = new ByteArrayOutputStream(1024);
    try {
        urlObject = new URL(url);
    } catch (MalformedURLException e) {
        e.printStackTrace();
        return;
    }
    try {
        URLConnection urlConnection = urlObject.openConnection();
        if(urlConnection instanceof HttpURLConnection) {
            httpURLConnection = (HttpURLConnection) urlConnection;
        }
    } catch (IOException e) {
        e.printStackTrace();
        return;
    }
    if(null == httpURLConnection) {
        return;
    }
    try {
        // 2.设置请求的一些参数
        httpURLConnection.setRequestMethod(HttpMethod.GET.name());
        httpURLConnection.setDoOutput(false);
        httpURLConnection.setDoInput(true);

        // 3.打开连接
        httpURLConnection.connect();

        // 4.是否需要使用OutputStream来向请求体中设置数据
        // 暂时不需要

        // 5.从InputStream中获取数据
        int responseCode = httpURLConnection.getResponseCode();
        if(responseCode != 200) {
            System.out.println("请求出错了");
            return;
        }
        is = httpURLConnection.getInputStream();
        byte[] buf = new byte[1024];
        int len = 0;
        while ((len = is.read(buf)) > 0) {
            // 使用ByteArrayOutputStream来缓存数据
            baos.write(buf, 0, len);
        }
        String retStr = new String(baos.toByteArray(), "utf-8");
        System.out.println(retStr);
    }catch (Exception e) {
        e.printStackTrace();
    }finally {
        // 6.关闭连接
        closeSomething(os);
        closeSomething(is);
        closeSomething(baos);
        if(null != httpURLConnection) {
            httpURLConnection.disconnect();
        }
    }
}
结果如下图:

此时要弄清楚一个问题,这几个步骤,哪一步发起的连接呢?
下面进行验证:
(1)openConnection()


(2)connect()

说明是在connect()方法调用只有才向服务器发起的tcp连接。
3.3 增加会员数据
其实上一步看完,我相信基本说清楚了使用HttpUrlConnection来进行http请求的过程基本说清楚了。
下面我们看看如何添加数据呢?
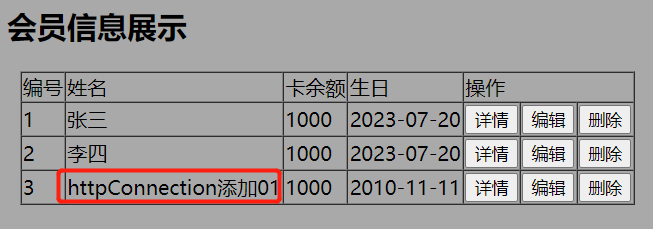
(1)发送json数据
下面我就贴出部分代码就行了。
// 2.设置请求的一些参数
httpURLConnection.setRequestMethod(HttpMethod.POST.name());
// 设置是否需要输出数据和接收数据
httpURLConnection.setDoOutput(true);
httpURLConnection.setDoInput(true);
httpURLConnection.setRequestProperty(HttpHeaders.CONTENT_TYPE,
        MediaType.APPLICATION_JSON_VALUE);

// 3.打开连接
httpURLConnection.connect();

// 4.是否需要使用OutputStream来向请求体中设置数据
os = httpURLConnection.getOutputStream();
MemberVO memberVO = new MemberVO();
memberVO.setId(3);
memberVO.setBirthday("2010-11-11");
memberVO.setBalance("1000");
memberVO.setName("httpConnection添加01");
String reqBodyStr = JSON.toJSONString(memberVO);
os.write(reqBodyStr.getBytes(StandardCharsets.UTF_8));
os.flush();

// 5.从InputStream中获取数据
int responseCode = httpURLConnection.getResponseCode();
if(responseCode != 200) {
    System.out.println("请求出错了");
    return;
}
is = httpURLConnection.getInputStream();
byte[] buf = new byte[1024];
int len = 0;
while ((len = is.read(buf)) > 0) {
    // 使用ByteArrayOutputStream来缓存数据
    baos.write(buf, 0, len);
}
String retStr = new String(baos.toByteArray(), "utf-8");
JSONObject jsonObject = JSON.parseObject(retStr);
if (jsonObject.getInteger("statusCode") != 200) {
    throw new Exception(jsonObject.getString("message"));
}
执行代码,可以看见添加成功了:
通过param来添加也试试:
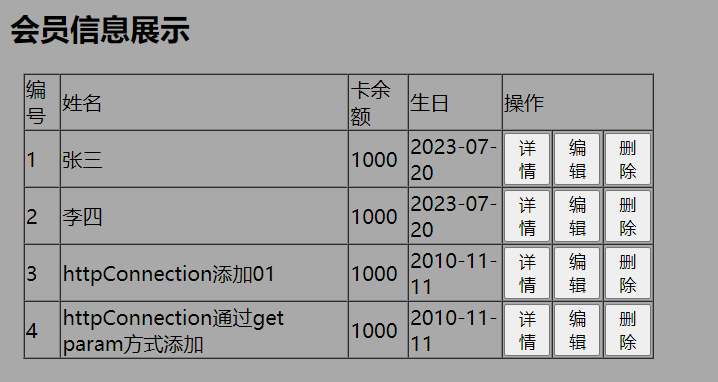
(2)使用get发送param数据
// 这里在构建url的时候使用spring中的工具类
MemberVO memberVO = new MemberVO();
memberVO.setId(4);
memberVO.setBirthday("2010-11-11");
memberVO.setBalance("1000");
memberVO.setName("httpConnection通过get+param方式添加");
UriComponents urlCom = UriComponentsBuilder.fromHttpUrl(url)
        .queryParam("name", memberVO.getName())
        .queryParam("id", memberVO.getId())
        .queryParam("birthday", memberVO.getBirthday())
        .queryParam("balance", memberVO.getBalance())
        .build().encode(StandardCharsets.UTF_8);

URL urlObject = null;
HttpURLConnection httpURLConnection = null;
OutputStream os = null;
InputStream is = null;
ByteArrayOutputStream baos = new ByteArrayOutputStream(1024);
try {
    urlObject = new URL(urlCom.toUriString());
} catch (MalformedURLException e) {
    e.printStackTrace();
    return;
}
数据添加成功:
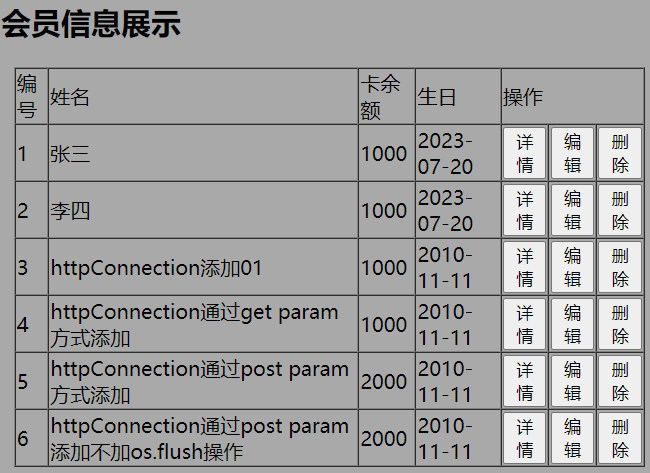
(3)使用post发送param数据
这里我只贴部分代码吧。
// 4.是否需要使用OutputStream来向请求体中设置数据
// 这里在构建url的时候使用spring中的工具类
MemberVO memberVO = new MemberVO();
memberVO.setId(5);
memberVO.setBirthday("2010-11-11");
memberVO.setBalance("2000");
memberVO.setName("httpConnection通过post+param方式添加");
UriComponents urlCom = UriComponentsBuilder.fromHttpUrl(url)
        .queryParam("name", memberVO.getName())
        .queryParam("id", memberVO.getId())
        .queryParam("birthday", memberVO.getBirthday())
        .queryParam("balance", memberVO.getBalance())
        .build().encode(StandardCharsets.UTF_8);
os = httpURLConnection.getOutputStream();
os.write(urlCom.getQuery().getBytes(StandardCharsets.UTF_8));
os.flush();
发现数据添加成功:

其实代码写到这里,我详情发送put请求和delete请求按照这个套路写就行了,问题不打了吧。
为啥要讲这么多原生的东西,其实目的很简单,
第一,并不是所有系统都能像我们平常开发的业务系统一样,引入很多开源的jar包。例如:大厂自己封装的工具,还有物联网设备。
第二,我们只有知道了原生的东西,才知道如何理解和优化有些框架。
这里有一个问题,我们在使用原生socket编程的时候,其实OutputStream的flush操作是将os缓冲区的内容推给网卡,那上述代码中的flush有啥作用呢?
能不调用吗?
验证如下:
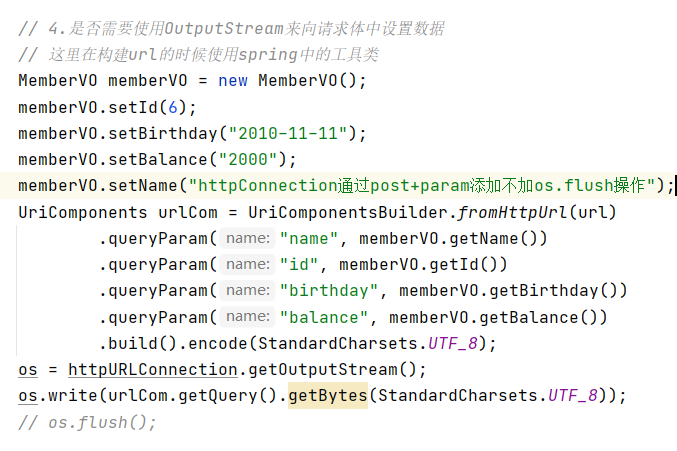
代码执行通过并添加成功了:
其实相当于,java为我们计算了body体的长度,并设置了对应的请求头给服务端。
(我理解这个操作应该是我们尝试获取InputStream流的时候做的。)
3.4 文件操作相关
通过上述的几个例子,至少我们明白了,只要明白了发送数据包的包结构,那么就完全可以使用原生的方式发送http请求。
下面我们来看看这种multipart/form-data类型的数据怎么发送呢?
我先截个网上对该MIME-TYPE的描述:
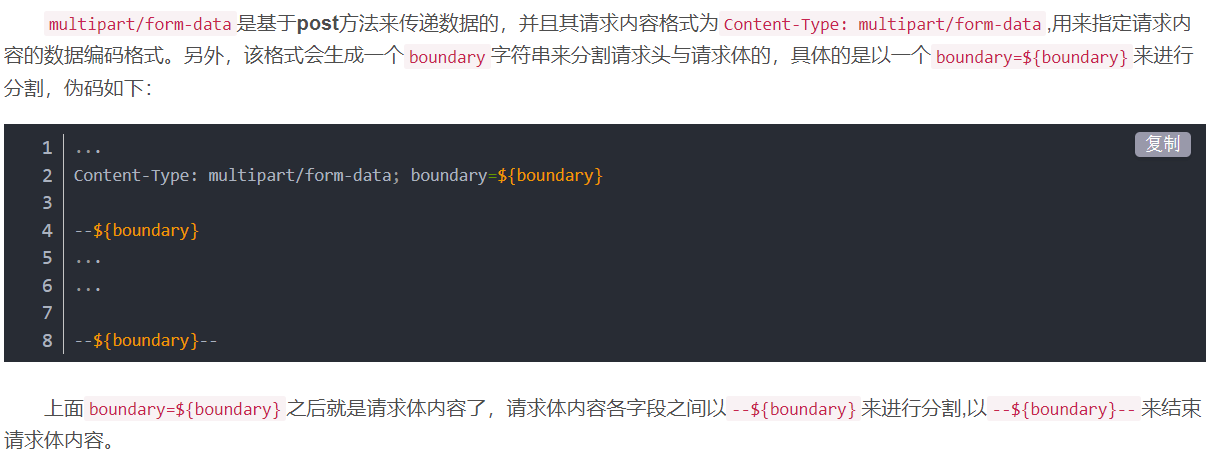
深入了解可以看看:https://blog.csdn.net/dreamerrrrrr/article/details/111146763
下面就是java代码了:
    @Test
    public void uploadFileTest() {
        // 1.需要通过URL来获取UrlConnection实例
        String url = "http://localhost:8080/member/fileUpload";

        URL urlObject = null;
        HttpURLConnection httpURLConnection = null;
        OutputStream os = null;
        InputStream is = null;
        ByteArrayOutputStream baos = new ByteArrayOutputStream(1024);
        try {
            urlObject = new URL(url);
        } catch (MalformedURLException e) {
            e.printStackTrace();
            return;
        }
        try {
            URLConnection urlConnection = urlObject.openConnection();
            if(urlConnection instanceof HttpURLConnection) {
                httpURLConnection = (HttpURLConnection) urlConnection;
            }
        } catch (IOException e) {
            e.printStackTrace();
            return;
        }
        if(null == httpURLConnection) {
            return;
        }
        try {
            // 2.设置请求的一些参数
            httpURLConnection.setRequestMethod(HttpMethod.POST.name());
            // 设置是否需要输出数据和接收数据
            httpURLConnection.setDoOutput(true);
            httpURLConnection.setDoInput(true);
            // 生成boundary,理论上只要不重复就行。
            String boundary = "JAVA-HttpUrlConnection-" +
                    UUID.randomUUID().toString().replace("-", "");
            String boundaryPrefix = "--";
            httpURLConnection.setRequestProperty(HttpHeaders.CONTENT_TYPE,
                    "multipart/form-data; boundary=" + boundary);

            // 3.打开连接
            httpURLConnection.connect();

            // 4.是否需要使用OutputStream来向请求体中设置数据
            os = httpURLConnection.getOutputStream();
            /* 设置参数 */
            // 分割符
            os.write((boundaryPrefix + boundary + "\r\n").getBytes(StandardCharsets.UTF_8));
            // 数据头
            os.write((HttpHeaders.CONTENT_DISPOSITION + ": form-data; name=\"fileName\"\r\n")
                    .getBytes(StandardCharsets.UTF_8));
            // 空行
            os.write("\r\n".getBytes(StandardCharsets.UTF_8));
            // 参数数据
            os.write(("urlConnection上传的文件.txt").getBytes(StandardCharsets.UTF_8));
            // 换行
            os.write("\r\n".getBytes(StandardCharsets.UTF_8));

            /* 设置文件 */
            // 分割符
            os.write((boundaryPrefix + boundary + "\r\n").getBytes(StandardCharsets.UTF_8));
            // 数据头
            os.write((HttpHeaders.CONTENT_DISPOSITION + ": form-data; name=\"file\"; filename=\"temp.txt\"\r\n")
                    .getBytes(StandardCharsets.UTF_8));
            // 空行
            os.write("\r\n".getBytes(StandardCharsets.UTF_8));
            // 文件数据
            Files.copy(Paths.get("d:", "temp.txt"), os);
            // 换行
            os.write("\r\n".getBytes(StandardCharsets.UTF_8));

            // 结尾
            os.write((boundaryPrefix + boundary + boundaryPrefix).getBytes(StandardCharsets.UTF_8));

            // 5.从InputStream中获取数据
            int responseCode = httpURLConnection.getResponseCode();
            if(responseCode != 200) {
                System.out.println("请求出错了");
                return;
            }
            is = httpURLConnection.getInputStream();
            byte[] buf = new byte[1024];
            int len = 0;
            while ((len = is.read(buf)) > 0) {
                // 使用ByteArrayOutputStream来缓存数据
                baos.write(buf, 0, len);
            }
            String retStr = new String(baos.toByteArray(), "utf-8");
            JSONObject jsonObject = JSON.parseObject(retStr);
            if (jsonObject.getInteger("statusCode") != 200) {
                throw new Exception(jsonObject.getString("message"));
            }
        }catch (Exception e) {
            e.printStackTrace();
        }finally {
            // 6.关闭连接
            closeSomething(os);
            closeSomething(is);
            closeSomething(baos);
            if(null != httpURLConnection) {
                httpURLConnection.disconnect();
            }
        }
    }
上述代码调试了很多遍才成功。
其实就是要理解multipart/form-data这种类型数据的报文结构。
我尝试把内容通过文件的方式展示出来:
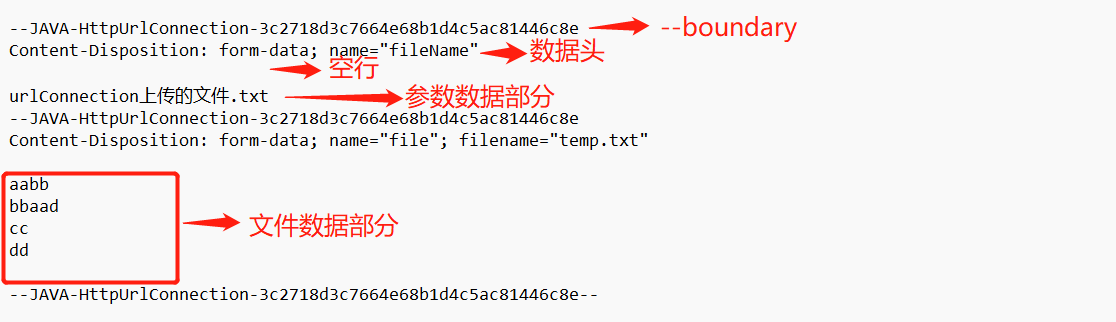
所以一个part包含:
--${boundary}\r\n
数据头\r\n
\r\n
数据部分\r\n
最后再以--${boundary}--结尾就可以了。
当然验证截图如下:

二、使用apache的httpclient组件发送http请求
讲完上述第一部分,我相信我们对http协议本身常用的MIME类型细节已经熟悉了,甚至对java原生的发送请求的api也熟悉了。
但是毕竟太复杂了,确实不友好。
现在我们讲讲apache的httpclient组件发送http请求有多丝滑。
1.引入httpclient的依赖
我们引入4.x.x版本:
<dependency>
    <groupId>org.apache.httpcomponents</groupId>
    <artifactId>httpclient</artifactId>
    <version>4.5.14</version>
</dependency>
这是个经典的版本。
2.发送get请求
我先贴出官网给的一个简单例子。
CloseableHttpClient httpclient = HttpClients.createDefault();
HttpGet httpGet = new HttpGet("http://targethost/homepage");
CloseableHttpResponse response1 = httpclient.execute(httpGet);
// The underlying HTTP connection is still held by the response object
// to allow the response content to be streamed directly from the network socket.
// In order to ensure correct deallocation of system resources
// the user MUST call CloseableHttpResponse#close() from a finally clause.
// Please note that if response content is not fully consumed the underlying
// connection cannot be safely re-used and will be shut down and discarded
// by the connection manager.
try {
    System.out.println(response1.getStatusLine());
    HttpEntity entity1 = response1.getEntity();
    // do something useful with the response body
    // and ensure it is fully consumed
    EntityUtils.consume(entity1);
} finally {
    response1.close();
}
下面我们仿照着写一个查询会员列表的功能
代码:
@Test
public void testGetMemberList() throws Exception{
    CloseableHttpClient httpclient = HttpClients.createDefault();
    HttpGet httpGet = new HttpGet("http://localhost:8080/member");
    CloseableHttpResponse response1 = httpclient.execute(httpGet);
    ByteArrayOutputStream baos = new ByteArrayOutputStream(1024);
    try {
        System.out.println(response1.getStatusLine());
        HttpEntity entity1 = response1.getEntity();

        InputStream is = entity1.getContent();
        byte[] buf = new byte[1024];
        int len = 0;
        while ((len = is.read(buf)) > 0) {
            // 使用ByteArrayOutputStream来缓存数据
            baos.write(buf, 0, len);
        }
        String retStr = new String(baos.toByteArray(), "utf-8");
        JSONObject jsonObject = JSON.parseObject(retStr);
        if (jsonObject.getInteger("statusCode") != 200) {
            throw new Exception(jsonObject.getString("message"));
        }
        System.out.println(retStr);
        EntityUtils.consume(entity1);
    } finally {
        response1.close();
        baos.close();
    }
}
打印截图如下:
3.发送post请求
3.1 post+param请求
直接上代码吧
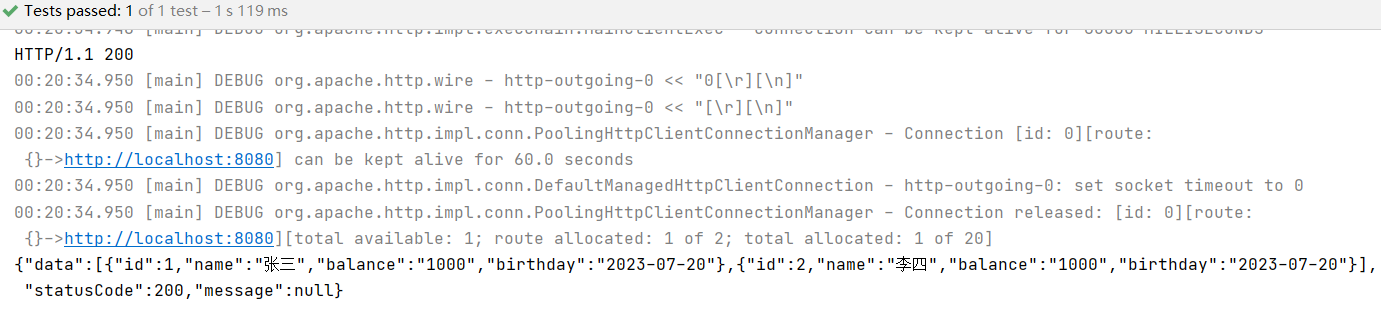
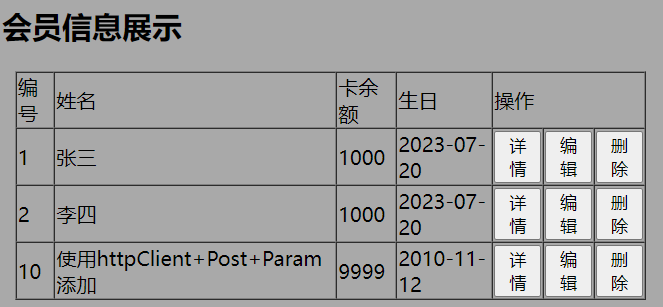
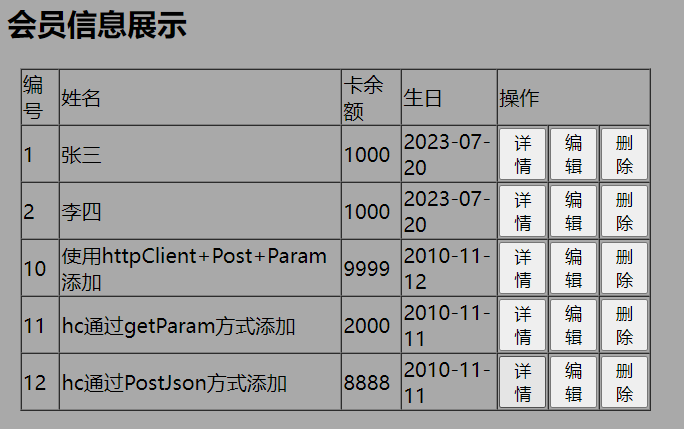
@Test
public void testPostAddMember() throws Exception {
    CloseableHttpClient httpclient = HttpClients.createDefault();
    HttpPost httpPost = new HttpPost("http://localhost:8080/member/param");
    List<NameValuePair> nvps = new ArrayList<NameValuePair>();
    nvps.add(new BasicNameValuePair("id", "10"));
    nvps.add(new BasicNameValuePair("name", "使用httpClient+Post+Param添加"));
    nvps.add(new BasicNameValuePair("birthday", "2010-11-12"));
    nvps.add(new BasicNameValuePair("balance", "9999"));
    httpPost.setEntity(new UrlEncodedFormEntity(nvps));
    CloseableHttpResponse response2 = httpclient.execute(httpPost);
    ByteArrayOutputStream baos = new ByteArrayOutputStream(1024);
    try {
        System.out.println(response2.getStatusLine());
        HttpEntity entity2 = response2.getEntity();
        InputStream is = entity2.getContent();
        byte[] buf = new byte[1024];
        int len = 0;
        while ((len = is.read(buf)) > 0) {
            // 使用ByteArrayOutputStream来缓存数据
            baos.write(buf, 0, len);
        }
        String retStr = new String(baos.toByteArray(), "utf-8");
        JSONObject jsonObject = JSON.parseObject(retStr);
        if (jsonObject.getInteger("statusCode") != 200) {
            throw new Exception(jsonObject.getString("message"));
        }
        System.out.println(retStr);
        EntityUtils.consume(entity2);
    } finally {
        response2.close();
        baos.close();
    }
}
添加成功的截图:

3.2 使用get + param方式请求
代码如下:
    @Test
    public void testGetParamAddMember() throws Exception {
        String url = "http://localhost:8080/member/param";
        MemberVO memberVO = new MemberVO();
        memberVO.setId(11);
        memberVO.setBirthday("2010-11-11");
        memberVO.setBalance("2000");
        memberVO.setName("hc通过getParam方式添加");
        UriComponents urlCom = UriComponentsBuilder.fromHttpUrl(url)
                .queryParam("name", memberVO.getName())
                .queryParam("id", memberVO.getId())
                .queryParam("birthday", memberVO.getBirthday())
                .queryParam("balance", memberVO.getBalance())
                .build().encode(StandardCharsets.UTF_8);

        CloseableHttpClient httpclient = HttpClients.createDefault();
        HttpGet httpGet = new HttpGet(urlCom.toUriString());
        // 下面这种方式已经试过,不行
//        BasicHttpParams httpParams = new BasicHttpParams();
//        httpParams.setParameter("id", 11);
//        httpParams.setParameter("name", "使用hcGetParam方式添加");
//        httpParams.setParameter("birthday", "2011-03-11");
//        httpParams.setParameter("balance", 99999);
//        httpGet.setParams(httpParams);
        CloseableHttpResponse response2 = httpclient.execute(httpGet);
        ByteArrayOutputStream baos = new ByteArrayOutputStream(1024);
        try {
            System.out.println(response2.getStatusLine());
            HttpEntity entity2 = response2.getEntity();
            InputStream is = entity2.getContent();
            byte[] buf = new byte[1024];
            int len = 0;
            while ((len = is.read(buf)) > 0) {
                // 使用ByteArrayOutputStream来缓存数据
                baos.write(buf, 0, len);
            }
            String retStr = new String(baos.toByteArray(), "utf-8");
            JSONObject jsonObject = JSON.parseObject(retStr);
            if (jsonObject.getInteger("statusCode") != 200) {
                throw new Exception(jsonObject.getString("message"));
            }
            System.out.println(retStr);
            EntityUtils.consume(entity2);
        } finally {
            response2.close();
            baos.close();
        }
    }


3.3 通过post+json方式添加会员
@Test
public void testPostJsonAddMember() throws Exception {
    // 获取hc实例
    CloseableHttpClient httpclient = HttpClients.createDefault();
    // 构造HttpUriRequest实例
    HttpPost httpPost = new HttpPost("http://localhost:8080/member");
    // 设置entity
    MemberVO memberVO = new MemberVO();
    memberVO.setId(12);
    memberVO.setBirthday("2010-11-11");
    memberVO.setBalance("8888");
    memberVO.setName("hc通过PostJson方式添加");
    StringEntity stringEntity = new StringEntity(JSON.toJSONString(memberVO), "utf-8");
    stringEntity.setContentType(MediaType.APPLICATION_JSON_VALUE);
    httpPost.setEntity(stringEntity);
    // 发送请求
    CloseableHttpResponse response2 = httpclient.execute(httpPost);
    ByteArrayOutputStream baos = new ByteArrayOutputStream(1024);
    try {
        System.out.println(response2.getStatusLine());
        // 获取响应实体
        HttpEntity entity2 = response2.getEntity();
        InputStream is = entity2.getContent();
        byte[] buf = new byte[1024];
        int len = 0;
        while ((len = is.read(buf)) > 0) {
            // 使用ByteArrayOutputStream来缓存数据
            baos.write(buf, 0, len);
        }
        String retStr = new String(baos.toByteArray(), "utf-8");
        JSONObject jsonObject = JSON.parseObject(retStr);
        if (jsonObject.getInteger("statusCode") != 200) {
            throw new Exception(jsonObject.getString("message"));
        }
        System.out.println(retStr);
        EntityUtils.consume(entity2);
    } finally {
        response2.close();
        baos.close();
    }
}
验证结果:
4.文件上传功能
代码基本是参照官网给的example来编写的,这里要强调,需要引入一个依赖:
<dependency>
    <groupId>org.apache.httpcomponents</groupId>
    <artifactId>httpmime</artifactId>
    <version>4.5.14</version>
</dependency>
java代码如下:
@Test
public void hcUploadFileTest() throws Exception{
    CloseableHttpClient httpclient = HttpClients.createDefault();
    try {
        HttpPost httppost = new HttpPost("http://localhost:8080/member/fileUpload");
        FileBody file = new FileBody(Paths.get("d:", "temp.txt").toFile());
        StringBody fileName = StringBody.create("hc传入的文件名称.txt", ContentType.TEXT_PLAIN.getMimeType(),
                Charset.forName("utf-8"));

        HttpEntity reqEntity = MultipartEntityBuilder.create()
                .addPart("file", file)
                .addPart("fileName", fileName)
                .build();


        httppost.setEntity(reqEntity);

        System.out.println("executing request " + httppost.getRequestLine());
        CloseableHttpResponse response = httpclient.execute(httppost);
        try {
            System.out.println("----------------------------------------");
            System.out.println(response.getStatusLine());
            HttpEntity resEntity = response.getEntity();
            if (resEntity != null) {
                System.out.println("Response content length: " + resEntity.getContentLength());
            }
            EntityUtils.consume(resEntity);
        } finally {
            response.close();
        }
    } finally {
        httpclient.close();
    }
}
我先把其打印的请求报文日志贴出来,更加能帮助你理解multipart/form-data的报文结构:
06:21:07.936 [main] DEBUG org.apache.http.headers - http-outgoing-0 >> POST /member/fileUpload HTTP/1.1
06:21:07.936 [main] DEBUG org.apache.http.headers - http-outgoing-0 >> Content-Length: 426
06:21:07.936 [main] DEBUG org.apache.http.headers - http-outgoing-0 >> Content-Type: multipart/form-data; boundary=RrxE9BM4vDUS-0Liy4BUeB4WldSN9gub
06:21:07.936 [main] DEBUG org.apache.http.headers - http-outgoing-0 >> Host: localhost:8080
06:21:07.936 [main] DEBUG org.apache.http.headers - http-outgoing-0 >> Connection: Keep-Alive
06:21:07.936 [main] DEBUG org.apache.http.headers - http-outgoing-0 >> User-Agent: Apache-HttpClient/4.5.14 (Java/1.8.0_211)
06:21:07.936 [main] DEBUG org.apache.http.headers - http-outgoing-0 >> Accept-Encoding: gzip,deflate
06:21:07.937 [main] DEBUG org.apache.http.wire - http-outgoing-0 >> "POST /member/fileUpload HTTP/1.1[\r][\n]"
06:21:07.937 [main] DEBUG org.apache.http.wire - http-outgoing-0 >> "Content-Length: 426[\r][\n]"
06:21:07.937 [main] DEBUG org.apache.http.wire - http-outgoing-0 >> "Content-Type: multipart/form-data; boundary=RrxE9BM4vDUS-0Liy4BUeB4WldSN9gub[\r][\n]"
06:21:07.937 [main] DEBUG org.apache.http.wire - http-outgoing-0 >> "Host: localhost:8080[\r][\n]"
06:21:07.937 [main] DEBUG org.apache.http.wire - http-outgoing-0 >> "Connection: Keep-Alive[\r][\n]"
06:21:07.937 [main] DEBUG org.apache.http.wire - http-outgoing-0 >> "User-Agent: Apache-HttpClient/4.5.14 (Java/1.8.0_211)[\r][\n]"
06:21:07.937 [main] DEBUG org.apache.http.wire - http-outgoing-0 >> "Accept-Encoding: gzip,deflate[\r][\n]"
06:21:07.937 [main] DEBUG org.apache.http.wire - http-outgoing-0 >> "[\r][\n]"
06:21:07.937 [main] DEBUG org.apache.http.wire - http-outgoing-0 >> "--RrxE9BM4vDUS-0Liy4BUeB4WldSN9gub[\r][\n]"
06:21:07.937 [main] DEBUG org.apache.http.wire - http-outgoing-0 >> "Content-Disposition: form-data; name="file"; filename="temp.txt"[\r][\n]"
06:21:07.937 [main] DEBUG org.apache.http.wire - http-outgoing-0 >> "Content-Type: application/octet-stream[\r][\n]"
06:21:07.937 [main] DEBUG org.apache.http.wire - http-outgoing-0 >> "Content-Transfer-Encoding: binary[\r][\n]"
06:21:07.938 [main] DEBUG org.apache.http.wire - http-outgoing-0 >> "[\r][\n]"
06:21:07.938 [main] DEBUG org.apache.http.wire - http-outgoing-0 >> "aabb[\n]"
06:21:07.938 [main] DEBUG org.apache.http.wire - http-outgoing-0 >> "bbaad[\n]"
06:21:07.938 [main] DEBUG org.apache.http.wire - http-outgoing-0 >> "cc[\n]"
06:21:07.938 [main] DEBUG org.apache.http.wire - http-outgoing-0 >> "dd[\n]"
06:21:07.938 [main] DEBUG org.apache.http.wire - http-outgoing-0 >> "[\r][\n]"
06:21:07.938 [main] DEBUG org.apache.http.wire - http-outgoing-0 >> "--RrxE9BM4vDUS-0Liy4BUeB4WldSN9gub[\r][\n]"
06:21:07.938 [main] DEBUG org.apache.http.wire - http-outgoing-0 >> "Content-Disposition: form-data; name="fileName"[\r][\n]"
06:21:07.938 [main] DEBUG org.apache.http.wire - http-outgoing-0 >> "Content-Type: text/plain; charset=UTF-8[\r][\n]"
06:21:07.938 [main] DEBUG org.apache.http.wire - http-outgoing-0 >> "Content-Transfer-Encoding: 8bit[\r][\n]"
06:21:07.938 [main] DEBUG org.apache.http.wire - http-outgoing-0 >> "[\r][\n]"
06:21:07.938 [main] DEBUG org.apache.http.wire - http-outgoing-0 >> "hc[0xe4][0xbc][0xa0][0xe5][0x85][0xa5][0xe7][0x9a][0x84][0xe6][0x96][0x87][0xe4][0xbb][0xb6][0xe5][0x90][0x8d][0xe7][0xa7][0xb0].txt"
06:21:07.939 [main] DEBUG org.apache.http.wire - http-outgoing-0 >> "[\r][\n]"
06:21:07.939 [main] DEBUG org.apache.http.wire - http-outgoing-0 >> "--RrxE9BM4vDUS-0Liy4BUeB4WldSN9gub--[\r][\n]"
看到这里,发现httpclient发送http请求的确简单了很多。
三、使用spring的RestTemplate发送http请求
RestTemplate其实是spring提供的一种高级的api去发起http请求,我们可以参考官网对RestTemplate的解释:

意思就是说,默认情况RestTemplate使用了HttpURLConnection作为其底层的实现。
但是也可以自己切换到其他库,只要这些库实现了ClientHttpRequestFactory就可以。
比如:Apache HttpComponents,netty,OkHttp等。这里说的Apache HttpComponents你可以理解成就是我们上面讲到的httpclient。
1.使用默认的实现来发送请求
1.1 发送get+param请求增加会员数据
代码如下:
@Test
public void testGetUseParamAddMember() {
    String url = "http://localhost:8080/member/param";
    MemberVO memberVO = new MemberVO();
    memberVO.setId(100);
    memberVO.setBirthday("2010-11-11");
    memberVO.setBalance("9888");
    memberVO.setName("通过restTemplate的get+param方式添加");
    UriComponents urlCom = UriComponentsBuilder.fromHttpUrl(url)
            .queryParam("name", memberVO.getName())
            .queryParam("id", memberVO.getId())
            .queryParam("birthday", memberVO.getBirthday())
            .queryParam("balance", memberVO.getBalance())
            .build().encode(StandardCharsets.UTF_8);
    String retStr = restTemplate.getForObject(urlCom.toUriString(), String.class);
    if (StringUtils.isEmpty(retStr)) {
        throw new RuntimeException("");
    }
    JSONObject jsonObject = JSON.parseObject(retStr);
    if (jsonObject.getInteger("statusCode") != null
            && 200 != jsonObject.getInteger("statusCode")) {
        throw new RuntimeException("");
    }
    System.out.println(retStr);
}
成功截图:

但是有问题,我们看看查询到的列表:
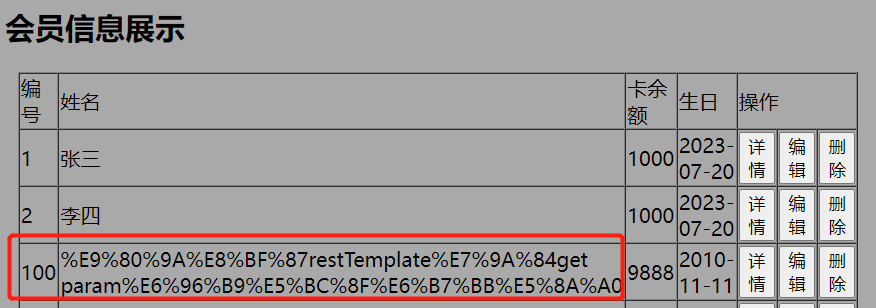
这条数据是有很大问题的,如果url发送前没有编码的话,调用是不会成功的,那这是为什么呢?
看看下面的截图:
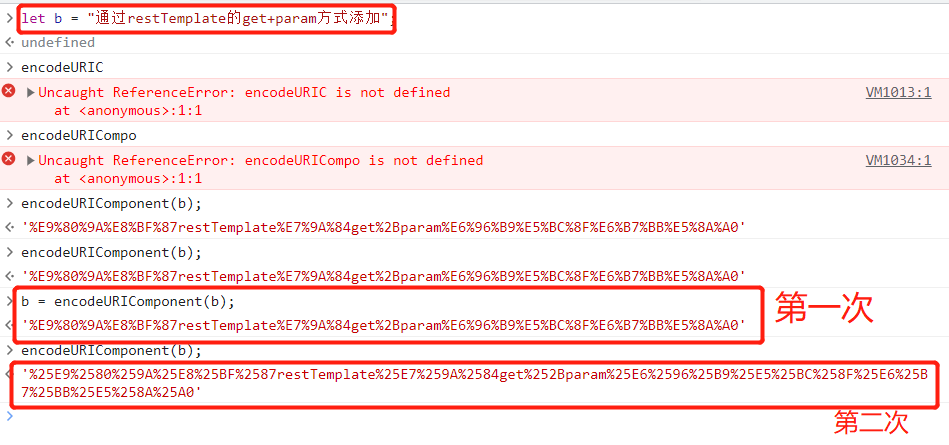
得到的结论就是:如果在使用RestTemplate的api的时候,如果传入uri对象实例,那么其内部不会进行uri编码操作,而如果传入的是string,那么
内部会自动进行一次uri编码。而在我们代码里面,传入string之前,自己进行了一次编码,而api内部又进行了一次编码,所以有问题。
所以我们发现,api中,一旦传入的是uri对象,后面的参数值就没有了,意味着自己必须提前准备好uri。
1.2 get+param请求的问题解决
(1)尝试传入uri对象
// 构造UriComponents的时候编码
UriComponents urlCom = UriComponentsBuilder.fromHttpUrl(url)
        .queryParam("name", memberVO.getName())
        .queryParam("id", memberVO.getId())
        .queryParam("birthday", memberVO.getBirthday())
        .queryParam("balance", memberVO.getBalance())
        .encode()
        .build();
// 传入uri对象
String retStr = restTemplate.getForObject(urlCom.toUri(), String.class);
(2)传入string但是自己首先不编码
// 构造UriComponents的时候不进行编码
UriComponents urlCom = UriComponentsBuilder.fromHttpUrl(url)
        .queryParam("name", memberVO.getName())
        .queryParam("id", memberVO.getId())
        .queryParam("birthday", memberVO.getBirthday())
        .queryParam("balance", memberVO.getBalance())
        .build();
// 传入的string是未编码的
String retStr = restTemplate.getForObject(urlCom.toUriString(), String.class);
1.3 发送get+param请求增加会员数据新写法
首先我们要为RestTemplate配置一个UriTemplateHandler实例。
@BeforeAll
public static void init() {
    restTemplate = new RestTemplate();
    String baseUrl = "http://localhost:8080";
    DefaultUriBuilderFactory factory = new DefaultUriBuilderFactory(baseUrl);
    factory.setEncodingMode(DefaultUriBuilderFactory.EncodingMode.TEMPLATE_AND_VALUES);
    restTemplate.setUriTemplateHandler(factory);
}
该配置已经把请求地址的基础部分配置好了,并设置了地址模板的处理模式。
其次在发起调用的时候加上对应的参数值就行了。
@Test
public void testGetUseParamAddMember2() {
    String uri = "/member/param?id={a}&name={b}&birthday={c}&balance={d}";
    String retStr = restTemplate.getForObject(uri, String.class,
            101, "rtGetParam使用模板方式添加", "2001-10-23", 998);
    if (StringUtils.isEmpty(retStr)) {
        throw new RuntimeException("");
    }
    JSONObject jsonObject = JSON.parseObject(retStr);
    if (jsonObject.getInteger("statusCode") != null
            && 200 != jsonObject.getInteger("statusCode")) {
        throw new RuntimeException("");
    }
    System.out.println(retStr);
}
代码运行没问题,而且配置了这个UriTemplateHandler实例和基地址,RestTemplate同样可以传入绝对地址进行调用。
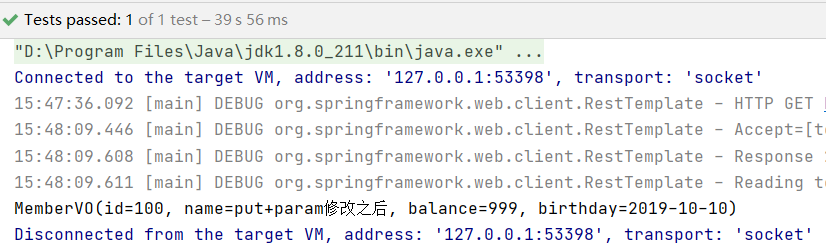
1.4 发送put请求修改数据
@Test
public void testGetUseParamAddMemberPrepareUri() {
    String uri = "/member/{1}?id={2}&name={3}&birthday={4}&balance={5}";
    URI expand = restTemplate.getUriTemplateHandler().expand(uri,
            100, 100, "put+param修改之后", "2019-10-10", 999);
    restTemplate.put(expand, null);
}
修改后:

1.5 发送post+param请求添加会员
代码如下:
@Test
public void testPostUseParamAddMember() {
    // 地址信息
    String url = "http://localhost:8080/member/param";
    // 使用post发送数据要有请求体
    LinkedMultiValueMap<String,Object> param = new LinkedMultiValueMap<>();
    param.add("id", 102);
    param.add("name", "通过RT的post+param添加");
    param.add("birthday", "2001-03-09");
    param.add("balance", 99999);

    RequestEntity<LinkedMultiValueMap<String,Object>> requestEntity = RequestEntity.post(url)
            .body(param);
    String s = restTemplate.postForObject(url, requestEntity, String.class);
    System.out.println(s);
}
验证成功。
1.6 发送post+json添加会员数据
代码如下:
@Test
public void testPostJsonAddMember() {
    // 地址信息
    String url = "http://localhost:8080/member";
    // 使用post发送数据要有请求体
    MemberVO memberVO = new MemberVO();
    memberVO.setId(103);
    memberVO.setBirthday("2010-11-11");
    memberVO.setBalance("12356");
    memberVO.setName("rt的post+json添加");
    RequestEntity<String> requestEntity = RequestEntity.post(url)
            .header(HttpHeaders.CONTENT_TYPE, MediaType.APPLICATION_JSON_VALUE)
            .body(JSON.toJSONString(memberVO));
    String s = restTemplate.postForObject(url, requestEntity, String.class);
    System.out.println(s);
}
验证成功。

1.7 文件上传
代码如下:
@Test
public void testFileUpload() {
    // 地址信息
    String url = "http://localhost:8080/member/fileUpload";
    // 使用multipart/form-data发送数据
    // 1.准备好body
    MultiValueMap<String,Object> allParts = new LinkedMultiValueMap<>();
    allParts.add("fileName", "使用rt上传的文件.txt");
    allParts.add("file", new FileSystemResource(Paths.get("d:", "temp.txt")));
    // 2.准备request对象
    RequestEntity<MultiValueMap<String, Object>> requestEntity = RequestEntity.post(url)
            .header(HttpHeaders.CONTENT_TYPE, MediaType.MULTIPART_FORM_DATA_VALUE)
            .body(allParts);
    // 3.发送请求
    String s = restTemplate.postForObject(url, requestEntity, String.class);
    System.out.println(s);
}
发送成功:


2.切换到其他实现
2.1 配置内部使用httpclient发送请求
配置的代码修改:
@BeforeAll
public static void init() {
    restTemplate = new RestTemplate(new HttpComponentsClientHttpRequestFactory());
    String baseUrl = "http://localhost:8080";
    DefaultUriBuilderFactory factory = new DefaultUriBuilderFactory(baseUrl);
    factory.setEncodingMode(DefaultUriBuilderFactory.EncodingMode.TEMPLATE_AND_VALUES);
    restTemplate.setUriTemplateHandler(factory);
}
2.2 配置之后调用会员详情接口
获取会员详情代码
@Test
public void testMemberDetail() {
    // 获取会员信息
    String uri = "/member/{id}";
    String retString = restTemplate.getForObject(uri, String.class, 100);
    // 使用TypeRefercece在反序列化的时候获取泛型参数
    NormalResponseObject<MemberVO> resObj =
            JSON.parseObject(retString, new TypeReference<NormalResponseObject<MemberVO>>() {
    });
    System.out.println(resObj.getData());
}
看日志打印如下:
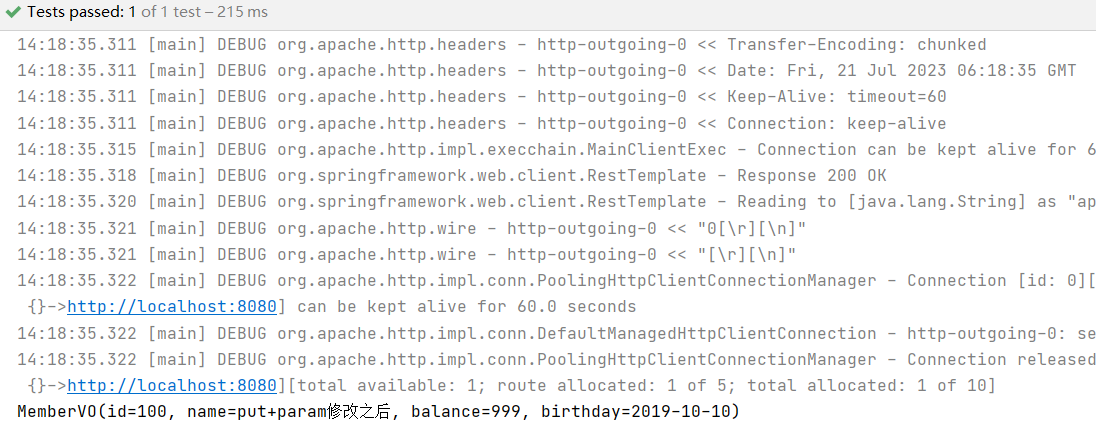
看上述日志就知道httpclient生效了,如何配置okHttp,一起在下面介绍吧。
四、使用okHttp组件发送http请求
1.okHttp的概述
这是该框架的地址:https://square.github.io/okhttp/
OkHttp是一个默认情况下高效的HTTP客户端:(要求jdk1.8及以上版本)
- HTTP/2支持允许对同一主机的所有请求共享一个套接字。
- 连接池减少了请求延迟(如果HTTP/2不可用)。
- 透明的GZIP缩小了下载量。
- 响应缓存完全避免了网络重复请求。
2.简单使用
引入依赖:
<dependency>
    <groupId>com.squareup.okhttp3</groupId>
    <artifactId>okhttp</artifactId>
    <version>4.5.0</version>
</dependency>
2.1 get获取会员数据
@Test
public void getAllMembers() {
    // 准备url
    String url = "http://localhost:8080/member";

    // 创建client对象
    OkHttpClient client = new OkHttpClient();

    // 创建请求对象
    Request request = new Request.Builder()
            .url(url)
            .build();
    // 发起请求
    try (Response response = client.newCall(request).execute()) {
        String retStr = response.body().string();
        NormalResponseObject<List<MemberVO>> allMemberRes =
                JSON.parseObject(retStr, new TypeReference<NormalResponseObject<List<MemberVO>>>() {
        });
        if(allMemberRes.getStatusCode() != 200) {
            throw new RuntimeException("");
        }
        List<MemberVO> memberList = allMemberRes.getData();
        memberList.forEach(System.out::println);
    }catch (Exception e) {
        e.printStackTrace();
    }
}
这个api看起来更加简洁了。
2.2 增加会员数据
@Test
public void testPostParamAddMember() {
    // 准备url
    String url = "http://localhost:8080/member/param";

    // 创建client对象
    OkHttpClient client = new OkHttpClient();

    // 创建请求对象
    RequestBody formBody = new FormBody.Builder()
            .add("id", "1000")
            .add("name", "okHttpPostParam添加")
            .add("birthday", "1990-10-23")
            .add("balance", "99981")
            .build();
    Request request = new Request.Builder()
            .url(url)
            .post(formBody)
            .build();
    // 发起请求
    try (Response response = client.newCall(request).execute()) {
        String retStr = response.body().string();
        System.out.println(retStr);
    }catch (Exception e) {
        e.printStackTrace();
    }
}
2.3 文件操作
代码如下:
@Test
public void testFileOperation() throws Exception{
    // 创建client对象
    OkHttpClient client = new OkHttpClient();

    // 构建formData的body
    RequestBody requestBody = new MultipartBody.Builder()
            .setType(MultipartBody.FORM)
            .addFormDataPart("fileName", "由okHttp上传的文件.txt")
            .addFormDataPart("file", "temp.txt",
                    RequestBody.create(Paths.get("d:", "temp.txt").toFile(),
                            MediaType.get("text/plain")))
            .build();
    // 构建请求对象
    Request request = new Request.Builder()
            .url("http://localhost:8080/member/fileUpload")
            .post(requestBody)
            .build();
    // 发送
    try (Response response = client.newCall(request).execute()) {
        if (!response.isSuccessful()) throw new IOException("Unexpected code " + response);

        System.out.println(response.body().string());
    }
}
甚至在使用的时候都不用自己设置请求头就搞定了。

3.如何在RestTemplate中使用okHttp组件
在spring类库搜索ClientHttpRequestFactory的实现类。
目前我本地spring版本是5.3.0,使用springboot的版本是2.5.5版本。
找到了下面的类:
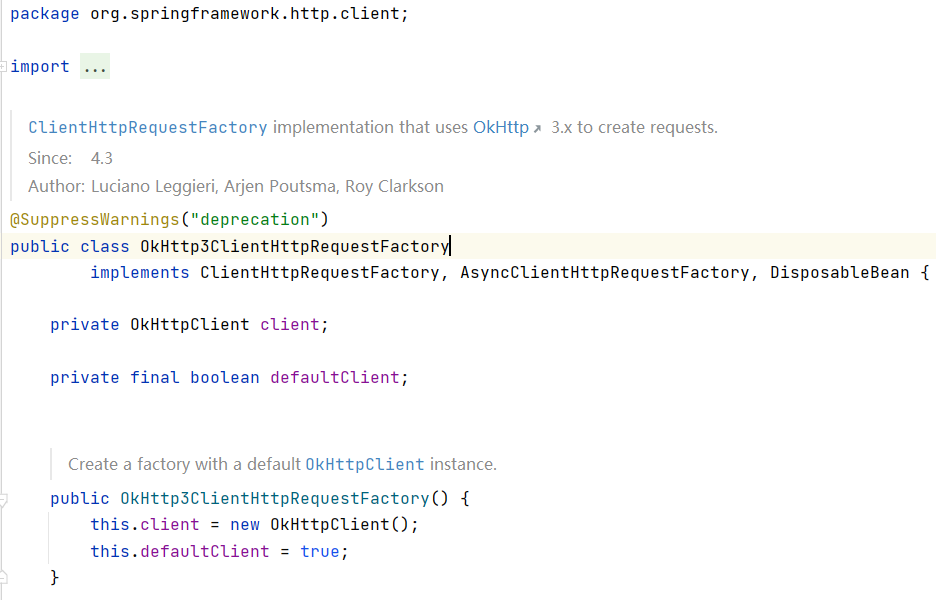
很明显,该类是为了适配3.x的okHttp而设计的。我本地是okHttp是4.5.0,我先试试:
调用成功了,debug跟踪调用流程:
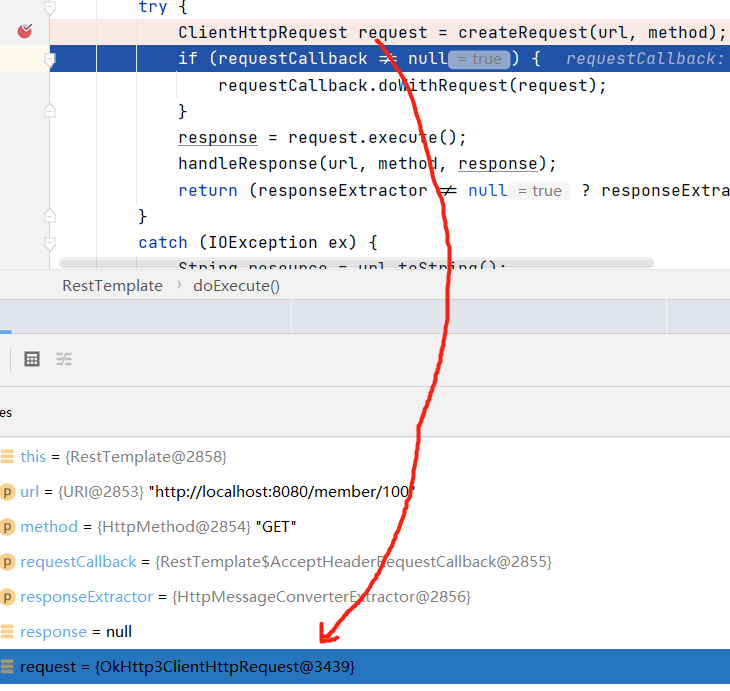
确实使用了OkHttp的功能。

到此本文就结束了,来做一个小小总结吧:
我首先是使用springboot建立了一个小项目,提供了一些我们常用的http接口定义,其中包含了get,post,put,delete和文件相关的操作。
然后为了验证这些接口的正确性,我写了一个小页面,引入Jquery来发送ajax请求,验证了每个接口是否正确能实现业务逻辑。
所以本文也适合前端开发的人看看,一方面是了解http协议常见的这些接口定义和内涵,另一方面也可以学到发送ajax请求的简单写法。
其次,我分别从几个方面写了java语言发起http请求的代码:
一个是原生的基于HttpURLConnection的方式,
一个是使用apache 的Http Compoments项目中的HttpClient发送http请求
一个是使用RestTemplate发送http请求
最后使用okHttp发送http请求。
其实RestTemplate只是一个壳子,具体里面使用啥工作,取决于我们配置的RestTemplate对象。
本文没有具体细讲HttpClient和okHttp框架的配置细节。以后有机会再写吧,总之,希望对大家有帮助吧,谢谢。

 浙公网安备 33010602011771号