Mybatis
快速入门 (使用配置文件完成)##
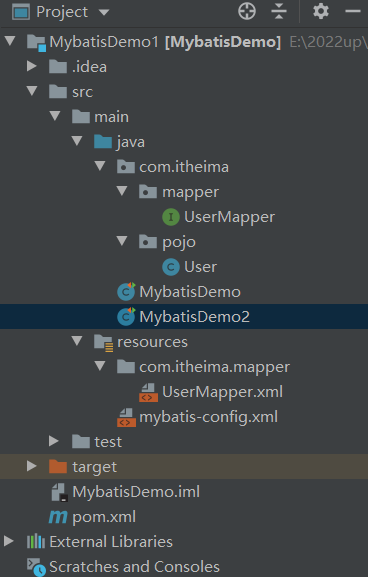
创建好一个Maven项目还有准备好一个有id和name的数据库,然后在resource文件夹下面创建mybatis-config.xml
<?xml version="1.0" encoding="UTF-8" ?>
<!DOCTYPE configuration
        PUBLIC "-//mybatis.org//DTD Config 3.0//EN"
        "http://mybatis.org/dtd/mybatis-3-config.dtd">
<configuration>
    <environments default="development">
        <environment id="development">
            <transactionManager type="JDBC"/>
            <dataSource type="POOLED">
                <property name="driver" value="com.mysql.cj.jdbc.Driver"/>
                <property name="url" value="jdbc:mysql://localhost:3306/day17?serverTimezone=UTC"/>
                <property name="username" value="root"/>
                <property name="password" value="123456"/>
            </dataSource>
        </environment>
    </environments>
    <mappers>
        <mapper resource="UserMapper.xml"/>
    </mappers>
</configuration>
配置文件是用来配置数据库连接信息的
在同resource路径下创建UserMapper.xml
<?xml version="1.0" encoding="UTF-8" ?>
<!DOCTYPE mapper
        PUBLIC "-//mybatis.org//DTD Mapper 3.0//EN"
        "http://mybatis.org/dtd/mybatis-3-mapper.dtd">

<mapper namespace="test">
    <select id="selectAll" resultType="com.itheima.pojo.User">
    select * from user;
  </select>

</mapper>
返回值类型resultType 返回值类型满足pojo下的实体类的属性名和数据库的列名对应(如果出现和数据库中的列名不对应时,resultType后续有更好的替换方法)
去java项目路径下创建User对象
package com.itheima.pojo;

public class User {
   private int id;
   private String name;

    public int getId() {
        return id;
    }

    public void setId(int id) {
        this.id = id;
    }

    public String getName() {
        return name;
    }

    public void setName(String name) {
        this.name = name;
    }

    @Override
    public String toString() {
        return "User{" +
                "id=" + id +
                ", name='" + name + '\'' +
                '}';
    }
}
创建运行类MybatisDemo
import org.apache.ibatis.io.Resources;
import org.apache.ibatis.session.SqlSession;
import org.apache.ibatis.session.SqlSessionFactory;
import org.apache.ibatis.session.SqlSessionFactoryBuilder;
import org.junit.jupiter.api.Test;

import java.io.InputStream;
import java.util.List;

public class MybatisDemo {
    @Test
    public void test() throws Exception{
        //1.配置文件路径
        String resource = "mybatis-config.xml";
		//2.将配置文件转成字节流的方式
        InputStream inputStream = Resources.getResourceAsStream(resource);
		//3.用SqlSessionFactory来获取创建和数据库的连接
        SqlSessionFactory sqlSessionFactory = new SqlSessionFactoryBuilder().build(inputStream);
		//4.SqlSession读取sqlSessionFactory中的数据库信息
        SqlSession sqlSession = sqlSessionFactory.openSession();
		//5.selectList中的参数是UserMapper.xml中的【命名空间.id】即 test.selectAll
        List<Object> users = sqlSession.selectList("test.selectAll");
		//6.输出集合中的数据
        System.out.println(users);
		//7.关闭sqlSession
        sqlSession.close();
    }
}
什么是SqlSession呢?
SqlSession是Mybatis最重要的构建之一,可以简单的任务Mybatis一系列的配置目的是生成类似JDBC生成的Connection对象的SqlSession,这样才能和数据库开启“沟通的桥梁”,通过SqlSession可以实现增删改查(当然现在更加推荐是使用Mapper接口的形式),那么它是如何执行实现的呢?
了解SqlSession的运作原理是学习Mybatis插件的必经之路,因为Mybatis的插件会在SqlSession运行过程中“插入”运行,如果没有很好理解的话,Mybatis插件可能会覆盖相应的源码造成严重的问题。
(1)sqlsession简单原理介绍
sqlSession提供select、insert、update、delete方法,在旧版本中使用sqlsession接口的这些方法,但是在新版本中Mybatis就会建议直接使用mapper接口的方法。映射器其实就是一个动态代理对象,进入到MapperMethod的execute方法就能简单找打sqlsession的删除,更新、查询、选择方法,从底层实现来说:通过动态代理技术,让接口跑起来,之后采用命令模式,最后还是采用了sqlsession的接口方法(getMapper()方法等到Mapper)执行sql查询(也就是说Mapper接口方法的底层实现还是采用了Sqlsession的接口方法实现的)。
(2)selsession的四个重要对象
1)Execute:调度执行StatementHandler、ParmmeterHandler、ResultHandler执行相应的SQL语句;
2)StatementHandler:使用数据库中的Statement(PrepareStatement)执行操作,即底层是封装好的PrepareStatement;
3)ParammeterHandler:处理SQL参数;
4)ResultHandler:结果集ResultSet封装处理放回。
SqlSessionFactory和SqlSession的实现过程:
mybatis框架主要是围绕着SqlSessionFactory进行的,创建过程大概如下:
(1)、定义一个Configuration对象,其中包含数据源、事务、mapper文件资源以及影响数据库行为属性设置settings
(2)、通过配置对象,则可以创建一个SqlSessionFactoryBuilder对象
(3)、通过 SqlSessionFactoryBuilder 获得SqlSessionFactory 的实例。
(4)、SqlSessionFactory 的实例可以获得操作数据的SqlSession实例,通过这个实例对数据库进行
Mybatis代理开发

(上述代码的基础上做出以下改进)
在pojo同目录下创建一个mapper包创建一个接口UserMapper
package com.itheima.mapper;

import com.itheima.pojo.User;

import java.util.List;

public interface UserMapper {
    List<User> selectAll();
}
因为mapper接口的配置usermapper.xml必须和usermapper接口在同一个路径下,但是如果直接在java.com.itheima.mapper包下放usermapper和usermapper.xml的话就会产生混乱,此时我们发现,在resource下可以创建同样的目录,编译后会在同样的目录下。比如说,在java.com.itheima.mapper编译后的文件和resource.com.itheima.mapper编译后的文件,会在一样的classes路径下。所以在resource文件下创建usermapper.xml即可。
<?xml version="1.0" encoding="UTF-8" ?>
<!DOCTYPE mapper
        PUBLIC "-//mybatis.org//DTD Mapper 3.0//EN"
        "http://mybatis.org/dtd/mybatis-3-mapper.dtd">

<mapper namespace="com.itheima.mapper.UserMapper">

    <select id="selectAll" resultType="com.itheima.pojo.User">
    select * from user;
  </select>

</mapper>
在mybatis-config.xml中修改
<?xml version="1.0" encoding="UTF-8" ?>
<!DOCTYPE configuration
        PUBLIC "-//mybatis.org//DTD Config 3.0//EN"
        "http://mybatis.org/dtd/mybatis-3-config.dtd">
<configuration>
    <environments default="development">
        <environment id="development">
            <transactionManager type="JDBC"/>
            <dataSource type="POOLED">
                <property name="driver" value="com.mysql.cj.jdbc.Driver"/>
                <property name="url" value="jdbc:mysql://localhost:3306/day17?serverTimezone=UTC"/>
                <property name="username" value="root"/>
                <property name="password" value="123456"/>
            </dataSource>
        </environment>
    </environments>
    <mappers>
        <mapper resource="com/itheima/mapper/UserMapper.xml"/>
    </mappers>
		<!--        如果映射类多了,mapper标签要一个个添加,比较繁杂。所以可改成包扫描的方式-->
		<!--        <package name="com.itheima.mapper"/>    -->

</configuration>
上面的mapper标签中的resource路径则是UserMapper.xml的相对路径,因为和mybatis-config.xml都是同在resource下,所以填入的路径为resource下的com/itheima/mapper/UserMapper.xml即可。
更新主方法
import com.itheima.mapper.UserMapper;
import com.itheima.pojo.User;
import org.apache.ibatis.io.Resources;
import org.apache.ibatis.session.SqlSession;
import org.apache.ibatis.session.SqlSessionFactory;
import org.apache.ibatis.session.SqlSessionFactoryBuilder;
import org.junit.jupiter.api.Test;

import java.io.InputStream;
import java.util.List;

public class MybatisDemo2 {
    @Test
    public void test() throws Exception{
        //配置文件路径
        String resource = "mybatis-config.xml";
        InputStream inputStream = Resources.getResourceAsStream(resource);
        SqlSessionFactory sqlSessionFactory = new SqlSessionFactoryBuilder().build(inputStream);

        SqlSession sqlSession = sqlSessionFactory.openSession();
//淘汰   List<Object> users = sqlSession.selectList("test.selectAll");

        UserMapper userMapper = sqlSession.getMapper(UserMapper.class);
        List<User> users=userMapper.selectAll();

        System.out.println("-------");
        System.out.println(users);
        sqlSession.close();
        System.out.println("-------");
    }
}
可以看出,用代理开发之后,mybatis已经不需要用sqlSession.selectList("test.selectAll")获取mapper配置文件中的命名空间和id的方式来获取实例。而是通过sqlSession.getMapper(UserMapper.class)直接获取mapper接口中的方法,mapper接口中的方法名要对应mapper中的select的id,命名空间是mapper的路径,比如现在学习用的是com.itheima.mapper.UserMapper。
整体流程(主方法)
- 获取sqlSession
- 通过sqlSession.getMapper(UserMapper.class) 获取对应的mapper接口代理对象,通过该行代码找到UserMapper接口
- (编译后)在UserMapper的相同路径下有一个UserMapper.xml,里面有sql语句
- 通过userMapper调用selectAll(),而UserMapper接口中的selectAll()对应usermapper.xml中的sql语句的id,有了id便可以获取sql语句。
别名
在mybatis-config.xml中
<configuration>

    <typeAliases>
        <package name="com.itheima.pojo"/>
    </typeAliases>

</configuration>
此时UserMapper里面的resultType改进如下
// <select id="selectAll" resultType="com.itheima.pojo.user">淘汰
 <select id="selectAll" resultType="user">
    select * from user;
 </select>
(注意:typeAliases标签体一定要放在前面让其先运行)
mybatis中如果数据库中的列名和实体类的名字不一致,可以用resultMap标签使其对应
在resultMap中,对应主键的时候用id标签,一般列就用result标签
<resultMap id="BrandResultMap" type="brand">
    <result column="user_name" property="userName"/>
</resultMap>

<select id="select" resultMap="BrandResultMap">
    select userName from brand;
</select>
如此即可讲数据库中的user_name列和实体类中的userName属性相对应,封装返回值的时候就不会出null了。
mybatis的占位符有两种
- #{} :会先将其转为?,防止sql注入
- ${} :拼接sql,存在sql注入问题
所以传参数的时候通常用第一种方式,第二种方式可动态设置所需要查询的表名的时候使用(不建议)。
如果sql语句中出现了大于号小于号等符号不能使用,因为是在xml中写的语句,此时有两种解决方式
- 转移字符
- CDATA区
动态查询,多条件查询
<select id="selectByCondition" resultType="com.itheima.pojo.Brand">
    select *
    from user
    where
    <if test="id!=null and id!=0">
        id=#{id}
    </if>
    <if test="name!=null and name!=''">
        and name like #{name}
    </if>
    <if test="age!=0 and age!=0">
        and age like #{age};
    </if>
</select>
如上多条件查询的时候,语句中需要传入的参数有三个,但是有时候只传入了age参数,这时语句就会变成
select * from user where and age like #{age};
以上的语句就出错,此时有两种思路解决问题:
-
在where条件后加恒等式如下
select * from user where 1=1 and age like #{age}; -
mybtis的mapper提供的< where>标签,
 <select id="selectByCondition" resultType="com.itheima.pojo.Brand">
     select *
     from user
     <where>
         <if test="id!=null and id!=0">
             id=#{id}
         </if>
         <if test="name!=null and name!=''">
             and name like #{name}
         </if>
         <if test="age!=0 and age!=0">
             and age like #{age};
         </if>
     </where>
 </select>
单条件查询 当查询的套件是单选框的时候,mybatis中有< choose>标签可实现,类似于java中的switch,choose标签下的< when>标签相当于switch中的case,如果用户没有选择选项,则choose下的< otherwise>相当于switch下的default使用。如果不用< otherwise>,还有一种方法是,用< where>标签将< choose>包裹起来,能达到同样的效果。
在mybatis中修改数据库的时候,记得提交事务,不然默认回滚
    SqlSession sqlSession=sqlSessionFactory.openSession(true);
    //如果是true是自动提交事务,而默认是false,则需要在事务执行时候,
       在下面加上sqlSession.commit 手动提交。
主键返回
插入数据成功之后,在控制台获取不到数据库中刚刚添加的这条数据的主键id
<insert useGeneratedKeys="true" keyProperty="id">
mybatis删除功能的实现
【单删】
去mapper定义接口,因为返回的是影响到的行数,所以返回值类型是int型
int deleteById(int id);
去mapper.xml里面定义语句
<delete id="deleteById">
    delete from user where id=#{id};
</delete>
【多删】
接收的是一个数组,数组里面存放的是一系列的id,所以需要用一个int数组来接收
int deleteByIdS(int[] ids);
mybatis会将数组参数封装成为一个Map集合,默认的k名叫array,v名自定义。
如果collerction的k名想使用自己自定义的名字,需要去mapper接口里面讲定义的接口加上@Pram()
int deleteByIdS(@Param("ids") int[] ids);
<delete id="deleteByIdS">
    delete from user where id in (
        <foreach collection="array" item="id" separator=",">
            #{id}
        </foreach>
        );
</delete>
上述< foreach>中因为接收的id是多个,所以需要定义一个separator属性来规定分隔符。
上面的代码中“in”后面夹着foreach标签的“(” “)”两个括号,可以用foreach里面的open和close属性来隐藏掉,如下
<delete id="deleteByIdS">
    delete from user where id in
        <foreach collection="array" item="id" separator="," open="(" close=")">
            #{id}
        </foreach>
        ;
</delete>
使用注解完成##
再mapper接口中添加注解
@Select("select *from user")
List<Brand> selectAll();
注解只推荐在简单sql语句中查询,因为复杂语句在注解中写会显得混乱


 浙公网安备 33010602011771号