
Anchor free--Centernet
2019年的目标检测属于anchor free的一年,各类anchor free方法井喷,各种方式都有。在我看来,anchor free一定要有速度
优势(移动端部署),否则我干嘛不直接使用two-stage呢(像cornernet在GPU下速度只有5fps)?
不过学习了解一下相关思想还是必须的,知乎上已经有一些不错的总结
https://zhuanlan.zhihu.com/p/86270414
https://zhuanlan.zhihu.com/p/86721091
https://zhuanlan.zhihu.com/p/67305905
目前anchor free分了两类,一类是预测关键点的,通常包括top-left, bottom-right,center point 等等,以及repoints这样
预测多个不规则点的(和dcv相结合),最后再解码成box。另外一类是直接回归的,类似于最早的YOLO这种,但目前这类方法,
通常会加上FPN+focal loss(这也是相比于YOLO,anchor free 方法精度提升的主要原因)。
CenterNet
https://github.com/xingyizhou/CenterNet
这是anchor free论文中我最喜欢的一篇了。one stage + anchor free + no nms,论文行文清洗,代码也很友好,目前也
应用到很多场景中了。在实际工作中,曾经比较测试过基于centernet的人脸检测和MTCNN,至少速度上看,MTCNN还是有优势的;
当时项目中人脸检测环境比较友好,精度上也没啥差别,所以当时在我看来并没有什么优势。不过我还是很喜欢这篇paper。
1、网络结构
论文里给了多个网络结构,Resnet-18 with up-convolutional layers, DLA34, Hourglass-104 等,不过我对后两个网络不熟悉,
所以这里看看Resnet-18 with up-convolutional layers。
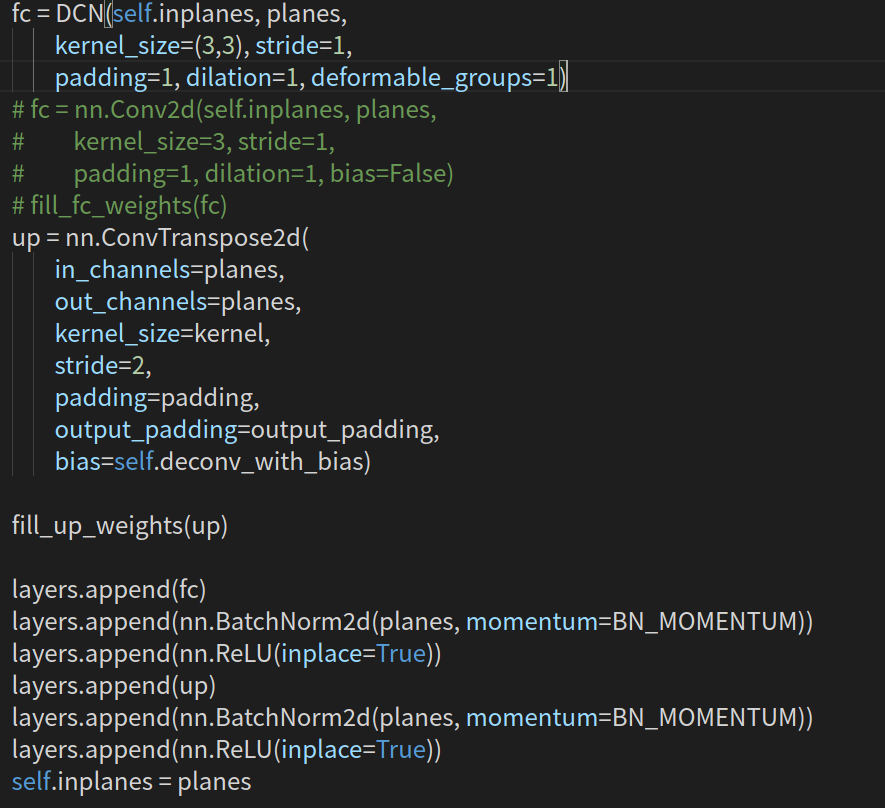
首先是经典的resnet18的4个stage,这里有5个stride=2来降低分辨率,然后用3层deconv来升分辨率(最终是512/2^2 = 128)

来看_make_deconv_layer,一共3层,这里看某一层,首先包括一个3*3的可形变卷积,然后才是deconv(分辨率
变为原来的2倍  )。注意:这里使用
的kernel_size=4,这也是我第一次见到偶数大小的卷积核。
再来看输出的头部参数。一共三个head,其中hm为heatmap、wh为对应中心点的width和height、reg为偏置量。
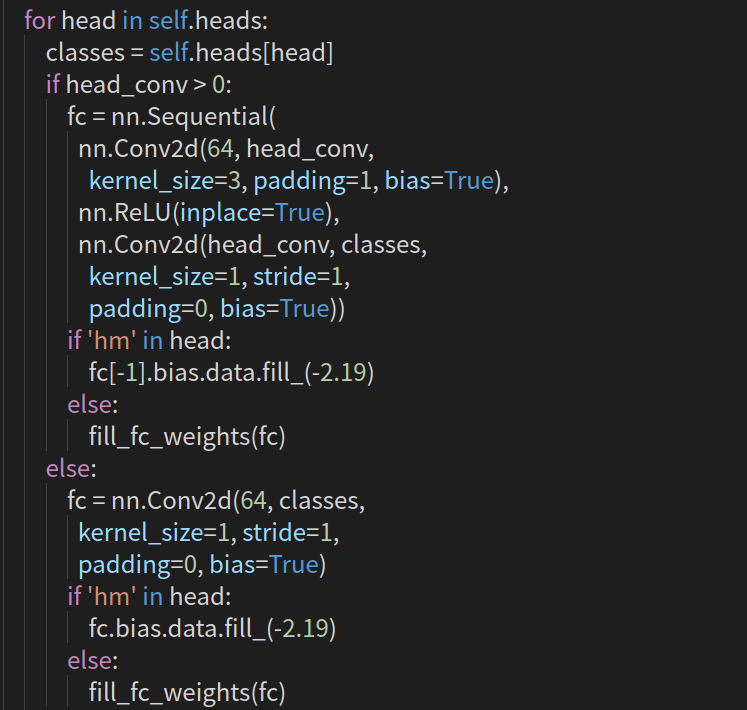
这里写的不够直观,带入参数为

2、训练阶段
2.1 训练标签
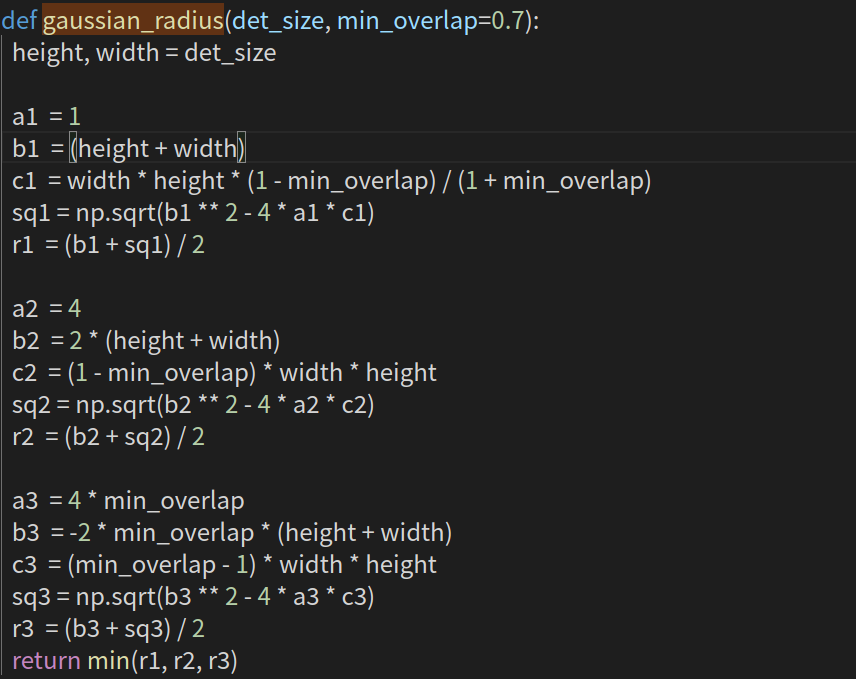
Center预测的是中心点,在选定标签时,以中心为圆心,构建高斯核,但高斯核的半径该如何确定呢?一共有三种情况,
这里可参考https://zhuanlan.zhihu.com/p/96856635
2.2 损失函数
包括三个损失
中心损失,采用修改版的focal loss,

其中, ,p为降采样后的中心点。
中心偏置损失,可选

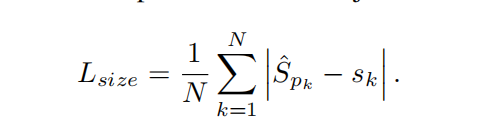
目标大小损失
最终三个loss相加
3、推理阶段
首先是预处理,包括对图像做归一化、缩放处理;此外还包括图片中心、尺度(多尺度推理)、输出特征图大小
#  预处理,分辨率、归一化设置
  def pre_process(self, image, scale, meta=None):
    height, width = image.shape[0:2]
    new_height = int(height * scale)
    new_width  = int(width * scale)
    if self.opt.fix_res:
      # 512 * 512
      inp_height, inp_width = self.opt.input_h, self.opt.input_w
      c = np.array([new_width / 2., new_height / 2.], dtype=np.float32)
      s = max(height, width) * 1.0

    else:
      inp_height = (new_height | self.opt.pad) + 1
      inp_width = (new_width | self.opt.pad) + 1
      c = np.array([new_width // 2, new_height // 2], dtype=np.float32)
      s = np.array([inp_width, inp_height], dtype=np.float32)

    trans_input = get_affine_transform(c, s, 0, [inp_width, inp_height])
    resized_image = cv2.resize(image, (new_width, new_height))
    inp_image = cv2.warpAffine(
      resized_image, trans_input, (inp_width, inp_height),
      flags=cv2.INTER_LINEAR)

    inp_image = ((inp_image / 255. - self.mean) / self.std).astype(np.float32)
    images = inp_image.transpose(2, 0, 1).reshape(1, 3, inp_height, inp_width)

    if self.opt.flip_test:
      images = np.concatenate((images, images[:, :, :, ::-1]), axis=0)

    # 返回缩放加归一化的images
    images = torch.from_numpy(images)
    # 图片的中点,输出大小
    meta = {'c': c, 's': s,
            'out_height': inp_height // self.opt.down_ratio,
            'out_width': inp_width // self.opt.down_ratio}
    return images, meta
然后就是推理,输出三个head,然后解码
def process(self, images, return_time=False):
    with torch.no_grad():
      output = self.model(images)[-1]
      hm = output['hm'].sigmoid_() # 1*80 * 128 * 128
      wh = output['wh'] # 1 * 2 * 128 * 128
      reg = output['reg'] if self.opt.reg_offset else None # 1 * 2 * 128 * 128
      #

      if self.opt.flip_test:
        hm = (hm[0:1] + flip_tensor(hm[1:2])) / 2
        wh = (wh[0:1] + flip_tensor(wh[1:2])) / 2
        reg = reg[0:1] if reg is not None else None
      torch.cuda.synchronize()
      forward_time = time.time()
      # 解码
      dets = ctdet_decode(hm, wh, reg=reg, cat_spec_wh=self.opt.cat_spec_wh, K=self.opt.K)

    if return_time:
      return output, dets, forward_time
    else:
      return output, dets
来看看解码的过程。首先做一个非传统的nms(实际上就是3*3区域max_pool),然后取出100个最大的得分,包括其对应的索引,类别,以及在特征图上的位置。
def ctdet_decode(heat, wh, reg=None, cat_spec_wh=False, K=100):
    batch, cat, height, width = heat.size()
    # heat = torch.sigmoid(heat)
    # perform nms on heatmaps
    # 3*3求最大值
    heat = _nms(heat)
    # print(heat.shape)

    #
    scores, inds, clses, ys, xs = _topk(heat, K=K)
    if reg is not None:
      reg = _transpose_and_gather_feat(reg, inds)
      reg = reg.view(batch, K, 2)
      xs = xs.view(batch, K, 1) + reg[:, :, 0:1]
      ys = ys.view(batch, K, 1) + reg[:, :, 1:2]
    else:
      xs = xs.view(batch, K, 1) + 0.5
      ys = ys.view(batch, K, 1) + 0.5

    wh = _transpose_and_gather_feat(wh, inds)

    if cat_spec_wh:
      wh = wh.view(batch, K, cat, 2)
      clses_ind = clses.view(batch, K, 1, 1).expand(batch, K, 1, 2).long()
      wh = wh.gather(2, clses_ind).view(batch, K, 2)
    else:
      wh = wh.view(batch, K, 2)
    clses  = clses.view(batch, K, 1).float()
    scores = scores.view(batch, K, 1)
    bboxes = torch.cat([xs - wh[..., 0:1] / 2,
                        ys - wh[..., 1:2] / 2,
                        xs + wh[..., 0:1] / 2,
                        ys + wh[..., 1:2] / 2], dim=2)
    detections = torch.cat([bboxes, scores, clses], dim=2)

    return detections
最后将检测到的box映射到原图上
def ctdet_post_process(dets, c, s, h, w, num_classes):
  # dets: batch x max_dets x dim
  # return 1-based class det dict
  print("----------")
  print(dets.shape)
  print(c, s, h, w, num_classes)
  ret = []
  for i in range(dets.shape[0]):
    top_preds = {}
    dets[i, :, :2] = transform_preds(
          dets[i, :, 0:2], c[i], s[i], (w, h))
    dets[i, :, 2:4] = transform_preds(
          dets[i, :, 2:4], c[i], s[i], (w, h))
    classes = dets[i, :, -1]
    for j in range(num_classes):
      inds = (classes == j)
      top_preds[j + 1] = np.concatenate([
        dets[i, inds, :4].astype(np.float32),
        dets[i, inds, 4:5].astype(np.float32)], axis=1).tolist()
    ret.append(top_preds)
  return ret
参考 https://zhuanlan.zhihu.com/p/66048276
https://zhuanlan.zhihu.com/p/76378871

 浙公网安备 33010602011771号