《用OpenResty搭建高性能服务端》笔记
概要
《用OpenResty搭建高性能服务端》是
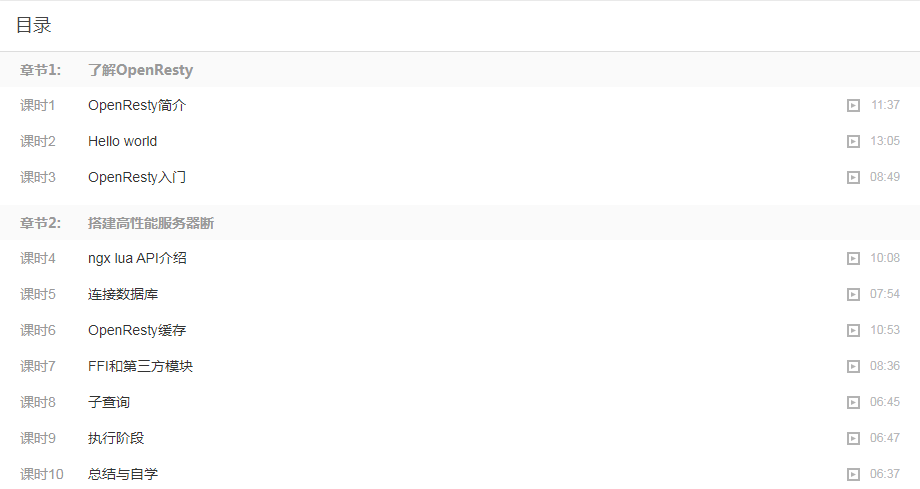
OpenResty系列课程中的入门课程,主讲人:温铭老师。课程分为10个章节,侧重于OpenResty的基本概念和主要特点的介绍,包括它的指令、nginx_luaAPI、缓存、如何连接数据库、执行阶段等,并通过几个实际的操作和代码片段,告诉大家学习中如何搭建开发、测试环境,如何调试、查找和解决问题。
视频播放地址:https://study.163.com/course/introduction.htm?courseId=1520005
课程目录一览:
个人评价:评分满分。内容由浅入深,思路清晰,内容组织有序,容易上手,为初学者打开了一扇学习的大门。非常不错的分享。学完后需再配合 《OpenResty最佳实践》 + 官方文档 进行系统学习。
下面是学习笔记,内容主要是以老师的讲解为主,加上部分自己补充或理解的内容。
本文环境:
$ uname -a
Linux ba2f3eedf7df 4.4.111-boot2docker #1 SMP Thu Jan 11 16:25:31 UTC 2018 x86_64 x86_64 x86_64 GNU/Linux

$ cat /etc/redhat-release
CentOS release 6.8 (Final)

$ /usr/local/openresty/bin/openresty -v
nginx version: openresty/1.13.6.2

$ /usr/local/openresty/luajit/bin/luajit -v
LuaJIT 2.1.0-beta3 -- Copyright (C) 2005-2017 Mike Pall. http://luajit.org/
OpenResty 简介
OpenResty®是一个基于 Nginx 与 Lua 的高性能 Web 平台,其内部集成了大量精良的 Lua 库、第三方模块以及大多数的依赖项。用于方便地搭建能够处理超高并发、扩展性极高的动态 Web 应用、Web 服务和动态网关。
OpenResty 基于Nginx开发,可以简单认为是 Nginx + lua-nginx-module的组合版。
官网:https://openresty.org/cn/
官方文档:https://github.com/openresty/lua-nginx-module#version
高性能服务端两个重要要素:需要支持缓存,语言层面要支持异步非堵塞。
缓存速度上,内存 > SSD > 机械磁盘;本机 > 网络 ; 进程内 > 进程间 。异步非阻塞指的是事件驱动方式(事件完成后再通知)。
OpenResty 包含的技术:
- Nginx:不仅仅是负载均衡+反向代理等功能,Nginx c module开发成本高。
- LuaJIT:OpenResty用的是 LuaJIT,LuaJIT 是主打性能的Lua。
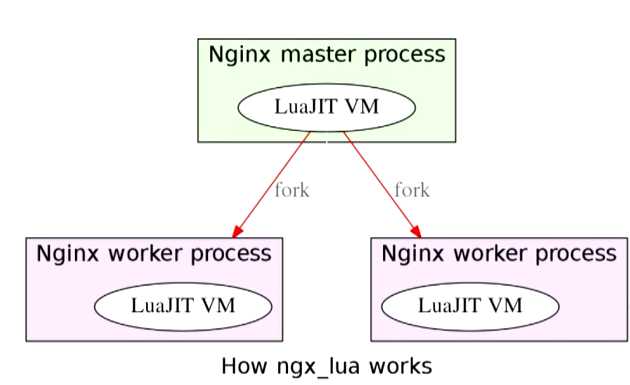
OpenResty 本质上是将 LuaJIT 的虚拟机嵌入到 Nginx的worker中,所以效率特别高,在性能上,OpenResty 接近或超过 Nginx c module:
OpenResty已经颠覆了高性能服务端的开发模式。
OpenResty与市面上其他语言对比:
- node.js:第一门将异步非阻塞特性放入自己语言中的,前端同学可以快速切入。但是 node.js 用回调(callback)实现异步非阻塞,代码写起来比较麻烦。
- Python:3.4之后加入了异步的支持,比如异步io和aiohttp;3.5引入了协程。缺点是版本跨度大,因为很多人还是使用2.7。
- Golang:最近几年非常火。缺点:代码写法上需要使用go关键字;线上热调试不方便(
SystemTap提供了有限的支持)。
Hello World
OpenResty安装
以 CentOS 为例:
mkdir /opt && cd /opt

# download openresty
wget https://openresty.org/download/openresty-1.13.6.2.tar.gz

tar zxvf openresty-1.13.6.2.tar.gz
cd openresty-1.13.6.2

# configure
./configure --prefix=/usr/local/openresty -j4

make -j4 && make install
其中 源码包可以到 https://openresty.org/cn/download.html 该页面获取。
-j4表示使用4核。configure那一步还可以指定各种参数:
./configure --prefix=/usr/local/openresty \
            --with-luajit \
            --without-http_redis2_module \
            --with-http_iconv_module \
            --with-http_postgres_module
使用 ./configure --help 查看更多的选项。
其它系统环境上安装可以参考 https://openresty.org/cn/installation.html 。
其实安装 OpenResty 和安装 Nginx 是类似的,因为 OpenResty 是基于 Nginx 开发的。
如果已经安装了 Nginx,又想使用 OpenResty 的功能,可以参考 《Nginx编译安装Lua》:https://www.cnblogs.com/52fhy/p/10164553.html 一文安装lua-nginx-module模块即可。
第一个程序
修改 /usr/local/openresty/nginx/conf/nginx.conf:
worker_processes  1;
error_log logs/error.log;
events {
    worker_connections 1024;
}
http {
    server {
        listen 8080;
        location /hello {
            default_type text/html;
            content_by_lua '
                ngx.say("<p>hello, world</p>")
            ';
        }
    }
}
把默认的80端口改为8080,新增/hello部分。
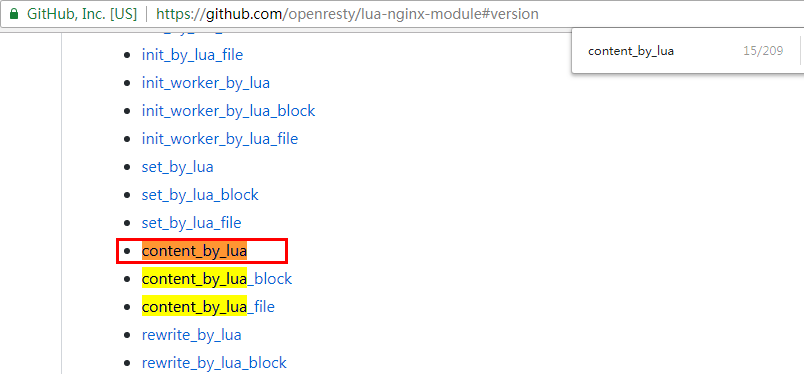
其中content_by_lua便是 OpenResty 提供的指令,在官方文档可以搜索到:
现在我们启动OpenResty:
/usr/local/openresty/nginx/sbin/nginx
启动成功后,查看效果:
curl http://127.0.0.1:8080/hello
<p>hello, world</p>
说明成功运行了。
知识点:
1、content_by_lua:返回的内容使用 lua 代码。
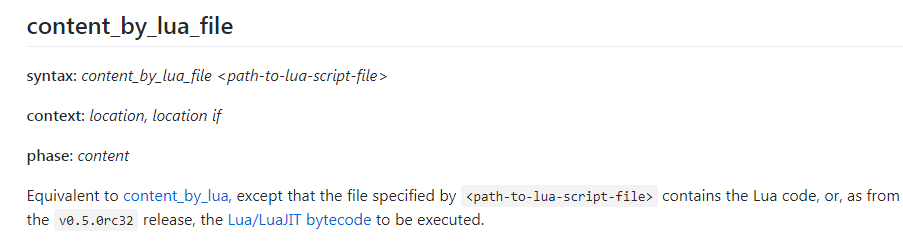
2、content_by_lua_file:读取lua文件里的 lua 代码。
3、默认情况下,修改Lua代码,需要 reload OpenResty服务才会生效。可以修改lua_code_cache为off,作用域: http, server, location, location if。请勿在生产环境里开启。
测试1:使用content_by_lua_file
cd /usr/local/openresty
mkdir nginx/conf/lua
vim nginx/conf/lua/hello.lua
内容为:
ngx.say("<p>hello, lua world</p>")
然后修改 nginx.conf:
location /hello {
    default_type text/html;
    content_by_lua_file conf/lua/hello.lua;
}
重启 OpenResty:
$ ./nginx/sbin/nginx -s reload
启动成功后,查看效果:
$ curl http://127.0.0.1:8080/hello
<p>hello, lua world</p>
测试2:关闭lua_code_cache:
根据lua_code_cache作用域,我们可以在server块加上:
lua_code_cache off;
location /hello {
    default_type text/html;
    content_by_lua_file conf/lua/hello.lua;
}
然后重启:
$ ./nginx/sbin/nginx -s reload
nginx: [alert] lua_code_cache is off; this will hurt performance in /usr/local/openresty/nginx/conf/nginx.conf:43
提示说lua_code_cache关闭后影响性能。我们再次修改 nginx/conf/lua/hello.lua的代码,保存后就会生效,无需 reload server。
OpenResty 入门
这节使用 ngx_lua api完成一个小功能。
lua代码:
nginx/conf/lua/get_random_string.lua
-- 实现随机字符串

local args = ngx.req.get_uri_args()
local salt = args.salt

if not salt then
        ngx.exit(ngx.HTTP_BAD_REQUEST)
end

local str = ngx.md5(ngx.time() .. salt)
ngx.say(str)
修改 nginx.conf ,新增:
location /get_random_string {
    content_by_lua_file conf/lua/get_random_string.lua;
}
由于修改了 nginx.conf ,需要reload OpenResty 服务。然后,我们访问服务:
$ curl http://127.0.0.1:8080/get_random_string?salt=2
2d8231ff301ab0ce8b95c7e4c2c59574

$ curl http://127.0.0.1:8080/get_random_string?salt=2
c145db4ec45a6bf792ac30ed4246c563
说明:
1、ngx.req.get_uri_args()用于获取URI请求参数。
2、ngx.HTTP_BAD_REQUEST为ngx常量,指的是400。代码里尽量使用常量。
3、ngx.time()用于获取时间戳,是带有缓存的。与Lua的日期库不同,不涉及系统调用。尽量使用Ngx给出的方法,以免发生性能问题。
4、ngx.md5()用于生成md5值。
5、如果代码里有语法错误,我们可以通过nginx 的 error.log里看到,默认文件是 nginx/logs/error.log。
再次提醒大家,做 OpenResty 开发,lua-nginx-module 的文档是你的首选,Lua 语言的库都是同步阻塞的,用的时候要三思。也就是说,尽量使用 ngx_lua提供的api,而不是使用 Lua 本身的。例如
ngx.sleep()与 lua提供的sleep,前者不会造成阻塞,后者是会阻塞的,详见:sleep · OpenResty最佳实践 。
ngx_lua API介绍
本节主要是带着大家简单的过一下常用的ngx_lua API。
ngx_lua 有60多个指令(Directive),140多个 API(截止到2019-3-26)。
指令 是 ngx_lua 提供给Nginx调用的方法,与 Nginx自带的 location、rewrite等是一个级别的。指令有自己的作用域,例如:content_by_lua_file只能作用于 location和location if里面:
API 是指ngx_lua基于lua代码实现的一系列方法或常量,遵循 lua的语法规则。只能在lua代码块或者lua文件里使用。
例如:
content_by_lua '
    ngx.say("<p>hello, world</p>")
';
其中content_by_lua是指令,作用于location块;ngx.say()是 ngx_lua 提供的API。
在官方文档上可以找到指令及API所在的位置:
下面,我们使用 ngx_lua完成另外一个小功能:实现base64的解码并重新json编码输出。代码里会用到一些指令和API。
lua代码:
nginx/conf/lua/decode_info.lua
-- 实现base64的解码并重新json编码输出

local json = require "cjson"

ngx.req.read_body()
local args = ngx.req.get_post_args()

if not args or not args.info then
        ngx.exit(ngx.HTTP_BAD_REQUEST)
end

local client_ip = ngx.var.remote_var or '127.0.0.1'
local user_agnet = ngx.req.get_headers()['user_agent'] or ''
local info = ngx.decode_base64(args.info)

local res = {}
res.client_ip = client_ip
res.user_agnet = user_agnet
res.info = info

ngx.say(json.encode(res))
修改 nginx.conf ,新增:
location /decode_info {
    content_by_lua_file conf/lua/decode_info.lua;
}
由于修改了 nginx.conf ,需要 reload OpenResty 服务。然后,我们访问服务:
$ php -r "echo base64_encode('test');"
dGVzdA==
$ curl -XPOST -d "info=dGVzdA==" http://127.0.0.1:8080/decode_info
{"user_agnet":"curl\/7.19.7","client_ip":"127.0.0.1","info":"test"}
说明:
1、require是 lua 里面引入其他库的关键字。这里引入的 cjson。
2、当我们要读取 http里的post数据的时候,就需要使用ngx.req.read_body()。该API同步读取客户端请求主体而不阻塞Nginx事件循环。
3、ngx.req.get_post_args() 用于获取post请求数据。
4、ngx.var.remote_var实际是获取的nginx里的变量remote_var。也就是说,ngx.var.xxx实际是获取的nginx里的变量xxx。例如:

nginx变量详见:[Alphabetical index of variables}(http://nginx.org/en/docs/varindex.html)。 ngx_lua ngx.var API详见:ngx.var.VARIABLE。
5、ngx.req.get_headers() 用于读取nginx的header参数。返回的是lua table。
6、ngx.decode_base64()用于 base64字符串解码。对应的编码API是 ngx.encode_base64()。
防盗版声明:本文系原创文章,发布于公众号飞鸿影的博客(fhyblog)及博客园,转载需作者同意。
连接数据库
连接数据库我们需要使用到ngx_lua的第三方库:
- lua-resty-redis library based on ngx_lua cosocket.
- lua-resty-mysql library based on ngx_lua cosocket.
这两个库都是基于cosocket实现的,特点是异步非阻塞。代码风格是同步的写法。更多第三方库详见:See Also 。
连接 MySQL
lua代码:
nginx/conf/lua/test_mysql.lua
local mysql = require "resty.mysql"

local db, err = mysql:new()
if not db then
    ngx.say("failed to instantiate mysql: ", err)
    return
end

db:set_timeout(1000) -- 1 sec

local ok, err, errcode, sqlstate = db:connect{
    host = "127.0.0.1",
    port = 3306,
    database = "ngx_test",
    user = "ngx_test",
    password = "ngx_test",
    charset = "utf8",
    max_packet_size = 1024 * 1024,
}

if not ok then
    ngx.say("failed to connect: ", err, ": ", errcode, " ", sqlstate)
    return
end

-- insert
res, err, errcode, sqlstate =
    db:query("insert into cats (name) "
             .. "values (\'Bob\'),(\'\'),(null)")
if not res then
    ngx.say("bad result: ", err, ": ", errcode, ": ", sqlstate, ".")
    return
end

ngx.say(res.affected_rows, " rows inserted into table cats ",
        "(last insert id: ", res.insert_id, ")")

-- run a select query, expected about 10 rows in the result set
res, err, errcode, sqlstate =
    db:query("select * from cats order by id asc", 10)
if not res then
    ngx.say("bad result: ", err, ": ", errcode, ": ", sqlstate, ".")
    return
end

local cjson = require "cjson"
ngx.say("result: ", cjson.encode(res))

-- close connection
local ok, err = db:close()
if not ok then
     ngx.say("failed to close: ", err)
     return
end
修改 nginx.conf ,新增:
location /test_mysql {
    content_by_lua_file conf/lua/test_mysql.lua;
}
由于修改了 nginx.conf ,需要 reload OpenResty 服务。然后,我们访问服务:
$ http://127.0.0.1:8080/test_mysql
连接 Redis
lua代码:
nginx/conf/lua/test_redis.lua
local redis = require "resty.redis"

local red = redis:new()
red:set_timeout(1000) -- 1 sec

local ok, err = red:connect("127.0.0.1", 6379)
if not ok then
    ngx.say("failed to connect: ", err)
    return
end

ok, err = red:set("dog", "an animal")
if not ok then
    ngx.say("failed to set dog: ", err)
    return
end

ngx.say("set result: ", ok)

local res, err = red:get("dog")
if not res then
    ngx.say("failed to get dog: ", err)
    return
end

if res == ngx.null then
    ngx.say("dog not found.")
    return
end

ngx.say("dog: ", res)

-- close the connection right away
local ok, err = red:close()
if not ok then
     ngx.say("failed to close: ", err)
     return
end
修改 nginx.conf ,新增:
location /test_redis {
    content_by_lua_file conf/lua/test_redis.lua;
}
由于修改了 nginx.conf ,需要 reload OpenResty 服务。然后,我们访问服务:
$ http://127.0.0.1:8080/test_redis
更多参考:
redis 接口的二次封装(简化建连、拆连等细节) · OpenResty最佳实践
OpenResty 缓存
使用 Lua shared dict
使用的话首先需要在 nginx.conf 加上一句:
lua_shared_dict my_cache 128m;
这个my_cache就是申请 Lua shared dict 缓存, 下面示例里会用到。
这个缓存是 Nginx 所有 worker 之间共享的,内部使用的 LRU 算法(最近最少使用)来判断缓存是否在内存占满时被清除。
function get_from_cache(key)
    local cache_ngx = ngx.shared.my_cache
    local value = cache_ngx:get(key)
    return value
end

function set_to_cache(key, value, exptime)
    if not exptime then
        exptime = 0
    end

    local cache_ngx = ngx.shared.my_cache
    local succ, err, forcible = cache_ngx:set(key, value, exptime)
    return succ
end
更多支持的命令详见:https://github.com/openresty/lua-nginx-module#ngxshareddict 。
使用 Lua LRU cache
这个 cache 是 worker 级别的,不会在 Nginx wokers 之间共享。并且,它是预先分配好 key 的数量,而 shared dict 需要自己用 key 和 value 的大小和数量,来估算需要把内存设置为多少。
官方示例:
myapp.lua
local _M = {}

-- alternatively: local lrucache = require "resty.lrucache.pureffi"
local lrucache = require "resty.lrucache"

-- we need to initialize the cache on the lua module level so that
-- it can be shared by all the requests served by each nginx worker process:
local c, err = lrucache.new(200)  -- allow up to 200 items in the cache
if not c then
    return error("failed to create the cache: " .. (err or "unknown"))
end

function _M.go()
    c:set("dog", 32)
    c:set("cat", 56)
    ngx.say("dog: ", c:get("dog"))
    ngx.say("cat: ", c:get("cat"))

    c:set("dog", { age = 10 }, 0.1)  -- expire in 0.1 sec
    c:delete("dog")

    c:flush_all()  -- flush all the cached data
end

return _M
nginx.conf
http {
    lua_package_path "/path/to/lua-resty-lrucache/lib/?.lua;;";

    server {
        listen 8080;

        location = /t {
            content_by_lua '
                require("myapp").go()
            ';
        }
    }
}
更多支持的命令详见:https://github.com/openresty/lua-resty-lrucache 。
那么这两个缓存 如何选择 ?
shared.dict使用的是共享内存,每次操作都是全局锁,如果高并发环境,不同 worker 之间容易引起竞争。所以单个shared.dict的体积不能过大。lrucache是 worker 内使用的,由于 Nginx 是单进程方式存在,所以永远不会触发锁,效率上有优势,并且没有shared.dict的体积限制,内存上也更弹性,但不同 worker 之间数据不同享,同一缓存数据可能被冗余存储。
你需要考虑的,一个是
Lua lru cache提供的 API 比较少,现在只有 get、set 和 delete,而ngx shared dict还可以add、replace、incr、get_stale(在 key 过期时也可以返回之前的值)、get_keys(获取所有 key,虽然不推荐,但说不定你的业务需要呢);第二个是内存的占用,由于ngx shared dict是 workers 之间共享的,所以在多 worker 的情况下,内存占用比较少。
本节内容参考来自:https://moonbingbing.gitbooks.io/openresty-best-practices/content/ngx_lua/cache.html
FFI和第三方模块
FFI
FFI是 LuaJIT 中的一个扩展库,它允许我们使用 Lua 代码调用C语言的数据结构和函数。
FFI库在很大程度上避免了在C中编写繁琐的手动 Lua/C 绑定的需要。无需学习单独的绑定语言 - 它解析普通的C声明!这些可以从C头文件或参考手册中剪切粘贴。
如何调用外部C库函数呢?
1、加载FFI库。
2、为函数添加C声明。
3、调用命名的C函数。
看一个官方提供的简单示例:
-- test_ffi.lua

local ffi = require("ffi")
ffi.cdef[[
int printf(const char *fmt, ...);
]]
ffi.C.printf("Hello %s!", "world")
我们运行:
$ luajit test_ffi.lua
Hello world!
详见:http://luajit.org/ext_ffi.html
增加第三方模块
默认的 resty 库所在位置:
$ pwd
/usr/local/openresty
$ ls lualib/
cjson.so  ngx/      rds/      redis/    resty/
$ ls lualib/resty/
aes.lua   limit/         md5.lua        redis.lua   sha384.lua  upload.lua
core/      lock.lua      memcached.lua  sha1.lua    sha512.lua  upstream/
core.lua  lrucache/      mysql.lua      sha224.lua  sha.lua     websocket/
dns/       lrucache.lua  random.lua     sha256.lua  string.lua
现在以安装 lua-resty-http 为例:
$ cd /opt

# 下载并解压
$  wget https://github.com/ledgetech/lua-resty-http/archive/v0.13.tar.gz && tar zxvf v0.13.tar.gz

# 复制到resty目录即可
$ cp -r lua-resty-http-0.13/lib/resty/* /usr/local/openresty/lualib/resty/

# 查看安装的模块
$ cd /usr/local/openresty/lualib/resty/ && ls http*
http_headers.lua  http.lua
使用示例:
local http = require "resty.http"
local httpc = http.new()

local res, err = httpc:request_uri("http://example.com/helloworld", {
    method = "POST",
    body = "a=1&b=2",
    headers = {
      ["Content-Type"] = "application/x-www-form-urlencoded",
    },
    keepalive_timeout = 60,
    keepalive_pool = 10
})

if not res then
    ngx.say("failed to request: ", err)
    return
end

ngx.status = res.status

for k,v in pairs(res.headers) do
  --
end

ngx.say(res.body)
子查询
子查询只是模拟 HTTP 接口的形式, 没有 额外的 HTTP/TCP 流量,也 没有 IPC (进程间通信) 调用。所有工作在内部高效地在 C 语言级别完成。
子查询只能在一个 location 里调用其它 一个或多个 `location。
res = ngx.location.capture(uri, options?)发起子查询
返回一个包含四个元素的 Lua 表 (res.status,res.header,res.body, 和res.truncated)。
作用域:rewrite_by_lua *,access_by_lua *,content_by_lua *。
示例:
res = ngx.location.capture(
     '/foo/bar',
     { method = ngx.HTTP_POST, body = 'hello, world' }
 )
res1, res2, ... = ngx.location.capture_multi({ {uri, options?}, {uri, options?}, ... })发起多个并发子查询
作用域:rewrite_by_lua *,access_by_lua *,content_by_lua *。
示例:
res1, res2, res3 = ngx.location.capture_multi{
     { "/foo", { args = "a=3&b=4" } },
     { "/bar" },
     { "/baz", { method = ngx.HTTP_POST, body = "hello" } },
 }

 if res1.status == ngx.HTTP_OK then
     ...
 end

 if res2.body == "BLAH" then
     ...
 end
作用:
减少网络请求。
方便配置降级服务。
子查询文档参考: https://github.com/openresty/lua-nginx-module#ngxlocationcapture
执行阶段
下面这个图是 ngx_lua 各个指令的执行顺序。
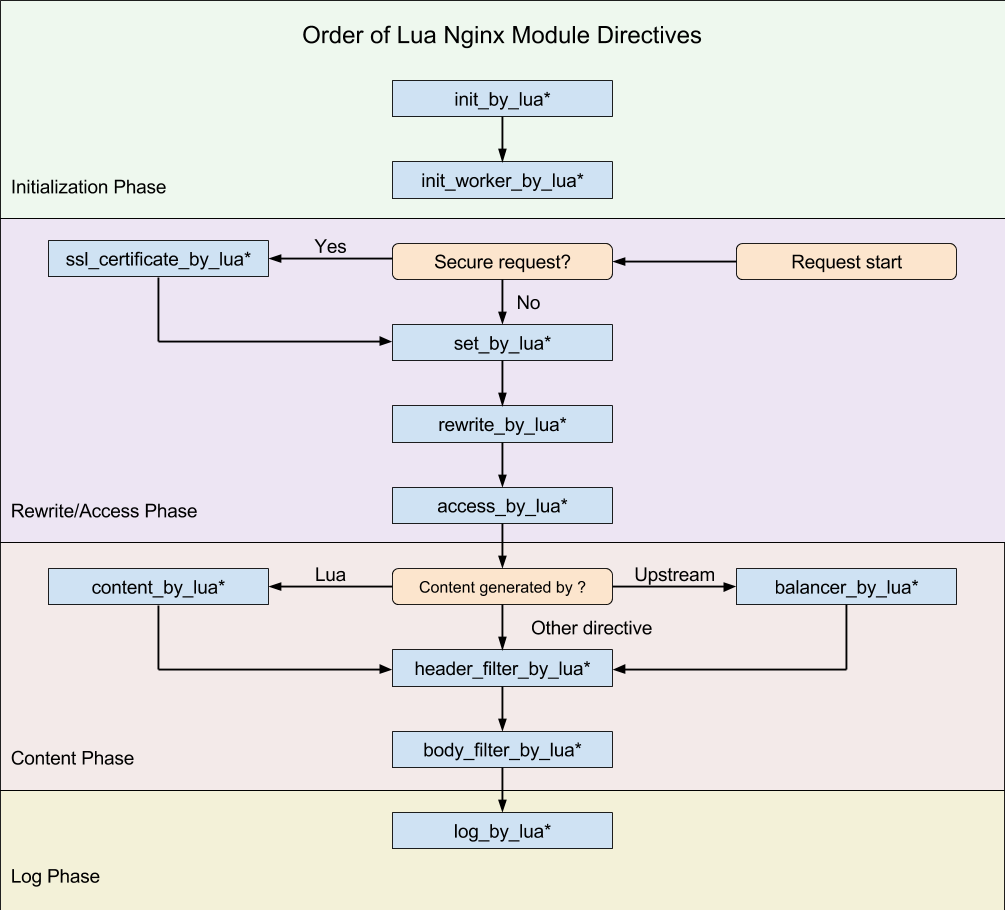
执行阶段说明:
set_by_lua*: 流程分支处理判断变量初始化rewrite_by_lua*: 转发、重定向、缓存等功能(例如特定请求代理到外网)access_by_lua*: IP 准入、接口权限等情况集中处理(例如配合 iptable 完成简单防火墙)content_by_lua*: 内容生成header_filter_by_lua*: 响应头部过滤处理(例如添加头部信息)body_filter_by_lua*: 响应体过滤处理(例如完成应答内容统一成大写)log_by_lua*: 会话完成后本地异步完成日志记录(日志可以记录在本地,还可以同步到其他机器)
由于 Nginx 把一个请求分成了很多阶段,这样第三方模块就可以根据自己行为,挂载到不同阶段进行处理达到目的。不同的阶段,有不同的处理行为,理解了他,也能更好的理解 Nginx 的设计思维。
总结与自学
1、如何自学
《OpenResty最佳实践》
2、遇到问题怎么办
- 看 nginx 的error.log
- 疑难问题把可复现信息在官方邮件组里反馈
- 善用Google
- QQ交流群

参考
1、OpenResty® - 中文官方站
https://openresty.org/cn/
2、openresty/lua-nginx-module: Embed the Power of Lua into NGINX HTTP servers
https://github.com/openresty/lua-nginx-module#version
3、FFI Library
http://luajit.org/ext_ffi.html
4、luajit FFI简单使用(1) - Abel's Blog - CSDN博客
https://blog.csdn.net/erlang_hell/article/details/52836467
5、OpenResty最佳实践
https://moonbingbing.gitbooks.io/openresty-best-practices/
欢迎关注公众号"飞鸿影记(fhyblog)",探寻物件背后的逻辑,记录生活真实的影子。

作者:飞鸿影
出处:http://52fhy.cnblogs.com/
版权申明:没有标明转载或特殊申明均为作者原创。本文采用以下协议进行授权,自由转载 - 非商用 - 非衍生 - 保持署名 | Creative Commons BY-NC-ND 3.0,转载请注明作者及出处。


 浙公网安备 33010602011771号