【Kali】Kali Linux搭建Metasploitable3靶机详细过程
概述
Metasploitable3是Metasploitable2的升级版本,它是一个虚拟靶机系统,里面含有大量未被修复的安全漏洞,它主要是用于metasploit-framework测试的漏洞目标。众所周知Metasploitable2由于年久失修,被更好的Metasploitable3给取代了。但是rapid7(官方)这次却没有提供VM镜像,而是仅仅提供动态构建VM镜像的方法。之前的Metasploitable2提供的是VM快照文件,这使得维护和更新变得非常麻烦,因此Metasploitable3利用动态构建的方法来让用户自行创建VM镜像。这种新的构建方法有很多好处:我们可以轻松地在多个操作系统上应用相同的漏洞利用,为多个虚拟化平台构建,最重要的是,可以接受社区的贡献。
本文介将介绍如何在Kali Linux中下载官方脚本,并创建启动Metasploitable3虚拟机镜像。
准备安装文件
官方提供的安装脚本文件托管在Github上,其地址为:https://github.com/rapid7/Metasploitable3
Building
首先我们在特定的目录中创建一个名为:metasploitable3-workspace的目录,然后在该目录中curl Vagrantfile然后通过vagrant up进行构建VM镜像。
- 官方推荐构建步骤如下:
mkdir metasploitable3-workspace
cd metasploitable3-workspace
curl -O https://raw.githubusercontent.com/rapid7/metasploitable3/master/Vagrantfile && vagrant up
Trouble-shutting
安装vagrant
如果你以为按照官方推荐的方法去构建就OK了,那么只能说 U A 2 young 2 simple😂😂😂 Kali Linux中默认是没有安装vagrant的,在正式构建前首先需要安装vagrant。通过命令apt-get install vagrant即可安装,安装大致过程如下:
⚡ root@F0rGeEk ~ apt-get install vagrant
eading package lists... Done
Building dependency tree
Reading state information... Done
The following additional packages will be installed:
vagrant-libvirt
The following NEW packages will be installed:
vagrant vagrant-libvirt
#.......安装过程省略
使用vagrant进行构建
按照官方推荐方法,进行构建过程如下:
⚡ root@F0rGeEk /media/root/软件1/VMware/metasploitable3-workspace curl -O https://raw.githubusercontent.com/rapid7/metasploitable3/master/Vagrantfile && vagrant up
% Total % Received % Xferd Average Speed Time Time Time Current
Dload Upload Total Spent Left Speed
100 1550 100 1550 0 0 1681 0 --:--:-- --:--:-- --:--:-- 1679
Traceback (most recent call last):
25: from /usr/bin/vagrant:23:in `<main>'
24: from /usr/bin/vagrant:23:in `load'
23: from /usr/share/rubygems-integration/all/gems/vagrant-2.2.9/bin/vagrant:200:in `<top (required)>'
22: from /usr/share/rubygems-integration/all/gems/vagrant-2.2.9/lib/vagrant/environment.rb:290:in `cli'
21: from /usr/share/rubygems-integration/all/gems/vagrant-2.2.9/lib/vagrant/cli.rb:67:in `execute'
20: from /usr/share/rubygems-integration/all/gems/vagrant-2.2.9/plugins/commands/up/command.rb:87:in `execute'
19: from /usr/share/rubygems-integration/all/gems/vagrant-2.2.9/lib/vagrant/plugin/v2/command.rb:186:in `with_target_vms'
18: from /usr/share/rubygems-integration/all/gems/vagrant-2.2.9/lib/vagrant/plugin/v2/command.rb:186:in `each'
17: from /usr/share/rubygems-integration/all/gems/vagrant-2.2.9/lib/vagrant/plugin/v2/command.rb:204:in `block in with_target_vms'
16: from /usr/share/rubygems-integration/all/gems/vagrant-2.2.9/lib/vagrant/plugin/v2/command.rb:180:in `block in with_target_vms'
15: from /usr/share/rubygems-integration/all/gems/vagrant-2.2.9/lib/vagrant/environment.rb:715:in `machine'
14: from /usr/share/rubygems-integration/all/gems/vagrant-2.2.9/lib/vagrant/vagrantfile.rb:81:in `machine'
13: from /usr/share/rubygems-integration/all/gems/vagrant-2.2.9/lib/vagrant/vagrantfile.rb:81:in `new'
12: from /usr/share/rubygems-integration/all/gems/vagrant-2.2.9/lib/vagrant/machine.rb:146:in `initialize'
11: from /usr/share/rubygems-integration/all/gems/vagrant-2.2.9/lib/vagrant/machine.rb:261:in `communicate'
10: from /usr/share/rubygems-integration/all/gems/vagrant-2.2.9/lib/vagrant/registry.rb:27:in `get'
9: from /usr/share/rubygems-integration/all/gems/vagrant-2.2.9/plugins/communicators/winrm/plugin.rb:15:in `block in <class:Plugin>'
8: from /usr/lib/ruby/2.7.0/rubygems/core_ext/kernel_require.rb:92:in `require'
7: from /usr/lib/ruby/2.7.0/rubygems/core_ext/kernel_require.rb:92:in `require'
6: from /usr/share/rubygems-integration/all/gems/vagrant-2.2.9/plugins/communicators/winrm/communicator.rb:6:in `<top (required)>'
5: from /usr/share/rubygems-integration/all/gems/vagrant-2.2.9/plugins/communicators/winrm/communicator.rb:6:in `require_relative'
4: from /usr/share/rubygems-integration/all/gems/vagrant-2.2.9/plugins/communicators/winrm/shell.rb:8:in `<top (required)>'
3: from /usr/share/rubygems-integration/all/gems/vagrant-2.2.9/lib/vagrant/util/silence_warnings.rb:8:in `silence!'
2: from /usr/share/rubygems-integration/all/gems/vagrant-2.2.9/plugins/communicators/winrm/shell.rb:9:in `block in <top (required)>'
1: from /usr/lib/ruby/2.7.0/rubygems/core_ext/kernel_require.rb:92:in `require'
/usr/lib/ruby/2.7.0/rubygems/core_ext/kernel_require.rb:92:in `require': cannot load such file -- winrm (LoadError)
构建过程出现报错,报错信息大致是说缺少winrm插件。那么接下来就是安装缺少的必要插件。
安装vagrant插件
根据实际安装过程发现,如果要成功构建Metasploitable3需要安装winrm、winrm-fs、vagrant-vbguest、winrm-elevated、vagrant-reload这几个插件。安装过程如下:
⚡ root@F0rGeEk ~ vagrant plugin install winrm winrm-fs vagrant-vbguest winrm-elevated vagrant-reload
Installing the 'winrm' plugin. This can take a few minutes...
Fetching vagrant-libvirt-0.1.2.gem
Fetching erubi-1.9.0.gem
Fetching gssapi-1.3.0.gem
Fetching gyoku-1.3.1.gem
Fetching little-plugger-1.1.4.gem
Fetching logging-2.2.2.gem
Fetching nori-2.6.0.gem
Fetching rubyntlm-0.6.2.gem
Fetching winrm-2.3.4.gem
Installed the plugin 'winrm (2.3.4)'!
Installing the 'winrm-fs' plugin. This can take a few minutes...
Fetching winrm-fs-1.3.4.gem
Installed the plugin 'winrm-fs (1.3.4)'!
Installing the 'vagrant-vbguest' plugin. This can take a few minutes...
Fetching micromachine-3.0.0.gem
Fetching vagrant-vbguest-0.24.0.gem
Installed the plugin 'vagrant-vbguest (0.24.0)'!
Installing the 'winrm-elevated' plugin. This can take a few minutes...
Fetching winrm-elevated-1.2.1.gem
Installed the plugin 'winrm-elevated (1.2.1)'!
Installing the 'vagrant-reload' plugin. This can take a few minutes...
Fetching vagrant-reload-0.0.1.gem
Installed the plugin 'vagrant-reload (0.0.1)'!
继续使用vagrant构建
这个构建的速度主要是取决与你的网速,下图是当时构建的截图,100Mbps的下载速度大概用了不到5分钟。
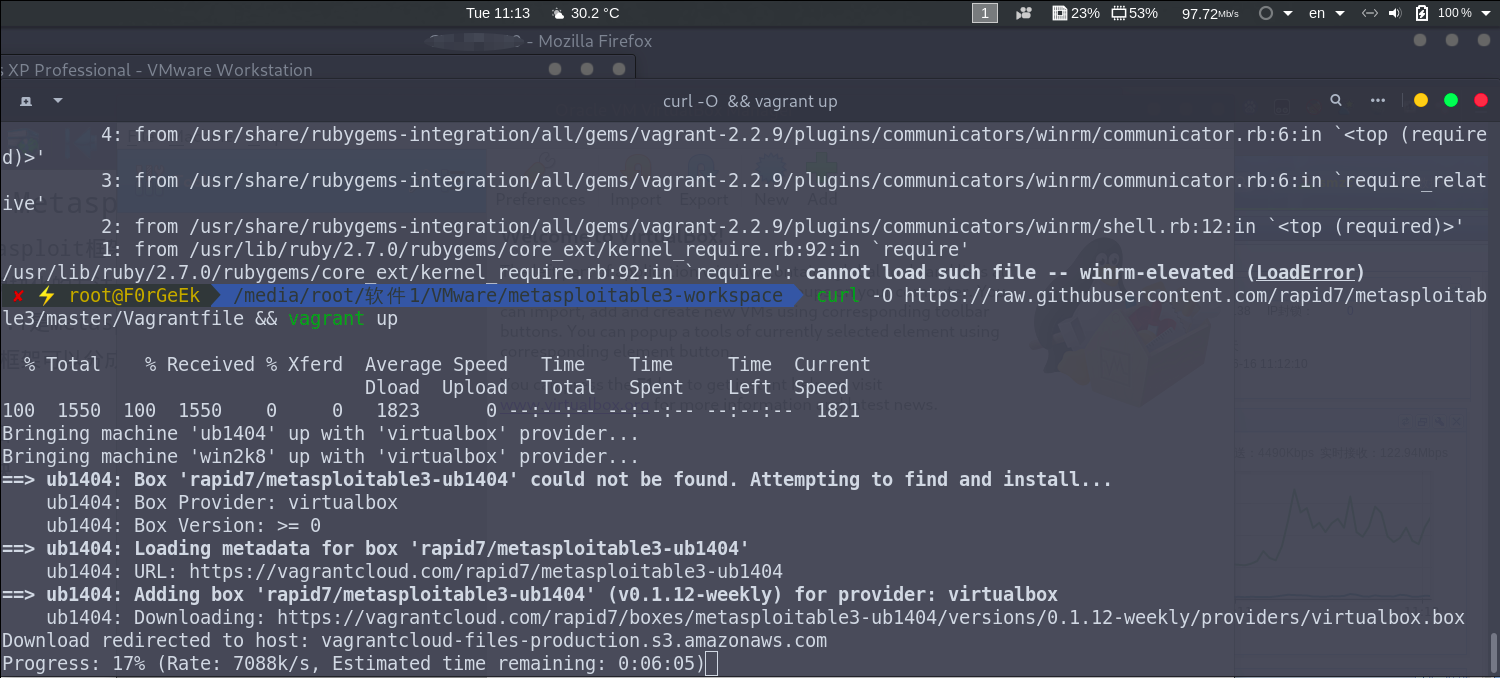
下面是构建详细过程:
✘ ⚡ root@F0rGeEk /media/root/软件1/VMware/metasploitable3-workspace curl -O https://raw.githubusercontent.com/rapid7/metasploitable3/master/Vagrantfile && vagrant up
% Total % Received % Xferd Average Speed Time Time Time Current
Dload Upload Total Spent Left Speed
100 1550 100 1550 0 0 1823 0 --:--:-- --:--:-- --:--:-- 1821
Bringing machine 'ub1404' up with 'virtualbox' provider...
Bringing machine 'win2k8' up with 'virtualbox' provider...
==> ub1404: Box 'rapid7/metasploitable3-ub1404' could not be found. Attempting to find and install...
ub1404: Box Provider: virtualbox
ub1404: Box Version: >= 0
==> ub1404: Loading metadata for box 'rapid7/metasploitable3-ub1404'
ub1404: URL: https://vagrantcloud.com/rapid7/metasploitable3-ub1404
==> ub1404: Adding box 'rapid7/metasploitable3-ub1404' (v0.1.12-weekly) for provider: virtualbox
ub1404: Downloading: https://vagrantcloud.com/rapid7/boxes/metasploitable3-ub1404/versions/0.1.12-weekly/providers/virtualbox.box
Download redirected to host: vagrantcloud-files-production.s3.amazonaws.com
==> ub1404: Successfully added box 'rapid7/metasploitable3-ub1404' (v0.1.12-weekly) for 'virtualbox'!
==> ub1404: Importing base box 'rapid7/metasploitable3-ub1404'...
==> ub1404: Matching MAC address for NAT networking...
==> ub1404: Checking if box 'rapid7/metasploitable3-ub1404' version '0.1.12-weekly' is up to date...
==> ub1404: Setting the name of the VM: Metasploitable3-ub1404
==> ub1404: Clearing any previously set network interfaces...
==> ub1404: Preparing network interfaces based on configuration...
ub1404: Adapter 1: nat
ub1404: Adapter 2: hostonly
==> ub1404: Forwarding ports...
ub1404: 22 (guest) => 2222 (host) (adapter 1)
==> ub1404: Running 'pre-boot' VM customizations...
==> ub1404: Booting VM...
==> ub1404: Waiting for machine to boot. This may take a few minutes...
ub1404: SSH address: 127.0.0.1:2222
ub1404: SSH username: vagrant
ub1404: SSH auth method: password
ub1404: Warning: Connection reset. Retrying...
ub1404: Warning: Remote connection disconnect. Retrying...
ub1404:
ub1404: Inserting generated public key within guest...
ub1404: Removing insecure key from the guest if it's present...
ub1404: Key inserted! Disconnecting and reconnecting using new SSH key...
The private key to connect to this box via SSH has invalid permissions
set on it. The permissions of the private key should be set to 0600, otherwise SSH will
ignore the key. Vagrant tried to do this automatically for you but failed. Please set the
permissions on the following file to 0600 and then try running this command again:
/media/root/软件1/VMware/metasploitable3-workspace/.vagrant/machines/ub1404/virtualbox/private_key
Note that this error occurs after Vagrant automatically tries to
do this for you. The likely cause of this error is a lack of filesystem
permissions or even filesystem functionality. For example, if your
Vagrant data is on a USB stick, a common case is that chmod is
not supported. The key will need to be moved to a filesystem that
supports chmod.
启动virtualbox
通过上一个步骤,如果成功构建了Metasploitable3.那么会在/root/VirtualBox VMs目录中生成一个名为:Metasploitable3-ub1404的目录。该目录则是Metasploitable3的虚拟机文件目录。可以根据自己的需要将该目录迁移至其他地方。
⚡ root@F0rGeEk ~/VirtualBox VMs/Metasploitable3-ub1404 ls -l
total 5693204
drwx------ 2 root root 4096 Jun 16 11:21 Logs
-rw------- 1 root root 5833752576 Jun 16 11:32 metasploitable3-ub1404-disk001.vmdk
-rw------- 1 root root 2933 Jun 16 11:21 Metasploitable3-ub1404.vbox
-rw------- 1 root root 2933 Jun 16 11:21 Metasploitable3-ub1404.vbox-prev
启动virtualbox,然后选择Machine-->add。然后点击上面的目录,virtualbox会自动加载我们构建好的虚拟机如下图所示:
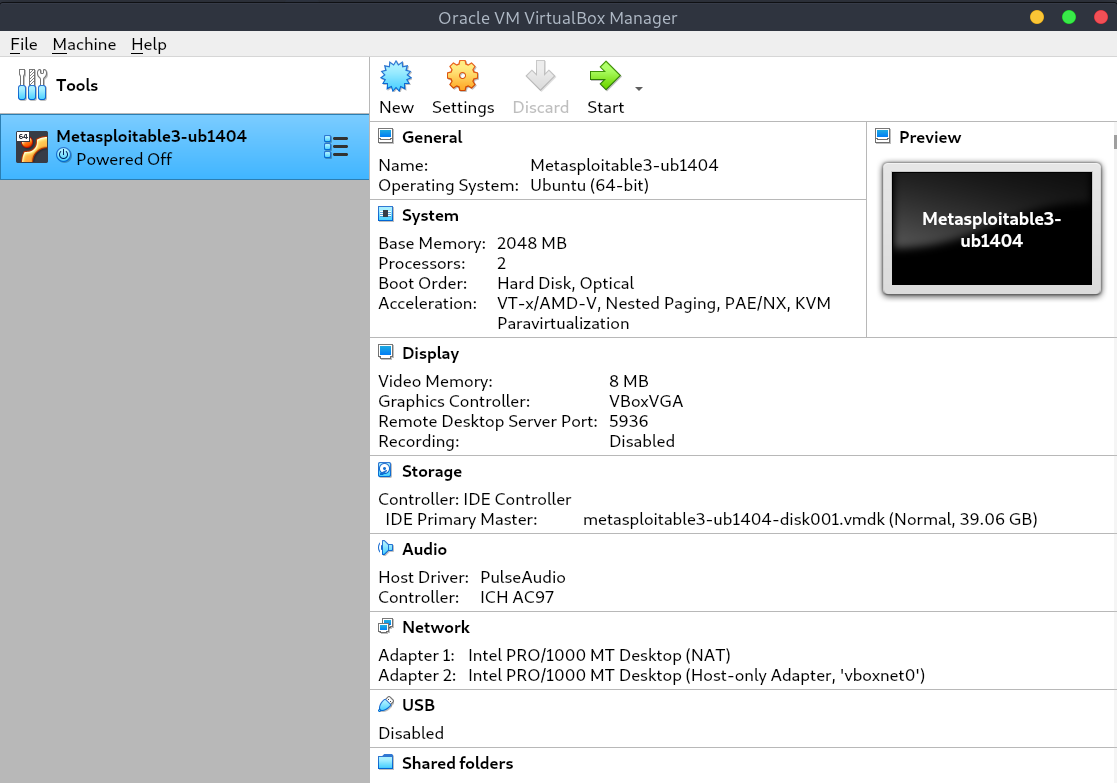
接下来就可以点击start开始享用了,其中系统初始的用户名密码都是vagrant
创建metasploitable3-win2k8
通过以上几个步骤,我们仅仅是创建了metasploitable3-ubuntu1404.不熟悉Linux的同鞋可能用起来比较麻烦,所以接下来我们构建基于window2008R2的metasploite3.
以下引用1.3.4小节中部分内容
Bringing machine 'ub1404' up with 'virtualbox' provider...
Bringing machine 'win2k8' up with 'virtualbox' provider...
以上步骤中,我们可以看见脚本是打算构建ubuntu和windows两个版本的Vbox。但是观察详细构建步骤时发现,当ubuntu版本构建完成后并没有自动构建windows版本,而是配置完成就退出构建。所以下面我们手动构建win2k8版本。
首先我们修改1.3.4步骤下载的Vagrantfile,我这里通过vi查看并修改这个vagrant文件。
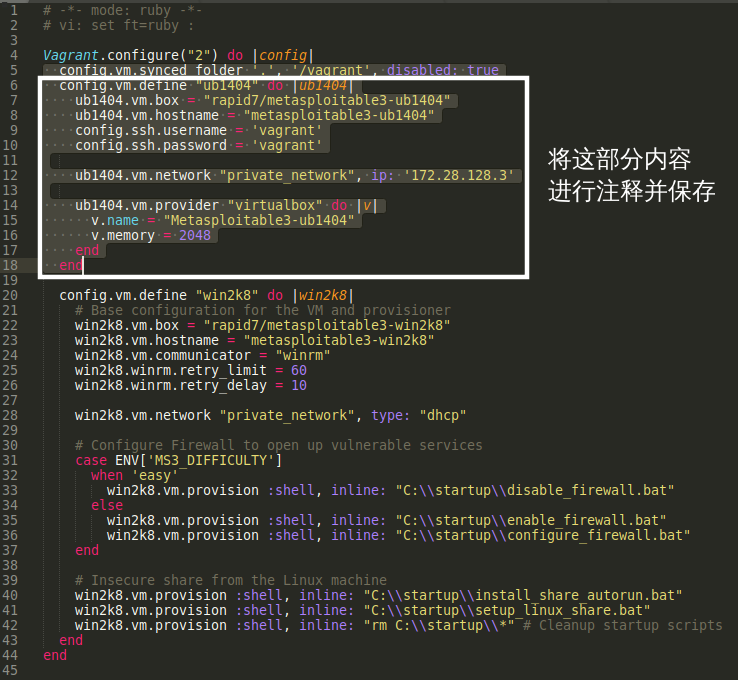
修改后vagrant文件如下:
# -*- mode: ruby -*-
# vi: set ft=ruby :

Vagrant.configure("2") do |config|
  config.vm.synced_folder '.', '/vagrant', disabled: true
  # config.vm.define "ub1404" do |ub1404|
  #  ub1404.vm.box = "rapid7/metasploitable3-ub1404"
  #  ub1404.vm.hostname = "metasploitable3-ub1404"
  #  config.ssh.username = 'vagrant'
  #  config.ssh.password = 'vagrant'

  #  ub1404.vm.network "private_network", ip: '172.28.128.3'

  #  ub1404.vm.provider "virtualbox" do |v|
  #    v.name = "Metasploitable3-ub1404"
  #    v.memory = 2048
  #  end
  # end

  config.vm.define "win2k8" do |win2k8|
    # Base configuration for the VM and provisioner
    win2k8.vm.box = "rapid7/metasploitable3-win2k8"
    win2k8.vm.hostname = "metasploitable3-win2k8"
    win2k8.vm.communicator = "winrm"
    win2k8.winrm.retry_limit = 60
    win2k8.winrm.retry_delay = 10

    win2k8.vm.network "private_network", type: "dhcp"

    # Configure Firewall to open up vulnerable services
    case ENV['MS3_DIFFICULTY']
      when 'easy'
        win2k8.vm.provision :shell, inline: "C:\\startup\\disable_firewall.bat"
      else
        win2k8.vm.provision :shell, inline: "C:\\startup\\enable_firewall.bat"
        win2k8.vm.provision :shell, inline: "C:\\startup\\configure_firewall.bat"
    end

    # Insecure share from the Linux machine
    win2k8.vm.provision :shell, inline: "C:\\startup\\install_share_autorun.bat"
    win2k8.vm.provision :shell, inline: "C:\\startup\\setup_linux_share.bat"
    win2k8.vm.provision :shell, inline: "rm C:\\startup\\*" # Cleanup startup scripts
  end
end
接下来我们通过vagrant up指令进行构建:
⚡ root@F0rGeEk /media/root/软件1/VMware/metasploitable3-workspace vagrant up
Bringing machine 'win2k8' up with 'virtualbox' provider...
==> win2k8: Box 'rapid7/metasploitable3-win2k8' could not be found. Attempting to find and install...
win2k8: Box Provider: virtualbox
win2k8: Box Version: >= 0
==> win2k8: Loading metadata for box 'rapid7/metasploitable3-win2k8'
win2k8: URL: https://vagrantcloud.com/rapid7/metasploitable3-win2k8
==> win2k8: Adding box 'rapid7/metasploitable3-win2k8' (v0.1.0-weekly) for provider: virtualbox
win2k8: Downloading: https://vagrantcloud.com/rapid7/boxes/metasploitable3-win2k8/versions/0.1.0-weekly/providers/virtualbox.box
Download redirected to host: vagrantcloud-files-production.s3.amazonaws.com
.......下载大小不到7G,这里省略下载过程
同样构建好后通过virtualbox导入打开即可,选择vagrant账户并用密码vagrant登录。administrator的密码你就想办法自己搞吧!


 浙公网安备 33010602011771号