Linux 文件权限、系统优化(初识)
 Linux中文件权限操作,系统优化相关操作,超级详细!
目录

Linux 文件权限、系统优化
1、文件权限的详细操作

1、简介:
权限就是用户可以对文件可以进行的操作,例如:可读,可写,可执行
2、命令及归属:
-
命令:
chmod-
参数:
-c: 若该文件权限确实已经更改,才显示其更改动作-f:若该文件权限无法被更改也不要显示错误讯息-v:显示权限变更的详细资料-R:对目前目录下的所有文件与子目录进行相同的权限变更(即以递归的方式逐个变更)
-
-
格式:chmod [参数] [修改权限文件名]
-
文件权限的归属分为:
u-属主(Owner)、g-属组(Group)、o-其他使用者(Other Users)
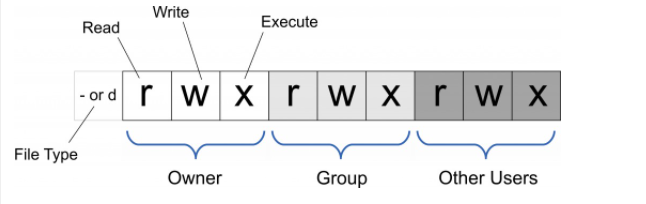
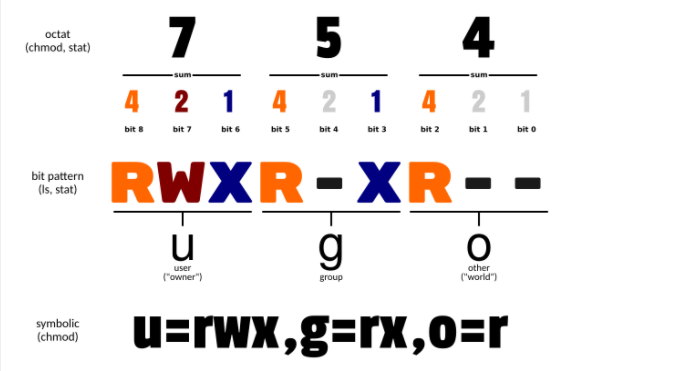
- 权限字符及其编号
- 使用字符添加权限直接
+号就可以添加权限,-号代表取消权限,=代表唯一设定权限
功能一览表:
| Operator | 说明 |
|---|---|
+ |
为指定的用户类型增加权限 |
- |
去除指定用户类型的权限 |
= |
设置指定用户权限的设置,即将用户类型的所有权限重新设置 |
| 模式 | 对应数字 | 描述 |
|---|---|---|
r |
4 | 设置为可读权限 |
w |
2 | 设置为可写权限 |
x |
1 | 设置为可执行权限 |
3、权限对于用户和目录的意义

权限对于用户的意义:
- 文件属主和超管可以修改文件或目录的权限;
- root用户是高于权限;
- 普通用户是严格遵守权限的;
- 权限需要重新登才生效(su和su - 都可以);
权限对于目录的意义:
**设置最小权限使文件执行相应的操作**
- 文件可读,文件所在路径(文件夹)的最小权限是必须拥有可执行权限。
- 文件可写,文件所在路径(文件夹)的最小权限是必须拥有可执行权限
- 文件可执行,文件所在路径(文件夹)的最小权限是必须拥有可读可执行权限
4、创建文件/文件夹的默认权限来源
- 相关文件:/etc/profile
- 在Linux中,常用的文件的权限是666,目录的权限是777
- 创建文件的默认权限是跟
umask值相减,遇到奇数加一,遇到偶数则不变 - 创建文件夹的权限只和umask相减
- 创建文件的默认权限是跟
- 查看profile文件中的umask值,及运算关系
[root@localhost ~]# cat /etc/profile

root用户举例,示例如下:
# 查看uid
[root@localhost ~]# id root
uid=0(root) gid=0(root) groups=0(root)
# uid <199,第一步为假了

[root@localhost test]# /usr/bin/id -gn
root
[root@localhost test]# /usr/bin/id -un
root
# 执行结果相同,为真
# False && True = False,所以root的umask = 022

# 那么我们在root用户下创建的用户默认权限就可以计算了,文件权限666和目录权限777与umask相减来验证

# 1、文件默认权限验证
666的每位与022相减:
6-0 =6   # 偶数不用变
6-2 =4   # 偶数不用变
6-2 = 4  # 偶数不用变
# 所以root下创建文件的默认权限为644---->rw-r--r--

# 实际创建验证
[root@localhost test]# touch a.txt
[root@localhost test]# ll -i
total 0
1423023 -rw-r--r--. 1 root root 0 Dec 15 15:48 a.txt

# 2、目录默认权限验证
777的每位与022直接相减,不需要判断奇偶
7 - 0 = 7
7 - 2 = 5
7 - 2 = 5
# 所以root下创建的目录的默认权限为755 ----> rwxr-xr-x

# 实际创建验证
[root@localhost ~]# mkdir test
[root@localhost ~]# ll -i
1423022 drwxr-xr-x. 2 root root   19 Dec 15 15:48 test
5、修改文件权限案例
案例:a.txt为例,修改文件ugo的权限
[root@localhost test]# ll -ia
1423023 -rw-r--r--. 1 root root   0 Dec 15 15:48 a.txt
# 现在ugo的权限为读写,可读,可读,把ugo的权限扩大,改为读写执行
[root@localhost test]# chmod ugo+rwx a.txt
			或
[root@localhost test]# chmod 777 a.txt
[root@localhost test]# ll -i
total 0
1423023 -rwxrwxrwx. 1 root root 0 Dec 15 15:48 a.txt

# 将a.txt ugo的读写执行权限都去掉
[root@localhost test]# chmod ugo-rwx a.txt
			或
[root@localhost test]# chmod -777 a.txt
[root@localhost test]# ll -i
total 0
1423023 ----------. 1 root root 0 Dec 15 15:48 a.txt

# 分别给a.txt 的u读写执行,g添加读写,o添加读权限
[root@localhost test]# chmod u+rwx,g+rw,o+r a.txt
		或
[root@localhost test]# chmod 764 a.txt
[root@localhost test]# ll -i
total 0
1423023 -rwxrw-r--. 1 root root 0 Dec 15 15:48 a.txt

# 分别给a.txt 的u读写,g执行,o没有任何权限
[root@localhost test]# chmod u+rw,g+x a.txt
		或
[root@localhost test]# chmod 610 a.txt
[root@localhost test]# ll -i
total 0
1423023 -rw---x---. 1 root root 0 Dec 15 15:48 a.txt
案例:以test文件夹为例,分配权限
# 查看test文件夹文件的权限
[root@localhost test]# ll
total 0
----------. 1 root root 0 Dec 15 15:48 a.txt
----------. 1 root root 0 Dec 15 16:25 b.txt
# 没有任何权限,下面给test文件下的所有文件添加读写执行权限
[root@localhost ~]# chmod -R 777 test
[root@localhost ~]# ll test
total 0
-rwxrwxrwx. 1 root root 0 Dec 15 15:48 a.txt
-rwxrwxrwx. 1 root root 0 Dec 15 16:25 b.txt

# 将test目录下所有文件的属组的执行权限,其他使用者的写和执行权限去掉
[root@localhost ~]# chmod -R g-x,o-wx test/
[root@localhost ~]# ll test/
total 0
-rwxrw-r--. 1 root root 0 Dec 15 15:48 a.txt
-rwxrw-r--. 1 root root 0 Dec 15 16:25 b.txt
ps:若用 chmod 4755 filename 可使此程序具有 root 的权限。
2、系统优化
系统信息查看方法
-
查看系统名称信息:
# cat /etc/redhat-release CentOS release 7.5.1804 -
查看系统内核版本(用于显示当前操作系统名称)
-
uname :Linux命令,用于显示当前操作系统名称
-
-a:详细输出所有信息,依次为内核名称,主机名,内核版本号,内核版本,硬件名,处理器类型,硬件平台类型,操作系统名称[root@localhost ~]# uname Linux [root@localhost ~]# uname -a Linux localhost.localdomain 3.10.0-1160.el7.x86_64 #1 SMP Mon Oct 19 16:18:59 UTC 2020 x86_64 x86_64 x86_64 GNU/Linux -
-r:显示linux操作系统内核版本号# uname -r 3.10.0-862.el7.x86_64 -
-m:查看系统硬件位数# uname -m x86_64
系统基础优化
添加系统普通用户
-
添加系统普通用户:
useradd [用户名] -
设置用户密码 :
passwd [用户名]- 免交互模式:
echo [密码]|passwd --stdin [用户名](一般用在脚本文件中)
- 免交互模式:
-
切换用户信息:
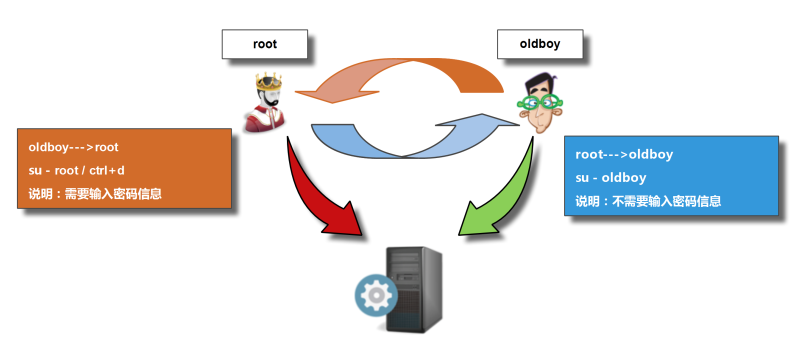
su和su -- 二者区别就是
su是切换用户,但是切换后的用户缺少相应的文件或环境变量;su -相当于重新登录,切换后的用户携带环境变量或相应文件 - 通过
pwd和echo $PATH两个命令查看超管和普通用户切换后的区别 - root用户切换到普通用户不需要输入密码
- 普通用户切换到root用户需要输入密码
- 二者区别就是
用户切换原理图:
-
查看当前登录用户信息:
whoami命令[root@localhost ~]# whoami root -
查看当前用户登录系统的终端 :
who命令[root@localhost ~]# who root tty1 2021-12-15 08:50 root pts/0 2021-12-15 15:14 (192.168.15.1) root pts/2 2021-12-15 16:52 (192.168.15.1) # tty和pts的含义 tty ---- 代表虚拟机开的窗口 pts ---- 代表此时Xshell开的窗口
命令提示信息优化
- 通过
echo $PS1命令修改显示命令行提示符格式信息
临时切换提示
-
大写方式
[root@localhost ~]# echo $PS1 [\u@\h \W]\$ # 大写方式只能显示路径基名,不显示完全路径 [root@localhost ~]#cd /etc/sysconfig/network-scripts/ [root@localhost network-scripts]# -
小写方式
[root@localhost ~]# PS1='[\u@\h \w]\$'
# 通过小写方式这样就能显示完整路径了
[root@localhost ~]#cd /etc/sysconfig/network-scripts/
[root@localhost /etc/sysconfig/network-scripts]#
永久设置切换提示
- 相关文件:
/etc/profile- 在profile文件内添加
export PS1='[\u@\h \w]\$ ' - 重载文件命令:
source - 重载文件:
source /etc/profile,设置成功+
- 在profile文件内添加

【待续】

 浙公网安备 33010602011771号