Day21
1-nodejs 中有哪些常用的内置模块
在使用内模块的时候需要先将所需的内置模块进行引入、
OS模块
在nodejs中OS模块提供了与操作系统相关的属性和方法

// 导入OS内置模块,必须先进行导入,否则无法使用
const os = require("os")
// 根据操作系统生成对应的换行符
console.log(os.EOL);
// 查看电脑CPU信息
console.log(os.cpus());
// 查看电脑的内容总大小,单位是字节
console.log(os.totalmem());
// 查看点奥的剩余内存大小 单位是字节
console.log(os.freemem());
// 查看电脑主机名称
console.log(os.hostname());
// 查看电脑系统类型
console.log(os.type());
path模块
nodejs总的path模块用于处理文件和目录的路径
// 导入内置模块——path
const path = require('path')
// 获取文件名称
console.log(path.basename('c/d/e/filename.js'));
// 获取文件路径
console.log(path.dirname('c/d/e/filename.js'));
// 获取路径中文件夹的后缀名称
console.log(path.extname('c/d/e/filename.js'));
// 将输出的路径进行拼接
console.log(path.join('/c','/d','/e'));
// 模拟cd操作并进行拼接
console.log(path.resolve('c','d','e'));//如果前面没有“/”会自动将当前的绝对路径添加到前面
console.log(path.resolve('/c','/d','e'));//由于c和d前面都具有“/”,表示c和d都是根目录下面的子文件夹,因此d会将c进行替换
url模块
在nodejs中url模块是用来解析url地址的
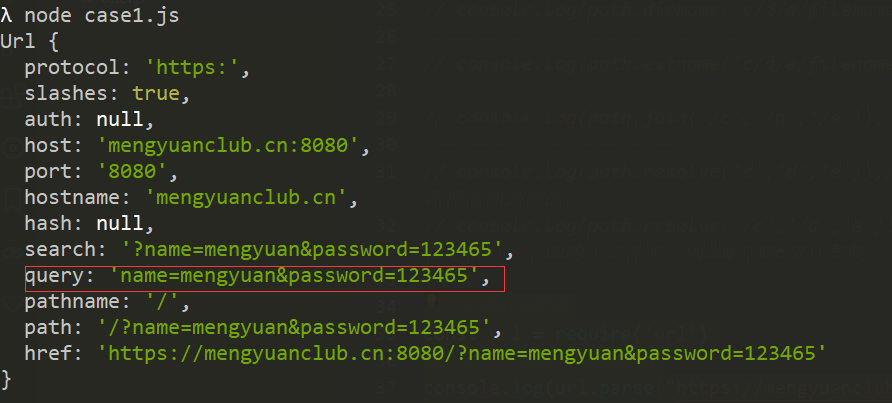
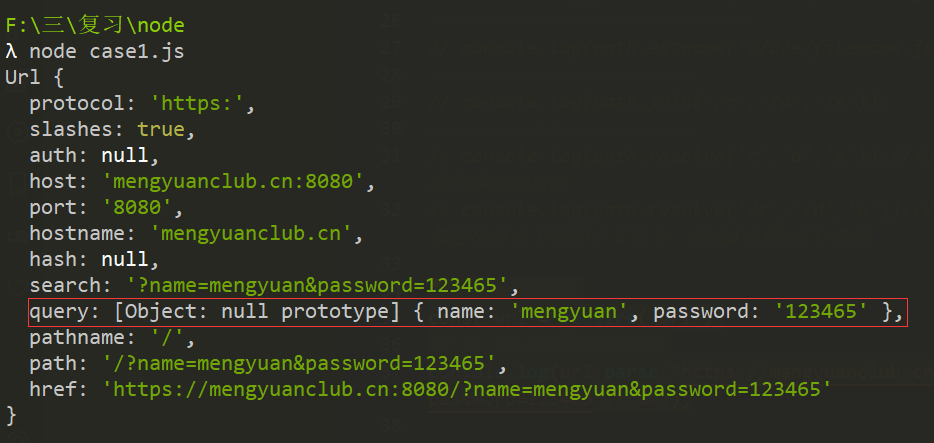
url.parse(要解析的内容,是否查询字符串)
是否查询字符串,默认是false,不进行单独解析;可以选填true,进行单独解析。返回值是一个解析好的对象
// 导入url模块
const url = require('url')
// 第二个参数使用默认值
console.log(url.parse("https://mengyuanclub.cn:8080?name=mengyuan&password=123465"));
// 导入url模块
const url = require('url')
// 第二个参数使用默认值
console.log(url.parse("https://mengyuanclub.cn:8080?name=mengyuan&password=123465",true));
在url模块中resolve是以一种Web浏览器解析超链接的方式把一个目标URL解析成一个相对于一个基础的url
console.log(url.resolve('https://lynnn.cn/foo/bar','aa'))
console.log(url.resolve('https://lynnn.cn/foo/bar','../aa'))
console.log(url.resolve('https://lynnn.cn/foo/bar/','aa'))
console.log(url.resolve('https://lynnn.cn/foo/bar/','../aa'))

如果第一个参数后面没有/,第二个参数前面没有/;
如果第一个参数后面没有/,第二个参数前面是./;
如果第一个参数后面有/,第二个参数前面是../;
表示第一个参数最后一个文件夹和第二个参数是同级目录,第二个参数会将第一个参数的最后一个文件夹进行替换
如果第一个参数后面具有/,第二个参数前面没有/;
表示第二个参数直接拼接到第一个参数后面
如果第一个参数后面没有/,第二个参数前面是../;
表示第二个参数和第一个参数的倒数第二个文件夹是同级会直接进行替换
2-常用的第三方模块
3-如何创建一个服务器
4-http 搭建的服务相应给客户端的数据如果是中文,应该如何处理
5-第三方 router 模块和 serve-static 如何使用,作用是什么?
-
建立项目文件夹并生成项目描述文件
使用命令npm init -y生成package.json文件 -
创建网站服务器实现客户端和服务器端通信
创建一个app.js文件,然后在里面写创建服务器的内容
/* app.js文件内容 */
// 引入http模块
const http = require('http');
// 创建网站服务器
const app = http.createServer();
// 当客户端访问服务器端的时候
app.on('request', (req, res) => {
	res.end('ok');
});
// 端口监听
app.listen(80);
console.log('服务器启动成功');
- 1
- 2
- 3
- 4
- 5
- 6
- 7
- 8
- 9
- 10
- 11
- 12
- 连接数据库并根据需求设计学员信息表
使用命令npm install mongoose安装MongoDB模块
/* 创建model文件夹和创建connect.js文件并写内容 */
const mongoose = require('mongoose');
// 连接数据库
mongoose.connect('mongodb://localhost/playground', { useNewUrlParser: true })
	.then(() => console.log('数据库连接成功'))
	.catch(() => console.log('数据库连接失败'))
- 1
- 2
- 3
- 4
- 5
- 6
在原来的app.js文件中导入这个模块
/* app.js文件追加内容 */
// 数据库连接
require('./model/connect');
- 1
- 2
- 3
设计集合规则与创建集合
/* user.js文件内容,这个文件与connect文件同文件夹 */
const mongoose = require('mongoose');
// 创建学生集合规则
const studentsSchema = new mongoose.Schema({
	name: {
		type: String,
		required: true,
		minlength: 2,
		maxlength: 10
	},
	age: {
		type: Number,
		min: 10,
		max: 25
	},
	sex: {
		type: String
	},
	email: String,
	hobbies: [ String ],
	collage: String,
	enterDate: {
		type: Date,
		default: Date.now
	}
});
// 创建学生信息集合
const Student = mongoose.model('Student', studentsSchema);
// 将学生信息集合进行导出
module.exports = Student;
- 1
- 2
- 3
- 4
- 5
- 6
- 7
- 8
- 9
- 10
- 11
- 12
- 13
- 14
- 15
- 16
- 17
- 18
- 19
- 20
- 21
- 22
- 23
- 24
- 25
- 26
- 27
- 28
- 29
- 30
在下面的路由文件index.js中导入这个模块,模块返回值是一个构造函数
/* index.js文件追加内容 */
const Student = require('../model/user');
- 1
- 2
- 创建路由并实现页面模板呈递
使用第三方模块router实现路由,命令npm install router
使用命令npm install art-template下载模板引擎
新建一个router文件夹,创建一个index.js文件来专门写路由的内容,在里面导入这个模块,模块返回值是一个函数,用来获取路由对象的

 浙公网安备 33010602011771号