CSS选择器及其样式
一、三种样式
css优势(html)内容与表现(css)分离
1、行外样式
2、行内样式
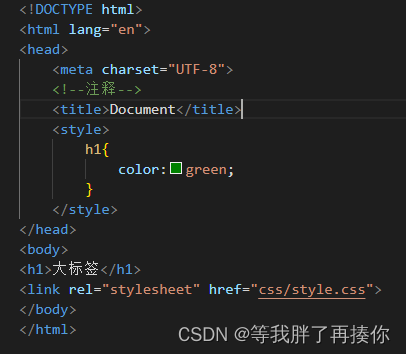
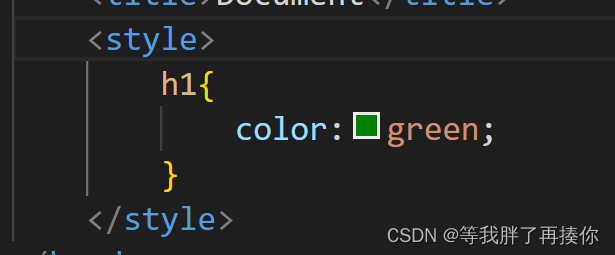
3、内部样式(注意要写在body的前面)
二、三种选择器
1、标签选择器
这种选择器会改变所有此类标签的格式
2、类选择器
这样写就能控制单一的标签格式
3、id选择器
id选择器在上文,注意!id选择器只能对应一个,不能设置为组的形势
id选择器>class选择器>标签选择器
二、层次选择器
1、后代选择器:在某个元素的后面 (全部)
/*后代选择器*/
body p{
    background:red;
}
2、子选择器,一代,儿子
/*子选择器*/
body>p{
  background:#3cbda6;
}
3、相邻兄弟选择器 同辈
/*相邻弟弟选择器:只有一个,相邻(向下)*/
.active + p{
background:#a13d30;
}
4、通用选择器
/*通用兄弟选择器、当前选中元素的向下所有兄弟元素*/
.active~p{
    background:#02ff00;
}
5、结构伪类选择器
/*ul的第一个元素*/
ul li:first-child{
    background:red;
}
/*ul的最后一个元素*/
ul li:last-child{
    background:red;
}
/*选中p1:定位到父元素,选择当前的第一个元素,选择当前p元素的父级元素
选中父级元素的第一个,并且是当前元素才生效!*/
p:nth-child(2){
background:red;
}
/*选中父元素,下的p元素的第二个,类型*/
p:nth-of-type(1){
background:yellow;
}
/*当鼠标放在该标签上会改变标签的颜色*/
a:hover{
background:red;
}5、属性选择器💯
可以自定义设置开头或者结尾的标签并设置背景颜色
<!DOCTYPE html>
<html lang="en">
<head>
    <meta charset="UTF-8">
    <!--注释-->
    <title>Document</title>
    <style>
    .demo a{
		float: left;
		display: block;
		height: 50px;
		width: 50px;
		border-radius: 10px;
		background-color: blue;
		text-align: center;
		color: gainsboro;
		text-decoration: none;
		margin-right: 5px;
		font: bold 20px/50px Arial;
	}
	/*属性名,属性名=属性值(正则)
	= 绝对等于
	*=包含*/
   /*存在id属性的元素  a[]{}  */
   a[id]{
	background:yellow;
   }
   a[id=first]{
	background: yellow;
   }
   /*class中带有属性links*/
   a[class=links]{
	background: yellow;
   }
   /*选中herf中以http开头的元素*/
   a[href^=http]{
	background: yellow;
   }
   /*选中以什么结尾的*/
   a[href$=jpg]{
	background: yellow;
   }

    </style>
</head>
<body>
<p class="demo">
	<a href="https://www.baidu.com"id="first">1</a>
	<a href="" class="links item active" target="_blank" title="text">2</a>
	<a href="imags/123.html" class="links item">3</a>
	<a href="imags/123.png" class="links item">4</a>
	<a href="imags/123.jpg" class="links item">5</a>
	<a href="abc" class="links item">6</a>
	<a href="/a.pdf" class="links item">7</a>
	<a href="/abc.pdf" class="links item">8</a>
	<a href="abc.doc" class="links item">9</a>
	<a href="abcd.doc" class="links item last">10</a>
</p>
</body>
</html>
三、美化网页元素
1、span标签
<!DOCTYPE html>
<html lang="en">
<head>
    <meta charset="UTF-8">
    <!--注释-->
    <title>Document</title>
    <style>
      #title1{
    font-size: 50px;
	  }
    </style>
</head>
<body>
欢迎学习<span id="title1">java</span>
</body>
</html>
2、字体样式
<!DOCTYPE html>
<html lang="en">
<head>
    <meta charset="UTF-8">
    <!--注释-->
    <title>Document</title>
	<!--
		font-family: 楷体;设置字体    加英文样式用逗号隔开
		font-size: 50px; 设置大小
		font-weight: bold; 设置粗细
	-->
    <style>
    body{
		font-family: 楷体;
		color: cornflowerblue;
	}
	h1{
		font-size: 50px;
	}
	.p1{
		font-weight: bold;
	}
    </style>
</head>
<body>
<h1>鹊桥仙</h1>
<p class="p1">【北宋】秦观</p>
<p>纤云弄巧,飞星传恨,银汉迢迢暗渡。</p>
<p>金风玉露一相逢,便胜却、人间无数。</p>
<p>柔情似水,佳期如梦,忍顾鹊桥归路。</p>
<p>两情若是长久时,又岂在、朝朝暮暮。</p>
</body>
</html>
3、文本样式
<!DOCTYPE html>
<html lang="en">
<head>
    <meta charset="UTF-8">
    <!--注释-->
    <title>Document</title>
    <style>
	h1{
		color: rgba(0, 255, 255, 0.9);
		text-align:center;
	}
	p{
		text-align: center;
	  /*首行缩进两个字符*/
		text-indent: 2em;
	}
	.p1{
		background: rgb(114, 79, 79);
		height: 300px;/*高度*/
		line-height: 300px;/*行高*/

	}
	.lang1{
		text-decoration: line-through;/*中划线*/
		text-decoration: overline;/*上划线*/
		text-decoration: underline;/*下划线*/
	}
        /*去下滑线
        text-decoration:none;
        */
    </style>
</head>
<body>
<p class="lang1">217861786</p>
<h1>鹊桥仙</h1>
<p class="p1">【北宋】秦观</p>
<p>纤云弄巧,飞星传恨,银汉迢迢暗渡。</p>
<p>金风玉露一相逢,便胜却、人间无数。</p>
<p>柔情似水,佳期如梦,忍顾鹊桥归路。</p>
<p>两情若是长久时,又岂在、朝朝暮暮。</p>
</body>
</html>
4、超链接伪类
正常情况下,a,a:hover
/*鼠标悬停时的状态*/
a:hover{
color:orange;
font-size:50px;
}
5、列表
<!DOCTYPE html>
<html lang="en">
<head>
    <meta charset="UTF-8">
    <!--注释-->
    <title>列表样式</title>
<link href="css/style.css"rel="stylesheet">
</head>
<body>
<div id="nav">
	<h2 class="title">全部商品分类</h2>

	<ul>
		<li>
			<a href="#">图书</a>
			<a href="#">音像</a>
			<a href="#">数字商品</a>
		</li>
		<li>
			<a href="#">家用电器</a>
			<a href="#">手机</a>
			<a href="#">数码</a>
		</li>
		<li>
			<a href="#">电脑</a>
			<a href="#">办公</a>
		</li>
		<li>
			<a href="#">家居</a>
			<a href="#">家装</a>
			<a href="#">厨具</a>
		</li>
		<li>
			<a href="#">服饰鞋帽</a>
			<a href="#">个性化妆</a>
		</li>
		<li>
			<a href="#">礼品箱包</a>
			<a href="#">钟表</a>
			<a href="#">珠宝</a>
		</li>
		<li>
			<a href="#">食品饮料</a>
			<a href="#">保健食品</a>
		</li>
		<li>
			<a href="#">彩票</a>
			<a href="#">旅行</a>
			<a href="#">充值</a>
			<a href="#">票务</a>
		</li>
	</ul>
</div>

	</body>
</html>
#nav{
width: 300px;
}
.title{
font-size: 18px;
font-weight: bold;
text-indent: 2em;
line-height: 35px;
background-color: brown;
}
/*ul li
none 去掉原点
circle 空心圆
decimal 数字
square 正方形*/
ul{
background-color: rgb(90, 81, 81);
}
ul li{
height: 30px;
list-style: none;
text-indent: 1em;
}
a{
text-decoration: noen;
font-size: 14px;
color:black
}
a:hover{
color:orange;
text-decoration: underline;
}运行结果展示:
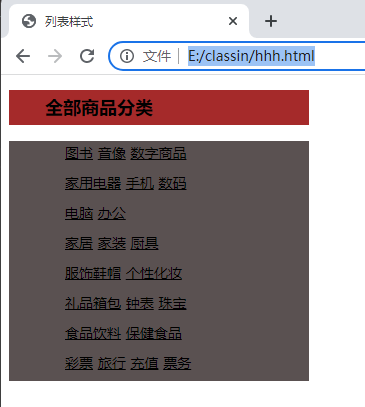
6、背景
背景颜色
background-color: rgb(90, 81, 81);背景图片
这里的no-repeat表示只会出现一次的图片
background: red url("C:\Users\lenovo\Pictures\Saved Pictures\d.png") 270px 10px no-repeat;7、盒子模型
margin:外边距
padding:内边距
border:边框
一般初始话应该设置它们的属性为0
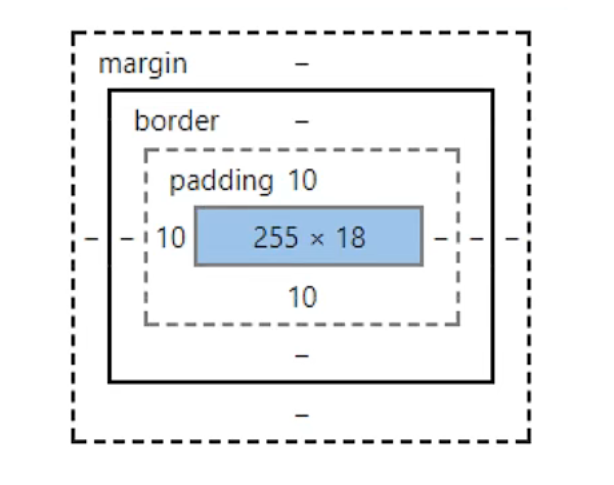
设置边框:
#box{
width:300px;
border:1px solid red;
}
8、外边距
<!DOCTYPE html>
<html lang="en">
<head>
    <meta charset="UTF-8">
    <!--注释-->
    <title>列表样式</title>
	<style>
		#box{
			width: 300px;
			border: 1px solid red;
			margin: 0 auto;
			/*
			一个参数为上下左右
			两个参数上下为0,左右适中
			四个参数上下左右*/
		}

		h2{
			font-size: 16px;
			background-color: rgb(137, 97, 248);
			line-height: 30px;
			color: white;

		}
		form{
			background-color: rgb(156, 122, 248);
		}
		input{
			border: 1px solid black;
		}
		div :nth-of-type(1){
			padding: 10px;/*和margin一样参数表达*/
		}
	</style>
</head>
<body>
	<div id="box">
		<h2>会员登陆</h2>
		<form action="#">
			<div>
				<span>用户</span>
				<input type="text">
			</div>
			<div>
				<span>密码</span>
				<input type="text">
			</div>
			<div>
				<span>邮箱</span>
				<input type="text">
			</div>

		</form>

	</div>

	</body>
9、圆角边框
10、阴影
<!DOCTYPE html>
<html lang="en">
<head>
    <meta charset="UTF-8">
    <!--注释-->
    <title>列表样式</title>
<style>
	/*左上 右上 右下 左下 顺时针方向
	两个值 左上 右下*/
	div{
		width: 100px;
		height: 100px;
		border: 10px solid 10px red;
		border-radius: 10px;/*这里可以设置圆形边框*/
		box-shadow: 10px 10px 100px yellow;/*在这里设置阴影*/
	}
</style>

</head>
<body>
	<div></div>
	</div>

	</body>
11、浮动
块级元素:独占一行
h1~h6 p div 列表...行内元素:不独占一行
sapn a img strong...行内元素可以被包含在块级元素中,反之,则不可以
<style>
	/*
	block 块元素
	inline 行内元素
	inline-block 是块元素,但是可以内联在一行
	*/
	div{
		width: 100px;
		height: 100px;
		border: 1px solid red;
	}
	span{
		width: 100px;
		height: 100px;
		border: 1px solid red;
		display: inline-block;
	}
</style>
display(放置在行内)也是实现行内元素排列的方式,但是我们很多情况都是用float实现
12、float
1.1 左右浮动 float left right
13、overflow和父级边框塌陷的问题
clear:right;/*右侧不允许有浮动*/
clear:left;/*左侧不允许有浮动*/
clear:both;/*两侧都不允许有浮动*/
clear:none;
解决方案;
1、增加父级元素高度
height:80px;/*增加*/2、 增加一个空的div标签清除浮动
<div class="clear"></div>
.clear{
clear:both;
margin:0;
padding:0;
}
3、overflow
超过我们所设定的长或者宽的时候,使用overflow
| visible | 默认值。内容不会被修剪,会呈现在元素框之外。 |
| hidden | 内容会被修剪,并且其余内容是不可见的。 |
| scroll | 内容会被修剪,但是浏览器会显示滚动条以便查看其余的内容。 |
| auto | 如果内容被修剪,则浏览器会显示滚动条以便查看其余的内容。 |
| inherit |
规定应该从父元素继承 overflow 属性的值 |
4、父级添加伪类:after
#father:after{
content:'';
display:block;
clear:both;
}
5、相对定位 (这里的相对位置是改变后的位置相对与改变前的位置)
<!DOCTYPE html>
<html lang="en">
<head>
    <meta charset="UTF-8">
    <!--注释-->
    <title>列表样式</title>
	<style>
   #box{
	width: 300px;
	height: 300px;
	padding: 10px;
	border: 2px solid red;
   }
   a{
	width: 100px;
	height: 100px;
	/*处理下划线*/
	text-decoration: none;
	/*设置行高与它本来的高度一致,可以让字体放在中间*/
	text-align: center;
	line-height: 100px;
	background-color: rgb(216, 125, 196);
	color: white;
	display: block;/*设置成块元素*/
   }
   /*悬停的时候变色*/
   a:hover{
	background-color: rgb(74, 175, 243);
   }
   .a2,.a4{
position: relative;/*设置为相对位置*/
/*这里的数据是改变后的位置相对于改变前的数据*/
left:200px;
top:-100px;
   }
   .a5{
	position: relative;
	left: 100px;
	top:-300px;
   }
	</style>
</head>
<body>
	 <div id="box">
		<a class="a1" href="#">1</a>
		<a class="a2" href="#">2</a>
		<a class="a3" href="#">3</a>
		<a class="a4" href="#">4</a>
		<a class="a5" href="#">5</a>
	 </div>
	</body>
运行结果如下:
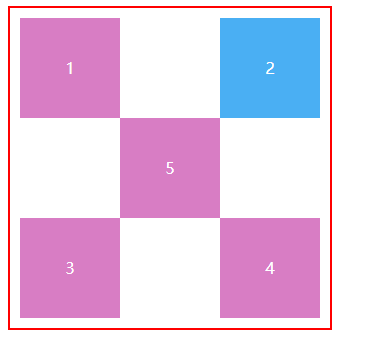
6、绝对定位
定位:基于xxx的定位,上下左右
a、没有父级元素定位的相对于浏览器定位
b、假设父级元素存在定位,通常相对于父级元素进行偏移(父设置相对位置子设置绝对absolate位置)
7、固定定位(保持在浏览器某一位置不动)
position:fixed;8、z-index
z-index可以把图片的层级放置在底层
透明度 opacity 0.5;


 浙公网安备 33010602011771号