
netty 处理客户端连接
Netty如何处理连接事件
上文讲了Netty如何绑定端口,现在我们来阅读下netty如何处理connect事件。上文我们说了NioEventLoop启动后不断去调用select的事件,当客户端连接时候,回触发processSelectedKeys方法,然后调用 processSelectedKey方法
| SelectKey | 说明 |
|---|---|
| OP_READ | 读 1 |
| OP_WRITE | 写 4 |
| OP_CONNECT | 客户端connect 8 |
| OP_ACCEPT | 连接 16 |
    private void processSelectedKey(SelectionKey k, AbstractNioChannel ch) {
        // 省略。。。
        try {
            // 16 是连接事件
            int readyOps = k.readyOps();
            // We first need to call finishConnect() before try to trigger a read(...) or write(...) as otherwise
            // the NIO JDK channel implementation may throw a NotYetConnectedException.
            if ((readyOps & SelectionKey.OP_CONNECT) != 0) {
                // remove OP_CONNECT as otherwise Selector.select(..) will always return without blocking
                // See https://github.com/netty/netty/issues/924
                int ops = k.interestOps();
                ops &= ~SelectionKey.OP_CONNECT;
                k.interestOps(ops);

                unsafe.finishConnect();
            }

            // Process OP_WRITE first as we may be able to write some queued buffers and so free memory.
            if ((readyOps & SelectionKey.OP_WRITE) != 0) {
                // Call forceFlush which will also take care of clear the OP_WRITE once there is nothing left to write
                ch.unsafe().forceFlush();
            }

            // Also check for readOps of 0 to workaround possible JDK bug which may otherwise lead
            if ((readyOps & (SelectionKey.OP_READ | SelectionKey.OP_ACCEPT)) != 0 || readyOps == 0) {
               // 调用NioMessageUnsafe的read方法
                unsafe.read();
            }
        } catch (CancelledKeyException ignored) {
            unsafe.close(unsafe.voidPromise());
        }
    }
通过代码我们知道调用的是NioMessageUnsafe的read方法,进入方法我们源码,我门发现其调用了NioServerSocketChannel的doReadMessages方法,
      try {
                    do {
                        // 调用NioServerSocketChannel的doReadMessages方法
                        int localRead = doReadMessages(readBuf);
                        if (localRead == 0) {
                            break;
                        }
                        if (localRead < 0) {
                            closed = true;
                            break;
                        }

                        allocHandle.incMessagesRead(localRead);
                    } while (continueReading(allocHandle));
                } catch (Throwable t) {
                    exception = t;
                }
                int size = readBuf.size();
                for (int i = 0; i < size; i ++) {
                    readPending = false;
                    // 触发fireChannelRead事件
                    pipeline.fireChannelRead(readBuf.get(i));
                }
    @Override
    protected int doReadMessages(List<Object> buf) throws Exception {
       //这里处理java的accpet事件
        SocketChannel ch = SocketUtils.accept(javaChannel());

        try {
            if (ch != null) {
                // 丢到buf里 然后触发channelRead事件
                buf.add(new NioSocketChannel(this, ch));
                return 1;
            }
        } catch (Throwable t) {
            logger.warn("Failed to create a new channel from an accepted socket.", t);

            try {
                ch.close();
            } catch (Throwable t2) {
                logger.warn("Failed to close a socket.", t2);
            }
        }

        return 0;
    }
之前文章我门在绑定端口时候,pipiline中添加了一个ServerBootstrapAcceptor类,我门看下其channelRead方法的实现
      @Override
        @SuppressWarnings("unchecked")
        public void channelRead(ChannelHandlerContext ctx, Object msg) {
            // 这个其实就是上面的NioSocketChannel
            final Channel child = (Channel) msg;
            // 我们启动设置的ChannelInitializer
            child.pipeline().addLast(childHandler);
            //设置 options
            setChannelOptions(child, childOptions, logger);       //设置 attributes
            setAttributes(child, childAttrs);

            try {
                // 注册child?
                childGroup.register(child).addListener(new ChannelFutureListener() {
                    @Override
                    public void operationComplete(ChannelFuture future) throws Exception {
                        if (!future.isSuccess()) {
                            forceClose(child, future.cause());
                        }
                    }
                });
            } catch (Throwable t) {
                forceClose(child, t);
            }
        }
接下来我们继续看下childGroup.register(child)如何注册channel的。逻辑就是调用EveentLoopGrpoup的next方法分配SingleThreadEventLoop,调用其register方法
    @Override
    public ChannelFuture register(Channel channel) {
        return register(new DefaultChannelPromise(channel, this));
    }

    @Override
    public ChannelFuture register(final ChannelPromise promise) {
        ObjectUtil.checkNotNull(promise, "promise");
        // 最终走到NioSocketChannel的unsafe对象,registry这个方法在Abstract&AbstractUnsafe对象里实现
        promise.channel().unsafe().register(this, promise);
        return promise;
    }
我们看下register方法实现,我们发现这个其实跟NioServerSocketChannel的注册是一样的,绑定EventLoop,并且开启EventLoop,然后调用其
       @Override
        public final void register(EventLoop eventLoop, final ChannelPromise promise) {
            ObjectUtil.checkNotNull(eventLoop, "eventLoop");
            if (isRegistered()) {
                promise.setFailure(new IllegalStateException("registered to an event loop already"));
                return;
            }
            if (!isCompatible(eventLoop)) {
                promise.setFailure(
                        new IllegalStateException("incompatible event loop type: " + eventLoop.getClass().getName()));
                return;
            }
            // 绑定当前的EventLoop
            AbstractChannel.this.eventLoop = eventLoop;

            if (eventLoop.inEventLoop()) {
                register0(promise);
            } else {
                try {
                  // 第一次提交Runnable会启动EventLoop线程去启动事件,具体之前Netty绑定端口文章我写过。如何去启动的
                    eventLoop.execute(new Runnable() {
                        @Override
                        public void run() {
                            register0(promise);
                        }
                    });
                } catch (Throwable t) {
                    logger.warn(
                            "Force-closing a channel whose registration task was not accepted by an event loop: {}",
                            AbstractChannel.this, t);
                    closeForcibly();
                    closeFuture.setClosed();
                    safeSetFailure(promise, t);
                }
            }
        }
继续看下register0方法
 private void register0(ChannelPromise promise) {
            try {
                // check if the channel is still open as it could be closed in the mean time when the register
                // call was outside of the eventLoop
                if (!promise.setUncancellable() || !ensureOpen(promise)) {
                    return;
                }
                boolean firstRegistration = neverRegistered;
                // 开始注册绑定selectKey
                doRegister();
                neverRegistered = false;
                registered = true;

                // Ensure we call handlerAdded(...) before we actually notify the promise. This is needed as the
                // user may already fire events through the pipeline in the ChannelFutureListener.
                pipeline.invokeHandlerAddedIfNeeded();

                safeSetSuccess(promise);
                pipeline.fireChannelRegistered();
                // Only fire a channelActive if the channel has never been registered. This prevents firing
                // multiple channel actives if the channel is deregistered and re-registered.
                if (isActive()) {
                    //第一次注册时候会调用HeadContext的channelActive完成读事件的注册
                    if (firstRegistration) {
                        pipeline.fireChannelActive();
                    } else if (config().isAutoRead()) {
                        // This channel was registered before and autoRead() is set. This means we need to begin read
                        // again so that we process inbound data.
                        //
                        // See https://github.com/netty/netty/issues/4805
                        beginRead();
                    }
                }
            } catch (Throwable t) {
                // Close the channel directly to avoid FD leak.
                closeForcibly();
                closeFuture.setClosed();
                safeSetFailure(promise, t);
            }
        }
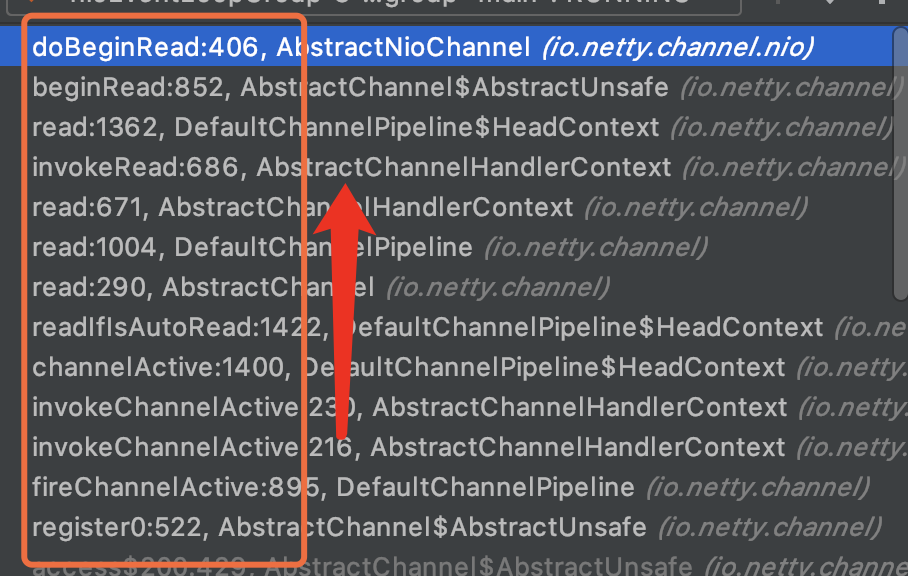
这边如何调用链路比较长 我这边以断点形式给大家展示一下
至此netty完成了处理客户端的连接,绑定EventLoop,并且开启EventLoop,完成读事件的注册,
结束
❝识别下方二维码!回复: 「
❞入群」 ,扫码加入我们交流群!


欢迎关注我的公众号!里面可以加入微信技术交流群!


 浙公网安备 33010602011771号