
kvm磁盘管理
kvm磁盘管理
kvm虚拟机虚拟磁盘格式转换
各种格式说明介绍
row:裸格式,占用空间较大,不支持快照功能,性能较好,不方便传输(顺序读写) 50G 2G 传输50G
qcow2:cow   占用空间小,支持快照,性能比raw差一点,方便传输(随机读写)  50G 2G 传输2G
qemu-img
info 查看虚拟磁盘信息
create 创建虚拟磁盘文件
	qemu-img create test.raw 5G
	qemu-img create -f qcow2 test.qcow2  5G
resize 调整虚拟磁盘容量大小
	qemu-img resize test.raw  +5G
	qemu-img resize test.qcow2  5G
	不管是什么格式的虚拟磁盘,不能缩容
convert 转换磁盘格式

1.#创建一块qcow2的虚拟硬盘(仅测试使用,无实际意义)


[root@qiudao /opt]# mkdir /data
[root@qiudao /opt]# cd /data/
[root@qiudao /data]# qemu-img create -f qcow2 centos7.qcow2 2G
Formatting 'centos7.qcow2', fmt=qcow2 size=2147483648 encryption=off cluster_size=65536 lazy_refcounts=off
[root@qiudao /data]# ll -h
total 196K
-rw-r--r-- 1 root root 193K 2019-07-23 10:58 centos7.qcow2


#查看当前虚拟机硬盘信息


[root@qiudao /data]# qemu-img info /data/centos7.qcow2
image: /data/centos7.qcow2
file format: qcow2
virtual size: 2.0G (2147483648 bytes)
disk size: 196K
cluster_size: 65536
Format specific information:
compat: 1.1
lazy refcounts: false


#转换格式,语法说明


[root@qiudao /data]# qemu-img --help |grep convert
convert [-c] [-p] [-q] [-n] [-f fmt] [-t cache] [-T src_cache] [-O output_fmt] [-o options] [-s snapshot_name] [-S sparse_size] filename [filename2 [...]] output_filename


2.#转换原有磁盘格式


[root@qiudao /opt]# qemu-img convert -f raw -O qcow2 centos7.raw centos7.qcow2


#转化之后,要想使用,要修改kvm虚拟机的主配置文件

[root@qiudao /opt]# virsh edit centos7


32 <disk type='file' device='disk'>
33 <driver name='qemu' type='qcow2'/>        #将原来的raw改成qcow2
34 <source file='/opt/centos7.qcow2'/>        #将原来的raw改成qcow2
35 <target dev='vda' bus='virtio'/>
36 <address type='pci' domain='0x0000' bus='0x00' slot='0x06' function='0x0'/>
37 </disk>


3.#删除原磁盘文件
[root@qiudao /opt]# rm -f centos7.raw


4.#启动kvm虚拟机
[root@qiudao /opt]# virsh start centos7


5.#连接测试
[root@qiudao /opt]# virsh console centos7
kvm在线热添加硬盘
#进入/opt目录下,添加一块硬盘

[root@qiudao ~]# cd /opt/
[root@qiudao /opt]# ll
total 10003908
-rw-r--r-- 1 qemu qemu 3916431360 2019-07-22 22:03 CentOS-6.8-x86_64-bin-DVD1.iso
-rw-r--r-- 1 qemu qemu 1752956928 2019-07-24 01:04 centos7.qcow2
-rw-r--r-- 1 qemu qemu 4588568576 2019-07-22 17:58 CentOS-7-x86_64-DVD-1810.iso

#添加5G硬盘
[root@qiudao /opt]# qemu-img create -f qcow2 /opt/centos7-add01.qcow2 5G
Formatting '/opt/centos7-add01.qcow2', fmt=qcow2 size=5368709120 encryption=off cluster_size=65536 lazy_refcounts=off

#查看信息
[root@qiudao /opt]# qemu-img info centos7-add01.qcow2
image: centos7-add01.qcow2
file format: qcow2
virtual size: 5.0G (5368709120 bytes)
disk size: 196K
cluster_size: 65536
Format specific information:
compat: 1.1
lazy refcounts: false


#给kvm虚拟机centos7热添加硬盘
[root@qiudao /opt]# virsh attach-disk centos7 /opt/centos7-add01.qcow2 vdb --live --cache=none --subdriver=qcow2  #临时生效
Disk attached successfully

[root@qiudao /opt]# virsh attach-disk centos7 /opt/centos7-add01.qcow2 vdb --live --cache=none --subdriver=qcow2 --config #永久生效,最好写绝对路径
vdb             #第二块硬盘

--live            #热添加

--cache=none    #宿主机对客户机的镜像的读写cache开启,off表示关闭

--subdriver        #驱动类型

#vnc查看添加结果
 [root@kvm01 opt]# virsh  console   centos7

 [root@centos7 ~]# lsblk


#剥离磁盘

[root@kvm01 opt]# virsh   detach-disk  centos7  vdb
Disk detached successfully

[root@kvm01 opt]# virsh  console   centos7
Connected to domain centos7
Escape character is ^]

[root@centos7 ~]# lsblk
在线扩容磁盘的大小
#增加硬盘大小,生产环境中,只加不减

[root@qiudao /opt]# qemu-img resize /opt/centos7-add01.qcow2 +5G
Image resized.
[root@qiudao /opt]# qemu-img info /opt/centos7-add01.qcow2
image: /opt/centos7-add01.qcow2
file format: qcow2
virtual size: 10G (10737418240 bytes)
disk size: 260K
cluster_size: 65536
Format specific information:
compat: 1.1
lazy refcounts: false


#再重新给centos7热添加硬盘
[root@qiudao /opt]# virsh attach-disk centos7 /opt/centos7-add01.qcow2 vdb --live --cache=none --subdriver=qcow2  #最好写绝对路径
Disk attached successfully


#控制台登录

[root@kvm01 opt]# virsh  console   centos7
Connected to domain centos7
Escape character is ^]


[root@centos7 ~]# lsblk
NAME            MAJ:MIN RM  SIZE RO TYPE MOUNTPOINT
sr0              11:0    1 1024M  0 rom
vda             252:0    0   10G  0 disk
├─vda1          252:1    0    1G  0 part /boot
└─vda2          252:2    0    9G  0 part
  ├─centos-root 253:0    0    8G  0 lvm  /
  └─centos-swap 253:1    0    1G  0 lvm  [SWAP]
vdb             252:16   0   10G  0 disk

#格式化操作,创建文件系统

[root@centos7 ~]# mkfs.xfs   /dev/vdb
meta-data=/dev/vdb               isize=512    agcount=4, agsize=655360 blks
         =                       sectsz=512   attr=2, projid32bit=1
         =                       crc=1        finobt=0, sparse=0
data     =                       bsize=4096   blocks=2621440, imaxpct=25
         =                       sunit=0      swidth=0 blks
naming   =version 2              bsize=4096   ascii-ci=0 ftype=1
log      =internal log           bsize=4096   blocks=2560, version=2
         =                       sectsz=512   sunit=0 blks, lazy-count=1
realtime =none                   extsz=4096   blocks=0, rtextents=0

#挂载使用
[root@centos7 ~]# mount  /dev/vdb  /opt/
[root@centos7 ~]# df -h
Filesystem               Size  Used Avail Use% Mounted on
/dev/mapper/centos-root  8.0G 1007M  7.1G  13% /
devtmpfs                 988M     0  988M   0% /dev
tmpfs                   1000M     0 1000M   0% /dev/shm
tmpfs                   1000M  8.5M  992M   1% /run
tmpfs                   1000M     0 1000M   0% /sys/fs/cgroup
/dev/vda1               1014M  133M  882M  14% /boot
tmpfs                    200M     0  200M   0% /run/user/0
/dev/vdb                  10G   33M   10G   1% /opt
普通分区的扩容
1检查是否挂载,有卸载,剥离出来
2.外面添加
qemu-img resize web02.add.qcow2  15G
3.挂载
virsh  console   centos7
mount  /dev/vdb  /opt/
4.跟新文件系统,调整元数据
xfs_growfs  /opt
根分区扩容
#根分区扩容
1.先关机,存在快照,删除快照

2.扩容根分区

[root@kvm01 opt]# qemu-img  resize  /opt/centos7.qcow2   +10G
Image resized.

3.登录进行从新分区
virsh  console   centos7
[root@qiudao /opt]# fdisk /dev/vda
删除原有的分区,重新创建分区
partprobe		#通知内核系统分区发生变化
4.重启
reboot
5.跟新文件系统
[root@centos7 ~]# xfs_growfs   /dev/centos/root		#更新文件系统
具体详见:RAID&LVM有关磁盘的故障
kvm快照管理(写实复制,相当于创建分支)
基本命令
#创建
virsh snapshot-create centos7
#查看
virsh snapshot-list centos7
#恢复
virsh snapshot-revert centos7 --snapshotnanme  +时间戳
#删除
virsh snapshot-delete centos7 --snapshotname   +时间戳

#注意:raw格式的磁盘无法创建快照,qcow2支持快照,并且快照就保存在qcow2的磁盘文件中
1.#创建快照
[root@qiudao ~]# virsh snapshot-create centos7
Domain snapshot 1563866292 created

 #开机状态下的快照
[root@kvm01 opt]# virsh   snapshot-create   centos7
Domain snapshot 1575391158 created
[root@kvm01 opt]# ll /var/lib/libvirt/qemu/snapshot/centos7/
total 16
-rw------- 1 root root 4951 Dec  4 00:39 1575390933.xml
-rw------- 1 root root 4973 Dec  4 00:39 1575391158.xml


#查看主机快照列表
[root@qiudao ~]# virsh snapshot-list centos7
Name Creation Time State
------------------------------------------------------------
1563866292 2019-07-23 15:18:12 +0800 running


#查看快照信息
[root@qiudao ~]# virsh snapshot-info centos7 --snapshotname 1563866292
Name: 1563866292
Domain: centos7
Current: yes
State: running
Location: internal
Parent: -
Children: 0
Descendants: 0
Metadata: yes


#模拟虚拟机故障,登陆虚拟机,进行删除操作。
[root@qiudao ~]# virsh console centos7
[root@centos7 ~]# rm -rf /*


#登录测试
[root@qiudao ~]# virsh console centos7
Connected to domain centos7
Escape character is ^]


-bash: /bin/rm: No such file or directory
[root@centos7 ~]# ll
-bash: /bin/ls: No such file or directory
[root@centos7 ~]# ls
-bash: /bin/ls: No such file or directory


#还原快照
[root@qiudao ~]# virsh snapshot-revert centos7 1563866292

#登录测试
[root@qiudao ~]# virsh console centos7
Connected to domain centos7
Escape character is ^]


CentOS Linux 7 (Core)
Kernel 3.10.0-957.el7.x86_64 on an x86_64


centos7 login: root
Password:
Last login: Tue Jul 23 11:33:15 on ttyS0
[root@centos7 ~]# ll
total 4
-rw-------. 1 root root 1161 Jul 22 20:52 anaconda-ks.cfg


#快照配置文件位置
[root@qiudao ~]# tree /var/lib/libvirt/qemu/snapshot/
/var/lib/libvirt/qemu/snapshot/
└── centos7
└── 1563866292.xml


#删除快照
[root@qiudao ~]# virsh snapshot-delete centos7 1563866292
Domain snapshot 1563866292 deleted
克隆
手动克隆
1.关机
[root@kvm01 opt]# virsh shutdown centos7-clone
2.到户配置信息
[root@kvm01 opt]# virsh dumpxml centos7 >centos7.3bak
3.拷贝
cp 磁盘(注意快照也会)
[root@kvm01 opt]# cp centos7.qcow2 web02.qcow2
4.修改路径
[root@kvm01 opt]# vim centos7.3bak
编辑如下几个配置文件
vi /etc/libvirt/qemu/centos7.xml
<name>centos7</name>
<uuid>ec29ba5d-863f-4317-b4dd-c7e1f23260d9</uuid> #删掉
<source file='/opt/centos7.qcow2'/>
<mac address='52:54:00:6a:e9:e4'/> #删掉
5.导入配置
[root@kvm01 opt]# virsh define centos7.3bak
6.启动kvm
[root@kvm01 opt]# virsh start web02
7.进入kvm
[root@kvm01 opt]# virsh console web02
8.测试 连接
ifup eth0   #启动网卡
完整克隆
[root@qiudao /opt]# virsh shutdown centos7        #只有关机状态才能克隆

Domain centos7 is being shutdown

[root@qiudao /opt]# virsh list --all

## Id Name State

- centos6 shut off
- centos7 shut off

--auto-clone     #从原始客户机配置中自动生成克隆名称和存储路径。

-o                #原始客户机名称;必须为关闭或者暂停状态。


[root@qiudao /opt]# virt-clone --auto-clone -o centos7 -n centos7-v1

Allocating 'centos72-clone.qcow2' | 10 GB 00:01:01

Clone 'centos7-v1' created successfully.

[root@qiudao /opt]# virsh list --all

## Id Name State

- centos6 shut off
- centos7 shut off
- centos7-v1 shut off        #克隆主机名称

[root@qiudao /opt]# ll
total 11851148
-rw-r--r-- 1 qemu qemu 3916431360 2019-07-22 22:03 CentOS-6.8-x86_64-bin-DVD1.iso
-rw------- 1 root root 1468268544 2019-08-30 21:07 centos7-clone.qcow2     #克隆机的镜像文件

-rw-r--r-- 1 root root 1752956928 2019-08-30 21:05 centos7.qcow2
-rw-r--r-- 1 root root 11534336 2019-08-30 21:05 centos7-add01.qcow2
-rw-r--r-- 1 qemu qemu 4588568576 2019-07-22 17:58 CentOS-7-x86_64-DVD-1810.iso

[root@qiudao /opt]# ll /etc/libvirt/qemu/
total 20
drwxr-xr-x 2 root root 6 2019-07-23 10:28 autostart
-rw------- 1 root root 3906 2019-07-22 22:11 centos6.xml
-rw------- 1 root root 4377 2019-08-30 21:06 centos7-v1.xml        #克隆机的配置文件

-rw------- 1 root root 4365 2019-07-23 16:23 centos7.xml
drwx------ 3 root root 42 2019-07-22 17:03 networks
连接克隆
#Kvm手动克隆虚拟机:
前提:关机状态下
1:创建基于链接克隆的虚拟磁盘文件
qemu-img create -f qcow2 -b old_disk new_disk

2:备份centos7的虚拟机配置文件,另存为centos7-v2

3:修改centos7-v2的虚拟机配置文件

    a:<name>centos7-v2</name>
    b:删除uuid
    c:删除mac address
    d:修改虚拟机磁盘路径

4:导入centos7-v2

5:检查是否正常启动


6:编写自动化脚本
[root@kvm01 opt]# cat link_clone.sh
#!/bin/bash
Old_name=$1
New_name=$2
#1.关闭宿主机
virsh  shutdown  $Old_name &>/dev/null
sleep 3
#2.导出宿主机配置信息
virsh  dumpxml	$Old_name > /opt/${New_name}.xml
#3.创建基于宿主机的磁盘文件
qemu-img create  -f  qcow2 -b /opt/${Old_name}.qcow2   /opt/${New_name}.qcow2 &>/dev/null
#4.编辑配置文件
sed  -i   "s#$Old_name#$New_name#g"   /opt/${New_name}.xml
sed  -i  '/uuid/d'  /opt/${New_name}.xml
sed  -i  '/mac address/d'  /opt/${New_name}.xml
#5.导入配置
virsh  define  /opt/${New_name}.xml  &>/dev/null

#6.启动测试
virsh  start  $New_name  &>/dev/null


#执行测试
[root@kvm01 opt]# sh link_clone.sh centos7 lb01

#7.console登录

virsh  console $New_name

#一键创建连接克隆
[root@qiudao /opt]# virt-install --virt-type kvm --os-type=linux --os-variant rhel7 --name web05 --memory 1024 --vcpus 1 --disk /opt/web05.qcow2 --boot hd --network network=default --graphics vnc,listen=0.0.0.0 --noautoconsole
本地硬盘 web05.qcow2
--boot  #指定启动路径
hd   磁盘
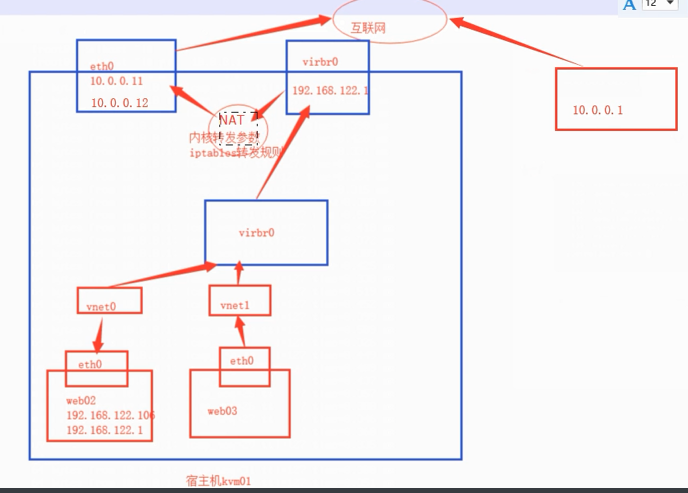
kvm虚拟机的桥接网络
NAT连接
问题:用户访问跟我们的业务的ip地址不一样
前期测试
#查看交换机
[root@kvm01 opt]# brctl show
bridge name	bridge id		STP enabled	interfaces
virbr0		8000.5254004f87a6	yes		virbr0-nic
							vnet0
#查看内核转换参数
[root@kvm01 opt]# sysctl -a|grep ipv4|grep forward
net.ipv4.ip_forward = 1    #开启
sysctl net.ipv4.ip_forward = 1 可以手动控制
新创建的kvm-NAT
virt-install --virt-type kvm --os-type=linux --os-variant rhel7 --name web05 --memory 1024 --vcpus 1 --disk /opt/web05.qcow2 --boot hd --network network=default --graphics vnc,listen=0.0.0.0 --noautoconsole
前期准备
#创建一个桥接网络,执行命令

[root@qiudao ~]# virsh iface-bridge eth0 br0
Created bridge br0 with attached device eth0
Bridge interface br0 started

#查看
[root@qiudao ~]# cat /etc/sysconfig/network-scripts/ifcfg-br0
DEVICE="br0"
ONBOOT="yes"
TYPE="Bridge"
BOOTPROTO="none"
IPADDR="10.0.0.100"
NETMASK="255.255.255.0"
GATEWAY="10.0.0.254"
IPV6INIT="yes"
IPV6_AUTOCONF="yes"
DHCPV6C="no"
STP="on"
DELAY="0"
[root@qiudao ~]# cat /etc/sysconfig/network-scripts/ifcfg-eth0
DEVICE=eth0
ONBOOT=yes
BRIDGE="br0"


#查看桥接网络信息

[root@qiudao ~]# brctl show
bridge name    bridge id        STP enabled    interfaces
br0        8000.000c2990428b    yes        eth0
virbr0        8000.5254007cc337    yes        virbr0-nic
桥接模式
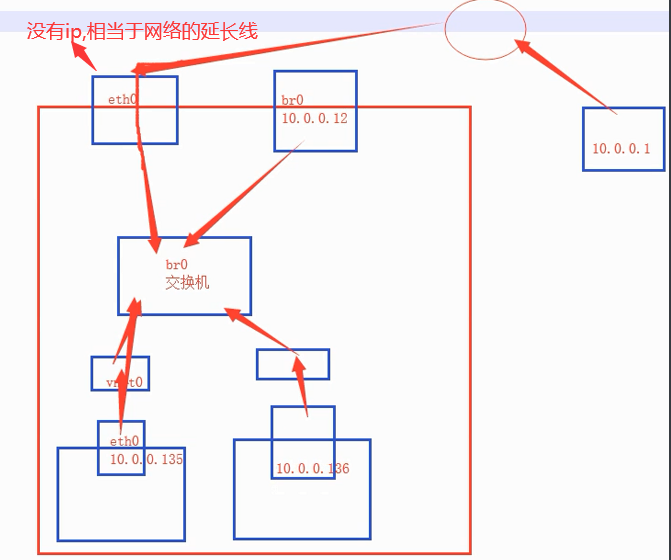
新创建的,走桥接模式
virt-install --virt-type kvm --os-type=linux --os-variant rhel7 --name web05 --memory 1024 --vcpus 1 --disk /opt/web05.qcow2 --boot hd --network bridge=br0 --graphics vnc,listen=0.0.0.0 --noautoconsole
修改桥接模式
#关闭主机centos7


[root@qiudao ~]# virsh shutdown centos7
Domain centos7 is being shutdown


[root@qiudao ~]# virsh list --all
Id Name State
----------------------------------------------------
- centos6 shut off
- centos7 shut off
- centos7-v1 shut off


#修改配置文件

[root@qiudao ~]# virsh edit centos7


74 <interface type='bridge'>        #类型修改为bridge
75 <mac address='52:54:00:59:9d:20'/>
76 <source bridge='br0'/>        #类型和名称

77 <model type='virtio'/>
78 <address type='pci' domain='0x0000' bus='0x00' slot='0x03' function='0x0'/>
79 </interface>


#启动主机

[root@qiudao ~]# virsh start centos7
Domain centos7 started


[root@qiudao ~]# virsh list --all
Id Name State
----------------------------------------------------
2 centos7 running
- centos6 shut off
- centos7-v1 shut off


#连接修改网卡信息

[root@qiudao ~]# virsh console centos7


[root@centos7 ~]# cat /etc/sysconfig/network-scripts/ifcfg-eth0
TYPE="Ethernet"
BOOTPROTO="none"
NAME="eth0"
DEVICE="eth0"
ONBOOT="yes"
IPADDR="10.0.0.101"
NETMASK="255.255.255.0"
GATEWAY="10.0.0.254"
DNS1="223.5.5.5"


#重启网络

[root@centos7 ~]# systemctl restart network
[root@centos7 ~]# systemctl stop NetworkManager
[root@centos7 ~]# systemctl disable NetworkManager
systemctl start libvirtd
#配置dns解析
[root@webvirtmgr ~]# cat /etc/resolv.conf
# Generated by NetworkManager
nameserver 223.5.5.5
nameserver 223.6.6.6


#测试上网

[root@centos7 ~]# ping baidu.com
PING baidu.com (39.156.69.79) 56(84) bytes of data.
64 bytes from 39.156.69.79 (39.156.69.79): icmp_seq=1 ttl=128 time=29.5 ms
64 bytes from 39.156.69.79 (39.156.69.79): icmp_seq=2 ttl=128 time=30.5 ms


#本地直接连接kvm虚拟机

[C:\~]$ ssh root@10.0.0.101

Connecting to 10.0.0.101:22...
Connection established.
To escape to local shell, press 'Ctrl+Alt+]'.


Last failed login: Fri Aug 30 23:46:16 CST 2019 from 10.0.0.1 on ssh:notty
There was 1 failed login attempt since the last successful login.
Last login: Fri Aug 30 23:26:26 2019
[root@centos7 ~]#
热添加网卡,内存,cpu
1.kvm添加网卡
virsh attach-interface web04 --type bridge --source br0 --model virtio  #临时
virsh attach-interface web04 --type bridge --source br0 --model virtio --config #永久
#剥离网卡
detach-interface web04 --type bridge --mac +地址

#查看挂载硬盘
virsh # domblklist web02
Target     Source
------------------------------------------------
vda        /opt/web02.qcow2
hda        -
#查看mac地址
virsh # domiflist web02
Interface  Type       Source     Model       MAC
-------------------------------------------------------
vnet0      bridge     br0        virtio      52:54:00:9e:c8:b7
vnet3      bridge     br0        virtio      52:54:00:f4:f3:9a

2.热添加内存
#连接克隆
virt-install --virt-type kvm --os-type=linux --os-variant rhel7 --name web01 --memory 512,maxmemory=2048 --vcpus 1 --disk /opt/web01.qcow2 --boot hd --network bridge=br0 --graphics vnc,listen=0.0.0.0 --noautoconsole
#添加内存
virsh setmem  web02 1024M --live
#登录kvm,查看
free -m

3.添加cpu
virt-install --virt-type kvm --os-type=linux --os-variant rhel7 --name web01 --memory 512,maxmemory=2048 --vcpus 1,maxvcpus=10 --disk /opt/web01.qcow2 --boot hd --network bridge=br0 --graphics vnc,listen=0.0.0.0 --noautoconsole
#进入kvm查看cpu核数
lscpu
#添加核数
virsh setvcpus  web02  2
掌握—》熟悉—》了解
- 掌握:倒背如流。
- 熟悉:正背如流。
- 了解:看到能够想起。
如果喜欢本篇博文,博文左边可以点个赞,谢谢您啦!
如果您喜欢厚颜无耻的博主我,麻烦点个
关注

 浙公网安备 33010602011771号