VS2022使用C++基于Libtorch调用Yolo模型(C++实现非极大值抑制NMS)
VS2022使用C++基于Libtorch调用Yolo模型
现在试着将之前训练的模型移植到C++平台,经过一系列的调试,最终完成了C++中实现调用模型进行视频识别
效果:

环境准备
确保已经安装了cuda与cudnn且添加了环境变量

Libtorch库准备
Pytorch的C++版本——libtorch下载
打开Pytorch官网:https://pytorch.org/
下拉找到如下模块

选择Libtorch -> C++/Java -> 对应的cuda版本 -> 选择debug版本或release版本下载
这里下载的是release版本,下载完成后,解压到本地
后续调用模型还需用到OpenCV,需自行准备OpenCV的MSVC版本
VS2022 项目属性配置
创建一个空项目,改为Release x64模式
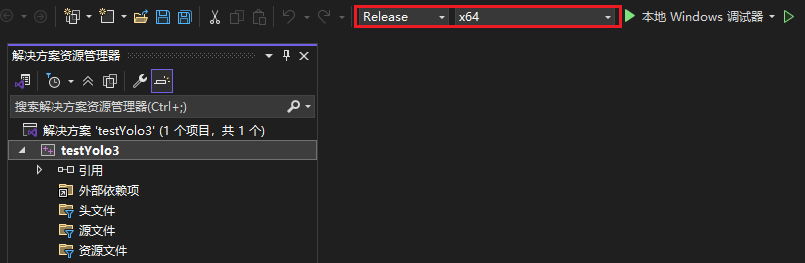
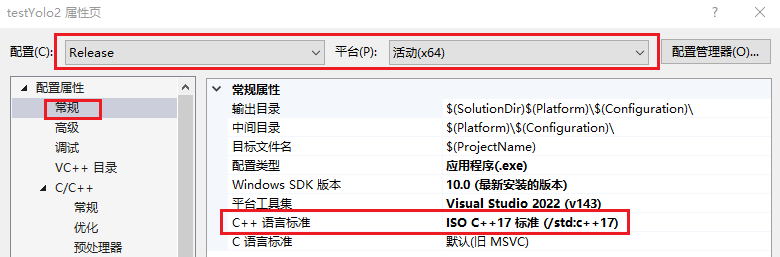
右键项目选择属性进入属性页,注意上方配置要改为Release x64,选择常规,确定C++语言标准为 ISO C++ 17标准
进入VC++ 目录选项

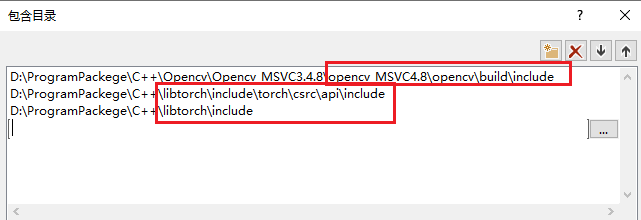
包含目录中添加libtorch目录下的两个include目录,以及OpenCV目录下的include目录
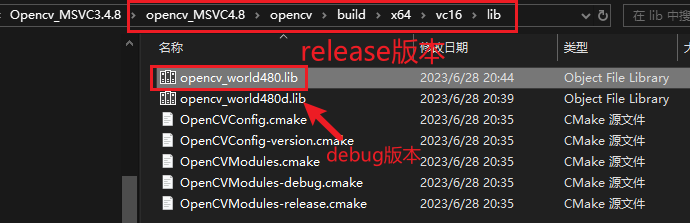
库目录中添加libtorch下的lib目录,以及OpenCV目录下的lib目录(在x64/vc16/lib目录下)

选择链接器 - 输入选项,附加依赖项中添加如下信息
opencv_world480.lib
c10.lib
c10_cuda.lib
torch_cpu.lib
torch_cuda.lib

确保lib文件在填写的库目录下可以找到

选择配置属性 - 调试选项,环境中加入libtorch和OpenCV的lib文件对应的同名dll文件目录,这里libtorch是在lib目录下,opencv是在bin目录下,通过;分号隔开,去对应的目录下确认后再填写
PATH=D:\ProgramPackege\C++\libtorch\lib;D:\ProgramPackege\C++\Opencv\Opencv_MSVC3.4.8\opencv_MSVC4.8\opencv\build\x64\vc16\bin
(配置这一步是无需配置libtorch和OpenCV的环境变量,如果配置了环境变量则无需配置这一步,如果缺少则程序运行会报缺少dll错误)

选择链接器 - 命令行配置如下命令, 注意是链接器下的命令行,不是C/C++下的命令行选项
/INCLUDE:?warp_size@cuda@at@@YAHXZ
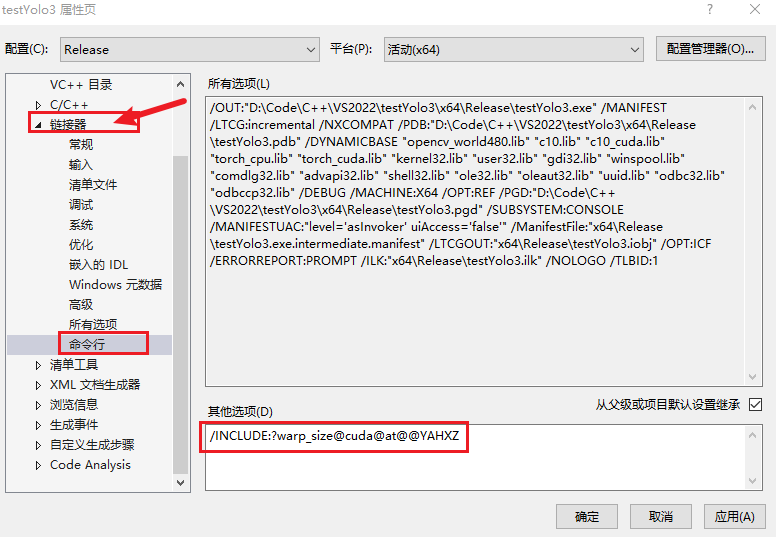
如果不配置该命令,则Libtorch无法调用到cuda也就是GPU,运行测试程序就会出现如下情况

创建一个测试cpp程序
#include <iostream>
#include <torch/torch.h>

int main() {
	std::cout << "CUDA available devices: " << torch::cuda::device_count() << std::endl;
    if (torch::cuda::is_available()) {
        std::cout << "CUDA is available!" << std::endl;
    }
    else {
        std::cout << "CUDA is not available!" << std::endl;
    }
    return 0;
}
成功调用GPU

模型文件准备(Python)
前面文章中,我们训练了自己的目标识别模型,生成的模型文件为best.pt文件,但是在Libtorch中不能直接加载.pt格式的模型文件,需要先将模型文件转为TorchScript格式,这里使用Python实现(yolo源码提供了对应的格式转换接口)
在之前训练模型的环境下,创建一个转换格式的Python文件,模型目录切换成要转换的模型
from export import run

run(
    weights='D:/Code/Python/test_doro/runs/train/exp/weights/best.pt',
    include=('torchscript',),  # 只导出torchscript
    device='0'  # '0' 用GPU; ‘cpu’ 用CPU
)
运行后,会在原模型文件同级目录下生成转换格式后的模型文件

创建一个python文件来测试转换后的模型能否正常加载并推理
import cv2
import torch
# 加载模型并移动到 GPU
model_path = '../runs/train/exp/weights/best.torchscript'
model = torch.jit.load(model_path)
model.to('cuda')
model.eval()
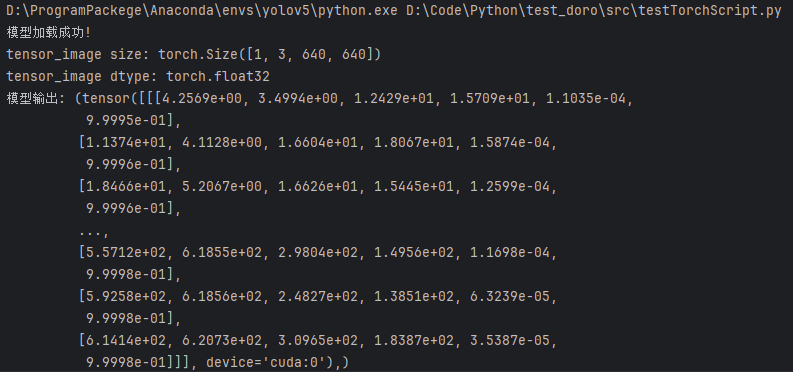
print("模型加载成功!")
# 读取并预处理图片
img = cv2.imread('E:/test/testImg/doro1.png') # 用一张测试图片
img = cv2.cvtColor(img, cv2.COLOR_BGR2RGB)
img = cv2.resize(img, (640, 640))
img_float = img.astype('float32') / 255.0
tensor_image = torch.from_numpy(img_float)
tensor_image = tensor_image.unsqueeze(0) # 变为 [1, H, W, 3]
tensor_image = tensor_image.permute(0, 3, 1, 2) # 调整为 [N, C, H, W]
tensor_image = tensor_image.to('cuda')
print("tensor_image size:", tensor_image.size())
print("tensor_image dtype:", tensor_image.dtype)
# 模型推理
output = model(tensor_image)
print("模型输出:", output)
输出正常,将对应模型文件取出放到合适的目录下,完成了模型文件的准备
调用模型
将python测试成功的代码流程在VS2022中转换为C++格式
#include <iostream>
#include <opencv2/opencv.hpp>
#include <filesystem>
#include <torch/script.h>
// 显示图片
void showImage(const cv::Mat& img) {
cv::imshow("Window", img);
cv::waitKey(1); // Wait for a key press indefinitely
}
int main() {
// 加载模型
std::string modelPath = "E:/test/model/best_v5.torchscript";
// 判断文件是否存在
if (!std::filesystem::exists(modelPath)) {
std::cerr << "模型文件不存在: " << modelPath << std::endl;
return -1;
}
torch::jit::script::Module module;
try {
module = torch::jit::load(modelPath);
//输入张量移动到GPU
module.to(at::kCUDA);
module.eval(); // 设置为推理模式
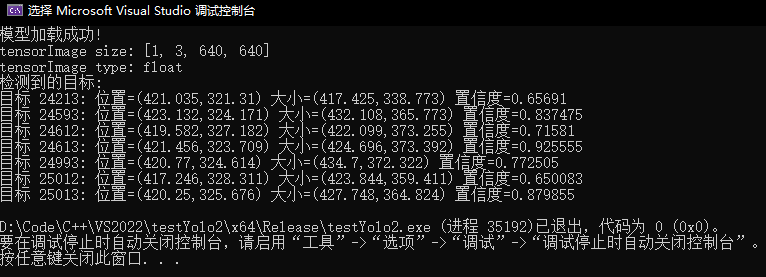
std::cout << "模型加载成功!" << std::endl;
}
catch (const c10::Error& e) {
std::cerr << "Error loading the model: " << e.what() << std::endl;
return -1;
}
// 读取图片
cv::Mat img = cv::imread("E:/test/testImg/doro1.png");
if (img.empty()) {
std::cerr << "Error loading image" << std::endl;
return -1;
}
// 图像预处理
// 调整图像大小,根据模型要求
cv::resize(img, img, cv::Size(640, 640));
// 转换为浮点型并归一化
cv::Mat imgFloat;
img.convertTo(imgFloat, CV_32F, 1.0 / 255);
// 将 cv::Mat 转换为 torch::Tensor
torch::Tensor tensorImage = torch::from_blob(imgFloat.data, { 1, imgFloat.rows, imgFloat.cols, 3 });
tensorImage = tensorImage.permute({ 0, 3, 1, 2 }); // 调整为 [N, C, H, W]
// 移动到GPU
tensorImage = tensorImage.to(at::kCUDA);
std::cout << "tensorImage size: " << tensorImage.sizes() << std::endl;
std::cout << "tensorImage type: " << tensorImage.dtype() << std::endl;
// 模型推理
std::vector<torch::jit::IValue> inputs;
inputs.push_back(tensorImage);
torch::IValue output_iv = module.forward(inputs);
torch::Tensor output;
if (output_iv.isTuple()) {
auto output_tuple = output_iv.toTuple()->elements();
output = output_tuple[0].toTensor(); // 假设目标 Tensor 是 tuple 的第一个元素
}
else {
output = output_iv.toTensor();
}
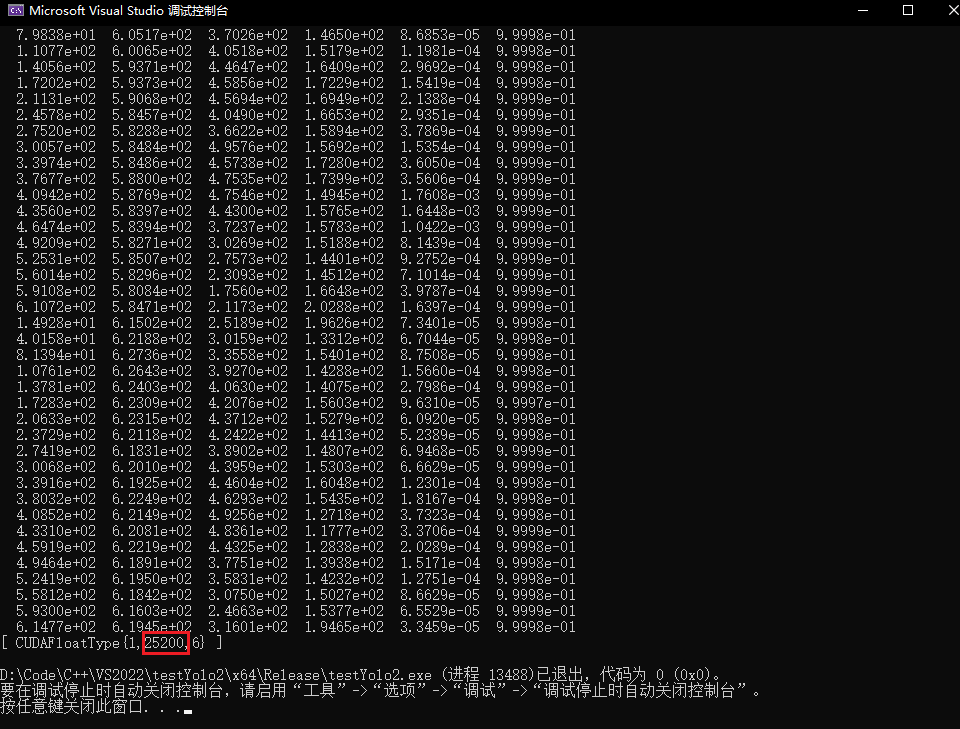
std::cout << "推理结果: " << output << std::endl;
return 0;
}
识别到目标时,结果输出2万多条信息,说明同一个目标会被大量的重复检测到
输出优化
输出结果中,每行都有6个数字,它们分别代表
检测框中心x坐标 y坐标 宽度 高度 置信度分数 类别概率
如果想要在图片中绘制出检测框,并显示出来,绘制大量的检测框没有意义,且消耗大量性能
- 输出太多,为了让输出更有意义
- 过滤低置信度的检测框:设置置信度阈值
- 过滤重复的检测框:非极大值抑制
torch::Tensor
在对输出进行预处理之前,首先需要具体了解一下输出的类型torch::Tensor。torch::Tensor是 PyTorch C++ API (LibTorch) 中的核心数据类型,类似于 Python 中的 torch.Tensor,用于表示多维数组并支持自动微分。
- 基本特性
- 多维数组:可以表示标量(0D)、向量(1D)、矩阵(2D)或更高维度的数据
- 设备支持:可以存储在CPU或Cuda(GPU)上
- 数据类型:支持多种数据类型如float32,float64,int8,int32等
- 自动微分:支持自动计算梯度
根据前面输出的结果,可以得到输出的是一个三维张量
第一维度包括二维数据和数据统计: [[二维数据], [ CUDAFloatType{1,25200,6} ]]
二维数据中就包括每个检测框的详细信息:[[x1, y1, w1, d1, s1, t1], [x2, y2, w2, d2, s2, t2], ...] (其中s代表置信度分数,t代表类别概率,通常将二者想乘作为检测框的整体置信度分数)
-
访问torch::Tensor
Libtorch重载了operator[],使得我们可以如同多维数组一般访问其内容- 如上结果输出中 通过
output[0][0][0]得到x1的值(注意仍是torch::Tensor类型)
-
常用函数
item<T>():将单元素张量转换为C++基本数据类型- 如:
int i = idx[0].item<int>()
- 如:
select(dim, index):在指定dim维度上,选取下标为index的切片,降一维dim = 0时,就是获取对应index索引的块,如对上述结果即三维张量output作output.select(0, 0),即返回了二维数据的二维张量dim = 1时,(输入张量需要大于等于二维)拿二维张量举例如ts.select(1,0)则是将该二维张量的第0列作为一维输出张量
slice(dim, start, end, step):在指定维度dim上,按步长step从start到end取切片,步长默认值为1- 如
output.select(0, 0).slice(1, 0, 4)即返回在二维数据张量的基础上切割了后两项,仅保留了前四项的二维张量
- 如
index_select(dim, index_tensor):在指定维度dim上,按index_tensor给出的下标取出元素- 通常用于根据排序后的下标排序其他多维张量
torch::Tensor boxes_sorted = boxes.index_select(0, idx);(idx已排序)
- 通常用于根据排序后的下标排序其他多维张量
- `expand(sizes):用于扩展或缩减张量形状(大小),不复制数据,在原基础上修改
min(tensor)/max(tensor):取元素最小/最大值- 如
tensor::min(t)
- 如
clamp(min, max):将张量中所有元素限制在[min, max]范围内,小于min的值会被设置为min,大于max的值会被设置为maxts.clamp(0)表示将张量元素设置为非负数
nonzero():返回一个包含输入张量中所有非零元素索引的张量,对于多维的张量,返回的就是非零元素坐标- 注意输出形状为
shape[n, 1],即有非零元素个数个一维的元素 - 对于
[1, 0, 2],结果为[[0], [2]]
- 注意输出形状为
squeeze(dim):移除dim维度,但仅当dim维度为一维时才生效squeeze():无参数版本,去除所有维度为1的维度(不是删除而是类似于融合)。- 对于
[[1], [2], [3]],去除维度为1的维度后,结果为[1, 2, 3] - 通常与
nonzero()配合使用
- 对于
sort(dim, descending):在指定维度排序,返回排序后的值和原始下标auto [scores_sorted, idx] = scores.sort(0, true);
低置信度过滤
增加一个置信度阈值,仅输出置信度高于该阈值的目标
// 模型推理后处理结果
float conf_threshold = 0.5; // 置信度阈值
std::cout << "检测到的目标:" << std::endl;
for (int i = 0; i < output.size(1); ++i) {
	float confidence = output[0][i][4].item<float>();
	float class_prob = output[0][i][5].item<float>();

	// 只显示高置信度的检测结果
	if (confidence * class_prob > conf_threshold) {
		float x = output[0][i][0].item<float>();
		float y = output[0][i][1].item<float>();
		float w = output[0][i][2].item<float>();
		float h = output[0][i][3].item<float>();

		std::cout << "目标 " << i << ": "
			<< "位置=(" << x << "," << y << ") "
			<< "大小=(" << w << "," << h << ") "
			<< "置信度=" << confidence * class_prob << std::endl;
	}
}
输出结果:
可以发现过滤掉了大量的无效输出,但是如果在此基础上绘制检测框仍会对同一个目标绘制多次,影响观感
非极大值抑制(NMS)
在Python推理yolo模型时没有出现这样的情况是因为yolo源码底层实现了非极大值抑制,对输出作预处理,也就是去除重复的检测框,仅保留置信度最高的检测框
在C++中调用Yolo模型则需要我们自己实现
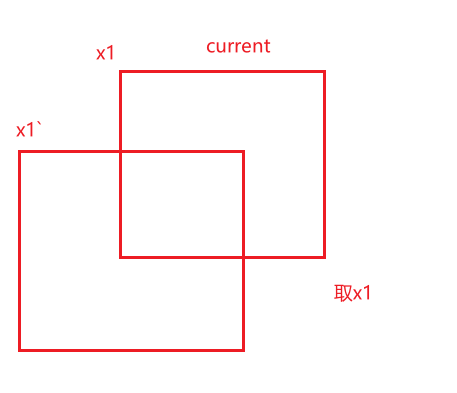
判断两个框是否重复,这里涉及到一个交并比(Intersection of Union,IOU)概念,来描述两个框之间的重合度

使用公式来描述就是:
转换成二维图形描述则是:
- 实现流程:
- 先将输出分为坐标和置信度两部分,坐标用于计算面积,置信度用于计算检测框的完整置信度
	// 将输出转换为前4项和后两项便于计算
	torch::Tensor boxes = output.select(0, 0).slice(1, 0, 4); // 获取前4项
	torch::Tensor scores = output.select(0, 0).select(1, 4) * output.select(0, 0).select(1, 5); // 获取置信度
- 进行置信度过滤,输出中有大量置信度低的无效数据,先过滤掉这部分数据再进行去重有利于提高效率(这里打印出来测试查看过滤的数量)
- 注意这里我们设置的返回值为要保留的检测框索引,在进行过滤后元素数量变少,索引也不再对应原始的索引
- 需要使用一个临时的vector来存储原始的索引,最后将保留的索引映射到原始索引中
// 置信度过滤
torch::Tensor conf_mask = scores > conf_threshold;
if (conf_mask.sum().item<int>() == 0) {
return std::vector<size_t>();
}
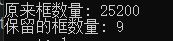
std::cout << "原来框数量: " << scores.numel() << std::endl;
// 只保留高置信度的 boxes 和 scores
// 获取超过阈值置信度框的索引(确保是 1D 张量)
auto keep_idx = conf_mask.nonzero().squeeze().reshape(-1); // [M]
// 过滤 boxes 和 scores
boxes = boxes.index_select(0, keep_idx); // [M, 4]
scores = scores.index_select(0, keep_idx); // [M]
std::cout << "保留的框数量: " << scores.numel() << std::endl;
// 用于映射返回原始索引
std::vector<int64_t> original_index;
for (int i = 0; i < keep_idx.numel(); ++i) {
original_index.push_back(keep_idx[i].item<int64_t>());
}
可以发现过滤效果很好
- 可以利用
torch:Tensor的优势,整体计算所有框的面积作为一维张量
	torch::Tensor x1 = boxes.select(1, 0);	// 获取所有框的左上角x坐标
	torch::Tensor y1 = boxes.select(1, 1);	// 获取所有框的左上角y坐标
	torch::Tensor x2 = boxes.select(1, 0) + boxes.select(1, 2); // 计算右下角x坐标 (x + w)
	torch::Tensor y2 = boxes.select(1, 1) + boxes.select(1, 3); // 计算右下角y坐标 (y + h)
	// 计算每个框的面积
	torch::Tensor areas = (x2 - x1) * (y2 - y1);
- 按置信度进行排序,获取排序后的
index张量
	// 按置信度排序  C++17特性 结构化绑定排序idx_sorted
	auto [scores_sorted, idx_sorted] = scores.sort(0, true);
- 遍历idx_sorted张量列表,
- 将第一个(也就是置信度最高)索引加入要保留的索引列表,这里定义为
keep
- 将第一个(也就是置信度最高)索引加入要保留的索引列表,这里定义为
	std::vector<size_t> keep;
	while (idx_sorted.numel() > 0) {
		size_t current_idx = idx_sorted[0].item<int64_t>(); // 获取当前置信度最高的框的索引
		keep.push_back(current_idx);
		if (idx_sorted.numel() == 1) break; // 如果只剩下一个框,直接跳出循环
- 获取其他的检测框,并计算相交的边界值
- 其中通过
x1.index_select(0, other_idx)获取其余检测框的对应左上角x值.clamp_min(x1[current_idx].item<float>()则是与当前置信度最高的检测框比较取相交的左侧边界
- 其他边界同理

- 其中通过
		auto other_idx = idx_sorted.slice(0, 1, idx_sorted.numel()); // 剩余的框
		/* 获取当前框与其他框的相交的边界值 */
		/*	x1.index_select(0, other_idx) 获取其他框的左边界
		*	clamp_min(x1[current_idx].item<float>()) 确保其他框相交部分的左边界不小于当前框的左边界
		*/
		auto inter_x1 = x1.index_select(0, other_idx).clamp_min(x1[current_idx].item<float>());		// 左边界
		auto inter_y1 = y1.index_select(0, other_idx).clamp_min(y1[current_idx].item<float>());		// 上边界
		auto inter_x2 = x2.index_select(0, other_idx).clamp_max(x2[current_idx].item<float>());		// 右边界
		auto inter_y2 = y2.index_select(0, other_idx).clamp_max(y2[current_idx].item<float>());		// 下边界

		// 计算相交区域的宽度和高度 并计算相交区域的面积
		auto inter_w = (inter_x2 - inter_x1).clamp_min(0);
		auto inter_h = (inter_y2 - inter_y1).clamp_min(0);
		auto inter_area = inter_w * inter_h;
- 计算
IOU值,去除IOU值超过阈值的索引
		// IOU 计算部分
		// IOU = 交集面积 / (A面积 + B面积 - 交集面积)
		auto current_area = areas.index_select(0, idx_sorted.slice(0, 1));  // 当前框的面积
		auto other_area = areas.index_select(0, other_idx);					// 其他框的面积
		auto iou = inter_area / (current_area + other_area - inter_area);

		// 保留 IOU <= iou_threshold 的框(即去除重叠过高的框)
		auto keep_mask = (iou <= iou_threshold).nonzero().squeeze(); // 得到iou <= iou_threshold元素的索引列表
		idx_sorted = other_idx.index_select(0, keep_mask);
	}
- 由于最初进行了置信度过滤,此处保留的索引已经不是原始的索引,需要映射到原始索引中再进行返回
	std::vector<size_t> final_keep;
	// 将保留的索引转换为原始索引
	for (size_t idx : keep) {
		final_keep.push_back(original_index[idx]);
	}
	return final_keep;
举例解释:
假设过滤后得到这样的4个检测框
x1 = [10, 20, 15, 25];
y1 = [10, 20, 15, 25];
x2 = [60, 70, 65, 75];
y2 = [60, 70, 65, 75];
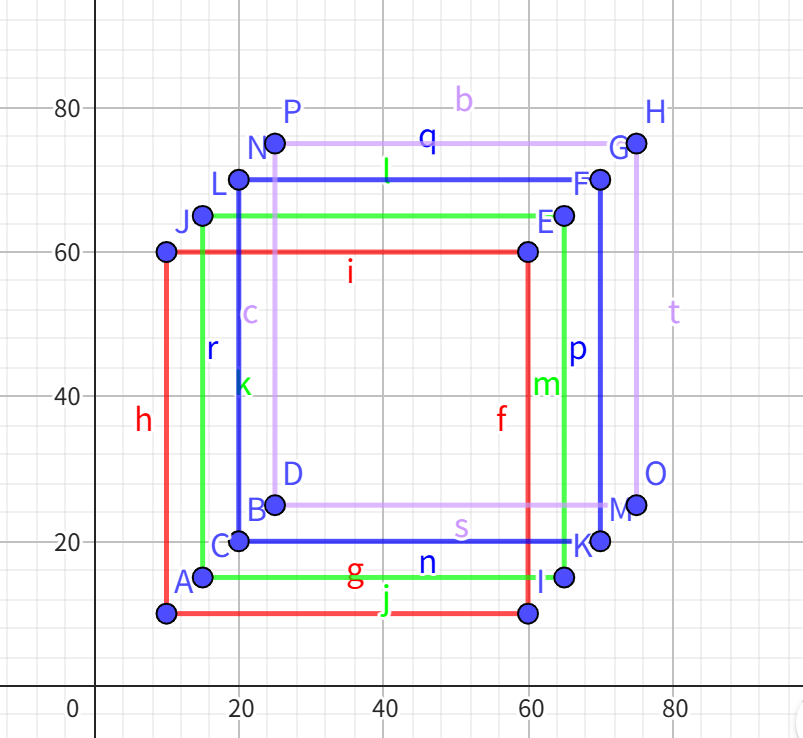
排序后:idx = [2, 0, 1, 3];
先将置信度最高的索引加入keep保留列表 keep = [2]
置信度最高的框的坐标
xx1_ = x1[max_score_idx] = [15]
yy1_ = y1[max_score_idx] = [15]
xx2_ = x2[max_score_idx] = [65]
yy2_ = y2[max_score_idx] = [65]
剩余框的坐标
other_idx = idx.slice(0, 1, idx.size(0)) = [0, 1, 3]
xx1 = x1.index_select(0, other_idx) = [10, 20, 25]
yy1 = y1.index_select(0, other_idx) = [10, 20, 25]
xx2 = x2.index_select(0, other_idx) = [60, 70, 75]
yy2 = y2.index_select(0, other_idx) = [60, 70, 75]
重叠区域 : 其他检测框 与 当前检测框 相比 取x1较大值,x2较小值,y1较大值,y2较小值
获取边界值
auto inter_x1 = x1.index_select(0, other_idx).clamp_min(x1[current_idx].item<float>());		// 左边界
auto inter_y1 = y1.index_select(0, other_idx).clamp_min(y1[current_idx].item<float>());		// 上边界
auto inter_x2 = x2.index_select(0, other_idx).clamp_max(x2[current_idx].item<float>());		// 右边界
auto inter_y2 = y2.index_select(0, other_idx).clamp_max(y2[current_idx].item<float>());		// 下边界
• inter_x1 = [10, 20, 25].clamp_min([15]) = [15, 20, 25]
• inter_y1 = [10, 20, 25].clamp_min([15]) = [15, 20, 25]
• inter_x2 = [60, 70, 75].clamp_min([65]) = [60, 65, 65]
• inter_y2 = [60, 70, 75].clamp_min([65]) = [60, 65, 65]
w = = [60-15, 65-20, 65-25] = [45, 45, 40]
h = = [60-15, 65-20, 65-25] = [45, 45, 40]
inter = w * h = [2025, 2025, 1600]
面积
• areas = (x2 - x1) * (y2 - y1)
• areas[2] = (65-15)(65-15) = 5050 = 2500
• areas[0] = (60-10)(60-10) = 5050 = 2500
• areas[1] = (70-20)(70-20) = 5050 = 2500
• areas[3] = (75-25)(75-25) = 5050 = 2500
IOU计算
• iou = inter / (areas[2] + areas[other_idx] - inter)
• areas[other_idx] = [2500, 2500, 2500]
• iou = [2025/(2500+2500-2025), 2025/(2500+2500-2025), 1600/(2500+2500-1600)]
• iou = [2025/4475, 2025/4475, 1600/3400]
• iou ≈ [0.4525, 0.4525, 0.4706]
auto keep_mask = (iou <= iou_threshold).nonzero().squeeze(); // 得到iou <= iou_threshold元素的索引列表
idx_sorted = other_idx.index_select(0, keep_mask);
keep_mask = [] 为空
循环结束
得到结果
keep = [2]
注意:在获取置信度最高的检测框坐标时,使用了auto xx1_ = x1.index_select(0, idx.slice(0, 1));语法,从结果上来看,与auto xx1_ = x1[max_score_idx]结果是等效的,那为什么不使用更加直观的[]操作符进行单个元素的访问呢?
- 内存访问模式差异:
index_select是Libtorch优化的批量操作,可以高效地处理批量索引访问,内部有专门的优化实现,使用[]操作符进行单个元素的访问,失去了批量操作的优化机会。 - 计算图连续性:使用
x1.index_select(0, idx.slice(0, 1))方法,所有操作都在Tensor层面进行,有利于GPU并行计算,而使用[]频繁访问单个元素,增加了CPU-GPU之间的数据传输
视频识别 C++实现
完整源码:
#include <iostream>
#include <opencv2/opencv.hpp>
#include <filesystem>
#include <torch/script.h>

// 模型定义
torch::jit::script::Module module;

// 加载模型
void loadModel(const std::string& modelPath) {
	try {
		module = torch::jit::load(modelPath);
		module.to(at::kCUDA); // 移动模型到GPU
		module.eval();  // 设置为推理模式
		std::cout << "模型加载成功!" << std::endl;
	}
	catch (const c10::Error& e) {
		std::cerr << "Error loading the model: " << e.what() << std::endl;
		exit(-1);
	}
}

// NMS非极大值抑制 对输出作预处理 返回保留的框的索引
std::vector<size_t> nms(const torch::Tensor& output, float iou_threshold, float conf_threshold) {
	// 将输出转换为前4项和后两项便于计算
	torch::Tensor boxes = output.select(0, 0).slice(1, 0, 4); // 获取前4项
	torch::Tensor scores = output.select(0, 0).select(1, 4) * output.select(0, 0).select(1, 5); // 获取置信度

	// 置信度过滤
	torch::Tensor conf_mask = scores > conf_threshold;
	if (conf_mask.sum().item<int>() == 0) {
		return std::vector<size_t>();
	}
	std::cout << "原来框数量: " << scores.numel() << std::endl;
	// 只保留高置信度的 boxes 和 scores
	// 获取超过阈值置信度框的索引(确保是 1D 张量)
	auto keep_idx = conf_mask.nonzero().squeeze().reshape(-1); // [M]
	// 过滤 boxes 和 scores
	boxes = boxes.index_select(0, keep_idx); // [M, 4]
	scores = scores.index_select(0, keep_idx); // [M]
	std::cout << "保留的框数量: " << scores.numel() << std::endl;

	// 用于映射返回原始索引
	std::vector<int64_t> original_index;
	for (int i = 0; i < keep_idx.numel(); ++i) {
		original_index.push_back(keep_idx[i].item<int64_t>());
	}

	torch::Tensor x1 = boxes.select(1, 0);	// 获取所有框的左上角x坐标
	torch::Tensor y1 = boxes.select(1, 1);	// 获取所有框的左上角y坐标
	torch::Tensor x2 = boxes.select(1, 0) + boxes.select(1, 2); // 计算右下角x坐标 (x + w)
	torch::Tensor y2 = boxes.select(1, 1) + boxes.select(1, 3); // 计算右下角y坐标 (y + h)
	// 计算所有框的面积
	torch::Tensor areas = (x2 - x1) * (y2 - y1); // [M]

	// 按置信度降序排序  C++17特性 结构化绑定排序idx
	auto [scores_sorted, idx_sorted] = scores.sort(0, true);

	std::vector<size_t> keep;
	while (idx_sorted.numel() > 0) {
		size_t current_idx = idx_sorted[0].item<int64_t>(); // 获取当前置信度最高的框的索引
		keep.push_back(current_idx);

		if (idx_sorted.numel() == 1) break; // 如果只剩下一个框,直接跳出循环

		auto other_idx = idx_sorted.slice(0, 1, idx_sorted.numel()); // 剩余的框
		/* 获取当前框与其他框的相交的边界值 */
		/*	x1.index_select(0, other_idx) 获取其他框的左边界
		*	clamp_min(x1[current_idx].item<float>()) 确保其他框相交部分的左边界不小于当前框的左边界
		*/
		auto inter_x1 = x1.index_select(0, other_idx).clamp_min(x1[current_idx].item<float>());		// 左边界
		auto inter_y1 = y1.index_select(0, other_idx).clamp_min(y1[current_idx].item<float>());		// 上边界
		auto inter_x2 = x2.index_select(0, other_idx).clamp_max(x2[current_idx].item<float>());		// 右边界
		auto inter_y2 = y2.index_select(0, other_idx).clamp_max(y2[current_idx].item<float>());		// 下边界

		// 计算相交区域的宽度和高度 并计算相交区域的面积
		auto inter_w = (inter_x2 - inter_x1).clamp_min(0);
		auto inter_h = (inter_y2 - inter_y1).clamp_min(0);
		auto inter_area = inter_w * inter_h;

		// IOU 计算部分
		// IOU = 交集面积 / (A面积 + B面积 - 交集面积)
		auto current_area = areas.index_select(0, idx_sorted.slice(0, 1));  // 当前框的面积
		auto other_area = areas.index_select(0, other_idx);					// 其他框的面积
		auto iou = inter_area / (current_area + other_area - inter_area);

		// 保留 IOU <= iou_threshold 的框(即去除重叠过高的框)
		auto keep_mask = (iou <= iou_threshold).nonzero().squeeze(); // 得到iou <= iou_threshold元素的索引列表
		idx_sorted = other_idx.index_select(0, keep_mask);
	}
	std::vector<size_t> final_keep;
	// 将保留的索引转换为原始索引
	for (size_t idx : keep) {
		final_keep.push_back(original_index[idx]);
	}
	return final_keep;
}

int main() {
	// 加载模型
	loadModel("E:/test/model/best_v5.torchscript");
	// 读取视频
	cv::VideoCapture cap("E:/test/testVideo/doro3.mp4");
	if (!cap.isOpened()) {
		std::cerr << "Error opening video file" << std::endl;
		return -1;
	}
	cv::Mat frame;
	while (true) {
		cap >> frame;
		if (frame.empty()) {
			break;
		}
		// 图像预处理
		// 转换 BGR 为 RGB
		//cv::cvtColor(frame, frame, cv::COLOR_BGR2RGB);
		// 调整图像大小,根据模型要求
		cv::resize(frame, frame, cv::Size(640, 640));
		// 转换为浮点型并归一化
		cv::Mat imgFloat;
		frame.convertTo(imgFloat, CV_32F, 1.0 / 255);
		// 将 cv::Mat 转换为 torch::Tensor
		torch::Tensor tensorImage = torch::from_blob(imgFloat.data, { 1, imgFloat.rows, imgFloat.cols, 3 });
		tensorImage = tensorImage.permute({ 0, 3, 1, 2 }); // 调整为 [N, C, H, W]
		tensorImage = tensorImage.to(at::kCUDA);
		// 模型推理
		std::vector<torch::jit::IValue> inputs;
		inputs.push_back(tensorImage);
		torch::IValue output_iv = module.forward(inputs);
		torch::Tensor output;
		if (output_iv.isTuple()) {
			auto output_tuple = output_iv.toTuple()->elements();
			output = output_tuple[0].toTensor();  // 假设目标 Tensor 是 tuple 的第一个元素
		}
		else {
			output = output_iv.toTensor();
		}
		// 输出预处理

		std::vector<size_t> keep = nms(output, 0.45);  // IOU 阈值设为 0.45
		// 模型推理后处理结果
		float conf_threshold = 0.5; // 置信度阈值
		// std::cout << "检测到的目标:" << std::endl;
		for (size_t &i : keep) {
			float confidence = output[0][i][4].item<float>();
			float class_prob = output[0][i][5].item<float>();

			// 只显示高置信度的检测结果
			if (confidence * class_prob > conf_threshold) {
				float x = output[0][i][0].item<float>();
				float y = output[0][i][1].item<float>();
				float w = output[0][i][2].item<float>();
				float h = output[0][i][3].item<float>();
				float conf = confidence * class_prob;
				// 绘制检测框
				cv::rectangle(frame, cv::Point(x - w / 2 , y - h / 2),
					cv::Point(x + w / 2, y + h / 2), cv::Scalar(0, 0, 200), 2);
				cv::putText(frame, std::to_string(conf), cv::Point(x - w / 2, y - h / 2 - 10),
					cv::FONT_HERSHEY_SIMPLEX, 0.5, cv::Scalar(0, 0, 200), 2);
				std::cout << "目标 " << i << ": "
					<< "位置=(" << x << "," << y << ") "
					<< "大小=(" << w << "," << h << ") "
					<< "置信度=" << conf << std::endl;
			}
		}

		cv::imshow("Window", frame);
		cv::waitKey(10);

	}
	return 0;
}

 浙公网安备 33010602011771号