


SpringBoot学习笔记(六)
本文主要介绍SpringBoot:Thymeleaf模板引擎和国际化的使用
一、SpringBoot:Thymeleaf模板引擎
在学习Thymeleaf之前,我们回忆一下JSP:
JSP(全称JavaServer Pages)是由Sun Microsystems公司主导创建的一种动态网页技术标准。JSP部署于网络服务器上,可以响应客户端发送的请求,并根据请求内容动态地生成HTML、XML或其他格式文档的Web网页,然后返回给请求者。JSP技术以Java语言作为脚本语言,为用户的HTTP请求提供服务,并能与服务器上的其它Java程序共同处理复杂的业务需求。----摘自百度百科
JSP最大的特点,是支持Java开发,能以模板话的方式,动态添加动态网页内容,轻松实现数据显示与交互。
然而,SpringBoot项目以jar的形式发布,而且内嵌Tomcat,它默认是不支持JSP的。
- SpringBoot推荐使用模板引擎:
其实jsp就是一个模板引擎,还有用的比较多的freemarker,包括SpringBoot给我们推荐的Thymeleaf。
在知乎上,有很多大神解答:Spring / SpringBoot为什么推荐使用thymeleaf?

- 众多模板引擎,其实它们的思想都是大同小异:
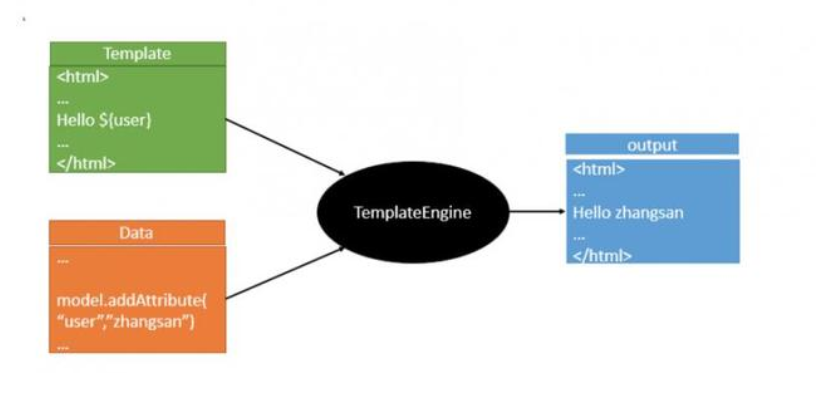
模板引擎重要的是交互数据,能够动态的将页面数据展示,后台分装的数据要如何与前端的所需要的数据对应起来,模板引擎在中间起到定位传递数据的效果。
- 介绍SpringBoot如何使用Thmeleaf
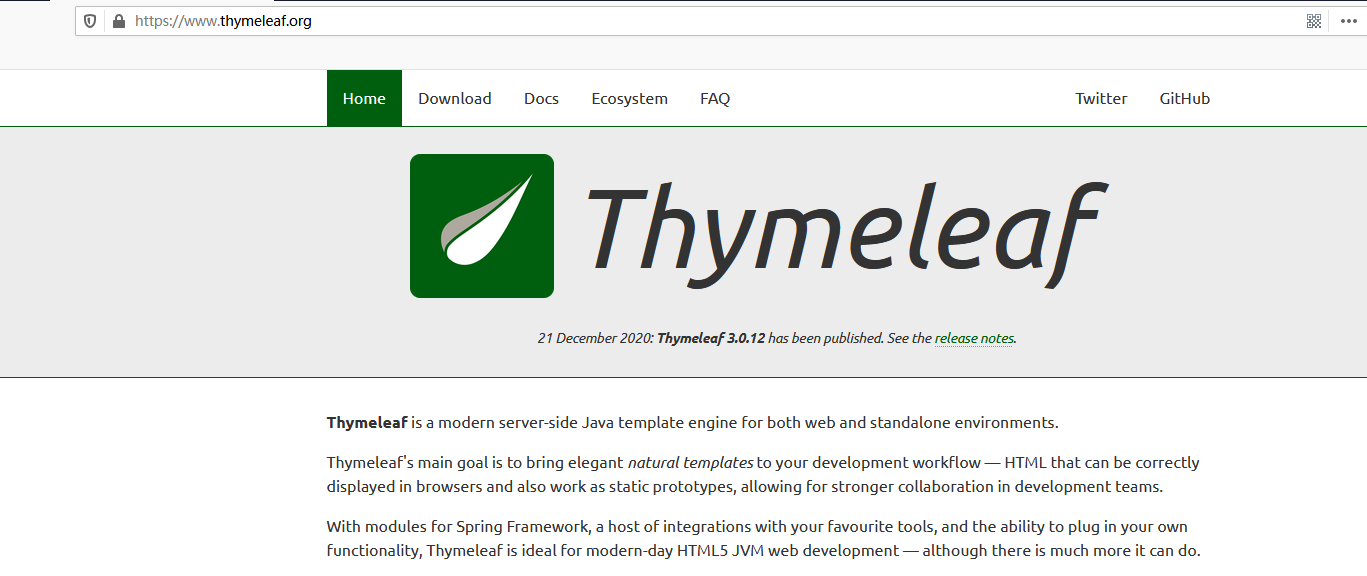
Thymeleaf 官网:https://www.thymeleaf.org/
Thymeleaf 在Github 的主页:https://github.com/thymeleaf/thymeleaf
1.引入Thymeleaf
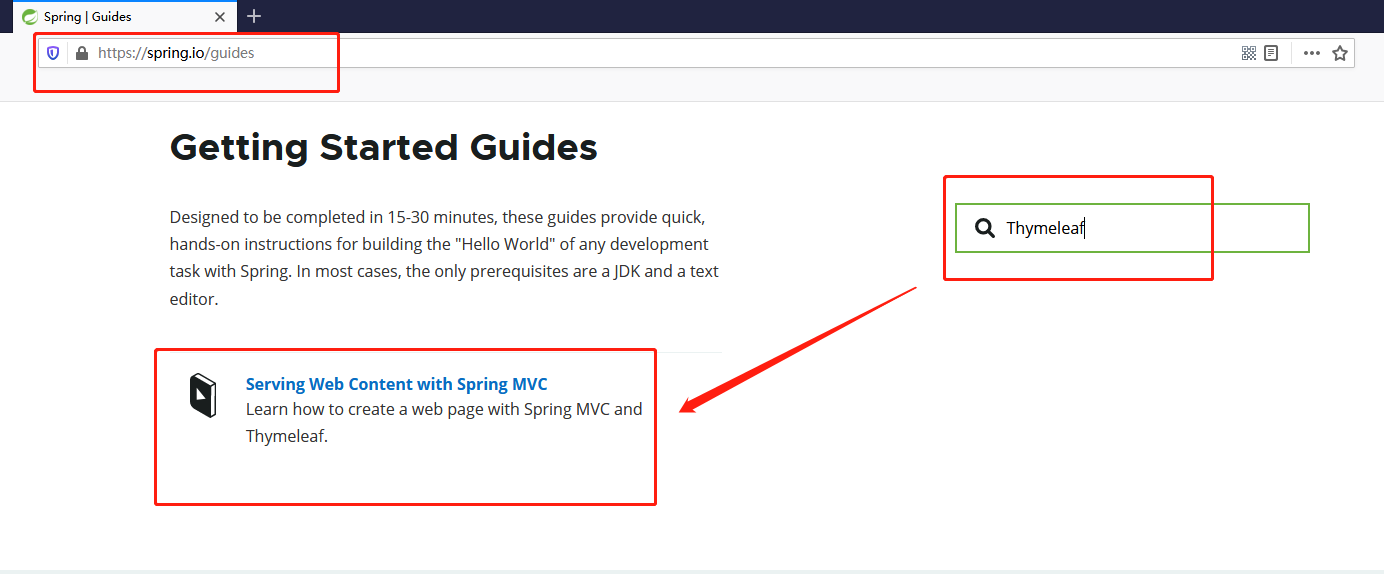
在Spring官方文档中,可以找到Guies:Learn how to create a web page with Spring MVC and Thymeleaf.
在SpringBoot文档可以找到Thymeleaf的Starter:https://docs.spring.io/spring-boot/docs/2.4.4/reference/html/using-spring-boot.html#using-boot-starter
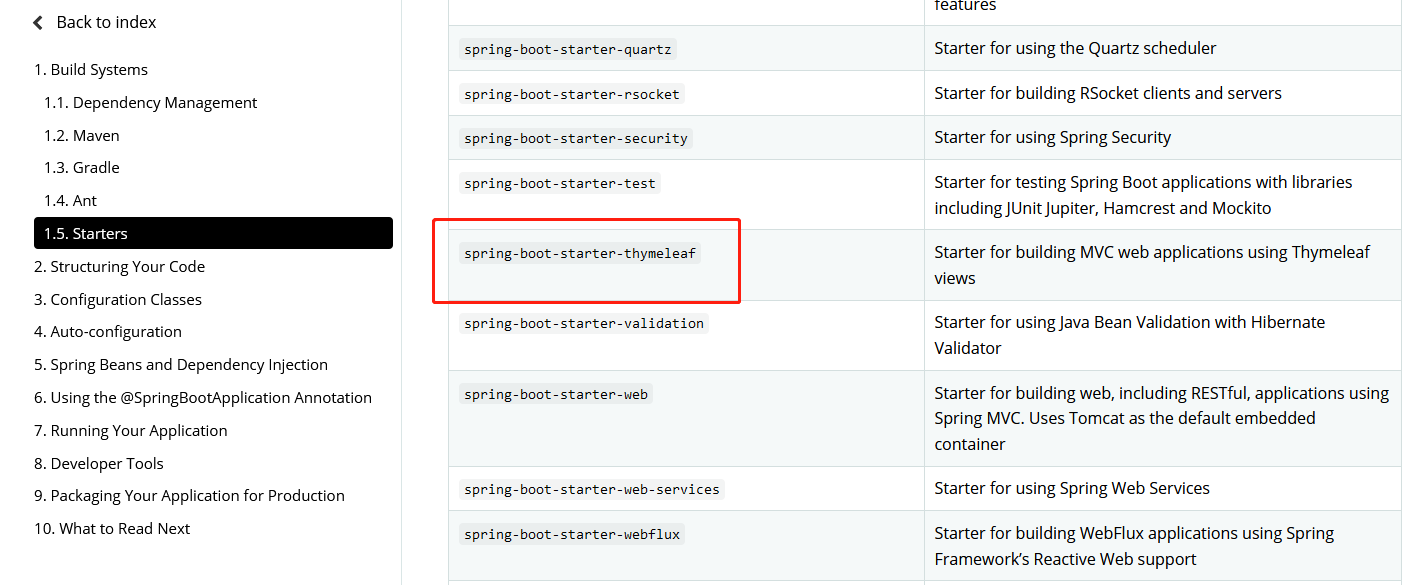
找到对应的pom依赖:
<!--Thymeleaf-->
<dependency>
	<groupId>org.springframework.boot</groupId>
	<artifactId>spring-boot-starter-thymeleaf</artifactId>
</dependency>
Maven会自动下载jar包:

- 引入完毕,如何使用:
首先得按照SpringBoot的自动配置原理看一下我们这个Thymeleaf的自动配置规则,在按照那个规则,我们进行使用。
我们去找一下Thymeleaf的自动配置类:ThymeleafProperties (看到其默认的前缀/后缀)

使用Thymeleaf什么都不需要配置,我们将文件放到指定的文件夹下即可,Thymeleaf会帮助我们自动渲染。非常符合开箱即用的原则,而且在无网络的状态下,依然可以使用,代码风格优雅,简洁。
- 测试
1.编写一个TestController
import org.springframework.stereotype.Controller;
import org.springframework.web.bind.annotation.RequestMapping;

@Controller
public class TestController {
    @RequestMapping("/test")
    public String test1(){
        //classpath:/templates/test.html
        return "test";
    }
}
2、编写一个测试页面 test.html 放在 templates 目录下
<!DOCTYPE html>
<html lang="en">
<head>
    <meta charset="UTF-8">
    <title>Title</title>
</head>
<body>
<span style="background: orange">Hello,Thymeleaf!</span>
</body>
</html>
3.Run

- Thymeleaf 语法学习
Thymeleaf 官网:https://www.thymeleaf.org/
- 做个简单的练习 :需求查出一些数据,并在页面中展示。
1、修改测试请求,增加数据传输
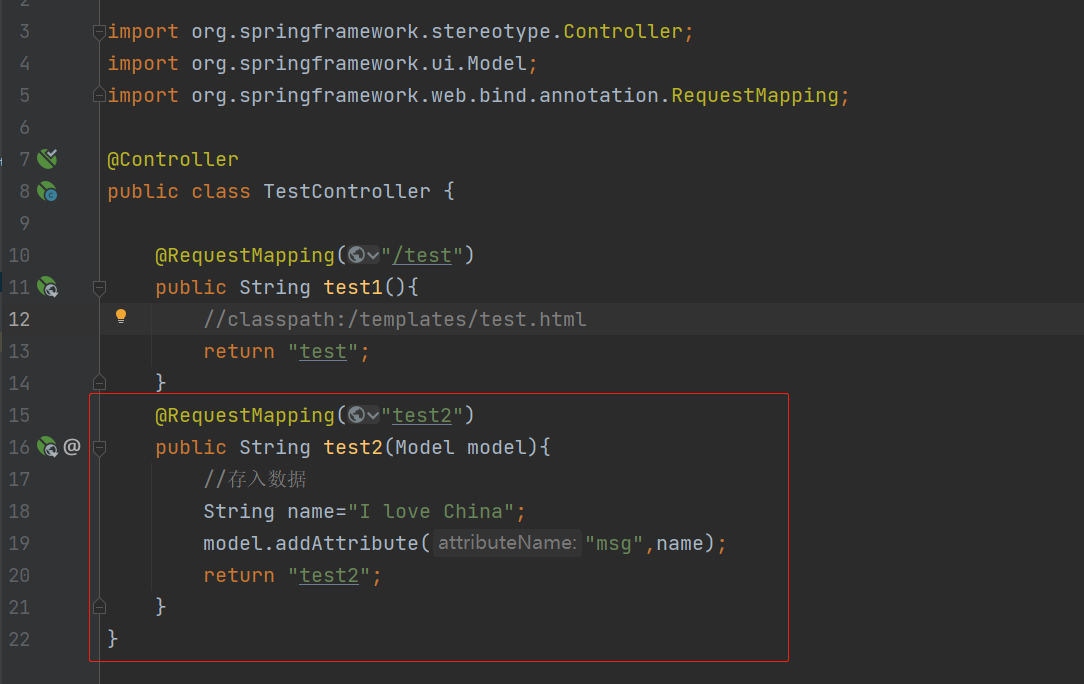
    @RequestMapping("test2")
    public String test2(Model model){
        //存入数据
        String name="I love China";
        model.addAttribute("msg",name);
        return "test2";
    }
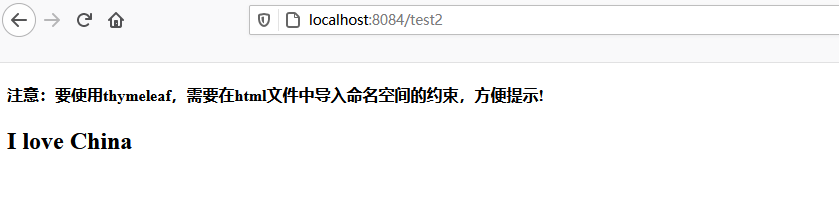
2、要使用thymeleaf,需要在html文件中导入命名空间的约束,方便提示。
xmlns:th="http://www.thymeleaf.org"
3.编写前端页面
<!DOCTYPE html>
<html lang="en" xmlns:th="http://www.thymeleaf.org">
<head>
    <meta charset="UTF-8">
    <title>你来啦</title>
</head>
<body>
<h4>注意:要使用thymeleaf,需要在html文件中导入命名空间的约束,方便提示!</h4>

<h2 th:text="${msg}"></h2>
</body>
</html>
4.Run
- Thymeleaf的使用语法:
- 文档需要自己看,下面再来个小测试:
1.Controller,放一些数据
@RequestMapping("/test3")
public  String test3(Map<String,Object> map){

	map.put("msg","<h1>Hello</h1>");
	map.put("users", Arrays.asList("zhouzhou",new Date()));
	return "test3";
    }
2.测试页面取出数据:
<!DOCTYPE html>
<html lang="en" xmlns:th="http://www.thymeleaf.org">
<head>
<meta charset="UTF-8">
<title>My Thymeleaf</title>
</head>
<body>
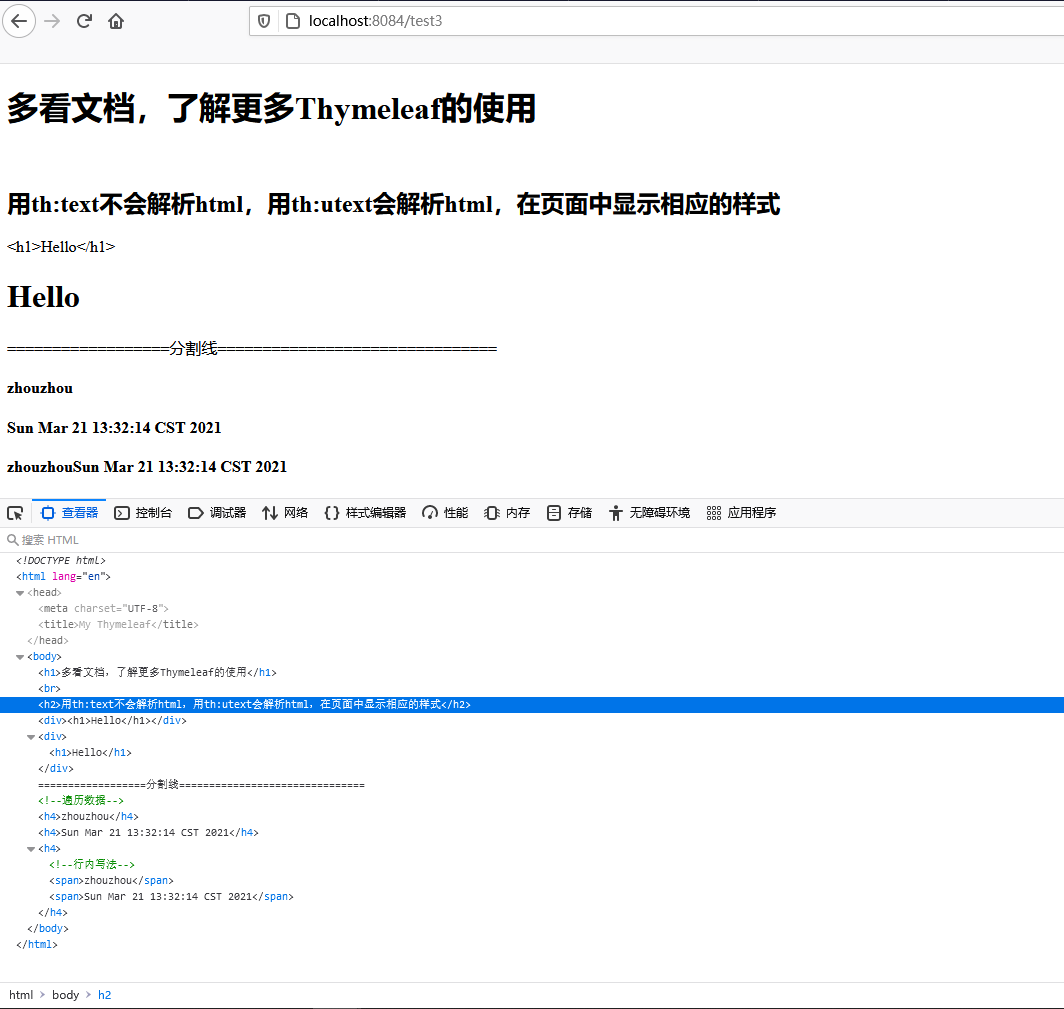
<h1>多看文档,了解更多Thymeleaf的使用</h1>
<br/>
<h2>用th:text不会解析html,用th:utext会解析html,在页面中显示相应的样式</h2>
<div th:text="${msg}"></div>
<div th:utext="${msg}"></div>
==================分割线===============================
<!--遍历数据-->
<h4 th:each="user:${users}" th:text="${user}"></h4>
<h4>
<!--行内写法-->
<span th:each="user:${users}">[[${user}]]</span>
</h4>
</body>
</html>
3.Run
二、SpringBoot:国际化
有些网站会去涉及中英文甚至多语言的切换——国际化
- 准备工作
先在IDEA中统一设置properties的编码问题:

- 编写国际化配置文件
1.在resources资源文件下新建一个i18n目录,存放国际化配置文件
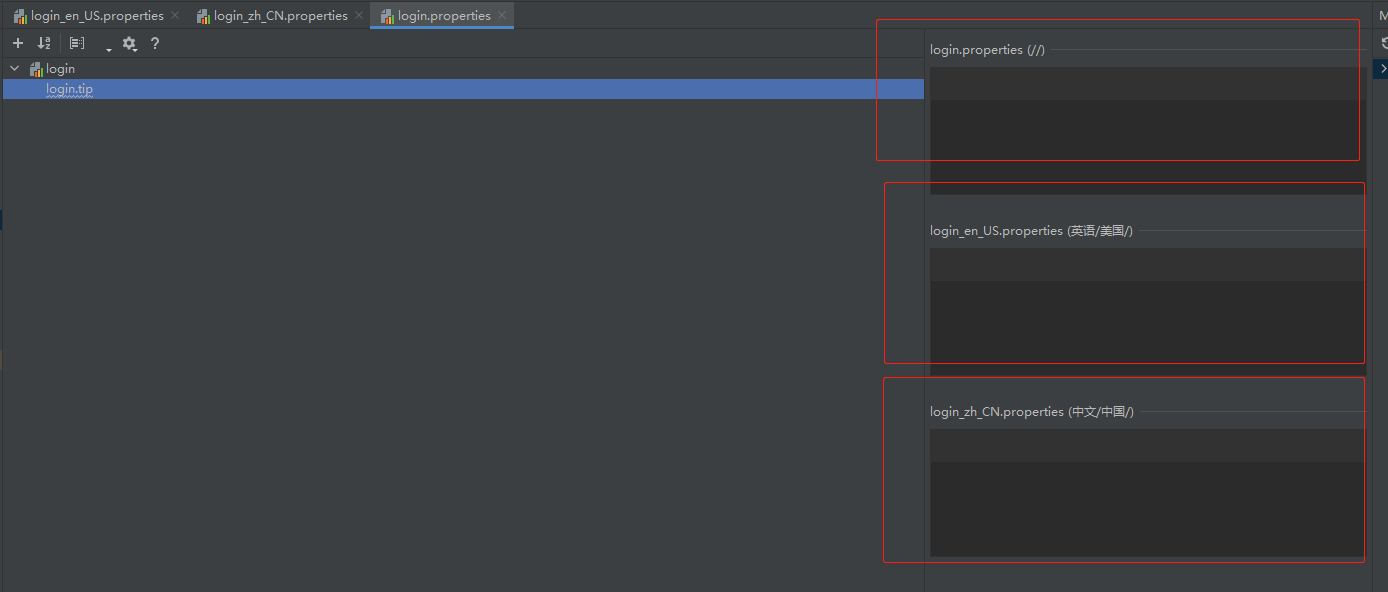
2.建立一个login.properties文件、login_zh_CN.properties文件,发现IDEA自动识别了我们要做国际化操作。
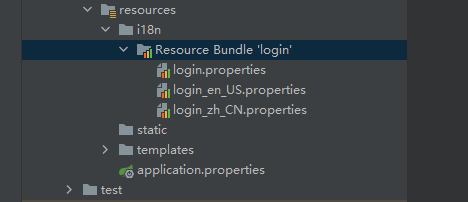
文件夹变了!
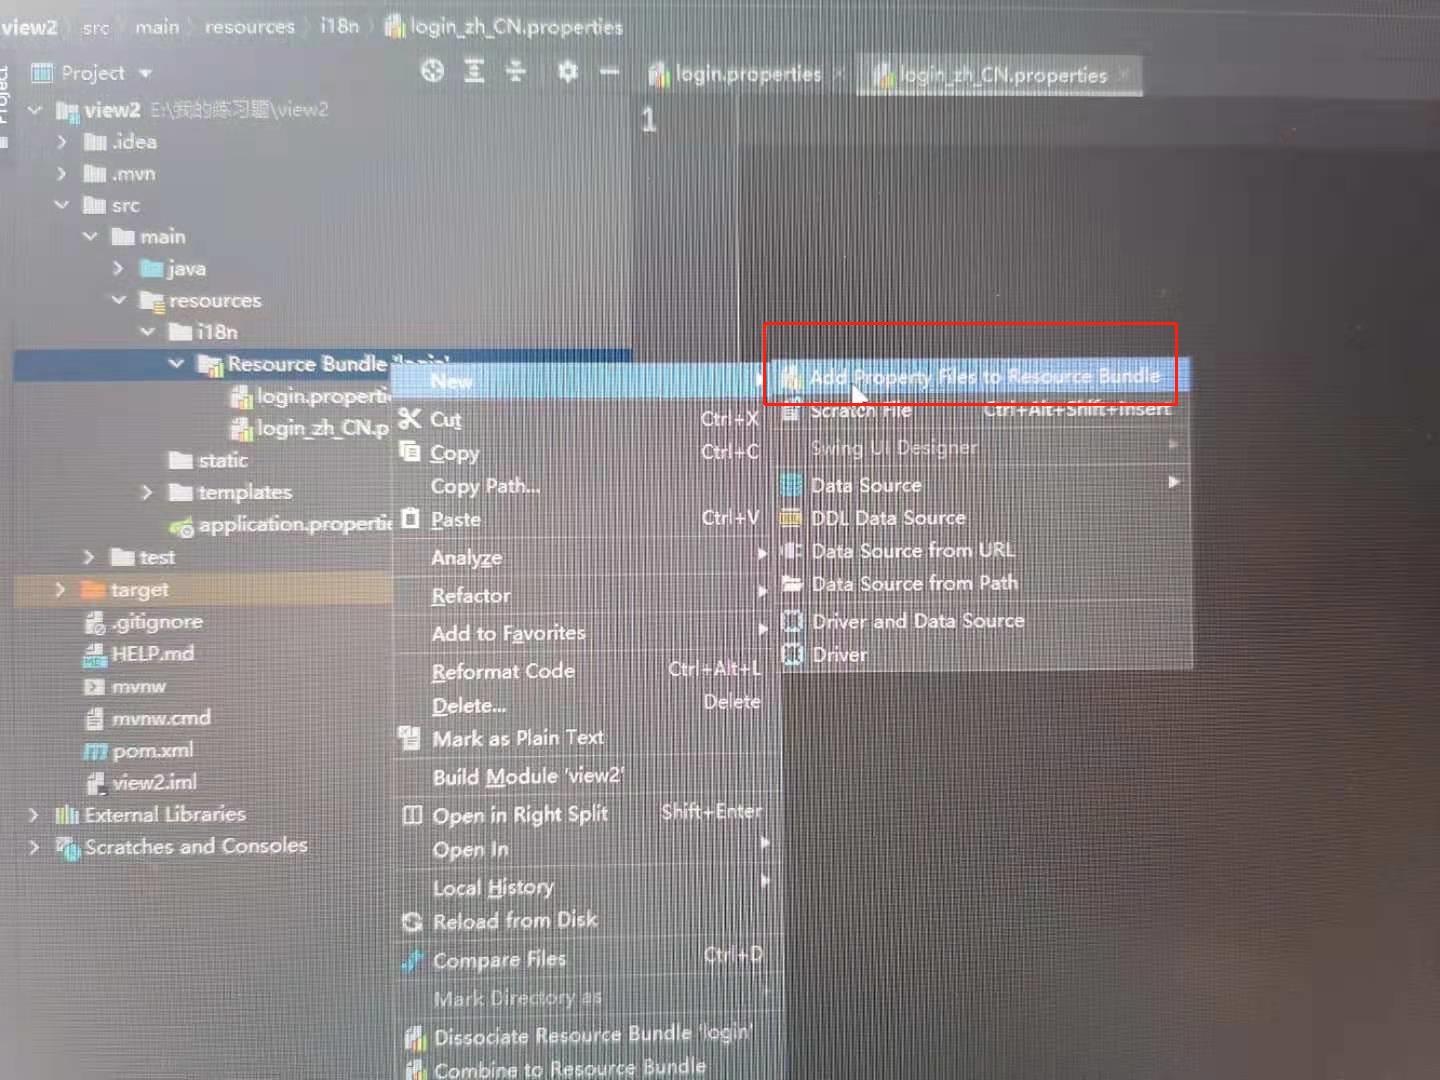
3.利用这里,再新建一个文件
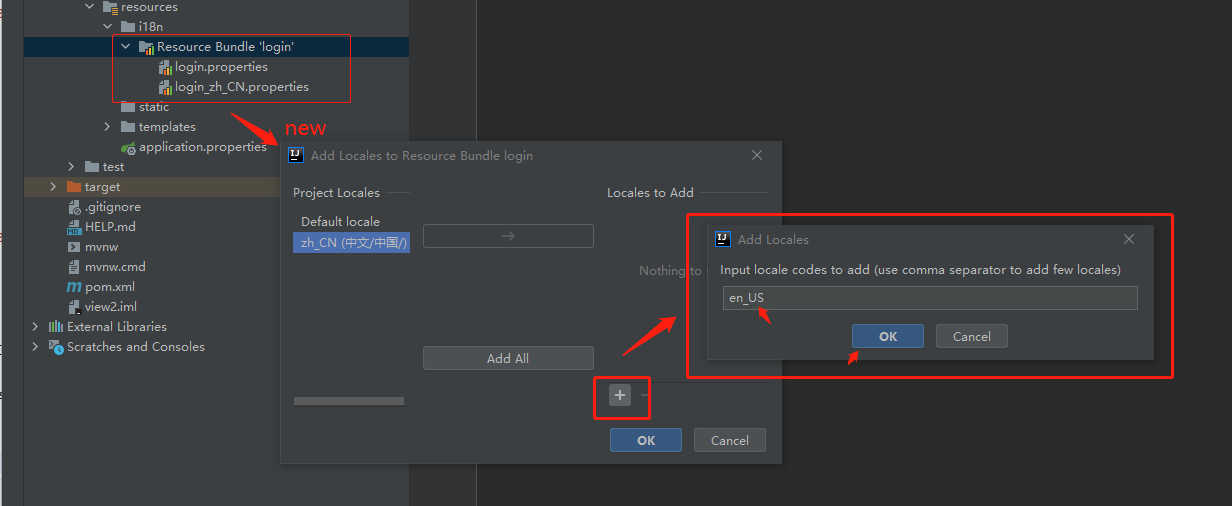
显示:
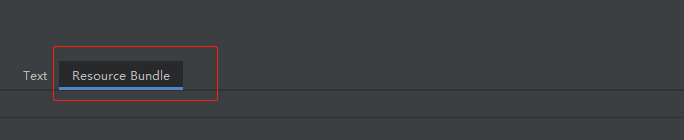
4.编写配置也可以用视图:
5.在视图中,点击 + 号就可以直接添加属性
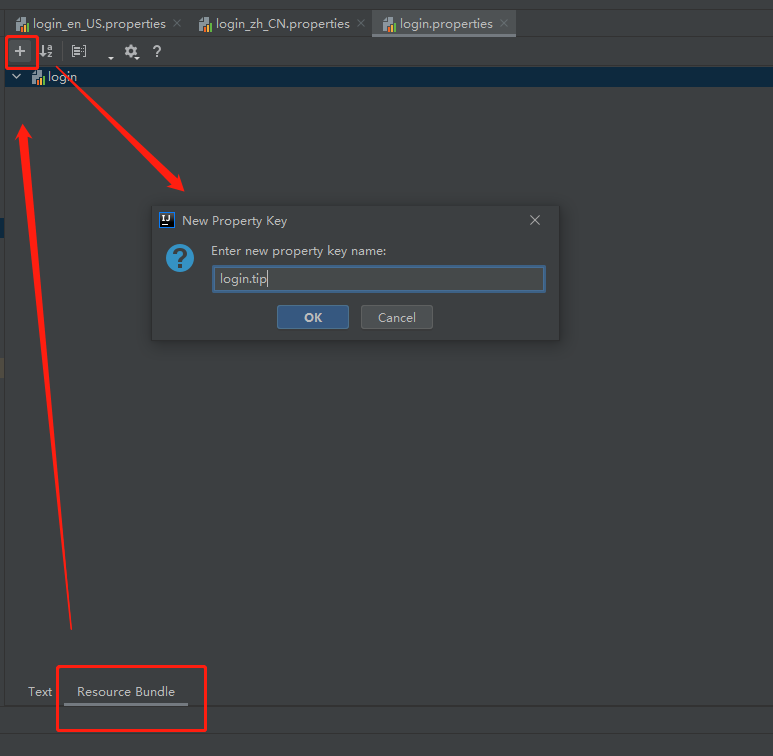
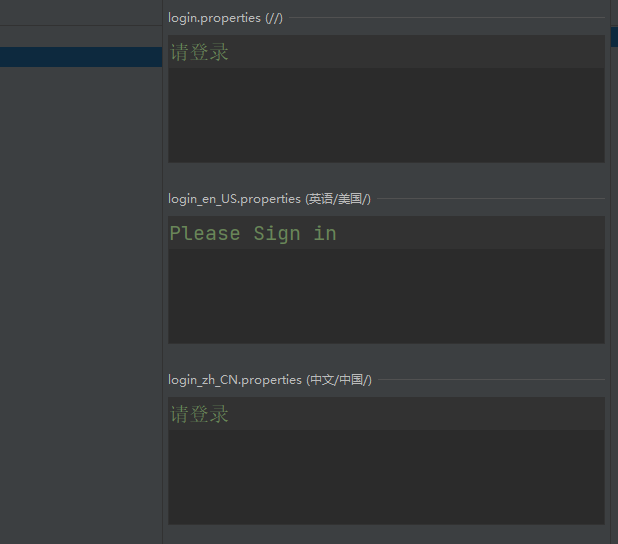
6.新建一个login.tip,可以看到边上有三个文件框可以输入
7.添加内容
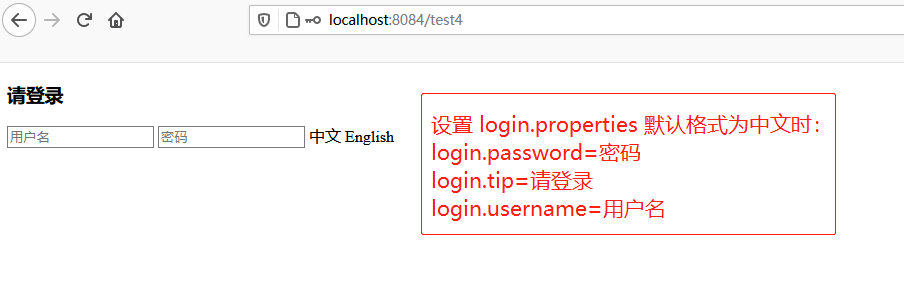
8.抽取页面需要显示的国际化页面消息,找到哪些内容需要编写国际化的配置
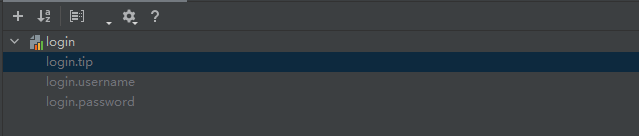
找到配置文件并查看:
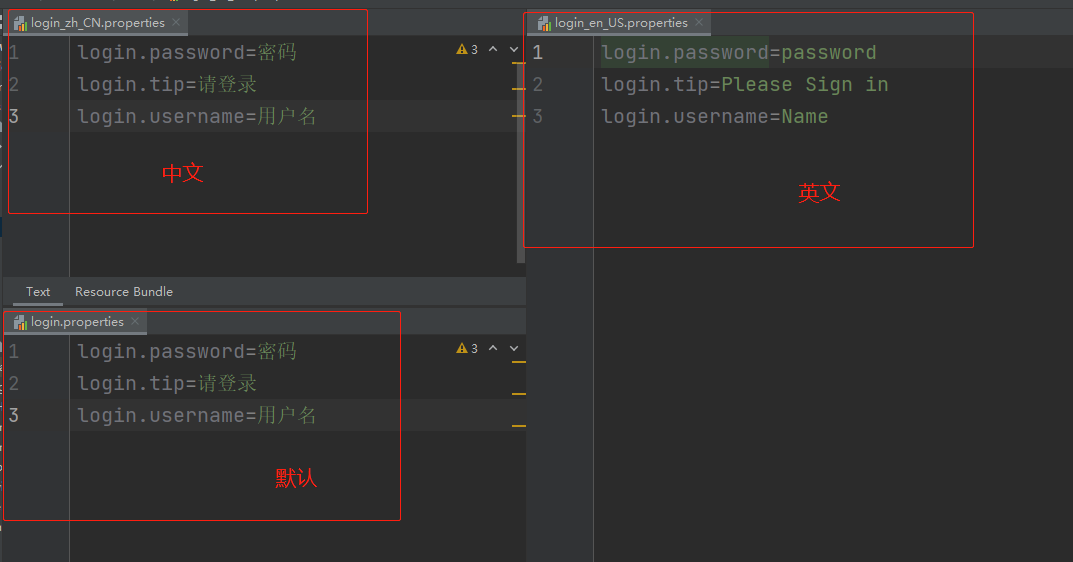
配置文件部分搞定!
9.由于我们添置了i18n目录,所以我们要去配置这个messages的路径:

spring.messages.basename=i18n.login
- 配置文件生效探究
看一下SpringBoot对国际化的自动配置!这里又涉及到一个类:MessageSourceAutoConfiguration
/**
 * {@link EnableAutoConfiguration Auto-configuration} for {@link MessageSource}.
 *
 * @author Dave Syer
 * @author Phillip Webb
 * @author Eddú Meléndez
 * @since 1.5.0
 */
@Configuration(proxyBeanMethods = false)
@ConditionalOnMissingBean(name = AbstractApplicationContext.MESSAGE_SOURCE_BEAN_NAME, search = SearchStrategy.CURRENT)
@AutoConfigureOrder(Ordered.HIGHEST_PRECEDENCE)
@Conditional(ResourceBundleCondition.class)
@EnableConfigurationProperties
public class MessageSourceAutoConfiguration {

	private static final Resource[] NO_RESOURCES = {};

	@Bean
	@ConfigurationProperties(prefix = "spring.messages")
	public MessageSourceProperties messageSourceProperties() {
		return new MessageSourceProperties();
	}
	//获取properties 传递过来的值,进行判断
	@Bean
	public MessageSource messageSource(MessageSourceProperties properties) {
		ResourceBundleMessageSource messageSource = new ResourceBundleMessageSource();
		// 设置国际化文件的基础名(去掉语言国家代码的)
		if (StringUtils.hasText(properties.getBasename())) {
			messageSource.setBasenames(StringUtils
					.commaDelimitedListToStringArray(StringUtils.trimAllWhitespace(properties.getBasename())));
		}
		if (properties.getEncoding() != null) {
			messageSource.setDefaultEncoding(properties.getEncoding().name());
		}
		messageSource.setFallbackToSystemLocale(properties.isFallbackToSystemLocale());
		Duration cacheDuration = properties.getCacheDuration();
		if (cacheDuration != null) {
			messageSource.setCacheMillis(cacheDuration.toMillis());
		}
		messageSource.setAlwaysUseMessageFormat(properties.isAlwaysUseMessageFormat());
		messageSource.setUseCodeAsDefaultMessage(properties.isUseCodeAsDefaultMessage());
		return messageSource;
	}
	//省略下面代码
- 测试1:设计一个简单的页面
<!DOCTYPE html>
<html lang="en" xmlns:th="http://www.thymeleaf.org">
<head>
    <meta charset="UTF-8">
    <title>Title</title>
</head>
<body>
<form action="/test">
    <h3 th:text="#{login.tip}">Please Sign in</h3>
    <input type="text" th:placeholder="#{login.username}">
    <input type="password" th:placeholder="#{login.password}">

    <a>中文</a>
    <a>English</a>
</form>
</body>
</html>
Run: 启动项目,访问一下,发现已经自动识别为中文。
- 测试2:实现根据按钮自动切换中文英文
配置国际化解析
在Spring中有一个国际化的Locale (区域信息对象);里面有一个叫做LocaleResolver (获取区域信息对象)的解析器。
我们去webmvc自动配置文件,寻找SpringBoot默认配置:
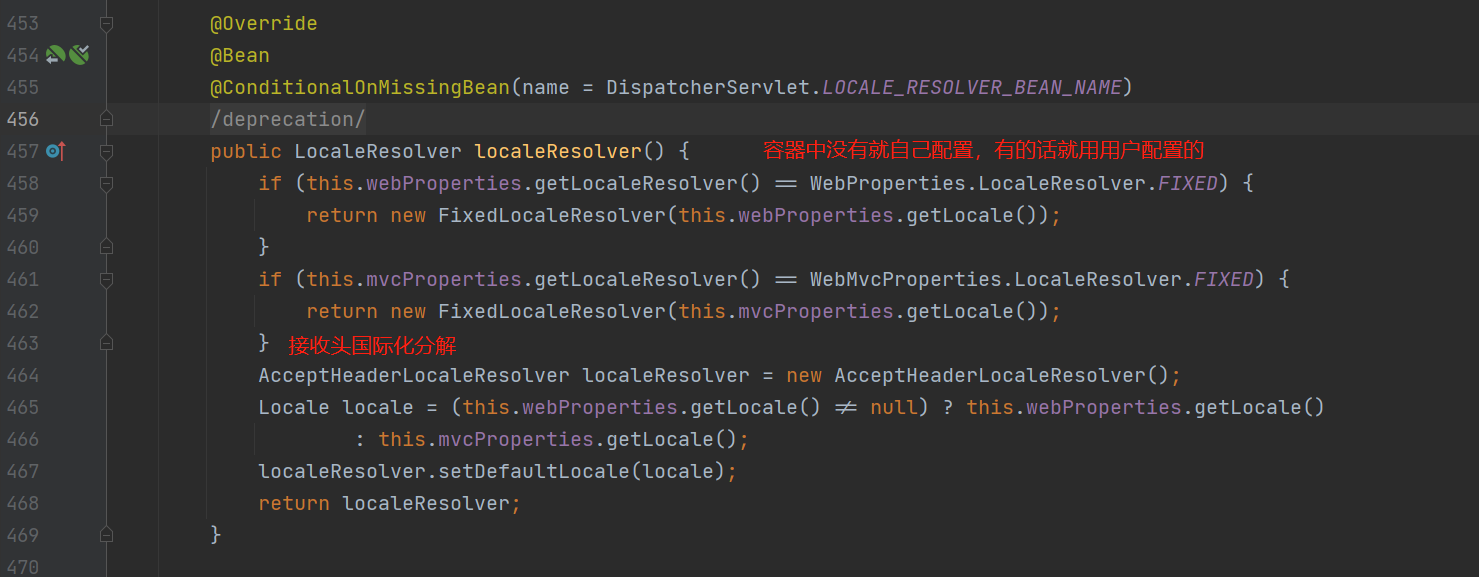
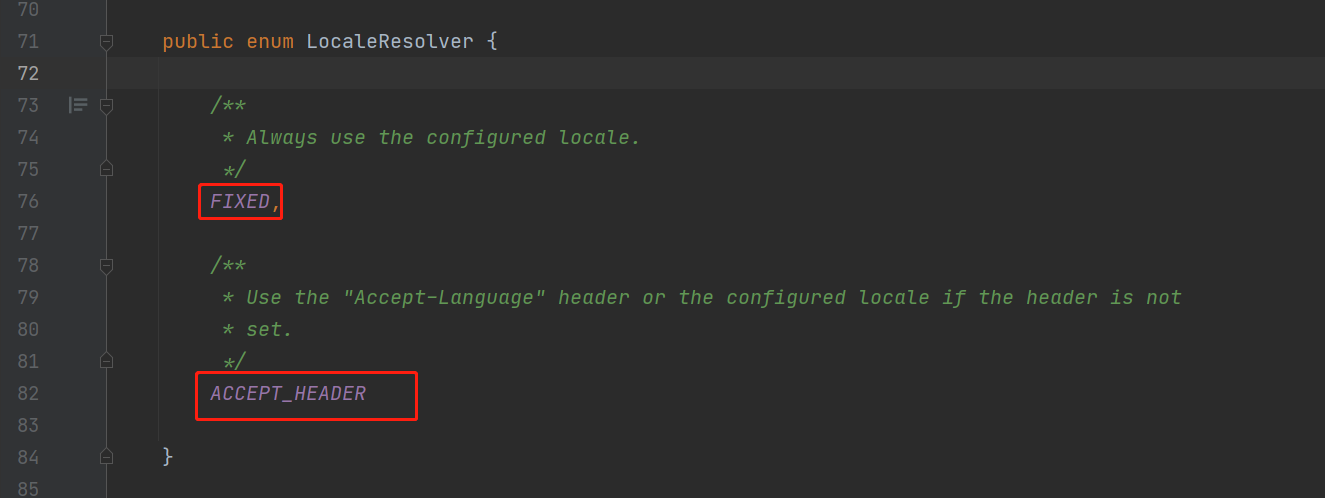
其中,FIXED常量源码:
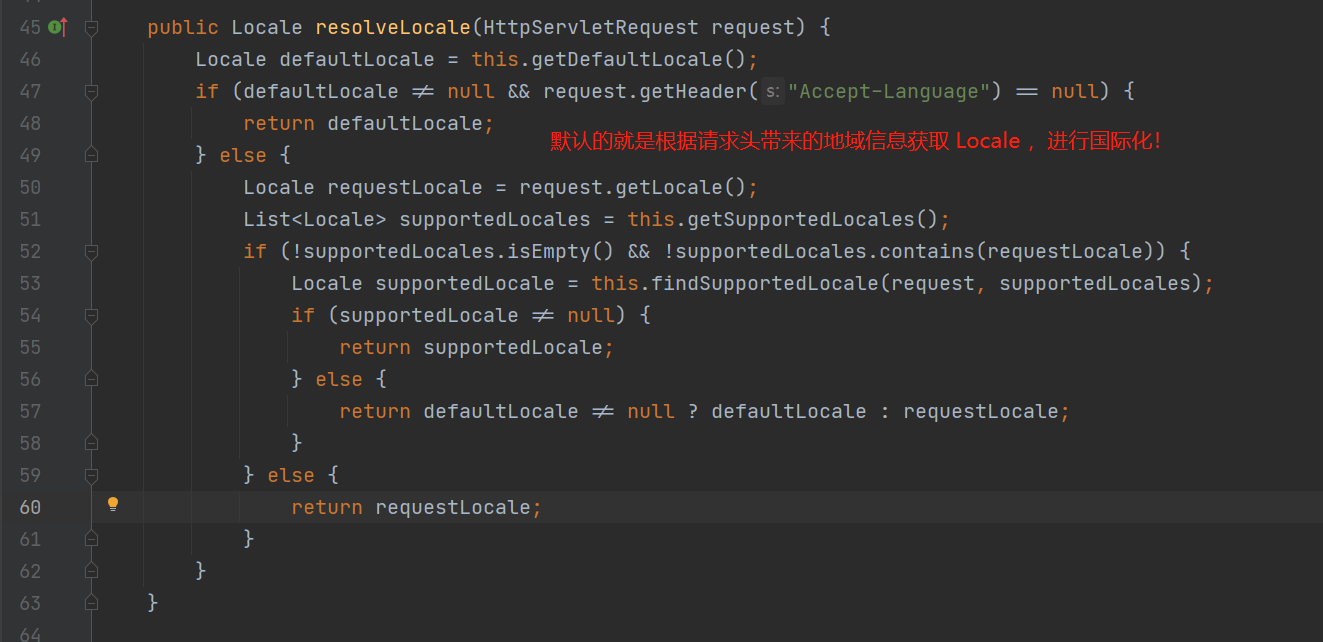
另外查看到,AcceptHeaderLocaleResolver这个类中有一个方法:
所以,想让我们的国际化资源生效,就需要让我们自己的Locale生效!我们写一个自己的LocaleResolver,可以在链接上携带区域信息!
1.修改一下前端页面的跳转连接:
<!DOCTYPE html>
<html lang="en" xmlns:th="http://www.thymeleaf.org">
<head>
    <meta charset="UTF-8">
    <title>Title</title>
</head>
<body>
<form action="/test">
    <h3 th:text="#{login.tip}">Please Sign in</h3>
    <input type="text" th:placeholder="#{login.username}">
    <input type="password" th:placeholder="#{login.password}">

    <!-- 这里传入参数不需要使用问号(?),使用(key=value)-->
    <a th:href="@{/test4(language='zh_CN')}">中文</a>
    <a th:href="@{/test4(language='en_US')}">English</a>
</form>
</body>
</html>
2.添加组件(处理国际化需求)
package com.zhou.component;

import org.springframework.util.ObjectUtils;
import org.springframework.web.servlet.LocaleResolver;

import javax.servlet.http.HttpServletRequest;
import javax.servlet.http.HttpServletResponse;
import java.util.Locale;

public class MyLocaleResolver implements LocaleResolver {
    //解析请求
    @Override
    public Locale resolveLocale(HttpServletRequest httpServletRequest) {
        String language = httpServletRequest.getParameter("language");
        Locale aDefault = Locale.getDefault();//如果没有获取到就是用系统默认的
        //如果请求连接不为空:StringUtils.isEmpty(language)被弃用了。
        if(!ObjectUtils.isEmpty(language)){
            //分割请求参数
            String[] split = language.split("_");
            //国家,地区
            aDefault = new Locale(split[0], split[1]);
        }
        return aDefault;
    }

    @Override
    public void setLocale(HttpServletRequest httpServletRequest, HttpServletResponse httpServletResponse, Locale locale) {

    }
}
3.配置组件
package com.zhou.config;

import com.zhou.component.MyLocaleResolver;
import org.springframework.context.annotation.Bean;
import org.springframework.context.annotation.Configuration;
import org.springframework.web.servlet.LocaleResolver;
import org.springframework.web.servlet.config.annotation.WebMvcConfigurer;


//扩展SpringBoot
@Configuration
public class MyMvcConfig implements WebMvcConfigurer {

    //自定义国际化组件生效
    @Bean
    public LocaleResolver localeResolver(){
        return new MyLocaleResolver();
    }
}
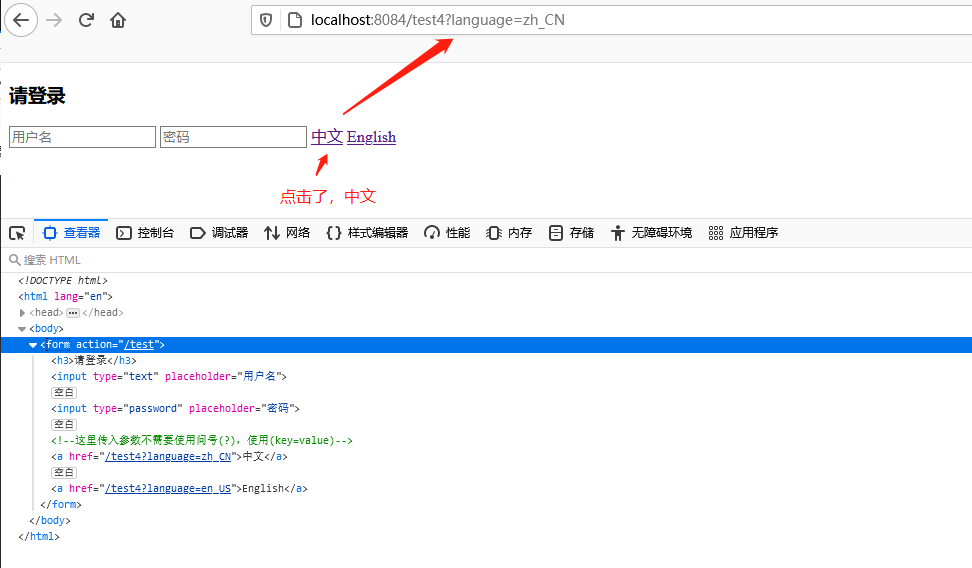
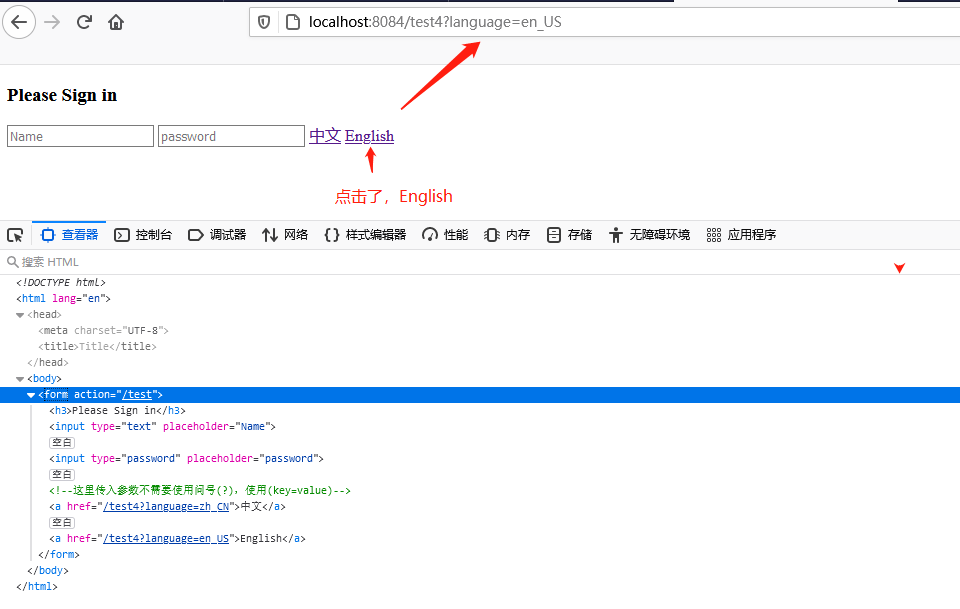
4.测试:
访问:http://localhost:8084/test4 并点击:中文 或者English
点击中文:
点击English

 浙公网安备 33010602011771号