谈谈iOS开发如何写个人中心这类页面--静态tableView页面的编写
本文来自 网易云社区 。
一、本文讲的是什么问题?
在开发 iOS 应用时,基本都会遇到个人中心、设置、详情信息等页面,这里截取了某应用的详情编辑页面和个人中心页面,如下:
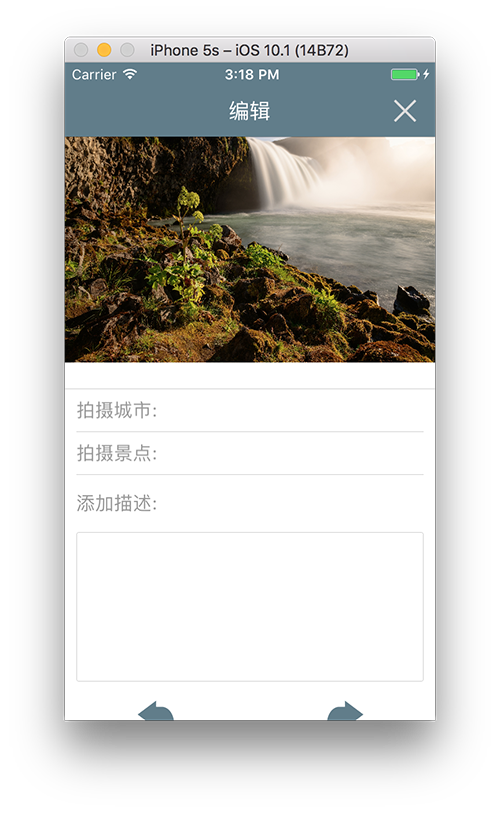

我们以页面结构的角度考虑这两个页面的共同点:
- 每个页面都有多种样式的 View。
- 两个页面的 View 数量都不算特别多,并不像常见的产品列表页面那样可以多次加载更多数据。
- 每个 View 都可能根据视觉或交互设计师要求随时变动位置,比如上图中编辑图片页面调整一下"添加描述"的位置。
- 页面有些 View 的数据展示不是网络数据,比如个人中心下面几行每一行左边的 title 都是固定的。
如果觉着以一个应用为例子不具有说服力,那么大家可以打开各自手机上的应用看一下(比如微信、淘宝等)。 根据我个人的项目开发经验,基本上每个应用都会有拥有一些具有上述共同点(一个或多个)的页面。
那么这类页面应该怎么编写才能保证规范性以及灵活性?本文就是讲述了这一类页面应该如何编写。
提示:阅读本文时,建议参考 本文的demo,本文的demo提供了 Objective-C 版本和 Swift 版本。
二、常见的几类写法
使用 Xib
使用 Xib 对这类页面进行可视化编辑是一种不错的选择,但这类方案也有部分缺点,比如:
- 编写布局可能需要直接使用 Autolayout,这样一旦出了问题可能不如使用 Masonry 写约束调试方便;
- Xib 中各视图的颜色值或 frame 值如果需要保持整个应用的统一,还是需要在代码里进行设置; 例如,上面个人中心的页面中,头像距离屏幕的左边距其实在全局已经定义为一个常量值(一般视觉都会定一些全局性的规范),但是 Xib 中设置 frame 无法直接引用已定义的常量;
Xib 确实是一种不错的方法,简单方便,但从上面分析可看出 Xib 也存在一些问题。本文对 Xib 不再进行深入讨论,一是个人喜好,另外主要原因是工作中对 Xib 使用并不多, 所以可能有些东西尚未深入研究,无法过多的讨论。
使用 UIScrollView
有些同学写这类页面时可能会选择一个不怎么好的方案:将页面所有的 View 作为 UIScrollView 的子View。
代码举例
这样编写这类页面时,controller 的代码基本类似于下面这样:
- (void)viewDidLoad {
    [super viewDidLoad];
    [self loadSubviews];
}

- (void)loadSubviews {
    // scrollView 作为所有子View的容器
    _scollView = [[UIScrollView alloc] init];
    [self.view addSubview:_scrollView];

    _view1 = [[UIView alloc] init];
    [_scrollView addSubview:_view1];

    // 添加其余子View,并为每个View设置约束(如果不使用约束,则也需要在 viewWillLayoutSubviews 方法中为各个View设置 Frame)
    // 此外,还要定义各类点击行为和点击效果。
}
方案缺点分析
根据经验来看,这类写法基本不可取,主要原因有以下几点:
- 当页面内容比较多的时候,子View数量会很多,这样一方面由于添加子View的代码过多引起 Controller 变得庞大,另一方面子View很多时,对子View的布局容易出现错误,不易排查。
- 针对第一点,可能会有开发人员将子View按行进行分块,并封装成一个较大的 View,这样会减少 UIScrollView 直接管理的子View数量,一定程度上避免了第一点问题。 但是,当设计师需要移动不同行的顺序,或者在某一位置添加了一行新的内容,这时候修改布局大概会令人吐血了吧。
- 如果某一行视图需要点击,则需要为该行视图添加手势或者采用 UIButton,并设置好点击的回调;当页面视图行数较多时,会导致代码杂乱。
所以,对于随业务需求修改极有可能导致页面布局和内容变化的页面,我们不能使用 UIScrollView 来管理子View。那么什么时候可以使用 UIScrollView 来管理页面中的视图呢? 这里给出两个条件:
- 当页面内容很少,并且页面需要像 UIScrollView 一样可以滚动。
- 页面内容在一定时期内基本不太可能修改的页面。一般常见于非主要业务的页面,如反馈页面,评论页面。
当满足这两个条件时,建议采用 UIScrollView 来管理页面中的视图,这也是最简单的方案,如下图某应用的反馈页面:

使用 UITableView
另一种方案是将页面中每一行看作为 UITableView 的一个 Cell,通过 UITableView 来组织这类页面中的各个视图。
代码举例
下面让我们以 demo 中的页面为例,来看一下这种方案写出的 Controller 代码是什么样子的:
(1) 先介绍一下 demo 页面,如下图:
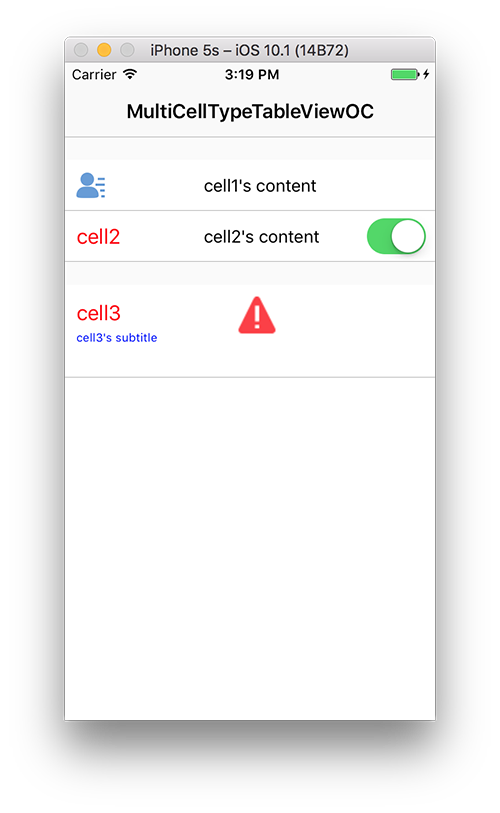
整个页面是以 UITableView 实现的,分为两个 section:cell1(类型为 MCDemoCell1)和 cell2(类型为 MCDemoCell2) 为 section1,cell3(类型为 MCDemoCell3) 为 section2。
(2) 首先,我们要新建一个 UITableView,然后为其设置 dataSource 和 delegate,以及确定其布局,代码如下:
#pragma mark - Life cycle.

- (void)viewDidLoad {
    [super viewDidLoad];
    self.title = @"MultiCellTypeTableViewOC";
    self.view.backgroundColor = [UIColor whiteColor];

    [self loadSubviews];
}

- (void)viewWillLayoutSubviews {
    [super viewWillLayoutSubviews];
    _tableView.frame = self.view.bounds; // 对 tableView 布局
}

#pragma mark - Load views.

- (void)loadSubviews {
    _tableView = [[UITableView alloc] initWithFrame:CGRectZero style:UITableViewStylePlain];
    _tableView.delegate = self; // 设置 tableView 的 delegate
    _tableView.dataSource = self; // 设置 tableView 的 dataSource
    [self.view addSubview:_tableView];
}
(3) 实现 UITableViewDataSource 的方法:

#pragma mark - UITableViewDataSource.

- (NSInteger)numberOfSectionsInTableView:(UITableView *)tableView {
    // 返回 section 的数量,本例中为 2
    return 2;
}

- (NSInteger)tableView:(UITableView *)tableView numberOfRowsInSection:(NSInteger)section {
    // 根据 section 区分有几个 cell
    if (section == 0) {
        return 2;
    } else {
        return 1;
    }
}

- (UITableViewCell *)tableView:(UITableView *)tableView cellForRowAtIndexPath:(NSIndexPath *)indexPath {
    UITableViewCell *cell = nil;
    // 根据 indexPath 获取不同的 Cell
    if (indexPath.section == 0) {
        if (indexPath.row == 0) {
            cell = [self getCell1];
        } else {
            cell = [self getCell2];
        }
    } else {
        cell = [self getCell3];
    }

    return cell;
}
上述代码中获取不同 Cell 的方法是私有方法,主要就是创建一个类型的 Cell,然后为该 Cell 进行配置数据,下面是 getCell2 的例子:
- (UITableViewCell *)getCell2 {
    MCDemoCell2 *cell = [[MCDemoCell2 alloc] init];
    cell.titleLabel.text = @"cell2";
    cell.contentLabel.text = @"cell2's content";
    cell.rightSwitchButton.on = YES;
    cell.delegate = self;
    return cell;
}
(4) 实现 UITableViewDelegate 的方法:
#pragma mark - UITableViewDelegate.

- (CGFloat)tableView:(UITableView *)tableView heightForHeaderInSection:(NSInteger)section {
    return 20;
}

- (CGFloat)tableView:(UITableView *)tableView heightForRowAtIndexPath:(NSIndexPath *)indexPath {
    CGFloat cellHeight = 0;
    // 根据 indexPath 获取不同 Cell 的高度
    if (indexPath.section == 0) {
        cellHeight = 44.0;
    } else {
        cellHeight = 80.0;
    }
    return cellHeight;
}

- (void)tableView:(UITableView *)tableView didSelectRowAtIndexPath:(NSIndexPath *)indexPath {
    [tableView deselectRowAtIndexPath:indexPath animated:YES];
    // 如果选中不同 cell 的动作不一致,则需要使用判断执行对应的操作
    if (indexPath.section == 0) {
        if (indexPath.row == 0) {
            NSLog(@"cell1 selected");
        } else {
            NSLog(@"cell2 selected");
        }
    } else {
        NSLog(@"cell3 selected");
    }
}
这种方案的详细代码见 demo 的 OldViewController。
方案优点分析
对比上一方案,本方案有了下面几点改进:
- 内容以行为单位封装成 Cell,只需要对 Cell 内部的视图做好布局即可,无需关心 UITableView 中 Cell 的布局,这样就避免了视图过多时布局的麻烦。
- 当设计师需要移动不同行的顺序或者添加新的内容时,只需要调整 UITableView 的代理方法即可,无需修改布局。
- UITableView 代理方法可以统一处理 Cell 的点击事件,而且无需手动添加手势。
方案缺点分析
虽然该方案对比 UIScrollView 方案有了不少改进,但是仍然有些问题:
- tableView:numberOfRowsInSection: 我们需要根据 section 的数值返回不同的 Cell 数量,当 section 较多时,就会有多个 if else 语句,降低了代码的可读性。除此方法外,tableView:cellForRowAtIndexPath: 以及 tableView:heightForRowAtIndexPath: 、tableView:didSelectRowAtIndexPath: 也存在类似的问题。
- 过多的 if else 导致的最主要问题是降低了代码的灵活性。例如:如果需要调整各个 Cell 的顺序或者在某处添加一个 Cell, 那么几乎第一点中的所有方法都需要修改 if else 逻辑,代码基本没有任何灵活性可言。
- 在 tableView:cellForRowAtIndexPath: 方法中,我们在获取某个 Cell 时,需要提供一个私有方法来创建该 Cell(例如 getCell2),当然也可以不提供私有方法,直接在 tableView:cellForRowAtIndexPath: 方法中创建,其实没有本质区别。
- 当前 tableView:heightForRowAtIndexPath: 中返回的高度是根据 indexPath 固定的,不能满足动态高度Cell(Cell 的高度根据其内容动态变化),如果需要满足动态高度Cell的需求,需要引入其他处理方法。
- 这种方案目前不支持 Cell 的复用,当然,对于这类 Cell 数量不太多的页面,Cell 不复用也可以,所以这个缺点不太重要。
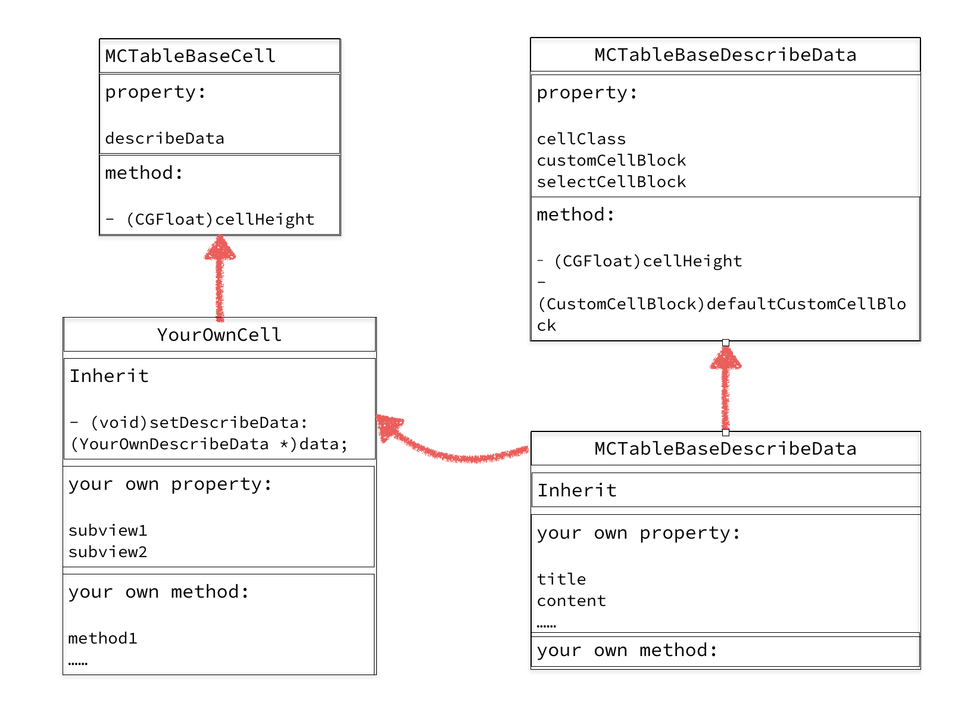
三、本文的方案
针对上面方案的缺点,本文提出了一种新的方案,可以消除上述方案的缺点,下图简单展示了本方案的基本思想:
代码举例
(1) 页面中的每个 Cell 都需要继承自 MCTableBaseCell,然后在子类中添加自定义属性和方法,如 MCDemoCell1 的定义如下:
@interface MCDemoCell1 : MCTableBaseCell

@property (nonatomic, strong) UIImageView *headerIconImageView;
@property (nonatomic, strong) UILabel *contentLabel;

@end
(2) 为该页面定义一个继承自 MCTableBaseDescribeData 的 DescribeData 类,该类中需要添加页面中所有 Cell 所需的数据。
例如,上面的 MCDemoCell1 需要一个 image 和 content 字符串,那么自定义的 DescribeData 中也应该包含有这两个信息。 demo 中的 DescribeData 需要包含有 MCDemoCell1, MCDemoCell2, MCDemoCell3 所需的数据,所以定义如下:
@interface MCDemoTableDescribeData : MCTableBaseDescribeData

@property (nonatomic, copy) NSString *title;
@property (nonatomic, copy) NSString *subTitle;
@property (nonatomic, assign) BOOL switchStatus;
@property (nonatomic, copy) NSString *indicateImageName;
@property (nonatomic, copy) NSString *content;
@property (nonatomic, copy) NSString *headerIconName;
@property (nonatomic, weak) id<MCDemoCell2Delegate> cell2Delegate;

@end
(3) 有了 MCDemoTableDescribeData 的定义,我们需要为 MCDemoCell 的实现重写 setDescribeData: 方法,在该方法中, 我们需要将 describeData 中与 MCDemoCell 有关的数据赋值给 MCDemoCell,代码如下:
- (void)setDescribeData:(MCTableBaseDescribeData *)describeData {
    if ([describeData isKindOfClass:MCDemoTableDescribeData.class]) {
        MCDemoTableDescribeData *data = (MCDemoTableDescribeData *)describeData;
        _headerIconImageView.image = [UIImage imageNamed:data.headerIconName];
        _contentLabel.text = data.content;
    }
}
此外,我们需要为 MCDemoCell 重写 sizeThatFits: 方法,在该方法中,我们可以根据 MCDemoCell 的数据动态计算出 Cell 高度,该方法会在后面获取 Cell 高度时调用。
- (CGSize)sizeThatFits:(CGSize)size {
    CGFloat height;
    // 根据 Cell 的实际内容计算出 Cell 的高度。
    //例如根据 contentLabel 的内容,计算出 Cell 需要展示 content 所需的高度。
    return CGSizeMake(0, height);
}
(4) 下面就可以编写 Controller 了。首先要定义一个属性,用来保存 tableView 所有 Cell 需要的 DescribeData:
@property (nonatomic, strong) NSArray<NSArray<MCDemoTableDescribeData *> *> *cellDescriptionDatas;
(5) 然后创建 tableView 并配置 tableView 的 delegate、dataSource 等属性:
- (void)loadSubviews {
    _tableView = [[UITableView alloc] initWithFrame:CGRectZero style:UITableViewStylePlain];
    _tableView.separatorStyle = UITableViewCellSeparatorStyleNone;
    _tableView.backgroundColor = [UIColor lightTextColor];
    _tableView.delegate = self;
    _tableView.dataSource = self;
    [self.view addSubview:_tableView];

    // register cell class, use UITableView+MCRegisterCellClass
    [_tableView registerCellClasses:@[[MCDemoCell1 class],
                                      [MCDemoCell2 class],
                                      [MCDemoCell3 class]]];
}
注意: 最后一句代码使用到的方法是本文定义的 UITableView+MCRegisterCellClass 这个 category 提供的,是为了方便注册 Cell 的 Class 和 dequeue 出相应的 Cell,详细请看 demo 中的代码。
(6) 为该页面的 TableView 加载所需的 DescribeData 数据:
- (void)loadCellDescribeDatas {
    MCDemoTableDescribeData *cell1Data = [[MCDemoTableDescribeData alloc] init];
    cell1Data.cellClass = [MCDemoCell1 class];
    cell1Data.headerIconName = @"header_icon";
    cell1Data.content = @"cell1's content";
    cell1Data.selectCellBlock = ^(MCTableBaseCell *cell, MCTableBaseDescribeData *describeData) {
        NSLog(@"cell1 selected");
    };

    MCDemoTableDescribeData *cell2Data = [[MCDemoTableDescribeData alloc] init];
    cell2Data.cellClass = [MCDemoCell2 class];
    cell2Data.title = @"cell2";
    cell2Data.content = @"cell2's content";
    cell2Data.switchStatus = YES;
    cell2Data.cell2Delegate = self;

    MCDemoTableDescribeData *cell3Data = [[MCDemoTableDescribeData alloc] init];
    cell3Data.cellClass = [MCDemoCell3 class];
    cell3Data.indicateImageName = @"indicate";
    cell3Data.title = @"cell3";
    cell3Data.subTitle = @"cell3's subtitle";

    _cellDescriptionDatas = @[@[cell1Data, cell2Data], @[cell3Data]];
}
在创建了某个 Cell 的 DescribeData 后,我们需要为 DescribeData 设置 cellClass(必须设置项) 以及该 Cell 显示所需的其他数据。有两个地方需要注意:
- selectCellBlock: 是选中该 cell 时执行的动作,在之后的 tableView:didSelectRowAtIndexPath: 时会用到;
- customCellBlock: 这个 block 默认实现是将新建的 cell1Data/Cell2Data/Cell3Data 赋值给 Cell 的 describeData 属性, 这样在新建 Cell 时调用 customCellBlock 就可以按照 Cell 中重写的 setDescribeData: 方法中的代码为 Cell 填充数据以及改变样式。 如果需要自定义 customCellBlock,请在自定义的 customCellBlock 中先调用 MCTableBaseDescribeData 的 defaultCustomCellBlock。
(7) 添加 UITableViewDataSource 的方法:
#pragma mark - UITableViewDataSource.

- (NSInteger)numberOfSectionsInTableView:(UITableView *)tableView {
    return _cellDescriptionDatas.count;
}

- (NSInteger)tableView:(UITableView *)tableView numberOfRowsInSection:(NSInteger)section {
    return _cellDescriptionDatas[section].count;
}

- (UITableViewCell *)tableView:(UITableView *)tableView cellForRowAtIndexPath:(NSIndexPath *)indexPath {
    MCDemoTableDescribeData *data = _cellDescriptionDatas[indexPath.section][indexPath.row];
    UITableViewCell *cell = [_tableView dequeueReusableCellWithClassType:data.cellClass];
    data.customCellBlock((MCTableBaseCell *)cell, data);
    return cell;
}
(8) 添加 UITableViewDelegate 的方法:
#pragma mark - UITableViewDelegate.

- (CGFloat)tableView:(UITableView *)tableView heightForHeaderInSection:(NSInteger)section {
    return 20;
}

- (CGFloat)tableView:(UITableView *)tableView heightForRowAtIndexPath:(NSIndexPath *)indexPath {
    MCDemoTableDescribeData *data = _cellDescriptionDatas[indexPath.section][indexPath.row];
    UITableViewCell *cell = [_tableView dequeueReusableCellWithClassType:data.cellClass];
    data.customCellBlock((MCTableBaseCell *)cell, data);
    return [data cellHeight];
}

- (void)tableView:(UITableView *)tableView didSelectRowAtIndexPath:(NSIndexPath *)indexPath {
    [tableView deselectRowAtIndexPath:indexPath animated:YES];
    MCDemoTableDescribeData *data = _cellDescriptionDatas[indexPath.section][indexPath.row];
    if (data.selectCellBlock) {
        UITableViewCell *cell = [tableView cellForRowAtIndexPath:indexPath];
        data.selectCellBlock((MCTableBaseCell *)cell, data);
    }
}
本方案的详细代码见 demo 的 ViewController。
方案优点分析
通过上面步骤我们可以发现本方案的一些优点:
- Cell 在页面中的位置由 cellDescribeData 在 cellDescriptionDatas 数组中的位置决定,我们可以通过 loadCellDescribeDatas 方法中调整 cellDescribeData 的顺序来方便的调整 Cell 在页面的位置。
- numberOfSectionsInTableView: 和 tableView:numberOfRowsInSection: 可以通过 cellDescriptionDatas 方便获取,无需 if else 语句。
- tableView:cellForRowAtIndexPath: 、 tableView:heightForRowAtIndexPath: 以及 tableView:didSelectRowAtIndexPath: 方法可以通过 indexPath 获取 cellDescriptionDatas 中的 DescribeData。DescribeData 中就有了足够的条件能够获取到所需的信息,非常方便。
- Cell 的高度支持动态计算。只要自定义的 Cell 重写 sizeThatFits: 方法, 并在中动态计算的高度然后返回即可。
- 该页面的 Cell 可以方便的移植到其他页面,在有这种需求时,建议使用 MCDemoCell3 那样为 Cell 定义一个 ViewModel 属性,ViewModel 包含且仅包含与该 Cell 展示有关的数据。然后在 setDescribeData: 中根据 describeData 创建出 ViewModel ,代码示例如下:
#pragma mark - Getter & Setter. - (void)setDescribeData:(MCTableBaseDescribeData *)describeData { if ([describeData isKindOfClass:MCDemoTableDescribeData.class]) { MCDemoCell3ViewModel *viewModel = [[MCDemoCell3ViewModel alloc] initWithDescribeData:(MCDemoTableDescribeData *)describeData]; self.viewModel = viewModel; } } - (void)setViewModel:(MCDemoCell3ViewModel *)viewModel { if (_viewModel == viewModel) { return; } _viewModel = viewModel; _titleLabel.text = _viewModel.title; _subTitleLabel.text = _viewModel.subTitle; _indicateImageView.image = _viewModel.indicateImage; } - 这样可以保证 Cell 拥有更强的复用性。例如,如果需要用在另一个这一类的页面,只需要在 setDescribeData: 中添加几行代码即可:
- (void)setDescribeData:(MCTableBaseDescribeData *)describeData { if ([describeData isKindOfClass:MCDemoTableDescribeData.class]) { MCDemoCell3ViewModel *viewModel = [[MCDemoCell3ViewModel alloc] initWithDescribeData:(MCDemoTableDescribeData *)describeData]; self.viewModel = viewModel; } else if ([describeData isKindOfClass:MCDemoTableDescribeData2.class]) { MCDemoCell3ViewModel *viewModel = [[MCDemoCell3ViewModel alloc] initWithDescribeData:(MCDemoTableDescribeData2 *)describeData]; self.viewModel = viewModel; } } - 本方案中 Cell 支持复用,且提供了方便的注册 Cell 类型和获取某类型 Cell 的 category: UITableView+MCRegisterCellClass。
- MCTableBaseDescribeData 提供默认的 customCellBlock,一般均可满足需求,这样将定义各个 Cell 样式的代码从 Controller 转移到了各个 Cell 内部,使得 Controller 中代码简洁。
方案缺点分析
每种方案都有缺点,本方案也不例外,缺点主要表现在两个方面:
- 由于自定义的 DescribeData 类型中包含了页面所有 Cell 所需的数据,但每一个 Cell 的 DescribeData 用不到这么多属性,所以这样就浪费了一些内存资源。
- 每一种架构的学习都有一定成本,本方案也需要一些学习成本。
四、总结
我们解决一个问题通常都会有多种方法,每种方法都各有优缺点。 在解决架构的问题时,我们应该多思考,根据需求切实分析各种方案的优缺点,最后再做出取舍,不要限制自己解决某一问题时一定要用某种方案。
上面应该已经清晰的讲述了本文要解决的问题,并给出了一种解决问题的方案,该方案对我们通常写出的代码进行了一定的抽象,可以保证灵活可扩展以及代码规范一致,并且容易掌握, 经过实践,使用本文的方案进行这类页面的编写的速度也很不错。但正如上面所说,每种方案都有优缺点(本方案优缺点上面已列出),还是需要架构师在进行选型时充分权衡。
当然也欢迎各位提出问题、进行交流。
本文已由作者白天宇授权网易云社区发布,原文链接:谈谈iOS开发如何写个人中心这类页面--静态tableView页面的编写

 浙公网安备 33010602011771号