

NETCORE - IdentityServer4 单点登录SSO
NETCORE - IdentityServer4 单点登录SSO - oidc模式
测试项目
1. 服务端:NETCORE.ID4.SSO.Server(netcore3.1 MVC)
2. 客户端1:NETCORE.ID4.SSO.Client1(net6 webapi)
3. 客户端2:NETCORE.ID4.SSO.Client2(net6 webapi)
搭建服务端
下载模板,在 cmd 中运行:
dotnet new -i IdentityServer4.Templates
dotnet new is4inmem
更名为:NETCORE.ID4.SSO.Server
在config.cs 文件中增加两个客户端配置
                new Client
                {
                    //客户端id
                    ClientId = "mvc1",
                    //客户端密钥
                    ClientSecrets = { new Secret("secret".Sha256()) },
                    //授权模式为code
                    AllowedGrantTypes = GrantTypes.Code,
                    //ids发放code时要回调客户端的地址
                    RedirectUris = { "https://localhost:7099/signin-oidc" },
                    //完成在ids中注销后回调客户端的这个地址
                    PostLogoutRedirectUris = { "https://localhost:7099/signout-callback-oidc" },
                    //ids允许此客户端访问这些scope
                    AllowedScopes = new List<string>
                    {
                        IdentityServerConstants.StandardScopes.OpenId,
                        IdentityServerConstants.StandardScopes.Profile
                    }
                },
                new Client
                {
                    //客户端id
                    ClientId = "mvc2",
                    //客户端密钥
                    ClientSecrets = { new Secret("secret".Sha256()) },
                    //授权模式为code
                    AllowedGrantTypes = GrantTypes.Code,
                    //ids发放code时要回调客户端的地址
                    RedirectUris = { "https://localhost:7271/signin-oidc" },
                    //完成在ids中注销后回调客户端的这个地址
                    PostLogoutRedirectUris = { "https://localhost:7271/signout-callback-oidc" },
                    //ids允许此客户端访问这些scope
                    AllowedScopes = new List<string>
                    {
                        IdentityServerConstants.StandardScopes.OpenId,
                        IdentityServerConstants.StandardScopes.Profile
                    }
                }
创建客户端1
NETCORE.ID4.SSO.Client1(net6 webapi)
安装 nuget 包:Microsoft.AspNetCore.Authentication.OpenIdConnect

配置:Program.cs
using System.IdentityModel.Tokens.Jwt;

var builder = WebApplication.CreateBuilder(args);


var config = builder.Configuration;


builder.Services.AddControllers();
// Learn more about configuring Swagger/OpenAPI at https://aka.ms/aspnetcore/swashbuckle
builder.Services.AddEndpointsApiExplorer();
builder.Services.AddSwaggerGen();


builder.Services.AddControllersWithViews();
JwtSecurityTokenHandler.DefaultMapInboundClaims = false;//还没研究过它是干啥的
builder.Services.AddAuthentication(options => //注册asp.net core 身份验证核心服务,并配置
{
    options.DefaultScheme = "Cookies";//默认的身份验证方案名
    options.DefaultChallengeScheme = "oidc";//用来跳转到dis登录页的身份验证方案名
                                            //注意这俩配置与下面注册的身份验证方案的名字对应
})
.AddCookie("Cookies")//注册asp.net core 默认的基于cookie的身份验证方案
.AddOpenIdConnect("oidc", options =>//注册ids为我们提供的oidc身份验证方案
{
    options.Authority = "https://localhost:5001";//配置ids的根路径
    options.ClientId = "mvc1";//此客户但的id
    options.ClientSecret = "secret";//此客户端的密钥
    options.ResponseType = "code";//授权模式
    options.SaveTokens = true;//是否将最后获取的idToken和accessToken存储到默认身份验证方案中
});


var app = builder.Build();

// Configure the HTTP request pipeline.
if (app.Environment.IsDevelopment())
{
    app.UseSwagger();
    app.UseSwaggerUI();
}

app.UseHttpsRedirection();

app.UseAuthentication();
app.UseAuthorization();

app.MapControllers();

app.Run();
增加 WebApi 控制器:ValuesController.cs
using Microsoft.AspNetCore.Authorization;
using Microsoft.AspNetCore.Http;
using Microsoft.AspNetCore.Mvc;

namespace NETCORE.ID4.SSO.Client1.Controllers
{
    [Route("api/[controller]")]
    [ApiController]
    public class ValuesController : ControllerBase
    {

        [HttpGet]
        [Route("get1")]
        public string get1()
        {
            return "value1";
        }


        [HttpGet]
        [Route("get2")]
        [Authorize]
        public string get2()
        {
            return "value2";
        }


    }
}
创建客户端2
NETCORE.ID4.SSO.Client2(net6 webapi)
安装 nuget 包:Microsoft.AspNetCore.Authentication.OpenIdConnect
增加 WebApi 控制器(与client1一样):ValuesController.cs
配置:Program.cs
using System.IdentityModel.Tokens.Jwt;

var builder = WebApplication.CreateBuilder(args);

// Add services to the container.
var config = builder.Configuration;

builder.Services.AddControllers();
// Learn more about configuring Swagger/OpenAPI at https://aka.ms/aspnetcore/swashbuckle
builder.Services.AddEndpointsApiExplorer();
builder.Services.AddSwaggerGen();


#region IdentityServer4

builder.Services.AddControllersWithViews();
JwtSecurityTokenHandler.DefaultMapInboundClaims = false;//还没研究过它是干啥的
builder.Services.AddAuthentication(options => //注册asp.net core 身份验证核心服务,并配置
{
    options.DefaultScheme = "Cookies";//默认的身份验证方案名
    options.DefaultChallengeScheme = "oidc";//用来跳转到dis登录页的身份验证方案名
                                            //注意这俩配置与下面注册的身份验证方案的名字对应
})
.AddCookie("Cookies")//注册asp.net core 默认的基于cookie的身份验证方案
.AddOpenIdConnect("oidc", options =>//注册ids为我们提供的oidc身份验证方案
{
    options.Authority = "https://localhost:5001";//配置ids的根路径
    options.ClientId = "mvc2";//此客户但的id
    options.ClientSecret = "secret";//此客户端的密钥
    options.ResponseType = "code";//授权模式
    options.SaveTokens = true;//是否将最后获取的idToken和accessToken存储到默认身份验证方案中
});


#endregion


var app = builder.Build();

// Configure the HTTP request pipeline.
if (app.Environment.IsDevelopment())
{
    app.UseSwagger();
    app.UseSwaggerUI();
}

app.UseHttpsRedirection();

app.UseAuthentication();
app.UseAuthorization();

app.MapControllers();

app.Run();
测试:
在同一浏览器中
直接访问:https://localhost:7099 的接口
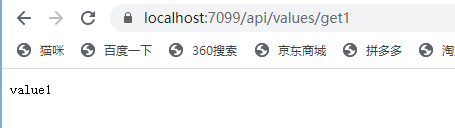
访问 https://localhost:7099/api/values/get2时,会跳转到登录页
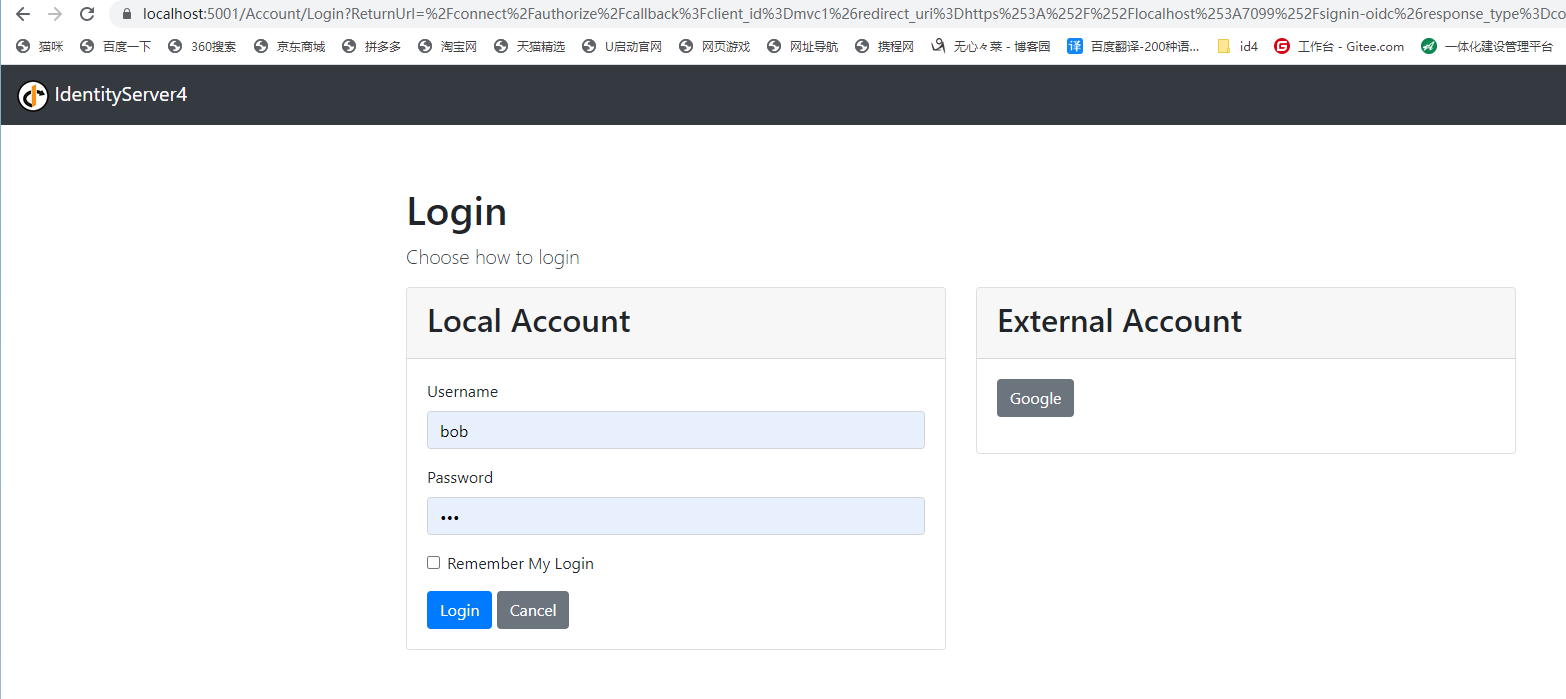
登录后,会自动跳转获取数据

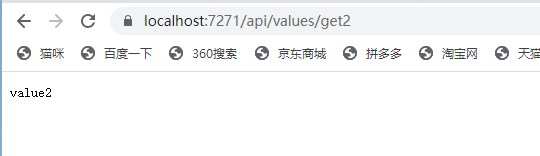
在访问client2 的接口时,会自动跳转一下鉴权服务,发现已登录,会自动跳转回来,获取到数据
参考 :https://www.bbsmax.com/A/QW5Y71mKzm/

 浙公网安备 33010602011771号