Spring
Spring
简介
- Spring 理念:使现有的技术更加容易使用,本身是一个大杂烩,整合了现有的技术框架
- SSH Struct2+Spring+Hibernate(早期,现在没用了)
- SSM SpringMVC+Spring+Mybatis
- 官网
- 官网下载地址
- maven下载地址
<dependency>
    <groupId>org.springframework</groupId>
    <artifactId>spring-webmvc</artifactId>
    <version>5.2.8.RELEASE</version>
</dependency>
优点
总结一句话:Spring就是一个轻量级的控制反转(IOC)和面向切面编程(AOP)的框架!
- Spring是一个开源的免费的框架(容器)
- Spring是一个轻量级、非入侵式的框架
- 控制反转(IOC)、面向切面编程(AOP)
- 支持事务的处理,对框架整合的支持
拓展
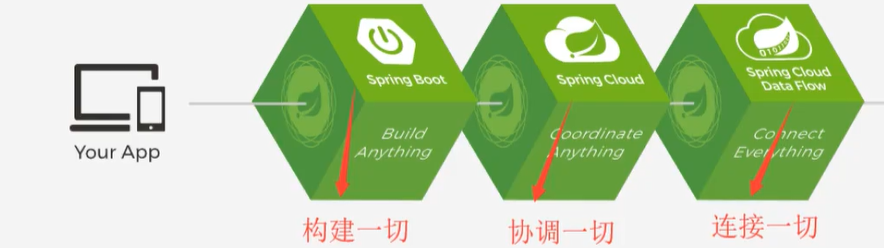
- SpringBoot
- 一个快速开发的脚手架
- 基于SpringBoot可以快速开发单个微服务
- 约定大于配置
- Spring Cloud
- SpringCloud是基于SpringBoot实现的
IOC本质
通过添加了一个set×××Dao,发生转变
HelloString
- 新建一个空的maven项目,导入包
- 新建实体类Hello
package com.jmu.pojo;

public class Hello {
    private String name;

    public String getName() {
        return name;
    }

    public void setName(String name) {
        this.name = name;
    }

    public Hello(String name) {
        this.name = name;
    }

    public Hello() {
    }

    @Override
    public String toString() {
        return "Hello{" +
                "name='" + name + '\'' +
                '}';
    }
}
- 配置元数据
在resources目录下,新建ApplicationContext.xml
<?xml version="1.0" encoding="UTF-8"?>
<beans xmlns="http://www.springframework.org/schema/beans"
       xmlns:xsi="http://www.w3.org/2001/XMLSchema-instance"
       xsi:schemaLocation="http://www.springframework.org/schema/beans
        https://www.springframework.org/schema/beans/spring-beans.xsd">
<!--    使用Spring来创建对象,在Spring这些都称为Bean-->
    <bean id="hello" class="com.jmu.pojo.Hello">
        <property name="name" value="Spring"/>
    </bean>
</beans>
配置ApplicationContext.xml上下文

- 实例化容器
ApplicationContext context = new ClassPathXmlApplicationContext("services.xml", "daos.xml");
import com.jmu.pojo.Hello;
import org.springframework.context.ApplicationContext;
import org.springframework.context.support.ClassPathXmlApplicationContext;

public class MyTest {
    public static void main(String[] args) {
//        获取Spring上下文对象
        ApplicationContext context = new ClassPathXmlApplicationContext("beans.xml");
//        我们的对象都在Spring中管理,我们要使用,取出即可 走无参构造的方法
        Hello hello = (Hello) context.getBean("hello");
        System.out.println(hello);
    }
}
Hello对象是谁创建?Spring
Hello对象的属性是谁创建?Spring
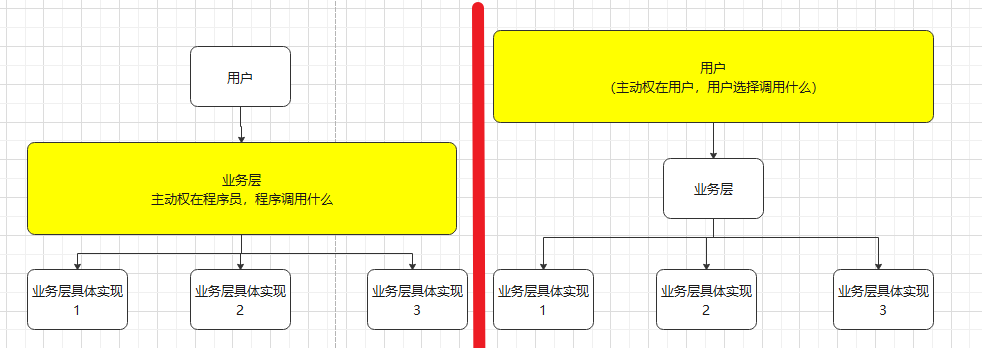
这个过程叫控制反转:
-
控制:谁来控制对象的创建,传统应用程序的对象是由程序本身控制创建的,使用Spring后,对象是由Spring来创建的
-
反转:程序本身不创建对象,而变成被动的接收对象
IOC创建对象的方式
-
使用无参构造创建对象,默认!
-
假设我们要使用有参构造创建对象
-
通过下标赋值
-
<bean id="hello" class="com.jmu.pojo.Hello">
    <constructor-arg index="0" value="你好" />
</bean>
-
-
直接通过参数名赋值
-
<bean id="hello" class="com.jmu.pojo.Hello">
    <constructor-arg name="name" value="nihao" />
</bean>
-
-
-
在配置文件加载的时候,容器中管理的对象就已经初始化了
Spring配置
别名 alias
<alias name="hello" alias="hello2" />
bean中name也可以取别名,而且还可以取多个别名
<bean id="hello" class="com.jmu.pojo.Hello" name="hello3,hello4">
    <constructor-arg name="name" value="nihao" />
</bean>
导入 imoport
import一般用于团队 开发使用,他可以将多个配置文件,导入合并为一个
假设,现在项目中有多个人开发,这三个人复制不同的类开发,不同的类需要注册在不同的bean中,我们可以利用import将所有人的beans.xml合并成一个,使用的时候直接使用总的配置就可以了
<import resource="bean1.xml" />
<import resource="bean2.xml" />
<import resource="bean3.xml" />
依赖注入
依赖:bean对象中的创建依赖于容器
注入:bean对象中的所有属性,由容器来注入
构造器注入
上面提到
Set方式注入【重点】
public class Student {
    private String name;
    private Hello hello;
    private String[] books;
    private List<String> hobby;
    private Map<String,String> card;
    private Set<String> games;
    private Properties info;
    .....
<bean id="stu" class="com.jmu.pojo.Student" >
        <!--    普通值注入 value-->
        <property name="name" value="张三" />
        <!--    Bean注入 ref-->
        <property name="hello" ref="hello" />
        <!--        数组-->
        <property name="books">
            <list>
                <value>《小王子》</value>
                <value>《诗经》</value>
            </list>
        </property>
        <!--        Map-->
        <property name="card">
            <map>
                <entry key="sno" value="s1001"/>
                <entry key="cno" value="c1001" />
            </map>
        </property>
        <!--        set-->
        <property name="games">
            <set>
                <value>掷骰子</value>
                <value>飞行棋</value>
            </set>
        </property>
        <property name="hobby">
            <list>
                <value>徒步</value>
                <value>看书</value>
            </list>
        </property>
        <property name="info">
            <props>
                <prop key="driver">administrator@example.org</prop>
                <prop key="username">support@example.org</prop>
                <prop key="password">development@example.org</prop>
            </props>
        </property>
    </bean>
bean作用域
单例模式(Spring默认)
Student stu1 = (Student) context.getBean("stu");
Student stu2 = (Student) context.getBean("stu");
stu1.setName("修改姓名");
System.out.println(stu2.getName());//修改姓名
System.out.println(stu1==stu2);//true
原型模式
每次从容器中get都会产生新的对象
<bean id="stu" class="com.jmu.pojo.Student" scope="prototype">
bean的自动装配
没有使用自动装配,就需要
<bean id="dog" class="com.jmu.pojo.Dog">
    </bean>
    <bean id="cat" class="com.jmu.pojo.Cat">
    </bean>

<bean id="people" class="com.jmu.pojo.People">
    <property name="cat" ref="cat"/>
    <property name="dog" ref="dog"/>
</bean>
ByType自动装配
会在容器 上下文查询,和自己对象Set方法类型一样
<bean id="dog" class="com.jmu.pojo.Dog">
</bean>
<bean id="cat" class="com.jmu.pojo.Cat">
</bean>
<bean id="people" class="com.jmu.pojo.People" autowire="byType">
</bean>
ByName自动装配
- 会在容器上下文中查询,和自己对象Set方法后面的值一样
- byname,需要保证所有bean的id唯一,并且这个bean需要和自动注入的属性的set方法的值一致
<bean id="dog" class="com.jmu.pojo.Dog">
</bean>
<bean id="cat" class="com.jmu.pojo.Cat">
</bean>

<bean id="people" class="com.jmu.pojo.People" autowire="byName">
</bean>
使用注解实现自动装配(重要)
在spring4之后,要使用注解开发,必须要导入aop包
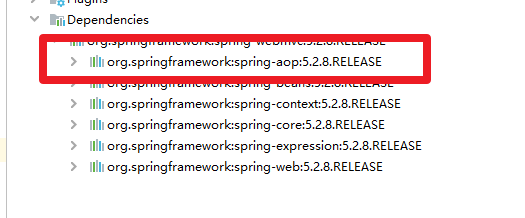
目前这个是有包含的
<dependency>
    <groupId>org.springframework</groupId>
    <artifactId>spring-webmvc</artifactId>
    <version>5.2.8.RELEASE</version>
</dependency>
要使用注解须知
- 导入约束 3行
- 配置注解的支持
<context:annotation-config/> - 官网注解链接
<?xml version="1.0" encoding="UTF-8"?>
<beans xmlns="http://www.springframework.org/schema/beans"
    xmlns:xsi="http://www.w3.org/2001/XMLSchema-instance"
    xmlns:context="http://www.springframework.org/schema/context"
    xsi:schemaLocation="http://www.springframework.org/schema/beans
        https://www.springframework.org/schema/beans/spring-beans.xsd
        http://www.springframework.org/schema/context
        https://www.springframework.org/schema/context/spring-context.xsd">

    <context:annotation-config/>

</beans>
@Autowired
直接在属性上使用即可
public class People {
    @Autowired
    private Cat cat;
    ...
如果@Autowired自动装配环境比较复杂,自动装配无法通过@Autowired完成的时候,我们可以使用@Qualifier(value = "dog1")去配置@Autowired的使用,指定一个唯一的bean对象注入
@Autowired
@Qualifier(value = "dog1")
private Dog dog;
使用注解开发bean
注解说明
@Component 装配bean
//等价于<bean id="user" class="com.jmu.pojo.User">
//@Component 组件
@Component
public class User {
    public String name="DJ";

}
@Component的衍生注解(效果和@Component一样),我们在web开发中,会按照mvc三层架构分层!
| 层 | 注解 |
|---|---|
| dao | @Repository |
| service | @Service |
| controller | @Controller |
@Autowired 自动装配
见上
@Value 属性注入
public class User {
    //等价于public String name="DJ Value";
    //<property name="name" value="DJ Value" />
    //@Value 组件
    @Value("DJ Value")
    public String name;
}
@Value("DJ Value")
public void setName(String name) {
    this.name = name;
}
@Scope 作用域
prototype singleton
@Scope("singleton")
@Component
public class User {
小结
- xml和注解
- xml更加万能,适用任何场合,维护简单方便
- 注解 不是自己的类适用不了,维护复杂
- xml和注解最佳实践
- xml用来管理bean
- 注解 只负责属性的注入
使用JavaConfig配置Spring
完全不使用Spring的xml配置,全权交给java来做
javaConfig是Spring的一个子项目,在Spring4之后,它成为一个核心功能
配置类
package com.jmu.config;


import com.jmu.pojo.User;
import org.springframework.context.annotation.Bean;
import org.springframework.context.annotation.Configuration;

@Configuration
public class Myconfig {
    //方法名   相当于bean标签的id属性
    //返回值   相当于bean标签的class属性
    @Bean
    public User getUser() {
        return new User();
    }
}
实体类
package com.jmu.pojo;
import org.springframework.beans.factory.annotation.Value;

public class User {
    private String name;
    public String getName() {
        return name;
    }
    @Value("名字")
    public void setName(String name) {
        this.name = name;
    }
    @Override
    public String toString() {
        return "User{" +
                "name='" + name + '\'' +
                '}';
    }
}
测试类
import org.springframework.context.ApplicationContext;
import org.springframework.context.annotation.AnnotationConfigApplicationContext;

public class Test {
    public static void main(String[] args) {
        ApplicationContext context=new AnnotationConfigApplicationContext(com.jmu.config.Myconfig.class);
        System.out.println(context.getBean("getUser"));
    }
}
代理模式
为什么要学习代理模式?
因为这就里SpringAOP的底层
分类
- 静态代理
- 动态代理
静态代理
角色分析
| 例子 | ||
|---|---|---|
| 抽象角色 | 一般使用接口或抽象类解决 | 租房 |
| 真实角色 | 被代理的角色 | 房东 |
| 代理角色 | 代理真实角色,一般会有一些附属操作 | 中介 |
| 客户 | 访问代理对象的人 |
步骤
- 接口
public interface Rent {
    void rent();
}
- 真实角色
public class Host implements Rent {
    public void rent() {
        System.out.println("房东出租房子");
    }
}
- 代理角色
public class Proxy {
    private Host host;
    public Proxy(Host host) {
        this.host = host;
    }
    public void rent(){
        seeHouse();
        host.rent();
    }
    //看房
    public void seeHouse(){
        System.out.println("中介代理带你看房");
    }
}
- 客户
public class Client {
    public static void main(String[] args) {
        Host host = new Host();
        //host.rent();
        Proxy proxy = new Proxy(host);
        proxy.rent();
    }
}
优点
- 可以使真实角色更加纯粹!不用去关注一些公共业务
- 公共就交给代理角色,实现业务的分工
缺点
- 一个真实角色就会产生一个代理角色 ,代码量翻倍,开发效率降低
动态代理
-
动态代理和静态代理角色一样
-
动态代理的代理类是动态生成的,不是我们直接写好的
-
动态代理分为两大类:基于接口的动态代理,基于类的动态代理
- 基于接口——JDK动态代理(下面的例子)
- 基于类——cglib
- java字节码实现——javasist
需要了解两个类:
- Proxy 代理类
- InvocationHandler 调用处理程序
步骤
接口
public interface Rent {
    void rent();
}
真实对象
public class Host implements Rent {
    public void rent() {
        System.out.println("房东出租房子");
    }
}
InvocationHandler
package com.jmu;

import java.lang.reflect.InvocationHandler;
import java.lang.reflect.Method;
import java.lang.reflect.Proxy;

public class PInvocationHandler implements InvocationHandler {
    //被代理的接口
    private Rent rent;
    public void setRent(Rent rent) {
        this.rent = rent;
    }

    //生成得到代理类
    public Object getProxy(){
        return Proxy.newProxyInstance(this.getClass().getClassLoader(),
                rent.getClass().getInterfaces(),this);
    }

    //处理代理实例,并返回结果
    public Object invoke(Object proxy, Method method, Object[] args) throws Throwable {
        log(method.getName());
        seeHouse();
        Object result = method.invoke(rent,args);
        return result;
    }

    public void seeHouse(){
        System.out.println("中介带你看房");
    }
    public void log(String msg){
        System.out.println("执行了"+msg+"方法");
    }
}
客户
public class Client {
    public static void main(String[] args) {
        //真实角色
        Host host = new Host();
        //代理角色 还没有生成
        PInvocationHandler pih = new PInvocationHandler();
        //通过调用程序处理角色来处理我们要调用的接口对象
        pih.setRent(host);
        //动态生成
        Rent proxy = (Rent) pih.getProxy();

        proxy.rent();

    }
}
使用Spring实现AOP
[重点]使用AOP织入,需要导入一个依赖包
<dependency>
    <groupId>org.aspectj</groupId>
    <artifactId>aspectjweaver</artifactId>
    <version>1.9.5</version>
</dependency>
execution()理解
例如定义切入点表达式
execution (* com.sample.service.impl..*. *(..))
execution()是最常用的切点函数,其语法如下所示:
整个表达式可以分为五个部分:
1、execution(): 表达式主体。
2、第一个*号:表示返回类型, *号表示所有的类型
4、第二个*号:表示类名,*号表示所有的类
5、*(..):最后这个星号表示方法名,*号表示所有的方法,后面括弧里面表示方法的参数,两个句点表示任何参数
方式一:使用Spring的API接口
配置文件applicationContext.xml
<bean id="userService" class="com.jmu.service.UserServiceImpl" />
<bean id="beforelog" class="com.jmu.log.BeforeLog" />
<bean id="afterlog" class="com.jmu.log.AfterLog" />

<!--    配置aop 需要导入aop配置-->
    <aop:config>
<!--    切入点 expression表达式 execution(要执行的位置)-->
        <aop:pointcut id="pointcut" expression="execution(* com.jmu.service.UserServiceImpl.*(..))"/>
<!--    执行环绕增加-->
        <aop:advisor advice-ref="beforelog" pointcut-ref="pointcut"/>
        <aop:advisor advice-ref="afterlog" pointcut-ref="pointcut"/>

    </aop:config>
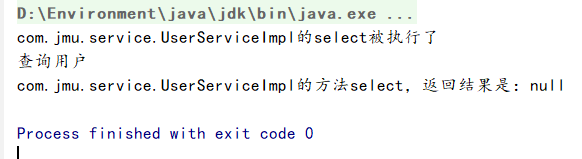
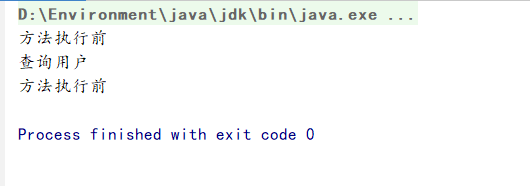
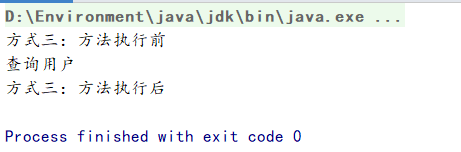
测试
public static void main(String[] args) {
    ApplicationContext context=new ClassPathXmlApplicationContext("applicationContext.xml");
    UserService userService = (UserService)context.getBean("userService");
    userService.select();
}
方式二:使用自定义类实现AOP
自定义类
public class LogAll {
    public void before(){
        System.out.println("方法执行前");
    }
    public void after(){
        System.out.println("方法执行前");
    }
}
配置文件
<aop:config>
<!--        自定义切面 ref 要引用的类-->
        <aop:aspect ref="logall">
<!--            切入点-->
            <aop:pointcut id="point" expression="execution(* com.jmu.service.UserServiceImpl.*(..)) "/>
<!--            通知-->
            <aop:before method="before" pointcut-ref="point" />
            <aop:after method="after" pointcut-ref="point" />
        </aop:aspect>
    </aop:config>
测试同上,结果
方式三:使用注解实现AOP
配置文件
<!--注册Bean-->
    <bean id="annotationPointCut" class="com.jmu.log.AnnotationPointCut" />
<!--    开启注解支持-->
    <aop:aspectj-autoproxy />
@Aspect //标注这个类是一个切面
public class AnnotationPointCut {
    @Before("execution(* com.jmu.service.UserServiceImpl.*(..))")
    public void before(){
        System.out.println("方式三:方法执行前");
    }
    @After("execution(* com.jmu.service.UserServiceImpl.*(..))")
    public void after(){
        System.out.println("方式三:方法执行后");
    }
}
整合Mybatis
- 导入相关的jar包
- 之前的mybatis那些包
- mybatis-spring.jar包
- Spring操作数据库包

上面选择版本
| MyBatis-Spring | MyBatis | Spring |
|---|---|---|
| 1.3.2 | 3.5.5 | 5.2.8 |
<dependency>
    <groupId>org.mybatis</groupId>
    <artifactId>mybatis</artifactId>
    <version>3.5.5</version>
</dependency>
<dependency>
    <groupId>mysql</groupId>
    <artifactId>mysql-connector-java</artifactId>
    <version>5.1.47</version>
</dependency>
<dependency>
    <groupId>junit</groupId>
    <artifactId>junit</artifactId>
    <version>4.11</version>
</dependency>
<!--Spring操作数据库 需要添加一个spring-jdbc-->
<dependency>
    <groupId>org.springframework</groupId>
    <artifactId>spring-jdbc</artifactId>
    <version>5.2.7.RELEASE</version>
</dependency>
<!--Spring-mybatis整合包-->
<dependency>
    <groupId>org.mybatis</groupId>
    <artifactId>mybatis-spring</artifactId>
    <version>1.3.2</version>
</dependency>
<dependency>
    <groupId>org.springframework</groupId>
    <artifactId>spring-webmvc</artifactId>
    <version>5.2.8.RELEASE</version>
</dependency>
<dependency>
    <groupId>org.aspectj</groupId>
    <artifactId>aspectjweaver</artifactId>
    <version>1.9.5</version>
</dependency>
方式一:使用SqlSessionTemplate整合
- 导入包
- 连接数据库
- 编写mybatis配置文件
mybatis-config.xml
<?xml version="1.0" encoding="UTF8" ?>
<!DOCTYPE configuration
        PUBLIC "-//mybatis.org//DTD Config 3.0//EN"
        "http://mybatis.org/dtd/mybatis-3-config.dtd">
<!--        configuration核心配置文件-->
<configuration>
</configuration>
- 写实体类
public class User {
    private int auto_id;
    private String username;
    private String password;
    private int age;
    ....
- 编写接口
com.jmu.pojo.mapper.userMapper
public interface UserMapper {
    List<User> getAll();
}
- 编写接口配置文件
UserMapper.xml
<?xml version="1.0" encoding="UTF-8" ?>
<!DOCTYPE mapper
        PUBLIC "-//mybatis.org//DTD Mapper 3.0//EN"
        "http://mybatis.org/dtd/mybatis-3-mapper.dtd">
<mapper namespace="com.jmu.mapper.UserMapper">
    <select id="getAll" resultType="com.jmu.pojo.User">
        select * from user
    </select>
</mapper>
- 编写UserMapper实现类
package com.jmu.mapper;

import com.jmu.pojo.User;
import org.mybatis.spring.SqlSessionTemplate;

import java.util.List;

public class UserMapperImpl implements UserMapper {

    //原来,我们的所有操作都使用SqlSession来执行
    //现在,都使用sqlSessionTemplate
    private SqlSessionTemplate  sqlSessionTemplate;

    public List<User> getAll() {
        UserMapper userMapper = sqlSessionTemplate.getMapper(UserMapper.class);
        return userMapper.getAll();
    }

    public SqlSessionTemplate getSqlSessionTemplate() {
        return sqlSessionTemplate;
    }

    public void setSqlSessionTemplate(SqlSessionTemplate sqlSessionTemplate) {
        this.sqlSessionTemplate = sqlS
            essionTemplate;
    }
}
- 编写Spring配置文件
spring-dao.xml
<?xml version="1.0" encoding="UTF8"?>
<beans xmlns="http://www.springframework.org/schema/beans"
xmlns:xsi="http://www.w3.org/2001/XMLSchema-instance"
xmlns:aop="http://www.springframework.org/schema/aop"
xsi:schemaLocation="http://www.springframework.org/schema/beans
https://www.springframework.org/schema/beans/spring-beans.xsd
http://www.springframework.org/schema/aop
https://www.springframework.org/schema/aop/spring-aop.xsd">
<!-- DataSource 使用Spring的数据源 替换mybatis的配置 c3p0 dbcp druid
我们这里使用Spring提供的JDBC: org.springframework,jdbc.datasource
-->
<bean id="dataSource" class="org.springframework.jdbc.datasource.DriverManagerDataSource">
<property name="driverClassName" value="com.mysql.jdbc.Driver"/>
<property name="url" value="jdbc:mysql://localhost:3306/demo?serverTimezone=GMT&useUnicode=true&characterEncoding=utf8&useSSL=true"/>
<property name="username" value="root"/>
<property name="password" value="123456"/>
</bean>
<!-- <sqlSessionFactory-->
<bean id="sqlSessionFactory" class="org.mybatis.spring.SqlSessionFactoryBean">
<property name="dataSource" ref="dataSource" />
<!-- 绑定Mybatis配置文件-->
<property name="configLocation" value="classpath:mybatis-config.xml" />
<property name="mapperLocations" value="classpath:com/jmu/mapper/*.xml"/>
</bean>
<!-- 开启注解支持-->
<aop:aspectj-autoproxy />
<!-- SqlSessionTemplate就是我们使用的sqlSession-->
<bean id="sqlSession" class="org.mybatis.spring.SqlSessionTemplate">
<!-- 只能使用构造器注入sqlSessionFactory 因为他没有SetSqlSessionFactory方法-->
<constructor-arg index="0" ref="sqlSessionFactory" />
</bean>
</beans>
- 配置文件
applicationContext.xml
<?xml version="1.0" encoding="UTF8"?>
<beans xmlns="http://www.springframework.org/schema/beans"
       xmlns:xsi="http://www.w3.org/2001/XMLSchema-instance"
       xmlns:aop="http://www.springframework.org/schema/aop"
       xsi:schemaLocation="http://www.springframework.org/schema/beans
        https://www.springframework.org/schema/beans/spring-beans.xsd
        http://www.springframework.org/schema/aop
        https://www.springframework.org/schema/aop/spring-aop.xsd">
    <import resource="spring-dao.xml"/>

    <bean id="userMapper" class="com.jmu.mapper.UserMapperImpl">
        <property name="sqlSessionTemplate" ref="sqlSession" />
    </bean>
</beans>
- 测试
public class MyTest {
    public static void main(String[] args) throws IOException {
        ApplicationContext context=new ClassPathXmlApplicationContext("applicationContext.xml");
        UserMapper mapper = context.getBean("userMapper",UserMapper.class);
        List<User> all=mapper.getAll();
        for (User user : all) {
            System.out.println(user);
        }
    }
}
方式二:使用SqlSessionDaoSupport(了解)
SqlSessionDaoSupport 是一个抽象的支持类,用来为你提供 SqlSession。调用 getSqlSession() 方法你会得到一个 SqlSessionTemplate,之后可以用于执行 SQL 方法
package com.jmu.mapper;

import com.jmu.pojo.User;
import org.mybatis.spring.support.SqlSessionDaoSupport;

import java.util.List;

public class UserMapperImpl2 extends SqlSessionDaoSupport implements UserMapper{
    public List<User> getAll() {
        UserMapper userMapper = getSqlSession().getMapper(UserMapper.class);
        return userMapper.getAll();
    }
}
applicationContext.xml注册Bean
<bean id="userMapper" class="com.jmu.mapper.UserMapperImpl2">
    <property name="sqlSessionFactory" ref="sqlSessionFactory" />
</bean>
声明式事务
一个使用 MyBatis-Spring 的其中一个主要原因是它允许 MyBatis 参与到 Spring 的事务管理中。而不是给 MyBatis 创建一个新的专用事务管理器,MyBatis-Spring 借助了 Spring 中的 DataSourceTransactionManager 来实现事务管理。
一旦配置好了 Spring 的事务管理器,你就可以在 Spring 中按你平时的方式来配置事务。并且支持 @Transactional 注解和 AOP 风格的配置。在事务处理期间,一个单独的 SqlSession 对象将会被创建和使用。当事务完成时,这个 session 会以合适的方式提交或回滚。
事务配置好了以后,MyBatis-Spring 将会透明地管理事务。这样在你的 DAO 类中就不需要额外的代码了。
标准配置
要开启 Spring 的事务处理功能,在 Spring 的配置文件中创建一个 DataSourceTransactionManager 对象:
applicationContext.xml
<!--配置声明式事务-->
<bean id="transactionManager" class="org.springframework.jdbc.datasource.DataSourceTransactionManager">
  <constructor-arg ref="dataSource" />
</bean>
导入约束 3行(tx)
xmlns:tx="http://www.springframework.org/schema/tx"
http://www.springframework.org/schema/tx
https://www.springframework.org/schema/tx/spring-tx.xsd
<!--    结合AOP实现事务的织入-->
<!--    配置事务的通知-->
    <tx:advice id="txAdvice" transaction-manager="" >
<!--        给那些方法配置配置-->
        <tx:attributes>
<!--        所有方法-->
            <tx:method name="*"/>
        </tx:attributes>
    </tx:advice>

<!--    配置事务切入 -->
    <aop:config>
<!--        mapper下面的所有类 所有方法-->
        <aop:pointcut id="txPointCut" expression="execution(* com.jmu.mapper.*.*(..))"/>
        <aop:advisor advice-ref="txAdvice" pointcut-ref="txPointCut" />
     </aop:config>

 浙公网安备 33010602011771号