2020SDN实验 4:Open vSwitch 实验——Mininet 中使用 OVS 命令
一、实验目的
Mininet 安装之后,会连带安装 Open vSwitch,可以直接通过 Python 脚本调用Open vSwitch 命令,从而直接控制
Open vSwitch,通过实验了解调用控制的方法。
二、实验要求
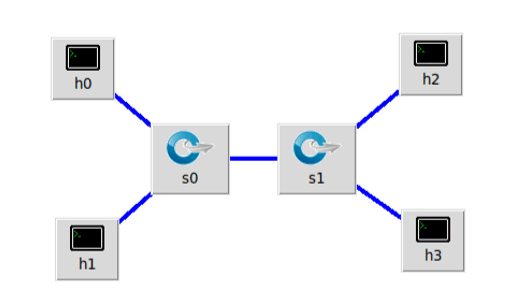
1. 学习 ovsSingleBr.py 和 ovsMultiBr.py,在下图拓扑中实现一个 VLAN。
创建流表
    print switch0.cmd(r'ovs-ofctl -O OpenFlow13 add-flow dp0 priority=1,in_port=1,actions=push_vlan:0x8100,set_field:4096-\>vlan_vid,output:3')
    print switch0.cmd(r'ovs-ofctl -O OpenFlow13 add-flow dp0 priority=1,in_port=2,actions=push_vlan:0x8100,set_field:4097-\>vlan_vid,output:3')
    print switch0.cmd(r'ovs-ofctl -O OpenFlow13 add-flow dp0 priority=1,dl_vlan=0,actions=pop_vlan,output:1')
    print switch0.cmd(r'ovs-ofctl -O OpenFlow13 add-flow dp0 priority=1,dl_vlan=1,actions=pop_vlan,output:2')
    print switch1.cmd(r'ovs-ofctl -O OpenFlow13 add-flow dp1 priority=1,in_port=1,actions=push_vlan:0x8100,set_field:4096-\>vlan_vid,output:3')
    print switch1.cmd(r'ovs-ofctl -O OpenFlow13 add-flow dp1 priority=1,in_port=2,actions=push_vlan:0x8100,set_field:4097-\>vlan_vid,output:3')
    print switch1.cmd(r'ovs-ofctl -O OpenFlow13 add-flow dp1 priority=1,dl_vlan=0,actions=pop_vlan,output:1')
    print switch1.cmd(r'ovs-ofctl -O OpenFlow13 add-flow dp1 priority=1,dl_vlan=1,actions=pop_vlan,output:2')
测试vlan
$   h0.cmdPrint('ping -Q 0x10 -c 3 ' + h1.IP())
$    h0.cmdPrint('ping -Q 0x20 -c 3 ' + h2.IP())
$   h0.cmdPrint('ping -Q 0x30 -c 3 ' + h3.IP())
$    h1.cmdPrint('ping -Q 0x40 -c 3 ' + h2.IP())
$    h1.cmdPrint('ping -Q 0x50 -c 3 ' + h3.IP())
$    h2.cmdPrint('ping -Q 0x60 -c 3 ' + h3.IP())
上述代码将 h0 和 h2 划分在 VLAN 0 中,h1 和 h3 划分在 VLAN 1 中,由于拓扑没有控制器,并且初始化时删除了交换机中的所有流表,因此除非下发流表,否则主机之间网络无法连通。请尝试修改代码,利用 ovs 命令直接下发 VLAN 设置的流表项,最终测试h0和h2互通,h1和h3互通,其余主机均不通。
OVS 实现 VLAN 可参考博客:https://www.cnblogs.com/fjlinww/p/11791846.html
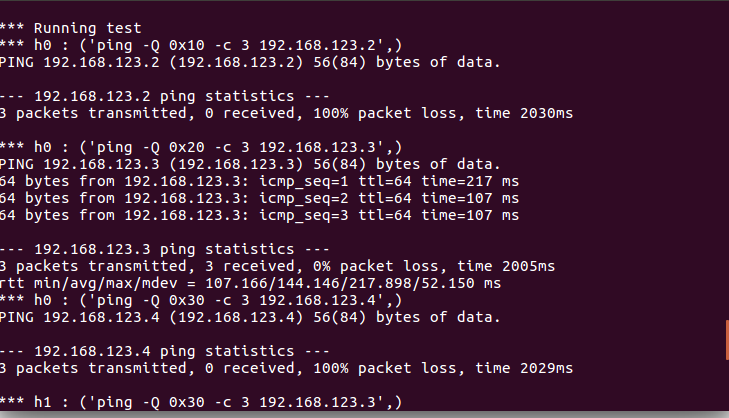
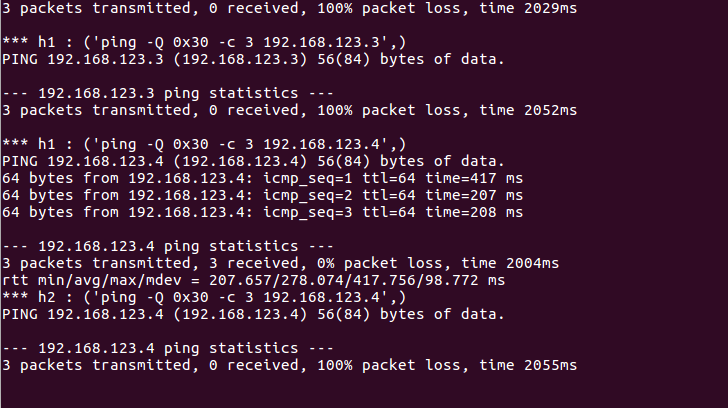
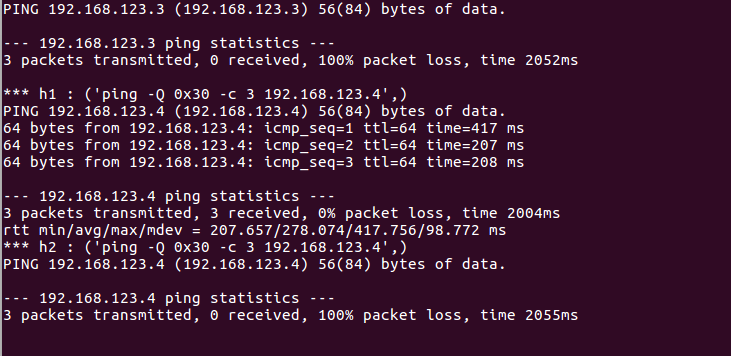
结果如下图所示:


 浙公网安备 33010602011771号