01-Shiro
一、简介
Apache Shiro 是 Java 的一个安全(权限)框架。
Shiro 可以非常容易的开发出足够好的应用,其不仅可以用在 JavaSE 环境,也可以用在 JavaEE 环境。
Shiro 可以完成:认证、授权、加密、会话管理、与Web 集成、缓存 等。
下载:http://shiro.apache.org/
功能简介
基本功能点如下图所示:
功能简介
Authentication:身份认证/登录,验证用户是不是拥有相应的身份;
Authorization:授权,即权限验证,验证某个已认证的用户是否拥有某个权限;即判断用 户是否能进行什么操作,如:验证某个用户是否拥有某个角色。或者细粒度的验证某个用户对某个资源是否具有某个权限;
Session Manager:会话管理,即用户登录后就是一次会话,在没有退出之前,它的所有 信息都在会话中;会话可以是普通 JavaSE 环境,也可以是 Web 环境的;
Cryptography:加密,保护数据的安全性,如密码加密存储到数据库,而不是明文存储;
Web Support:Web 支持,可以非常容易的集成到Web 环境;
Caching:缓存,比如用户登录后,其用户信息、拥有的角色/权限不必每次去查,这样可 以提高效率;
Concurrency:Shiro 支持多线程应用的并发验证,即如在一个线程中开启另一个线程,能 把权限自动传播过去;
Testing:提供测试支持;
Run As:允许一个用户假装为另一个用户(如果他们允许)的身份进行访问;
Remember Me:记住我,这个是非常常见的功能,即一次登录后,下次再来的话不用登录了。
Shiro 架构(Shiro外部来看)
从外部来看Shiro ,即从应用程序角度的来观察如何使用 Shiro 完成工作: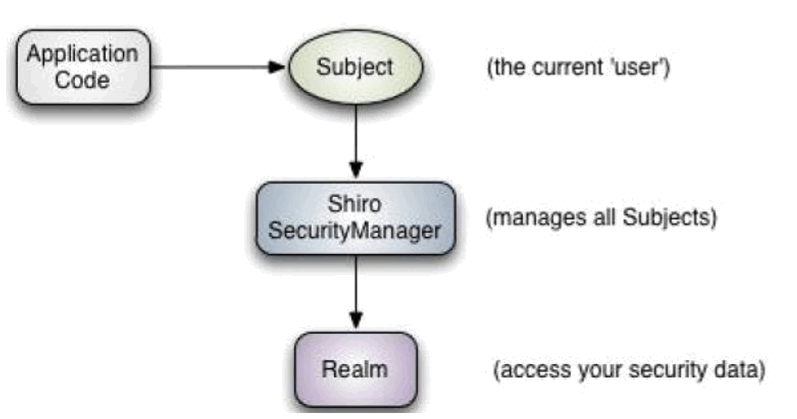
Shiro 架构
Subject:应用代码直接交互的对象是 Subject,也就是说 Shiro 的对外 API 核心就是 Subject。Subject 代表了当前“用户”, 这个用户不一定是一个具体的人,与当前应用交互的任何东西都是 Subject,如网络爬虫, 机器人等;与 Subject 的所有交互都会委托给 SecurityManager; Subject 其实是一个门面,SecurityManager 才是实际的执行者;
SecurityManager:安全管理器;即所有与安全有关的操作都会与 SecurityManager 交互;且其管理着所有 Subject;可以看出它是 Shiro 的核心,它负责与 Shiro 的其他组件进行交互,它相当于 SpringMVC 中 DispatcherServlet 的角色
Realm:Shiro 从 Realm 获取安全数据(如用户、角色、权限),就是说 SecurityManager 要验证用户身份,那么它需要从 Realm 获取相应的用户进行比较以确定用户身份是否合法;也需要从 Realm 得到用户相应的角色/ 权限进行验证用户是否能进行操作;可以把 Realm 看成 DataSource。
Shiro 架构(Shiro内部来看)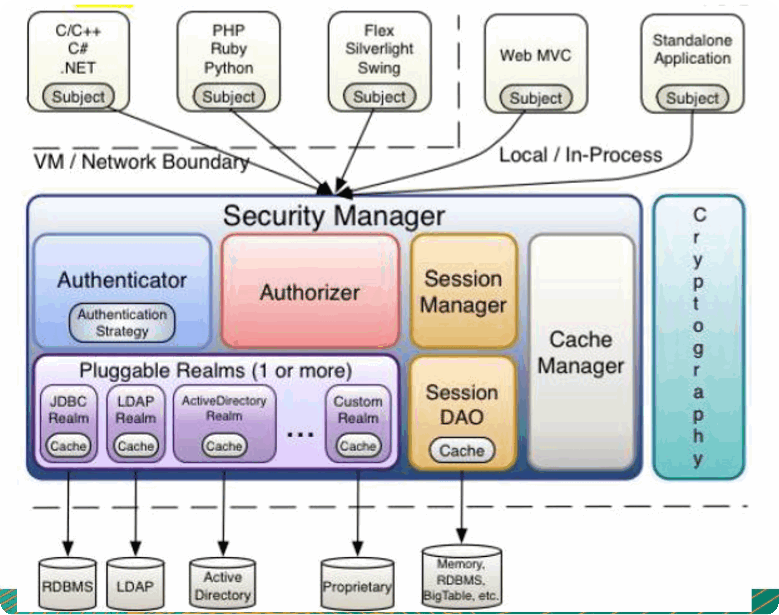
Shiro 架构
Subject:任何可以与应用交互的“用户”;
SecurityManager :相当于SpringMVC 中的 DispatcherServlet;是 Shiro 的心脏; 所有具体的交互都通过 SecurityManager 进行控制;它管理着所有 Subject、且负责进 行认证、授权、会话及缓存的管理。
Authenticator:负责 Subject 认证,是一个扩展点,可以自定义实现;可以使用认证 策略(Authentication Strategy),即什么情况下算用户认证通过了;
Authorizer:授权器、即访问控制器,用来决定主体是否有权限进行相应的操作;即控 制着用户能访问应用中的哪些功能;
Realm:可以有 1 个或多个 Realm,可以认为是安全实体数据源,即用于获取安全实体 的;可以是JDBC 实现,也可以是内存实现等等;由用户提供;所以一般在应用中都需要 实现自己的Realm。
SessionManager:管理 Session 生命周期的组件;而 Shiro 并不仅仅可以用在 Web 环境,也可以用在如普通的 JavaSE 环境 。
CacheManager:缓存控制器,来管理如用户、角色、权限等的缓存的;因为这些数据 基本上很少改变,放到缓存中后可以提高访问的性能。
Cryptography:密码模块,Shiro 提高了一些常见的加密组件用于如密码加密/解密。
二、集成Spring
与Web 集成
Shiro 提供了与 Web 集成的支持,其通过一个 ShiroFilter 入口来拦截需要安全控制的URL,然后进行相应的控制。
ShiroFilter 类似于如 Strut2/SpringMVC 这种 web 框架的前端控制器,是安全控制的入口点,其负责读取配置(如 ini 配置文件),然后判断URL 是否需要登录/权限等工作。
ShiroFilter 的工作原理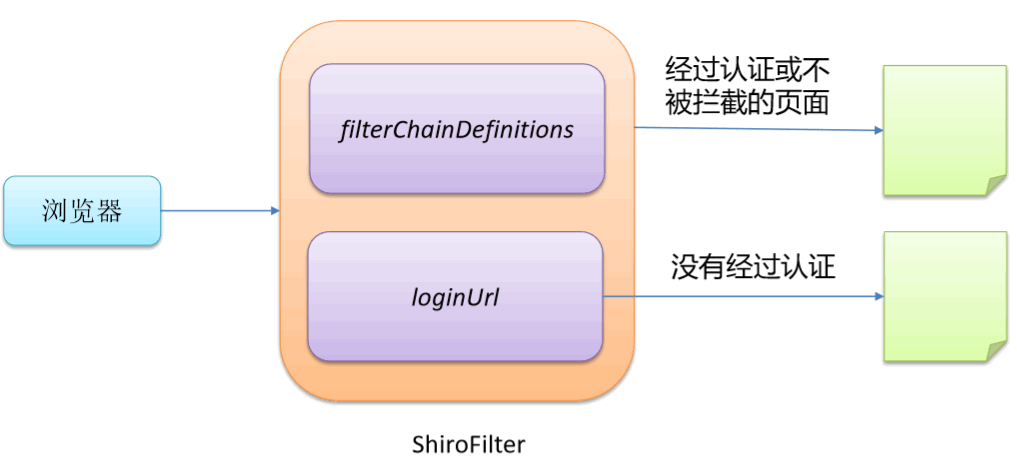
————————————————————————————————
在web.xml中配置了 shiroFilter 且filterMMapping 是/*,那么表示所有的 请求都会被拦截到。那么。如果访问的路径在 filterChainDefinitions 中没有定义的,或者是设置可以匿名访问的,那么就可以访问到访问路径中的页面。不然,会被重定向到 loginUrl 。
applicationContxt.xml
<property name="filterChainDefinitions">
    <value>
        /login.jsp = anon
        /shiro/login = anon
        /shiro/logout = logout

        /user.jsp = roles[user]
        /admin.jsp = roles[admin]

        # everything else requires authentication:
        /** = authc
    </value>
</property>
<!-- Shiro Filter is defined in the spring application context: -->
    <!--
    1. 配置  Shiro 的 shiroFilter.
    2. DelegatingFilterProxy 实际上是 Filter 的一个代理对象. 默认情况下, Spring 会到 IOC 容器中查找和
    <filter-name> 对应的 filter bean. 也可以通过 targetBeanName 的初始化参数来配置 filter bean 的 id.
    -->
    <filter>
        <filter-name>shiroFilter</filter-name>
        <filter-class>org.springframework.web.filter.DelegatingFilterProxy</filter-class>
        <init-param>
            <param-name>targetFilterLifecycle</param-name>
            <param-value>true</param-value>
        </init-param>
    </filter>

    <filter-mapping>
        <filter-name>shiroFilter</filter-name>
        <url-pattern>/*</url-pattern>
    </filter-mapping>
部分细节
[urls] 部分的配置,其格式是: “url=拦截器[参数],拦截 器[参数]”;
如果当前请求的 url 匹配 [urls] 部分的某个 url 模式,将会 执行其配置的拦截器。
anon(anonymous) 拦截器表示匿名访问(即不需要登 录即可访问)
authc(authentication)拦截器表示需要身份认证通过后 才能访问。
applicationContext.xml
<bean id="shiroFilter" class="org.apache.shiro.spring.web.ShiroFilterFactoryBean">
    <property name="securityManager" ref="securityManager"/>
    <property name="loginUrl" value="/login.jsp"/>  被拦截后访问的路径。
    <property name="successUrl" value="/list.jsp"/>  访问成功后跳转的路径。
    <property name="unauthorizedUrl" value="/unauthorized.jsp"/>

    <property name="filterChainDefinitionMap" ref="filterChainDefinitionMap"></property>

    <!--
        配置哪些页面需要受保护.
        以及访问这些页面需要的权限.
        1). anon 可以被匿名访问
        2). authc 必须认证(即登录)后才可能访问的页面.
        3). logout 登出.
        4). roles 角色过滤器
    -->
    <property name="filterChainDefinitions">
        <value>
            /login.jsp = anon

            # everything else requires authentication:
            /** = authc
        </value>
    </property>
    <!--
    <property name="filterChainDefinitions">
        <value>
            /login.jsp = anon
            /shiro/login = anon
            /shiro/logout = logout

            /user.jsp = roles[user]
            /admin.jsp = roles[admin]

            # everything else requires authentication:
            /** = authc
        </value>
    </property>
    -->
</bean>
其中设置的 bean shiroFiilter 必须和 web.xml中的是一致的。
否则会抛出 NoSuchBeanDefinitionExceptioon 异常。在上下文中没有这样的一个bean 被定义。
<filter-name>shiroFilter</filter-name>
<filter-class>org.springframework.web.filter.DelegatingFilterProxy</filter-class>
id 必须和 web.xml 文件中配置的 DelegatingFilterProxy 的 <filter-name> 一致。
若不一致, 则会抛出: NoSuchBeanDefinitionException. 因为 Shiro 会来 IOC 容器中查找和 <filter-name> 名字对应的 filter bean。
在org.springframework.web.filter.DelegatingFilterProxy 源码中
是Servlet 2.3 Filter 的一个代理对象。在IOC 容器中找实现了 Filter 接口的那个Bean。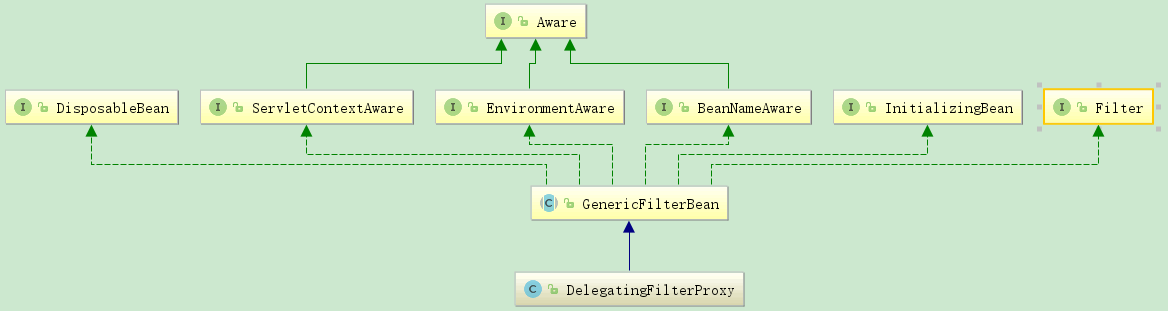
DelegatingFilterProxy 实际上是 Filter 的一个代理对象. 默认情况下, Spring 会到 IOC 容器中查找和
<filter-name> 对应的 filter bean. 也可以通过 targetBeanName 的初始化参数来配置 filter bean 的 id。
也可以自己进行指定:这时候 配置的bean shiroFilter 可以改成abc。
<filter>
    <filter-name>shiroFilter</filter-name>
    <filter-class>org.springframework.web.filter.DelegatingFilterProxy</filter-class>
    <init-param>
        <param-name>targetFilterLifecycle</param-name>
        <param-value>true</param-value>
    </init-param>
    <init-param>
        <param-name>targetBeanName</param-name>
        <param-value>abc</param-value>
    </init-param>
</filter>
在DelegatingFilterProxy 源码中:
public void setTargetBeanName(String targetBeanName) {
   this.targetBeanName = targetBeanName;
}
shiro中默认的过滤器(拦截器)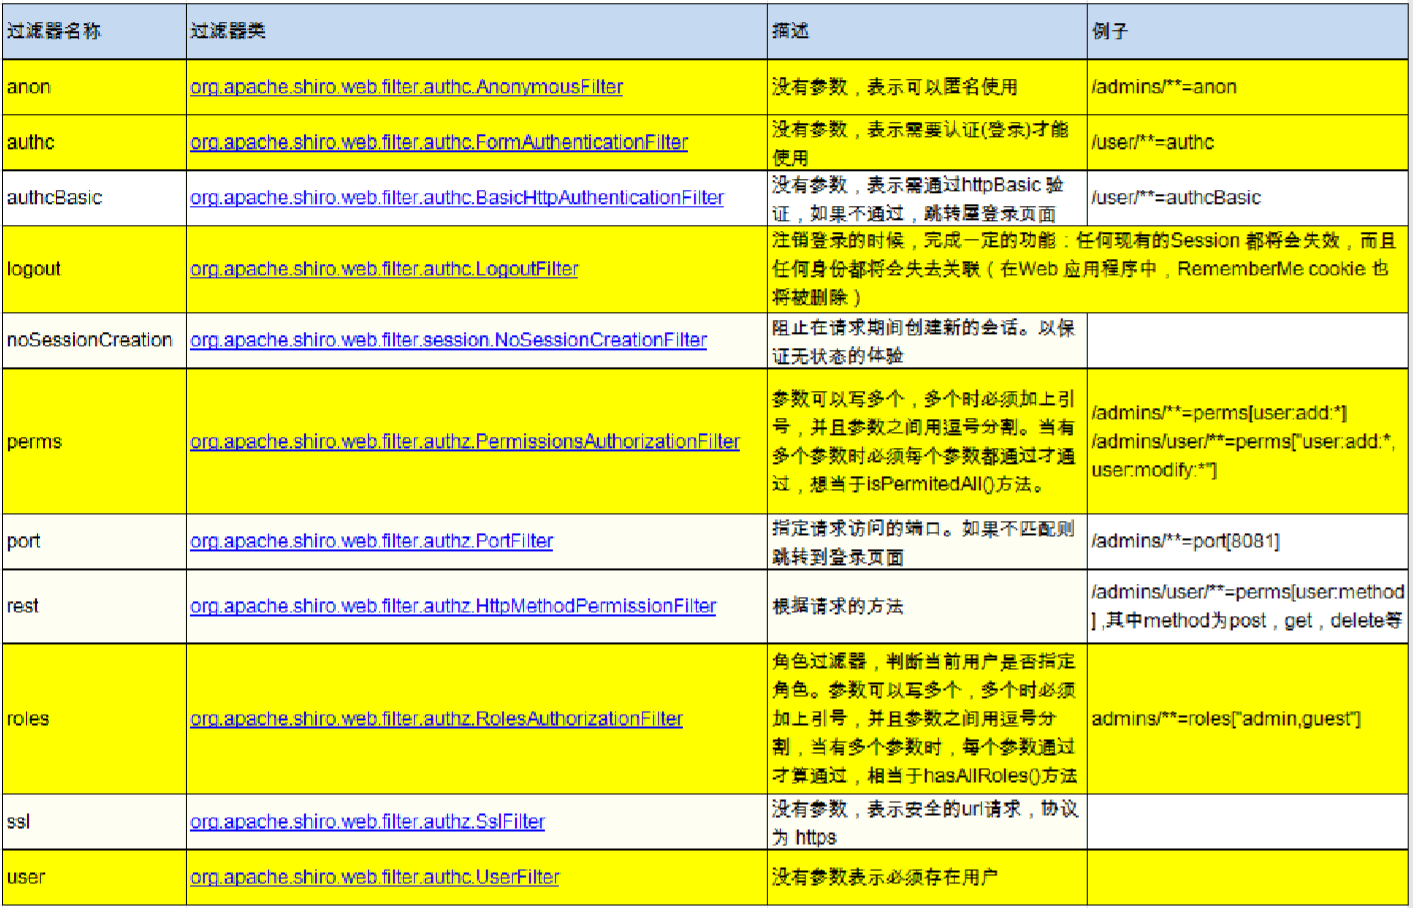
部分细节
[urls] 部分的配置,其格式是: “url=拦截器[参数],拦截器[参数]”;
如果当前请求的 url 匹配 [urls] 部分的某个 url 模式,将会 执行其配置的拦截器。
anon(anonymous) 拦截器表示匿名访问(即不需要登 录即可访问)
authc (authentication)拦截器表示需要身份认证通过后 才能访问。
配置的参数:
public void setFilterChainDefinitions(String definitions) {
        Ini ini = new Ini();
        ini.load(definitions);
        Section section = ini.getSection("urls");
        if (CollectionUtils.isEmpty(section)) {
            section = ini.getSection("");
        }

        this.setFilterChainDefinitionMap(section);
    }
URL 匹配模式
url 模式使用 Ant 风格模式
Ant 路径通配符支持 ?、*、**,注意通配符匹配不 包括目录分隔符“/”:
– ?:匹配一个字符,如 /admin? 将匹配 /admin1,但不匹配 /admin 或 /admin/;
– *:匹配零个或多个字符串,如 /admin 将匹配 /admin、 /admin123,但不匹配 /admin/1;
– **:匹配路径中的零个或多个路径,如 /admin/** 将匹配 /admin/a 或 /admin/a/b。

URL 匹配顺序 -->优先级问题。可以参见 Servlet 法拦截优先级。
URL 权限采取第一次匹配优先的方式,即从头开始使用第一个匹配的 url 模式对应的拦截器链。
如:
– /bb/**=filter1
– /bb/aa=filter2
– /**=filter3
– 如果请求的url是“/bb/aa”,因为按照声明顺序进行匹配,那么将使用 filter1 进行拦截。
第一次匹配优先的原则:那么此时的 list.jsp 就访问不了了。
<property name="filterChainDefinitions">
    <value>
        /login.jsp = anon

        # everything else requires authentication:
        /** = authc
        /list.jsp = anon
    </value>
</property>
三、认证
Shiro的架构,从外部来看
流程


#
# Licensed to the Apache Software Foundation (ASF) under one
# or more contributor license agreements.  See the NOTICE file
# distributed with this work for additional information
# regarding copyright ownership.  The ASF licenses this file
# to you under the Apache License, Version 2.0 (the
# "License"); you may not use this file except in compliance
# with the License.  You may obtain a copy of the License at
#
#     http://www.apache.org/licenses/LICENSE-2.0
#
# Unless required by applicable law or agreed to in writing,
# software distributed under the License is distributed on an
# "AS IS" BASIS, WITHOUT WARRANTIES OR CONDITIONS OF ANY
# KIND, either express or implied.  See the License for the
# specific language governing permissions and limitations
# under the License.
#
# =============================================================================
# Quickstart INI Realm configuration
#
# For those that might not understand the references in this file, the
# definitions are all based on the classic Mel Brooks' film "Spaceballs". ;)
# =============================================================================

# -----------------------------------------------------------------------------
# Users and their assigned roles
#
# Each line conforms to the format defined in the
# org.apache.shiro.realm.text.TextConfigurationRealm#setUserDefinitions JavaDoc
# -----------------------------------------------------------------------------
[users]
# user 'root' with password 'secret' and the 'admin' role
root = secret, admin
# user 'guest' with the password 'guest' and the 'guest' role
guest = guest, guest
# user 'presidentskroob' with password '12345' ("That's the same combination on
# my luggage!!!" ;)), and role 'president'
presidentskroob = 12345, president
# user 'darkhelmet' with password 'ludicrousspeed' and roles 'darklord' and 'schwartz'
darkhelmet = ludicrousspeed, darklord, schwartz
# user 'lonestarr' with password 'vespa' and roles 'goodguy' and 'schwartz'
lonestarr = vespa, goodguy, schwartz

# -----------------------------------------------------------------------------
# Roles with assigned permissions
#
# Each line conforms to the format defined in the
# org.apache.shiro.realm.text.TextConfigurationRealm#setRoleDefinitions JavaDoc
# -----------------------------------------------------------------------------
[roles]
# 'admin' role has all permissions, indicated by the wildcard '*'
admin = *
# The 'schwartz' role can do anything (*) with any lightsaber:
schwartz = lightsaber:*
# The 'goodguy' role is allowed to 'delete' (action) the user (type) with
# license plate 'zhangsan' (instance specific id)
goodguy = user:delete:zhangsan
/**
 * Simple Quickstart application showing how to use Shiro's API.
 *
 * @since 0.9 RC2
 */
public class Quickstart {

    private static final transient Logger log = LoggerFactory.getLogger(Quickstart.class);


    public static void main(String[] args) {

        // The easiest way to create a Shiro SecurityManager with configured
        // realms, users, roles and permissions is to use the simple INI config.
        // We'll do that by using a factory that can ingest a .ini file and
        // return a SecurityManager instance:

        // Use the shiro.ini file at the root of the classpath
        // (file: and url: prefixes load from files and urls respectively):
        Factory<SecurityManager> factory = new IniSecurityManagerFactory("classpath:shiro.ini");
        SecurityManager securityManager = factory.getInstance();

        // for this simple example quickstart, make the SecurityManager
        // accessible as a JVM singleton.  Most applications wouldn't do this
        // and instead rely on their container configuration or web.xml for
        // webapps.  That is outside the scope of this simple quickstart, so
        // we'll just do the bare minimum so you can continue to get a feel
        // for things.
        SecurityUtils.setSecurityManager(securityManager);

        // Now that a simple Shiro environment is set up, let's see what you can do:

        // get the currently executing user:
        // 获取当前的 Subject. 调用 SecurityUtils.getSubject();
        Subject currentUser = SecurityUtils.getSubject();

        // Do some stuff with a Session (no need for a web or EJB container!!!)
        // 测试使用 Session
        // 获取 Session: Subject#getSession()
        Session session = currentUser.getSession();
        session.setAttribute("someKey", "aValue");
        String value = (String) session.getAttribute("someKey");
        if (value.equals("aValue")) {
            log.info("---> Retrieved the correct value! [" + value + "]");
        }

        // let's login the current user so we can check against roles and permissions:
        // 测试当前的用户是否已经被认证. 即是否已经登录.
        // 调动 Subject 的 isAuthenticated()
        if (!currentUser.isAuthenticated()) {
            // 把用户名和密码封装为 UsernamePasswordToken 对象
            UsernamePasswordToken token = new UsernamePasswordToken("lonestarr", "vespa");
            // rememberme
            token.setRememberMe(true);
            try {
                // 执行登录.
                currentUser.login(token);
            }
            // 若没有指定的账户, 则 shiro 将会抛出 UnknownAccountException 异常.
            catch (UnknownAccountException uae) {
                log.info("----> There is no user with username of " + token.getPrincipal());
                return;
            }
            // 若账户存在, 但密码不匹配, 则 shiro 会抛出 IncorrectCredentialsException 异常。
            catch (IncorrectCredentialsException ice) {
                log.info("----> Password for account " + token.getPrincipal() + " was incorrect!");
                return;
            }
            // 用户被锁定的异常 LockedAccountException
            catch (LockedAccountException lae) {
                log.info("The account for username " + token.getPrincipal() + " is locked.  " +
                        "Please contact your administrator to unlock it.");
            }
            // ... catch more exceptions here (maybe custom ones specific to your application?
            // 所有认证时异常的父类.
            catch (AuthenticationException ae) {
                //unexpected condition?  error?
            }
        }

        //say who they are:
        //print their identifying principal (in this case, a username):
        log.info("----> User [" + currentUser.getPrincipal() + "] logged in successfully.");

        //test a role:
        // 测试是否有某一个角色. 调用 Subject 的 hasRole 方法.
        if (currentUser.hasRole("schwartz")) {
            log.info("----> May the Schwartz be with you!");
        } else {
            log.info("----> Hello, mere mortal.");
            return;
        }

        //test a typed permission (not instance-level)
        // 测试用户是否具备某一个行为. 调用 Subject 的 isPermitted() 方法。
        if (currentUser.isPermitted("lightsaber:weild")) {
            log.info("----> You may use a lightsaber ring.  Use it wisely.");
        } else {
            log.info("Sorry, lightsaber rings are for schwartz masters only.");
        }

        //a (very powerful) Instance Level permission:
        // 测试用户是否具备某一个行为.
        if (currentUser.isPermitted("user:delete:zhangsan")) {
            log.info("----> You are permitted to 'drive' the winnebago with license plate (id) 'eagle5'.  " +
                    "Here are the keys - have fun!");
        } else {
            log.info("Sorry, you aren't allowed to drive the 'eagle5' winnebago!");
        }

        //all done - log out!
        // 执行登出. 调用 Subject 的 Logout() 方法.
        System.out.println("---->" + currentUser.isAuthenticated());

        currentUser.logout();

        System.out.println("---->" + currentUser.isAuthenticated());

        System.exit(0);
    }
}
1、获取当前的Subject,调用SecurityUtils.getSubject()
SecurityUtils.setSecurityManager(securityManager);
Subject currentUser = SecurityUtils.getSubject();
2、测试当前用户是否已经被认证,即是否已经登录。
currentUser.isAuthenticated()
3、若没有认证,把用户名和密码封装为 UsernamePasswordToken 对象。
1)创建一个表单也难
2)点击提交,把请求提交到SpringMVC 的Handler
3)获取用户名和密码。
4、执行登录。调用Subject 的login(token)
void login(AuthenticationToken var1) throws AuthenticationException;
currentUser.login(token);
5、自定义Realm 的方法。从数据库中获取对应的记录。,返回给Shiro。-->事实上这里传入的token,是传入到了这里。
1)如何创建Realm。
实际上继承 org.apache.shiro.realm..AuthenticatingRealm 类。
2)实现doGetAuthenticationInfo(AuthenticationToken) 方法。
6、由 shiro完成对密码的比对。
身份验证
身份验证:一般需要提供如身份 ID 等一些标识信息来表明登录者的身份,如提供 email,用户名/密码来证明。
在 shiro 中,用户需要提供 principals (身份)和 credentials(证明)给 shiro,从而应用能验证用户身份:
principals:身份,即主体的标识属性,可以是任何属性,如用户名、 邮箱等,唯一即可。一个主体可以有多个 principals,但只有一个 Primary principals,一般是用户名/邮箱/手机号。
credentials:证明/凭证,即只有主体知道的安全值,如密码/数字证书等。
最常见的 principals 和 credentials 组合就是用户名/密码了。
身份验证基本流程
1、收集用户身份/凭证,即如用户名/密码。
2、调用 Subject.login 进行登录,如果失败将得到相应的 AuthenticationException 异常,根据异常提示用户错误信息;否则登录成功。
3、创建自定义的 Realm 类,继承 org.apache.shiro.realm.AuthorizingRealm类,实现 doGetAuthenticationInfo()方法。
后退,然后在重新进来还是可以,因为shiro存在缓存。因此,这是在测试的时候,要用到shiro的logout 功能。
那么shiro 是如何进行如何进行密码不必对的。
1、先是前台一个表单提交,到了shiroHandler (也就是controller)中,获取到了用户名和密码。
2、调用 Subject currentUser = SecurityUtils.getSubject();
...currentUser.login(token); 将token 往后传。
3、传到了 ShiroRealm 的doGetAutehticationInfo 方法中。因为ShiroRealm 继承了 AutehticationInfoRealm(做认证)。
该方法中的token 就是上述的UsernamePassword token 。因此这里保存了用户名密码。
4、ShiroRealm 中的upToken 是前台获取的用户名,密码。还有一个
info = new SimpleAuthenticationInfo(principal, credentials, credentialsSalt, realmName);
info 保存的是从数据库查询的密码。密码的比对是shiro 完成的。-->什么时候对比,怎么对比。
密码的比对:
通过 AuthenticationRealm 的 credentialsMather 属性来进行的密码的比对。-->现在这里是明文直接比较的。
那么数据表中英爱是加密了的。MD5 盐值加密。加密算法是不可逆的。
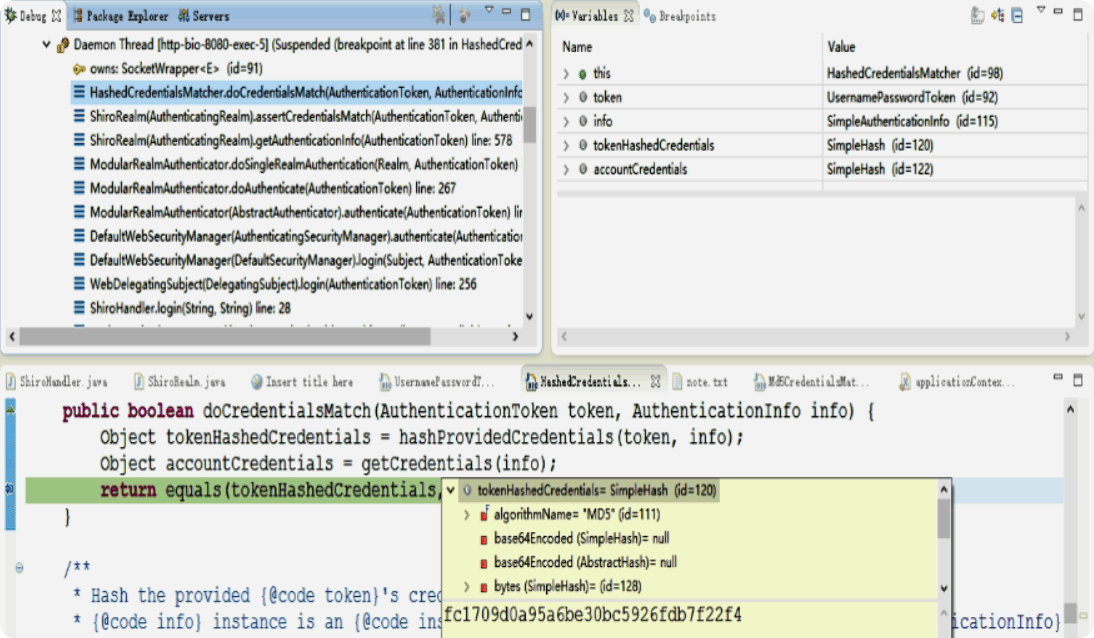
1、如何将一个字符串加密为MD5。 -->测试:可以在UsernamePasswordToken 类中的 getPassword() 方法处打一个断点,
在往前找到 HashedcredentialsMatcher 类中的 doCredentialsMatch(AutenticationToken token,AuthenticationInfo info) 。
2、替换当前的Realm 的CredentialsMather 属性,直接使用HashedCredentialsMatcher 对象,并设置加密算法即可。
<!--
    3. 配置 Realm
    3.1 直接配置实现了 org.apache.shiro.realm.Realm 接口的 bean
-->
<bean id="jdbcRealm" class="com.atguigu.shiro.realms.ShiroRealm">
    <property name="credentialsMatcher">
        <bean class="org.apache.shiro.authc.credential.HashedCredentialsMatcher">
            <property name="hashAlgorithmName" value="MD5"></property>
            <property name="hashIterations" value="1024"></property>  这里是指定MD5加密次数
        </bean>
    </property>
</bean>
加密存在的问题:
如果密码一样的话,加密之后的值一样。现在需要让两个人的密码一样,加密后值还是不一样,这样更加安全。-->加盐
如何做:
1、因此返回值需要将盐值带上。-->使用复杂构造器
//4). 盐值.
ByteSource credentialsSalt = ByteSource.Util.bytes(username);//ByteSource 是一个接口,存在一个内部类及其方法。一般使用唯一字符串做盐。
SimpleAuthenticationInfo info = null; //new SimpleAuthenticationInfo(principal, credentials, realmName);
info = new SimpleAuthenticationInfo(principal, credentials, credentialsSalt, realmName);
return info;
2、使用ByteSource.util.bytes()来计算盐值。
3、盐值需要唯一:一般使用随机字符串或userId
4、使用 new SimpleHash(hashAlgorithmName, credentials, salt, hashIterations); 来计算盐值加密后的值。
Shiro 多个Realm 和验证策略:
ModularRealmAuthenticator 类中。多个Realm 的验证。
身份验证示例
AuthenticationException
如果身份验证失败请捕获 AuthenticationException 或其子类
最好使用如“用户名/密码错误”而不是“用户名错误”/“密码错误”, 防止一些恶意用户非法扫描帐号库;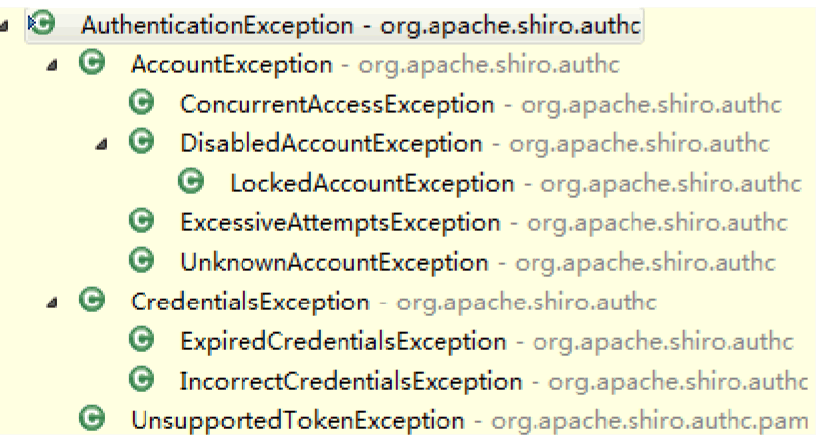
认证流程
身份认证流程
1、首先调用 Subject.login(token) 进行登录,其会自动委托给 SecurityManager 。
2、SecurityManager 负责真正的身份验证逻辑;它会委托给 Authenticator 进行身份验证;。
3、Authenticator 才是真正的身份验证者,Shiro API 中核心的身份 认证入口点,此处可以自定义插入自己的实现;
4、Authenticator 可能会委托给相应的 AuthenticationStrategy 进 行多 Realm 身份验证,默认 ModularRealmAuthenticator 会调用 AuthenticationStrategy 进行多 Realm 身份验证;
5、Authenticator 会把相应的 token 传入 Realm,从 Realm 获取 身份验证信息,如果没有返回/抛出异常表示身份验证失败了。此处可以配置多个Realm,将按照相应的顺序及策略进行访问。
Realm
Realm:Shiro 从 Realm 获取安全数据(如用户、角色、 权限),即 SecurityManager 要验证用户身份,那么它需要从 Realm 获取相应的用户进行比较以确定用户身份是否合法;也需要从Realm得到用户相应的角色/权限进行验证 用户是否能进行操作 。
Realm接口如下:
Realm
一般继承 AuthorizingRealm(授权)即可;其继承了 AuthenticatingRealm(即身份验证),而且也间接继承了 CachingRealm(带有缓存实现)。
Realm 的继承关系:
Authenticator
Authenticator 的职责是验证用户帐号,是 Shiro API 中身份验 证核心的入口点:如果验证成功,将返回AuthenticationInfo 验 证信息;此信息中包含了身份及凭证;如果验证失败将抛出相应的AuthenticationException 异常
SecurityManager 接口继承了 Authenticator,另外还有一个 ModularRealmAuthenticator实现,其委托给多个Realm 进行验证,验证规则通过 AuthenticationStrategy 接口指定。
AuthenticationStrategy :认证策略
AuthenticationStrategy 接口的默认实现:
FirstSuccessfulStrategy:只要有一个 Realm 验证成功即可,只返回第 一个 Realm 身份验证成功的认证信息,其他的忽略;
AtLeastOneSuccessfulStrategy:只要有一个Realm验证成功即可,和 FirstSuccessfulStrategy 不同,将返回所有Realm身份验证成功的认证信 息;
AllSuccessfulStrategy:所有Realm验证成功才算成功,且返回所有 Realm身份验证成功的认证信息,如果有一个失败就失败了。
ModularRealmAuthenticator 默认是 AtLeastOneSuccessfulStrategy 策略。
四、授权
授权,也叫访问控制,即在应用中控制谁访问哪些资源(如访问页面/编辑数据/页面操作 等)。
在授权中需了解的几个关键对象:主体(Subject)、资源(Resource)、权限 (Permission)、角色(Role)。
——————————————
主体(Subject):访问应用的用户,在 Shiro 中使用 Subject 代表该用户。用户只有授权后才允许访问相应的资源。
资源(Resource):在应用中用户可以访问的 URL,比如访问 JSP 页面、查看/编辑某些 数据、访问某个业务方法、打印文本等等都是资源。用户只要授权后才能访问。
权限(Permission):安全策略中的原子授权单位,通过权限我们可以表示在应用中用户 有没有操作某个资源的权力。即权限表示在应用中用户能不能访问某个资源,如:访问用 户列表页面查看/新增/修改/删除用户数据(即很多时候都是CRUD(增查改删)式权限控 制)等。权限代表了用户有没有操作某个资源的权利,即反映在某个资源上的操作允不允许。
Shiro 支持粗粒度权限(如用户模块的所有权限)和细粒度权限(操作某个用户的权限, 即实例级别的)
角色(Role):权限的集合,一般情况下会赋予用户角色而不是权限,即这样用户可以拥有 一组权限,赋予权限时比较方便。典型的如:项目经理、技术总监、CTO、开发工程师等 都是角色,不同的角色拥有一组不同的权限。
授权方式
Shiro 支持三种方式的授权:
– 编程式:通过写if/else 授权代码块完成
– 注解式:通过在执行的Java方法上放置相应的注解完成,没有权限将抛出相应的异常 。
– JSP/GSP 标签:在JSP/GSP 页面通过相应的标签完成。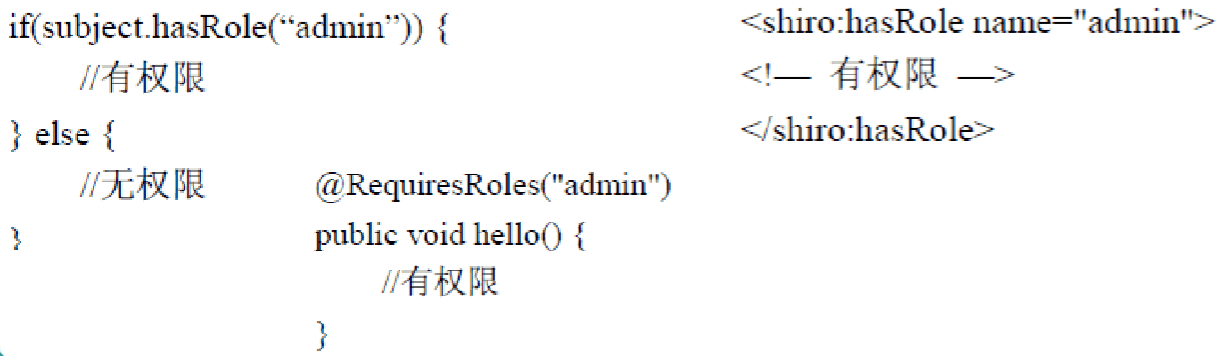
默认拦截器
Shiro 内置了很多默认的拦截器,比如身份验证、授权等相关的。默认拦截器可以参考 org.apache.shiro.web.filter.mgt.DefaultFilter中的枚举 拦截器: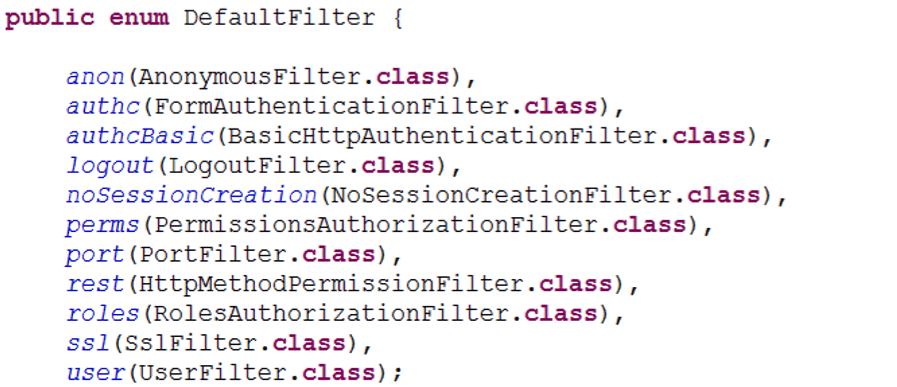
身份验证相关的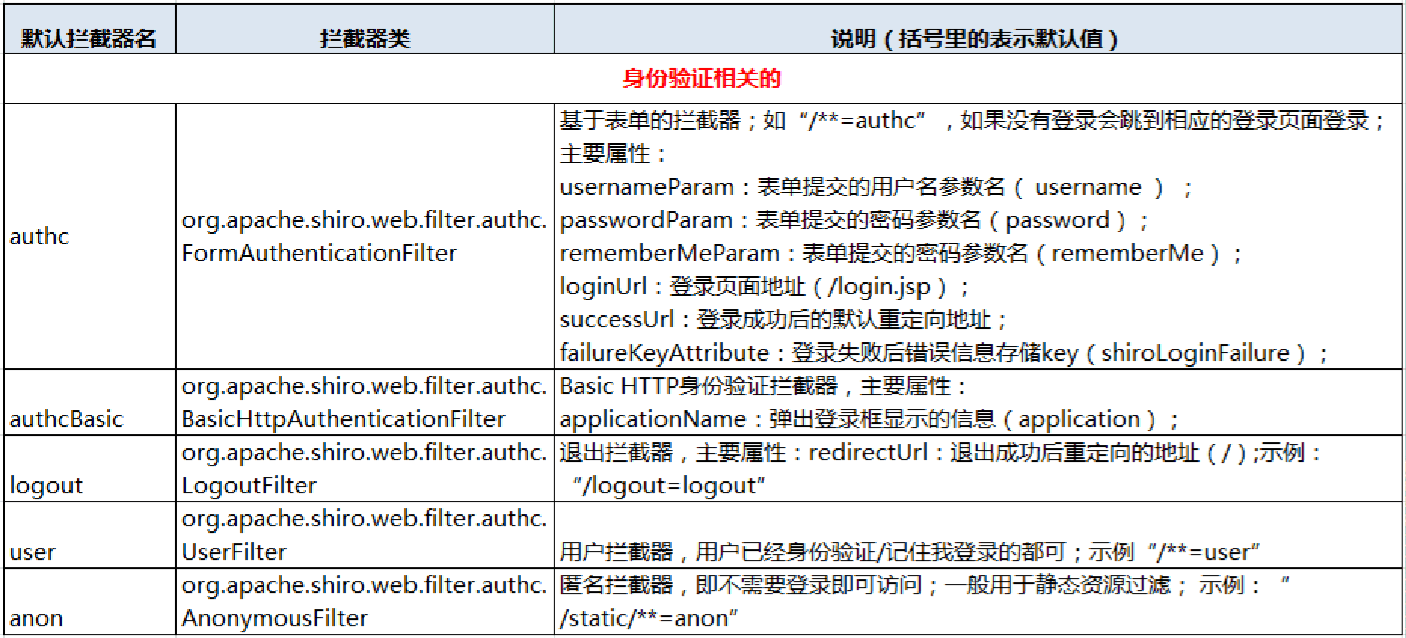
授权相关的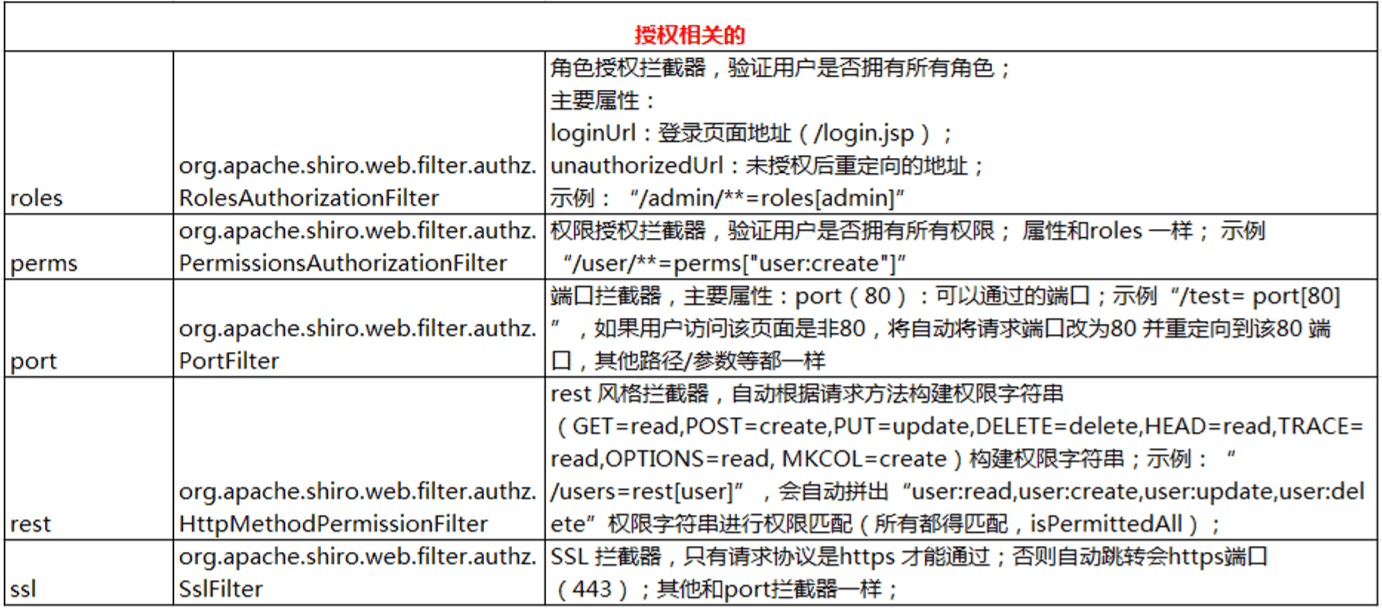
其他


 浙公网安备 33010602011771号