03-Mybatis、连接池、事务、动态sql、多表查询
一、Mybatis连接池与事务深入
1.1、Mybatis的连接池技术
在 Mybatis 中也有连接池技术,但是它采用的是自 己的连接池技术。在 Mybatis 的 SqlMapConfig.xml 配置文件中,通过<dataSource type=”pooled”>来实 现 Mybatis 中连接池的配置。
1.1.1、Mybatis连接池的分类
>>org.apache..ibatis.datasource
>>org.apache..ibatis.datasource.jndi
>>org.apache..ibatis.datasource.pooled
>>org.apache..ibatis.datasource.unpooled
Mybtis将数据源分为三类
UNPOOLED 不使用连接池的数据源
POOLED 使用连接池的数据源
JNDI 使用 JNDI 实现的数据源
Mybatis DataSource实现UML图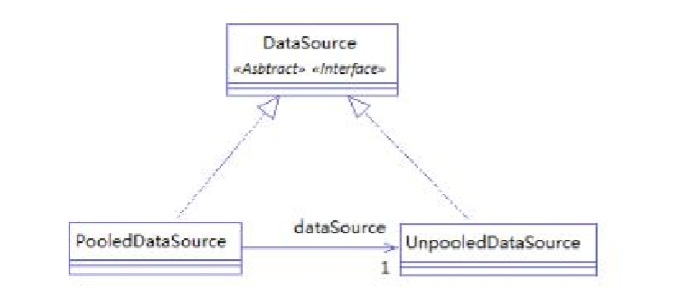
PooledDataSource和UnpooledDataSource都实现了java.sql.DataSource接口
并且PooledDataSource持有有一个UnpooledDataSource的引用。
当PooledDataSource需要创建java.sql.Connection实例时,还是需要通过UnpooledDataSource来创建。
PooledDataSource指示提供一种缓存连接池机制。
==>在这三种数据源中,我们一般采用的是 POOLED 数据源(很多时候我们所说的数据源就是为了更好的管理数据 库连接,也就是我们所说的连接池技术)。
1.1.2、Mybatis中数据源的配置
<dataSource type="POOLED">
      <!-- 配置连接数据库的4个基本信息 -->
      <property name="driver" value="${jdbc.driver}"/>
      <property name="url" value="${jdbc.url}"/>
      <property name="username" value="${jdbc.username}"/>
      <property name="password" value="${jdbc.password}"/>
</dataSource>

type=”POOLED”:MyBatis 会创建 PooledDataSource 实例
type=”UNPOOLED” : MyBatis 会创建 UnpooledDataSource 实例
type=”JNDI”:MyBatis 会从 JNDI 服务上查找 DataSource 实例,然后返回使用
1.1.3、Mybatis中DataSource的存取
MyBatis 是通过工厂模式来创建数据源 DataSource 对象的, MyBatis 定义了抽象的工厂接 口:org.apache.ibatis.datasource.DataSourceFactory,通过其 getDataSource()方法返回数据源 DataSource。
MyBatis 创建了 DataSource 实例后,会将其放到 Configuration 对象内的 Environment 对象中, 供以后使用。
1.1.4、Mybatis中连接过程的分析
1.2、Mybatis的事务控制
1.2.1、JDBC中事务的控制
在JDBC中可以通过手动方式将事务的提交改为手动方式,通过
setAutoCommit()
1.2.2、Mybatis中事务提交方式
sqlSession = factory.openSession();
...
sqlSession.commit();

1.2.3、Mybatis自动提交事务的设置
sqlSession = factory.openSession(true); //设置为自动提交事务。
此时,事务就变成了自动提交,同时实现CRUD操作时记录的保存。虽然这也是一种方式,但设置为自动提交方式为 false再根据情况决定是否进行提交,这种方式更常用。因为我们可以根据业务 情况来决定提交是否进行提交。
二、Mybatis的动态SQL语句
业务逻辑复杂时,SQL 是动态变化的,此时在前面的学习的 SQL 就不能满足要求了。
动态 SQL
MyBatis 的强大特性之一便是它的动态 SQL。如果你有使用 JDBC 或其它类似框架的经验,你就能体会到根据不同条件拼接 SQL 语句的痛苦。例如拼接时要确保不能忘记添加必要的空格,还要注意去掉列表最后一个列名的逗号。利用动态 SQL 这一特性可以彻底摆脱这种痛苦。

虽然在以前使用动态 SQL 并非一件易事,但正是 MyBatis 提供了可以被用在任意 SQL 映射语句中的强大的动态 SQL 语言得以改进这种情形。

动态 SQL 元素和 JSTL 或基于类似 XML 的文本处理器相似。在 MyBatis 之前的版本中,有很多元素需要花时间了解。MyBatis 3 大大精简了元素种类,现在只需学习原来一半的元素便可。MyBatis 采用功能强大的基于 OGNL 的表达式来淘汰其它大部分元素。

if
choose (when, otherwise)
trim (where, set)
foreach
2.1、动态SQL之<if>标签
<!--根据用户信息,查询用户列表-->
<select id="findByUser" resultType="com.itheima.domain.User">
      select * from user where 1=1
    <if test="username != null and username!=''">
      and username  like #{username}
    </if>
    <if test="address!=null">
      and address like#{address}
    </if>
</select>
注意:<if>标签的 test 属性中写的是对象的属性名,如果是包装类的对象要使用 OGNL 表达式的写法。
另外要注意 where 1=1 的作用!
2.2、动态SQL之<where>标签
为了简化上面 where 1=1 的条件拼装,我们可以采用<where>标签来简化开发。
<select id="findByUser" resultType="com.itheima.domain.User">
    select * from user
    <where>
      <if test="username != null and username!=''">
        and username  like #{username}
      </if>
      <if test="address!=null">
        and address like#{address}
      </if>
    </where>
</select>
2.3、动态标签纸<foreach>标签
2.3、需求
SELECT * FROM USERS WHERE username LIKE '%张%' AND id IN (10,89,16) ;
2.3.1、在QueryVo中加入一个List集合用于封装参数
2.3.2、持久层Dao接口
//根据id集合查询用户
List<User> findInIds(QueryVo vo);
2.3.3、持久层Dao配置
<select id="findByIds" resultType="com.itheima.domain.User" parameterType="com.itheima.domain.QueryVo">
    select * from user
    <where>
      <if test="ids!=null and ids.size()>0">
        <foreach collection="ids" open="id in (" close=")" item="id" separator=",">
          #{id}
        </foreach>
      </if>
    </where>
</select>
SQL语句
select 字段 from user where id in (?)
<foreach>标签用于遍历集合,它的属性
collection: 代表要遍历的集合元素,注意编写时不要写#{}
open: 代表语句的开始部分
close: 代表结束部分
item: 代表遍历集合的每个元素,生成的变量名
sperator: 代表分隔符
2.4、Mybatis中简写编写的SQL片段
Sql 中可将重复的 sql 提取出来,使用时用 include 引用即可,最终达到 sql 重用的目的。
2.4.1、定义代码片段
<sql id="defaultSql">
    select * from user
</sql>
2.4.2、引用代码片段
<!--查询所有用户-->
<select id="findByUser" resultType="com.itheima.domain.User">
 <include refid="defaultSql"></include>
</select>

<!--查询所有用户在id的集合之中-->
  <select id="findByIds" resultType="com.itheima.domain.User" parameterType="com.itheima.domain.QueryVo">
  <!--select * from user-->
  <include refid="defaultSql"></include>
  <where>
    <if test="ids!=null and ids.size()>0">
      <foreach collection="ids" open="id in (" close=")" item="id" separator=",">
        #{id}
      </foreach>
    </if>
  </where>
</select>
三、Mybatis多表查询之一对多
3.1、一对一查询(多对一)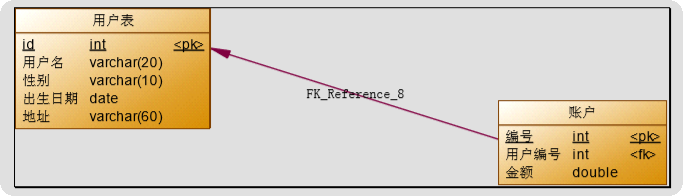
3.1.1、方式一
3.1.1.1、定义账户信息的实体类
3.1.1.2编写sql语句
SELECT account.*, user.username, user.address FROM account, user WHERE account.uid = user.id
3.1.1.3、定义AccountUser类
为了能够封装上面 SQL 语句的查询结果,定义 AccountCustomer 类中要包含账户信息同时还要包含用户信 息,所以我们要在定义 AccountUser 类时可以继承 Account类。
3.1.1.4、定义账户的持久层Dao接口
3.1.1.5、定义AccountDao.xml文件中的查询配置信息
<!--查询所有-->
<select id="findAll" resultType="accountuser">
    SELECT account.*,user.username,user.address FROM account,user WHERE account.uid = user.id;
</select>
3.1.1.6、创建AccountTest测试类
3.1.1.7、小结
定义专门的 po 类作为输出类型,其中定义了 sql 查询结果集所有的字段。此方法较为简单,企业中使用普遍。
3.1.2、方式二
使用 resultMap,定义专门的 resultMap 用于映射一对一查询结果。 通过面向对象的(has a)关系可以得知,我们可以在 Account 类中加入一个 User 类的对象来代表这个账户是哪个用户的。
3.1.2.1、修改Account类


public class Account {
    private Integer id;
    private Integer uid;
    private Double money;

    //从表实体也应该包含主表实体的一个对象引用
    private User user;

    public User getUser() {
        return user;
    }

    public void setUser(User user) {
        this.user = user;
    }

    public Integer getId() {
        return id;
    }

    public void setId(Integer id) {
        this.id = id;
    }

    public Integer getUid() {
        return uid;
    }

    public void setUid(Integer uid) {
        this.uid = uid;
    }

    public Double getMoney() {
        return money;
    }

    public void setMoney(Double money) {
        this.money = money;
    }

    @Override
    public String toString() {
        return "Account{" +
                "id=" + id +
                ", uid=" + uid +
                ", money=" + money +
                '}';
    }
}
3.1.2.2、修改AccountDao接口中的方法
List<Account> findAll();
此时返回值类型是Account,因为该类中包含了一个User类对象。可以用来封装账号对应的用户信息。
3.1.2.3、重新定义AccountDao.xml文件
<mapper namespace="com.itheima.dao.IAccountDao">
  <!--建立对应的关系-->
  <resultMap id="accountMap" type="account">
    <id column="aid" property="id"></id>
    <result column="uid" property="uid"></result>
    <result column="money" property="money"></result>
    <association property="user" column="uid" javaType="user">
      <id column="id" property="id"></id>
      <result column="username" property="username"></result>
      <result column="sex" property="sex"></result>
      <result column="birthday" property="birthday"></result>
      <result column="address" property="address"></result>
    </association>
  </resultMap>

  <!--查询所有-->
  <select id="findAll" resultMap="accountMap">
   select u.*,a.id as aid,a.uid,a.money from account a,user u where a.uid =u.id;
  </select>
</mapper>
association-->表示主表实体的引用 。表示关联的查询结果
property-->该从表实体(包含的主表对象实体作为属性)的名称。关联查询的结果存储在Account对象上的那个属性
column-->外键名称。
javaType-->标识关联查询结果的类型。
3.1.2.4、在AccountTest类中加入测试方法
1 @Test
2 public void testFindAll(){
3     List<Account> accounts = accountDao.findAll();
4     for(Account au :accounts){
5         System.out.println("--------------");
6         System.out.println(au);
7         System.out.println(au.getUser());
8     }
9 }
3.2、一对多查询
3.2.1、编写sql语句
select u.*,a.id as aid,a.uid ,a.money from user u LEFT JOIN account a on u.id=a.uid;
3.2.2、在User类中加入List<Account>
3.2.3、用户持久层Dao接口中加入查询方法
List<User> findAll();
3.2.4、映射文件配置
<resultMap id="userMap" type="user">
    <id column="id" property="id"></id>
    <result column="username" property="username"></result>
    <result column="address" property="address"></result>
    <result column="sex" property="sex"></result>
    <result column="birthday" property="birthday"></result>
    <!-- collection 是用于建立一对多中集合属性的对应关系    ofType 用于指定集合元素的数据类型    -->
    <collection property="accounts" ofType="account">
      <id column="aid" property="id"></id>
      <result column="uid" property="uid"></result>
      <result column="money" property="money"></result>
    </collection>
</resultMap>

<!--查询所有-->
<select id="findAll" resultMap="userMap">
    select u.*,a.id as aid,a.uid ,a.money from user u LEFT JOIN account a on u.id=a.uid;
</select>
collection-->表示关联查询结果集
property-->关联查询的结果集存储在User对象上的那个属性
ofType-->指定关联查询的结果集中的对象类型即List中的对象类型。此处可以使用别名,也可以使用全限定名。
四、Mybatis多表查询之多对多
4.1、实现Role到User多对多
多对多关系可以看成是双向的一对多关系。
4.1.1、用户与角色关系模型
4.1.2、业务要求及实现SQL
-- 写法一
SELECT u.*,r.id AS rid,r.role_name,r.role_desc FROM role r LEFT JOIN user_role ur ON r.id = ur.rid  LEFT JOIN user u ON ur.uid =u.id
-- 写法二
SELECT r.*,u.id uid, u.username username, u.birthday birthday, u.sex sex, u.address address FROM ROLE r INNER JOIN  USER_ROLE ur ON ( r.id = ur.rid) INNER JOIN  USER u ON (ur.uid = u.id);
4.1.3、编写Role实体类
存在多对多的映射关系,一个角色可以赋予多个用户。
4.1.4、编写Role持久层接口
4.1.5、编写映射文件
<mapper namespace="com.itheima.dao.IRoleDao">

  <resultMap id="roleMap" type="role">
    <id property="roleId" column="rid"></id>
    <result column="role_name" property="roleName"></result>
    <result column="role_desc" property="roleDesc" ></result>
    <collection property="users" ofType="user">
      <id column="id" property="id"></id>
      <result column="username" property="username"></result>
      <result column="address" property="address"></result>
      <result column="sex" property="sex"></result>
      <result column="birthday" property="birthday"></result>
    </collection>
  </resultMap>

  <!--查询所有-->
  <select id="findAll" resultMap="roleMap">
    SELECT u.*,r.id AS rid,r.role_name,r.role_desc FROM role r
    LEFT JOIN user_role ur ON r.id = ur.rid
    LEFT JOIN user u ON ur.uid =u.id
  </select>

</mapper>
4.2、实现User到Role的多对多
JNDI数据源
JNDI:Java Naming and Directory Interface。是SUN公司推出的一套规范,属于JavaEE技术之一。目的是模仿windows系统中的注册表。
在服务器中注册数据源: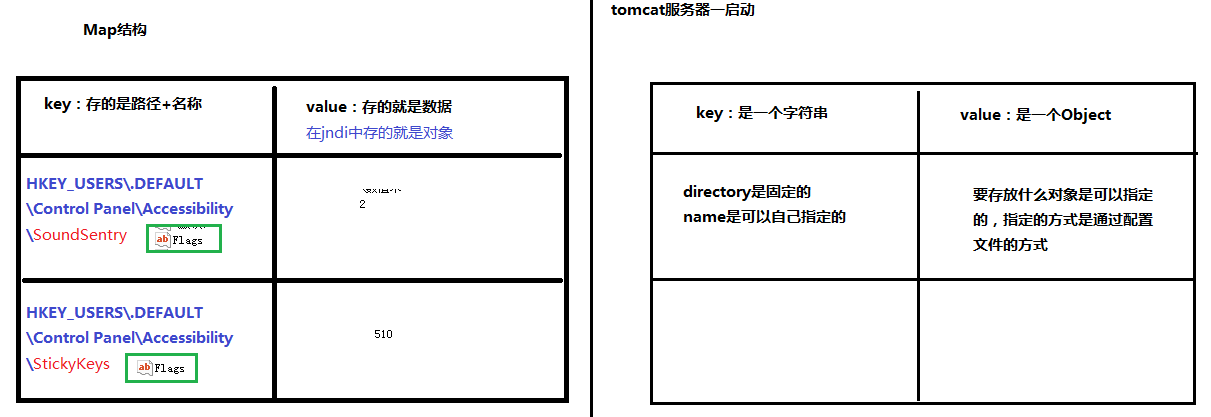
修改SqlMapConfig.xml中的配置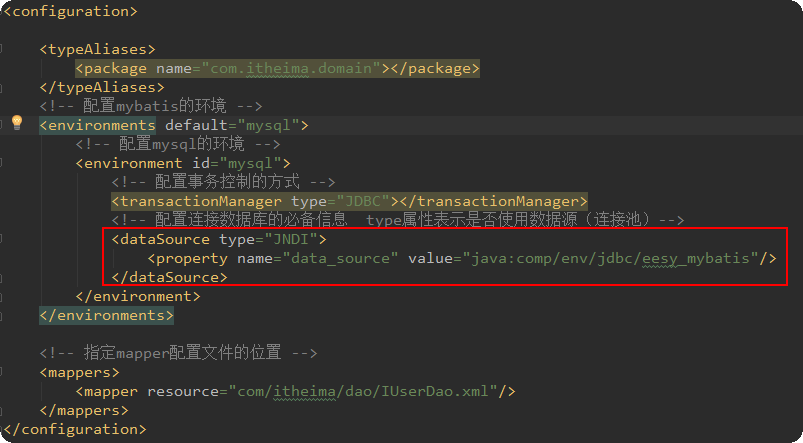


 浙公网安备 33010602011771号