

Notification使用详解之三:通过服务更新进度通知&在Activity中监听服务进度
上次我们讲到如何实现一个可更新的进度通知,实现的方式是启动一个线程模拟一个下载任务,然后根据任务进度向UI线程消息队列发送进度消息,UI线程根据进度消息更新通知的UI界面。可是在实际应用中,我们一般会将上传、下载等比较耗时的后台任务以服务的形式运行,更新进度通知也是交由后台服务来完成的。 不过有的时候,除了在通知里面显示进度信息,我们也要在Activity中显示当前进度,很多下载系统都有这样的功能,例如Android自带浏览器的下载系统、QQ浏览器的下载系统等等。那么如何实现这一功能呢?实现方式有很多,我们今天先来介绍其中的一种:在Activity中主动监听服务的进度。
具体的思路是:让Activity与后台服务绑定,通过中间对象Binder的实例操作后台服务,获取进度信息和服务的状态以及在必要的时候停止服务。
关于服务的生命周期,如果有些朋友们不太熟悉的话,可以去查阅相关资料;如果以后有时间,我可能也会总结一些与服务相关的知识。
为了让大家对这个过程更清晰一些,在上代码之前,我们先来看看几个截图:

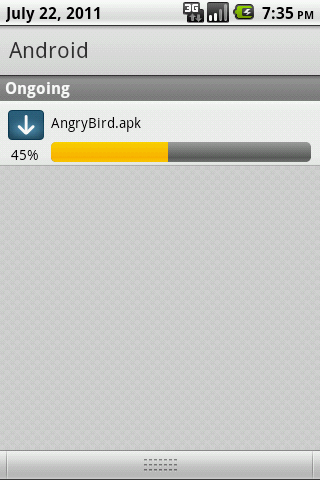


整个过程如上图所示:在我们点击开始按钮后,下载任务开始运行,同事更新通知上的进度,当前Activity也从后台服务获取进度信息,显示到按钮下方;当我们点击通知后,跳转到下载管理界面,在这里我们也从后台服务获取进度,还可以做取消任务等操作。
了解了整个过程的情况后,我们就来分析一下具体的代码实现。
首先是/res/main.xml布局文件:
<?xml version="1.0" encoding="utf-8"?>
<LinearLayout xmlns:android="http://schemas.android.com/apk/res/android"
    android:orientation="vertical"
    android:layout_width="fill_parent"
    android:layout_height="fill_parent">
    <Button
        android:layout_width="fill_parent"
        android:layout_height="wrap_content"
        android:text="start"
        android:onClick="start"/>
    <TextView
        android:id="@+id/text"
        android:layout_width="fill_parent"
        android:layout_height="wrap_content"
        android:gravity="center"/>
</LinearLayout>
其中Button是用来启动服务的,TextView是用来显示进度信息的。
然后再在看一下MainActivity.java的代码:
package com.scott.notification;

import android.app.Activity;
import android.content.ComponentName;
import android.content.Context;
import android.content.Intent;
import android.content.ServiceConnection;
import android.os.Bundle;
import android.os.Handler;
import android.os.IBinder;
import android.os.Message;
import android.view.View;
import android.widget.TextView;

public class MainActivity extends Activity {

	private DownloadService.DownloadBinder binder;
	private TextView text;

	private boolean binded;

	private Handler handler = new Handler() {
		public void handleMessage(android.os.Message msg) {
			int progress = msg.arg1;
			text.setText("downloading..." + progress + "%");
		};
	};

	private ServiceConnection conn = new ServiceConnection() {

		@Override
		public void onServiceConnected(ComponentName name, IBinder service) {
			binder = (DownloadService.DownloadBinder) service;
			binded = true;
			// 开始下载
			binder.start();
			// 监听进度信息
			listenProgress();
		}

		@Override
		public void onServiceDisconnected(ComponentName name) {
		}
	};

	@Override
	public void onCreate(Bundle savedInstanceState) {
		super.onCreate(savedInstanceState);
		setContentView(R.layout.main);
		text = (TextView) findViewById(R.id.text);
	}

	@Override
	protected void onDestroy() {
		super.onDestroy();
		if (binded) {
			unbindService(conn);
		}
	}

	public void start(View view) {
		if (binded) {
			binder.start();
			listenProgress();
			return;
		}
		Intent intent = new Intent(this, DownloadService.class);
		startService(intent);	//如果先调用startService,则在多个服务绑定对象调用unbindService后服务仍不会被销毁
		bindService(intent, conn, Context.BIND_AUTO_CREATE);
	}

	/**
	 * 监听进度
	 */
	private void listenProgress() {
		new Thread() {
			public void run() {
				while (!binder.isCancelled() && binder.getProgress() <= 100) {
					int progress = binder.getProgress();
					Message msg = handler.obtainMessage();
					msg.arg1 = progress;
					handler.sendMessage(msg);
					if (progress == 100) {
						break;
					}
					try {
						Thread.sleep(200);
					} catch (InterruptedException e) {
						e.printStackTrace();
					}
				}
			};
		}.start();
	}
}
我们可以看到,当点击开始按钮后,以bindService的方式绑定服务,用获取到的DownloadService.DownloadBinder实例启动服务,并在Activity中启动一个线程监听服务的进度信息,及时的显示到按钮下方。
服务类DownloadService.java代码如下:
package com.scott.notification;

import android.app.Notification;
import android.app.NotificationManager;
import android.app.PendingIntent;
import android.app.Service;
import android.content.Context;
import android.content.Intent;
import android.os.Binder;
import android.os.Handler;
import android.os.IBinder;
import android.os.Message;
import android.widget.RemoteViews;

public class DownloadService extends Service {

	private static final int NOTIFY_ID = 0;
	private boolean cancelled;
	private int progress;

	private Context mContext = this;

	private NotificationManager mNotificationManager;
	private Notification mNotification;

	private DownloadBinder binder = new DownloadBinder();

	private Handler handler = new Handler() {
		public void handleMessage(android.os.Message msg) {
			switch (msg.what) {
			case 1:
				int rate = msg.arg1;
				if (rate < 100) {
					// 更新进度
					RemoteViews contentView = mNotification.contentView;
					contentView.setTextViewText(R.id.rate, rate + "%");
					contentView.setProgressBar(R.id.progress, 100, rate, false);
				} else {
					// 下载完毕后变换通知形式
					mNotification.flags = Notification.FLAG_AUTO_CANCEL;
					mNotification.contentView = null;
					Intent intent = new Intent(mContext, FileMgrActivity.class);
					// 告知已完成
					intent.putExtra("completed", "yes");
					//更新参数,注意flags要使用FLAG_UPDATE_CURRENT
					PendingIntent contentIntent = PendingIntent.getActivity(mContext, 0, intent, PendingIntent.FLAG_UPDATE_CURRENT);
					mNotification.setLatestEventInfo(mContext, "下载完成", "文件已下载完毕", contentIntent);
					stopSelf();//停掉服务自身
				}

				// 最后别忘了通知一下,否则不会更新
				mNotificationManager.notify(NOTIFY_ID, mNotification);
				break;
			case 0:
				// 取消通知
				mNotificationManager.cancel(NOTIFY_ID);
				break;
			}
		};
	};

	@Override
	public void onCreate() {
		super.onCreate();
		mNotificationManager = (NotificationManager) getSystemService(android.content.Context.NOTIFICATION_SERVICE);
	}

	@Override
	public IBinder onBind(Intent intent) {
		// 返回自定义的DownloadBinder实例
		return binder;
	}

	@Override
	public void onDestroy() {
		super.onDestroy();
		cancelled = true; // 取消下载线程
	}

	/**
	 * 创建通知
	 */
	private void setUpNotification() {
		int icon = R.drawable.down;
		CharSequence tickerText = "开始下载";
		long when = System.currentTimeMillis();
		mNotification = new Notification(icon, tickerText, when);

		// 放置在"正在运行"栏目中
		mNotification.flags = Notification.FLAG_ONGOING_EVENT;

		RemoteViews contentView = new RemoteViews(mContext.getPackageName(), R.layout.download_notification_layout);
		contentView.setTextViewText(R.id.fileName, "AngryBird.apk");
		// 指定个性化视图
		mNotification.contentView = contentView;

		Intent intent = new Intent(this, FileMgrActivity.class);
		PendingIntent contentIntent = PendingIntent.getActivity(mContext, 0, intent, PendingIntent.FLAG_UPDATE_CURRENT);
		// 指定内容意图
		mNotification.contentIntent = contentIntent;
		mNotificationManager.notify(NOTIFY_ID, mNotification);
	}

	/**
	 * 下载模块
	 */
	private void startDownload() {
		cancelled = false;
		int rate = 0;
		while (!cancelled && rate < 100) {
			try {
				// 模拟下载进度
				Thread.sleep(500);
				rate = rate + 5;
			} catch (InterruptedException e) {
				e.printStackTrace();
			}
			Message msg = handler.obtainMessage();
			msg.what = 1;
			msg.arg1 = rate;
			handler.sendMessage(msg);

			this.progress = rate;
		}
		if (cancelled) {
			Message msg = handler.obtainMessage();
			msg.what = 0;
			handler.sendMessage(msg);
		}
	}

	/**
	 * DownloadBinder中定义了一些实用的方法
	 *
	 * @author user
	 *
	 */
	public class DownloadBinder extends Binder {

		/**
		 * 开始下载
		 */
		public void start() {
			//将进度归零
			progress = 0;
			//创建通知
			setUpNotification();
			new Thread() {
				public void run() {
					//下载
					startDownload();
				};
			}.start();
		}

		/**
		 * 获取进度
		 *
		 * @return
		 */
		public int getProgress() {
			return progress;
		}

		/**
		 * 取消下载
		 */
		public void cancel() {
			cancelled = true;
		}

		/**
		 * 是否已被取消
		 *
		 * @return
		 */
		public boolean isCancelled() {
			return cancelled;
		}
	}
}
我们看到,在服务中有个DownloadBinder类,它继承自Binder,定义了一系列方法,获取服务状态以及操作当前服务,刚才我们在MainActivity中获取的就是这个类的实例。最后,不要忘了在AndroidManifest.xml中配置该服务。关于进度通知的布局文件/res/layout/download_notification_layout.xml,在这里就不需贴出了,朋友们可以参考一下Notification使用详解之二中进度通知布局的具体代码。
下面我们来介绍一下FileMgrActivity,它就是点击通知之后跳转到的界面,布局文件/res/filemgr.xml如下:
<?xml version="1.0" encoding="utf-8"?>
<LinearLayout xmlns:android="http://schemas.android.com/apk/res/android"
    android:orientation="vertical"
    android:layout_width="fill_parent"
    android:layout_height="fill_parent">
    <ProgressBar
          android:id="@+id/progress"
        style="?android:attr/progressBarStyleHorizontal"
        android:layout_width="fill_parent"
        android:layout_height="wrap_content"
        android:max="100"
        android:progress="0"/>
    <Button
        android:id="@+id/cancel"
        android:layout_width="fill_parent"
        android:layout_height="wrap_content"
        android:text="cancel"
        android:onClick="cancel"/>
</LinearLayout>
我们来看一下FileMgrActivity.java具体的代码:
package com.scott.notification;

import android.app.Activity;
import android.content.ComponentName;
import android.content.Context;
import android.content.Intent;
import android.content.ServiceConnection;
import android.os.Bundle;
import android.os.Handler;
import android.os.IBinder;
import android.os.Message;
import android.view.View;
import android.widget.Button;
import android.widget.ProgressBar;

public class FileMgrActivity extends Activity {
	private DownloadService.DownloadBinder binder;
	private ProgressBar progressBar;
	private Button cancel;
	private boolean binded;

	private Handler handler = new Handler() {
		public void handleMessage(android.os.Message msg) {
			int progress = msg.arg1;
			progressBar.setProgress(progress);
			if (progress == 100) {
				cancel.setEnabled(false);
			}
		};
	};

	private ServiceConnection conn = new ServiceConnection() {

		@Override
		public void onServiceConnected(ComponentName name, IBinder service) {
			binder = (DownloadService.DownloadBinder) service;
			//监听进度信息
			listenProgress();
		}

		@Override
		public void onServiceDisconnected(ComponentName name) {
		}
	};

    @Override
    public void onCreate(Bundle savedInstanceState) {
        super.onCreate(savedInstanceState);
        setContentView(R.layout.filemgr);
        progressBar = (ProgressBar) findViewById(R.id.progress);
        cancel = (Button) findViewById(R.id.cancel);

        if ("yes".equals(getIntent().getStringExtra("completed"))) {
        	//如果已完成,则不需再绑定service
        	progressBar.setProgress(100);

        	cancel.setEnabled(false);
        } else {
        	//绑定service
            Intent intent = new Intent(this, DownloadService.class);
        	bindService(intent, conn, Context.BIND_AUTO_CREATE);
        	binded = true;
        }
    }

    @Override
    protected void onDestroy() {
    	super.onDestroy();
    	//如果是绑定状态,则取消绑定
    	if (binded) {
    		unbindService(conn);
    	}
    }

    public void cancel(View view) {
    	//取消下载
    	binder.cancel();
    }

    /**
     * 监听进度信息
     */
	private void listenProgress() {
		new Thread() {
			public void run() {
				while (!binder.isCancelled() && binder.getProgress() <= 100) {
					int progress = binder.getProgress();
					Message msg = handler.obtainMessage();
					msg.arg1 = progress;
					handler.sendMessage(msg);
					try {
						Thread.sleep(200);
					} catch (InterruptedException e) {
						e.printStackTrace();
					}
				}
			};
		}.start();
	}
}
我们发现,它和MainActivity实现方式很相似,恩,他们都是通过和服务绑定后获取到的Binder对象来跟服务通信的,都是主动和服务打招呼来获取信息和控制服务的。
这两个Activity和一个Service似乎像是复杂的男女关系,两个男人同时喜欢一个女人,都通过自己的手段试图从那个女人获取爱情,两个男人都很主动,那个女人显得很被动。
以上就是今天的全部内容,也许朋友们会有疑问,能不能让Service主动告知Activity当前的进度信息呢?答案是可以。下一次,我就会和大家分享一下,如何变Service为主动方,让一个女人脚踏两只船的方式。

 浙公网安备 33010602011771号