

基础总结篇之四:Service完全解析
富貴必從勤苦得,男兒須讀五車書。唐.杜甫《柏學士茅屋》
作为程序员的我们,须知富贵是要通过勤苦努力才能得到的,要想在行业内有所建树,就必须刻苦学习和钻研。
今天我们来讲一下Android中Service的相关内容。
Service在Android中和Activity是属于同一级别上的组件,我们可以将他们认为是两个好哥们,Activity仪表不凡,迷倒万千少女,经常做一些公众人物角色,而Service一副彪悍的长相,但却身强力壮,常常在后台做一些搬运工的力气活,虽然有些累,但大家都不能失去他。
下面我们就围绕Service对其进行全面讲解:
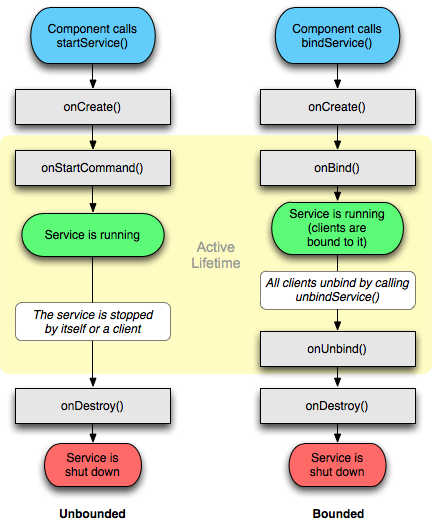
1.Service生命周期
Service生命周期可以从两种启动Service的模式开始讲起,分别是context.startService()和context.bindService()。
(1).startService的启动模式下的生命周期:当我们首次使用startService启动一个服务时,系统会实例化一个Service实例,依次调用其onCreate和onStartCommand方法,然后进入运行状态,此后,如果再使用startService启动服务时,不再创建新的服务对象,系统会自动找到刚才创建的Service实例,调用其onStart方法;如果我们想要停掉一个服务,可使用stopService方法,此时onDestroy方法会被调用,需要注意的是,不管前面使用了多个次startService,只需一次stopService,即可停掉服务。
(2).bindService启动模式下的生命周期:在这种模式下,当调用者首次使用bindService绑定一个服务时,系统会实例化一个Service实例,并一次调用其onCreate方法和onBind方法,然后调用者就可以和服务进行交互了,此后,如果再次使用bindService绑定服务,系统不会创建新的Service实例,也不会再调用onBind方法;如果我们需要解除与这个服务的绑定,可使用unbindService方法,此时onUnbind方法和onDestroy方法会被调用。
两种模式有以下几点不同之处:startService模式下调用者与服务无必然联系,即使调用者结束了自己的生命周期,只要没有使用stopService方法停止这个服务,服务仍会运行;通常情况下,bindService模式下服务是与调用者生死与共的,在绑定结束之后,一旦调用者被销毁,服务也就立即终止,就像江湖上的一句话:不求同生,但愿同死。
值得一提的是,以前我们在使用startService启动服务时都是习惯重写onStart方法,在Android2.0时系统引进了onStartCommand方法取代onStart方法,为了兼容以前的程序,在onStartCommand方法中其实调用了onStart方法,不过我们最好是重写onStartCommand方法。
以上两种模式的流程如下图所示:
下面我们就结合实例来演示一下这两种模式的生命周期过程。我们新建一个名为service的项目,然后创建一个MyService的服务类,代码如下:
package com.scott.service;

import android.app.Service;
import android.content.Intent;
import android.os.IBinder;
import android.util.Log;

public class MyService extends Service {

	private static final String TAG = "MyService";

	@Override
	public void onCreate() {
		super.onCreate();
		Log.i(TAG, "onCreate called.");
	}

	@Override
	public int onStartCommand(Intent intent, int flags, int startId) {
		Log.i(TAG, "onStartCommand called.");
		return super.onStartCommand(intent, flags, startId);
	}

	@Override
	public void onStart(Intent intent, int startId) {
		super.onStart(intent, startId);
		Log.i(TAG, "onStart called.");
	}

	@Override
	public IBinder onBind(Intent intent) {
		Log.i(TAG, "onBind called.");
		return null;
	}

	@Override
	public boolean onUnbind(Intent intent) {
		Log.i(TAG, "onUnbind called.");
		return super.onUnbind(intent);
	}

	@Override
	public void onDestroy() {
		super.onDestroy();
		Log.i(TAG, "onDestroy called.");
	}
}
然后再AndroidManifest.xml中配置服务信息,不然这个服务就不会生效,配置如下:
<service android:name=".MyService">
            <intent-filter>
                 <action android:name="android.intent.action.MyService" />
                 <category android:name="android.intent.category.DEFAULT" />
            </intent-filter>
        </service>
如果服务只是在本应用中使用,大可以去掉<intent-filter>属性。
服务搭建完成之后,我们就来关注一下调用者MainActivity,它很简单,只有两个按钮,一个是启动服务,另一个是停止服务,我们来看一下他们的点击事件:
	/**
	 * 启动服务
	 * @param view
	 */
	public void start(View view) {
		Intent intent = new Intent(this, MyService.class);
		startService(intent);
	}

	/**
	 * 停止服务
	 * @param view
	 */
	public void stop(View view) {
		Intent intent = new Intent(this, MyService.class);
		stopService(intent);
	}
接下来我们就先点击一次启动按钮,看看都发生了些什么。日志打印结果如下:

当然我们觉得还不过瘾,再点击一次,我们会发现结果略有不同:

我们看到第二次点击时onCreate方法就不再被调用了,而是直接调用了onStartCommand方法(onStartCommand中又调用了onStart方法)。我们选择“Settings->Application s->Running services”就会发现我们刚刚启动的服务:

然后我们点击停止按钮,试图停止服务,我们发现如下现象:

我们会发现onDestroy方法被调用了,此时服务就停止运行了。我们再次查看“Running services”,就会发现MyService这个服务已全无踪迹。
在这个过程中,onBind方法和onUnbind方法始终没被调用,我们下面就让这两位show一下自己。
我们修改一下MainActivity的代码,使其可以可以以bindService的方式启动一个服务,代码如下:
	private ServiceConnection conn = new ServiceConnection() {

		@Override
		public void onServiceConnected(ComponentName name, IBinder service) {
			//connected
			Log.i(TAG, "onServiceConnected called.");
		}

		/**
		 * 	Called when a connection to the Service has been lost.
		 *	This typically happens when the process hosting the service has crashed or been killed.
		 *	This does not remove the ServiceConnection itself.
		 *	this binding to the service will remain active,
		 *	and you will receive a call to onServiceConnected when the Service is next running.
		 */
		@Override
		public void onServiceDisconnected(ComponentName name) {
		}
	};

	/**
	 * 绑定服务
	 * @param view
	 */
	public void bind(View view) {
		Intent intent = new Intent(this, MyService.class);
		bindService(intent, conn, Context.BIND_AUTO_CREATE);
	}

	/**
	 * 解除绑定
	 * @param view
	 */
	public void unbind(View view) {
		unbindService(conn);
	}
在使用bindService绑定服务时,我们需要一个ServiceConnection代表与服务的连接,它只有两个方法,onServiceConnected和onServiceDisconnected,前者是在操作者在连接一个服务成功时被调用,而后者是在服务崩溃或被杀死导致的连接中断时被调用,而如果我们自己解除绑定时则不会被调用,所以我们这里只研究onServiceConnected这个方法。
看样子是可以去绑定一个服务了,其实还不行,因为我们前面服务中的onBind方法返回值为null,这样是不行的,要想实现绑定操作,必须返回一个实现了IBinder接口类型的实例,该接口描述了与远程对象进行交互的抽象协议,有了它我们才能与服务进行交互。我们于是有了这样的代码:
	@Override
	public IBinder onBind(Intent intent) {
		Log.i(TAG, "onBind called.");
		return new Binder() {};
	}
我们返回了一个Binder的实例,而这个Binder恰恰是实现了IBinder接口,所以这样就可以实现绑定服务的操作了,一起来演示一下。
先点击一下绑定按钮,我们会发现在MainActivity中打印日志如下:

似的,onServiceConnected方法被调用了,看来绑定连接已经成功了,看看MyService如何:

onCreate方法和onBind方法被调用了,此时服务已进入运行阶段,如果再次点击绑定按钮,onCreate和onBinder并不会再次被调用,这个过程中它们仅被调用一次。
然后点击解除绑定按钮,我们会发现MyService打印如下:
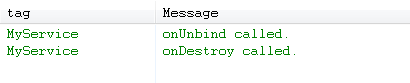
可以看到onUnbind方法和onDestroy方法被调用了,此时MyService已被销毁,整个生命周期结束。
另一方面,当我们退出MainActivity时,服务也会随之而结束,从这一点上看,MyService可以说是誓死追随着MainActivity。
需要注意的是,在连接中断状态再去做解除绑定操作会引起一个异常,在MainActivity销毁之前没有进行解除绑定也会导致后台出现异常信息,此时我们就要想办法确保不会出现此类情况,可以这样做:
	private boolean binded;

	@Override
	public void onServiceConnected(ComponentName name, IBinder service) {
		binded = true;
	}

	/**
	 * 解除绑定
	 * @param view
	 */
	public void unbind(View view) {
		unbindService();
	}

	@Override
	protected void onDestroy() {
		super.onDestroy();
		unbindService();
	}

	/**
	 * 解除服务绑定
	 */
	private void unbindService() {
		if (binded) {
			unbindService(conn);
			binded = false;
		}
	}
以上就是bindService的生命周期,正如我们上面讲的一样,使用bindService启动服务后调用者和服务绑定到了一起,当调用者被销毁,服务也立即结终止。
通常情况下是这样的,不过也有特殊情况。当startService和bindService在同一场合下使用时,就会出现稍微不同的现象。
如果我们先以startService方式启动服务,然后再用bindService绑定到这个服务,之后使用unbindService解除绑定,此时服务并不会因此而终止,而是继续运行,直到我们使用stopService来停止这个服务。下面我们再修改一下代码以验证这个过程。MyService保持不变,我们只需修改一下MainActivity。MainActivity最新代码如下:
package com.scott.service;

import android.app.Activity;
import android.content.ComponentName;
import android.content.Context;
import android.content.Intent;
import android.content.ServiceConnection;
import android.os.Bundle;
import android.os.IBinder;
import android.util.Log;
import android.view.View;

public class MainActivity extends Activity {

	private static final String TAG = "MainActivity";

	@Override
    public void onCreate(Bundle savedInstanceState) {
        super.onCreate(savedInstanceState);
        setContentView(R.layout.main);
    }

	private ServiceConnection conn = new ServiceConnection() {

		@Override
		public void onServiceConnected(ComponentName name, IBinder service) {
			Log.i(TAG, "onServiceConnected called.");
		}

		@Override
		public void onServiceDisconnected(ComponentName name) {
		}
	};

	/**
	 * 启动服务
	 * @param view
	 */
	public void start(View view) {
		Intent intent = new Intent(this, MyService.class);
		startService(intent);
	}

	/**
	 * 绑定服务
	 * @param view
	 */
	public void bind(View view) {
		Intent intent = new Intent(this, MyService.class);
		bindService(intent, conn, Context.BIND_AUTO_CREATE);
	}

	/**
	 * 解除绑定
	 * @param view
	 */
	public void unbind(View view) {
		unbindService(conn);
	}

	/**
	 * 停止服务
	 * @param view
	 */
	public void stop(View view) {
		Intent intent = new Intent(this, MyService.class);
		stopService(intent);
	}
}
在MainActivity中包含了四个按钮事件,分别是startService、bindService、unbindService和stopService,我们逐一地按下,看看都发生了什么。
首先按下启动服务的按钮,MyService打印如下:
恩,意料之中。然后我们再按下绑定服务的按钮,MyService打印如下:

此时,只有onBind被调用,之后两者就绑定成功。我们再按下解除绑定的按钮,MyService打印如下:

此时,onUnbind方法方法被调用,注意,此时MyService并没有因解除绑定而终止,而是继续运行。也许我们心里会问,如果多次按下绑定服务的按钮或重复以上两个步骤,结果如何呢?答案是onBind和onUnbind都不会再被调用了。看不到onBind被调用,是不是没有绑定成功啊,我们来看一下MainActivity打印信息:

重复按下绑定按钮,几次都绑定成功了。最后我们按下停止服务的按钮,MyService打印如下:

此时,onDestroy被调用了,此时MyService停止了运行,整个生命周期结束。
以上就是关于MyService生命周期的讲解,下面我们来介绍一下如何与服务进行通信。与服务之间的通信可以分为两种,进程内的通信和进程间的通信,前者调用者和服务在同一应用进程内,而后者是分布在不同应用进程中的。
2.进程内与服务通信
进程内与服务通信实际上就是通过bindService的方式与服务绑定,获取到通信中介Binder实例,然后通过调用这个实例的方法,完成对服务的各种操作。我们上面也介绍了不少关于bindService的内容,下面我们就针对实际需求对代码做改动。首先是MyService,代码如下:
package com.scott.service;

import android.app.Service;
import android.content.Intent;
import android.os.Binder;
import android.os.IBinder;
import android.util.Log;

public class MyService extends Service {

	private static final String TAG = "MyService";

	@Override
	public IBinder onBind(Intent intent) {
		Log.i(TAG, "onBind called.");
		return new MyBinder();
	}

	/**
	 * 绑定对象
	 * @author user
	 *
	 */
	public class MyBinder extends Binder {

		/**
		 * 问候
		 * @param name
		 */
		public void greet(String name) {
			Log.i(TAG, "hello, " + name);
		}
	}
}
我们创建了一个MyBinder的内部类,定义了一个greet方法,在onBind方法中就将这个MyBinder的实例返回,只要调用者获取到这个实例,就可以像拿着游戏手柄一样对服务进行操作。我们来看一下调用者的代码吧,MainActivity代码如下:
package com.scott.service;

import android.app.Activity;
import android.content.ComponentName;
import android.content.Context;
import android.content.Intent;
import android.content.ServiceConnection;
import android.os.Bundle;
import android.os.IBinder;
import android.view.View;

public class MainActivity extends Activity {

	/**
	 * 绑定对象实例
	 */
	private MyService.MyBinder binder;

	@Override
    public void onCreate(Bundle savedInstanceState) {
        super.onCreate(savedInstanceState);
        setContentView(R.layout.main);
    }

	private ServiceConnection conn = new ServiceConnection() {

		@Override
		public void onServiceConnected(ComponentName name, IBinder service) {
			binder = (MyService.MyBinder) service;	//获取其实例
			binder.greet("scott");					//调用其方法
		}

		@Override
		public void onServiceDisconnected(ComponentName name) {
		}
	};

	/**
	 * 绑定服务
	 * @param view
	 */
	public void bind(View view) {
		Intent intent = new Intent(this, MyService.class);
		bindService(intent, conn, Context.BIND_AUTO_CREATE);
	}

	/**
	 * 解除绑定
	 * @param view
	 */
	public void unbind(View view) {
		unbindService(conn);
	}
}
在上面的代码中,我们是在绑定服务成功时将IBinder类型的service参数强转为MyService.MyBinder类型,获取绑定中介实例,然后调用其greet方法。
操作一下,看看效果如何。先点击绑定服务的按钮,MyService打印如下:

需要注意的是,与服务绑定是一个异步的过程,也就是说,在这一刻我们绑定服务,下一刻我们去操作binder对象,也许它还为null,这就容易引起空指针异常,正确的做法是把这些操作放到绑定成功之后,确保万无一失。
以上就是进程内通信的内容。
关于进程间通信的内容,限于篇幅原因,这里就不再陈述了,大家可以看我之前的两篇文章,做一下了解:

 浙公网安备 33010602011771号