1 复习ha相关 + weekend110的hive的元数据库mysql方式安装配置(完全正确配法)(CentOS版本)(包含卸载系统自带的MySQL)
本博文的主要内容是:
.复习HA相关
.MySQL数据库
.先在MySQL数据库中建立hive数据库
.hive的配置
以下是Apache Hadoop HA的总结。分为hdfs HA和yarn HA。
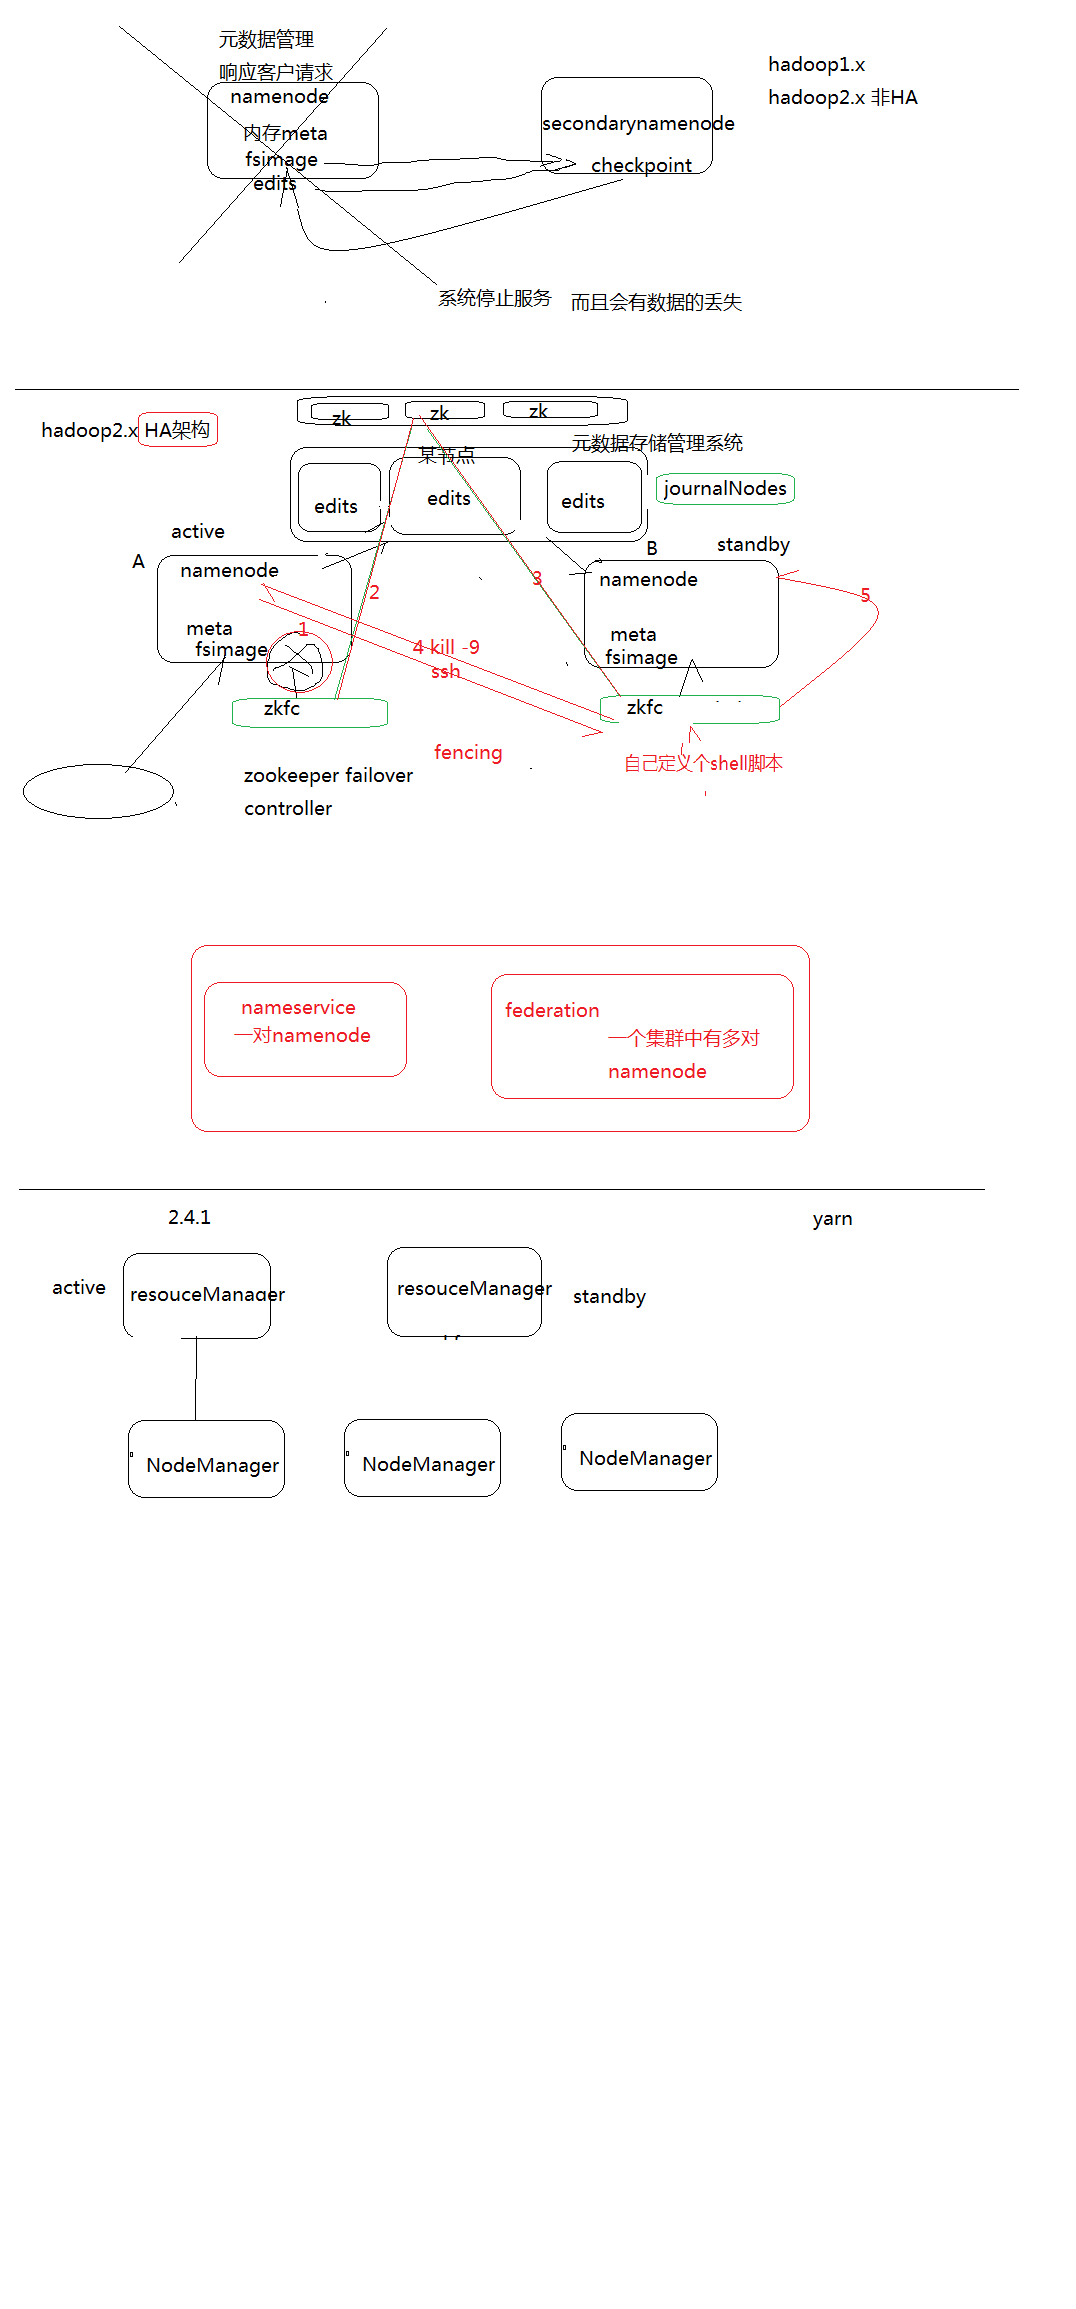

以上,是参考《Hadoop海量数据处理 技术详解与项目实战》
强烈建议,先看
想说的是,hive只是个工具,包括它的数据分析,依赖于mapreduce,它的数据管理,依赖于外部系统。
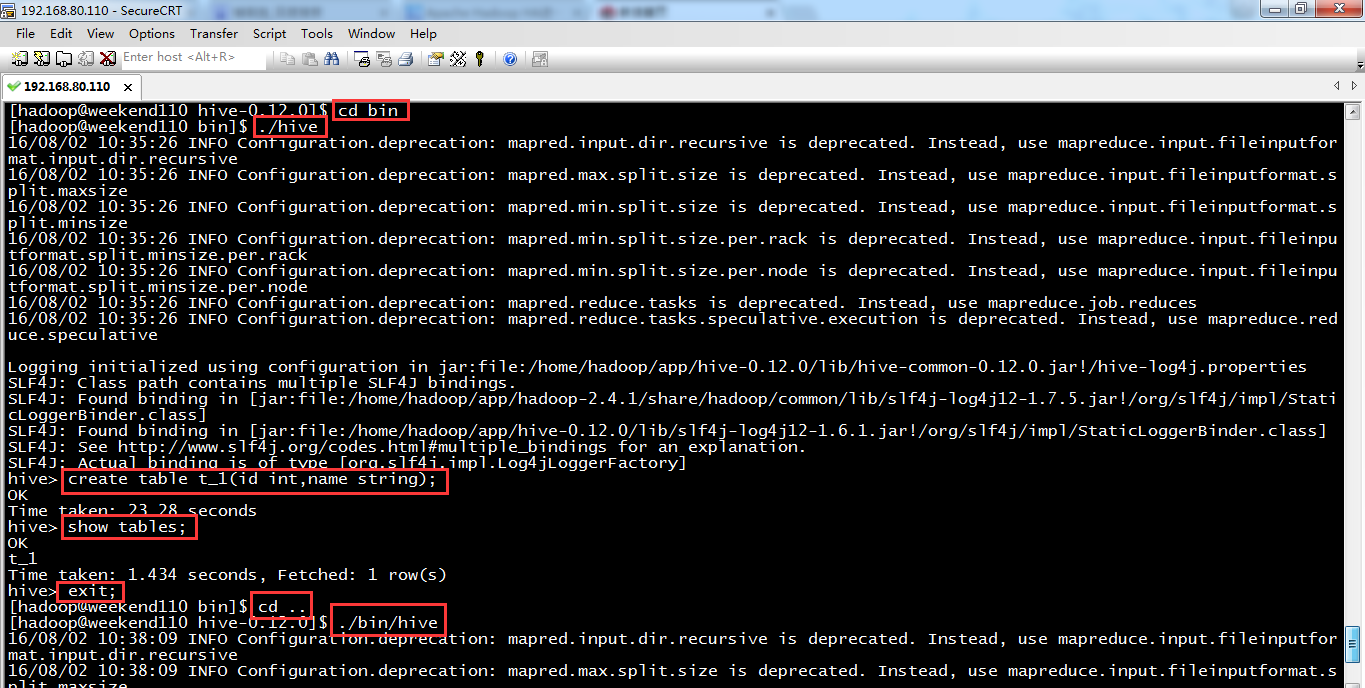

metastore_db,是在哪目录下运行,在哪里产生数据。
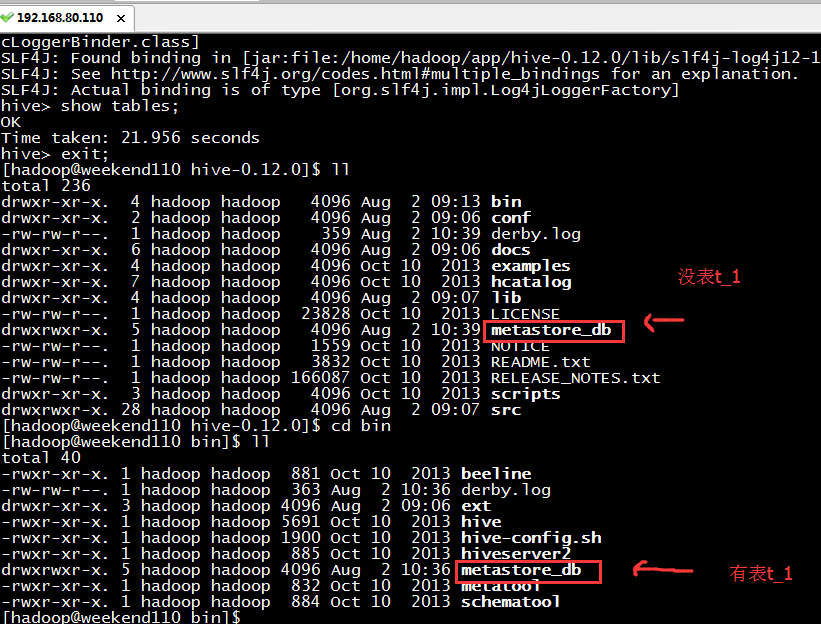
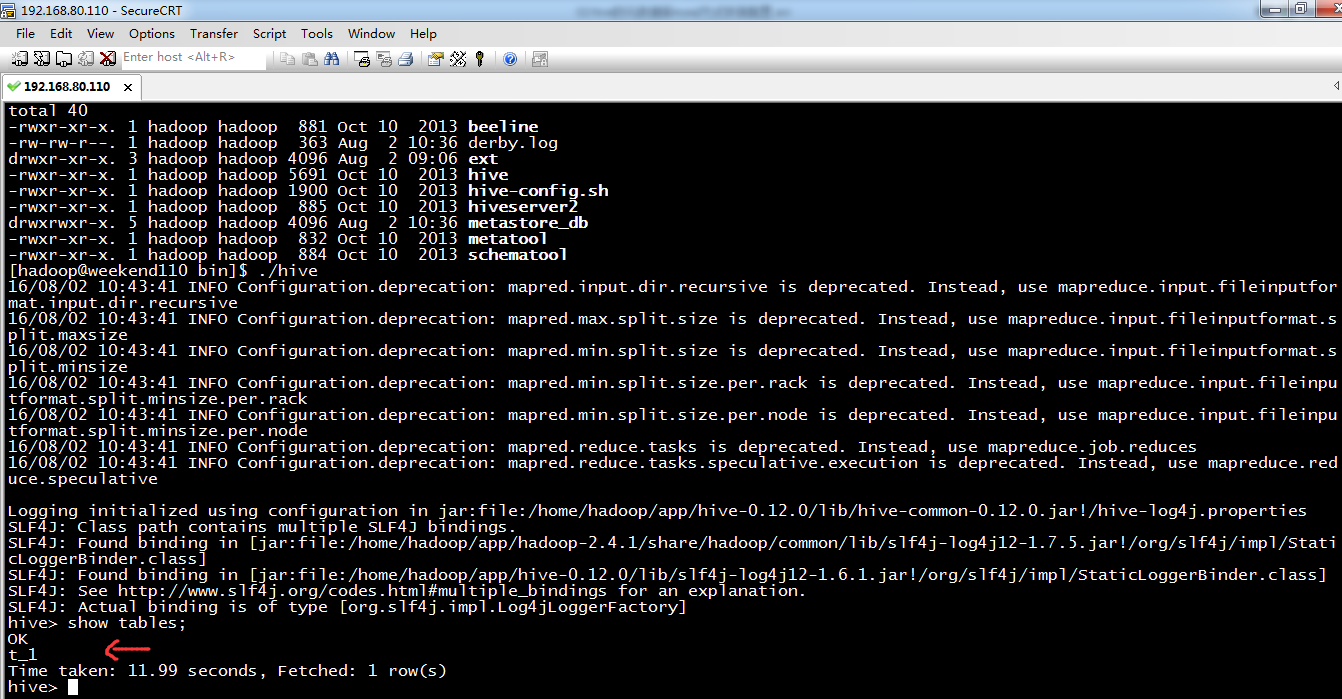
由此可见,你在哪路径下,执行hive指令,就在哪路径下生成metastore_db。建一套数据库文件,这样是极其不合适的,公司里每个人若不一样,则会显得非常混杂。导致员工之间无法公用交流。
为此,需公用的,mysql。作为hive的元数据管理。
若什么都不做,则hive默认是用derby,是单用户,不方便,不适合多用户。
说明的是,关于hive的安装和mysql的安装,一般,都是先安装好hive,再来安装mysql。当然,我也看到他人是反着的也可以。
配置mysql metastore(切换到root用户)
配置HIVE_HOME环境变量

1、在线安装Mysql数据库
如果你是一名有经验大数据工程师,无论是安装jdk(注意:CentOS6.5有自带的jdk),还是安装mysql。都是先查看系统是否已经安装Mysql包。
Centos 6.5下的OPENJDK卸载和SUN的JDK安装、环境变量配置
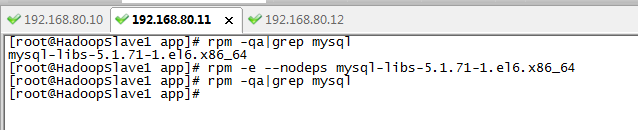
[root@HadoopSlave1 app]# rpm -qa|grep mysql
mysql-libs-5.1.71-1.el6.x86_64
[root@HadoopSlave1 app]# rpm -e --nodeps mysql-libs-5.1.71-1.el6.x86_64
[root@HadoopSlave1 app]# rpm -qa|grep mysql
[root@HadoopSlave1 app]#
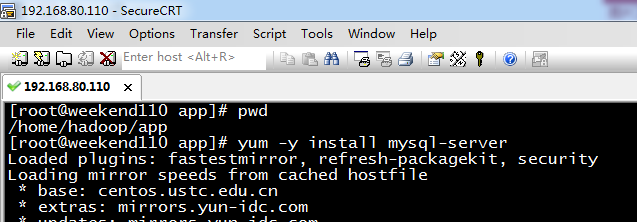
[root@weekend110 app]# pwd
/home/hadoop/app
[root@weekend110 app]# yum -y install mysql-server (CentOS版本)
若是Ubuntu系统的话,见
Ubuntu系统下安装并配置hive-2.1.0
或者,可以这么来安装。
但是这两个得,提前下载好。

rpm -ivh MySQL-server-5.1.73-1.glibc23.i386.rpm
rpm -ivh MySQL-client-5.1.73-1.glibc23.i386.rpm
参考:http://blog.csdn.net/u014726937/article/details/52142048
具体,见
60分钟内从零起步驾驭Hive实战学习笔记
2、启动MySQL服务
[root@weekend110 app]# service mysqld start (CentOS版本)
Initializing MySQL database: Installing MySQL system tables...
OK
Filling help tables...
OK
To start mysqld at boot time you have to copy
support-files/mysql.server to the right place for your system
PLEASE REMEMBER TO SET A PASSWORD FOR THE MySQL root USER !
To do so, start the server, then issue the following commands:
/usr/bin/mysqladmin -u root password 'new-password'
/usr/bin/mysqladmin -u root -h weekend110 password 'new-password'
Alternatively you can run:
/usr/bin/mysql_secure_installation
which will also give you the option of removing the test
databases and anonymous user created by default. This is
strongly recommended for production servers.
See the manual for more instructions.
You can start the MySQL daemon with:
cd /usr ; /usr/bin/mysqld_safe &
You can test the MySQL daemon with mysql-test-run.pl
cd /usr/mysql-test ; perl mysql-test-run.pl
Please report any problems with the /usr/bin/mysqlbug script!
[ OK ]
Starting mysqld: [ OK ]
[root@weekend110 app]#
[root@weekend110 app]# mysql -u root -p 进入
Enter password: (回车)
其实啊,这里啊,直接几步就可以了
mysql> CREATE USER 'hive'@'%' IDENTIFIED BY 'hive'; //创建一个账号:用户名为hive,密码为hive
mysql> GRANT ALL PRIVILEGES ON *.* to 'hive'@'%' IDENTIFIED BY 'hive' WITH GRANT OPTION; //将权限授予host为'weekend110'的hive用户
mysql> FLUSH PRIVILEGES;
mysql> exit;
其中, *.*:所有库下的所有表 %:任何IP地址或主机都可以连接
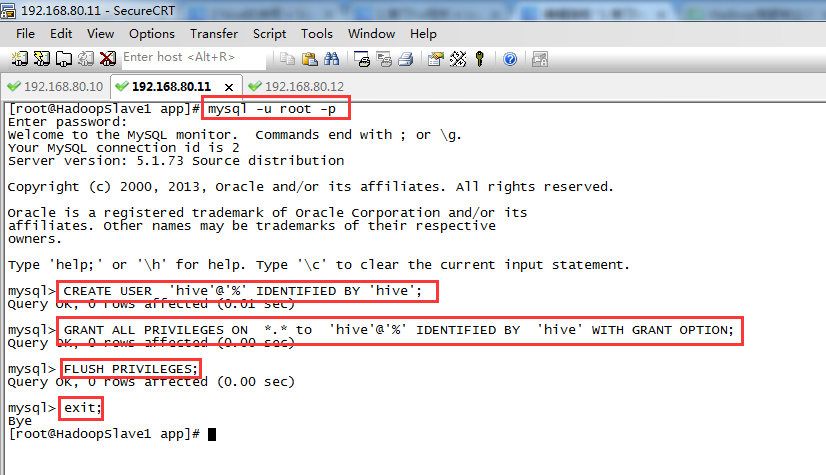
[root@HadoopSlave1 app]# mysql -u root -p
Enter password: (回车)
Welcome to the MySQL monitor. Commands end with ; or \g.
Your MySQL connection id is 2
Server version: 5.1.73 Source distribution
Copyright (c) 2000, 2013, Oracle and/or its affiliates. All rights reserved.
Oracle is a registered trademark of Oracle Corporation and/or its
affiliates. Other names may be trademarks of their respective
owners.
Type 'help;' or '\h' for help. Type '\c' to clear the current input statement.
mysql> CREATE USER 'hive'@'%' IDENTIFIED BY 'hive';
Query OK, 0 rows affected (0.01 sec)
mysql> GRANT ALL PRIVILEGES ON *.* to 'hive'@'%' IDENTIFIED BY 'hive' WITH GRANT OPTION;
Query OK, 0 rows affected (0.00 sec)
mysql> FLUSH PRIVILEGES;
Query OK, 0 rows affected (0.00 sec)
mysql> exit;
Bye
[root@HadoopSlave1 app]#
此外,为了使远程用户可以访问MySQL,需要修改 /etc/mysql/my.cnf(Ubuntu系统)或/etc/my.cnf(CentOS系统),将 bind-address一行注释掉。
当然,这可以以后更改,也可以的。
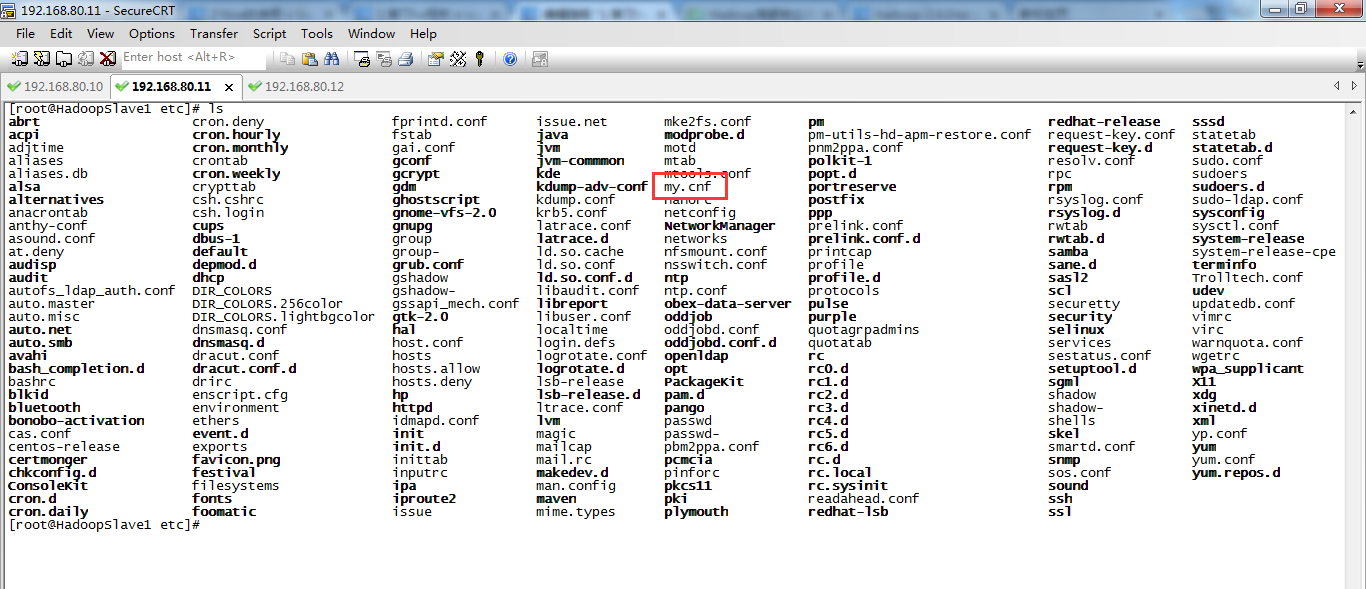
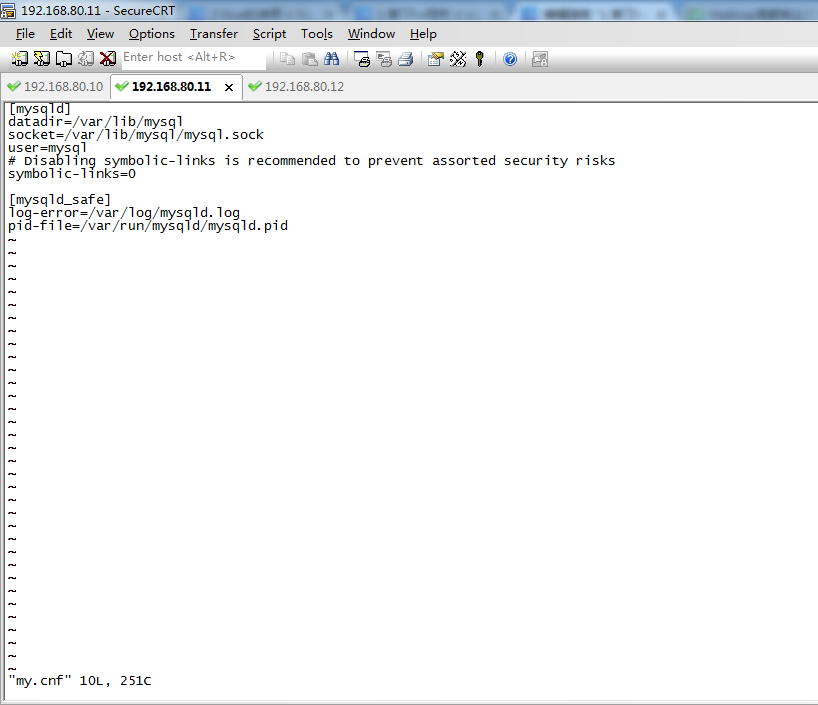
可以看出,CentOS系统里,是没有的。

sudo /etc/init.d/mysql restart 进行重启、
3、设置MySQL的root用户设置密码
MySQL在刚刚被安装的时候,它的 root 用户是没有被设置密码的(默认密码为空,是回车)。首先来设置 MySQL的root 用户的root密码。

[root@weekend110 app]# mysql -u root -p
Enter password: (回车)
Welcome to the MySQL monitor. Commands end with ; or \g.
Your MySQL connection id is 2
Server version: 5.1.73 Source distribution
Copyright (c) 2000, 2013, Oracle and/or its affiliates. All rights reserved.
Oracle is a registered trademark of Oracle Corporation and/or its
affiliates. Other names may be trademarks of their respective
owners.
Type 'help;' or '\h' for help. Type '\c' to clear the current input statement.
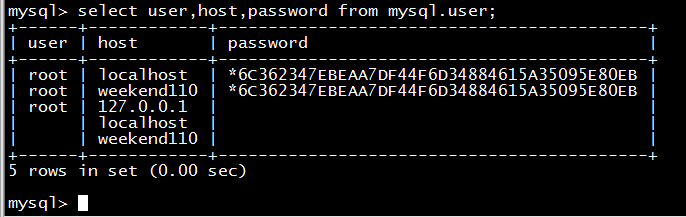
mysql> select user,host,password from mysql.user;
+------+------------+----------+
| user | host | password |
+------+------------+----------+
| root | localhost | |
| root | weekend110 | |
| root | 127.0.0.1 | |
| | localhost | |
| | weekend110 | |
+------+------------+----------+
5 rows in set (0.00 sec)
mysql> set password for root@localhost=password('rootroot');
Query OK, 0 rows affected (0.00 sec)
mysql> set password for root@weekend110=password('rootroot');
Query OK, 0 rows affected (0.00 sec)
mysql> select user,host,password from mysql.user;
+------+------------+-------------------------------------------+
| user | host | password |
+------+------------+-------------------------------------------+
| root | localhost | *6C362347EBEAA7DF44F6D34884615A35095E80EB |
| root | weekend110 | *6C362347EBEAA7DF44F6D34884615A35095E80EB |
| root | 127.0.0.1 | |
| | localhost | |
| | weekend110 | |
+------+------------+-------------------------------------------+
5 rows in set (0.00 sec)
mysql>
4、为 Hive 建立相应的 Mysql 账户hive,再设置密码hive。
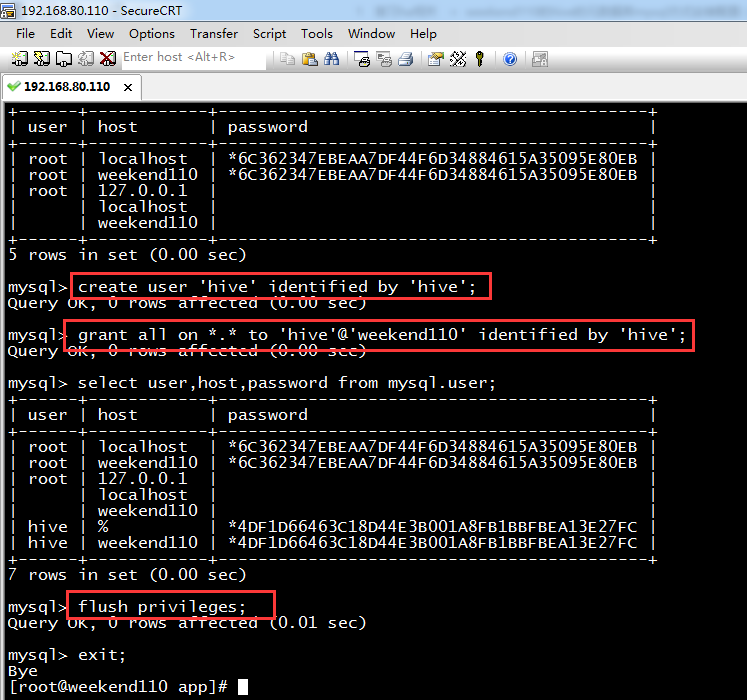
mysql> create user 'hive' identified by 'hive'; //创建一个账号:用户名为hive,密码为hive
Query OK, 0 rows affected (0.00 sec)
mysql> grant all on *.* to 'hive'@'weekend110' identified by 'hive'; //将权限授予host为'weekend110'的hive用户
Query OK, 0 rows affected (0.00 sec)
mysql> select user,host,password from mysql.user;
+------+------------+-------------------------------------------+
| user | host | password |
+------+------------+-------------------------------------------+
| root | localhost | *6C362347EBEAA7DF44F6D34884615A35095E80EB |
| root | weekend110 | *6C362347EBEAA7DF44F6D34884615A35095E80EB |
| root | 127.0.0.1 | |
| | localhost | |
| | weekend110 | |
| hive | % | *4DF1D66463C18D44E3B001A8FB1BBFBEA13E27FC |
| hive | weekend110 | *4DF1D66463C18D44E3B001A8FB1BBFBEA13E27FC |
+------+------------+-------------------------------------------+
7 rows in set (0.00 sec)
mysql> flush privileges;
Query OK, 0 rows affected (0.01 sec)
mysql> exit;
Bye
[root@weekend110 app]#
5、用刚才创建的 “hive” 账号登录,建立 Hive 专用的元数据库
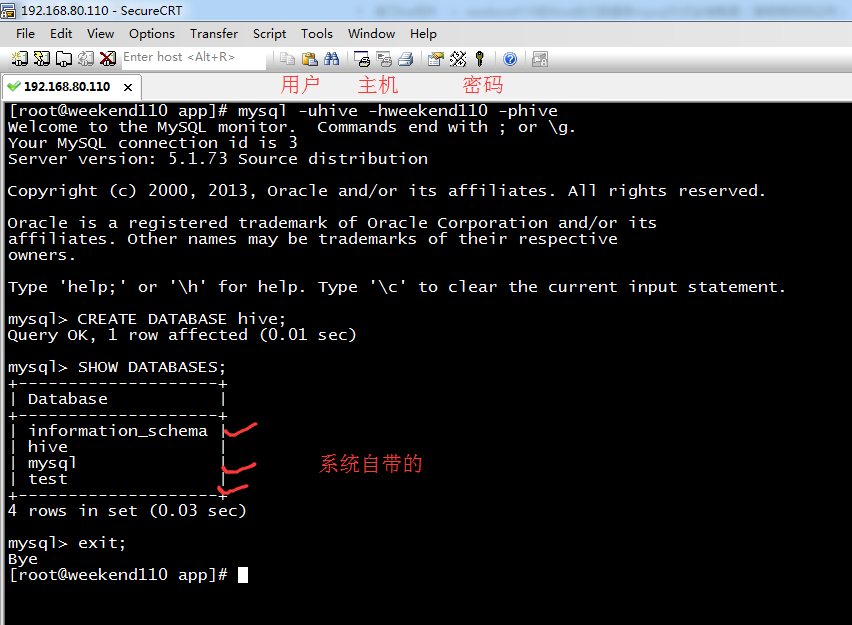
[root@weekend110 app]# mysql -uhive -hweekend110 -phive
Welcome to the MySQL monitor. Commands end with ; or \g.
Your MySQL connection id is 3
Server version: 5.1.73 Source distribution
Copyright (c) 2000, 2013, Oracle and/or its affiliates. All rights reserved.
Oracle is a registered trademark of Oracle Corporation and/or its
affiliates. Other names may be trademarks of their respective
owners.
Type 'help;' or '\h' for help. Type '\c' to clear the current input statement.
mysql> CREATE DATABASE hive; //建立 hive用户,专用的元数据库hive
Query OK, 1 row affected (0.01 sec)
mysql> SHOW DATABASES; (规范,大写)
+--------------------+
| Database |
+--------------------+
| information_schema |
| hive |
| mysql |
| test |
+--------------------+
4 rows in set (0.03 sec)
其中,默认创建好的是3个,information_schema、mysql、test。这三个数据库是MySQL安装程序自动创建的。
其中,mysql库中包含的是5个MySQL授权表,information_schema库中是相关信息,而test是供用户练习使用的。
mysql> exit;
Bye
[root@weekend110 app]#
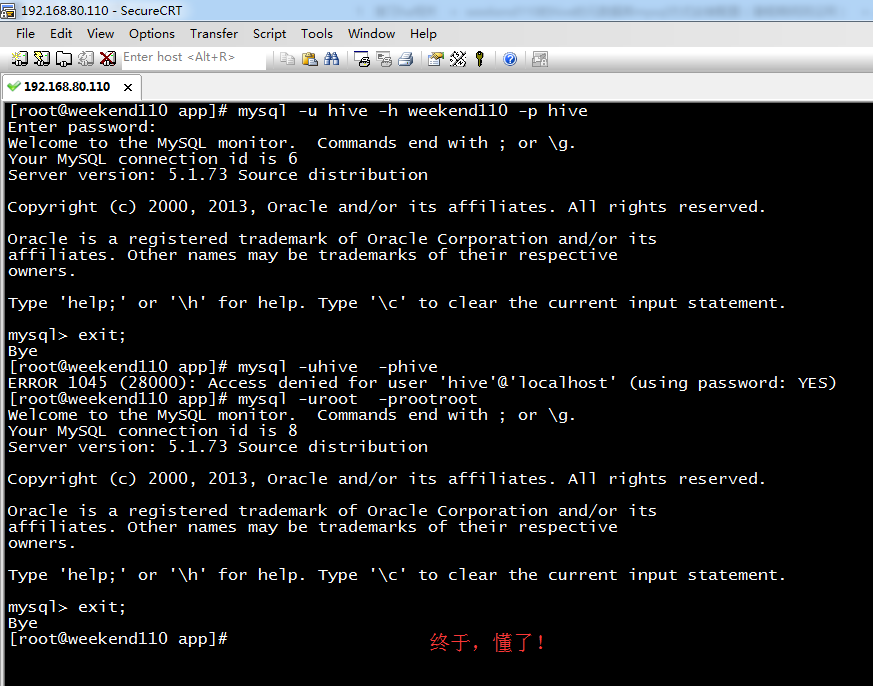
[root@weekend110 app]# mysql -u hive -h weekend110 -p hive
Enter password:
Welcome to the MySQL monitor. Commands end with ; or \g.
Your MySQL connection id is 6
Server version: 5.1.73 Source distribution
Copyright (c) 2000, 2013, Oracle and/or its affiliates. All rights reserved.
Oracle is a registered trademark of Oracle Corporation and/or its
affiliates. Other names may be trademarks of their respective
owners.
Type 'help;' or '\h' for help. Type '\c' to clear the current input statement.
mysql> exit;
Bye
[root@weekend110 app]# mysql -uhive -phive
ERROR 1045 (28000): Access denied for user 'hive'@'localhost' (using password: YES)
[root@weekend110 app]# mysql -uroot -prootroot
Welcome to the MySQL monitor. Commands end with ; or \g.
Your MySQL connection id is 8
Server version: 5.1.73 Source distribution
Copyright (c) 2000, 2013, Oracle and/or its affiliates. All rights reserved.
Oracle is a registered trademark of Oracle Corporation and/or its
affiliates. Other names may be trademarks of their respective
owners.
Type 'help;' or '\h' for help. Type '\c' to clear the current input statement.
mysql> grant all on *.* to 'hive'@'localhost' identified by 'hive';
Query OK, 0 rows affected (0.00 sec)
mysql> set password for hive@localhost=password('hive');
Query OK, 0 rows affected (0.00 sec)
mysql> flush privileges;
Query OK, 0 rows affected (0.00 sec)
mysql> exit;
Bye
[root@weekend110 app]#
最后结束,情况图是如下(此博文完全正确配法)

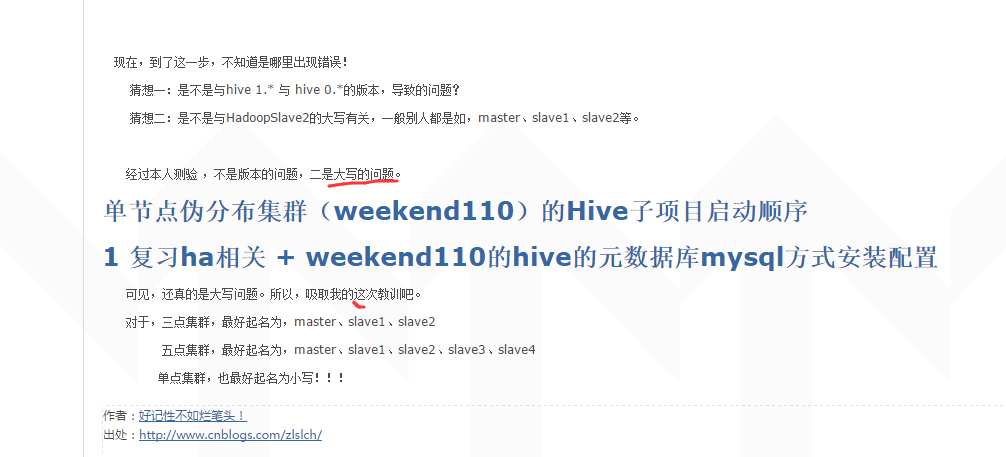
由此,可见啊,
hive权威安装出现的不解错误!(完美解决)
如果有误,请见博客
配置hive

学个技巧,如何快速的搜索。
先按Esc,再按Shift,再 . 键 + / 键
更改四个地方: (新手,只需配置这四个地方,即可)
javax.jdo.option.ConnectionURL
javax.jdo.option.ConnectionDriverName
javax.jdo.option.ConnectionUserName
javax.jdo.option.ConnectionPassword
当然,有些人说,要改5个地方,甚至,更多地方。
60分钟内从零起步驾驭Hive实战学习笔记
<property>
<name>javax.jdo.option.ConnectionURL</name>
<value>jdbc:derby:;databaseName=metastore_db;create=true</value>
<description>JDBC connect string for a JDBC metastore</description>
</property>
改为
<property>
<name>javax.jdo.option.ConnectionURL</name>
<value>jdbc:mysql://weekend110:3306/hive?createDatabaseIfNotExist=true</value>
<description>JDBC connect string for a JDBC metastore</description>
</property>
<property>
<name>javax.jdo.option.ConnectionDriverName</name>
<value>org.apache.derby.jdbc.EmbeddedDriver</value>
<description>Driver class name for a JDBC metastore</description>
</property>
改为
<property>
<name>javax.jdo.option.ConnectionDriverName</name>
<value>com.mysql.jdbc.Driver</value>
<description>Driver class name for a JDBC metastore</description>
</property>
<property>
<name>javax.jdo.option.ConnectionUserName</name>
<value>APP</value>
<description>username to use against metastore database</description>
</property>
改为
<property>
<name>javax.jdo.option.ConnectionUserName</name>
<value>hive</value>
<description>username to use against metastore database</description>
</property>
<property>
<name>javax.jdo.option.ConnectionPassword</name>
<value>mine</value>
<description>password to use against metastore database</description>
</property>
改为
<property>
<name>javax.jdo.option.ConnectionPassword</name>
<value>hive</value>
<description>password to use against metastore database</description>
</property>
之后,会出现如下问题。

还需驱动mysql的jar包,

自带的是derby的


也许,最好执行时,会出现如下问题。


步骤二: 则,需,创建一个目录,如我这里,是/home/spark/app/hive-1.2.1/iotmp
< property>
< name>hive.querylog.location< /name>
< value>/home/spark/app/hive-1.2.1/iotmp< /value>
< description>Location of Hive run time structured log file< /description>
< /property>
< property>
< name>hive.exec.local.scratchdir< /name>
< value>/home/spark/app/hive-1.2.1/iotmp< /value>
< description>Local scratch space for Hive jobs< /description>
< /property>
< property>
< name>hive.downloaded.resources.dir< /name>
< value>/home/spark/app/hive-1.2.1/iotmp< /value>
< description>Temporary local directory for added resources in the remote file system.< /description>
< /property>
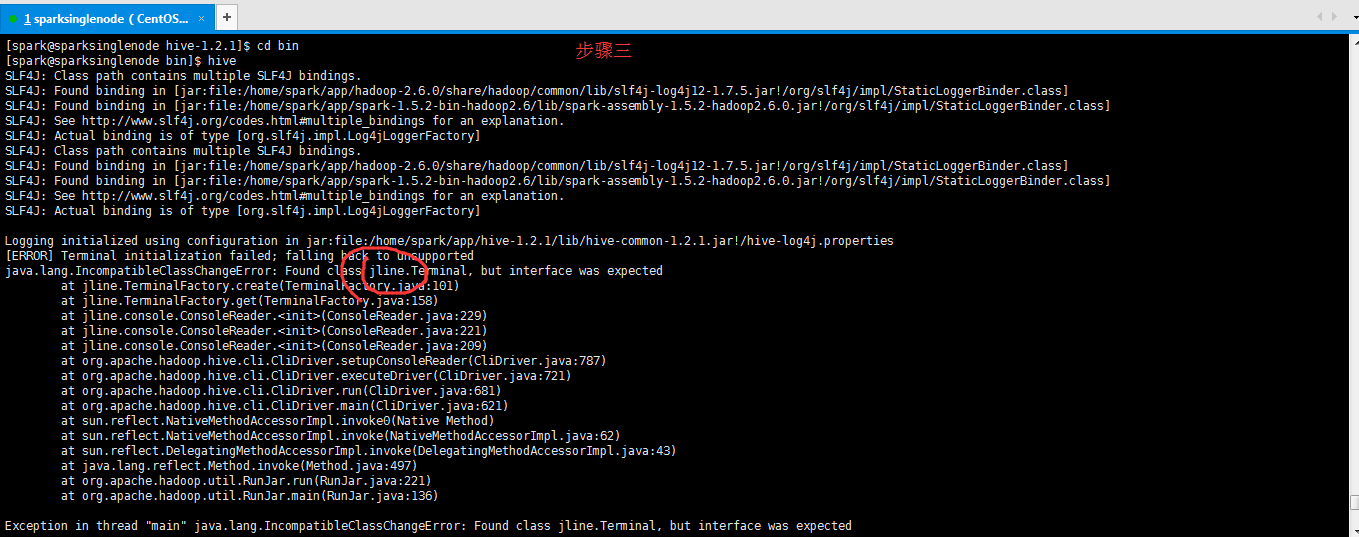
步骤四:解决方法:jline版本不一致,把HADOOP_HOME/share/hadoop/yarn/lib和HIVE_HOME/lib下的jline-**.jar版本一致就可以了,复制其中一个高版本覆盖另一个。
即,取其中的高版本即可。我这里的情况是,HADOOP_HOME/share/hadoop/yarn/lib下是0.9多,删除这个。
将HIVE_HOME/lib下的jline-2.12.jar,复制一份到HADOOP_HOME/share/hadoop/yarn/lib下。

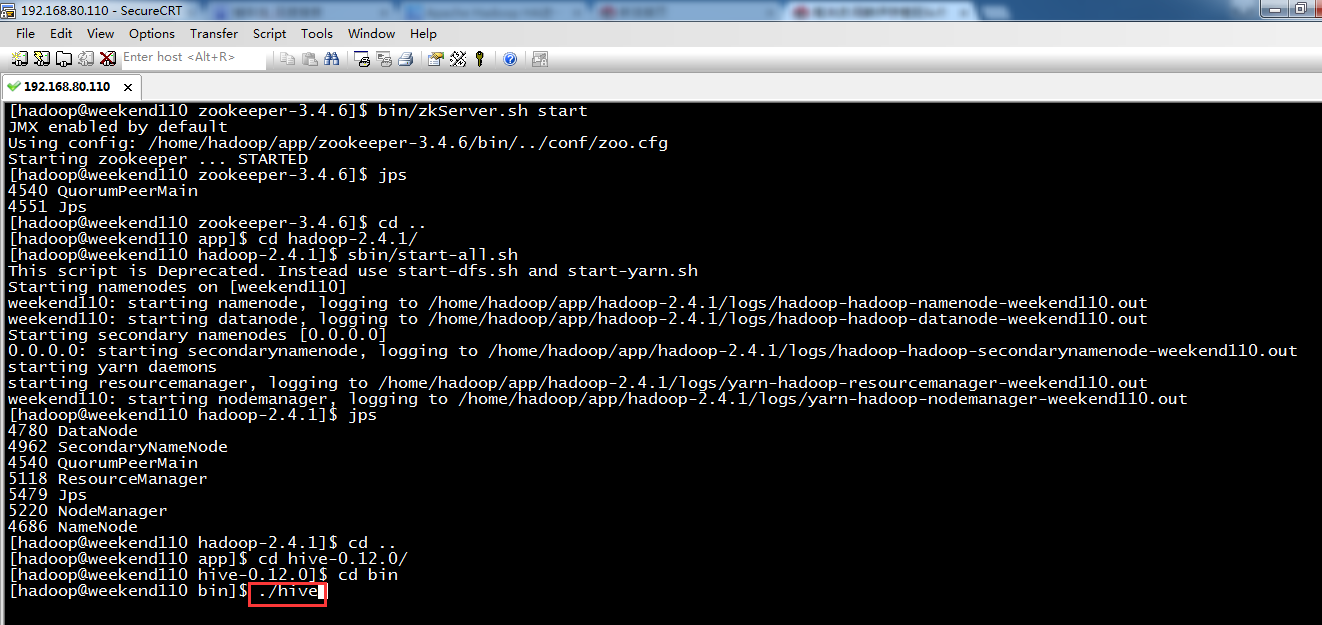
root用户来,验证一下
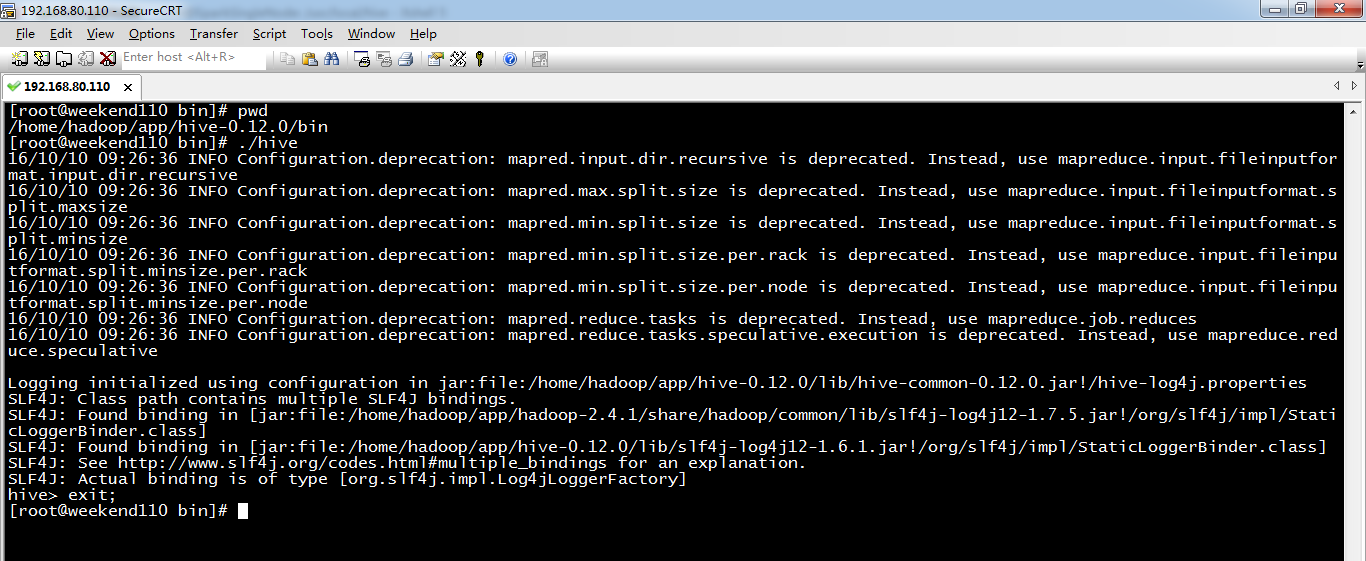
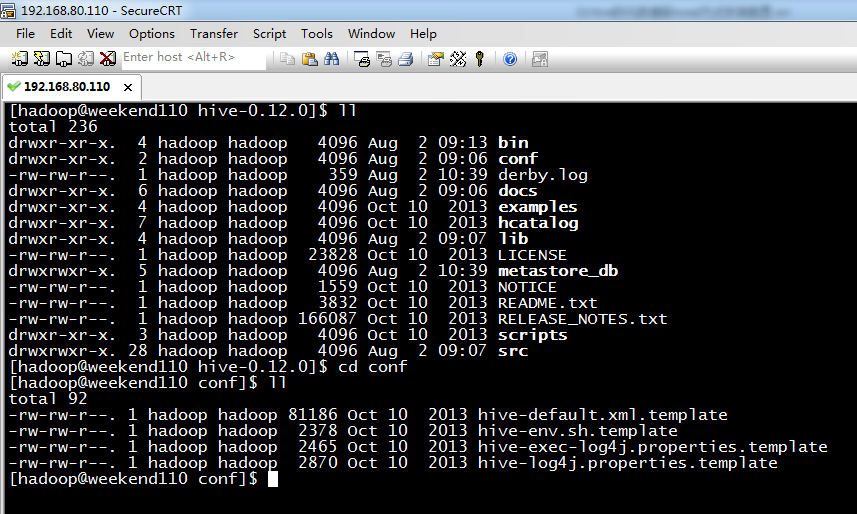
[root@weekend110 bin]# pwd
/home/hadoop/app/hive-0.12.0/bin
[root@weekend110 bin]# ./hive
16/10/10 09:26:36 INFO Configuration.deprecation: mapred.input.dir.recursive is deprecated. Instead, use mapreduce.input.fileinputformat.input.dir.recursive
16/10/10 09:26:36 INFO Configuration.deprecation: mapred.max.split.size is deprecated. Instead, use mapreduce.input.fileinputformat.split.maxsize
16/10/10 09:26:36 INFO Configuration.deprecation: mapred.min.split.size is deprecated. Instead, use mapreduce.input.fileinputformat.split.minsize
16/10/10 09:26:36 INFO Configuration.deprecation: mapred.min.split.size.per.rack is deprecated. Instead, use mapreduce.input.fileinputformat.split.minsize.per.rack
16/10/10 09:26:36 INFO Configuration.deprecation: mapred.min.split.size.per.node is deprecated. Instead, use mapreduce.input.fileinputformat.split.minsize.per.node
16/10/10 09:26:36 INFO Configuration.deprecation: mapred.reduce.tasks is deprecated. Instead, use mapreduce.job.reduces
16/10/10 09:26:36 INFO Configuration.deprecation: mapred.reduce.tasks.speculative.execution is deprecated. Instead, use mapreduce.reduce.speculative
Logging initialized using configuration in jar:file:/home/hadoop/app/hive-0.12.0/lib/hive-common-0.12.0.jar!/hive-log4j.properties
SLF4J: Class path contains multiple SLF4J bindings.
SLF4J: Found binding in [jar:file:/home/hadoop/app/hadoop-2.4.1/share/hadoop/common/lib/slf4j-log4j12-1.7.5.jar!/org/slf4j/impl/StaticLoggerBinder.class]
SLF4J: Found binding in [jar:file:/home/hadoop/app/hive-0.12.0/lib/slf4j-log4j12-1.6.1.jar!/org/slf4j/impl/StaticLoggerBinder.class]
SLF4J: See http://www.slf4j.org/codes.html#multiple_bindings for an explanation.
SLF4J: Actual binding is of type [org.slf4j.impl.Log4jLoggerFactory]
hive> exit;
[root@weekend110 bin]#
hadoop用户,来验证一下
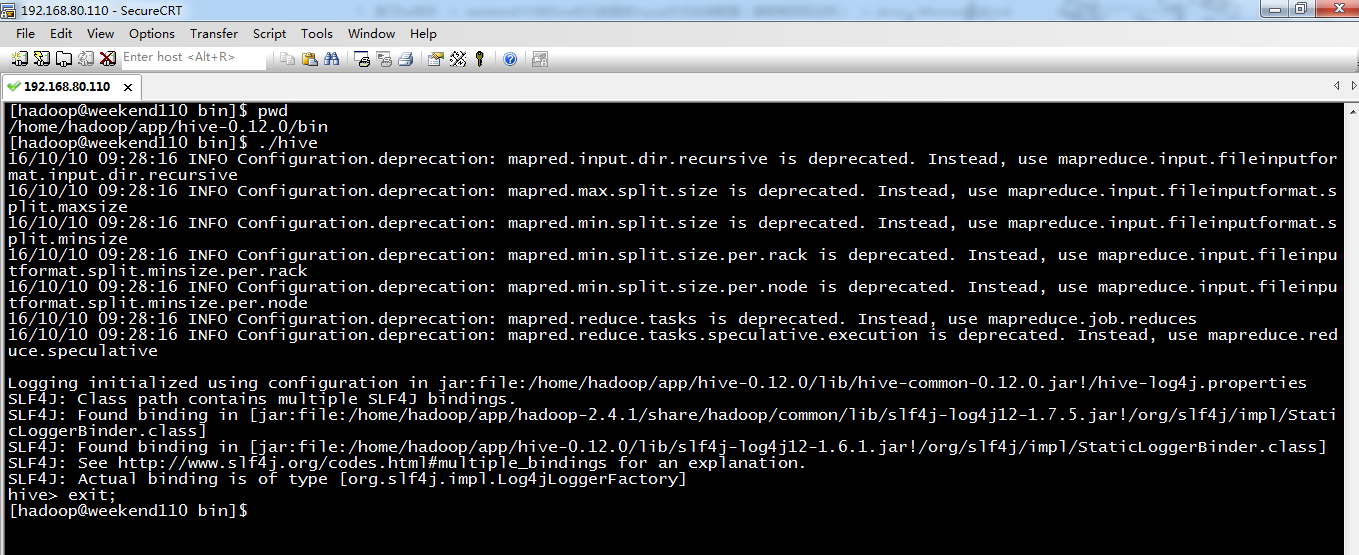
[hadoop@weekend110 bin]$ pwd
/home/hadoop/app/hive-0.12.0/bin
[hadoop@weekend110 bin]$ ./hive
16/10/10 09:28:16 INFO Configuration.deprecation: mapred.input.dir.recursive is deprecated. Instead, use mapreduce.input.fileinputformat.input.dir.recursive
16/10/10 09:28:16 INFO Configuration.deprecation: mapred.max.split.size is deprecated. Instead, use mapreduce.input.fileinputformat.split.maxsize
16/10/10 09:28:16 INFO Configuration.deprecation: mapred.min.split.size is deprecated. Instead, use mapreduce.input.fileinputformat.split.minsize
16/10/10 09:28:16 INFO Configuration.deprecation: mapred.min.split.size.per.rack is deprecated. Instead, use mapreduce.input.fileinputformat.split.minsize.per.rack
16/10/10 09:28:16 INFO Configuration.deprecation: mapred.min.split.size.per.node is deprecated. Instead, use mapreduce.input.fileinputformat.split.minsize.per.node
16/10/10 09:28:16 INFO Configuration.deprecation: mapred.reduce.tasks is deprecated. Instead, use mapreduce.job.reduces
16/10/10 09:28:16 INFO Configuration.deprecation: mapred.reduce.tasks.speculative.execution is deprecated. Instead, use mapreduce.reduce.speculative
Logging initialized using configuration in jar:file:/home/hadoop/app/hive-0.12.0/lib/hive-common-0.12.0.jar!/hive-log4j.properties
SLF4J: Class path contains multiple SLF4J bindings.
SLF4J: Found binding in [jar:file:/home/hadoop/app/hadoop-2.4.1/share/hadoop/common/lib/slf4j-log4j12-1.7.5.jar!/org/slf4j/impl/StaticLoggerBinder.class]
SLF4J: Found binding in [jar:file:/home/hadoop/app/hive-0.12.0/lib/slf4j-log4j12-1.6.1.jar!/org/slf4j/impl/StaticLoggerBinder.class]
SLF4J: See http://www.slf4j.org/codes.html#multiple_bindings for an explanation.
SLF4J: Actual binding is of type [org.slf4j.impl.Log4jLoggerFactory]
hive> exit;
[hadoop@weekend110 bin]$
总结,想说的是,在单节点集群里。hadoop和hive都是在一个节点里。
如上配置,或
<property>
<name>javax.jdo.option.ConnectionURL</name>
<value>jdbc:mysql://weekend110:3306/hive?useUnicode=true&characterEncoding=UTF-8&createDatabaseIfNotExist=true</value>
<description>JDBC connect string for a JDBC metastore</description>
</property>
直接启动没问题。
但是,我在3节点(HadoopMaster、HadoopSlave1、HadoopSlave2)上,的HadoopSlave1上这么配置,再启动。
一直报错误!
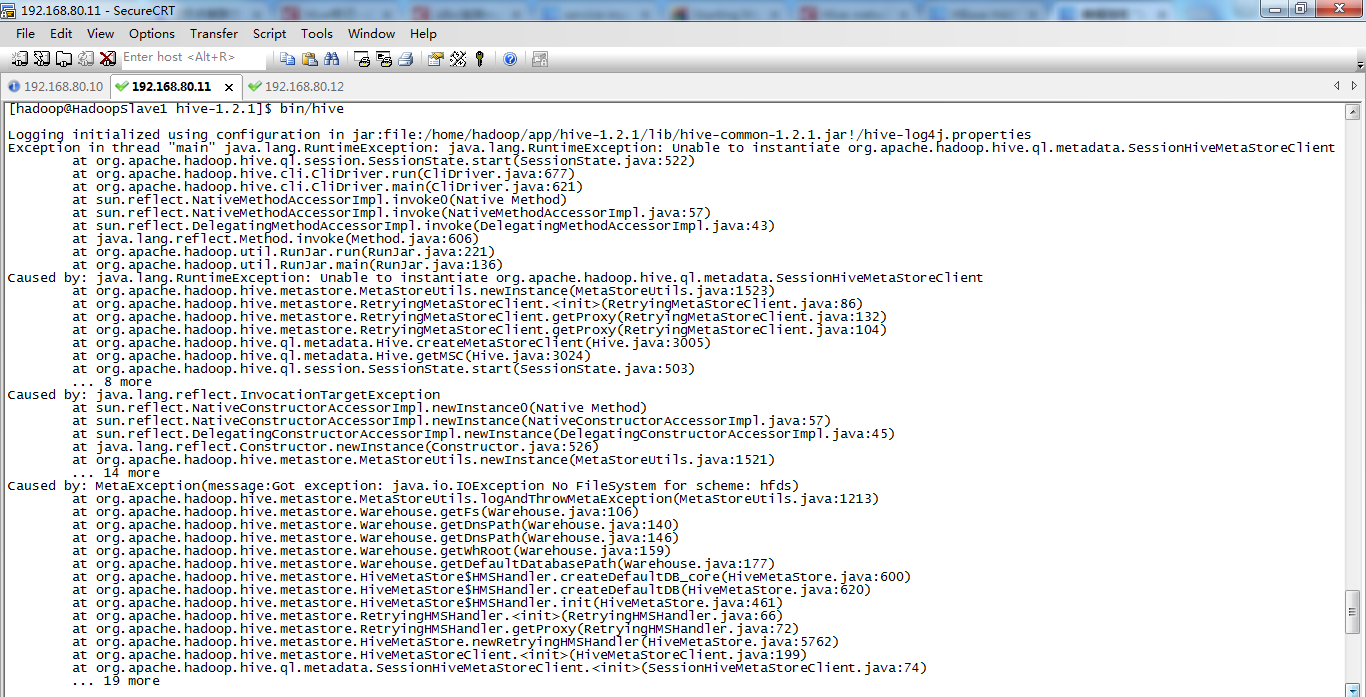
也许是没在主节点上配置吧!
作者:大数据和人工智能躺过的坑
出处:http://www.cnblogs.com/zlslch/
本文版权归作者和博客园共有,欢迎转载,但未经作者同意必须保留此段声明,且在文章页面明显位置给出原文链接,否则保留追究法律责任的权利。
如果您认为这篇文章还不错或者有所收获,您可以通过右边的“打赏”功能 打赏我一杯咖啡【物质支持】,也可以点击右下角的【好文要顶】按钮【精神支持】,因为这两种支持都是我继续写作,分享的最大动力!

 浙公网安备 33010602011771号