

在WPF中自定义你的绘制(二)
在WPF中自定义你的绘制(二)
周银辉
1,绘制几何图形
也许你在使用WPF进行开发的时候已经注意到一个很有意思的现象,要在屏幕上显示一个圆形(椭圆),你可以使用Ellipse对象,如下面的代码所示:
 <Grid>
<Ellipse Fill="#FFFFFFFF" Stroke="#FF000000" Margin="61,36,100,0" VerticalAlignment="Top" Height="33"/>
</Grid>而另外一个名为EllipseGeometry的对象同样可以做到:
<GeometryDrawing Brush="Blue">
<GeometryDrawing.Geometry>
<EllipseGeometry Center="50,50" RadiusX="20" RadiusY="45" />
</GeometryDrawing.Geometry>
<GeometryDrawing.Pen>
<Pen Thickness="1" Brush="Black" />
</GeometryDrawing.Pen>
</GeometryDrawing>向后者这样由几何图形名称加Geometry后缀的,就是今天我们要讨论的几何图形.
我们可以发现,Ellipse继承于Shape类,EllipseGemotry继承于Geometry类,虽然我们利用它们都可以绘制圆形,但EllipseGeometry比Ellipse是更轻量级的类,我们使用它可以获得更好的性能效益,但EllipseGeometry不支持WPF布局系统(Layout)、输入和焦点。这也是Shape与Geometry的区别。
我们也可以使用C#代码像传统的绘制(OnPaint)一样来自定义我们的绘制:
protected override void OnRender(DrawingContext dc)
 {
{
 base.OnRender(dc);
Geometry ellipse = new EllipseGeometry(new Point(100, 70), 100, 50);
GeometryDrawing drawing = new GeometryDrawing(Brushes.LightBlue, new Pen(Brushes.Green,1), ellipse);
dc.DrawDrawing(drawing);
 }
protected override void OnRender(DrawingContext dc)
}
protected override void OnRender(DrawingContext dc)
{
base.OnRender(dc);
BitmapImage bmp = new BitmapImage(new Uri("http://www.cnblogs.com/images/logo.gif", UriKind.Absolute));
ImageDrawing drawing = new ImageDrawing(bmp, new Rect(10, 10, 326, 43));
dc.DrawDrawing(drawing);
}效果如下:
3,绘制文本
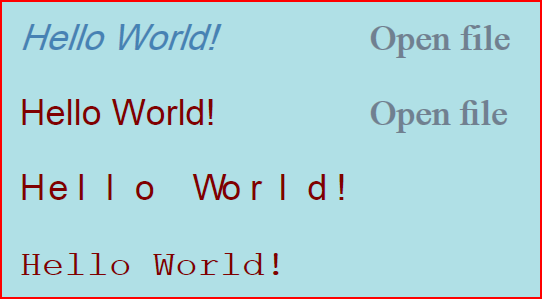
在WPF中我们可以高度定制文本的绘制,这需要了解GlyphRunDrawing类以及GlyphRun对象,其实在我们使用TextBlock时经常使用GlyphRun对象,它包含了文本字体的很多细节属性,请参见SDK的GlyphRun类。
<Page
xmlns="http://schemas.microsoft.com/winfx/2006/xaml/presentation"
xmlns:x="http://schemas.microsoft.com/winfx/2006/xaml"
xmlns:PresentationOptions="http://schemas.microsoft.com/winfx/2006/xaml/presentation/options"
xmlns:mc="http://schemas.openxmlformats.org/markup-compatibility/2006"
mc:Ignorable="PresentationOptions"
Margin="20" Background="White">
<!-- The example shows how to use different property settings of Glyphs objects. -->
<Canvas
xmlns="http://schemas.microsoft.com/winfx/2006/xaml/presentation"
xmlns:x="http://schemas.microsoft.com/winfx/2006/xaml"
Background="PowderBlue"
>
<Glyphs
FontUri = "C:\WINDOWS\Fonts\ARIAL.TTF"
FontRenderingEmSize = "36"
StyleSimulations = "ItalicSimulation"
UnicodeString = "Hello World!"
Fill = "SteelBlue"
OriginX = "50"
OriginY = "75"
/>
<!-- "Hello World!" with default kerning -->
<Glyphs
FontUri = "C:\WINDOWS\Fonts\ARIAL.TTF"
FontRenderingEmSize = "36"
UnicodeString = "Hello World!"
Fill = "Maroon"
OriginX = "50"
OriginY = "150"
/>
<!-- "Hello World!" with explicit character widths for proportional font -->
<Glyphs
FontUri = "C:\WINDOWS\Fonts\ARIAL.TTF"
FontRenderingEmSize = "36"
UnicodeString = "Hello World!"
Indices = ",80;,80;,80;,80;,80;,80;,80;,80;,80;,80;,80"
Fill = "Maroon"
OriginX = "50"
OriginY = "225"
/>
<!-- "Hello World!" with fixed-width font -->
<Glyphs
FontUri = "C:\WINDOWS\Fonts\COUR.TTF"
FontRenderingEmSize = "36"
StyleSimulations = "BoldSimulation"
UnicodeString = "Hello World!"
Fill = "Maroon"
OriginX = "50"
OriginY = "300"
/>
<!-- "Open file" without "fi" ligature -->
<Glyphs
FontUri = "C:\WINDOWS\Fonts\TIMES.TTF"
FontRenderingEmSize = "36"
StyleSimulations = "BoldSimulation"
UnicodeString = "Open file"
Fill = "SlateGray"
OriginX = "400"
OriginY = "75"
/>
<!-- "Open file" with "fi" ligature -->
<Glyphs
FontUri = "C:\WINDOWS\Fonts\TIMES.TTF"
FontRenderingEmSize = "36"
StyleSimulations = "BoldSimulation"
UnicodeString = "Open file"
Indices = ";;;;;(2:1)191"
Fill = "SlateGray"
OriginX = "400"
OriginY = "150"
/>
</Canvas>
</Page>
周银辉
1,绘制几何图形
也许你在使用WPF进行开发的时候已经注意到一个很有意思的现象,要在屏幕上显示一个圆形(椭圆),你可以使用Ellipse对象,如下面的代码所示:
<Grid> <Ellipse Fill="#FFFFFFFF" Stroke="#FF000000" Margin="61,36,100,0" VerticalAlignment="Top" Height="33"/> </Grid><GeometryDrawing Brush="Blue"> <GeometryDrawing.Geometry> <EllipseGeometry Center="50,50" RadiusX="20" RadiusY="45" /> </GeometryDrawing.Geometry> <GeometryDrawing.Pen> <Pen Thickness="1" Brush="Black" /> </GeometryDrawing.Pen></GeometryDrawing>我们可以发现,Ellipse继承于Shape类,EllipseGemotry继承于Geometry类,虽然我们利用它们都可以绘制圆形,但EllipseGeometry比Ellipse是更轻量级的类,我们使用它可以获得更好的性能效益,但EllipseGeometry不支持WPF布局系统(Layout)、输入和焦点。这也是Shape与Geometry的区别。
我们也可以使用C#代码像传统的绘制(OnPaint)一样来自定义我们的绘制:
protected override void OnRender(DrawingContext dc) {
 base.OnRender(dc); Geometry ellipse = new EllipseGeometry(new Point(100, 70), 100, 50); GeometryDrawing drawing = new GeometryDrawing(Brushes.LightBlue, new Pen(Brushes.Green,1), ellipse); dc.DrawDrawing(drawing); }
效果如下图: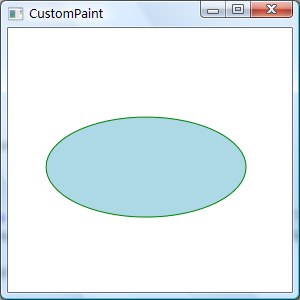
其他基本几何图形(如RectangleGeometry,LineGeometry等)与此类似。
2, 绘制图片
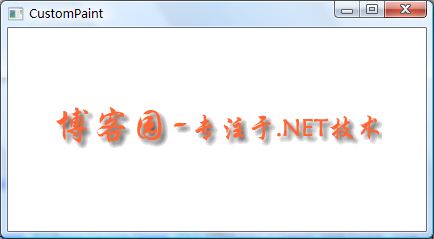
最简单的使用图片的方式当然是利用Image控件,就像以前我们使用PictureBox一样,但更多的我们是使用自定义方式来绘制,ImageDrawing 对象为我们绘制图片提供了方便。
protected override void OnRender(DrawingContext dc) { base.OnRender(dc); BitmapImage bmp = new BitmapImage(new Uri("http://www.cnblogs.com/images/logo.gif", UriKind.Absolute)); ImageDrawing drawing = new ImageDrawing(bmp, new Rect(10, 10, 326, 43)); dc.DrawDrawing(drawing); }3,绘制文本
在WPF中我们可以高度定制文本的绘制,这需要了解GlyphRunDrawing类以及GlyphRun对象,其实在我们使用TextBlock时经常使用GlyphRun对象,它包含了文本字体的很多细节属性,请参见SDK的GlyphRun类。
<Page xmlns="http://schemas.microsoft.com/winfx/2006/xaml/presentation" xmlns:x="http://schemas.microsoft.com/winfx/2006/xaml" xmlns:PresentationOptions="http://schemas.microsoft.com/winfx/2006/xaml/presentation/options" xmlns:mc="http://schemas.openxmlformats.org/markup-compatibility/2006" mc:Ignorable="PresentationOptions" Margin="20" Background="White"> <!-- The example shows how to use different property settings of Glyphs objects. --> <Canvas xmlns="http://schemas.microsoft.com/winfx/2006/xaml/presentation" xmlns:x="http://schemas.microsoft.com/winfx/2006/xaml" Background="PowderBlue" > <Glyphs FontUri = "C:\WINDOWS\Fonts\ARIAL.TTF" FontRenderingEmSize = "36" StyleSimulations = "ItalicSimulation" UnicodeString = "Hello World!" Fill = "SteelBlue" OriginX = "50" OriginY = "75" /> <!-- "Hello World!" with default kerning --> <Glyphs FontUri = "C:\WINDOWS\Fonts\ARIAL.TTF" FontRenderingEmSize = "36" UnicodeString = "Hello World!" Fill = "Maroon" OriginX = "50" OriginY = "150" /> <!-- "Hello World!" with explicit character widths for proportional font --> <Glyphs FontUri = "C:\WINDOWS\Fonts\ARIAL.TTF" FontRenderingEmSize = "36" UnicodeString = "Hello World!" Indices = ",80;,80;,80;,80;,80;,80;,80;,80;,80;,80;,80" Fill = "Maroon" OriginX = "50" OriginY = "225" /> <!-- "Hello World!" with fixed-width font --> <Glyphs FontUri = "C:\WINDOWS\Fonts\COUR.TTF" FontRenderingEmSize = "36" StyleSimulations = "BoldSimulation" UnicodeString = "Hello World!" Fill = "Maroon" OriginX = "50" OriginY = "300" /> <!-- "Open file" without "fi" ligature --> <Glyphs FontUri = "C:\WINDOWS\Fonts\TIMES.TTF" FontRenderingEmSize = "36" StyleSimulations = "BoldSimulation" UnicodeString = "Open file" Fill = "SlateGray" OriginX = "400" OriginY = "75" /> <!-- "Open file" with "fi" ligature --> <Glyphs FontUri = "C:\WINDOWS\Fonts\TIMES.TTF" FontRenderingEmSize = "36" StyleSimulations = "BoldSimulation" UnicodeString = "Open file" Indices = ";;;;;(2:1)191" Fill = "SlateGray" OriginX = "400" OriginY = "150" /> </Canvas></Page>
在《在WPF中自定义你的绘制(三)》中我们会继续讨论自定义绘制中更深入的话题:合并绘制、利用路径绘制图形、将我们的绘制转变为画刷,谢谢!

 浙公网安备 33010602011771号