跟我一起学WCF(5)——深入解析服务契约[上篇]
一、引言
在上一篇博文中,我们创建了一个简单WCF应用程序,在其中介绍到WCF最重要的概念又是终结点,而终结点又是由ABC组成的。对于Address地址也就是告诉客户端WCF服务所在的位置,而Contract又是终结点中比较重要的一个内容,在WCF中,契约包括服务契约、数据契约、消息契约和错误契约,在本篇博文将解析下数据契约的内容,关于其他三种契约将会后面的博文中陆续介绍。
二、引出问题——WCF操作重载限制
C#语言是支持操作重载的,然而在WCF实现操作重载有一定的限制。错误的操作重载实例:
1 [ServiceContract(Name = "HellworldService", Namespace = "http://www.Learninghard.com")]
2     public interface IHelloWorld
3     {
4         [OperationContract]
5         string GetHelloWorld();
6
7         [OperationContract]
8         string GetHelloWorld(string name);
9     }
如果你像上面一样来实现操作重载的话,在开启服务的时候,你将收到如下图所示的异常信息:

然而,为什么WCF不允许定义两个相同的操作名称呢?原因很简单,因为WCF的实现是基于XML的,它是通过WSDL来进行描述,而WSDL也是一段XML。在WSDL中,WCF的一个方法对应一个操作(operation)标签。我们可以参考下面一段XML,它是从一个WCF的WSDL中截取下来的。
<wsdl:import namespace="http://www.Learninghard.com" location="http://localhost:9999/GetHelloWorldService?wsdl=wsdl0"/>
<wsdl:types/>
<wsdl:binding name="BasicHttpBinding_HellworldService" type="i0:HellworldService">
<soap:binding transport="http://schemas.xmlsoap.org/soap/http"/>
<wsdl:operation name="GetHelloWorldWithoutParam">
<soap:operation soapAction="http://www.Learninghard.com/HellworldService/GetHelloWorldWithoutParam" style="document"/>
<wsdl:input>
<soap:body use="literal"/>
</wsdl:input>
<wsdl:output>
<soap:body use="literal"/>
</wsdl:output>
</wsdl:operation>
<wsdl:operation name="GetHelloWorldWithParam">
<soap:operation soapAction="http://www.Learninghard.com/HellworldService/GetHelloWorldWithParam" style="document"/>
<wsdl:input>
<soap:body use="literal"/>
</wsdl:input>
<wsdl:output>
<soap:body use="literal"/>
</wsdl:output>
</wsdl:operation>
</wsdl:binding>
<wsdl:service name="HelloWorldService">
<wsdl:port name="BasicHttpBinding_HellworldService" binding="tns:BasicHttpBinding_HellworldService">
<soap:address location="http://localhost:9999/GetHelloWorldService"/>
</wsdl:port>
</wsdl:service>
从上面的代码可以看出,每个Operation由一个operation XML Element表示,而每个Operation还应该具有一个能够唯一表示该Operation的ID,这个ID则是通过name属性来定义。Operation元素的Name属性通常使用方法名来定义,所以,如果WCF服务契约中,包含两个相同的操作方法名时,此时就违背了WSDL的规定,这也是WCF不可以使用操作重载的原因。
三、解决问题——WCF中实现操作重载
既然,找到了WCF中不能使用操作重载的原因(即必须保证Operation元素的Name属性唯一),此时,要想实现操作重载,则有两种思路:一是两个不同的操作名,二是实现一种Mapping机制,使得服务契约中的方法名映射到一个其他的方法名,从而来保证Name属性的唯一。对于这两种解决思路,第一种显然行不通,因为,方法名不同显然就不叫操作重载了,所以,我们可以从第二种解决思路下手。值得庆幸的是,这种解决思路,微软在实现WCF的时候已经帮我们实现好了,我们可以通过OperationContractAttribute的Name属性来为每个操作方法名定义一个别人,而生成的WSDL将使用这个别名来作为Operation元素的Name属性,所以我们只需要为两个相同方法名定义两个不同的别名就可以解决操作重载的问题了。既然有了思路,下面就看看具体的实现代码吧。具体服务契约的实现方法如下所示:
 1 namespace Contract
 2 {
 3     [ServiceContract(Name = "HellworldService", Namespace = "http://www.Learninghard.com")]
 4     public interface IHelloWorld
 5     {
 6         [OperationContract(Name = "GetHelloWorldWithoutParam")]
 7         string GetHelloWorld();
 8
 9         [OperationContract(Name = "GetHelloWorldWithParam")]
10         string GetHelloWorld(string name);
11     }
12 }
经过上面的步骤也就解决了在WCF中实现操作重载的问题。接下来让我们来完成一个完整的操作重载的例子。
定义契约完成之后,那就接着来实现下服务契约,具体的实现服务契约代码如下所示:
namespace Services
{
    public class HelloWorldService : IHelloWorld
    {
        public string GetHelloWorld()
        {
            return "Hello World";
        }

        public string GetHelloWorld(string name)
        {
            return "Hello " + name;
        }
    }
}
接着,来继续为这个WCF服务提供一个宿主环境,这里先以控制台应用程序来实现宿主应用程序,具体的实现代码和配置代码如下所示:
namespace WCFServiceHostByConsoleApp
{
    class Program
    {
        static void Main(string[] args)
        {
            using (ServiceHost host = new ServiceHost(typeof(Services.HelloWorldService)))
            {
                host.Opened += delegate
                {
                    Console.WriteLine("服务已开启,按任意键继续....");
                };

                host.Open();
                Console.ReadLine();
            }
        }
    }
}
对应的服务端配置文件如下所示:
<?xml version="1.0" encoding="utf-8" ?>
<configuration>
  <system.serviceModel>
    <behaviors>
      <serviceBehaviors>
        <behavior name="HelloWorldSerBehavior">
          <serviceMetadata httpGetEnabled="True" httpGetUrl="http://localhost:9999/GetHelloWorldService"/>
        </behavior>
      </serviceBehaviors>
    </behaviors>
    <services>
      <service name ="Services.HelloWorldService" behaviorConfiguration="HelloWorldSerBehavior">
        <endpoint address="http://localhost:9999/GetHelloWorldService" binding="basicHttpBinding" contract="Contract.IHelloWorld"/>
      </service>
    </services>
  </system.serviceModel>
</configuration>
接着,我们来创建一个客户端通过代理对象来调用WCF服务方法。首先以管理员运行WCFServiceHostByConsoleApp.exe文件来开启服务,WCF服务开启成功后,在对应的客户端右键添加服务引用,在打开的添加服务引用窗口中输入WCF服务地址:http://localhost:9999/GetHelloWorldService,点确定按钮来添加服务引用,添加成功后,VS中集成的代码生成工具会帮我们生成对应的代理类。接下来,我们可以通过创建一个代理对象来对WCF进行访问。具体客户端的实现代码如下所示:
 1 namespace Client3
 2 {
 3     class Program
 4     {
 5         static void Main(string[] args)
 6         {
 7             using (HellworldServiceClient helloWorldProxy = new HellworldServiceClient())
 8             {
 9                 Console.WriteLine("服务返回的结果是: {0}", helloWorldProxy.GetHelloWorldWithoutParam());
10                 Console.WriteLine("服务返回的结果是: {0}", helloWorldProxy.GetHelloWorldWithParam("Learning Hard"));
11             }
12
13             Console.ReadLine();
14         }
15     }
16 }
这样,你运行客户端程序时(注意不要关闭WCF服务宿主程序),你将看到如下图所示的运行结果。

在上面客户端的实现代码中,从客户端的角度来看,我们并不知道我们是对重载方法进行调用,因为我们调用的明明是两个不同的方法名,这显然还不是我们最终想要达到的效果,此时,有两种方式来达到客户端通过相同方法名来调用。
- 第一种方式就是手动修改生成的服务代理类和服务契约代码,使其支持操作重载,修改后的服务代理和服务契约代码如下所示:


namespace Client3.ServiceReference {


    [System.CodeDom.Compiler.GeneratedCodeAttribute("System.ServiceModel", "4.0.0.0")]
    [System.ServiceModel.ServiceContractAttribute(Namespace="http://www.Learninghard.com", ConfigurationName="ServiceReference.HellworldService")]
    public interface HellworldService {

        // 把自动生成的方法名GetHelloWorldWithoutParam修改成GetHelloWorld
        [System.ServiceModel.OperationContractAttribute(Name = "GetHelloWorldWithoutParam", Action = "http://www.Learninghard.com/HellworldService/GetHelloWorldWithoutParam", ReplyAction = "http://www.Learninghard.com/HellworldService/GetHelloWorldWithoutParamResponse")]
        string GetHelloWorld();

        // // 把自动生成的方法名GetHelloWorldWithoutParamAsync修改成GetHelloWorldAsync
        [System.ServiceModel.OperationContractAttribute(Name = "GetHelloWorldWithoutParam", Action="http://www.Learninghard.com/HellworldService/GetHelloWorldWithoutParam", ReplyAction="http://www.Learninghard.com/HellworldService/GetHelloWorldWithoutParamResponse")]
        System.Threading.Tasks.Task<string> GetHelloWorldAsync();

        [System.ServiceModel.OperationContractAttribute(Name = "GetHelloWorldWithParam", Action="http://www.Learninghard.com/HellworldService/GetHelloWorldWithParam", ReplyAction="http://www.Learninghard.com/HellworldService/GetHelloWorldWithParamResponse")]
        string GetHelloWorld(string name);

        [System.ServiceModel.OperationContractAttribute(Name = "GetHelloWorldWithParam", Action = "http://www.Learninghard.com/HellworldService/GetHelloWorldWithParam", ReplyAction = "http://www.Learninghard.com/HellworldService/GetHelloWorldWithParamResponse")]
        System.Threading.Tasks.Task<string> GetHelloWorldAsync(string name);
    }

    [System.CodeDom.Compiler.GeneratedCodeAttribute("System.ServiceModel", "4.0.0.0")]
    public interface HellworldServiceChannel : Client3.ServiceReference.HellworldService, System.ServiceModel.IClientChannel {
    }

    [System.Diagnostics.DebuggerStepThroughAttribute()]
    [System.CodeDom.Compiler.GeneratedCodeAttribute("System.ServiceModel", "4.0.0.0")]
    public partial class HellworldServiceClient : System.ServiceModel.ClientBase<Client3.ServiceReference.HellworldService>, Client3.ServiceReference.HellworldService {

        public HellworldServiceClient() {
        }

        public HellworldServiceClient(string endpointConfigurationName) :
                base(endpointConfigurationName) {
        }

        public HellworldServiceClient(string endpointConfigurationName, string remoteAddress) :
                base(endpointConfigurationName, remoteAddress) {
        }

        public HellworldServiceClient(string endpointConfigurationName, System.ServiceModel.EndpointAddress remoteAddress) :
                base(endpointConfigurationName, remoteAddress) {
        }

        public HellworldServiceClient(System.ServiceModel.Channels.Binding binding, System.ServiceModel.EndpointAddress remoteAddress) :
                base(binding, remoteAddress) {
        }

        public string GetHelloWorld() {
            return base.Channel.GetHelloWorld();
        }

        public System.Threading.Tasks.Task<string> GetHelloWorldAsync() {
            return base.Channel.GetHelloWorldAsync();
        }

        public string GetHelloWorld(string name) {
            return base.Channel.GetHelloWorld(name);
        }

        public System.Threading.Tasks.Task<string> GetHelloWorldAsync(string name) {
            return base.Channel.GetHelloWorldAsync(name);
        }
    }
}
此时,客户端的实现代码如下所示:
class Program
    {
        static void Main(string[] args)
        {
            using (HellworldServiceClient helloWorldProxy = new HellworldServiceClient())
            {
                Console.WriteLine("服务返回的结果是: {0}", helloWorldProxy.GetHelloWorld());
                Console.WriteLine("服务返回的结果是: {0}", helloWorldProxy.GetHelloWorld("Learning Hard"));
            }

            Console.ReadLine();
        }
    }
此时,客户端运行后的运行结果与上面的运行结果一样,这里就不贴图了。
- 第二种方式就是自己实现客户端代理类,而不是由VS代码生成工具。具体重新的proxy Class的实现代码代码如下所示:
 1 using Contract;
 2 using System.ServiceModel;
 3 namespace Client2
 4 {
 5     class HellworldServiceClient : ClientBase<IHelloWorld>, IHelloWorld
 6     {
 7         #region IHelloWorld Members
 8         public string GetHelloWorld()
 9         {
10             return this.Channel.GetHelloWorld();
11         }
12
13         public string GetHelloWorld(string name)
14         {
15             return this.Channel.GetHelloWorld(name);
16         }
17         #endregion
18     }
19 }
此时客户端的实现代码和配置文件如下所示:
namespace Client2
{
    class Program
    {
        static void Main(string[] args)
        {
            using (var proxy = new HellworldServiceClient())
            {
                // 通过自定义代理类来调用进行服务方法的访问
                Console.WriteLine("服务返回的结果是: {0}", proxy.GetHelloWorld());
                Console.WriteLine("服务返回的结果是: {0}", proxy.GetHelloWorld("Learning Hard"));
            }

            Console.Read();
        }
    }
}
对应的配置文件如下所示:
<configuration>
  <system.serviceModel>
    <client>
      <endpoint address="http://localhost:9999/GetHelloWorldService"
                binding ="basicHttpBinding"
                contract ="Contract.IHelloWorld"/>
    </client>
  </system.serviceModel>
</configuration>
四、利用Windows Service来寄宿WCF服务
在上一篇博文中,我们介绍了把WCF寄宿在控制台应用程序和IIS中,而WCF服务可以寄宿在任何应用程序中,如WPF、WinForms和Windows Services。这里再实现下如何在Windows Services中寄宿WCF服务。下面一步步来实现该目的。
- 第一步:创建Windows 服务项目,具体添加步骤为右键解决方案->添加->新建项目,在已安装模板中选择Windows 服务模板,具体如下图示所示:

- 第二步:添加Windows服务之后,你将看到如下图所示的目录结构。

然后修改对应的Service1.cs文件,使其实现如下代码所示:
 1 // 修改类名
 2 public partial class WindowsService : ServiceBase
 3     {
 4         public WindowsService()
 5         {
 6             InitializeComponent();
 7         }
 8
 9         public ServiceHost serviceHost = null;
10
11         // 启动Windows服务
12         protected override void OnStart(string[] args)
13         {
14             if (serviceHost != null)
15             {
16                 serviceHost.Close();
17             }
18
19             serviceHost = new ServiceHost(typeof(Services.HelloWorldService));
20             serviceHost.Open();
21         }
22
23         // 停止Windows服务
24         protected override void OnStop()
25         {
26             if (serviceHost != null)
27             {
28                 serviceHost.Close();
29                 serviceHost = null;
30             }
31         }
32     }
对应的配置文件代码如下所示:
 <system.serviceModel>
        <behaviors>
            <serviceBehaviors>
                <behavior name="WindowsServiceBehavior">
                    <serviceMetadata httpGetEnabled="true" />
                  <serviceDebug includeExceptionDetailInFaults="true"/>
                </behavior>
            </serviceBehaviors>
        </behaviors>
        <services>
            <service name="Services.HelloWorldService" behaviorConfiguration="WindowsServiceBehavior">
                <endpoint address=""
                    binding="wsHttpBinding" bindingConfiguration="" name="WindowsService"
                    contract="Contract.IHelloWorld" />
              <host>
                <baseAddresses>
                  <add baseAddress="http://localhost:8888/WCFServiceHostByWindowsService"/>
                </baseAddresses>
              </host>
            </service>
        </services>
    </system.serviceModel>
- 第三步:在WindowsService的设计界面,右键选择添加安装程序,具体操作如下图所示。

添加安装程序之后,会多出一个ProjectInstaller.cs文件,然后在其设计页面修改ServiceProcessInstaller和ServiceInstaller对象属性,具体设置的值如下图所示:

经过上面的步骤,程序的代码就都已经全部实现了,接下来要做的是安装Windows 服务和启动Windows服务。
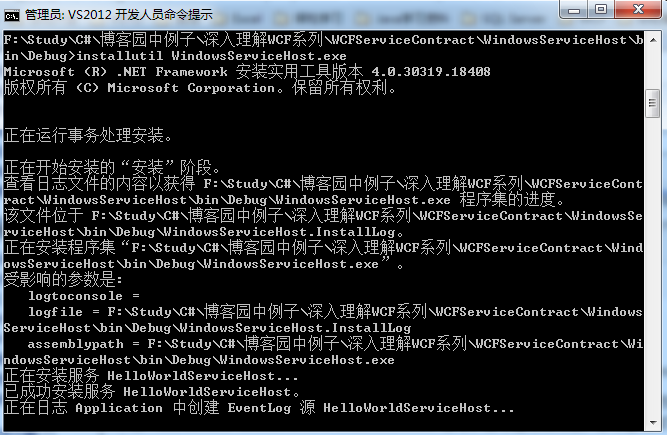
首先是安装Windows服务:以管理员身份运行VS2012开发命令提示,进入项目的对应的exe所在的文件夹,这里的指的是WindowsServiceHost.exe所在的文件夹,然后运行 “installutil WindowsServiceHost.exe”命令,命令运行成功后,你将看到如下所示的运行结果:
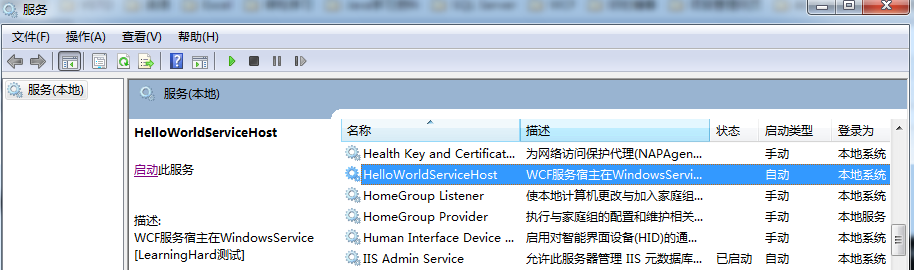
安装成功之后,你可以运行 “net start HelloWorldServiceHost” 命令来启动服务。因为开始设置服务的名称是HelloWorldServiceHost。你也可以通过Services中来手动启动服务,启动成功之后,你将在服务窗口看到启动的服务。具体效果如下图所示。
服务启动后,在客户端中同样是添加服务引用的方式来添加服务引用,在添加服务引用窗口输入地址:http://localhost:8888/WCFServiceHostByWindowsService。点击确定按钮。添加服务引用成功后,对应的客户端调用代码如下所示:
 1 namespace Client
 2 {
 3     class Program
 4     {
 5         static void Main(string[] args)
 6         {
 7             using (var proxy = new HellworldServiceClient())
 8             {
 9                 // 通过代理类来调用进行服务方法的访问
10                 Console.WriteLine("服务返回的结果是: {0}", proxy.GetHelloWorldWithoutParam());
11                 Console.WriteLine("服务返回的结果是: {0}", proxy.GetHelloWorldWithParam("Learning Hard"));
12             }
13
14             Console.Read();
15         }
16
17     }
18 }
此时的运行结果和前面客户端返回的运行结果是一样的。
五、总结
到这里,本文的内容就介绍结束了,本文主要解决了在WCF中如何实现操作重载的问题,实现思路可以概括为利用OperationContractAttribute类的Name属性来实现操作重载,而客户端的实现思路可以概括为重新代理类,利用信道Channel类带对对应的服务方法进行调用,最后,实现了把WCF服务寄宿在Windows Services中,这样WCF服务可以作为服务在机器上设置开机启动或其他方式启动了。在下一篇博文中将分享WCF服务契约的继承实现。
本人所有源代码下载:WCFServiceContract.zip
如果您认为这篇文章还不错或者有所收获,您可以通过右边的“打赏”功能 打赏我一杯咖啡【物质支持】,也可以点击右下角的【店长推荐】按钮【精神支持】,因为这两种支持都是我继续写作,分享的最大动力


 浙公网安备 33010602011771号