
eclipse/intellij Idea集成jetty
 jetty与eclipse集成使用
jetty相对weblogic、jboss、tomcat而言,启动速度快,十分方便开发调试,以下是eclipse里的使用步骤:
一、eclipse->Marketplace里搜索 jetty

一路Next安装
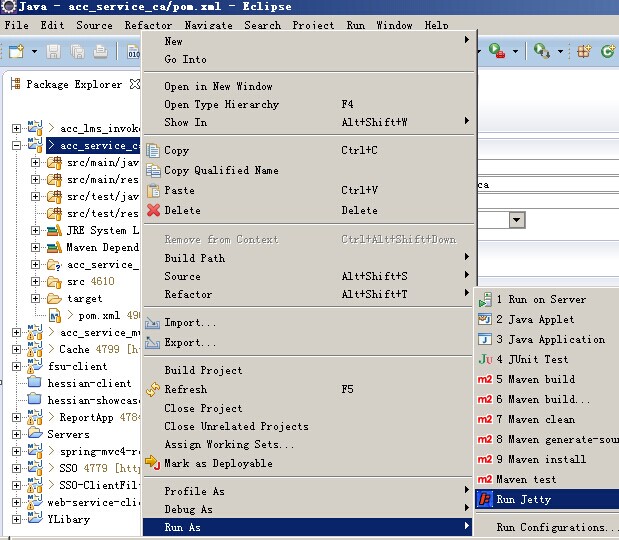
二、eclipse里run as -> run jetty
最后指出jetty的一个bug:
struts2+jetty运行时,web.xml中<welcome-file-list>...</welcome-file-list>指定的起始页,不管怎么设置,死活不起作用,解决办法:
    <!-- 指定首页,解决struts2+jetty首页失效的问题 -->
    <package name="home" namespace="/" extends="struts-default">
       <default-action-ref name="index" />
       <action name="index" >
           <result name="success">/index.htm</result>
       </action>
    </package>
在struts.xml中加入这一坨就行了,但要注意,在使用convention-plugin、rest-plugin插件的情况下,有时会造成浏览器里url无限循环跳转的情况。
附:
a) 手动启用jetty的方式 %jetty_home%目录下 java -jar start.jar 即可
b) 手动部署 %jetty_home%\webapps 目录,把war扔进去就可以了
c) 调整PermSize内存大小,%jetty_home%\start.ini文件打开,添加
-XX:PermSize=256m
-XX:MaxPermSize=512m
至于intellij idea,最方便的方式就是使用jetty-maven-plugin
 1             <plugin>
 2                 <groupId>org.mortbay.jetty</groupId>
 3                 <artifactId>jetty-maven-plugin</artifactId>
 4                 <version>8.1.15.v20140411</version>
 5                 <configuration>
 6                     <stopKey>exit</stopKey>
 7                     <stopPort>9090</stopPort>
 8                     <scanIntervalSeconds>10</scanIntervalSeconds>
 9                     <webAppConfig>
10                         <contextPath>/awbprint</contextPath>
11                     </webAppConfig>
12                 </configuration>
13             </plugin>
在pom.xml里添加这个后,左侧的plugin面板里,就直接出来N多选项
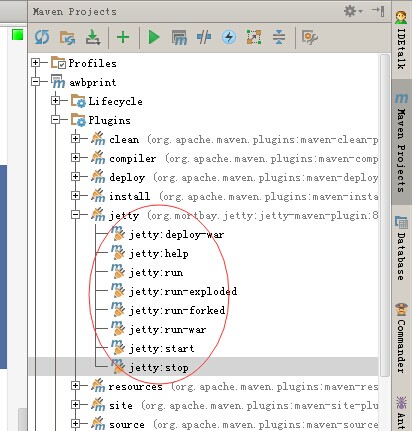
直接点击对应的节点就行了,比如点击“jetty:start”,就直接启用jetty了。
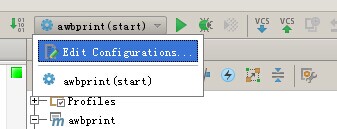
当然也可以针对某个项目,定制一个运行/调试的配置
在下面的对话框里,Command Line里输入jetty:start
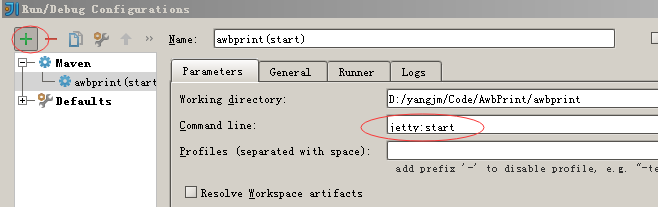
如果项目依赖的jar包很多,运行不久后,很容易出现内存不足,可以手动把内存调大一点

最后送二个小技巧:
1)plugin方式下,如何调整启动的端口号
<plugin>
                <groupId>org.mortbay.jetty</groupId>
                <artifactId>jetty-maven-plugin</artifactId>
                <version>${maven-jetty-plugin_version}</version>
                <configuration>
                    <connectors>
                        <connector implementation="org.eclipse.jetty.server.nio.SelectChannelConnector">
                            <port>8080</port>
                        </connector>
                    </connectors>
                    <stopKey>exit</stopKey>
                    <stopPort>9090</stopPort>
                    <scanIntervalSeconds>10</scanIntervalSeconds>
                    <webAppConfig>
                        <contextPath>/${project.artifactId}</contextPath>
                        <!--<contextPath>/</contextPath>-->
                    </webAppConfig>
                </configuration>
            </plugin>
connector节点下的port即是启动端口
注:如果采用最新的9.3.x版本,上面的配置将提示错误,可参考下面的配置
 1                     <plugin>
 2                         <groupId>org.eclipse.jetty</groupId>
 3                         <artifactId>jetty-maven-plugin</artifactId>
 4                         <version>9.3.9.v20160517</version>
 5                         <configuration>
 6                             <httpConnector>
 7                                 <port>8180</port>
 8                             </httpConnector>
 9                             <scanIntervalSeconds>10</scanIntervalSeconds>
10                             <webAppConfig>
11                                 <contextPath>/</contextPath>
12                             </webAppConfig>
13                         </configuration>
14                     </plugin>
更多该插件的参数,可参考官网文档
2)jetty独立部署时,如何修改contextPath?
在WEB-INF/放一个jetty-web.xml文件,参考以下内容:
<Configure class="org.eclipse.jetty.webapp.WebAppContext">
  <Set name="contextPath">/</Set>
 </Configure>
参考文章:
http://www.eclipse.org/jetty/documentation/current/configuring-contexts.html#setting-context-path
出处:http://yjmyzz.cnblogs.com
本文版权归作者和博客园共有,欢迎转载,但未经作者同意必须保留此段声明,且在文章页面明显位置给出原文连接,否则保留追究法律责任的权利。

 浙公网安备 33010602011771号