

树莓派学习笔记(3):利用VNC远程控制树莓派
转载请注明:@小五义http://www.cnblogs.com/xiaowuyi
等了一个十一假期,新买的B+终于到了。按照前两节的方法,重新安装了操作系统。
一、添加国内软件源
Raspberry Pi(树莓派)国内软件源:(http://www.linuxidc.com/Linux/2013-10/91012.htm)
修改配置文件:
pi@aborn ~ $ vi /etc/apt/sources.list
deb http://mirrors.tuna.tsinghua.edu.cn/raspbian/raspbian/ wheezy main contrib non-free rpi
deb-src http://mirrors.tuna.tsinghua.edu.cn/raspbian/raspbian/ wheezy main contrib non-free rpi
deb http://mirrors.neusoft.edu.cn/raspbian/raspbian/ wheezy main contrib non-free rpi
deb-src http://mirrors.neusoft.edu.cn/raspbian/raspbian/ wheezy main contrib non-free rpi
deb http://mirrors.ustc.edu.cn/raspbian/raspbian/ wheezy main contrib non-free rpi
deb-src http://mirrors.ustc.edu.cn/raspbian/raspbian/ wheezy main contrib non-free rpi
(这里如果vi不会用,可以百度一下。)
修改文件后,在终端中运行:
sudo apt-get update
二、添加输入法
这里我习惯用fcitx
于是安装fcitx
sudo apt-get install fcitx fcitx-tables-wbpy
三、添加vnc server
sudo apt-get update

sudo apt-get install tightvncserver
安装完成后,运行
tightvncserver
这时会要求输入控制密码,选择性输入查看密码,查看密码只能用来查看桌面,而控制密码才能对桌面进行操作。
此后,在电脑上安装vnc软件,下载地址:http://www.tightvnc.com/
安装时,选择自定义安装,仅安装tightvncviewer就可以。
每个用户可以启动多个VNCSERVER远程桌面,它们用ip加端口号:ip:1、ip:2、ip:3 来标识、区分,使用同一端口会使另外登录的用户自动退出。
四、设定固定IP
设定成固定IP后,方便日后操作,不需要每次先读取到IP才能工作。设定方法很简单,通过修改文件sudo vi /etc/network/interfaces文件完成,这里会用到root权限,树莓派root权限的获取可参考上一节评论(http://www.cnblogs.com/xiaowuyi/p/3980037.html)。
1、有线网络固定IP修改
原文件为:
auto lo

iface lo inet loopback
iface eth0 inet dhcp

allow-hotplug wlan0
iface wlan0 inet manual
wpa-roam /etc/wpa_supplicant/wpa_supplicant.conf
iface default inet dhcp
这里iface eth0 inet dhcp设置有线网络eth0为动态获取IP,因此可做如下修改:
auto lo
iface lo inet loopback
iface eth0 inet static
address 192.168.1.123
netmask 255.255.255.0
gateway 192.168.1.1

allow-hotplug wlan0
iface wlan0 inet manual
wpa-roam /etc/wpa_supplicant/wpa_supplicant.conf
iface default inet dhcp
2、无线网络的修改
auto lo

iface lo inet loopback
iface eth0 inet dhcp

allow-hotplug wlan0
iface wlan0 inet manual
wpa-roam /etc/wpa_supplicant/wpa_supplicant.conf
iface default inet static
address 192.168.1.123
netmask 255.255.255.0
gateway 192.168.1.1
修改成功后,IP地址换为192.168.1.123。
五、vnc的使用
通过以上的安装,每次启动vnc后,我们就不需要再连接显示器了,而是直接通过电脑就可以操作。具体方法是:
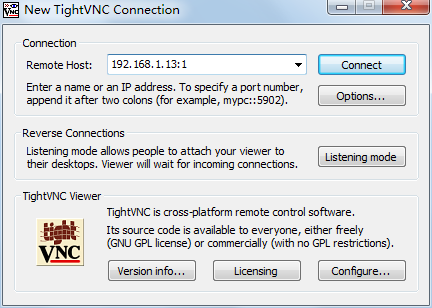
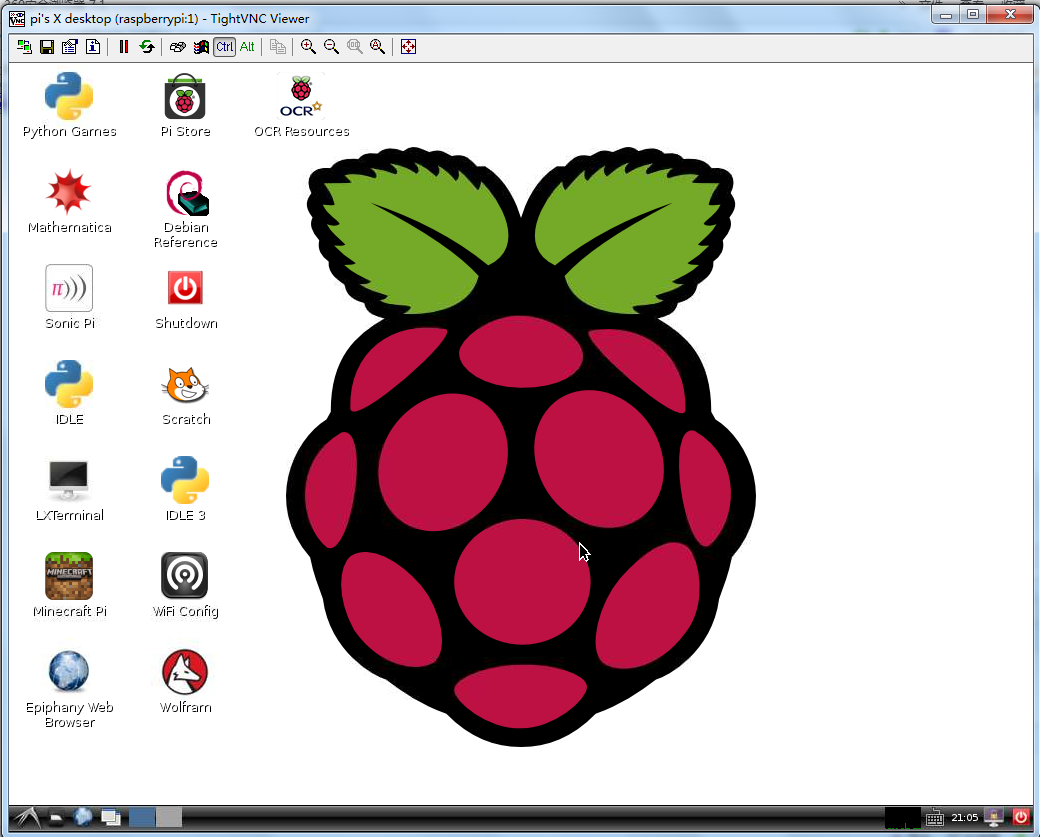
启动后,电脑通过putty与其连接:
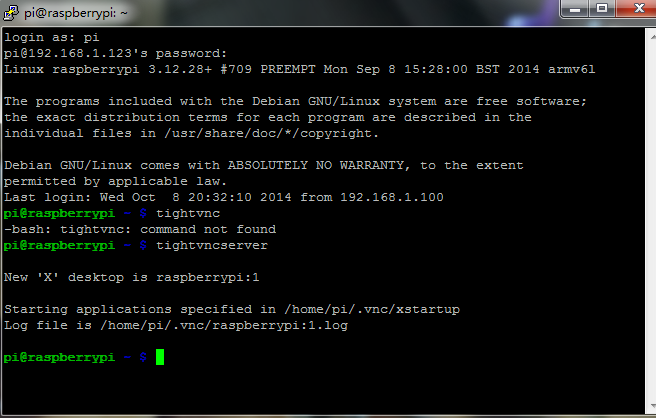
连接后,运行tightvncserver,建立一个新窗体。然后打开tightvncviewer,输入密码,出现窗体,如下图:
1、停止VNC窗口:
vncserver -kill:1
2、修改密码
vncpasswd
3、重启服务
service vncserver restart
>>欢迎加入讨论群:64770604

 浙公网安备 33010602011771号