

常用模块
logging模块
日志级别
日志级别从下到上
critical = 50
error = 40
warning = 30     #日志级别默认是warning
info = 20
debug = 10
noset = 0
例如:
import logging

logging.info("aaa")
logging.debug("bbb")
logging.warning("ccc")
logging.error("ddd")
logging.critical("ccc")
#打印
WARNING:root:ccc
ERROR:root:ddd
CRITICAL:root:ccc
#格式
日志级别:日志名:打印内容
控制日志打印到文件中,并自己定义日志的输出格式
import logging
logging.basicConfig(filename='access.log',
                    format='%(asctime)s - %(name)s - %(levelname)s -%(module)s:  %(message)s',
                    datefmt='%Y-%m-%d %H:%M:%S %p',
                    level=10)

logging.debug('调试debug')
logging.info('消息info')
logging.warning('警告warn')
logging.error('错误error')
logging.critical('严重critical')
#产生日志效果
2017-10-26 10:08:04 AM - root - DEBUG -spma:  调试debug
2017-10-26 10:08:04 AM - root - INFO -spma:  消息info
2017-10-26 10:08:04 AM - root - WARNING -spma:  警告warn
2017-10-26 10:08:04 AM - root - ERROR -spma:  错误error
2017-10-26 10:08:04 AM - root - CRITICAL -spma:  严重critical
可在logging.basicConfig()函数中通过具体参数来更改logging模块默认行为,可用参数有
filename:用指定的文件名创建FiledHandler(后边会具体讲解handler的概念),这样日志会被存储在指定的文件中。
filemode:文件打开方式,在指定了filename时使用这个参数,默认值为“a”还可指定为“w”。
format:指定handler使用的日志显示格式。
datefmt:指定日期时间格式。
level:设置rootlogger的日志级别
stream:用指定的stream创建StreamHandler。可以指定输出到sys.stderr,sys.stdout或者文件,默认为sys.stderr。若同时列出了filename和stream两个参数,则stream参数会被忽略。


#format日志格式
%(name)s:Logger的名字,并非用户名,详细查看

%(levelno)s:数字形式的日志级别

%(levelname)s:文本形式的日志级别

%(pathname)s:调用日志输出函数的模块的完整路径名,可能没有

%(filename)s:调用日志输出函数的模块的文件名

%(module)s:调用日志输出函数的模块名

%(funcName)s:调用日志输出函数的函数名

%(lineno)d:调用日志输出函数的语句所在的代码行

%(created)f:当前时间,用UNIX标准的表示时间的浮 点数表示

%(relativeCreated)d:输出日志信息时的,自Logger创建以 来的毫秒数

%(asctime)s:字符串形式的当前时间。默认格式是 “2003-07-08 16:49:45,896”。逗号后面的是毫秒

%(thread)d:线程ID。可能没有

%(threadName)s:线程名。可能没有

%(process)d:进程ID。可能没有

%(message)s:用户输出的消息
logging.basicConfig()
loggin模式的fromatter,handler,logger,filter对象
- formatter:定义日志格式,创造多个日志格式
- logger:负责产生日志
- handler:接收logger产生的日志,用filehandler打印到文件中,streamhandler打印到终端
Formatter应该绑定给FileHandler或streamHandler
filter:在logger和Handler中间过滤一次。
首先loggering产生logger对象,传给filer(不常用),在交给handler处理。
例如:
import  logging
#一 logger对象,负责产生日志信息的
logger = logging.getLogger("root")
#二 filter对象:略
#三 handler对象,负责接收logger对象传来的日志内容,控制打印到终端or文件
h1 = logging.FileHandler("t1.log")
h2 = logging.FileHandler("t2.log")
h3 = logging.StreamHandler("t3.log")
#四 formatter对象
#给文件
formatter1 = logging.Formatter(
                    '%(asctime)s - %(name)s - %(levelname)s -%(module)s:  %(message)s',
                    datefmt='%Y-%m-%d %H:%M:%S %p',)
#给终端
formatter2 = logging.Formatter(
                    '%(asctime)s - %(name)s - %(levelname)s -%(module)s:  %(message)s',
                    datefmt='%Y-%m-%d %H:%M:%S %p',)

#五 为handler对象绑定日志格式
##给文件:绑定到filehandler对象
h1.setFormatter(formatter1)
h2.setFormatter(formatter1)
#给终端:绑定到streamhandler对象
h3.setFormatter(formatter2)
#设置日志级别
h1.setLevel(10)
h2.setLevel(10)
h3.setLevel(10)
#六 把h1,h2,h3绑定给logger,这样logger对象才能把自己的日志交给他们三个负责输出
logger.addHandler(h1)
logger.addHandler(h2)
logger.addHandler(h3)
logger.setLevel(10)
#测试:
logger.warning("warning")
#日志成功打印注意:
# 日志内容的级别
# logger对象的日志级别必须 >= handler对象的日志级别
应用
配置文件(直接用)
"""
logging配置
"""

import os
import logging.config

# 定义三种日志输出格式 开始

standard_format = '[%(asctime)s][%(threadName)s:%(thread)d][task_id:%(name)s][%(filename)s:%(lineno)d]' \
                  '[%(levelname)s][%(message)s]' #其中name为getlogger指定的名字

simple_format = '[%(levelname)s][%(asctime)s][%(filename)s:%(lineno)d]%(message)s'

id_simple_format = '[%(levelname)s][%(asctime)s] %(message)s'

# 定义日志输出格式 结束

logfile_dir = os.path.dirname(os.path.abspath(__file__))  # log文件的目录

logfile_name = 'all2.log'  # log文件名

# 如果不存在定义的日志目录就创建一个
if not os.path.isdir(logfile_dir):
    os.mkdir(logfile_dir)

# log文件的全路径
logfile_path = os.path.join(logfile_dir, logfile_name)

# log配置字典
LOGGING_DIC = {
    'version': 1,
    'disable_existing_loggers': False,
    'formatters': {
        'standard': {
            'format': standard_format
        },
        'simple': {
            'format': simple_format
        },
    },
    'filters': {},
    'handlers': {
        #打印到终端的日志
        'console': {
            'level': 'DEBUG',
            'class': 'logging.StreamHandler',  # 打印到屏幕
            'formatter': 'simple'
        },
        #打印到文件的日志,收集info及以上的日志
        'default': {
            'level': 'DEBUG',
            'class': 'logging.handlers.RotatingFileHandler',  # 保存到文件
            'formatter': 'standard',
            'filename': logfile_path,  # 日志文件
            'maxBytes': 1024*1024*5,  # 日志大小 5M
            'backupCount': 5,
            'encoding': 'utf-8',  # 日志文件的编码,再也不用担心中文log乱码了
        },
    },
    'loggers': {
        #logging.getLogger(__name__)拿到的logger配置
        '': {
            'handlers': ['default', 'console'],  # 这里把上面定义的两个handler都加上,即log数据既写入文件又打印到屏幕
            'level': 'DEBUG',
            'propagate': True,  # 向上(更高level的logger)传递
        },
    },
}


def load_my_logging_cfg():
    logging.config.dictConfig(LOGGING_DIC)  # 导入上面定义的logging配置
    logger = logging.getLogger(__name__)  # 生成一个log实例
    logger.info('It works!')  # 记录该文件的运行状态

if __name__ == '__main__':
    load_my_logging_cfg()

logging配置文件
日志的继承
import logging

formatter=logging.Formatter('%(asctime)s - %(name)s - %(levelname)s -%(module)s:  %(message)s',
                    datefmt='%Y-%m-%d %H:%M:%S %p',)

ch=logging.StreamHandler()
ch.setFormatter(formatter)


logger1=logging.getLogger('root')
logger2=logging.getLogger('root.child1')
logger3=logging.getLogger('root.child1.child2')


logger1.addHandler(ch)
logger2.addHandler(ch)
logger3.addHandler(ch)
logger1.setLevel(10)
logger2.setLevel(10)
logger3.setLevel(10)

logger1.debug('log1 debug')
logger2.debug('log2 debug')
logger3.debug('log3 debug')
'''
2017-07-28 22:22:05 PM - root - DEBUG -test:  log1 debug
2017-07-28 22:22:05 PM - root.child1 - DEBUG -test:  log2 debug
2017-07-28 22:22:05 PM - root.child1 - DEBUG -test:  log2 debug
2017-07-28 22:22:05 PM - root.child1.child2 - DEBUG -test:  log3 debug
2017-07-28 22:22:05 PM - root.child1.child2 - DEBUG -test:  log3 debug
2017-07-28 22:22:05 PM - root.child1.child2 - DEBUG -test:  log3 debug``
这里需要注意的是,在我们重新定义一个日志文件的时候,需要重新定义文件名,将default这里复制重命名,修改成相应格式在下面(default字典下)添加,logger下的 “ ”也同理。
re正则
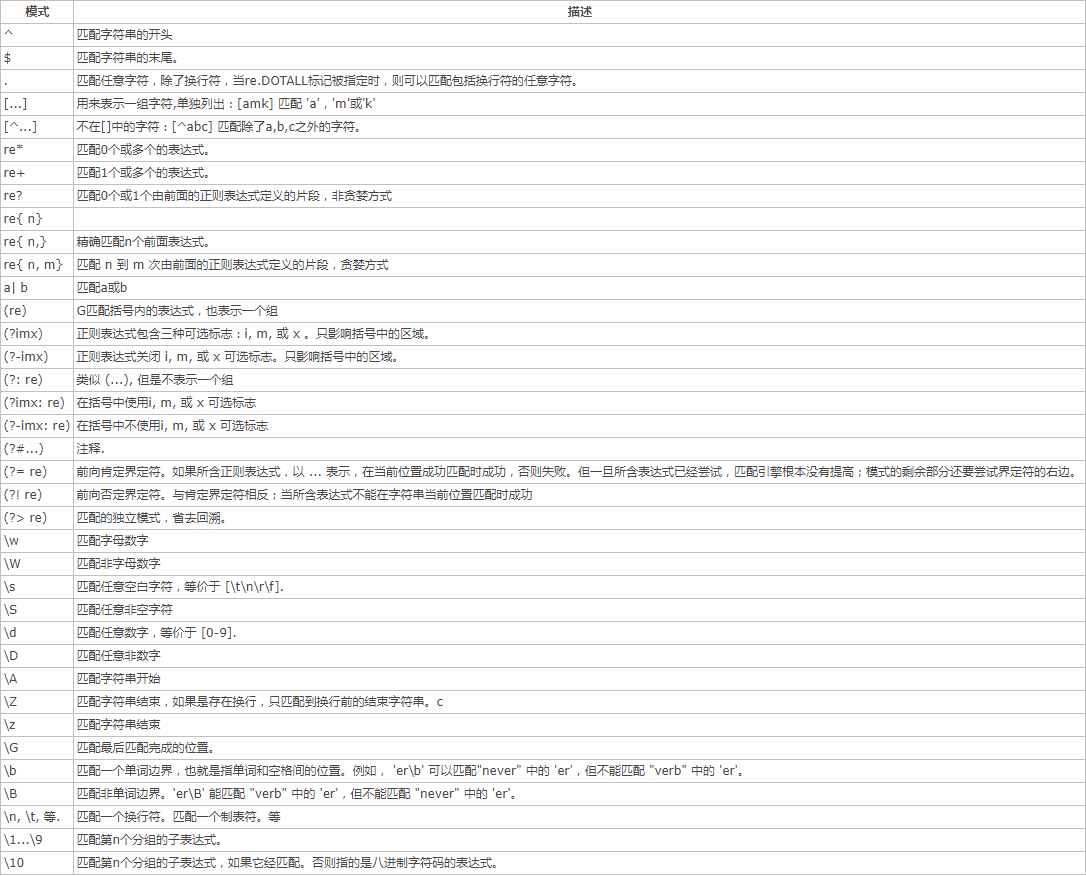
time与datetime模块
在python中,通常表示时间的方式
- 时间戳(timestamp):通常来说,时间戳表示的是从1970年1月1日00:00:00开始按秒计算的偏移量。我们运行“type(time.time())”,返回的是float类型。
- 格式化的时间字符串(Format String)
- 结构化的时间(struct_time):struct_time元组共有9个元素共九个元素:(年,月,日,时,分,秒,一年中第几周,一年中第几天,夏令时)
import time
#--------------------------我们先以当前时间为准,让大家快速认识三种形式的时间
print(time.time()) # 时间戳:1487130156.419527
print(time.strftime("%Y-%m-%d %X")) #格式化的时间字符串:'2017-02-15 11:40:53'

print(time.localtime()) #本地时区的struct_time
print(time.gmtime())    #UTC时区的struct_time
%a    Locale’s abbreviated weekday name.
%A    Locale’s full weekday name.
%b    Locale’s abbreviated month name.
%B    Locale’s full month name.
%c    Locale’s appropriate date and time representation.
%d    Day of the month as a decimal number [01,31].
%H    Hour (24-hour clock) as a decimal number [00,23].
%I    Hour (12-hour clock) as a decimal number [01,12].
%j    Day of the year as a decimal number [001,366].
%m    Month as a decimal number [01,12].
%M    Minute as a decimal number [00,59].
%p    Locale’s equivalent of either AM or PM.    (1)
%S    Second as a decimal number [00,61].    (2)
%U    Week number of the year (Sunday as the first day of the week) as a decimal number [00,53]. All days in a new year preceding the first Sunday are considered to be in week 0.    (3)
%w    Weekday as a decimal number [0(Sunday),6].
%W    Week number of the year (Monday as the first day of the week) as a decimal number [00,53]. All days in a new year preceding the first Monday are considered to be in week 0.    (3)
%x    Locale’s appropriate date representation.
%X    Locale’s appropriate time representation.
%y    Year without century as a decimal number [00,99].
%Y    Year with century as a decimal number.
%z    Time zone offset indicating a positive or negative time difference from UTC/GMT of the form +HHMM or -HHMM, where H represents decimal hour digits and M represents decimal minute digits [-23:59, +23:59].
%Z    Time zone name (no characters if no time zone exists).
%%    A literal '%' character.

格式化字符串的时间格式
因为计算机只能看懂时间戳,人类能看懂格式化的时间字符串,结构化时间,所以就有了格式转换的关系了。
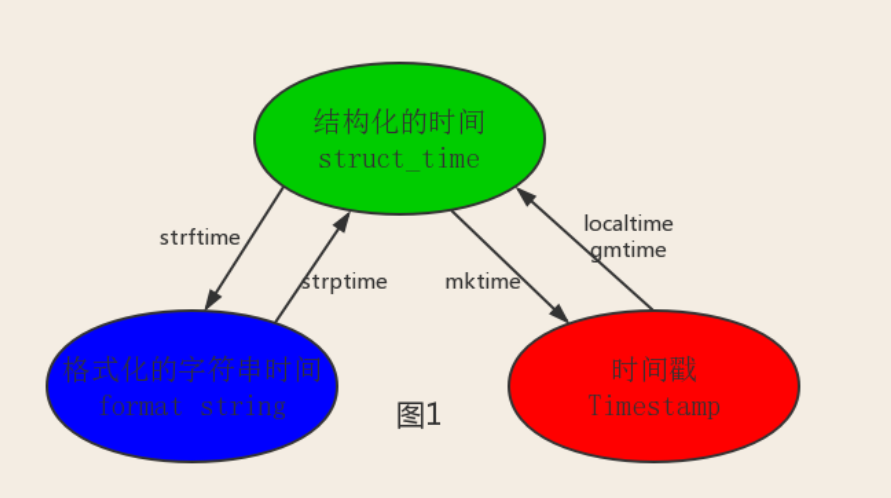
#--------------------------按图1转换时间
# localtime([secs])
# 将一个时间戳转换为当前时区的struct_time。secs参数未提供,则以当前时间为准。
time.localtime()
time.localtime(1473525444.037215)

# gmtime([secs]) 和localtime()方法类似,gmtime()方法是将一个时间戳转换为UTC时区(0时区)的struct_time。

# mktime(t) : 将一个struct_time转化为时间戳。
print(time.mktime(time.localtime()))#1473525749.0


# strftime(format[, t]) : 把一个代表时间的元组或者struct_time(如由time.localtime()和
# time.gmtime()返回)转化为格式化的时间字符串。如果t未指定,将传入time.localtime()。如果元组中任何一个
# 元素越界,ValueError的错误将会被抛出。
print(time.strftime("%Y-%m-%d %X", time.localtime()))#2016-09-11 00:49:56

# time.strptime(string[, format])
# 把一个格式化时间字符串转化为struct_time。实际上它和strftime()是逆操作。
print(time.strptime('2011-05-05 16:37:06', '%Y-%m-%d %X'))
#time.struct_time(tm_year=2011, tm_mon=5, tm_mday=5, tm_hour=16, tm_min=37, tm_sec=6,
#  tm_wday=3, tm_yday=125, tm_isdst=-1)
#在这个函数中,format默认为:"%a %b %d %H:%M:%S %Y"。
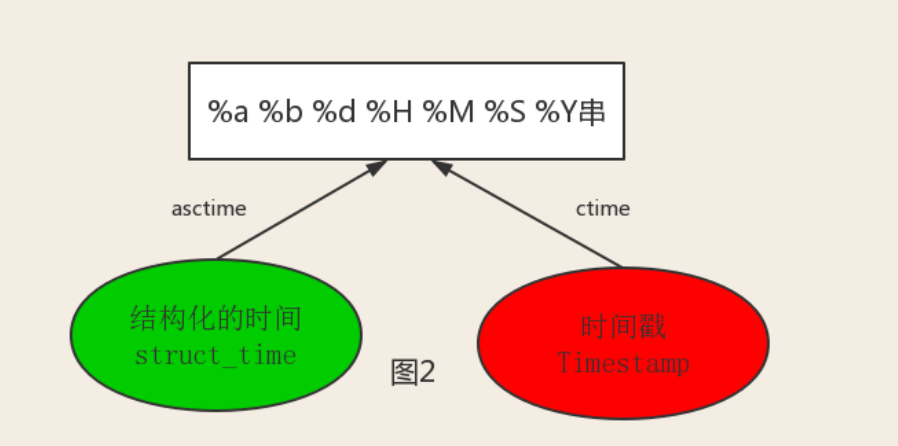
#--------------------------按图2转换时间
# asctime([t]) : 把一个表示时间的元组或者struct_time表示为这种形式:'Sun Jun 20 23:21:05 1993'。
# 如果没有参数,将会将time.localtime()作为参数传入。
print(time.asctime())#Sun Sep 11 00:43:43 2016

# ctime([secs]) : 把一个时间戳(按秒计算的浮点数)转化为time.asctime()的形式。如果参数未给或者为
# None的时候,将会默认time.time()为参数。它的作用相当于time.asctime(time.localtime(secs))。
print(time.ctime())  # Sun Sep 11 00:46:38 2016
print(time.ctime(time.time()))  # Sun Sep 11 00:46:38 2016
datatime
#时间加减
import datetime

# print(datetime.datetime.now()) #返回 2016-08-19 12:47:03.941925
#print(datetime.date.fromtimestamp(time.time()) )  # 时间戳直接转成日期格式 2016-08-19
# print(datetime.datetime.now() )
# print(datetime.datetime.now() + datetime.timedelta(3)) #当前时间+3天
# print(datetime.datetime.now() + datetime.timedelta(-3)) #当前时间-3天
# print(datetime.datetime.now() + datetime.timedelta(hours=3)) #当前时间+3小时
# print(datetime.datetime.now() + datetime.timedelta(minutes=30)) #当前时间+30分


#
# c_time  = datetime.datetime.now()
# print(c_time.replace(minute=3,hour=2)) #时间替换

datetime模块
random
import random

print(random.random())#(0,1)----float    大于0且小于1之间的小数

print(random.randint(1,3))  #[1,3]    大于等于1且小于等于3之间的整数

print(random.randrange(1,3)) #[1,3)    大于等于1且小于3之间的整数

print(random.choice([1,'23',[4,5]]))#1或者23或者[4,5]

print(random.sample([1,'23',[4,5]],2))#列表元素任意2个组合

print(random.uniform(1,3))#大于1小于3的小数,如1.927109612082716


item=[1,3,5,7,9]
random.shuffle(item) #打乱item的顺序,相当于"洗牌"
print(item)
import random
def make_code(n):
    res=''
    for i in range(n):
        s1=chr(random.randint(65,90))
        s2=str(random.randint(0,9))
        res+=random.choice([s1,s2])
    return res

print(make_code(9))

生成随机验证码
os模块
os.getcwd() 获取当前工作目录,即当前python脚本工作的目录路径
os.chdir("dirname")  改变当前脚本工作目录;相当于shell下cd
os.curdir  返回当前目录: ('.')
os.pardir  获取当前目录的父目录字符串名:('..')
os.makedirs('dirname1/dirname2')    可生成多层递归目录
os.removedirs('dirname1')    若目录为空,则删除,并递归到上一级目录,如若也为空,则删除,依此类推
os.mkdir('dirname')    生成单级目录;相当于shell中mkdir dirname
os.rmdir('dirname')    删除单级空目录,若目录不为空则无法删除,报错;相当于shell中rmdir dirname
os.listdir('dirname')    列出指定目录下的所有文件和子目录,包括隐藏文件,并以列表方式打印
os.remove()  删除一个文件
os.rename("oldname","newname")  重命名文件/目录
os.stat('path/filename')  获取文件/目录信息
os.sep    输出操作系统特定的路径分隔符,win下为"\\",Linux下为"/"
os.linesep    输出当前平台使用的行终止符,win下为"\t\n",Linux下为"\n"
os.pathsep    输出用于分割文件路径的字符串 win下为;,Linux下为:
os.name    输出字符串指示当前使用平台。win->'nt'; Linux->'posix'
os.system("bash command")  运行shell命令,直接显示
os.environ  获取系统环境变量
os.path.abspath(path)  返回path规范化的绝对路径
os.path.split(path)  将path分割成目录和文件名二元组返回
os.path.dirname(path)  返回path的目录。其实就是os.path.split(path)的第一个元素
os.path.basename(path)  返回path最后的文件名。如何path以/或\结尾,那么就会返回空值。即os.path.split(path)的第二个元素
os.path.exists(path)  如果path存在,返回True;如果path不存在,返回False
os.path.isabs(path)  如果path是绝对路径,返回True
os.path.isfile(path)  如果path是一个存在的文件,返回True。否则返回False
os.path.isdir(path)  如果path是一个存在的目录,则返回True。否则返回False
os.path.join(path1[, path2[, ...]])  将多个路径组合后返回,第一个绝对路径之前的参数将被忽略
os.path.getatime(path)  返回path所指向的文件或者目录的最后存取时间
os.path.getmtime(path)  返回path所指向的文件或者目录的最后修改时间
os.path.getsize(path) 返回path的大小
os路径处理
#方式一:推荐使用
import os
#具体应用
import os,sys
possible_topdir = os.path.normpath(os.path.join(
    os.path.abspath(__file__),
    os.pardir, #上一级
    os.pardir,
    os.pardir
))
sys.path.insert(0,possible_topdir)


#方式二:不推荐使用
os.path.dirname(os.path.dirname(os.path.dirname(os.path.abspath(__file__))))
sys模块
1 sys.argv           命令行参数List,第一个元素是程序本身路径
2 sys.exit(n)        退出程序,正常退出时exit(0)
3 sys.version        获取Python解释程序的版本信息
4 sys.maxint         最大的Int值
5 sys.path           返回模块的搜索路径,初始化时使用PYTHONPATH环境变量的值
6 sys.platform       返回操作系统平台名称
应用
#=========知识储备==========
#进度条的效果
[#             ]
[##            ]
[###           ]
[####          ]

#指定宽度
print('[%-15s]' %'#')
print('[%-15s]' %'##')
print('[%-15s]' %'###')
print('[%-15s]' %'####')

#打印%
print('%s%%' %(100)) #第二个%号代表取消第一个%的特殊意义

#可传参来控制宽度
print('[%%-%ds]' %50) #[%-50s]
print(('[%%-%ds]' %50) %'#')
print(('[%%-%ds]' %50) %'##')
print(('[%%-%ds]' %50) %'###')


#=========实现打印进度条函数==========
import sys
import time

def progress(percent,width=50):
    if percent >= 1:
        percent=1
    show_str=('[%%-%ds]' %width) %(int(width*percent)*'#')
    print('\r%s %d%%' %(show_str,int(100*percent)),file=sys.stdout,flush=True,end='')


#=========应用==========
data_size=1025
recv_size=0
while recv_size < data_size:
    time.sleep(0.1) #模拟数据的传输延迟
    recv_size+=1024 #每次收1024

    percent=recv_size/data_size #接收的比例
    progress(percent,width=70) #进度条的宽度70

打印进度条
shutil 是高级的文件,文件夹,压缩包处理模块。
二. 使用
shutil.copyfileobj(fsrc, fdst[, length])
将文件内容拷贝到另一个文件中
import shutil

shutil.copyfileobj(open('old.xml','r'), open('new.xml', 'w'))
shutil.copyfile(src, dst)
拷贝文件

shutil.copyfile('f1.log', 'f2.log')
shutil.copymode(src, dst)
仅拷贝权限。内容、组、用户均不变

shutil.copymode('f1.log', 'f2.log')
shutil.copystat(src, dst)
仅拷贝状态的信息,包括:mode bits, atime, mtime, flags

shutil.copystat('f1.log', 'f2.log')
shutil.copy(src, dst)
拷贝文件和权限

shutil.copy('f1.log', 'f2.log')
shutil.copy2(src, dst)
拷贝文件和状态信息

shutil.copy2('f1.log', 'f2.log')
shutil.ignore_patterns(*patterns)
shutil.copytree(src, dst, symlinks=False, ignore=None)
递归的去拷贝文件夹
shutil.copytree('folder1', 'folder2', ignore=shutil.ignore_patterns('*.pyc', 'tmp*'))

shutil.copytree('f1', 'f2', symlinks=True, ignore=shutil.ignore_patterns('*.pyc', 'tmp*'))
shutil.rmtree(path[, ignore_errors[, onerror]])
递归的去删除文件

shutil.rmtree('folder1')
shutil.move(src, dst)
递归的去移动文件,它类似mv命令,其实就是重命名。

shutil.move('folder1', 'folder3')
shutil.make_archive(base_name, format,...)

创建压缩包并返回文件路径,例如:zip、tar

创建压缩包并返回文件路径,例如:zip、tar

base_name: 压缩包的文件名,也可以是压缩包的路径。只是文件名时,则保存至当前目录,否则保存至指定路径,
如:www                        =>保存至当前路径
如:/Users/wupeiqi/www =>保存至/Users/wupeiqi/
format:	压缩包种类,“zip”, “tar”, “bztar”,“gztar”
root_dir:	要压缩的文件夹路径(默认当前目录)
owner:	用户,默认当前用户
group:	组,默认当前组
logger:	用于记录日志,通常是logging.Logger对象
#将 /Users/wupeiqi/Downloads/test 下的文件打包放置当前程序目录
import shutil
ret = shutil.make_archive("wwwwwwwwww", 'gztar', root_dir='/Users/wupeiqi/Downloads/test')


#将 /Users/wupeiqi/Downloads/test 下的文件打包放置 /Users/wupeiqi/目录
import shutil
ret = shutil.make_archive("/Users/wupeiqi/wwwwwwwwww", 'gztar', root_dir='/Users/wupeiqi/Downloads/test')


shutil 对压缩包的处理是通过调用ZipFile 和 TarFile两个模块来进行的。

import zipfile

# 压缩
z = zipfile.ZipFile('laxi.zip', 'w')
z.write('a.log')
z.write('data.data')
z.close()

# 解压
z = zipfile.ZipFile('laxi.zip', 'r')
z.extractall()
z.close()
import tarfile

# 压缩
tar = tarfile.open('your.tar','w')
tar.add('/Users/wupeiqi/PycharmProjects/bbs2.log', arcname='bbs2.log')
tar.add('/Users/wupeiqi/PycharmProjects/cmdb.log', arcname='cmdb.log')
tar.close()

# 解压
tar = tarfile.open('your.tar','r')
tar.extractall()  # 可设置解压地址
tar.close()
configparser模块
# 注释1
; 注释2

[section1]
k1 = v1
k2:v2
user=egon
age=18
is_admin=true
salary=31

[section2]
k1 = v1
读取
import configparser

config=configparser.ConfigParser()
config.read('a.cfg')

#查看所有的标题
res=config.sections() #['section1', 'section2']
print(res)

#查看标题section1下所有key=value的key
options=config.options('section1')
print(options) #['k1', 'k2', 'user', 'age', 'is_admin', 'salary']

#查看标题section1下所有key=value的(key,value)格式
item_list=config.items('section1')
print(item_list) #[('k1', 'v1'), ('k2', 'v2'), ('user', 'egon'), ('age', '18'), ('is_admin', 'true'), ('salary', '31')]

#查看标题section1下user的值=>字符串格式
val=config.get('section1','user')
print(val) #egon

#查看标题section1下age的值=>整数格式
val1=config.getint('section1','age')
print(val1) #18

#查看标题section1下is_admin的值=>布尔值格式
val2=config.getboolean('section1','is_admin')
print(val2) #True

#查看标题section1下salary的值=>浮点型格式
val3=config.getfloat('section1','salary')
print(val3) #31.0
&emsp改写
import configparser

config=configparser.ConfigParser()
config.read('a.cfg',encoding='utf-8')


#删除整个标题section2
config.remove_section('section2')

#删除标题section1下的某个k1和k2
config.remove_option('section1','k1')
config.remove_option('section1','k2')

#判断是否存在某个标题
print(config.has_section('section1'))

#判断标题section1下是否有user
print(config.has_option('section1',''))


#添加一个标题
config.add_section('egon')

#在标题egon下添加name=egon,age=18的配置
config.set('egon','name','egon')
config.set('egon','age',18) #报错,必须是字符串


#最后将修改的内容写入文件,完成最终的修改
config.write(open('a.cfg','w'))
&应用写一个ini文件
import configparser

config = configparser.ConfigParser()
config["DEFAULT"] = {'ServerAliveInterval': '45',
                      'Compression': 'yes',
                     'CompressionLevel': '9'}

config['bitbucket.org'] = {}
config['bitbucket.org']['User'] = 'hg'
config['topsecret.server.com'] = {}
topsecret = config['topsecret.server.com']
topsecret['Host Port'] = '50022'     # mutates the parser
topsecret['ForwardX11'] = 'no'  # same here
config['DEFAULT']['ForwardX11'] = 'yes'
with open('example.ini', 'w') as configfile:
   config.write(configfile)

基于上述方法添加一个ini文档
hashlib模块
hash:一种算法 ,3.x里代替了md5模块和sha模块,主要提供 SHA1, SHA224, SHA256, SHA384, SHA512 ,MD5 算法
三个特点:
- 1.内容相同则hash运算结果相同,内容稍微改变则hash值则变
- 2.不可逆推
- 3.相同算法:无论校验多长的数据,得到的哈希值长度固定。
import hashlib

m=hashlib.md5()# m=hashlib.sha256()

m.update('hello'.encode('utf8'))
print(m.hexdigest())  #5d41402abc4b2a76b9719d911017c592

m.update('alvin'.encode('utf8'))

print(m.hexdigest())  #92a7e713c30abbb0319fa07da2a5c4af

m2=hashlib.md5()
m2.update('helloalvin'.encode('utf8'))
print(m2.hexdigest()) #92a7e713c30abbb0319fa07da2a5c4af

'''
注意:把一段很长的数据update多次,与一次update这段长数据,得到的结果一样
但是update多次为校验大文件提供了可能。
'''
以上加密算法虽然依然非常厉害,但时候存在缺陷,即:通过撞库可以反解。所以,有必要对加密算法中添加自定义key再来做加密。
import hashlib

# ######## 256 ########

hash = hashlib.sha256('898oaFs09f'.encode('utf8'))
hash.update('alvin'.encode('utf8'))
print (hash.hexdigest())#e79e68f070cdedcfe63eaf1a2e92c83b4cfb1b5c6bc452d214c1b7e77cdfd1c7
以上加密算法虽然依然非常厉害,但时候存在缺陷,即:通过撞库可以反解。所以,有必要对加密算法中添加自定义key再来做加密。
import hashlib

######### 256 ########

hash = hashlib.sha256('898oaFs09f'.encode('utf8'))
hash.update('alvin'.encode('utf8'))
print (hash.hexdigest())#e79e68f070cdedcfe63eaf1a2e92c83b4cfb1b5c6bc452d214c1b7e77cdfd1c7
应用模拟密码撞库
import hashlib
passwds=[
    'alex3714',
    'alex1313',
    'alex94139413',
    'alex123456',
    '123456alex',
    'a123lex',
    ]
def make_passwd_dic(passwds):
    dic={}
    for passwd in passwds:
        m=hashlib.md5()
        m.update(passwd.encode('utf-8'))
        dic[passwd]=m.hexdigest()
    return dic

def break_code(cryptograph,passwd_dic):
    for k,v in passwd_dic.items():
        if v == cryptograph:
            print('密码是===>\033[46m%s\033[0m' %k)

cryptograph='aee949757a2e698417463d47acac93df'
break_code(cryptograph,make_passwd_dic(passwds))
python 还有一个 hmac 模块,它内部对我们创建 key 和 内容 进行进一步的处理然后再加密:
1 import hmac
2 h = hmac.new('alvin'.encode('utf8'))
3 h.update('hello'.encode('utf8'))
4 print (h.hexdigest())#320df9832eab4c038b6c1d7ed73a5940
特别要注意的一点
#要想保证hmac最终结果一致,必须保证:
#1:hmac.new括号内指定的初始key一样
#2:无论update多少次,校验的内容累加到一起是一样的内容

import hmac

h1=hmac.new(b'egon')
h1.update(b'hello')
h1.update(b'world')
print(h1.hexdigest())

h2=hmac.new(b'egon')
h2.update(b'helloworld')
print(h2.hexdigest())

h3=hmac.new(b'egonhelloworld')
print(h3.hexdigest())

'''
f1bf38d054691688f89dcd34ac3c27f2
f1bf38d054691688f89dcd34ac3c27f2
bcca84edd9eeb86f30539922b28f3981
'''

 浙公网安备 33010602011771号