How to Install Multiple Versions of Node.js on the same Server(PC) All In One
How to Install Multiple Versions of Node.js on the same Server(PC) All In One
https://www.sitepoint.com/quick-tip-multiple-versions-node-nvm/
Quick Tip: Install Multiple Versions of Node.js using nvm
March 14, 2016
This article was peer reviewed by Tim Severien. Thanks to all of SitePoint’s peer reviewers for making SitePoint content the best it can be!
When developing Node.js applications you might face situations where you need to install multiple versions of Node. This can happen when you have multiple projects and they have different requirements, or you have a deployable application which must be compatible with different Node versions. Without a good tool this would mean a lot of work and effort to install the different versions manually, and basing a project on a specific version. Fortunately there is a better way!
More from this author
Introducing nvm
nvm stands for Node Version Manager. As the name suggests, it helps you manage and switch between different Node versions with ease. It provides a command line interface where you can install different versions with a single command, set a default, switch between them and much more.
OS Support
nvm supports both Linux and OS X, but that’s not to say that Windows users have to miss out. There is a second project named nvm-windows which offers Windows users the possibility of easily managing Node environments. Despite the name, nvm-windows is not a clone of nvm, nor is it affiliated with it. However, the basic commands listed below (for installing, listing and switching between versions) should work for both nvm and nvm-windows.
Installation
Windows
First, make sure you uninstall any Node.js version you might have on your system, as they can collide with the installation. After this, download the latest stable installer. Run the executable installer, follow the steps provided and you’re good to go!
OS X/Linux
Removing previous Node installations is optional, although it is advised you do so. There are plenty of good resources online as to how you might do this (OS X, Linux). It is also good if you remove any npm installation you might have, since it might collide with nvm’s installation. You’ll also need to have a C++ compiler installed on your system. For OS X you can install the Xcode command line tools. You can do this by running the following command:
xcode-select --install
On Linux, you can install the build-essential package by running the following (assumes apt):
sudo apt-get update
sudo apt-get install build-essential
Having the required C++ compiler you can then install nvm using cURL or Wget. On your terminal, run the following:
With cURL:
curl -o- https://raw.githubusercontent.com/creationix/nvm/v0.31.0/install.sh | bash
Or with Wget:
wget -qO- https://raw.githubusercontent.com/creationix/nvm/v0.31.0/install.sh | bash
Note that the version number (v0.31.0) will change as the project develops, so it is worth checking the relevant section of project’s home page to find the most recent version.
This will clone the nvm repository to ~/.nvm and will make the required changes to your bash profile, so that nvm is available from anywhere in your terminal.
That’s it, nvm is installed and ready to be used.
Using nvm
If installed correctly, the nvm command is available anywhere in you terminal. Let’s see how to use it to manage Node.js versions.
Install Multiple Versions of Node.js
One of the most important parts of nvm is, of course, installing different versions of Node.js. For this, nvm provides the nvm install command. You can install specific versions by running this command followed by the version you want. For example:
nvm install 4.2.2
By running the above in a terminal, nvm will install Node.js version 4.2.2. nvm follows SemVer, so if you want to install, for example, the latest 4.2 patch, you can do it by running:
nvm install 4.2
nvm, will then install Node.js version 4.2.X, where X is the highest available version. At the time of writing this is 6, so you’ll have 4.2.6 version installed on your system. You can see the full list of available versions by running:
nvm ls-remote
For nvm-windows this is:
nvm ls available
npm
When installing a Node.js instance, nvm will also install a compatible npm version. Each Node version might bring a different npm version and you can run npm -v to check which one you’re currently using. Globally installed npm packages are not shared among different Node.js versions, as this could cause incompatibilities, rather they are installed alongside the current Node version in ~/.nvm/versions/node/<version>/lib/node_modules. This has the added advantage that users will not require sudo privileges to install global packages.
Fortunately when installing a new Node.js version you can reinstall the npm global packages from a specific version. For example:
nvm install v5.0.0 --reinstall-packages-from=4.2
By running the above nvm will install you Node.js version 5.0.0, the corresponding npm version, and reinstall the npm packages you had installed on the 4.2 version.
nvm will always target Node.js when only a version is specified, but it also allows to install io.js instances. To do so, the version needs to be prefixed with iojs-v:
nvm install iojs-v3.2.0
The above command will install io.js version 3.2.0 on your system.
To help even further, nvm has some aliases that you can use to target versions without writing a specific version:
node– this installs the latest Node.js version.iojs– this installs the latest io.js version.unstable– this installs Node.js 0.11 version, which is the last unstable version.
So, to install the latest Node.js version, you can just run:
nvm install node
You can also uninstall any instance you no longer think is useful, by running:
nvm uninstall 4.2.2
Switching between Versions
So far, we’ve seen how to install different Node versions. Let’s now go through how to switch between them. Let me first note that when a new version is installed, it is automatically put to use. So if you install latest Node.js version, and run node -v right after, you’ll see the latest version output.
To switch through installed versions, nvm provides the nvm use command. This works similar to the install command. So, you need to follow this by a version number or one of the aliases.
Following the install commands demonstrated above, you can:
Switch to Node.js version 4.2.2:
nvm use 4.2.2
Switch to Node.js version 4.2.6:
nvm use 4.2
Switch to io.js version 3.2.0:
nvm use iojs-v3.2.0
Or switch to latest Node.js version:
nvm use node
When switching to a different version, nvm will make the node instance in your terminal symlink to the proper Node.js instance.
You can also create custom aliases beyond the ones that come with nvm. For example by running:
nvm alias awesome-version 4.2.2
You’re setting an alias with the name ‘awesome-version’ for Node.js version 4.2.2. So, if you now run:
nvm use awesome-version
nvm will switch node to version 4.2.2. You can delete an alias by running
nvm unalias awesome-version
You can also set a default instance to be used in any shell, by targeting a version to the ‘default’ alias, like so:
nvm alias default node
Listing Installed Instances
At anytime you can check which versions you have installed by running:
nvm ls
This will display something resembling the following:
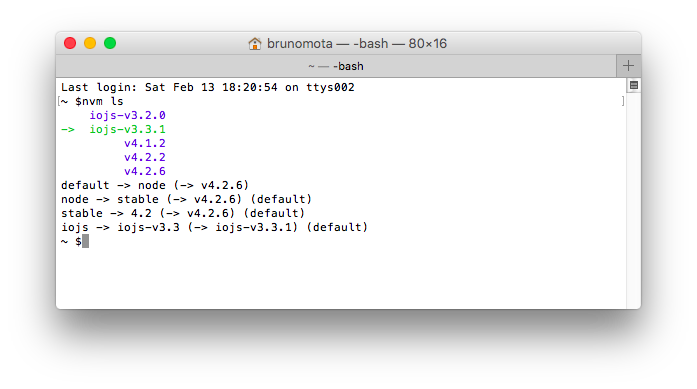
The entry in green, with an arrow on the left is the current version in use. Below the green and blue list, there is a list of available aliases. If you now execute:
nvm use node
nvm ls
It will display:
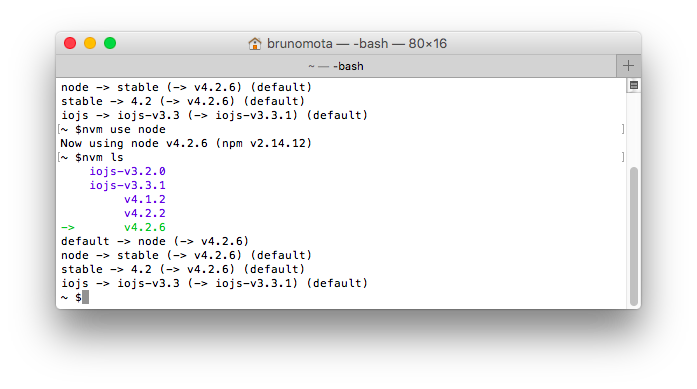
You can also check what is the current version in use with the command:
nvm current
Specify a Node Version on a Per-Project Basis
Version managers such as rbenv allow you to specify a Ruby version on a per-project basis (by writing that version to a.ruby-version file in your current directory). This is kind of possible with nvm in that if you create a .nvmrc file inside a project and specify a version number, you can cd into the project directory and type nvm use. nvm will then read the contents of the .nvmrc file and use whatever version of Node you specify.
If it’s really important to you that this happens automatically, there is a project (avn) which integrates with nvm, and is designed to address this need.
Other nvm Commands
There are other commands nvm provides, which are more of advanced or not common usage.
Running a command directly for an installed version without switching the node variable:
nvm run 4.2.2 --version
Running a command on a sub-shell, targeting a specific version:
nvm exec 4.2.2 node --version
Getting the path to the Node.js executable of a specific installed version:
nvm which 4.2.2
Conclusion
nvm is a great tool for any Node.js developer. It enables a concern free installation and switching between different versions, saving time for what really matters. A thank you note to Tim Caswell the creator of nvm, and Corey Butler for the nvm for windows support, and of course to the contributors of these great projects. Your work is greatly appreciated by the Node.js community.
What about you? Do you use nvm? How has your experience been with it? Would love to hear from you in the comments below.
Command line tools, io.js, node, node version manager, npm, nvm, nvm-windows, quick-tip
How can I use two versions of Node.js to run two different applications for each version in the same server?

To to run two different versions of Node.js at once, I would use Tim's nvm (node version manager) (creationix/nvm).
You can then easily install, switch to, or deploy multiple node versions.
- nvm install 0.10.32
- nvm install 0.11.14
Afterwards, you can run two node versions at once:
- nvm run 0.10.32 thisApp.js
- nvm run 0.11.14 thatApp.js
How install two version Node in one PC ?
Installing and switching between multiple versions of Node.js: n vs. nvm
n at a glance
| GitHub: | https://github.com/visionmedia/n |
|---|---|
| Install: | $ npm install -g n |
| Path to Script: | /usr/local/bin/n |
| Node Versions Path: | /usr/local/n/versions |
| How n gets a new version: | Downloads Binary Node tar.gz file for platform |
| How n switches versions: | Copies files from /usr/local/n/versions/ to /usr/local/ |
nvm at a glance
| GitHub: | https://github.com/creationix/nvm |
|---|---|
| Install: | curl https://raw.github.com/creationix/nvm/master/install.sh | sh |
| Path to Script: | ~/.nvm/nvm.sh |
| Node Versions Path: | ~/.nvm/ |
| How nvm gets a new version: | Downloads and compiles source node distribution (binary option also available) |
| How nvm switches versions: | updates $PATH variables to point to requested version within ~/.nvm/ directory |
https://github.com/xgqfrms-GitHub/nvm
demos
(🐞 反爬虫测试!打击盗版⚠️)如果你看到这个信息, 说明这是一篇剽窃的文章,请访问 https://www.cnblogs.com/xgqfrms/ 查看原创文章!
refs
©xgqfrms 2012-2021
www.cnblogs.com/xgqfrms 发布文章使用:只允许注册用户才可以访问!
原创文章,版权所有©️xgqfrms, 禁止转载 🈲️,侵权必究⚠️!
本文首发于博客园,作者:xgqfrms,原文链接:https://www.cnblogs.com/xgqfrms/p/5881799.html
未经授权禁止转载,违者必究!

 浙公网安备 33010602011771号